
Base Guide 7.2
Chapter 1
Introduction to Base
This document is Copyright © 2021 by the LibreOffice Documentation Team. Contributors are listed below. You may distribute it and/or modify it under the terms of either the GNU General Public License (https://www.gnu.org/licenses/gpl.html), version 3 or later, or the Creative Commons Attribution License (https://creativecommons.org/licenses/by/4.0/), version 4.0 or later.
All trademarks within this guide belong to their legitimate owners.
|
Pulkit Krishna |
Dan Lewis |
Jean Hollis Weber |
|
Martin Fox |
Robert Großkopf |
Pulkit Krishna |
|
Jost Lange |
Dan Lewis |
Hazel Russman |
|
Jochen Schiffers |
Jean Hollis Weber |
|
Please direct any comments or suggestions about this document to the Documentation Team’s mailing list: documentation@global.libreoffice.org.
Note
Everything you send to a mailing list, including your email address and any other personal information that is written in the message, is publicly archived and cannot be deleted.
Published December 2021. Based on LibreOffice 7.2 Community.
Other versions of LibreOffice may differ in appearance and functionality.
In everyday office operation, spreadsheets are regularly used to aggregate sets of data and to perform some kind of analyses on them. As the data in a spreadsheet is laid out in a table view, plainly visible and able to be edited or added to, many users ask why they should use a database instead of a spreadsheet. This book explains the differences between the two.
Note
In technical language, “database document file” is used for a database from a single interface and “database system” encompasses the database management system (DBMS) and the actual database.
Base offers access to various database systems through a graphical user interface. Base works by default with the embedded database engine HSQLDB.
This chapter introduces two sample databases and this entire book is built around them: Media_without_macros.odb and Media_with_macros.odb, extended with the inclusion of macros. Both databases are for operating a library: media capture, user uptake, media rental, and everything connected with it, such as the recall for readers.
A more detailed example is given later in this chapter (starting on page 1). It uses the Example_Sport.odb database to organize a sports competition.
Note
Like any software, LibreOffice Base is not completely free of errors. Particularly annoying are the regressions, which re-introduce a bug from a past version into the present version. The following link leads to the currently outstanding regressions:
A look at the bug list can therefore help you to understand the differences between documentation and its own version of the program.
A Base file is a compressed folder that contains information for the different work areas (components) of Base. In daily use, Base initially opens with the view shown in Figure 1.
The Base environment contains four work areas: Tables, Queries, Forms, and Reports. Depending on the area selected, various tasks—creating new content or calling up existing elements—may be carried out.
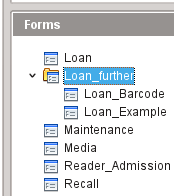
In the work areas Forms and Reports, the respective elements are arranged within a folder structure (Figure 2). This is done either directly when saving in the Save dialog or by the creation of new folders using Insert > Folder.
Although the basis for a database is formed by tables, Base starts with the Form view because forms are the elements most commonly used when working with databases. With the forms, you can make entries into the tables and analyze table content.
Figure 1: View of Base when opened
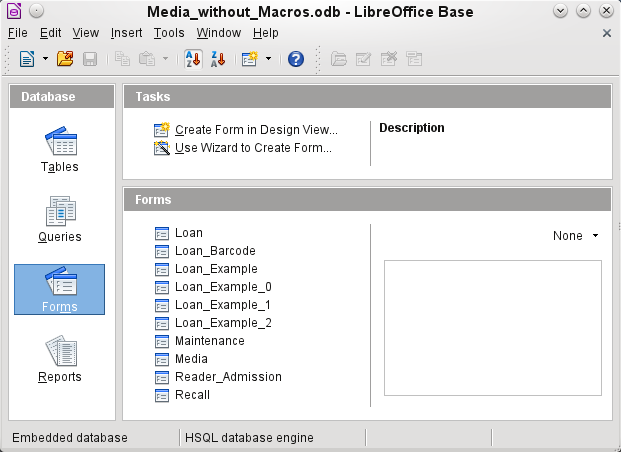
Figure 2: Directory structure in a work area
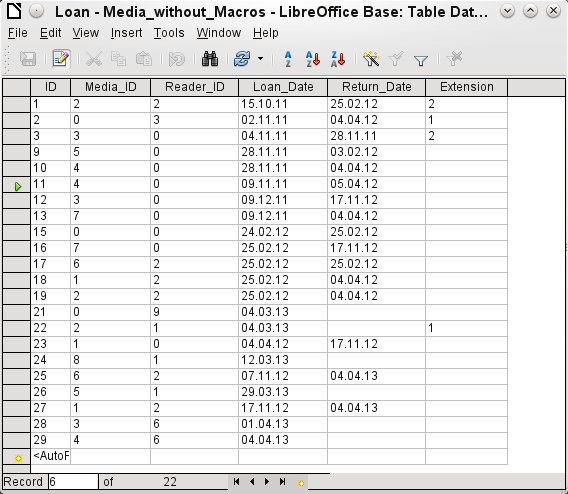
Simple forms show just one table, as in the upper part of the Loan form. The Loan form (Figure 3) has been extended to show additional information:
The range of persons shown can be filtered on last name to limit the detail shown. If a user inputs the letter “G” in the Filter field (Last Name) at the right of the Loan table, only persons whose last name begins with “G” will be shown.
New borrower information can be input directly into the table fields of the form.
Details of items to be borrowed are input and shown in the middle area of the form. The name of the user is also clearly emphasized. If a previously borrowed item is overdue and must be returned, this area is blocked (no input possible) and the title will indicate “Loan temporary locked!”. Items on loan are shown in the lower area of the form.
The borrowing date is set as the current date. In the pull-down field at the left of the Refresh button are the media items which can be borrowed. Items which are already on loan to the selected borrower are not available for selection.
Media items selected for loan are added to the current loan details by clicking the Refresh button.
In the lower section of the form (Return) it is not possible to delete a data row. Only the fields Return Date and Extension can be edited. If a borrower was previously locked and has subsequently returned the overdue item(s), the lending area can be unlocked by clicking the Refresh button.
Figure 3: The Loan form
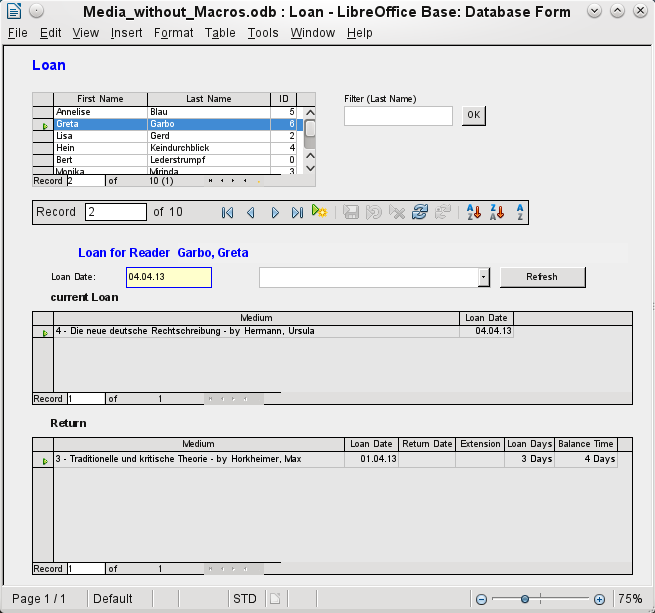
All these functions can be carried out without using macros, when the form is set up and filled in the manner described.
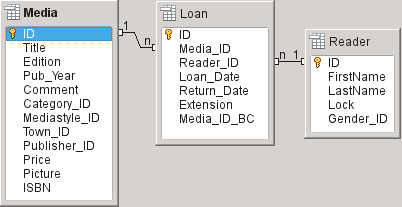
The tables in a database are related much like a net. A table receives information from other tables or provides it to them. This is referred to as the relationship, and is shown by a line between the tables connecting a field from each.
Note
The Reader table has a relationship with another table that involves Gender_ID. Similarly, the Media table has a relationship with four more tables, each one involving one of these fields: Category_ID, Mediastyle_ID, Town_ID, and Publisher_ID.
The Loan table is directly related to the Media and Reader tables, as shown in Figure 4.
When a book is borrowed, instead of its title being saved in the Loan table, only one number is saved in the Media_ID field. The ID field of the Media table stores the unique identifier for each record of this table. This field is a key field of the Media table: the primary key.
Figure 4: Relationship between the Loan and Reader tables
Tip
The primary key uniquely determines the values for each field in each record of a table. So, when an item is borrowed, the number entered into the Media_ID field matches the number in the ID field of the Media table that identifies the record which contains the information about the borrowed item.
The reader name is not entered in the Loan table every time. This Information is saved in the Reader table. It also has a primary key field which identifies each person who borrows an item. The value of this field can then be entered in the Loan table with the Reader_ID field identifying the specific person.
The relationships between the tables have the advantage that the desk work on the form is greatly reduced. Instead of having to enter the media title and first and last names without any errors, these can be entered by selecting the correct numbers for the Media_ID and Reader_ID fields, which allows the selection of the correct media items and first and last names. Finally, the same medium can be borrowed again later and the same reader can borrow several more media at any loan event.
Figure 5: Table data structure
The table structure for such a form is relatively basic and easy to set up. In the table shown in Figure 5, the same data can be directly input in the rows and columns of the table as when using the form. The relationships of this table to the other tables of the database are used in the form.
The most important field, the primary key (ID) which is posted automatically, shows the indispensable, unique content for most databases. For more on this topic, see the section “Relationships between tables” in Chapter 3, Tables.
The second field, Media_ID, stores values of the primary key of the Media table. It refers to the number in the corresponding field, ID, in the Media table. Such a reference to a primary key is called a foreign key. In the form, and the title and the author will be displayed instead of the foreign key in a list box. The list box transmits the value in the background to the foreign key of table.
The third field, Reader_ID, stores the primary key values of the Reader table. In this example, this key is only a number that refers to the reader who borrows media items. In the form, the last and first name of the reader are shown. As seen in the table, the reader with the primary key number '0' has borrowed a lot of media. The table can save the unique primary key of the Reader table as a foreign key Reader_ID many times. But in no case may a reader, who is listed in the foreign key of the Loan table, be deleted in the Reader table. Otherwise it would no longer be comprehensible as to who is now borrowing media. The database makes the default settings so that a deletion is impossible. The technical term for this is the requirement of referential integrity.
The loan date is stored In the fourth field. If this date is present and is later than the current date, the corresponding data set for the reader is shown in the bottom table of the form under the Return button.
The Extension field contains information about extensions of the loan for an item. The meaning of the values 1, 2... is explained later. The database contains a separate table with the label Preferences.
The input of this data permits the management of a simple library.
Queries show a view of the tables. They bring together content from multiple tables in an overview. Queries are stored only in the query language SQL. They are therefore not tables, even if in Base they appear to be the same as a table to us.
Figure 6: Example of query
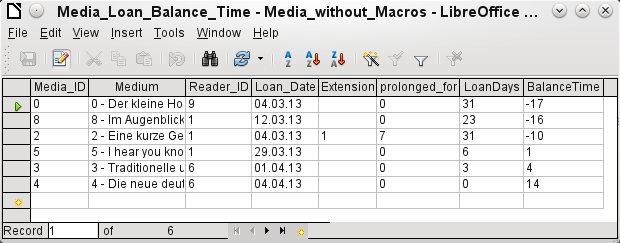
The query shown in Figure 6 lists all media that are currently out on loan. It calculates how long each item has been on loan and the balance of the loan period. When the Media_ID, the foreign key field, reads the primary key, the title and the author in the Media field are combined into a single text. This field will be needed in the form under the subtitle “Return”. Combined fields in the query also serve as connecting fields from the actual Loan form to the Loan table, namely through the Media_ID and Reader_ID fields.
All media are listed in which the return date is not enter in the Loan table. As an additional overview, the media name is included in the query together with the Media_ID.
The reference to the reader is established with the primary key of the Reader table.
The time difference in days is specified as LoanDays between the date of loan (Loan_Date) and the current date.
The number of LoanDays is subtracted from the Loan Time to give the remaining number of days in the loan period. The Loan Time can vary with different media types.
In the Settings table a value of '1' for Extension corresponds to an extension of the loan period of 7 days. In the data set above, the line with Media_ID '2' shows an extension of 7 days.
In reports the data is processed so that it can be printed out in a useful format. Forms such as the one in Figure 7 are not suitable for a cleanly formatted letter.
Figure 7: Form containing information for a recall notice

Before an actual report in the form of a recall notice can be printed, the recall information must be entered into the Recall form. The table in the form shows all persons who have borrowed items with a negative remaining loan time.
The recall date and recall notice number are entered for each media item to be recalled. This might be the current date in processing warnings. The recall date defaults to the current date. The recall number is an integer incremented by 1 with each successive recall notice for a particular lender/media.
This form, in the current database example without macros, requires user input to create recall notices. In the macro version, the date is automatically entered and the recall notice printed.
The recall notice (Figure 8) is generated by means of a query from the previously input data. The user of the database needs only to select the Recall report and a recall letter can be printed out and sent to all persons who have a recall entry made in the form on the previous page.
Figure 8: Sample recall notice
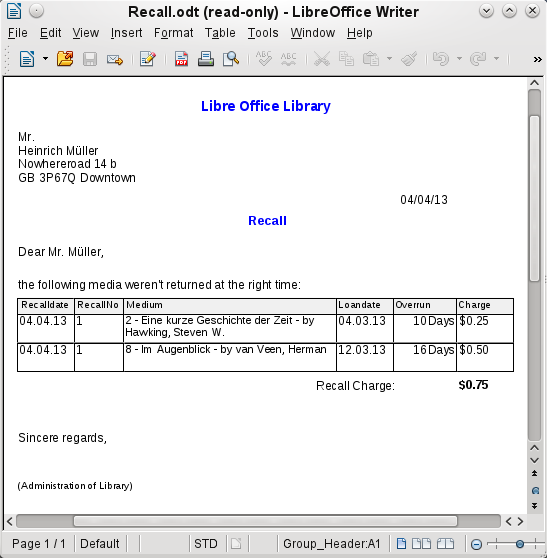
In such a report there may be multiple entries (overdue items) for a particular person. If the table containing the items for this person exceeds the space on a page, it is extended to include a succeeding page.
Such a report is more encompassing than a mail merge letter produced with Writer. It automatically gathers together the data sets for printing and arranges the necessary accompanying text accordingly.
A similar letter as in the above figure can be otherwise only implemented with macros, as described in “Creating a report” on page 1.
Tables, queries, forms, and reports of the internal database, HSQLDB, are stored in a Base file. Because the database file is written into memory, the multiple objects in it require you to deal carefully with it. Bug reports make it clear that a database file requires just a bit more careful treatment than, for example, a text file that is written in Writer.
The following instructions should therefore be taken into consideration when dealing with a Base file:
An open database file should not be saved with a different name by using Save As. When there is no other choice, the tables, queries, forms, and reports should first be closed. It is better to close the database file and create a copy of the file.
The Report Builder is an add-on. Although it is now no longer visible as a separate extension, it operates largely independent of the database file. Renaming the file removes the Report Builder of its foundation.
Because a table, query, form, or report is saved, it does not follow that the entire database file has been saved. This saving must be done separately. When an object (table, query, form, report) is saved, the information is written to the database file in memory; when the database file is saved, everything contained in the database file in memory is written to the *.odb file.
This memory behavior is especially true for working with the Report Builder. The preparation of a report is still the most unstable component inside the Base file. Therefore, after every step, the report and the *.odb file should both be saved. Once the report is created, it functions by itself without any particular problems.
Once a *.odb file is finished, data added to the database is only written in the database file in memory, but not in the *.odb file. Only when you close the *.odb file do you save the data to it. The content of the HSQLDB database will be written back into the file. A crash at this point can result in data loss. Therefore, a strategy should be developed so that backup copies are made on time. Chapter 9, Macros, includes a macro to make a backup copy when you open a database file. Likewise, a way is shown while the Base file is opened that this is as good as can be secured.
A significantly higher level of security finally can be met using external server databases like MySQL / MariaDB or PostgreSQL. For this, Base can then serve as a front end with the queries, forms, and reports for the database.
The creation of a database is discussed in Chapter 2, Creating a Database.
The following example is based on the default database HSQLDB that is installed with LibreOffice as an internal database. It is therefore an embedded database first created without any registration in LibreOffice. Various other database systems can be connected in addition to the internal HSQLDB.
The first step to do after finding a location for the database file and saving it there is to complete the wizard.
The database is intended to organize a sports competition into different disciplines. Therefore, Example_Sport was chosen as the name of the file.
As soon as the database has been saved, the main window for the database appears. By default, Tables is selected in the Database section on the left side of the window (Figure 9). The tables are the central storage for data; without tables, there is no database.
Click Create Table in Design View to open the window shown in Figure 10.
Figure 9: Main window for sample database Example_Sport.odb
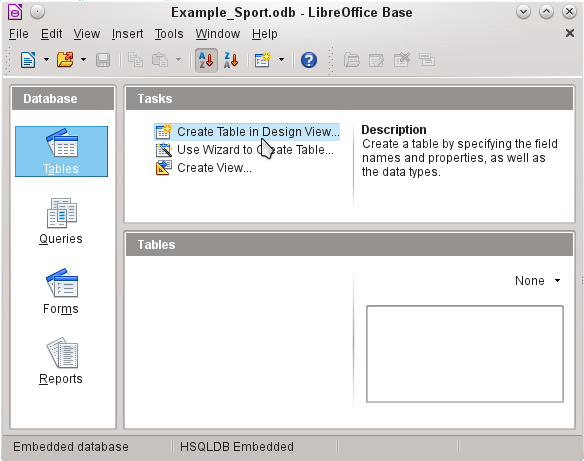
Figure 10: Design View for a table
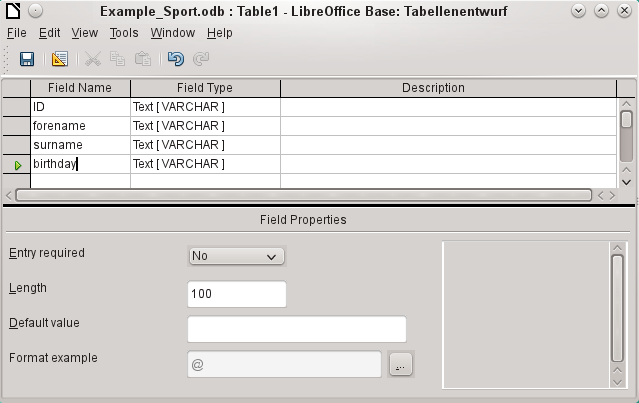
The field names for the first table will be entered here. The table should include the men and women starters. Here the field names are reduced first to the key components.
The field names forename (first name), surname (last name), and birthday are likely to be clear. In addition, a field called ID was added. This field will later take a value which is unique for each record. A unique key field is necessary for the embedded database. Otherwise, no records can be entered in the table. This key field is called the primary key in databases.
Another field could be used for this property. However, if for example, surname was used alone for this, two people with the same last name could not both be saved. In this case, it might help to declare two fields together in one shared primary key. There is no guarantee that it works in the long term, which it does not. So here the simple version is preferred.
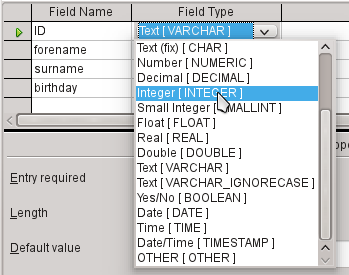
In the second step, select the field types for the already named fields from the lists. Set the ID field to the field type Integer. This field type has the advantage that it can be automatically provided by the embedded HSQLDB with the next higher integer.
Edit the field property of the ID field. For this field, activate the automatic setting of ascending numerical values: Field Properties > AutoValue > Yes.
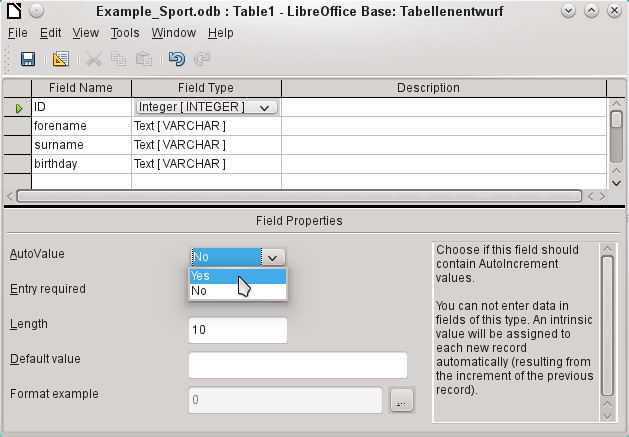
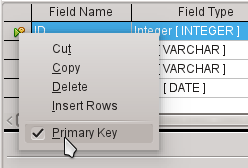
After selecting AutoValue, a key icon should appear on the row header when leaving the field type selection. This indicates that this field is the primary key of the table. If AutoValue is not selected, the primary key can also be selected in the context menu (right-click > primary key).
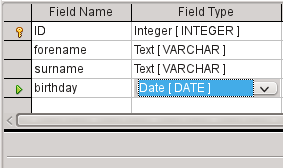
Select the field type for Birthday to Date. This ensures that only valid date entries are added. It is also used for sorting dates, or, for example, calculating age.
The table can now be saved under the name Starters. Subsequently, data can be entered. Input into the ID field is not necessary. It is done automatically when you save the record.
Note
The database file is a zipped folder of individual files. Storing a single object as the table is therefore not directly written to the database file itself. That’s why the Save button for the database file itself must be clicked even after the creation of tables, queries, forms, and reports.
Only when leaving the data row is the entered data saved automatically.
Starters (athletes) can now be entered. However, the following information is missing at first glance:
A list of sports in which the starters want to compete.
For competitions, the distinction between male and female starters.
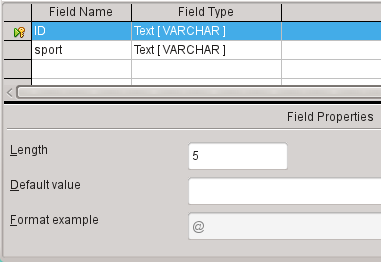
Create a Sport table. Since there are not many different sports, AutoValue is not selected for the primary key. Instead, the field type is left as Text, but limited to 5 characters. The 5 characters are sufficient, in order to find a suitable abbreviation for the sports.
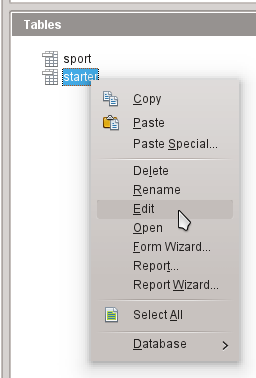
Open the Starter table again for editing, not for data entry, using the context menu of the table.
Add the field "gender" to the table. A new field may be added to the Table Design dialog only at the end of the table. It is also possible using SQL to add new fields to certain positions.
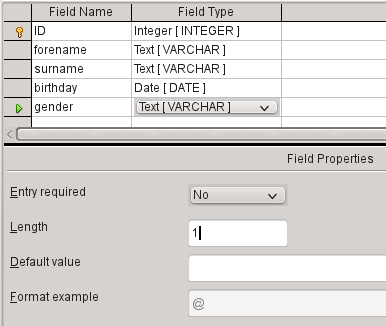
The length of the text in this field is limited to one character, sufficient for ‘m’ and ‘f’ as input.
Somehow, the two tables must be linked so that each starter can be registered in several sports and more starters can be registered for any sport. This is done through a table in which the values of the two primary keys of the Starter and Sport tables are saved. Since only the combination of these fields will be saved together, these fields are the primary key for this table. To assign the primary key to both fields, click the row header for the first field, then Shift+click the row header for the second field; this selects both fields. Right-click either row header, then click Primary Key in the context menu to specify the primary key.
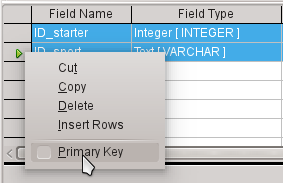
The appropriate values can be taken from Starter and Sport, since the fields must exactly match the field types that you want to save. ID_starter must therefore have the field type Integer. ID_sport has the field type Text and is limited to 5 characters also, as the ID field from the Sport table.
Save the table as rel_starter_sport.
Tip
The results of a competition could also be included in this table. However, if several competitions are held, a race date must be attached to the common primary key.
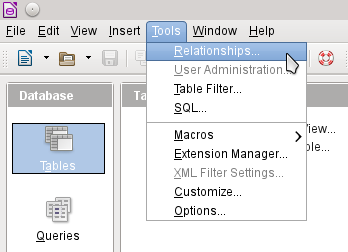
As the tables are completed, relationships between tables should be defined. This can prevent a number for a starter from appearing in the rel_starter_sport table that is not listed in the Starter table, for example. Tools > Relationships opens the window for the relationship definition.
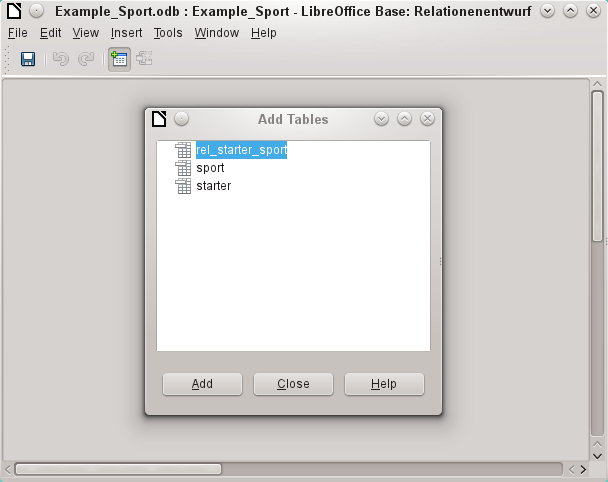
All tables created so far are necessary for the relationship definition. Click each individual table and click the Add button to add them to the relation design. Then close the Add Tables dialog.
All the fields are listed in the each of the added tables. The primary key fields are marked with a key symbol. The rectangles for the tables can be moved and resized.
Left-click "starter"."ID". Hold the mouse button down and move the pointer to "rel_starter_sport"."ID_starter". The cursor indicates a link. Release the mouse button. The following dialog will appear to define the relationship.

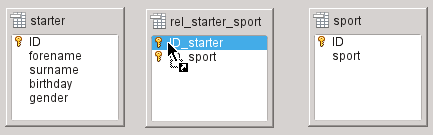
The "rel_starter_sport"."ID_sport" field should not be changed when "starter"."ID" is changed. This is the default. "ID" is not changed because it is an automatically autoincremented field and no input is needed.
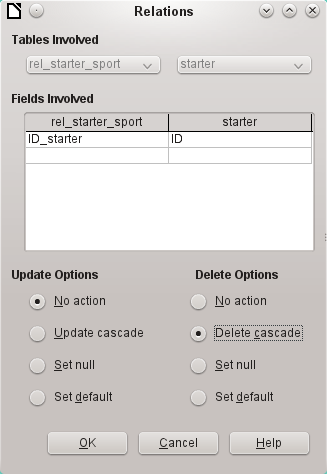
The record in the rel_starter_sport table should be deleted when "ID_sport" equals "starter"."ID" and "starter"."ID" is deleted. So if a starter is removed from the Starter table, then all relevant records from the rel_starter_sport table will be removed. This procedure is called Delete Cascade.
In the next step "rel_starter_sport"."ID_sport" and "sport"."ID" are connected by dragging the mouse while holding the left mouse button. Here, too, a record will be deleted when the corresponding sport is deleted.

For a data change in "sport"."ID" however, another variant has been selected. If "sport"."ID" is changed, "rel_starter_sport"."ID_sport" will be also. Thus, the abbreviation for a sport of up to 5 characters can be adjusted easily although there are already many records in the rel_starter_sport table. This procedure is called Update Cascade.
The fields are now completely connected. Each 1:n appears at the ends of the connections. A starter may repeatedly appear in the rel_starter_sport table. A sport can also repeatedly appear in the table rel_starter_sport table. A given combination of Starter and Sport can appear in the table only 1 time. From two 1:n relationships, an n:m relationship now exists through the intervening rel_starter_sport table.
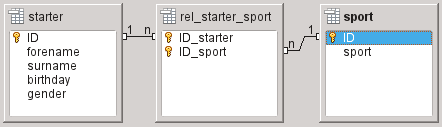
Such a table design can be bad when filled by typing content into tables. It requires all three tables to be opened when a starter is assigned to a sport. "starter"."ID" must be sought in the Starter table and transmitted to "rel_starter_sport"."ID_starter" and "sport"."ID" must be sought in the Sport table and transmitted to "rel_starter_sport"."ID_sport". This is too complicated. A form solves this more elegantly.
Forms can be created directly in the design view or by using the wizard. Even experienced people have learned that they can quickly use the wizard and then customize what it creates to produce what they want. This is often the more time-saving way.
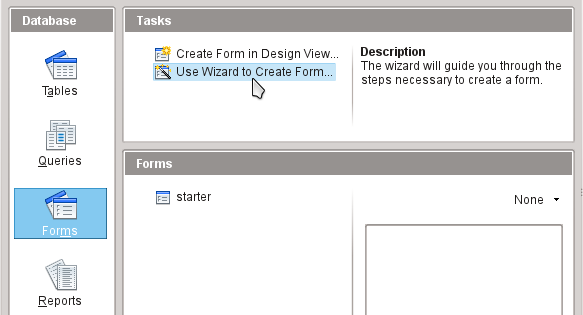
First select Forms in the Database section. Then in the Tasks section, select Use Wizard to Create Form.
The Starter table data should be written in the main form. Data for the Sport table is loaded directly with the few necessary sports and will be rarely updated.
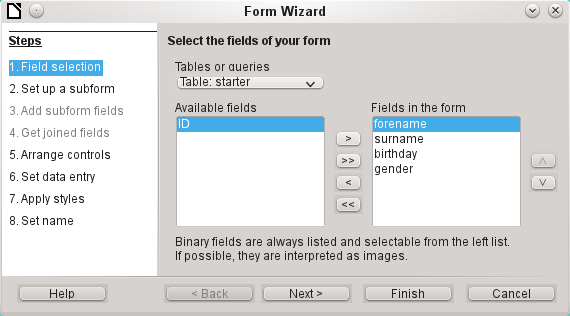
All fields except the primary key field "ID" are needed from the Starter table. The primary key field is filled automatically with a corresponding distinctive value.
Select the fields in the Available fields list and use the arrow buttons to move them to the Fields in the Form list. Click Next.
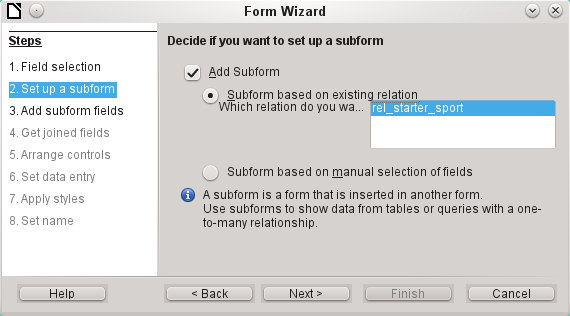
A subform should be set up where a sport can be assigned to a starter. In step 2, select Add Subform and Subform based on existing relation. To confirm the previously-defined relationship, select rel_starter_sport. Click Next.
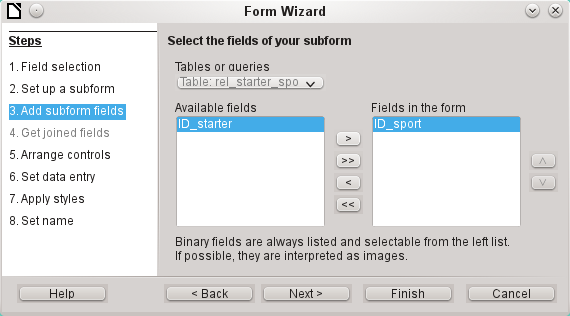
Only the ID_sport field is required from the rel_starter_sport table. The primary key in the Starter table provides the value for the ID_sport field for the current record by the connection of the main form to subform.
That this shortcut is already regulated can also be seen at Step 4 of the wizard: Get joined fields is inactive.
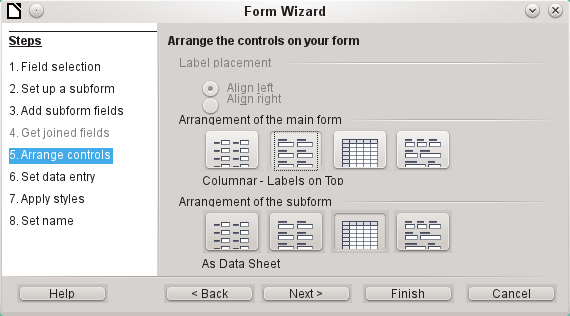
How the items in the main form and subform are arranged does not ultimately matter. However, the data assignment should also be plain for the inexperienced. In our example, As Data Sheet should not be selected for the main form; instead, choose Columnar – Labels on Top. The fields in the subform will later show all sports of the starters, so the subform arrangement is best left as it is: As Data Sheets.
Step 6 (Set data entry) should remain as it is: The form is to display all data. So then a new entry is possible, as well as an alteration of existing data.
Step 7 (Apply styles) is a matter of taste. Just beware: Some styles involve unexpected low-contrast images, especially in table control fields. Here then the font color of the data sheet fields must be readjusted if necessary.
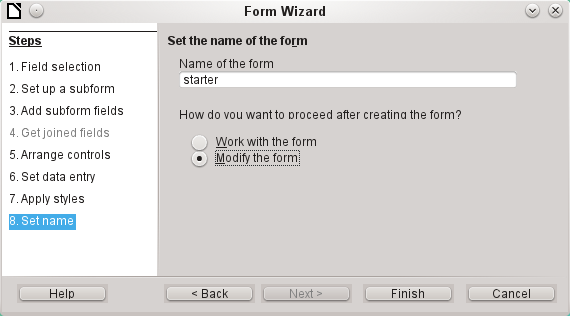
The form is not going to work because the subform still requires you to enter the abbreviation for the sports. What is needed is a selection of sports after the desired complete name. Therefore, in Step 8 (Set name), name the form starter and select Modify the form. Click Finish.
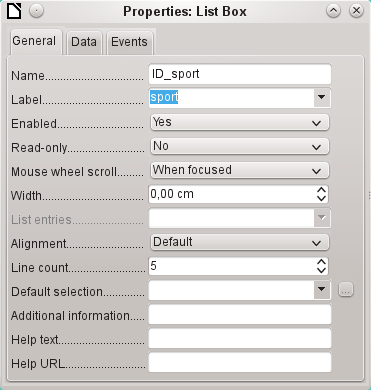
On the data sheet, right-click on the table header, ID_sport. In the context menu, select Replace with > List Box.
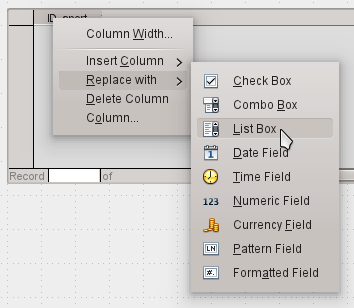
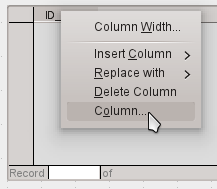
Then the list should be processed so that it can also display the corresponding data. Right-click again on ID_sport and select Column.
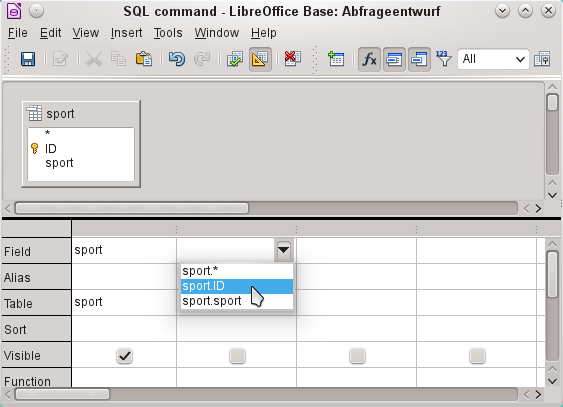
This opens the properties of the selected list box. Select Data > Type of list contents > Sql. With the help of SQL (Structured Query Language – standard query language for databases), the field should get its content from the Sport table.
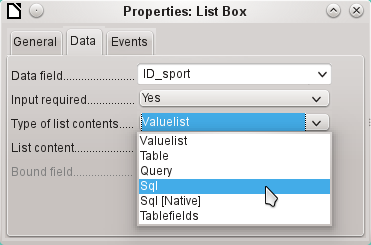
When Sql is selected, List content has an ellipse button on the right (...). Click this button to open the editor for creating queries. The query being created will be put together and finally saved in the list box itself.
In the Add Table or Query dialog, select Tables > sport, then click Add and Close.
In the first column in the lower part of the query editor, click in the box next to Field and select Sport from the drop-down list.
In the second column, select the sport.ID field. This field afterwards passes its value to the table, which is the data source of the subform. The prescribed words therefore are displayed and the appropriate shortcuts stored.
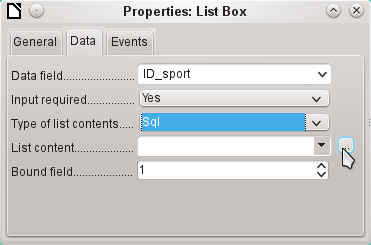
Save the query, which is then transmitted to the properties of the list box. Close the query editor.
Now the List content field in the Properties dialog shows the SQL code that has been created in the query editor:
SELECT "sport"."ID" FROM "sport"
This code says: From the "sport" table, select the "sport" field and the associated key value "sport"."ID".
This query illustrates the minimum that should be selected. Of course, sorting could be incorporated. Saving abbreviations with skillful selection gives a useful list of sports stored in "ID". If records are not sorted in a specified way, the sorting is always performed by the primary key field. In order to see sports later in the list box, this content must be entered in the Sport table accordingly.
Now we need to change label for the ID_sport field. It is still stored as ID_sport, but we want it to be visible as sport. Therefore: General > Label > sport. Close the Properties dialog.
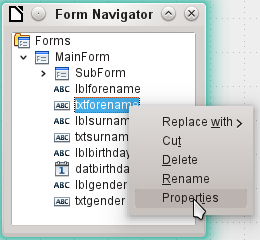
If you want to change the names of other fields, this is done best through the Form Navigator. If fields are clicked, not only the fields, but also the labels are selected. Through the wizard, they were grouped together. This then requires further action from the selection’s context menu.
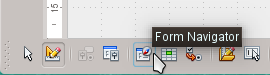
The Form Navigator is started from the Form Design toolbar at the bottom of the window.
Tip
Sometimes the toolbar will not open correctly for creating forms when processing the forms. The Form Navigator can not be found in this case.
To show the toolbars, choose View > Toolbars > Form Design and Form Controls. Should they then be visible during data entry, the view must be changed accordingly here again.
Each field can be examined individually with the Form Navigator. The field properties are then accessible in the context menu. A property entry is automatically saved after going to another property. It is possible to jump from one field to another even when the properties dialog is open. Here also the respective intermediate level is stored.
If the design has now been completed, save and close the form. Then save the Base file again.
Now if you want to enter data in the form, it might look something like this. In the following form, a record has been entered for the test. After entering the gender, click the Save button. Of course, sorting could be incorporated.
When using the form, you will notice some inconvenience:
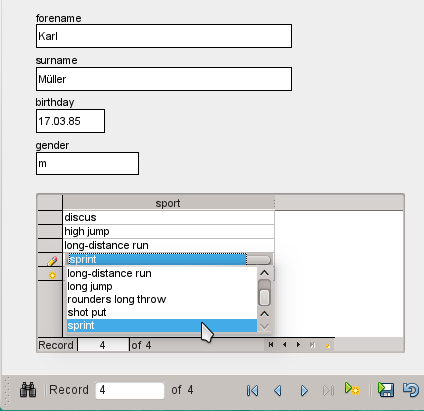
The subform with sports is not directly accessible. If navigating with the Tab key, after entering the gender Tab jumps directly to the next starter record.
The navigation bar, if in the subform, shows the record number of the subform. You should better navigate through only the main form.
The gender is entered depending upon the user preference found in memory. In the table, the length of the field has been limited to only 1 character. So here a safer entry must be guaranteed.
To solve these problems, open the form for editing, not data entry.
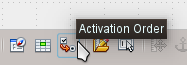
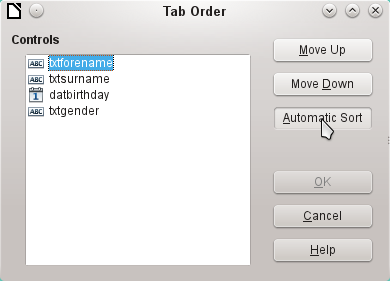
In order not to go straight to the next starter record using the Tab key after entering the gender, it is necessary to modify the activation sequence. Click Activation Order on the Form Design toolbar.
On the Tab Order dialog, select Automatic Sort, which affects not only the sorting of the displayed controls, but also the automatic redirection in the subform. Although not seen from the dialog, it is regulated in this way in the background.
Open the Form Navigator to view the subform properties.
Under Data > Navigation bar, change the value from Yes to Parent Form. Now the navigation toolbar always shows the number of the record from the Starter table.

To limit input to specified values, the control can not be a simple text box. In the main form, the solution can be found by entering gender in a Group Box. Another solution is to present the choices in a list box.
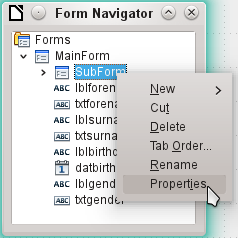
First, highlight the field for gender on the Navigator. Right-click this field to open the context menu. Select Replace > List Box. Properties will be selected using the context menu.
Data > Type of list contents > Valuelist is default here. In Data > List content enter the characters f and m below each other (using Shift+Enter). These abbreviations are the data that will be given to the Starter table.
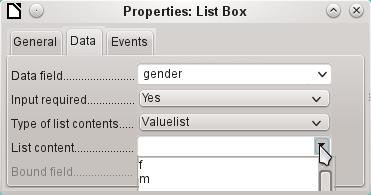
In General > List entries, specify what will be displayed in the list box. This can also be f and m, or it can be female and male as shown in the illustration. It must in any case have the same order as the items below Data.
Next select Yes for the property General > Dropdown. Look near the bottom of the General tab for this one.
The most striking inconveniences have thus far been eliminated. Now, you must again save the form and the database file. The input for male and female starters may begin as well as their assignment to the sports.
Thus, the following step is useful: records should be entered only once. Take care to ensure that the starters can also compete with each other by age and by sport. Otherwise the subsequent queries and reports do not make sense.
In a query, contents of various tables can be grouped together. Each of the starters should be displayed with the sports which they have entered.
Click Queries > Create Query in Design View. A dialog appears, listing tables from which we select all the tables for the query. It will be very clear when the rel_starter_sport table is selected as the second table. Then the connections are also equally well recognized.
The fields that should be displayed in the query can be added either by double-clicking the field names in the table or by selecting the Field row. A drop-down list appears, consisting of the field names and their corresponding table names indexed by table name. In order to match the fields of the tables correctly to their tables, they are labeled "table name"."field name" in queries. If "*" is used instead of the field name, it means that all the fields of the corresponding table are displayed.
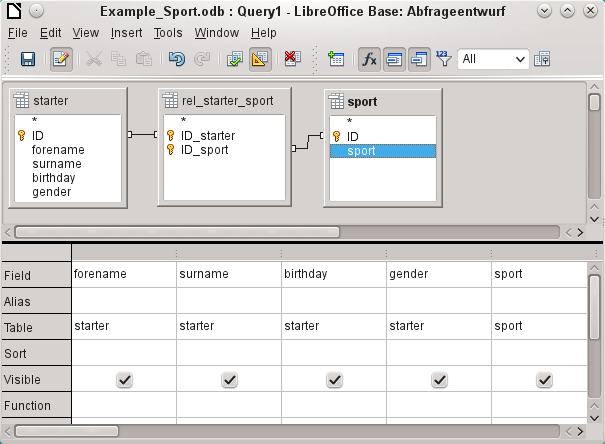
In principle, a query should be executed once before saving to see if it really produces the desired result. For this purpose, click the Run Query button shown above, press F5, or choose Edit > Run Query.

The query now displays all combinations of starters and sports. If starters have multiple sports, they have as many records. Starters do not appear without sports.

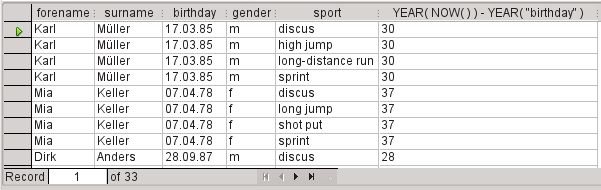
In order to put together different age groups in a competition, the year of birth is decisive. It depends on how old a person is in that year.
The year of birth can be used with different functions. For example, consider the following data.
YEAR(NOW())-YEAR("birthday")

NOW() stands for "now", for example the current date or time. The current year is read with YEAR(NOW()). YEAR("birthday") picks out the year of birth. A difference is formed between them, indicating how old the person is or will become in the current year.
These and many other functions that work with the built-in HSQLDB are described in the appendix of this book.
When the query is run during a given year (for example 2019), the appropriate calculations appear for that same year.
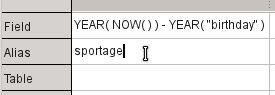
The whole code that we have entered in the field also appears in the column heading. This is remedied by entering an alias for the code under which the result will appear.
In the Alias row, the term "sportage" is entered. Here one should not use this age for anyone who has not had a birthday yet in this year.
If the query is run again, the column header no longer contains the code but the term sportage.
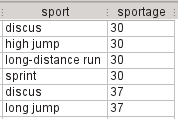
Thus the query should be saved under the name sportage instead of the confusion of using the code as the name. This query is then used as the basis for the next query, that the sportage now assigns an age_group.
The sportage query was chosen as the basis for the 2nd query. Before the term sportage in the table container is a different icon than seen for the tables of the first query. This symbol indicates that the basis of this query is a query and not a table.
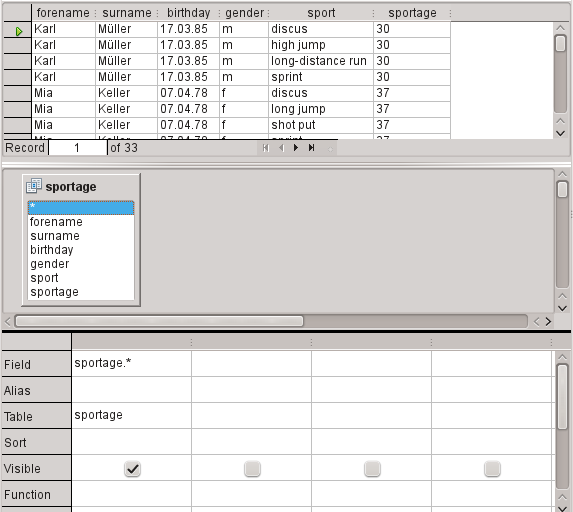
Double-click on * or select sportage.* to select all fields. So the following query returns the same result, but the formula is no longer visible.
Now access the sportage field. The sportage determines in which age group the respective person participates.
In order that the calculation will not be too complex, the following classifications should be modified: for those under 20 years of age, the starters are divided into age groups containing two ages per group beginning with 0. From 20 years and older, groups containing 10 ages each are formed, for example, 20–29 years.
Such formulas no longer really belong to the entry-level group of skills. A simpler allocation of ages would be possible even with the help of the following report. For more sophisticated allocations, please refer to the Appendix of this book.
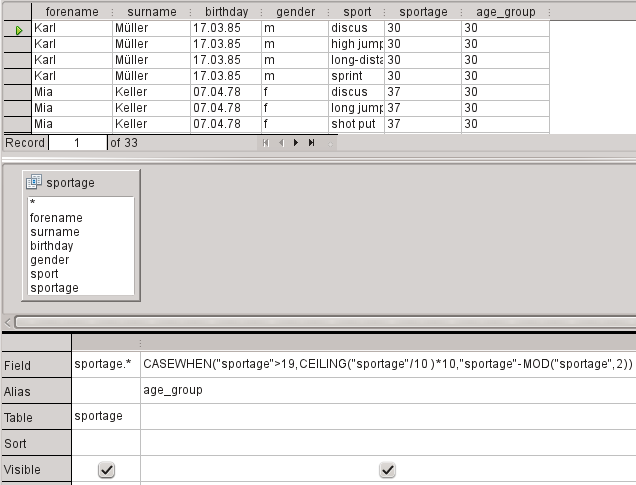
CASEWHEN( "sportage" > 19, CEILING( "sportage" / 10 ) * 10, "sportage" - MOD( "sportage", 2 ) )
CASEWHEN (condition to be tested for being true or false using a value, enter the value of this expression if true, enter the value of this expression if false). In English, this means:
If the sportage is over 19 years, sportage is used to calculate the next lower age that ends in a zero to get the age_group.
If the sportage is under 19 years; calculate MOD("sportage",2) by dividing the Athlete_age by 2 and using the remainder (this will be 0, or 1); and then subtract the remainder from the value of the sportage to get the age_group.
All starters over the age of 19 are thus assigned to an age group for each ten years. All starters up through age 19 are assigned to an age group for each two ages.
This formula was again assigned an alias, in this case the alias is age_group.
Save the query with the name registration.
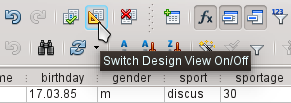
Switching off of the design view is not really necessary, since all entries are possible in the design view without any major problems. However, looking closer at the code in a query can never hurt. Finally, there are SQL expressions that fit poorly in the design view or are not possible there. But then the direct entry of the SQL code is used.
Tip

The code fields and tables are enclosed in double quotes and displayed in ocher colored. Terms of SQL code are are in blue, database functions in green.
SELECT "sportage".*, CASEWHEN( "sportage" > 19, CEILING( "sportage" / 10 ) * 10,"sportage" - MOD( "sportage", 2 ) ) AS "age_group" FROM "sportage"
The parts of the formula was already mentioned. Here now is the Structure:
SELECT "sportage".*,... AS "age_group" FROM "sportage"
Select from the sportage table all the records from and in addition to what is determined by the formula. That which is determined by the formula, refer to as "age_group".
The code does not distinguish between tables and queries as the basis of the data. It therefore works only in the graphical user interface of Base. A query can not have the same name as a table; a table can not have the same name as a query.
Immediately when the SQL button is clicked (It runs the SQL command directly) while in SQL View, the database responds with an error message. The embedded HSQLDB does not know the query "sportage" to which the current query "registration" refers.
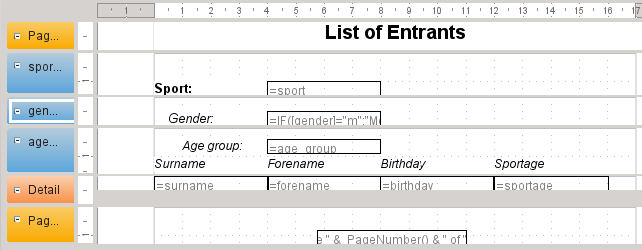
Use Reports > Create Report in Design View to create a report with a clear list of starters, sorted by sport, gender, and age group.
When the editor is started, the Add Field dialog first appears in the foreground. Use this dialog to take fields from the alphabetically sorted table as a basis. The query must be chosen as the data source.
In the report window, the right side shows an overview of the properties for the currently active object. If it is not visible, select View > Properties.
From Properties, select Data > Content type > Query. For the Content property, select the registration query, which was the final summary query.
The Report Builder now displays all the fields of the selected query.

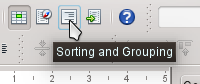
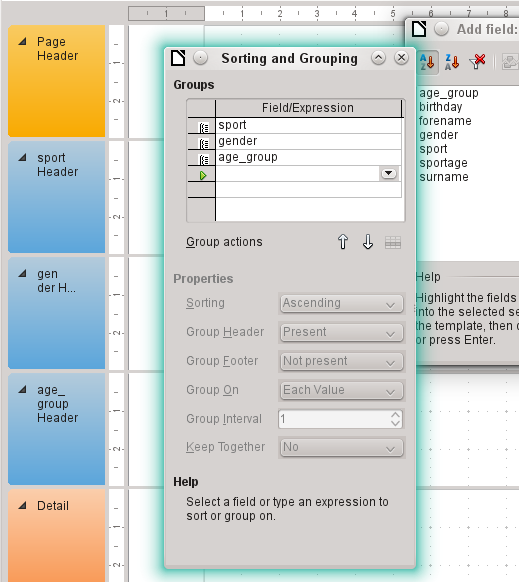
In the next step, open the Sorting and Grouping dialog, by using the toolbar button or by selecting View > Sorting and Grouping.
In the Sorting and Grouping dialog, select the sport, gender, and age_group fields.
A group header for sorting appear at each sorting selection on the left side of the report. Use the default settings for the properties of the sorting and grouping selections.
Close the Sorting and Grouping dialog.
Select the Group header, sport Header. This is visible within the white border of the header. Using the Add Field dialog, click on the starter field to insert a label field and a text field which will display the contents of the starter field.
By the same method, assign the gender and age_group fields to the appropriate group headers.
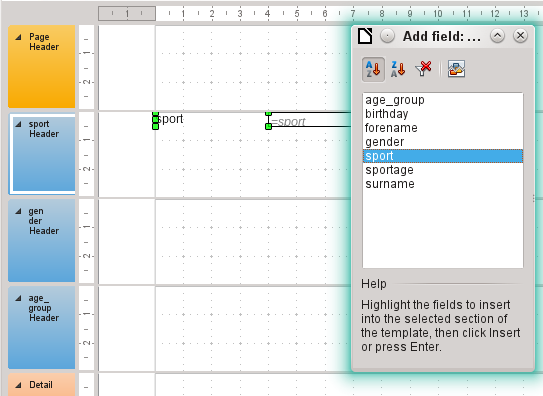
Insert all remaining fields in the Detail area.
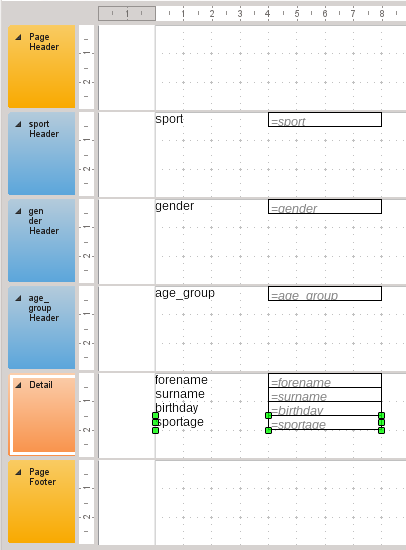
The draft report should now look like this:
Save the report. The name could be something like List of entrants.
Then save the database file itself; otherwise, the report is stored only temporarily.
Note
Especially when designing a report using the Report Builder, it often fails because of instabilities of the program. It is important to save both the report and database file.
Fortunately, the later executing of a report is not affected by these instabilities.
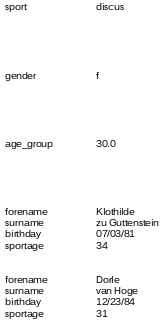
If this report is run with appropriate data, then the result looks like the following picture.
The beginning of the report shows two female starters who want to enter the high jump sport and belong to the age_group 30.
When running the report, some design flaws appear:
The distances between the group headers and the content in the Detail section are much too large.
The gender is indicated by m and f. Better would be names such as Men and Women.
Presumably because of the division in the query, the age_group field contains numbers with one decimal place.
The label fields from the Detail section (forename, surname, ...) would be better placed together horizontally as table headers below the age_group label and field in the age_group Header.
To reduce the vertical distances between the fields, use the mouse to drag the bottom border of the age_group header to the bottom of table headers. You can also highlight a section and regulate the height of the group header in Properties. Therefore, no field but only the group header should be labeled.
It is not possible for a section to be smaller than the labels and fields that it contains.
The age_group Header area should be made large enough to take the label fields from the Detail section.
Consider also when selecting the distances that a following group does not appear too close below the previous group. The label and text boxes may also need a distance to the top of the section containing them. If this distance to the top is not desired, group footers rather than headers can be displayed to provide this distance. Such a preference is possible in View > Sorting and Grouping for each group.
The designation of the gender in the table is not enough for the demands of a list of starters. Renaming the field could be done in the query. But because the query has already been created, you can use functions in the report instead.
Highlight the text field "= gender". In the Properties on the right side of the Report Builder tab, select Data > Data field. Click the button with the ellipse (...). You will see the Function Wizard.
From Category, select Logical and then double-click IF. The prediction in this function, which relies on other functions, must be switched off.
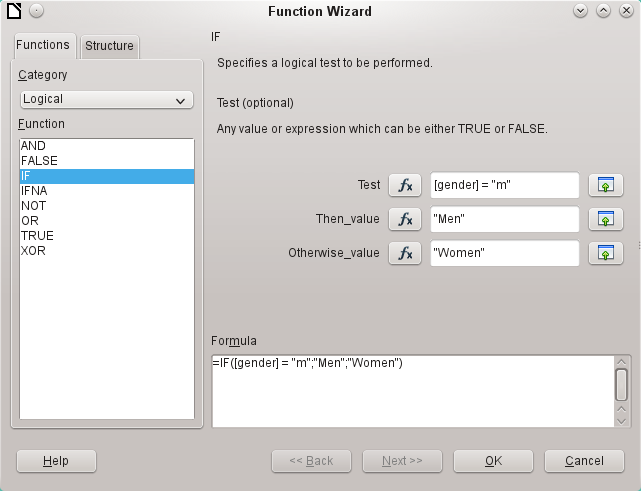
Input the Test value. This is the field of the query from which the data is read and is put in square brackets. Texts must be enclosed in double quotes. When gender has the value m, then Men is displayed in the report field. If there is no m, then Women appears.
Click OK to confirm the entry.
Thus, the wording of the field is changed accordingly.
The field that receives the contents of the database is identified in the report as a text box, but it can be formatted just like the fields in tables in Writer or Calc.
Highlight the field "= age_group". In the Properties on the right, select General > Formatting. The Formatting property is set to "text". Click the button with the ellipse (…). This opens the formatting dialog, which is also used in Calc, Writer, or when creating forms. Select Category > Number and confirm with OK.
The format of the display is now changed from text to numbers.
Fields can also be moved beyond the boundaries of a section to another section in Report Builder. However, sufficient space for the field must be present in the destination section. No part of one field can exist in the same location as any part of another field.
Positioning of fields using a mouse is inaccurate, so you need to provide ample space in each section for the fields. In a section like the group header age_group, fields can then be precisely positioned using the arrow keys.
To position fields using the keyboard, look at the properties General > Position X and General > Position Y.
Here a label field for the header was added. The entry of the text for the label field appears in the Properties of the fields.
The page footer is set in the properties: Visible > No. The bottom margin of the document contains too much space. Remember that the available amount is already additionally reduced by the size of the page margins. By default, all page margins are set for letter page format to 0.79 inches.
For more formatting options for reports, see Chapter 6, Reports.
The example presented here is only the first step for a database in the sports sector. Now, add a field for each possible item of needed information. A good place to add such a field is in the rel_starter_sport table.
However, if the inputs apply to several competitions for the same sport, include a date field or another field that can be assigned to the respective competition in the rel_starter_sport table. The field then also becomes part of the table’s primary key.
Perhaps the club membership could also be added. Adding a field in the starter table would be sufficient. When many clubs have the same name, this suggest adding a separate Club table and also the corresponding foreign key in the Starter table.
Then, of course, it must be determined, as with all competitions, who should be placed in what relevant age group and sport. Sorting is required here, which might again end up as a report with a results list.
It would be nice if every starter (again via a report) obtained a beautifully designed certificate with the personal performance and placement.
Such extensions are easily possible, as described in other chapters of this guide.