Base Guide 7.2
Chapter 2
Creating a Database
This document is Copyright © 2021 by the LibreOffice Documentation Team. Contributors are listed below. You may distribute it and/or modify it under the terms of either the GNU General Public License (https://www.gnu.org/licenses/gpl.html), version 3 or later, or the Creative Commons Attribution License (https://creativecommons.org/licenses/by/4.0/), version 4.0 or later.
All trademarks within this guide belong to their legitimate owners.
|
Pulkit Krishna |
Dan Lewis |
Jean Hollis Weber |
|
Martin Fox |
Robert Großkopf |
Pulkit Krishna |
|
Jost Lange |
Dan Lewis |
Hazel Russman |
|
Jochen Schiffers |
Jean Hollis Weber |
|
Please direct any comments or suggestions about this document to the Documentation Team’s mailing list: documentation@global.libreoffice.org.
Note
Everything you send to a mailing list, including your email address and any other personal information that is written in the message, is publicly archived and cannot be deleted.
Published December 2021. Based on LibreOffice 7.2 Community.
Other versions of LibreOffice may differ in appearance and functionality.
The basics of creating a database in LibreOffice are described in Chapter 8 of the Getting Started Guide, Getting Started with Base.
The database component of LibreOffice, called Base, provides a graphical interface for working with databases. In addition, LibreOffice contains a version of the HSQL database engine. This HSQLDB database can be used by only a single user. The entire data set is stored in an ODB file that has a file locking mechanism in the configuration folder when opened by a user.
Since LibreOffice 4.2, an internal Firebird database has been available in addition to the internal HSQLDB one. The Firebird database is included in “experimental features” in version 6.4 due to its instability (though it has improved much). The database examples in this book continue to refer to HSQLDB, but are customized so that most functions are directly transferable to Firebird. If necessary, alternatives in Firebird are shown.
If a database with multiple users is not planned, or if you wish to gain some initial experience with a database, the internal database engine will suffice. It is possible at some later stage to transfer the database to an external HSQLDB environment, where multiple users can have concurrent access to the database on the HSQLDB server. This is described later in this chapter.
To create an internal database from the LibreOffice Start screen, click the Database button; or, from anywhere in LibreOffice, use File > New > Database. The Database Wizard (Figure 1) opens.
Figure 1: Step 1 of Database Wizard: Select database
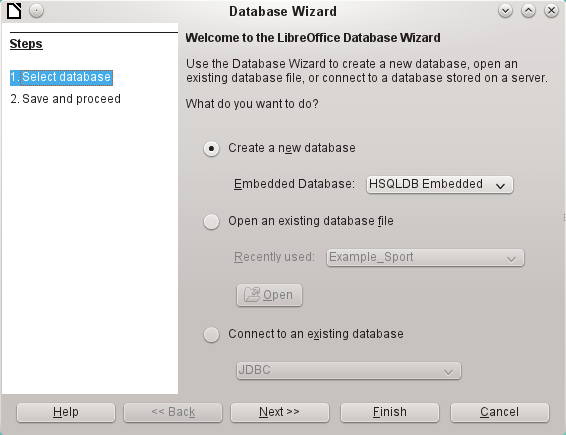
Select Create a new database. By default, this is an embedded HSQLDB database. An internal Firebird database is also available; see Caution note on next page.
The other options serve to open an existing file or create a connection to an external database such as an address book or a MySQL database.
Choose Next>> to proceed to Step 2 of the Database Wizard (Figure 2).
Figure 2: Step 2 of Database Wizard: Save and Proceed

A database registered with LibreOffice can be used by other components of LibreOffice, for example for mail merge letters in Writer. It is recommended that all databases should be registered when created, but the final choice belongs to the reader.
Select Open the database for editing and deselect Create tables using the table wizard. The latter option was covered in Chapter 1; the rest of this book does not use the wizards for creating tables, queries, and so on.
Click Finish to save the database. A standard Save As dialog opens, requesting a name and location for the *.odb file, which is ready for the entry of records from the internal database, and the storage of queries, forms, and reports. Unlike in the other parts of LibreOffice, the file is saved before you have made any visible entries.
Caution
1) Back up the HSQLDB database file.
2) Adapt functions as far as possible according to the list on this wiki page:
https://wiki.documentfoundation.org/Documentation/FirebirdMigration
3) Copy views that can not be directly converted from the SQL code and save them as queries.
4) Table Names and Column Names in Firebird can be a maximum of 31 characters long. If necessary, adapt to a shorter name.
5) Pure text tables (integrated *.csv table, etc.) are not possible under Firebird, so they must be placed elsewhere.
An external database must exist before it can be accessed. If access to a database is desired, the database must be set up to allow network connections with a specific user name and password before external programs can connect to it.
When such a database is properly set up, you may, depending on the available connection software (the database driver), create tables, input data, and query data.
Click on File > New > Database to open the Database Wizard (Figure 1) and select Connect to an existing database. The list of available database types varies according to operating system and user interface, but the following should always be available:
dBase
JDBC
MySQL
ODBC
Oracle JDBC
PostgreSQL
Spreadsheet
Text
as well as various types of address books.
The connection options vary according to the type of database selected. You can change the options after the *.odb file is created.
Some database types (for example, a connection to spreadsheets) do not allow new data to be entered. These are used only to search for or report on existing data. The descriptions in the following chapters deal exclusively with LibreOffice Base using the internal HSQLDB database. Most of the design work can be extended to databases that use MySQL, PostgreSQL, and so on.
Here are a couple of brief examples of how you can connect with an external database.
Base can connect to MySQL and MariaDB databases by three methods. The simplest and fastest way is direct connection with the MySQL connector. The other two are connection using ODBC or JDBC.
Note
In MySQL and MariaDB, it is possible to enter and change data in tables without a primary key field. The GUI of Base displays these tables, but offers no input or modification options.
If you want to use tables without a primary key, you can use Tools > SQL instead, or within forms via macros, to supply the tables with data.
After MySQL or MariaDB has been installed, do the following steps in the sequence described.
1) The administrator account in MySQL is called root. Linux users should note that this is not the root user of the Linux operating system. The root user must be assigned a password directly after installation, if this was not done before installation.
mysql -u root -p
To begin with, no password is set, so just press Enter. An entry prompt appears:
mysql>
All the following entries are made at the MySQL console. The passwords can be different according to whether the prompt comes from the local computer (localhost) or a different computer which is acting as a MySQL server (host).
SET PASSWORD FOR root@localhost=PASSWORD('Password');
SET PASSWORD FOR root@host=PASSWORD('Password')
For Windows users, the second line reads:
SET PASSWORD FOR root@'%'=PASSWORD('Password');
2) As a security measure, all current anonymous users are deleted.
DELETE FROM mysql.user WHERE User='';
DELETE FROM mysql.db WHERE User='';
FLUSH PRIVILEGES;
3) A database called libretest is created.
CREATE DATABASE libretest;
4) All rights to the libretest database are granted to the user lotest, who will log in with the password libre.
GRANT ALL ON libretest.* TO lotest IDENTIFIED BY 'libre';
Now the database is available and can be connected to as follows.
Starting with LibreOffice 6.2, the direct connection from Base to MySQL / MariaDB has been integrated into LibreOffice. Installing an extension is no longer required.
General access to MySQL is via JDBC or ODBC. To be able to use JDBC, it is necessary to install mysql-connector-java.jar. This Java Archive file is best copied into the same folder where the current java version used in LibreOffice is located. This is likely to be a subfolder like ...javapath.../lib/ext for a Linux installation.
Alternatively the appropriate folder containing the Java archive can be set through Tools > Options > LibreOffice > Advanced > Java > ClassPath.
To connect via ODBC, you must of course have ODBC software installed. Details of how to do this are not given here.
After installation of the software, it may happen that LibreOffice refuses the service because it can’t find the libodc.so library. In most systems, libodbc.so.2 will be present. You will need to make a link to this file in the same folder with the name libodbc.so.
In the odbcinst.ini and odbc.ini, which are necessary for the system, you need to make entries similar to the following:
[MySQL]
Description = ODBC Driver for MySQL
Driver = /usr/lib/libmyodbc5.so
[MySQL-test]
Description = MySQL database test
Driver = MySQL
Server = localhost
Database = libretest
Port = 3306
Socket =
Option = 3
Charset = UTF8
In Linux systems, these two files are located in the /etc/UnixODBC folder. If you do not enter the character set that you are going to use, there can be problems with umlauts even if the setup is the same in MySQL/MariaDB and in Base.
Details for the connection parameters can be found in the MySQL Handbook.
To access an existing MySQL database with a direct connection, follow these steps.
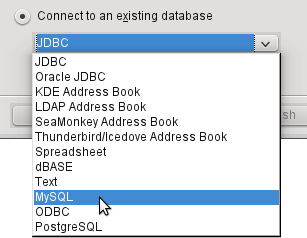
At Step 1 of the Database Wizard, select Connect to an existing database. From the list of database formats on the pull-down menu (Figure 3), select MySQL. Click Next>>.
Figure 3: Connecting to an existing MySQL database
At Step 2 of the Database Wizard (Figure 4), select to connect using ODBC or JDBC or directly.
Figure 4: Step 2 of Database Wizard: Set up MySQL connection
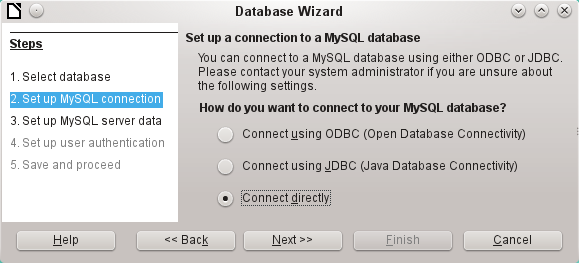
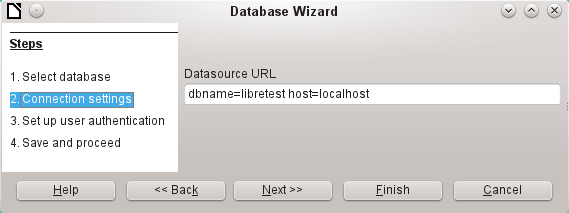
Direct connection is best for both speed and functionality. At Step 3 (Figure 5), fill in the required information.
Figure 5: Step 3 of Database Wizard: Enter required information for the connection
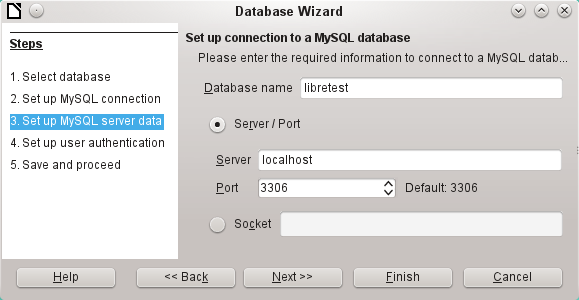
The database name must be known. If the server is on the same computer as the user interface in which the database is to be created, you can select localhost as server. Otherwise you can use an IP address or, according to the network structure, the name of the computer or even an Internet address. It is thus possible for Base to access a database which is on someone’s home page.
When working with Base over the Internet, you need to be aware of how the connection is set up. Is the connection secure? How is the password transmitted?
Any database accessible over the Internet should be protected by a specific username with a password. This provides a direct way of testing whether the connection should go ahead. A corresponding user needs to be set up in MySQL or MariaDB for the named server.
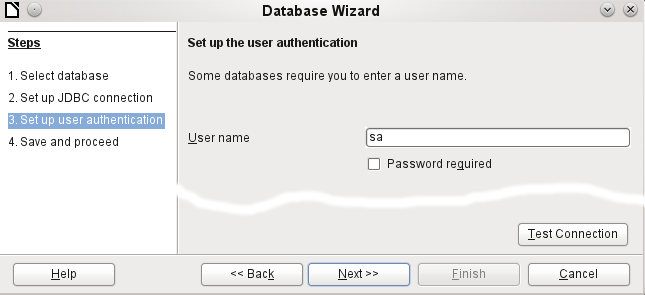
Figure 6: Step 4 of Database Wizard: Set up user authentication
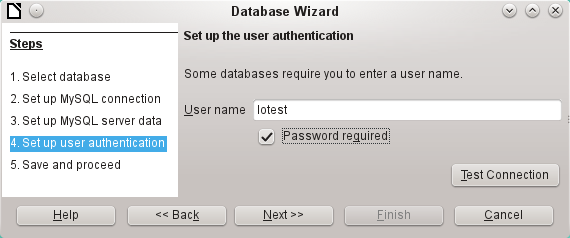
At Step 4, provide a username and select Password required. Click the Test Connection button to launch authentication with the given user name. After entering the password, you are informed whether the connection was successful. If, for example, MySQL is not currently running, you will get an error message.
Note
On each subsequent occasion that the database file is accessed, the dialog below appears when you first access the MySQL database.
Click Next>> to display Step 5 of the Database Wizard (Figure 7). Select No, do not register the database and Open the database for editing. Click Finish.
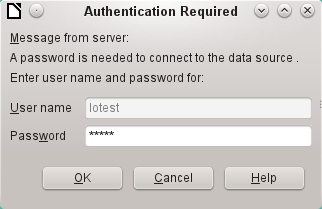
Figure 7: Step 5 of Database Wizard: Decide how to proceed after saving the database
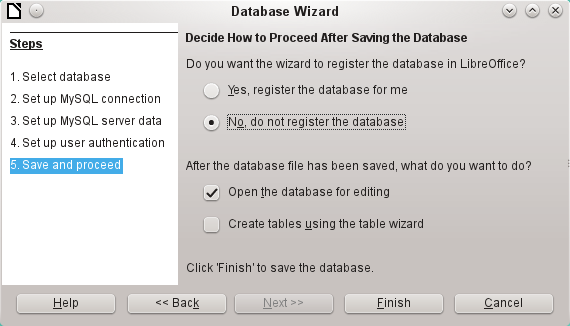
In this example, the database will not be registered, as it is only being built for tests. Registration is only necessary if other programs such as Writer are to access the records, for example for a mail merge.
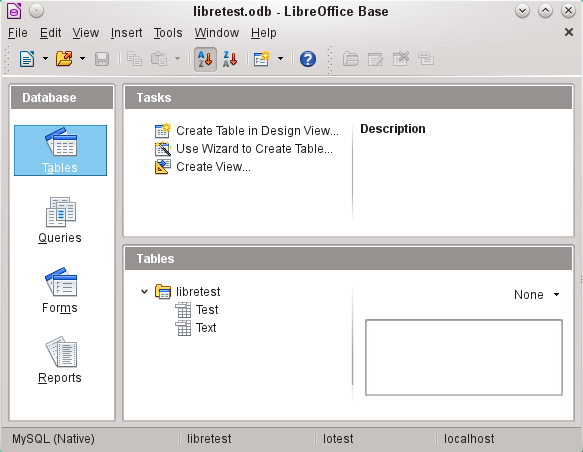
The wizard ends the connection setup by saving the database connection. The Base file is created and a view of the tables of the MySQL database is opened (Figure 8). The database tables are displayed under the name of the database itself.
At this stage the *.odb file contains only the connection information that will be read each time the database is launched, so that the tables in the MySQL database can be accessed.
Some drivers will show only the libretest database for which the connection was ordered. Other drivers also show other MySQL or MariaDB databases on the same server. What will be seen is totally dependent upon the specific driver and operating system being used.
Even with drivers showing only one database, access to other tables for queries is possible if the database user (lotest in the above example) can access the records with their password. Unlike the previous native LibreOffice drivers, this one does not provide write access to other MySQL databases on the same server.
Note
The statements in the above paragraph are dependent upon the operating system and driver that is used. Open SUSE will give the results seen. Ubuntu, using either the latest MySQL driver or directly connecting to the MySQL server, will allow visual and write access to all databases for which the user has access rights. Other operating systems and drivers may give different results.
Figure 8: View of the open database file with table overview and in the footer of the designation of the driver used MySQL (Native), the database name libretest, the user of the database lotest and the server on which the database is running, localhost.
In contrast to Base’s internal database, queries in MySQL require the database name for defining the tables. For example:
... FROM "test"."Class" AS "Class",...
It was necessary to give the combination of database name and table name an alternative name (alias) using “AS“. Several versions ago, the use of AS was dropped with the alias written without it. For example:
... FROM "test"."Class" "Class",...
Tables can be created and deleted in the database. Automatically incrementing values (AutoValues) work and can be selected at the table design stage. In MySQL, the values start at 1.
The first steps to making an ODBC connection are the same as for a direct connection. If an ODBC connection to MySQL is selected in the second step, the page shown in Figure 9 appears in the Database Wizard.
Figure 9: Setting up a connection to an ODBC database
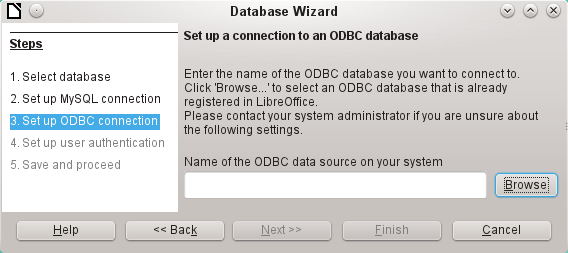
The ODBC data source need not have the same name as the database in MySQL itself. Here you must enter the name that is listed in the odbc.ini file. The simplest way to do this is to read the name directly out of odbc.ini by using the Browse button.
Figure 10: Choosing a data source
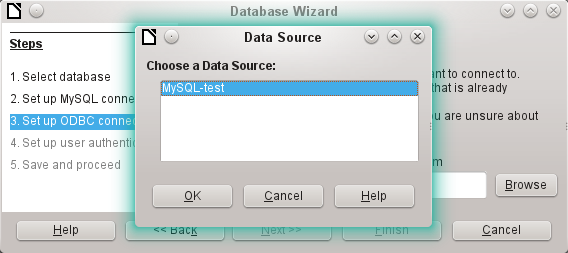
The name from the odbc.ini file appears. Here too, when you connect to a database, other tables on the MySQL server can be read quite easily.
Steps 4 and 5 are identical to those for a direct connection.
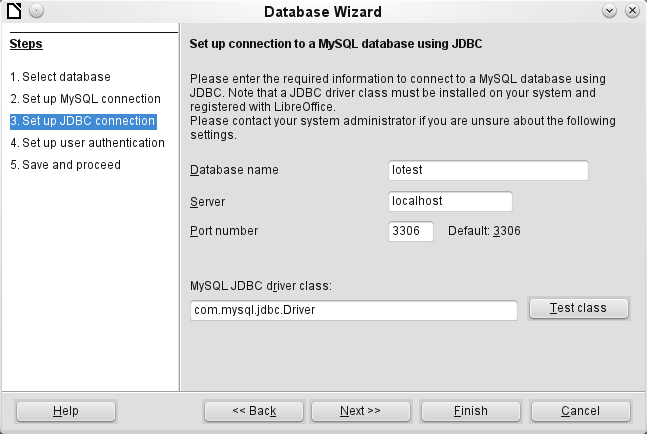
For a JDBC connection, the first steps are the same. The difference appears only with step 3 (Figure 11).
The wizard asks for the same information as for a direct connection. The database name is the one used by MySQL itself.
Use the Test class button to test whether the archive mysql-connector-java.jar is accessible by Java. This archive must either be on the path of the chosen Java version, or directly embedded in LibreOffice.
All further steps are identical to the previous connections. Connections to other databases on the same MySQL server are accessible by any user who has access rights to them.
Figure 11: Setting up a connection using JDBC
LibreOffice has a direct driver for PostgreSQL databases, which is preinstalled. To ensure a secure connection, follow these brief instructions for the first steps after installing PostgreSQL.
The following steps are necessary after installation using the package manager in OpenSUSE. You can assume similar ones in other operating systems.
1) The postgres user must be assigned a password. This can be done using the operating system’s utility.
2) The Postgre server must be launched by the administrator:
service postgresql start or rcpostgresql start.
3) The postgres user logs in at the console with:
su postgres
4) An unprivileged database user, here called lotest, is created with a password:
createuser -P lotest
5) In order to allow the database user to connect to the database which is to be created, an entry in the var/lib/pqsql/data/pg_hba.conf file must be changed. This file includes the methods used for identifying users at various levels. The method LibreOffice uses to communicate is the “password” method and not the “ident” method as set out initially in the file.
6) The system user “postgres“ logs in with “psql“:
psql -d template1 -U postgres
7) The system user creates the “libretest“ database:
CREATE DATABASE libretest;
Choose the postgres entry in Step 1 of the wizard. To make the connection, give the database name (dbname) and the host. Under some circumstances, it is necessary to give the fully qualified hostname including the domain name.
Figure 12: Setting up a direct connection
The user authentication (Step 3) is exactly the same as for MySQL.
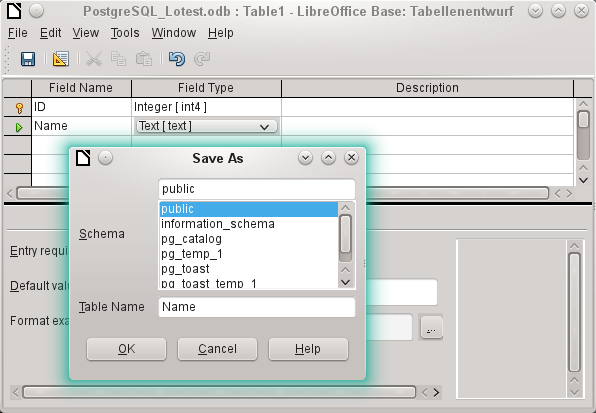
The Save As dialog (Figure 13) shows the various schema in PostgreSQL. The only one that can actually be saved to is the public schema, unless extended rights have been granted to this user.
Note
If tables from the internal HSQLDB database are copied to PostgreSQL, the Import Wizard uses the simple table names from HSQLDB, for example Table1. However, importing under this name will lead to errors. Instead, the schema name must be prepended, so that Table1 becomes public.Table1.
Figure 13: Saving to the public schema
When tables are being created, Base might suggest data types which the current PostgreSQL installation cannot handle. For example, by default text fields are given the field type Text[character_data]. PostgreSQL cannot process this field type. Changing the type to Text[varchar] solves the problem.
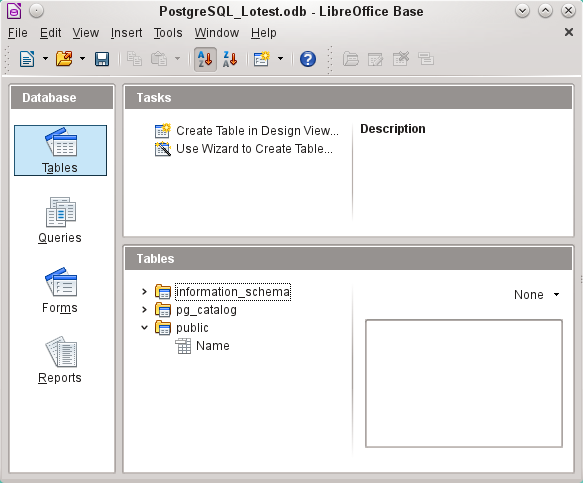
The various schema appear in the table view of PostgreSQL (Figure 14). In the public schema you can see a table called Name.
If the database is being opened for the first time, you will see a great many tables in the Information schema area. These tables, like those in the pg_catalog area, cannot be read or written to by the ordinary user. These different areas are called schema in PostgreSQL. Users create new tables in the public schema.
Figure 14: Table view of Postgre_SQL in LibreOffice Base
dBase databases have a format where all data is contained in separate, previously initialized tables. Links between the tables must be made in program code. Relations are not supported.
The dBase format is especially suitable for the exchange and extensive editing of data. In addition, spreadsheet calculations can directly access dBase tables.
dBase has no way to prevent the deletion of, for example, media in a library database that continue to be referenced in the media loans table.
Note
At present the only dBase databases that are recognized are those contained in files with the ending *.dbf in lower-case letters. Other endings such as *.DBF are not recognized. (Bug 46180)
Figure 14: Setting up a connection to dBase files
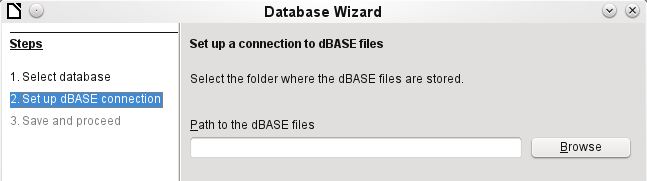
The connection is made to a specific folder. All *.dbf files in this folder will be included and shown in the *.odb database and can be linked together using queries.
Tables in dBase have no primary key. They can in principle be described as corresponding to the worksheets in Calc.
Figure 15: Tables in a dBase file
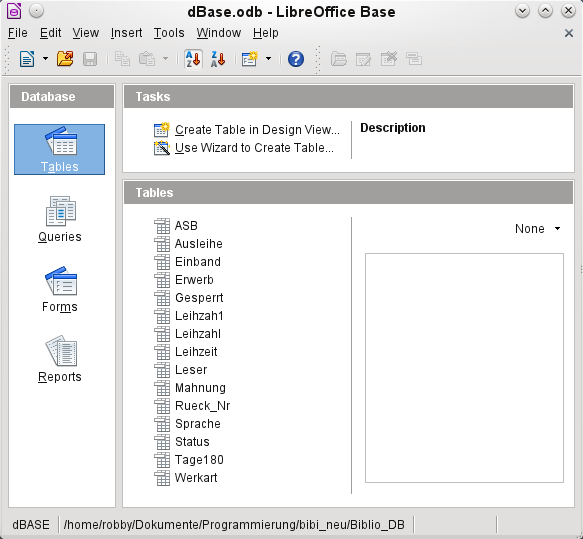
Tables can be created and will then be copied as new files in the folder previously selected.
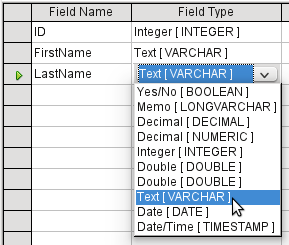
The number of different field types for a new dBase table is clearly less than when the internal HSQLDB format is used. In the following figure there are still some field types with the same type name.
Figure 16: Field types for a new dBase table
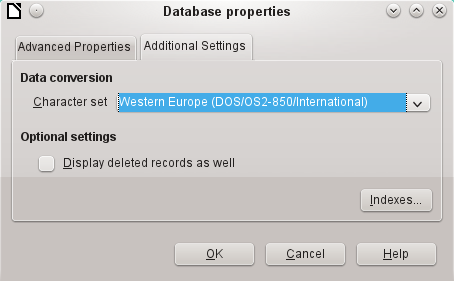
Base takes over the coding of the operating system. Therefore old dBase files easily develop errors when special characters are imported. The character set can be corrected subsequently using Edit > Database > Properties > Advanced Settings (Figure 17).
Figure 17: Correcting the character set
Note
The Import Wizard for dBase has problems with automatic recognition of numeric field types and Yes/No fields (Bug 53027). This may require you to make subsequent corrections.
Calc or Excel spreadsheets can also be used as the table source for databases. If, however, a Calc spreadsheet is used, no editing of the table data is possible. If the Calc document is still open, it will be write-protected.
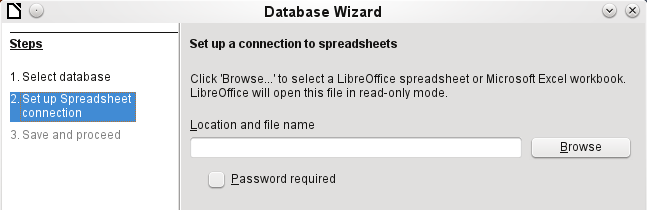
The only questions to be answered are the location of the spreadsheet file and whether or not it is password protected. Base then opens the spreadsheet and includes all worksheets in the document. The first row is used for the field names and the worksheet names become the table names.
Relationships between spreadsheets cannot be set up in Base, as Calc is not suitable for use as a relational database.
Figure 18: Setting up a connection to a spreadsheet
The Wizard will automatically seek a connection to an address book, for example as used in Thunderbird. The Wizard will prompt for the location of the ODB file that will be produced.
Figure 19: Tables in a Thunderbird address book
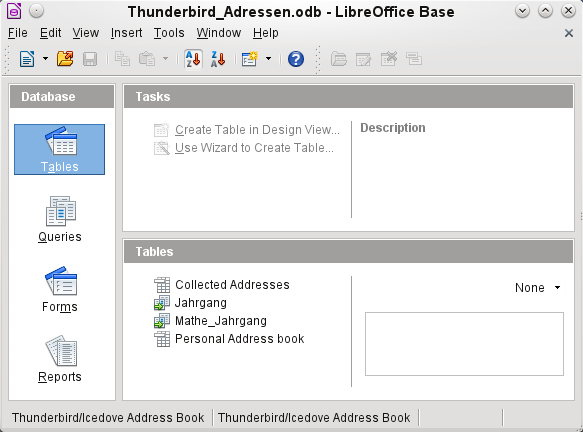
All tables are shown. As with Calc spreadsheets, the tables are not editable. Base uses the table data only for queries and mail merge applications.
Note
Only the Personal addresses file is read as an address book in Linux and macOS. Collected groups are currently only visible as part of the Personal addresses. Groups from Collected addresses are not shown.
In Base you can create a complete database by accessing text tables. Text tables can also be accessed from within an internal database.
The *.csv format is a common exchange format between databases. Records are stored in a form that can be read and modified by a simple text editor. Individual fields are separated by commas. If a field contains text that includes a comma, the text fields are enclosed in double quotes. Each new record begins with a new line.
For example, the contents of an address book which is in a format not supported by any Base driver can either be imported via a *.csv file (using Calc as an intermediary if necessary) or the file is directly imported into the database as a text table. To be editable there, the *.csv file must include a field with unique values that can serve as a primary key.
...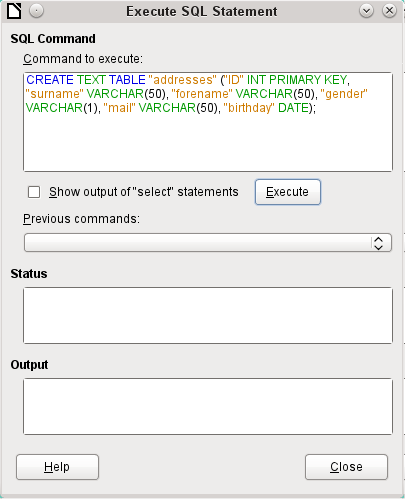
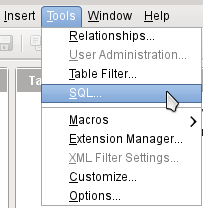
Figure 20: Creating a text table using Tools > SQL
A text table cannot be created using the graphical user interface. Instead you must use Tools > SQL to create a text table (see Figure 20). The fields in the text table must correspond in type and order to those that the text table makes available. For example the ID field must contain positive integers and the Birthday field must contain date values in the form Year – Month – Day.
The table is not directly visible in the user interface. If another enlargement is to follow, use View > Refresh tables to make the tables available. The table symbol indicates that this is not a “normal” database table.
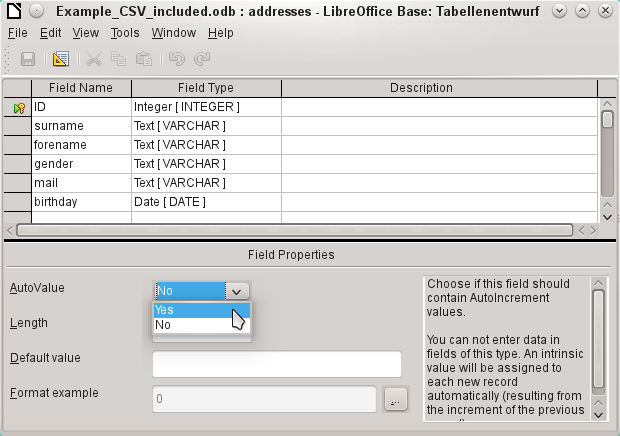
The table is opened for editing and the primary key field is changed to an automatically incrementing field.
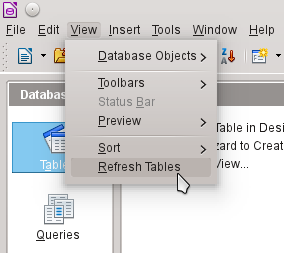
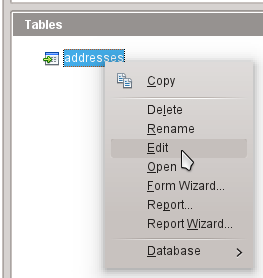
Figure 21: Editing a text table
Now we must make a connection to an external text table using using Tools > SQL. The text table lies in the same folder as the database itself.
SET TABLE "Addresses" SOURCE "Addresses.csv;encoding=UTF-8";
Tip
The encoding=UTF-8 term works in many systems. In some cases you need to use ansi instead of UTF-8.
After this the text table is available for input in the normal way. But the following points should be noted:
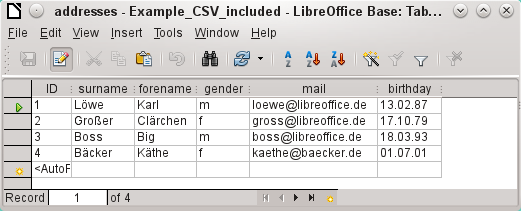
Text tables can be opened and edited simultaneously by external text programs. Loss of data cannot be excluded in these circumstances.
Changes in records already written lead to the corresponding line in the original file being cleared and the new version added at the end of the table. The table view shown above presents four written lines with correctly sorted ID numbers. In the original file, the second record has been altered, leading to the following record sequence by ID: 1, blank line, 3, 4, 2.
When connecting to a text file, the following parameters are available.
SET TABLE "Addresses" SOURCE "Addresses.csv;ignore_first=false;all_quoted=true;encoding=UTF-8";
“ignore_first=true” would mean that the first line is not read in. This makes sense if the line contains only field headings. The internal default for HSQLDB is false.
By default, HSQLDB text fields are only placed in double quotes if they contain an internal comma, since the comma is the default field separator. If every field is to be quoted, set all_quoted=true.
For further parameters, see http://www.hsqldb.org/doc/1.8/guide/guide.html#set_table_source-section
SET TABLE "Addresses" READONLY TRUE;
prevents anything from being written into the table. The table is then available read-only like an address book from a mail program. Setting write protection separately is only necessary when a primary key has been set for the table.
As in the previous example, *.csv files are used as a data source. Using Base, a folder containing the *.csv files is embedded as a data folder.
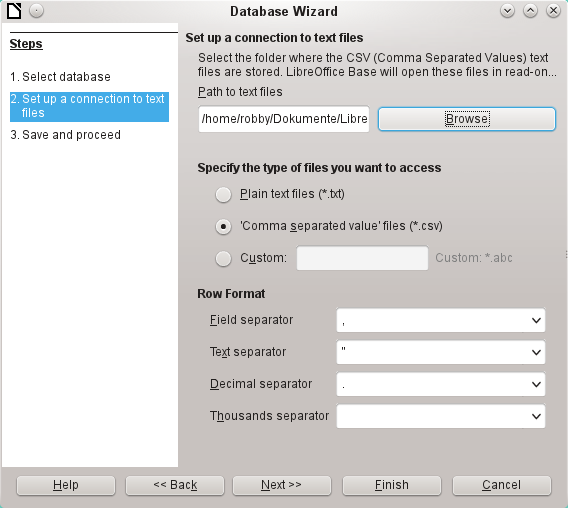
We begin by connecting to an existing database. Here the format Text has been selected.
The path to the text files is looked up. In the folder, all files of the specified type will be listed later. For *.csv files, choose the second option.
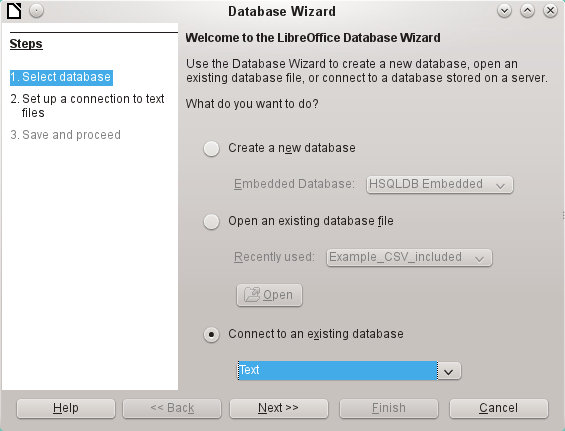
At this stage you can already see a clear warning that the files will be opened read-only with no write access.
In the Table view, all the tables in the specified folder are shown by their filenames but without the filename suffix. The tasks for creating tables are not active. The tables themselves can be read but not written.
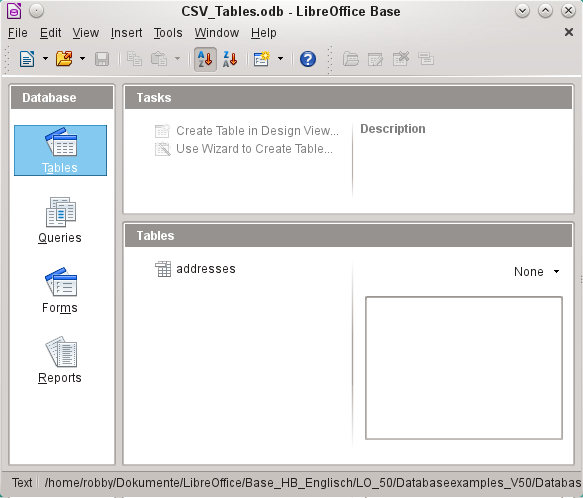
Access to the tables by queries is also limited to one table at a time and without the use of functions.
When such a database is used to search briefly in a *.csv file for records or to import a *.csv file into another database by using the copy function, it has fulfilled its purpose. The corresponding *.csv file is only moved into the specified folder and can be directly searched or copied. Such text databases are not suitable for more general use.
At some time, the old HSQLDB version used for internal databases will be replaced by an internal Firebird database. If you wish to see what Firebird can offer, here is the procedure for connecting to an external Firebird database.
As the documentation is not as comprehensive as for MySQL or PostgreSQL, here are the most important steps in installation.
Linux provides Firebird packages through its package managers. After installation, the server must be set up. The following steps under OpenSUSE 12.3 link to a functioning Firebird database:
1) Sysdba is the username for the administrative account. The default password is masterkey. This should be changed in a production environment.
2) To change the password in a terminal:
gsec -user sysdba -pass masterkey -mo sysdba -pw newpassword
3) To get to a functioning database, you need administrator rights on the computer. The system user firebird must have a password assigned to it.
4) The firebird user logs on at the console:
su firebird
5) A new user is created, shown here with the original default password for sdba:
gsec -user sysdba -pass masterkey -add lotest -pw libre
This creates a new user with the name lotest and the password libre.
6) Next, still as superuser, create a database for the user. For this we use the auxiliary program isql-fb.
isql-fb
You see the following message:
Use CONNECT or CREATE DATABASE to specify a database
followed directly by the SQL> prompt. The appropriate entries are:
SQL> CREATE DATABASE 'libretest.fdb'
CON> user 'lotest' password 'libre';
If these tasks are carried out as the system administrator root, the database will not be assigned to the correct user when networked. The database must be entered as the firebird user in the firebird group. Otherwise the connection will not work later.
Choose the Firebird entry in Step 1 of the wizard. To make the connection, give the database name (dbname) and the host. Under some circumstances, it is necessary to give the fully qualified hostname including the domain name.
Figure 22: Setting up a direct connection
The user authentication (Step 3) is exactly the same as for MySQL.
When tables are being created, Base might suggest data types which the current Firebird installation cannot handle.
First you will need to embed the Jar-archive into LibreOffice. However, there is no archive called firebird-*.jar. The current JDBC driver can be found at http://www.firebirdsql.org/en/jdbc-driver/. The driver name begins with Jaybird...
Copy the archive jaybird-full-2.2.8.jar (or whatever the current version is) out of the zip file and place it either in the Java path of the installation or import it directly into LibreOffice as an archive. See the corresponding section on MySQL.
The following parameters are important when installing JDBC:
JDBC URL – jdbc:firebirdsql://host[:port]/<path_or_alias>
Driver bus name – org.firebirdsql.jdbc.FBDriver
In the above example this becomes the URL
jdbc:firebirdsql://localhost/libretest.fdb?charSet=UTF-8
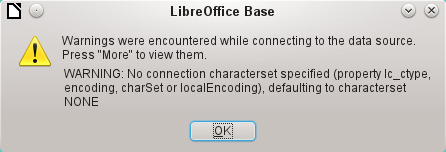
If you do not specify the character set, you will get this error:
When creating tables, take care that the formatting of corresponding fields (field properties) agrees from the beginning. Otherwise LibreOffice will set the default format for all numeric values, which, strangely enough, is a currency.
Subsequent alteration of field properties in tables are not possible but you can enlarge the table or delete fields.
First you must download the appropriate ODBC driver from http://www.firebirdsql.org/en/odbc-driver/. This driver is usually a simple file called libOdbcFb.so. This file is usually placed in a generally accessible path in the system. It must be executable.
In the odbcinst.ini and odbc.ini files, which are necessary to the system, the following entries are required:
[Firebird]
Description = Firebird ODBC driver
Driver64 = /usr/lib64/libOdbcFb.so
[Firebird-libretest]
Description = Firebird database libreoffice test
Driver = Firebird
Dbname = localhost:/srv/firebird/libretest.fdb
SensitiveIdentifier = Yes
In a Linux system, these two files are in the /etc/unixODBC folder. The variable SensitiveIdentifier must always be set to “Yes” so that entry into tables works when names and field definitions are not in upper case.
Tip
If for any reason the database has been opened but there is no access to the tables, you can use Tools > SQL to enter the SHUTDOWN SCRIPT command. The database can then be closed and reopened. This will not work if there has already been an error message Error in script file.
The records in the database are stored in the *.odb file in the subfolder database. Here there are two files called data and backup. If the data file is defective, it can be restored from backup. To do this, you must first edit the properties file, which is also in the database folder. It contains a line modified=no. Change this to modified=yes. That informs the system that the database was not correctly closed. When you restart, the compressed backup file will regenerate the data file.
Internal HSQLDB is indistinguishable from the external variant. If, as in the following description, the initial access to the database is from the outside, no server function is necessary. You just need the archive program which is supplied with LibreOffice. You will find it on the path under /program/classes/hsqldb.jar. The use of this archive is the safest solution, as you then get no version problems.
External HSQLDB is freely available for download at http://hsqldb.org/. When the database is installed, the following steps must be performed in LibreOffice:
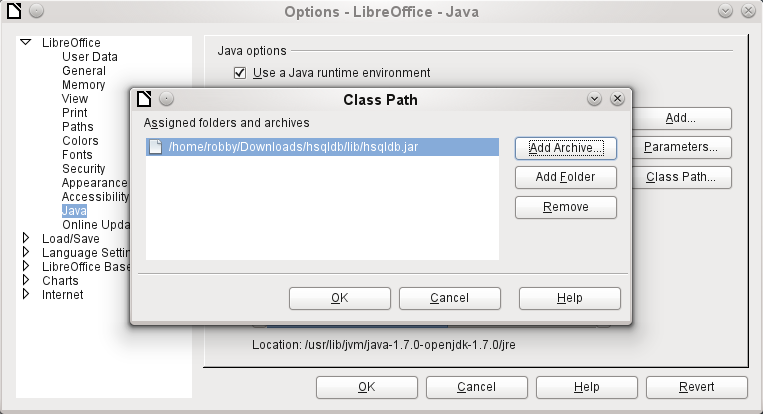
If the database driver does not lie on the Java-Runtime path, it must be entered as a Class Path under Tools > Options > Advanced.
The connection to the external database uses JDBC. The database file should be stored in a particular folder. This folder can be freely chosen. In the following example it is in the home folder. The rest of the folder path and the name of the database are not given here.
It is important, if data in the database are to be written using the GUI, that next to the database name the words ";default_schema=true" are written. This can be extended with ";shutdown=true", so that the database is shut down by LibreOffice.
So:
jdbc:hsqldb:file:/home/PathToDatabase/Databasename;default_schema=true;shutdown=true
In the folder you will find the files:
Databasename.backup
Databasename.data
Databasename.properties
Databasename.script
Databasename.log
The next step is to give the default user, if nothing in the HSQLDB configuration is to be changed:

This creates the connection and the database becomes accessible.
Caution
If an external database is edited with a version of HSQLDB 2.x, it can no longer be converted into an internal database under LibreOffice. This is because of additional functions that are not present in version 1.8.x. This terminates the invocation in the case of version 1.8.x while the script file of the database is being read in.
In the same way, an external database that has once been edited with a version of the second series cannot afterwards be edited with version 1.8.x, which is compatible with LibreOffice.
Including the external hsqldb.jar file in the class path can, in some versions, prevent internal databases from being opened. Base gets stuck because the drivers have the same name, and it tries to use the external driver for the internal database. This works the first time around. The second time, you get a message that the database cannot be opened as it was written with a newer version of HSQLDB.
To solve this problem, do not place the hsqldb.jar file, which is required for external databases, on LibreOffice’s class path. Instead the class path for this file should be set by a macro, as shown below.
SUB Start
Const cPath = "/home/robby/public_html/hsqldb_test/hsqldb.jar"
DIM oDataSource AS OBJECT
DIM oSettings AS OBJECT
DIM sURL AS STRING
sURL = ConvertToURL(cPath)
oDataSource = ThisComponent.DataSource
oSettings = oDataSource.Settings
oSettings.JavaDriverClassPath = sURL
END SUB
Here the hsqldb.jar file in a Linux system is on the path shown above. This path is passed to the database just opened as its driver file.
This macro is called just once after the *.odb file has been opened. It writes the corresponding connection to the Java class into the content.xml file in the *.odb archive:
<db:data-source-settings>
<db:data-source-setting
db:data-source-setting-is-list="false"
db:data-source-setting-name="JavaDriverClass"
db:data-source-setting-type="string">
<db:data-source-setting-value>
org.hsqldb.jdbcDriver
</db:data-source-setting-value>
</db:data-source-setting>
<db:data-source-setting
db:data-source-setting-is-list="false"
db:data-source-setting-name="JavaDriverClassPath"
db:data-source-setting-type="string">
<db:data-source-setting-value>
</db:data-source-setting-value>
</db:data-source-setting>
</db:data-source-settings>
Finally the Path could be written directly into content.xml without using a macro. However this method is not very comfortable for an ordinary user.
The only other known method requires installation of two versions of LibreOffice in parallel and modification of the bootstrap file for one of them. This method is also not very comfortable for an ordinary user.
Internal HSQL databases have the disadvantage that data storage involves a compressed archive. Only on compression are all the data finally written. This can more easily lead to data loss than when working with an external database. The following section shows the steps necessary to successfully change an existing database from an *.odb archive to an external version in HSQL.
From a copy of the existing database, extract the database folder. Copy the contents into an arbitrary folder as described above. Prefix the database name to the resultant filenames:
Databasename.backup
Databasename.data
Databasename.properties
Databasename.script
Databasename.log
Now the content.xml file must be extracted from the *.odb archive. Use any simple text editor to find the following lines:
<db:connection-data><db:connection-resource xlink:href="sdbc:embedded:hsqldb"/><db:login db:is-password-required="false"/></db:connection-data><db:driver-settings/>
These lines must be replaced with a connection to an external database, in this case a connection to a database with the name Union, in the hsqldb_data folder.
<db:connection-data><db:connection-resource xlink:href="jdbc:hsqldb:file:/home/robby/documents/databases/hsqldb_data/Union;default_schema=true"/><db:login db:user-name="sa" db:is-password-required="false"/></db:connection-data><db:driver-settings db:java-driver-class="org.hsqldb.jdbcDriver"/>
If, as described above, the basic configuration of HSQLDB was not damaged, the username and the optional password must also agree.
After changing the code, content.xml must be put back into the *.odb archive. The database folder in the archive is now surplus to requirements. The data will in the future be accessed through the external database.
For multi-user access, HSQLDB must be made available over a server. How the installation of the server is carried out varies depending on your operating system. For OpenSuSE, it is only necessary to download the appropriate package and to start the server centrally using YAST (runlevel setting). Users of other operating systems and other Linux distributions can likely find suitable advice on the Internet.
The home folder on the server (in SuSE, /var/lib/hsqldb) contains, among other things, a folder called data, in which the database is to be filed, and a file called server.properties, which controls the access to the databases in this folder.
The following lines reproduce the complete contents of this file on an example computer. It controls access to two databases, namely the original default database (which can be used as a new database) and the database that was extracted from the *.odb file.
# Hsqldb Server cfg file.
# See the Advanced Topics chapter of the Hsqldb User Guide.
server.database.0 file:data/db0
server.dbname.0 firstdb
server.urlid.0 db0-url
server.database.1 file:data/union
server.dbname.1 union
server.urlid.1 union-url
server.silent true
server.trace false
server.port 9001
server.no_system_exit true
The database.0 is addressed with the name firstdb, although the individual files in the data folder begin with db0. Another database was added as database.1. Here the database name and file begin identically.
The two databases are addressed in the following way:
jdbc:hsqldb:hsql://localhost/firstdb;default_schema=true
username sa
password
jdbc:hsqldb:hsql://localhost/union;default_schema=true
username sa
password
The suffix ;default_schema=true to the URL, which is necessary for write access using the Base GUI, is permanently included.
If you actually need to work on the server, you will want to consider if the database needs to be password-protected for security reasons.
Now you can connect to the server using LibreOffice.
With this access data, the server can be loaded on its own computer. On a network with other computers, you must give either the host name or the IP address to the server.
Example: A computer has the IP 192.168.0.20 and is known on the network by the name lin_serv. Now suppose there is another computer to be entered for connection to the database:
jdbc:hsqldb:hsql://192.168.0.20/union;default_schema=true
or:
jdbc:hsqldb:hsql://lin_serv/union;default_schema=true
The database is now connected and we can write into it. Quickly, however, an additional problem appears. The previously automatically generated values are suddenly no longer incremented. For this purpose we need an additional setting.
To use autovalues, different procedures for table configuration are needed according to the version of LibreOffice. Common to all of them is the following entry under Edit > Database > Advance settings:
Adding GENERATED BY DEFAULT AS IDENTITY(START WITH 0) causes the function of the automatically incrementing values for the primary key to be set. The GUI in LibreOffice takes up this command, but unfortunately prefixes the statement with NOT NULL, so that the command sequence for HSQLDB is not readable. Here you must ensure that HSQLDB is sent the above command so that the corresponding field will contain the primary key.
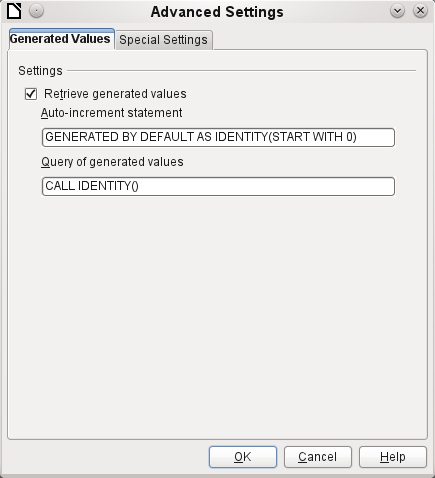
In all versions of LO, reading out the latest value and incrementing to the next uses the CALL IDENTITY() command. This allows you to create a mini-*.odb file, test it thoroughly, and then simply remove the tables.
All the queries, forms, and reports will still be usable, as the database for the *.odb file is still accessed in the same way, and the specific SQL commands can be used for the (real) external HSQLDB database.
Especially with connections to external databases, a connection may not function quite as desired. The character set may not be correct, or subforms may not function without errors, or something in the underlying parameters needs to be changed.
The following screenshots illustrate how you might change the connection parameters for an external PostgreSQL database.
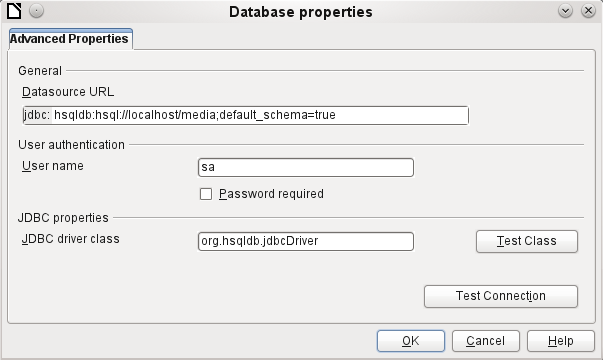
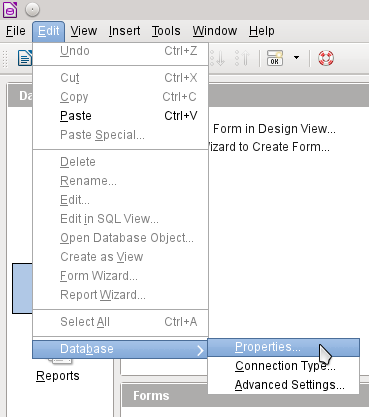
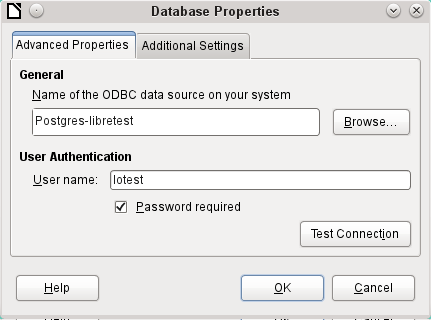
Under Edit > Database, you will find the choices Properties, Connection type, and Advanced settings. Choose Properties.
If the name of the data source has changed, it can be changed here. For an ODBC connection, the name by which the database is called up is set out in the odbc.ini file. The name is usually not quite the same as the actual database name in PostgreSQL.
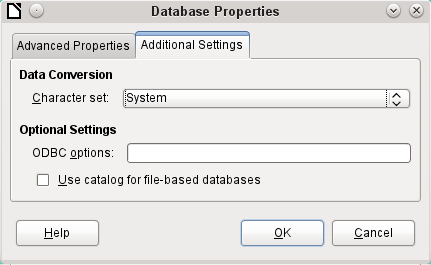
Is there a problem with the character set? These problems can be solved using the second tab of the dialog.
An additional special configuration of the driver is possible if a parameter should need to be implemented that is not currently in the odbc.ini file.
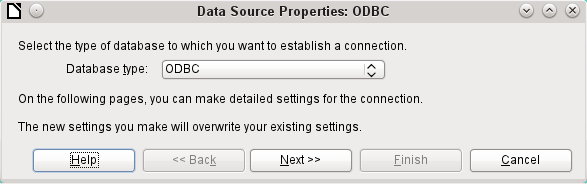
If the connection type is selected, the whole contact with the data source can be altered. The following steps are similar to those in the Database Wizard from step 2 onward. So, for example, you can change from ODBC to JDBC or a direct connection with LibreOffice’s internal driver. This is useful if you are doing preliminary tests to determine which connection method is most suitable for a project.
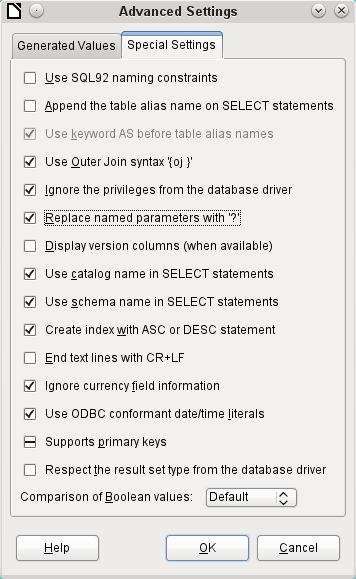
According to the database system, there are different commands to create automatically incrementing values. If you need to do something of this sort which is not currently possible with this driver, then you will need to do it by hand. This will require a command for creating an AutoValue field and also one to query the most recent value.
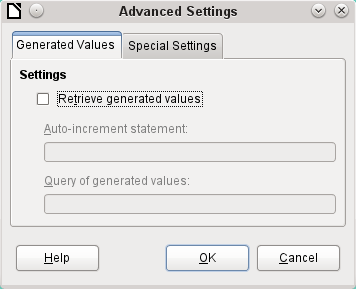
The special settings accessible through Tools > Database > Advanced Settings affect the interaction of external databases with Base in various ways. Some settings are grayed out as they cannot be changed in the underlying database. In the above example Replace named parameters with ? has been checked. It has been shown that otherwise the transmission of values from a main form to a subform in PostgreSQL does not work. Only with this setting does the form construction in Chapter 4, Forms, work correctly.