
Base Guide 7.2
Chapter 7
Linking to Databases
This document is Copyright © 2021 by the LibreOffice Documentation Team. Contributors are listed below. You may distribute it and/or modify it under the terms of either the GNU General Public License (https://www.gnu.org/licenses/gpl.html), version 3 or later, or the Creative Commons Attribution License (https://creativecommons.org/licenses/by/4.0/), version 4.0 or later.
All trademarks within this guide belong to their legitimate owners.
|
Pulkit Krishna |
|
|
|
Robert Großkopf |
Pulkit Krishna |
Jost Lange |
|
Dan Lewis |
Hazel Russman |
Jochen Schiffers |
|
Jean Hollis Weber |
|
|
Please direct any comments or suggestions about this document to the Documentation Team’s mailing list: documentation@global.libreoffice.org.
Note
Everything you send to a mailing list, including your email address and any other personal information that is written in the message, is publicly archived and cannot be deleted.
Published December 2021. Based on LibreOffice 7.2 Community.
Other versions of LibreOffice may differ in appearance and functionality.
With Base, you can use documents in LibreOffice Writer and Calc in various ways as data sources. This means that the use of Base is not necessarily tied to the registration of databases in the configuration of LibreOffice. External forms can also interact directly with Base, provided that the path to the data sources is supplied.
Many functions, such as printing labels or using data for form letters, require the registration of a database in the configuration of LibreOffice.
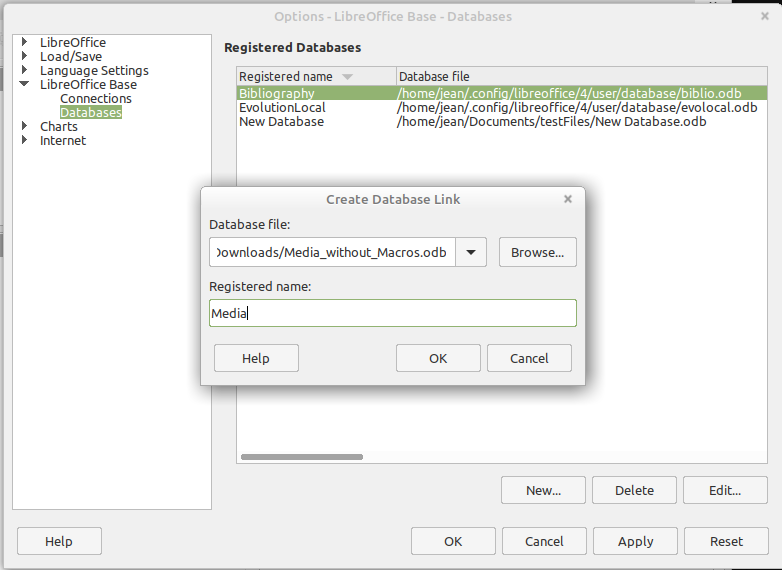
Using Tools > Options > LibreOffice Base > Databases > New, you can register a database for subsequent use by other LibreOffice components.
Find the database using a file browser and connect it to LibreOffice in a similar way as for a simple form. Give the database itself a suitably informative registered name, for example the name of the database file. The name serves as an alias, which can also be used in queries to the database.
The data source browser in Writer and Calc provides access to tables and queries of all registered databases under their registered names. To open the browser, use View > Data Sources, or press the Ctrl+Shift+F4 keys, or click the icon on the Standard toolbar.
The Data Sources icon is not usually visible on the Standard toolbar. To make it visible, right-click the Save button to open this toolbar. Scroll down to Visible Buttons. This opens a list of all of the buttons. Scroll down to near the bottom to find the Data Sources button. Click it to make it visible at the right end of the toolbar.
Tip
If you are using a laptop, you may need to press Ctrl+fn+shift+F4. The fn key (function) permits the use of the F keys for more than one feature.
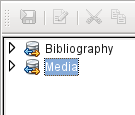
Figure 1: Data Sources Button

Registered data sources are shown on the left side of the data source browser, which is located by default at the top of the workspace. The Bibliography data source is included in LibreOffice by default. Other data sources are listed by their registered names.
Click on the expansion sign in front of the database name to open the database and show sub-folders for queries and tables. Other sub-folders of the database are not made available here. Internal forms and reports can only be accessed by opening the database itself.
Only when you click on the Tables folder is the database actually accessed. For databases protected by a password, the password must be entered at this point.
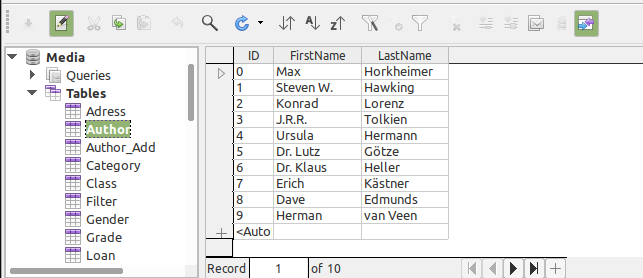
To the right of the name tree, you can see the table you have selected. It can be edited just as in Base. However, direct entry into tables should be carried out with caution in very complex relational databases, as the tables are linked together with foreign keys. For example, the database shown below has separate tables for street names, postcodes, and towns.
For a proper view of the data (but without the ability to edit), queries or views are more suitable.
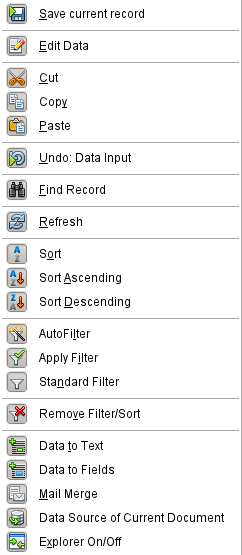
Many of the icons in the toolbar (Figure 2) will be familiar from data entry into tables. (The icons on your display may be different from those shown in the figure.)
The main new icons are those in the last section: Data to Text, Data to Fields, Mail Merge, Data Source of Current Document, Explorer On/Off. Their use is described below, using the Reader table of the Media database.
Figure 2: Data source browser toolbar
Tip
With this method, data can be inserted directly into specific places in a text document or specific cells of a spreadsheet. While the data could be typed into these locations, inserting it guarantees the accuracy of it. This is important when using mail merge which is discussed later.
When sending the same document to different people, this guarantees all will receive the exact same data.
Select one or more records to activate the Data to Text and Data to Fields functions.
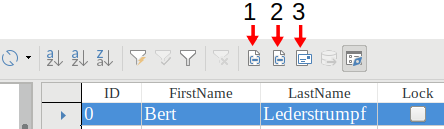
|
1 |
Data to Text |
2 |
Data to Fields |
3 |
Explorer On/Off |
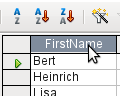
Figure 3: Select a data record
If you now choose Data to Text, a Wizard appears to carry out the necessary formatting (Figure 4).
The three choices for entering data as text are: as a table, as single fields, or as ordinary text.
Figure 4 shows the option Insert Data as Table. In the case of numeric and date fields, the database format can be changed to a chosen format. Otherwise, formatting is carried out automatically when the table fields are selected. The sequence of fields is adjusted by using the arrow keys.
Figure 4: Data entry as table
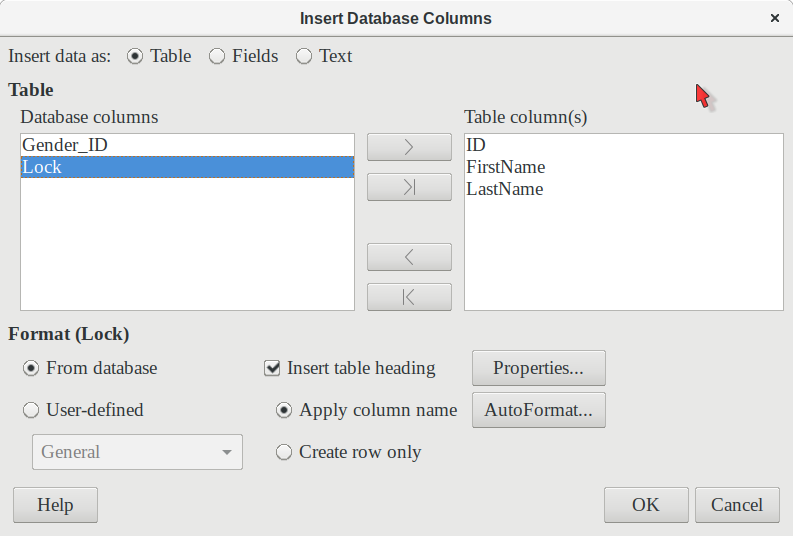
As soon as table columns have been selected, the Properties button for the table is activated. This allows you to set the usual table properties for Writer (table width, column width, and so on).
The Insert table heading checkbox determines if a table heading is required. If it is not checked, no separate row will be reserved for headings.
The row chosen for the table heading can be taken from the column names, or the record may be written out with space left for the headings to be edited in later. Choose the Create row only option.
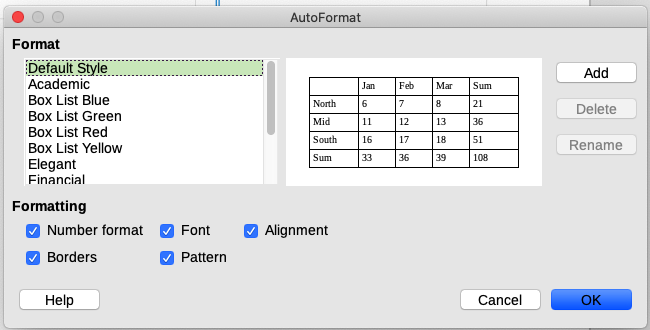
You can use the AutoFormat button to open a dialog with several pre-formatted table styles. Apart from the suggested Default Style, all the formats can be renamed. (You can also add autoformats; to do this, first create a table in the required format. Then select the table and click the Add button to add its format to the list.) You can also format the table in Writer by selecting it and choosing a format from the Table Styles list in the Styles deck of the sidebar; the list of table styles is the same as the list of formats in the AutoFormat dialog.
To create the table with the selected records and columns, click OK in the Insert Database Columns dialog.
Figure 5: The AutoFormat dialog provides a choice of table formats
Insert Data as Fields provides the possibility of using a mini-editor to position the various table fields successively in the text. The text created in this way can also be provided with a paragraph style. In this case too, the formatting of dates and numbers can be specified separately, or can be read directly from the table settings in the database.
Figure 6: Insert data as Fields – corresponds also to the dialog for Insert data as Text
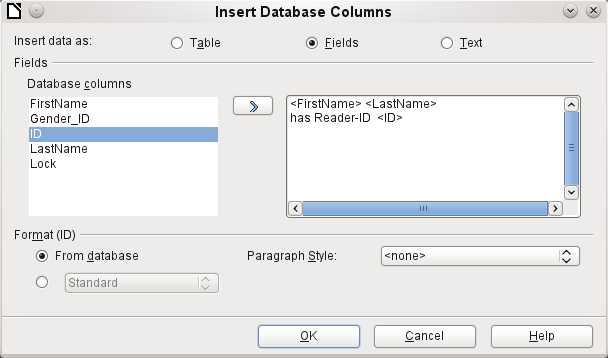
The fields inserted into the text in this way can subsequently be deleted singly or used for a mail merge.
If you choose Insert data as Text, the only difference from using fields is that fields remain linked to the database. When you insert as text, only the content of the specified fields is transferred and not the link to the actual database.
The results of the two procedures are compared below.
Figure 7: Comparison of Data as Fields and Data as Text
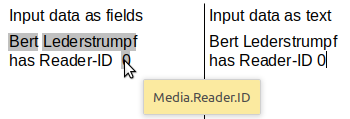
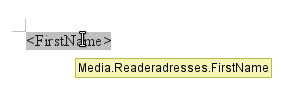
The fields have a gray background. If you hover the mouse cursor over the fields, a tooltip shows that the fields are linked to the Media database, to the Reader table and, within this table, to the ID field.
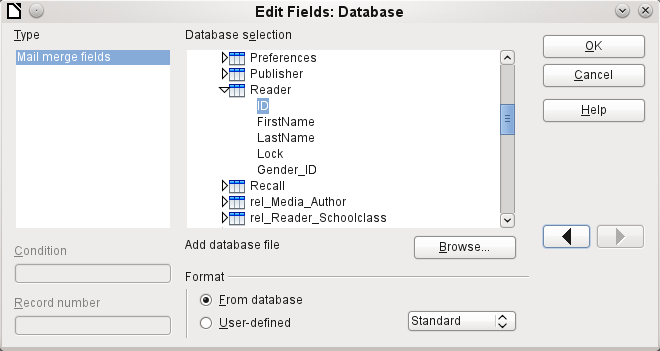
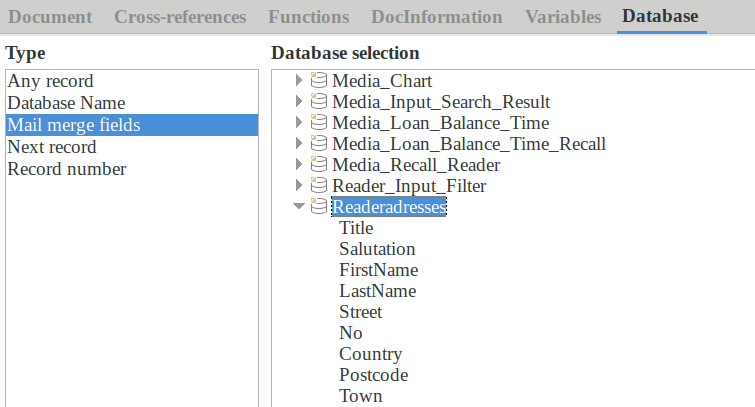
So, for example, a double-click on the ID field opens the following overview. This makes it clear which field was created through the Insert Data as Fields procedure. It is the same field type that is shown by Insert > Fields > More Fields > Database.
It is simpler to create such a field by selecting the column header of the table in the data source browser and dragging it into the document with the mouse. You can create a form letter directly in this way.
Figure 8: Double-click on an inserted field to show the properties of the Mail Merge fields
Tip
This method is useful when sending a document to several people in which each will be sent some data that is specific only for them. This is done through mail merge.
For example, libraries send out notices to people listing the media they have borrowed and not returned on time. The list will usually be different for each person, but all will receive a warning of some kind. Of course, the type of warning will depend upon the length of time since the media was due. Everyone who falls with a particular time period will receive the same warning.
To insert data to fields (see Figure 4):
1) Click on the left of one of the test rows to highlight it.
2) Click the Data to Text button to open the Insert Database Columns wizard.
3) Choose the option button, Fields.
4) Move the fields of the database that you want to use from the left list to the right one in the order you desire. Text can be added as well as in Figure 6.
5) To apply a specific paragraph style to these fields, select it from the Paragraph styles drop-down list.
6) Click OK.
Tip
Inserting data to text is done the same way as inserting data to fields. The only difference is whether you select Text or Fields respectively. The difference is in the appearance in the document or spreadsheet as shown below. The left one is data to text; the right one is data to fields.
Tip

Once a field has been inserted, the values it displays can be changed. Select the record (row) with ID = 1 and then click the Data to Fields button.

The Mail Merge button launches the Mail Merge Wizard. A form letter assembles its data from different tables, so you need first to launch the database. In the database, you then create a new query to make the required data available.
Figure 9: Mail merge wizard button

To launch the database, right-click on the database itself or on one of its tables or queries; this immediately refreshes the display in the data source browser. After that the Mail Merge Wizard can be called up by clicking the corresponding button.
Click on the Data Source of Current Document button to open a direct view of the table which forms the basis for the data inserted into the document. In the above example, the Reader table from the Media database appears.
Toggling the Explorer On/Off button shows or hides the directory tree on the left of the table view. This allows more space, if necessary, for a display of the data. To access another table, you need to switch the Explorer back on.
The Mail Merge Wizard is also accessible from the database browser. This Wizard allows the address field and the salutation to be constructed from a data source in small steps. In principle you can create these fields without using the Wizard. Here we will work through the steps of the Wizard as an example. The following steps use the Wizard to do this. This time, a query will be the data source, specifically Media’s Readeradresses. Search for it in the Query drop-down list as you did earlier for the Reader table in the Table drop-down list.
Tip
Remove any text document in Writer if it has links to a database. You can not establish a new link to that document when the old one is still active. Begin with a new document, which can be untitled, or a template letter that contains no links.
The Starting document for the form letter is the document to which the database fields will be linked.

The Merged document is the one containing the data for the various people who are to receive the form letters. In the merged document there is no linkage to the data source. It is similar to the output of Insert Data as Text.
The Mail Merge Wizard can produce either letters or emails using records from the database. In this example we will create letters using the Reader table of the Media database.
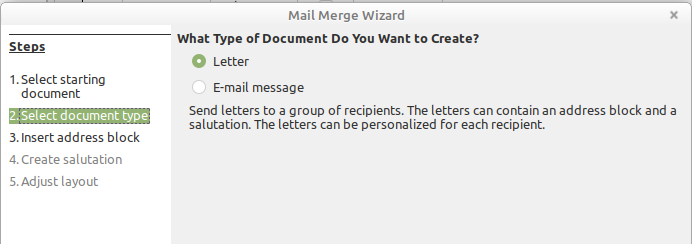
Figure 10: Insert address block
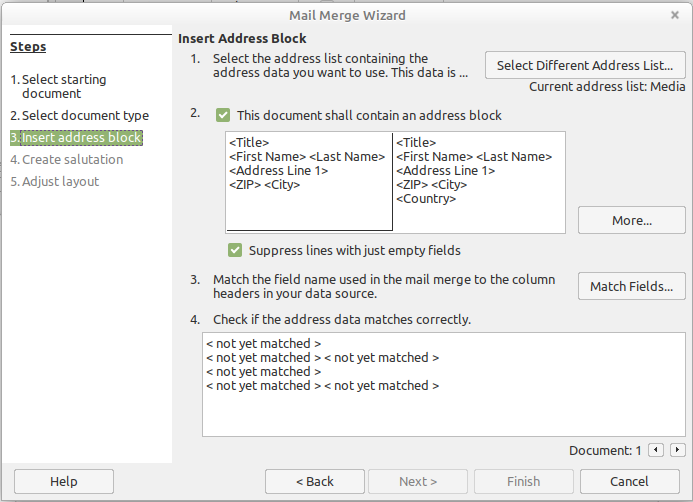
The entry of the address block allows the most extensive configuration. The suggested address list comes from the currently selected query or table in the currently selected database.
Step 2 determines the overall look of the address block, which can be customized further by clicking the More button. See Figure 10. The left Address is already selected, and this block will be used.
One element needs to be added: <Address Line 2>. To do this:
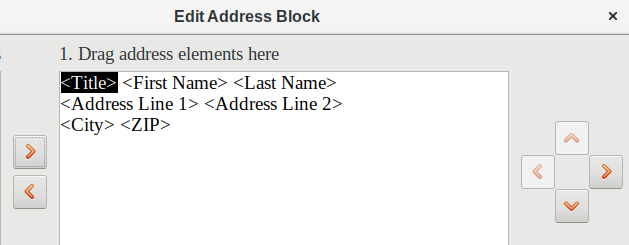
1) Click the More button.
2) Drag the <Address Line 2> element in the Address elements list to place it to the right of <Address Line 1>.
3) If there is not a space between these two elements, click the right arrow on the right side of the dialog to create the space.
4) Click OK.
5) Select Address Block: click OK.
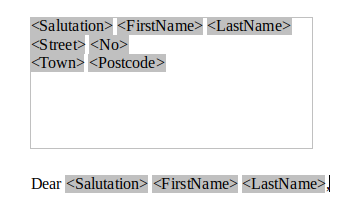
The <Title> element needs to be moved down one line placing it before <First Name> <Last Name>. Make sure to put a space between <Title> and First Name>. Use the four arrows on the right to move first <Last Name> and then <First Name>.
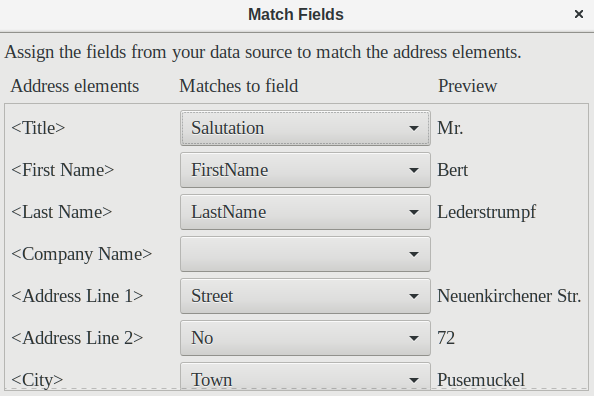
Step 3 serves to link the named fields in the address block to the correct fields in the database. The Wizard initially recognizes only those database fields which have exactly the same names as those the Wizard uses. In this example, none of the fields do match, so all will have to be selected from the drop-down lists in this step.
For <Title>, select Salutation.
For <FirstName> select First Name.
For <LastName> select Last Name
For <Address Line 1> select Street.
For <Address Line 2> select No.
For <City> select Town.
For <Zip> select Postal code.
Here the address elements are associated with the corresponding elements from the query of the database successfully transferred by the Mail Merge Wizard. Again the first record in the query is used for the preview.
The database settings are essentially ended with Step 4. Here, it is just a matter of choosing which field the gender of the recipient should be taken from. This field has already been named, so that only the field content for a female recipient still needs to be specified.
Note
Because the wizard has a bug at this point, the personal salutation is created using Data to Text as described above. Specifically, the field, Salutation, will provide the proper title for each person. The rest of the salutation is created by typing it onto the merge document.
1) To finish this page, uncheck Insert personalized salutation.
2) Make no change in the General salutation. It will be replaced later, but it is needed to identify where the salutation should be in the letter.
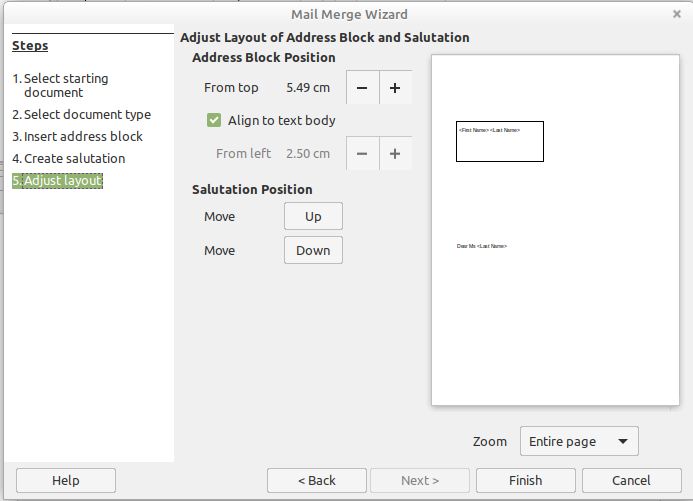
Click Next >. In Step 5, you can adjust the position of the address block and salutation on the page. (See Figure 11.) Then click Finish.

Figure 11: Adjusting the layout of the form letter
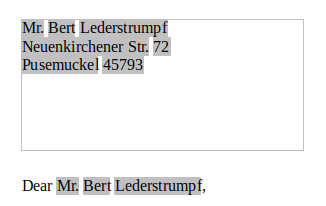
Now to finish the layout on the mail merge document. It contains the Address Block fields where you have placed them.
Now use Data to Text to replace the salutation.
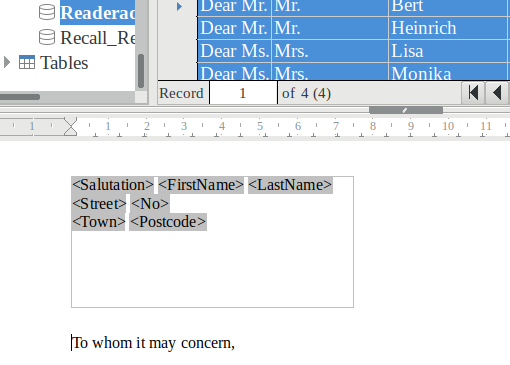
1) Replace To whom it may concern with Dear.
2) Drag-and-drop <Salutation> to one space after Dear.
3) Drag-and-drop <FirstName> to one space after <Salutation>.
4) Drag-and-drop <LastName> to one space after <FirstName>.
Select the top record in the Data Source window at its beginning. Then click the Data to Text button to see data entered into the fields.
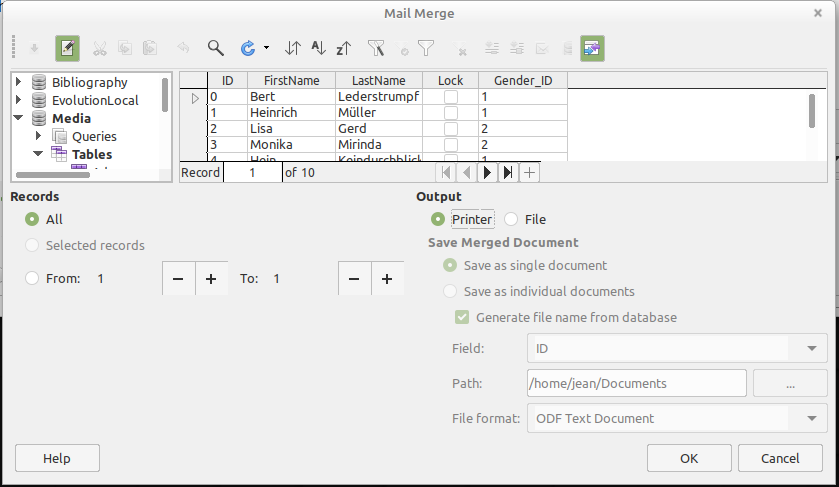
You now have a Writer document into which you can type the contents of the letter. To merge the fields and print the letters, choose File > Print from the Menu bar. The following message pops up. Click Yes.
The Mail Merge dialog (Figure 12) is now displayed, where you can optionally select records to include or exclude, and choose to print the letters or save them to a file. For more details, see the Mail Merge chapter in the Writer Guide.

Figure 12: Mail Merge dialog
File > New > Labels launches the Labels Wizard. It opens a dialog, which includes all questions of formatting and content for labels, before the labels themselves are produced. The settings in this dialog are saved in the personal settings for the user.
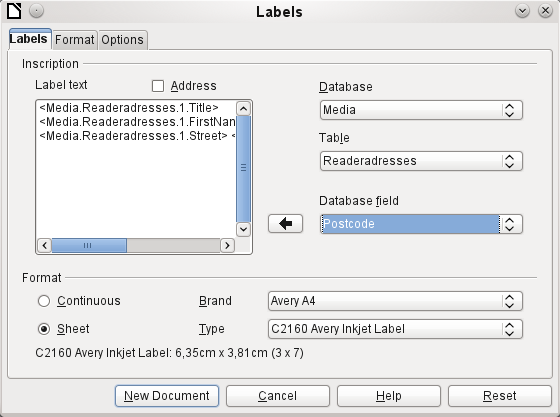
The basic settings for the content are in the Labels tab (Figure 13). If for Label text you check the Address box, all the labels will have the same content, taken from the LibreOffice settings for the user of the program.
As an example, we will again use the Addresses database. Although the next selection field is headed Tables, Tables and Queries are both listed here, just as in the data source browser.
Use the arrow buttons to insert individual database fields into the editor. The name for the database field Surname is set here to <Addresses.MailMergeQuery.1.Surname>. The sequence is thus <database.Table.1.database field>.
You can work with the keyboard in the editor. So for example, you can insert a line break at the beginning, so that the labels will not be printed directly on the top edge but the content can be printed as completely and clearly visible.
The format can be selected in the Labels tab. Here many label brands are incorporated so that most other settings in the Format tab are not necessary.
Figure 13: Labels tab of Labels dialog
Use the Format tab (Figure 14) to set the label size accurately. The settings are only significant when the make and type of the labels is not known. Note that, to print labels 7.00 cm wide, you need a page width a little bigger than 3*7.00 cm = 21.00 cm. Only then will three labels be printed in a row on the page.
Figure 14: Format tab of Labels dialog

On the Options tab you can specify whether only a single label or a whole page of labels will be produced. The page will then be filled with data from successive records of the database, beginning with the first record. If there are more records than will fit on the page, the next page will automatically be filled with the next set of records.
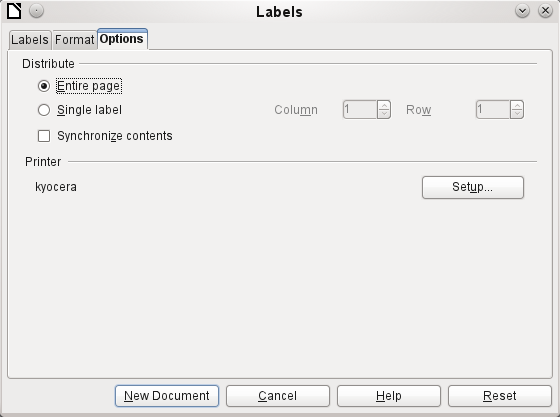
The Synchronize contents checkbox links all the labels together so that subsequent changes in layout of any label will be applied to all the others. To transfer the edited content, use the Synchronize button, which appears during label production if you have selected this checkbox.
Use the New Document button to create a document containing the selected fields.
When you initiate the printing process, the following question appears (as for form letters):
Choose Yes to fill the address database fields with the corresponding content.
The source of the data for the label printing is not found automatically; only the database is pre-selected. The actual query must be specified by the user, because in this case we are not dealing with a table.
When the query is selected and the corresponding records chosen (in this case All), the printing can begin. It is advisable, especially for the first tests, to choose Output to a File, on the Mail Merge dialog (Figure 12), which will save the labels as a document. The option to save in several documents is not appropriate for label printing but rather for letters to different recipients which can then be worked on subsequently.
Instead of using the Wizard, you can produce mail merge and label documents directly.
Mail merge fields can be taken from the database browser using the mouse.
Select the table header with the left mouse button. Hold the button down and drag the cursor through the text document. The cursor changes its shape to an insert symbol. The MailMerge field is inserted into the text document, here shown in the complete description which is made visible using View > Field names.

Mail merge fields can be inserted using Insert > Field > More Fields > Database.
Here all tables and queries in the selected database are available. Using the Insert button, you can insert the various fields one after another directly into the text at the current cursor position.
If you want to create a salutation, which is usual in form letters, you can use a hidden paragraph or hidden text: Insert > Fields > More Fields > Functions > Hidden paragraph. For both variants take care that the condition you formulate will not be fulfilled, since you want the paragraph to be visible.
For the formula Dear Ms <Surname>, to appear only when the person is female, a sufficient condition is:
[Media.Readeraddresses.Salutation] ! = "Mrs."
Now the only remaining problem is that there may be no surname. Under these circumstances, "Dear Sir/Madam," should appear so this is the condition you must insert. The overall condition is:
[Media.Readeraddresses.Salutation] ! "Mrs." OR NOT
[Media.Readeraddresses.Salutation]
That excludes the possibility of this paragraph appearing when the person is not female or there is no entered surname.
In the same way you can create entries for the masculine gender and for missing entries for the two remaining types of salutation.
Naturally you can create a salutation in the address field in exactly the same way, wherever the gender is specified.
Further information is given in the LibreOffice Help under Hiding Text and Conditional Text.
Of course it would be still simpler if someone who understands databases were to put the whole salutation right into the query. This can be done using a correlated subquery (see Chapter 5, Queries, in this book).
Particularly interesting for labels is the field type Next record. If this field type is chosen at the end of a label, the next label will be filled with data from the following record. Typical labels for sequential label printing look like the following figure when you use View > Field Names to make the corresponding field designations visible:
Figure 15: Field selection for labels with sequential content

For the last label on the page, you must allow for the fact that the next record is automatically called up following a page break. Here the field type Next record should not occur. Otherwise a record will be missed out because a double record jump occurs.
Tip
Creating mail merge letters is also possible directly from a database form. The only requirement is that the database be registered in LibreOffice.
When a mail merge is carried out, be sure to choose View > Normal. This ensures that the elements are correctly positioned on the page. If a form is then printed, the usual mail merge query appears.
This type of mail merge has the advantage that you do not need any files other than the *.odb file in order to print.
If simple form properties available in LibreOffice are to be used in other components such as Writer and Calc, you only need to display the Form Design toolbar, using View > Toolbars > Form design, then open the Form Navigator. You can build a form or, as described in Chapter 4, Forms, create a form field. The Data tab of the Form Properties dialog looks a little different from the one you see when forms are built directly in an ODB database file.
Figure 1: Form with an external data source
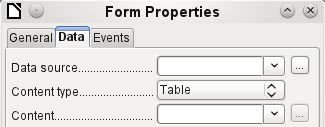
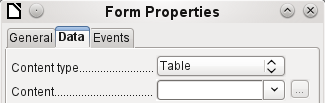
Figure 2: Form with an internal data source.
The Data source must be selected separately when using an external form. Use the button to the right of the data source listbox to open the file browser. Any ODB file can be selected. In addition, the field for the data source contains a link, beginning with file:///.
If instead you look in the listbox contents, you will see databases already registered in LibreOffice under their registered names.
The forms are created in exactly the same way as in Base itself.
The forms produced in this way are by default shown in edit mode each time the file is opened, not write-protected as in Base. To prevent accidental modification of the form, you can use File > Properties > Security to open the file read-only. You can even protect the file from alteration using a password. In office systems, it is also possible to declare the whole file as write-protected. This still allows entry into the fields of the form, but not movement of fields or the entering of text between them.
Tip
Forms can also be rapidly created by using drag and drop. To do this, open the database, find the relevant table or query, and select the table headers.
In Writer, select appropriate field headings with the left mouse button, hold down the Shift and Ctrl keys, and the mouse cursor will turn into a link symbol. Then drag the headings into the Writer document.
You can drag the fields into Calc files without the use of the additional keys. The copy symbol appears as a mouse cursor.
In both cases an entry field is created with the associated label. The link to the data source is created with the first actual entry of data, So data entry into such a form can commence immediately after the drag-and-drop operation.
Advantages of external forms
Disadvantages of external forms
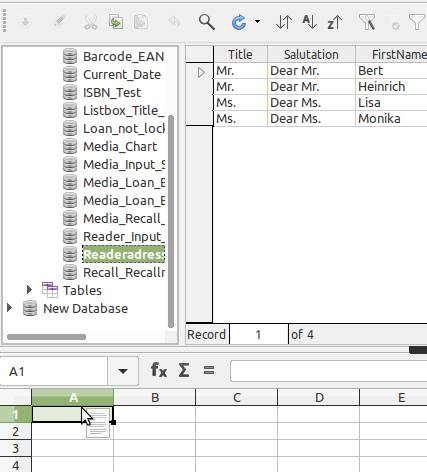
Data can be used in Calc for calculation purposes. For this purpose it is first necessary to make the data accessible in a Calc worksheet.
There are various ways of entering data into Calc.
Select a table with the left mouse button and drag it into a Calc worksheet. The cursor sets the left upper corner of the table. The table is created complete with field names. The data source browser in this case does not offer the options of Data to Text or Data to Fields.
Data dragged into Calc in this way shows the following properties:
Not only the data are imported, but the field properties too are read and acted on during the import. Fields such as house numbers, which were declared as text fields, are formatted as text after insertion into Calc.
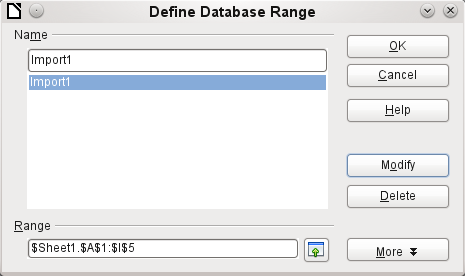
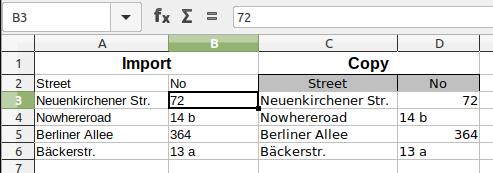
The import becomes a Calc range, which by default is assigned the name Import1. The data can later be accessed using this range. Data > Refresh range allows the range, where appropriate, to be supplied with new data from the database.
The imported data is not formatted except as the properties of the database fields require.
-
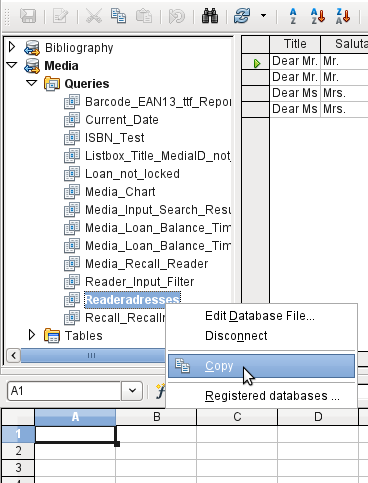
You can also use the context menu of a table to make a copy of the data. In this case, however, there is no import but merely a copy. The properties of the data fields are not read with them but are determined by Calc. In addition the field names are formatted as table headers.
You see the difference especially in database fields that are formatted as text. On import, Calc turns these into text fields, which are aligned to the left like other text. These numbers can then no longer be used in calculations.
If you export them again, the data remain as they were.
Tip
Importing data into Calc overwrites the previous contents and also any previous formatting. If data is to be exported consistently into the same table, you should use a separate sheet for data import. The data are then read into the other sheet by using the term tablename.fieldname. The fields in this sheet can be formatted suitably without risk of the formatting being overwritten.
Tip
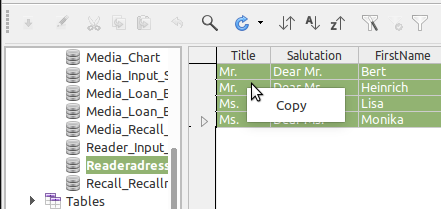
Records can also be copied directly from the database using the clipboard, or by drag and drop using the mouse. If a table or query is dragged into a Calc spreadsheet, the whole of the content is inserted. If the table or query is opened and one or more records selected, only these records together with the field names are copied when you drag them over.
Select the data in the Calc worksheet. Hold the left mouse button down and drag the data that you want to turn into a database into the table area of the database browser.
The cursor changes its appearance, showing that something can be inserted.
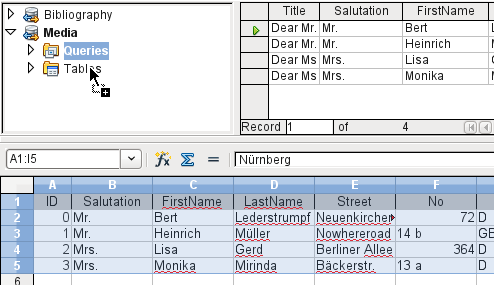
The first window of the Import Wizard opens. The further steps with the wizard are described in Chapter 3, Tables, in the section “Importing data from other sources”.
In the explorer of the data source browser, tables can be copied from one database to another by selecting the source table with the left mouse button, holding the button down, and dragging it into the target database in the table container. This causes the dialog for copying tables to be displayed.
In this way, for example, read-only databases (data sources such as address books from an email program or a spreadsheet table) can be used as a basis for a database in which the data become editable. Also data can be directly copied when changing to another database program (for example changing from PostgreSQL to MySQL).
If you wish the new database to have different relationships from the original one, you can arrange this by using appropriate queries. Those who are not sufficiently expert can instead use Calc. Just drag the data into a spreadsheet and prepare them for import into the target database using the facilities that Calc provides.
For the cleanest possible import into a new database, the tables should be prepared in advance. This allows problems of formatting and those involving the creation of primary keys to be recognized well in advance.
If records are available in tabular form, they can be inserted into Base using the clipboard and the wizard.
In Base, a right-click on the destination table begins the import. In the context menu under Copy are the commands Import and Import content. If you choose Paste, the Import Wizard will have already selected the table and Append data. Paste special gives only a query for an import filter. The available options are HTML and RTF.
If instead you right-click in the table container, the Import Wizard gives you only the choice of creating a new table.
If you want to import data from various external sources, it is best to choose a format that prevents your form from being modified during data entry. Using Writer, you can create forms in PDF format, put them online, and have the completed forms returned to you, for example as email attachments. All that is lacking is the simplest possible entry of the data into Base. The example illustrates such a means of import.
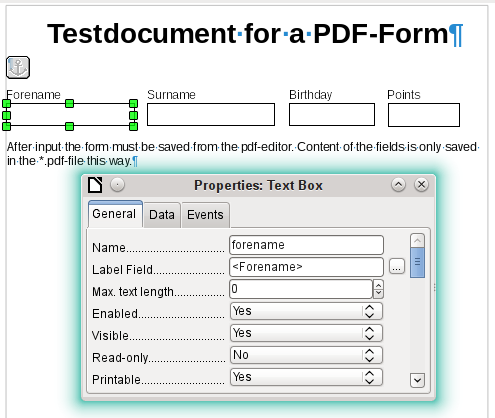
A PDF form is created as an external form with no link to the database. Using View > Toolbars > Form Controls, the necessary elements for the form are displayed and can be inserted as required.
Unfortunately PDF format makes no distinction between numeric fields, date fields, and text fields. For the example provided here, it is sufficient to use text fields for all the entries. Other field formats within the Writer form will inevitably be lost during PDF export.
Basically PDF forms can have the following fields:
Buttons
Text fields
Checkboxes
Comboboxes
Listboxes
The test form contains a total of 4 text fields. In Properties: Text box > General > Name, you should always choose the field name used in the database table when using the following import method in order to avoid problems with field names and field content.
Help messages are shown when the records are read, but do not appear in every PDF viewer.
To ensure that the form actually contains the records, it should be saved in the PDF viewer after data input, using the File > Save as menu option. The actual command for doing this might vary between viewers. Without this procedure, the viewer will show the records after the form has been opened on your own computer, but it actually reads them from the viewer’s temporary storage file and not directly from the PDF file. If the form is then transferred to another computer, it will be empty.
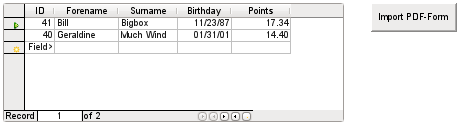
The form for the Base database is very simple in appearance. It is linked to the table and shows the records that have just been read in. The most recent entries are shown in the table control above.
The macro for reading the records in is entered under Properties: Button > Events > Execute Action.
To read the records out, we use the open source program pdftk. The program is freely available for both Windows and Linux. Linux distributions mostly have it as a package in their repositories. Windows users will find it at https://www.pdflabs.com/tools/pdftk-the-pdf-toolkit/
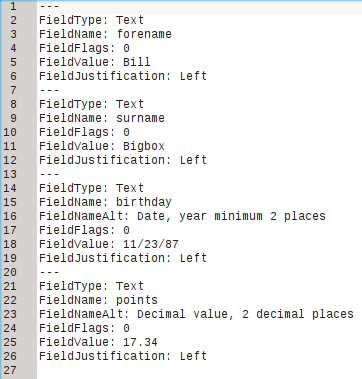
The records read out using pdftk are written into a text file, which looks like this:
Each field is represented by five to six lines in the file. For the macro, the important lines are FieldName (should be the same as FieldName in the destination table), FieldValue (content of the field after saving the PDF file), and FieldJustification (last line of the entry).
The whole import process is controlled by macros. The PDF form needs to be on the same path as the database. The records are read out of it into the text file, and then read into the database from this text file. This continues for all the PDF files in the folder. Old records should therefore be removed from the folder as far as possible, because the function does not check for duplication.
SUB PDF_Form_Import(oEvent AS OBJECT)
DIM inNumber AS INTEGER
DIM stRow AS STRING
DIM i AS INTEGER
DIM k AS INTEGER
DIM oDatasource AS OBJECT
DIM oConnection AS OBJECT
DIM oSQL_Command AS OBJECT
DIM oResult AS OBJECT
DIM stSql AS STRING
DIM oDB AS OBJECT
DIM oFileAccess AS OBJECT
DIM inFields AS INTEGER
DIM stFieldName AS STRING
DIM stFieldValue AS STRING
DIM stFieldType AS STRING
DIM stDir AS STRING
DIM stDir2 AS STRING
DIM stPDFForm AS STRING
DIM stFile AS STRING
DIM stTable AS STRING
DIM inNull AS INTEGER
DIM aFiles()
DIM aNull()
DIM stCommand AS STRING
DIM stParameter AS STRING
DIM oShell AS OBJECT
After the variables have been declared, the number of fields in the PDF form is given. The count begins at 0, so a value of 3 actually means a total of four fields. Using this count, it can be determined if all the data for a record has been read, so that it is ready to be transferred into the table.
inFields = 3
stTable = "Name"
oDatasource = ThisComponent.Parent.CurrentController
If NOT (oDatasource.isConnected()) THEN
oDatasource.connect()
END IF
oConnection = oDatasource.ActiveConnection()
oSQL_Command = oConnection.createStatement()
The database connection is made. The path to the database file in the file system is read. Using this path, the contents of the folder are read into the array aFiles. A loop checks each filename in the array to see if it ends in .pdf. Upper and lower case are not distinguished, as the results of the search are all converted into lower case using Lcase.
oDB = ThisComponent.Parent
stDir = Left(oDB.Location,Len(oDB.Location)-Len(oDB.Title))
oFileAccess = createUnoService("com.sun.star.ucb.SimpleFileAccess")
aFiles = oFileAccess.getFolderContents(stDir, False)
FOR k = 0 TO uBound(aFiles())
IF LCase(Right(aFiles(k),4)) = ".pdf" THEN
stDir2 = ConvertFromUrl(stDir)
stPDFForm = ConvertFromUrl(aFiles(k))
To determine the command for reading out the data, it is necessary to understand the operating system’s file address conventions. Therefore the original URL beginning with file:// must be adapted to the current system. The command for starting the pdftk program depends on the operating system. It might carry the suffix .exe or perhaps a complete path to the program like
C:\ Program Files (x86)\pdftk\pdftk.exe or the suffix might not be required at all. GetGuiType is used to determine the type of system in use: 1 stands for Windows, 3 for macOS, and 4 for Linux. The following steps only distinguish between Windows and the rest.
After this the Shell() function is used to pass the appropriate launch command for pdftk to the console. The argument True ensures that LibreOffice will wait until the shell process terminates.
IF GetGuiType = 1 THEN '()
stCommand = "pdftk.exe"
ELSE
stCommand = "pdftk"
END IF
stParameter = stPDFForm & " dump_data_fields_utf8 output "
& stDir2 & "PDF_Form_Data.txt"
Shell(stCommand,0,stParameter,True)
stFile = stDir & "PDF_Form_Data.txt"
i = -1
inNumber = FreeFile
The FreeFile function determines which is the next free data channel available in the operating system. This channel is read out as an integer number and used to connect directly to the PDF data file that has just been created. The INPUT instruction is used to read the file. This takes place outside LibreOffice. The external records are then read into LibreOffice.
OPEN stFile FOR INPUT AS inNumber
DO WHILE NOT Eof(inNumber)
LINE INPUT #inNumber, stRow
The PDF data file is now read line by line. Whenever the term FieldName occurs, the remaining content of the line is taken as the name of the field in the PDF form and also, because of the way the form was defined, the name of the database field into which the data should be written.
All the field names are combined directly for use in the later SQL commands. What this means in practice is that the field names are enclosed in double quotes and separated by commas.
In addition, for each field name a query determines the field type in the table. Date and decimal values must be transferred in a different way to text.
IF instr(stRow, "FieldName: ") THEN
IF stFieldName = "" THEN
stFieldName = """"+mid(stRow,12)+""""
ELSE
stFieldName = stFieldName & ",""" + mid(stRow,12)+""""
END IF
stSql = "SELECT TYPE_NAME FROM INFORMATION_SCHEMA.SYSTEM_COLUMNS
WHERE TABLE_NAME = '" + stTable + "' AND
COLUMN_NAME = '" + mid(stRow,12) + "'"
oResult = oSQL_Command.executeQuery(stSql)
WHILE oResult.next
stFieldType = oResult.getString(1)
WEND
END IF
As for the field names, so for the field values. However these must not be double-quoted but must be prepared in accordance with the requirements of SQL code. This means that text must be single-quoted, dates converted to conform with SQL conventions, and so on. This is done by the extra external SQL_Value function.
IF instr(stRow, "FieldValue: ") THEN
IF stFieldValue = "" THEN
stFieldValue = SQL_Value(mid(stRow,13), stFieldType)
ELSE
stFieldValue = stFieldValue & "," &
SQL_Value(mid(stRow,13), stFieldType)
END IF
END IF
If the term FieldJustification is found, this marks the end of the combined block of field name and properties. The counter i, which will subsequently be compared with the previously declared field counter inFields, is therefore incrememented by 1.
When i and inFields become equal, the SQL command can be put together. However you must ensure that empty records are not created from empty forms. Therefore there is a previous check for all field values being NULL. In such cases, the SQL command is launched immediately. Otherwise, the record is included for insertion into the Name table. After this, the variables are restored to their default values and the next PDF form can be read.
IF instr(stRow, "FieldJustification:") THEN
i = i + 1
END IF
IF i = inFields THEN
aNull = Split(stFieldValue,",")
FOR n = 0 TO Ubound(aNull())
IF aNull(n) = "NULL" THEN inNull = inNull + 1
NEXT
IF inNull < inFields THEN
stSql ="INSERT INTO """ + stTable + """(" + stFieldName + ")"
stSql = stSql + "VALUES (" + stFieldValue + ")"
oSQL_Command.executeUpdate(stSql)
END IF
stFieldName = ""
stFieldValue = ""
stFieldType = ""
i = -1
inNull = 0
END IF
LOOP
CLOSE inNumber
At the end of the procedure, one PDF_Form_Data.txt file remains. This is deleted. Then the form is reloaded so that the records that were read in can be displayed.
Kill(stFile)
END IF
NEXT
oEvent.Source.Model.Parent.reload()
END SUB
If the text contains a "'", this will be seen as an end-of-text marker during insertion by SQL. The SQL code for the insertion command fails if any more text follows without being enclosed in single quotes. To prevent this, each single quote within the text must be masked by another single quote. This is the job of the String_to_SQL function.
FUNCTION String_to_SQL(st AS STRING) AS STRING
IF InStr(st,"'") THEN
st = Join(Split(st,"'"),"''")
END IF
String_to_SQL = st
END FUNCTION
Dates in the PDF file are read as text. They cannot be checked in advance for correct entry.
When dates are written in English, the day, month and year are separated by dots or, more often, hyphens. The day and the month may have a single digit or two. The year may have two digits or four.
In SQL code, dates must begin with a four-digit year and be written YYYY-MM-DD. The entered dates therefore need to go through a conversion process.
The entered date is split up into day, month, and year parts. The day and month are given a leading zero and then right-truncated to two digits. This ensures a two-digit figure in all cases.
If the year part already has four digits (greater than 1000), the value is not changed. Otherwise, if the year is greater than 30, the date is assumed to belong to the last century and needs to have 1900 added. All other dates are assigned to the current century.
FUNCTION Date_to_SQLDate(st AS STRING) AS STRING
DIM stDay AS STRING
DIM stMonth AS STRING
DIM stDate AS STRING
DIM inYear AS INTEGER
stDay = Right("0" & Day(CDate(st)), 2)
stMonth = Right("0" & Month(CDate(st)), 2)
inYear = Year(CDate(st))
IF inYear = 0 THEN
inYear = Year(Now())
END IF
IF inYear > 1000 THEN
ELSEIF inYear > 30 THEN
inYear = 1900 + inYear
ELSE
inYear = 2000 + inYear
END IF
stDate = inYear & "-" & stMonth & "-" & stDay
Date_to_SQLDate = stDate
END FUNCTION
The SQL_Value function combines this function with the NULL settings shown below, and so gives correctly formatted values for input into the database to its calling function.
Empty fields yield a NULL value. The corresponding field in the table will also be empty.
FUNCTION SQL_Value(st AS STRING, stType AS STRING) AS STRING
DIM stValue AS STRING
IF st = "" THEN
SQL_Value = "NULL"
If this is a date field, and the content is to be recognizable as a date, its content must be converted into the SQL date format. If it is not recognizable as a date, the field should remain empty.
ELSEIF stType = "DATE" THEN
IF isDate(st) THEN
SQL_Value = "'" & Date_to_SQLDate(st) & "'"
ELSE
SQL_Value = "NULL"
END IF
A decimal field might contain commas instead of decimal points, with decimal places following them. In Basic and SQL, the decimal separator is always a dot. Therefore numbers containing a comma must be converted. The field must contain a number, so other characters such as units must be removed. This is carried out by the Val() function.
ELSEIF stType = "DECIMAL" THEN
stValue = Str(Val(Join(Split(st,","),".")))
All other content is treated as text. Single quotes are masked with a further single quote and the whole term is enclosed again in single quotes.
ELSE
SQL_Value = "'" & String_to_SQL(st) & "'"
END IF
END FUNCTION
For further details on macro construction, see Chapter 9 of this book. This example simply shows that it is possible to transfer data from PDF forms into Base without having to copy the values field by field using the clipboard. The construction of the above procedure has deliberately been kept very general and would need to be adapted to particular situations.