
Base Guide 7.2
Chapter 8
Database Tasks
This document is Copyright © 2021 by the LibreOffice Documentation Team. Contributors are listed below. You may distribute it and/or modify it under the terms of either the GNU General Public License (https://www.gnu.org/licenses/gpl.html), version 3 or later, or the Creative Commons Attribution License (https://creativecommons.org/licenses/by/4.0/), version 4.0 or later.
All trademarks within this guide belong to their legitimate owners.
|
Pulkit Krishna |
|
|
|
Robert Großkopf |
Pulkit Krishna |
Jost Lange |
|
Dan Lewis |
Hazel Russman |
Jochen Schiffers |
|
Jean Hollis Weber |
|
|
Please direct any comments or suggestions about this document to the Documentation Team’s mailing list: documentation@global.libreoffice.org.
Note
Everything you send to a mailing list, including your email address and any other personal information that is written in the message, is publicly archived and cannot be deleted.
Published December 2021. Based on LibreOffice 7.2 Community.
Other versions of LibreOffice may differ in appearance and functionality.
This chapter describes some solutions for problems that arise for many database users.
Data filtering using the GUI is described in Chapter 3, Tables. Here we describe a solution to a problem that many users have raised: how to use listboxes to search for the content of fields in tables, which then appear filtered in the underlying form section and can be edited.
The basis for this filtering is an editable query (see Chapter 5, Queries) and an additional table, in which the data to be filtered are stored. The query shows from its underlying table only the records that correspond to the filter values. If no filter value is given, the query shows all records.
The following example starts from a MediaExample table that includes, among others, the following fields: ID (primary key), Title, Category. The field types are INTEGER, VARCHAR, and VARCHAR respectively.
First we require a FilterExample table. This table contains a primary key and two filter fields (of course you can have more if you want): ID (primary key), Filter_1, Filter_2. As the fields of the MediaExample table, which is to be filtered, are of the type VARCHAR, the fields Filter_1 and Filter_2 are also of this type. ID can be the smallest numeric type, TINYINT because the Filter table will never contain more than one record.
You can also filter fields that occur in the MediaExample table only as foreign keys. In that case, you must give the corresponding fields in the FilterExample table the type appropriate for the foreign keys, usually INTEGER.
The following query is certainly editable:
SELECT * FROM "Media"
All records from the MediaExample table are displayed, including the primary key.
SELECT * FROM "Media"
WHERE "Title" = IFNULL( ( SELECT "Filter_1" FROM "Filter" ), "Title" )
If the field Filter_1 is not NULL, those records are displayed for which the Title is the same as Filter_1. If the field Filter_1 is NULL, the value of the Title field is used instead. As Title is the same as "Title", all records are displayed. This assumption does not hold, however, if the Title field of any record is empty (contains NULL). That means that those records will never be displayed that have no title entry. Therefore we need to improve the query:
SELECT * , IFNULL( "Title", '' ) AS "T" FROM "Media"
WHERE "T" = IFNULL( ( SELECT "Filter_1" FROM "Filter" ), "T" )
Tip
IFNULL(expression, value) requires the expression has the same field type as the value.
If the expression has the field type VARCHAR, use two single quotes '' as the value.
If it has DATE as its field type, enter a date as the value that is not contained in the field of the table to be filtered. Use this format: {D 'YYYY-MM-DD'}.
If it is any of the numerical field types, use the NUMERIC field type for the value. Enter a number that does not appear in the field of the table to be filtered.
This variant will lead to the desired goal. Instead of filtering Title directly, a field is filtered which carries the alias T. This field has no content either but it is not NULL. In the conditions only the field T is considered. All records are therefore displayed even if Title is NULL.
Unfortunately you cannot do this using the GUI. This command is available only directly with SQL. To make it editable in the GUI, further modification is required:
SELECT "Media".* , IFNULL( "Media"."Title", '' ) AS "T"
FROM "Media"
WHERE "T" = IFNULL( ( SELECT "Filter_1" FROM "Filter" ), "T" )
If the relationship of the table to the fields is now set up, the query becomes editable in the GUI. As a test, you can put a title into "Filter"."Filter_1".
As "Filter"."ID" sets the value '0', the record is saved and the filtering can be comprehended. If "Filter"."Filter_1" is emptied, the GUI treats that as NULL. A new test yields a display of all the media. In any case, before a form is created and tested, just one record with a primary key should be entered into the Filter table. It must be only one record, since sub-queries as shown above can only transmit one value.
The query can now be enlarged to filter two fields:
SELECT "Media".* , IFNULL( "Media"."Title", '' ) AS "T", IFNULL( "Media"."Category", '' ) AS "K"
FROM "Media"
WHERE "T" = IFNULL( ( SELECT "Filter_1" FROM "Filter" ), "T" ) AND "K" = IFNULL( ( SELECT "Filter_2" FROM "Filter" ), "K" )
This concludes the creation of the editable query. Now for the basic query for the two listboxes:
SELECT DISTINCT "Title", "Title"
FROM "MediaExample" ORDER BY "Title" ASC
The listbox should show the Title and then also transmit that Title to the Filter_1 field in the Filter table that underlies the form. Also no duplicate values should be shown (DISTINCT condition). And the whole thing should of course be sorted into the correct order.
A corresponding query is then created for the Category field, which is to write its data into the Filter_2 field in the Filter table.
If one of these fields contains a foreign key, the query is adapted so that the foreign key is passed to the underlying Filter table.
The form consists of two parts. Form 1 is the form based on the Filter table. Form 2 is the form based on the query. Form 1 has no navigation bar and the cycle is set to Current record. In addition, the Allow additions property is set to No. The first and only record for this form already exists.
Form 1 contains two listboxes with appropriate labels. Listbox 1 returns values for Filter_1 and is linked to the query for the Title field. Listbox 2 returns values for Filter_2 and relates to the query for the Category field.
Form 2 contains a table control field, in which all fields from the query can be listed except for the fields T and K. The form would still work if these fields were present; they are omitted to avoid a confusing duplication of field contents. In addition Form 2 contains a button, linked to the Update form function. An additional navigation bar can be built in to prevent screen flicker every time the form changes, due to the navigation bar being present in one form and not in the other.
Once the form is finished, the test phase begins. When a listbox is changed, the button on Form 2 is used to store this value and update Form 2. This now relates to the value which the listbox provides. The filtering can be made retrospective by choosing an empty field in the listbox.
The main difference between searching for data and filtering data is in the query technique. The aim is to deliver, in response to free language search terms, a resulting list of records that may only partially contain these actual terms. First the similar approaches to the table and form are described.
The table for the search content may be the same one that already contains the filter values. The Filter table is simply expanded to include a field named Searchterm. So, if required, the same table can be accessed and, using the forms, simultaneously filtered and searched. Searchterm has the field type VARCHAR.
The form is built just as for filtering. Instead of a listbox, we need a text entry field for the search term, and also perhaps a label field with the title Search. The field for the search term can stand alone in the form or together with the fields for filtering, if both functions are desired.
The difference between filtering and searching lies in the query technique. While filtering uses a term that already occurs in the underlying table, searching uses arbitrary entries. (After all, the listbox is constructed from the table content.)
SELECT * FROM "Media"
WHERE "Title" = ( SELECT "Searchterm" FROM "Filter" )
This query normally leads to an empty result list for these reasons:
When entering search terms, people seldom know completely and accurately what the title is. Therefore the correct title does not get displayed. To find the book "The Hitchhiker’s Guide to the Galaxy" it should be sufficient to put "Hitchhiker" into the Search field or even just "Hit".
If the Searchterm field is empty, only records are displayed in which there is no title. This only happens if the item does not have a title, or someone did not enter its title.
The last condition can be removed if the filtering condition is:
SELECT * FROM "Media"
WHERE "Title" = IFNULL( ( SELECT "Searchterm" FROM "Filter" ), "Title" )
With this refinement of the filtering (what happens if the title is NULL?) we get a result more in line with expectations. But the first condition is still not fulfilled. Searching should work well when only fragmentary knowledge is available. The query technique must therefore use the LIKE condition:
SELECT * FROM "Media"
WHERE "Title" LIKE ( SELECT '%' || "Searchterm" ||'%' FROM "Filter" )
or better still:
SELECT * FROM "Media" WHERE "Title" LIKE IFNULL( ( SELECT '%' || "Searchterm" ||'%' FROM "Filter" ), "Title" )
LIKE, coupled with %, means that all records are displayed which have the search term anywhere within them. % is a wildcard for any number of characters before or after the search term. Various questions still remain after this version of the query has been built:
It is common to use lower case letters for search terms. So what result do I get if I type "hitch" instead of "Hitch"?
What other conventions in writing need to be considered?
What about fields that are not formatted as text fields? Can you search for dates or numbers with the same search field?
And what if, as in the case of the filter, you want to prevent NULL values in the field from causing all the records to be displayed?
The following variant covers one or two of these possibilities:
SELECT * FROM "Media" WHERE
LOWER("Title") LIKE IFNULL( ( SELECT '%' || LOWER("Searchterm") ||'%' FROM "Filter" ), LOWER("Title") )
The condition changes the search term and the field content to lower case. This also allows whole sentences to be compared.
SELECT * FROM "Media" WHERE
LOWER("Title") LIKE IFNULL( ( SELECT '%' || LOWER("Searchterm") ||'%' FROM "Filter" ), LOWER("Title") ) OR
LOWER("Category") LIKE ( SELECT '%' || LOWER("Searchterm") ||'%' FROM "Filter" )
The IFNULL function must occur only once, so that when the Searchterm is NULL, LOWER("Title") LIKE LOWER("Title") is queried. And as the title should be a field that cannot be NULL, in such cases all records are displayed. Of course, for multiple field searches, this code becomes correspondingly longer. In such cases it is better to use a macro, to allow the code to cover all the fields in one go.
But does the code still work with fields that are not text? Although the LIKE condition is really tailored to text, it also works for numbers, dates, and times without needing any alterations. So in fact text conversion need not take place. However, a time field that is a mixture of text and numbers cannot interact with the search results – unless the query is broadened, so that a single search term is subdivided across all the spaces between the text and numbers. This, however, will significantly bloat the query.
Tip
The queries that are used for filtering and searching records can be directly embedded in the form.
The whole condition that has been put together above can be entered into the row filter using the form properties.
SELECT * FROM "Media" WHERE "Title" = IFNULL( ( SELECT "Searchterm" FROM "Filter" ), "Title" )
then becomes a form that uses the content of the Media table.
Under "Filter" we have
("Media"."Title" = IFNULL( ( SELECT "Searchterm" FROM "Filter" ), "Media"."Title" ))
In the filter entry, take care that the condition is put in brackets and works with the term "Table"."Field".
The advantage of this variant is that the filter can be switched on and off when the form is open.
Searching with LIKE is usually satisfactory for databases with fields containing text in amounts that can be easily scanned by eye. But what about Memo fields, which can contain several pages of text? In that case, the search needs to determine where the specified text can be found.
To locate text exactly, HSQLDB has the LOCATE function. LOCATE takes a search term (the text you want to look for) as its argument. You can also add a position to be searched. In short: LOCATE(Search term, Database text field, Position).
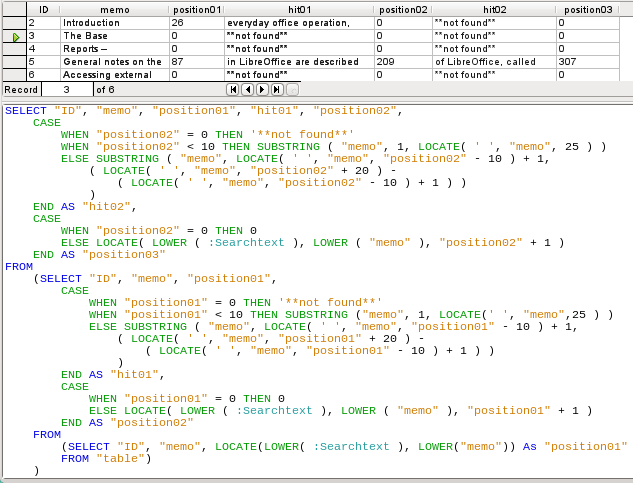
The following explanation uses a table called Table. The primary key is called ID and must be unique. There is also a field called Memo which was created as a field of type Memo (LONGVARCHAR). This Memo field contains a few sentences from this handbook.
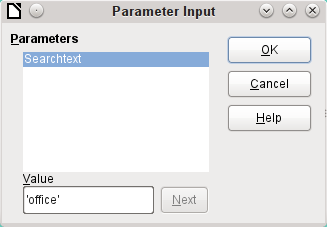
The query examples are presented as parametered queries. The search text to be entered is always ‘office’.
First we use LIKE. LIKE can only be used in conditions. If the search text is found anywhere, the corresponding record is shown. The comparison is between a lower-case version of the field content, using LOWER("Memo") and a lower-case version of the search text using LOWER(:Searchtext), to make the search case-insensitive. The longer the text in the memo field, the harder it becomes to see the term in the retrieved text.

LOCATE shows you more accurately just where your search term occurs. In records 1 and 2, the term does not occur. In this case LOCATE gives the position as ‘0’. It is easy to confirm the figure given for record 5: the string ‘Office’ begins at position 6. Naturally it would also be possible to display the results from LOCATE in the same way as for LIKE.
In the Hits column, the search results are displayed more accurately. The previous query has been used as a basis for this one. This allows the word “Position” to be used in the outer query instead of having to repeat LOCATE(LOWER(:Searchtext),LOWER("Memo")) each time. In principle, this is no different from saving the previous query and using it as a source for this one.
"Position" = 0 means that there is no result. In this case '**not found**' is displayed.
"Position" < 10 means that the search term occurs right at the beginning of the text. 10 characters can easily be scanned by eye. Therefore the entire text is displayed. Here instead of SUBSTRING("Memo",1), we could have used just "Memo".
For all other hits, the search looks for a space ' ' up to 10 characters before the search term. The displayed text does not start in the middle of a word but after a space. SUBSTRING("Memo",LOCATE(' ',"Memo","Position"-10)+1) ensures that the text starts at the beginning of a word which lies 10 characters at most before the search term.
In practice we would want to use more characters, as there are many words longer than that, and the search term might lie within another word with more than 10 characters in front of it. LibreOffice contains the search term “office” with the “O” as the sixth character. If the search term had been “hand”, Record 4 would have been fatal for the display. It contains the word “LibreOffice-Handbooks” which has 12 characters to the left of “hand”. If a maximum of 10 characters to the left was searched for spaces, the first one found would have been the character following the comma. This would be shown in the “Hits” column as beginning with ‘the built-in help system...’
The query technique is the same as for the previous query. Only the length of the hit to be displayed has been reduced to 25 characters. The SUBSTRING function requires as arguments the text to be searched, then the starting position for the result, and as a third optional argument, the length of the text string to be displayed. Here it has been set quite short for demonstration purposes. An advantage of shortening it is that storage requirements for large numbers of records are reduced, and the location can be easily seen. A visible disadvantage of this type of string shortening is that the cut is made in strict accordance with the 25 character limit, without consideration of where words begin.
Here we search from the 25th character in the “hits” to the next space character. The content to be displayed lies between these two positions.
It is much simpler if the match shows up at the beginning of the field. Here LOCATE(' ',"Memo",25) gives the exact position where the text begins. Since we want the text to be displayed from the beginning, this complies exactly with the length of the displayable term.
The search for the space following the search term is no more complicated if the term lies further on in the field. The search simply begins where the match is. Then a further 20 characters are counted, which are to follow under all circumstances. The next space after that is located using LOCATE(' ',"Memo","Position"+20). This gives only the location within the field as a whole, not the length of the string to be displayed. For that, we need to subtract the position at which the display of the matching text should start. This has already been set within the query by LOCATE(' ',"Memo","Position"-10)+1. In this way, the correct length of the text can be found.
The same technique can be used to string queries together. The previous query now becomes the data source for the new one. It has been inserted, enclosed in parentheses, under the term FROM. Only the fields are renamed to some extent as there are now multiple positions and matches. In addition, the next position is given a reference using LOCATE(LOWER(:Searchtext),LOWER("Memo"),"Position01"+1). This means that searching starts again at the position after the previous matching text.
The outermost query sets the corresponding fields for the other two queries, and also provides “hit02” using the same method as was previously used for “hit01”. In addition, this outermost query determines if there are any further matches. The corresponding position is given as “Position03”. Only record 5 has further matches, and these could be found in a further subquery.
The stacking of queries shown here could be carried further if desired. However, the addition of each new outer query puts an additional load on the system. It would be necessary to carry out some tests to determine how far it was useful and realistic to go. Chapter 9, Macros, shows how macros can be used to find all matching text strings in a field through the use of a form.
Base forms use graphical controls to handle images. If you are using an internal HSQLDB database, graphical controls are the only way to read images out of the database without using macros. They can also be used as links to images outside the database file.
The database requires a table which fulfills at least the following conditions:
|
Field name |
Field type |
Description |
|
ID |
Integer |
ID is the primary key of this table. |
|
Image |
Image |
Contains the image as binary data. |
A primary key must be present, but it does not have to be an integer. Other fields that add information about the image should be added.
The data that will be read into the image field is not visible in a table. Instead you see the word <OBJECT>. In the same way, images cannot be entered directly into a table. You have to use a form that contains a graphical control. The graphical control opens when clicked to show a file picker dialog. Subsequently it shows the image that was read in from the selected file.
Pictures that are to be inserted directly into the database should be as small as possible. As Base provides no way (except by using macros) to export images in their original size, it makes sense to use only the size necessary, for example printing in a report. Original images in the megapixel range are completely unnecessary and bloat the database. After adding only a few images, the internal HSQLDB gives a Java.NullPointerException and can no longer store the record. Even if the images are not quite so big, it may happen that the database becomes unusable.
In addition, images should not be integrated into tables that are designed to be searched. If, for example, you have a personnel database, and images for use in passes are to be included, these are best stored in a separate table with a foreign key in the main table. This means that the main table can be searched significantly faster, as the table itself does not require so much memory.
With a carefully designed folder structure, it is more convenient to access external files directly. Files outside the database can be as large as required, without having any effect on the working of the database itself. Unfortunately this also means renaming a folder on your own computer or on the Internet can cause you to lose access to the file.
If you do not want to read images directly into the database but only link to them, you need to make a small change to the previous table:
|
Field name |
Field type |
Description |
|
ID |
Integer |
ID is the primary key of this table. |
|
Image |
Text |
Contains the path to the image. |
If the field type is set to text, the graphical control on the form will transmit the path to the file. The picture can still be accessed by the graphical control exactly like an internal image.
Unfortunately you cannot do the same thing with a document. It is not possible even to read the path in, as graphical controls are designed for graphical images and the filepicker dialog shows only files with a graphical format.
With an image, the content can at least be seen in the graphical control, using the path to the file. With a document, there can be no display even if the path is stored in a table. First we need to enlarge the table somewhat so that at least a small amount of information about the document can be made visible.
|
Field name |
Field type |
Description |
|
ID |
Integer |
ID is the primary key of this table. |
|
Description |
Text |
Description of the document, search terms |
|
File |
Text |
Contains the path to the document. |
To make the path to the document visible, we need to build a file selection field into the form.
A file selection field has no tab for data in its properties dialog. It is therefore not bound to any field in the underlying table.
Using the file selection field, the path can be displayed but not stored. For this a special procedure is necessary which is tied to Events > Text modified:
SUB PathRead(oEvent AS OBJECT)
DIM oForm AS OBJECT
DIM oField AS OBJECT
DIM oField2 AS OBJECT
DIM stUrl AS STRING
oField = oEvent.Source.Model
oForm = oField.Parent
oField2 = oForm.getByName("graphical_control")
IF oField.Text <> "" THEN
stUrl = ConvertToUrl(oField.Text)
oField2.BoundField.updateString(stUrl)
END IF
END SUB
The event that triggers the procedure is passed to it and helps to find the form and the field in which the path is to be stored. Using oEvent AS OBJECT makes access simpler when another user wants to use a macro with the same name in a subform. It makes the file selection field accessible via oEvent.Source.Model. The form is accessed as the Parent of the file selection field. The name of the form is therefore irrelevant. From the form, the field called “graphical_control” can now be accessed. This field is normally used to store the paths to image files. In this case, the URL of the selected file is written into it. To ensure that the URL works with the conventions of the operating system, the text in the file selection field is converted into a generally valid form by using ConvertToUrl.
The database table now contains a path with the absolute format: file:///....
If path entries are read using a graphical control, this will yield a relative path. To make this usable, it must be improved. The procedure for doing this is much lengthier, as it involves a comparison between the input path and the real one.
The following macro is bound to the “Text modified” property of the file selection field.
SUB PathRead
DIM oDoc AS OBJECT
DIM oDrawpage AS OBJECT
DIM oForm AS OBJECT
DIM oField AS OBJECT
DIM oField2 AS OBJECT
DIM arUrl_Start()
DIM ar()
DIM ar1()
DIM ar2()
DIM stText AS STRING
DIM stUrl_complete AS STRING
DIM stUrl_Text AS STRING
DIM stUrl AS STRING
DIM stUrl_cut AS STRING
DIM ink AS INTEGER
DIM i AS INTEGER
oDoc = thisComponent
oDrawpage = oDoc.Drawpage
oForm = oDrawpage.Forms.getByName("Form")
oField = oForm.getByName("graphical_control")
oField2 = oForm.getByName("filecontrol")
First, as in all procedures, the variables are declared. Then the fields that are important for the entry of paths are searched. The whole of the following code is then carried out only if there is actually something in the file selection field, i.e. it has not been emptied by a record change.
IF oField2.Text <> "" THEN
arUrl_Start = split(oDoc.Parent.Url,oDoc.Parent.Title)
ar = split(ConvertToUrl(oFeld2.Text),"/")
stText = ""
The path to the database file is read. This is carried out, as shown above, first by reading the whole URL, then splitting it into an array so that the first element of the array contains the direct path.
Then all the elements of the path found in the file selector field are read into the array ar. The separator is /. This can be done directly in Linux. In Windows, the content of oField2 must be converted into a URL, which will use a forward slash (not a backslash) as the path delimiter.
The purpose of the split is to get the path to the file by simply cutting off the filename at the end. Therefore, in the next step, the path to the file is put together again and placed in the variable stText. The loop ends not with the last element in the ar array but with the previous element.
FOR i = LBound(ar()) TO UBound(ar()) - 1
stText = stText & ar(i) & "/"
NEXT
stText = Left(stText,Len(stText)-1)
arUrl_Start(0) = Left(arUrl_Start(0),Len(arUrl_Start(0))-1)
The final / is removed again, since otherwise an empty array value would appear in the following array, which would interfere with the path comparison. For correct comparison, the text must be converted into a proper URL beginning with file:///. Finally the path to the database file is compared with the path which has been created.
stUrl_Text = ConvertToUrl(stText)
ar1 = split(stUrl_Text,"/")
ar2 = split(arUrl_Start(0),"/")
stUrl = ""
ink = 0
stUrl_cut = ""
ar1ar2 array is compared step by step in a loop.
FOR i = LBound(ar2()) TO UBound(ar2())
IF i <= UBound(ar1()) THEN
The following code is executed only if the number i is no greater than the number of elements in ar1. If the value in ar2 is the same as the corresponding value in ar1, and no incompatible value has been found up to this point, the common content is stored in a variable that can finally be cut off from the path value.
IF ar2(i) = ar1(i) AND ink = 0 THEN
stUrl_cut = stUrl_cut & ar1(i) & "/"
ELSE
If there is a difference at any point between the two arrays, then for each different value, the sign for going up one directory will be added to the variable stUrl.
stUrl = stUrl & "../"
ink = 1
END IF
As soon as the index stored in i is greater than the number of elements in ar1, each further value in ar2 will cause a further ../ to be stored in the variable stUrl.
ELSE
stUrl = stUrl & "../"
END IF
NEXT
stUrl_complete = ConvertToUrl(oFeld2.Text)
oFeld.boundField.UpdateString(stUrl & Right(stUrl_complete,Len(stUrl_complete)-Len(stUrl_cut)))
END IF
END SUB
When the loop through ar2 is complete, we have established whether and by how much the file that is to be accessed is higher in the tree than the database file. Now stUrl_complete can be created out of the text in the file selector field. This also contains the filename. Finally the value is transferred into the graphical control. The URL value begins with stUrl, which contains the necessary number of dots (../). Then the beginning of stUrl_complete, the part that proved to be the same for the database and the external file, is cut off. The way to cut the string is stored in stUrl_cut.
Linked pictures can be displayed directly in a graphical control. But a larger display would be better at showing details.
Documents are not normally visible in Base.
To make this type of display possible, we again need to use macros. This macro is launched using a button on the form that contains the graphical control.
SUB View(oEvent AS OBJECT)
DIM oDoc AS OBJECT
DIM oForm AS OBJECT
DIM oField AS OBJECT
DIM oShell AS OBJECT
DIM stUrl AS STRING
DIM stField AS STRING
DIM arUrl_Start()
oDoc = thisComponent
oForm = oEvent.Source.Model.Parent
oField = oForm.getByName("graphical_control")
stUrl = oField.BoundField.getString
The graphical control in the form is located. As the table does not contain the image itself but only a path to it stored as a text string, this text is retrieved using getString.
Then the path to the database file is determined. The odb file, the container for the forms, is accessed using oDoc.Parent. The whole URL, including the filename, is read out using oDoc.Parent.Url. The filename is also stored in oDoc.Parent.Title. The text is separated using the split function with the filename as a separator. This gives the path to the database file as the first and only element of the array.
arUrl_Start = split(oDoc.Parent.Url,oDoc.Parent.Title)
oShell = createUnoService("com.sun.star.system.SystemShellExecute")
stField = convertToUrl(arUrl_Start(0) + stUrl)
oShell.execute(stField,,0)
END SUB
External programs can be launched using the structure com.sun.star.system.SystemShellExecute. The absolute path to the file, put together from the path to the database file and the internally-stored relative path from the database file, is passed to the external program. The operating system’s graphical interface determines which program is called on to open the file.
The oShell.execute command takes three arguments. The first is an executable file or the path to a data file that is linked to a program by the system. The second is an argument list for the program. The third is a number that determines how errors are to be reported. The possibilities are 0 (default error message), 1 (no message), and 2 (only allow the opening of absolute URLs).
When reading in the documents, the following conditions should always be observed:
The larger the documents, the more unwieldy the database becomes. Therefore for large documents, an external database is better than the internal one.
Like images, documents are not searchable. They are stored as binary data and can therefore be put into an image field.
Documents read into the internal HSQLDB database can only be read out using macros. You can’t do it using SQL queries.
The following macros for reading in and out depend on a table that includes a description of the data and the original filename, as well as a binary version of the file. The filename is not automatically stored along with the file, but it can provide useful information about the type of data stored in a file which is to be read out. Only then can the file safely be read by other programs.
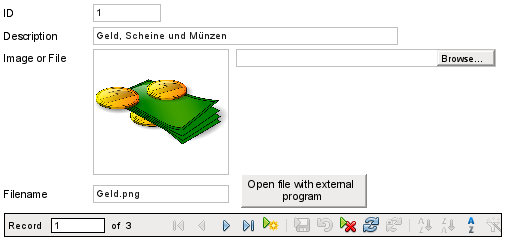
The table contains the following fields:
|
Field name |
Field type |
Description |
|
ID |
Integer |
ID is the primary key of this table. |
|
Description |
Text |
Document description, search terms, etc. |
|
File |
Image |
The image or file in binary form. |
|
Filename |
Text |
The name of the file, including the file suffix. Important for subsequent reading. |
The form for reading files in and out looks like this:
If image files are present in the database, they can be viewed in the form’s graphical control. All other types of file are hidden.
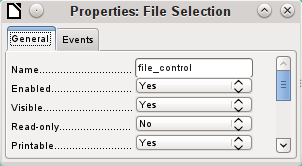
The following macro for reading a file in is triggered by Properties: File selection → Events → Text modified.
SUB FileInput_withName(oEvent AS OBJECT)
DIM oForm AS OBJECT
DIM oField AS OBJECT
DIM oField2 AS OBJECT
DIM oField3 AS OBJECT
DIM oStream AS OBJECT
DIM oSimpleFileAccess AS OBJECT
DIM stUrl AS STRING
DIM stName AS STRING
oField = oEvent.Source.Model
oForm = oField.Parent
oField2 = oForm.getByName("txt_filename")
oField3 = oForm.getByName("graphical_control")
IF oField.Text <> "" THEN
stUrl = ConvertToUrl(oField.Text)
ar = split(stUrl,"/")
stName = ar(UBound(ar))
oField2.BoundField.updateString(stName)
oSimpleFileAccess = createUnoService("com.sun.star.ucb.SimpleFileAccess")
oStream = oSimpleFileAccess.openFileRead(stUrl)
oField3.BoundField.updateBinaryStream(oStream, oStream.getLength())
END IF
END SUB
As the triggering event for the macro provides the name of another form field, it is not necessary to check if the fields are in the main form or a subform. All that is necessary is that all the fields must be in the same form.
The field “txt_filename” stores the name of the file to be searched for. In the case of images, this name must be entered by hand without using a macro. Here instead, the filename is determined via a URL and automatically entered when the data is read in.
The field “graphical_control” stores the actual data both for images and for other files.
The complete path, including the filename, is read from the file selector field using oFeld.Text. To ensure that the URL is not affected by OS-specific conditions, the text that has been read out is converted into the standard URL format using ConvertToUrl. This universally valid URL is split up within an array. The separator is /. The last element of the path is the filename. Ubound(ar) gives the index for this last element. The actual filename can then be read out using ar(Ubound(ar)) and transferred to the field as a string.
To read in the file itself requires UnoService com.sun.star.ucb.SimpleFileAccess. This service can read the content of the file as a stream of data. This is stored temporarily in the object oStream and then inserted as a data stream into the field bound to the “File” field in the table. This requires the length of the data stream to be provided as well as the oStream object.
The data are now inside the form field just as with a normal entry. However if the form is simply closed at this point, the data are not stored. Storage requires the Store button in the navigation bar to be pressed; it also happens automatically upon moving to the next record.
In the above method, it was briefly mentioned that the name of the file used for input into a graphical control cannot be directly determined. Here is a macro for determining this filename, which fits the form above. The filename cannot be determined with certainty by an event directly bound to the graphical control. Therefore the macro is launched using Form Properties > Events > Before record action.
SUB ImagenameRead(oEvent AS OBJECT)
oForm = oEvent.Source
IF InStr(oForm.ImplementationName, "ODatabaseForm") THEN
oField = oForm.getByName("graphical_control")
oField2 = oForm.getByName("txt_filename")
IF oField.ImageUrl <> "" THEN
stUrl = ConvertToUrl(oFeld.ImageUrl)
ar = split(stUrl,"/")
stName = ar(UBound(ar))
oField2.BoundField.updateString(stName)
END IF
END IF
END SUB
Before the record action, two implementations with different implementation names are carried out. The form is most easily accessible using the implementation ODatabaseForm.
In the graphical control, the URL of the data source can be accessed using ImageUrl. This URL is read, the filename is determined using the previous procedure FileInput_withName, and is transferred to the field txt_filename.
If after the above macro is run, you move to the next record, the path to the original image is still available. If a non-image file is now read in using the file selector field, the filename for the image will overwrite the name of that file, unless you use the following macro.
Unfortunately the path cannot be removed by the previous macro, since the image file is only read in when the record is saved. Removing the path at that point would delete the image.
The macro is launched using Form Properties > Events > After record action.
SUB ImagenameReset(oEvent AS OBJECT)
oForm = oEvent.Source
IF InStr(oForm.ImplementationName, "ODatabaseForm") THEN
oField = oForm.getByName("graphical_control")
IF oField.ImageUrl <> "" THEN
oField.ImageUrl = ""
END IF
END IF
END SUB
As in the “ImageRead” procedure, the graphical control is accessed. If there is an entry in ImageUrl, it is removed.
For both non-graphical files and original size images, the Open file with external program button must be pressed. Then the files in the temporary folder can be read and displayed using the program linked to the file suffix in the operating system.
The macro is launched using Properties: Button > Events > Execute action.
SUB FileDisplay_withName(oEvent AS OBJECT)
DIM oDoc AS OBJECT
DIM oDrawpage AS OBJECT
DIM oForm AS OBJECT
DIM oField AS OBJECT
DIM oField2 AS OBJECT
DIM oStream AS OBJECT
DIM oShell AS OBJECT
DIM oPath AS OBJECT
DIM oSimpleFileAccess AS OBJECT
DIM stName AS STRING
DIM stPath AS STRING
DIM stField AS STRING
oForm = oEvent.Source.Model.Parent
oField = oForm.getByName("graphical_control")
oField2 = oForm.getByName("txt_filename")
stName = oField2.Text
IF stName = "" THEN
stName = "file"
END IF
oStream = oField.BoundField.getBinaryStream
oPath = createUnoService("com.sun.star.util.PathSettings")
stPath = oPath.Temp & "/" & stName
oSimpleFileAccess = createUnoService("com.sun.star.ucb.SimpleFileAccess")
oSimpleFileAccess.writeFile(stPath, oStream)
oShell = createUnoService("com.sun.star.system.SystemShellExecute")
stField = convertToUrl(stPath)
oShell.execute(stField,,0)
END SUB
The position of the other affected fields in the form is given by the button. If a filename is missing, the file is simply given the name “File”.
The content of the form control “graphical_control” corresponds to that of the File field in the table. It is read out as a data stream. The path to the temporary folder is used as a path for this data; it can be set using Tools > Options > LibreOffice > Paths. If the data is subsequently to be used for other purposes, and not just displayed, it can be copied from this path. Within the macro, the file is opened directly after successful reading, using the program that has been bound to the file suffix by the graphical user interface of the operating system.
These code snippets come from queries to mailing lists. Particular problems arise that might perhaps be useful as solutions for your own database experiments.
A query needs to calculate a person's actual age from a birth date. See also the functions in the appendix to this Base Guide.
SELECT DATEDIFF('yy',"Birthdate",CURDATE()) AS "Age" FROM "Person"
This query gives the age as a difference in years. But, the age of a child born on 31 December 2011 would be given as 1 year on 1 January 2012, because that is a leap year. So we also need to consider the position of the day within the year. This is accessible using the DAYOFYEAR() function. Another function will carry out the comparison.
SELECT CASEWHEN
(DAYOFYEAR("Birthdate") > DAYOFYEAR(CURDATE()),
DATEDIFF ('yy',"Birthdate",CURDATE())-1,
DATEDIFF ('yy',"Birthdate",CURDATE()))
AS "Age" FROM "Person"
Now we get the correct current age in years.
CASEWHEN can also be used to make the text Birthday today appear in another field, if DAYOFYEAR("Birthdate") = DAYOFYEAR(CURDATE()).
A subtle objection might now arise: "What about leap years?". For persons born after 28 February, there will be an error of one day. Not a serious problem in everyday use, but should we not strive for accuracy?
CASEWHEN (
(MONTH("Birthdate") > MONTH(CURDATE())) OR
((MONTH("Birthdate") = MONTH(CURDATE())) AND (DAY("Birthdate") > DAY(CURDATE()))),
DATEDIFF('yy',"Birthdate",CURDATE())-1,
DATEDIFF('yy',"Birthdate",CURDATE()))
The code above achieves this goal. As long as the month of the birth date is greater than the current month, the year difference function will subtract one year. Equally one year will be subtracted when the two months are the same, but the day of the month for the birth date is greater than the day in the current date. Unfortunately this formula is not comprehensible to the GUI. Only Direct SQL-Command will handle this query successfully and that would prevent our query from being edited. But the query needs to be editable, so here is how to trick the GUI:
CASE
WHEN MONTH("Birthdate") > MONTH(CURDATE())
THEN DATEDIFF('yy',"Birthdate",CURDATE())-1
WHEN (MONTH("Birthdate") = MONTH(CURDATE()) AND DAY("Birthdate") > DAY(CURDATE()))
THEN DATEDIFF('yy',"Birthdate",CURDATE())-1
ELSE DATEDIFF('yy',"Birthdate",CURDATE())
END
With this formulation, the GUI no longer reacts with an error message. The age is now given accurately even in leap years and the query still remains editable.
Using a small calculation snippet, we can determine from the table who will be celebrating their birthdays within the next eight days.
SELECT *
FROM "Table"
WHERE
DAYOFYEAR("Date") BETWEEN DAYOFYEAR(CURDATE()) AND
DAYOFYEAR(CURDATE()) + 7
OR DAYOFYEAR("Date") < 7 -
DAYOFYEAR(CAST(YEAR(CURDATE())||'-12-31' AS DATE)) +
DAYOFYEAR(CURDATE())
The query shows all records whose date entry lies between the current day of the year and the following 7 days.
To show 8 days even at the end of a year, the day on which the year began must be thoroughly checked. This check occurs only for day numbers that are at most 7 days later than the last day number for the current year (usually 365) plus the day number for the current date. If the current date is more than 7 days from the end of the year, the total is <1. No record in the table has a date like that, so in such cases this partial condition is not fulfilled.
In the above formula, leap years will give a wrong result, as their dates are displaced by the occurrence of 29th February. The code needs to be more extensive to avoid this error:
SELECT *
FROM "Table"
WHERE
CASE
WHEN
DAYOFYEAR(CAST(YEAR("Date")||'-12-31' AS DATE)) = 366
AND DAYOFYEAR("Date") > 60 THEN DAYOFYEAR("Date") - 1
ELSE
DAYOFYEAR("Date")
END
BETWEEN
CASE
WHEN
DAYOFYEAR(CAST(YEAR(CURDATE())||'-12-31' AS DATE)) = 366
AND DAYOFYEAR(CURDATE()) > 60 THEN DAYOFYEAR(CURDATE()) - 1
ELSE
DAYOFYEAR(CURDATE())
END
AND
CASE
WHEN
DAYOFYEAR(CAST(YEAR(CURDATE())||'-12-31' AS DATE)) = 366
AND DAYOFYEAR(CURDATE()) > 60 THEN DAYOFYEAR(CURDATE()) + 6
ELSE
DAYOFYEAR(CURDATE()) + 7
END
OR DAYOFYEAR("Datum") < 7 -
DAYOFYEAR(CAST(YEAR(CURDATE())||'-12-31' AS DATE)) +
DAYOFYEAR(CURDATE())
Leap years can be recognized by having 366 as the total number of days rather than 365. This is used for the corresponding determination.
On the one hand, each date value must be tested to see if it lies in a leap year, and also for the correct count for the 60th day (31 days in January and 29 in February). In this case, all following DAYOFYEAR values for the date must be increased by 1. Then 1 March in a leap year will correspond exactly to 1 March in a normal year.
On the other hand, the current year (CURDATE()) must be tested to see if it is in fact a leap year. Here too the number of days must be increased by 1.
Displaying the end value for the next 8 days is not so simple either, since the year is still not included in the query. However this would be an easy condition to add: YEAR("Date") = YEAR(CURDATE()) for the current year or YEAR("Date") = YEAR(CURDATE()) + 1 for the next one.
When loaning out media, the library might want to know the exact day on which the medium should be returned. Unfortunately the internal HSQLDB does not provide the DATEADD() function which is available in many external databases and also in the internal Firebird. Here follows a roundabout way of achieving this for a limited time span.
First a table is created containing a sequence of dates covering the desired time span. For this purpose, Calc is opened and the name “ID” is placed in field A1 and “Date” in field B1. In Field A2 we enter 1 and in field B2 the starting date, for example 01/15/2015. Select A2 and B2 and drag them down. This will create a sequence of numbers in column A and a sequence of dates in column B.
Then this whole table, including the column headings, is selected and imported into Base: right click > Paste > Table name > Date. Under options, Definition and Data, and Use first row as column names are clicked. All the columns are transferred. After that, make sure that the ID field is given the type Integer [INTEGER] and the Date field the type Date [DATE]. A primary key is not necessary as the records are not going to be altered later. Since a primary key has not been defined, the table is write-protected.
Tip
You can also use a query technique to create such a view. If you use a filter table, you can even control the start date and the range of date values.
SELECT DISTINCT CAST
( "Y"."Nr" + (SELECT "Year" FROM "Filter" WHERE "ID" = True) - 1 || '-' ||
CASEWHEN( "M"."Nr" < 10, '0' || "M"."Nr", '' || "M"."Nr" ) || '-' ||
CASEWHEN( "D"."Nr" < 10, '0' || "D"."Nr", '' || "D"."Nr" )
AS DATE ) AS "Date"
FROM "Nrto31" AS "D", "Nrto31" AS "M", "Nrto31" AS "Y"
WHERE "Y"."Nr" <= (SELECT "Year" FROM "Filter" WHERE "ID" = True) AND "M"."Nr" <= 12 AND "D"."Nr" <= 31
This view accesses a table that contains only the numbers from 1-31 and is write-protected. Another filter table contains the starting year and the year range that the view should cover. The date is put together from these, creating a date expression (year, month, day) in text, that can then be converted into a date. HSQLDB accepts all days up to 31 a month and strings like 02/31/2015. However 02/31/2015 is transmitted as 3/03/2015. Therefore in preparing the view, you must use DISTINCT to exclude duplicate date values.
Here the following view is effective:
SELECT "a"."Date",
(SELECT COUNT(*) FROM "View_date" WHERE "Date" <=
"a"."Date")
AS "lfdNr"
FROM "View_Date" AS "a"
Using line numbering, the date value is converted into a number. As you cannot delete data in a view, no extra write protection is needed.
Using a query we can now determine a specific date, for example the date in 14 days time:
SELECT "a"."Loan_Date",
(SELECT "Date" FROM "Date" WHERE "ID" =
(SELECT "ID" FROM "Date" WHERE "Date" = "a"."Loan_Date")+14)
AS "Returndate"
FROM "Loans" AS "a"
The first column shows the loan date. This column is accessed by a correlating subquery which again is divided into two queries. SELECT "ID" FROM "Date" gives the value of the ID field, corresponding to the issue date. 14 days is added to the value. The result is assigned to the ID field by the outer subquery. This new ID then determines which date goes into the date field.
Unfortunately in the display of this query, the date type is not automatically recognized, so that it becomes necessary to use formatting. In a form, the corresponding display can be stored, so that each query will yield a date value.
A direct variant for determining the date value is possible using a shorter way:
SELECT "Loan_Date",
DATEDIFF( 'dd', '1899-12-30', "Loan_Date" ) + 14
AS "Returndate"
FROM "Table"
The numeric value returned can be formatted inside a form as a date, using a formatted field. However it takes a lot of work to make it available for further SQL processing in a query.
MySQL has a function called TIMESTAMPADD(). A similar function does not exist in HSQLDB. But the internal numeric value of the timestamp can be used to do the addition or subtraction, using a formatted field in a form.
Unlike the addition of days to a date, times cause a problem which might not be obvious in the beginning.
SELECT "DateTime"
DATEDIFF('ss', '1899-12-30', "DateTime" ) / 86400.0000000000 +
36/24 AS "DateTime+36hours"
FROM "Table"
The new calculated time is based on the difference from the system’s zero time. As in date calculations, this is the date of 12/30/1899.
Note
The zero date of 12/30/1899 is supposed to have been chosen because the year 1900, unlike most years divisible by 4, was not a leap year. So the tag ‘1’ of the internal calculation was moved back to 12/31/1899 and not 01/01/1900.
The difference is expressed in seconds, but the internal number counts days as numbers before the decimal point, and hours, minutes and seconds as decimal places. Since a day contains 60*60*24 seconds, the second count must be divided by 86400 to be able to calculate the days and fractions of days correctly. If the internal HSQLDB is to give decimal places at all, they must be included in the calculation, so instead of 86400, we must divide by 86400.0000000000. Decimal places in a query must use a decimal point as separator, regardless of locale conventions. The result will have 10 decimal places after the dot.
To this result must be added the total hours as a fractional part of a day. The calculated figure, suitably formatted, can be created in the query. Unfortunately the formatting is not saved but it can be transferred with the correct format using a formatted field in a form or report.
If minutes or seconds are to be added, be careful that they are supplied as fractions of a day.
If the date falls within November, December, January, etc. there are no problems with the calculation. They appear quite accurate: adding 36 hours to a timestamp of 01/20/2015 13:00:00 gives 01/22/2015 00:00:00. But things are different for 04/20/2015 13:00:00. The result is 04/22/2015 00:00:00. The calculation goes wrong because of summer time. The hour “lost” or “gained” by the time change is not taken into account. Within a single time zone, there are various ways of getting a “correct” result. Here is a simple variation:
SELECT "DateTime"
DATEDIFF( 'dd', '1899-12-30', "DateTime" ) +
HOUR( "DateTime" ) / 24.0000000000 +
MINUTE( "DateTime" ) / 1440.0000000000 +
SECOND( "DateTime" ) / 86400.0000000000 +
36/24
AS "DateTime+36hours"
FROM "Table"
Instead of counting hours, minutes and seconds since the date origin, they are counted from the current date. On 05/20/2015 the time is 13:00 but without summer time, it would be shown as 12:00. The HOUR function takes summer time into account and gives 13 hours as the hourly part of the time. This can then be added correctly to the daily part. Minutes and seconds are dealt with in exactly the same way. Finally the extra hours are added as a fractional part of a day and the whole thing is displayed as a calculated timestamp using cell formatting.
Two things need to be kept in view in this calculation:
When moving from winter time to summer time, the hourly values do not come out correctly. This can be corrected using an ancillary table, that takes the dates for the beginning and end of summer time and corrects the hourly count. A somewhat complicated business.
The display of times is possible only with formatted fields. The result is a decimal number, not a timestamp that could be stored directly as such in the database. Either it must be copied within the form or converted from a decimal number to a timestamp by using a complicated query. The breaking point in the conversion is the date value, as leap years or months with different numbers of days may be involved.
Instead of using a household book, a database on a PC can simplify the tiresome business of adding up expenses for food, clothing, transport, and so on. We want most of these details to be immediately visible in the database, so our example assumes that income and expenditure will be stored as signed values in one field called Amount. In principle, the whole thing can be expanded to cover separate fields and a relevant summation for each.
SELECT "ID", "Amount", (SELECT SUM("Amount") FROM "Cash" WHERE "ID" <= "a"."ID") AS "Balance" FROM "Cash" AS "a" ORDER BY "ID" ASC
This query causes for each new record a direct calculation of the current account balance. At the same time the query remains editable because the Balance field is created through a correlating sub-query. The query depends on the automatically created primary key ID to calculate the state of the account. However, balances are usually calculated on a daily basis. So we need a date query.
SELECT "ID", "Date", "Amount", ( SELECT SUM( "Amount" ) FROM "Cash" WHERE "Date" <= "a"."Date" ) AS "Balance" FROM "Cash" AS "a" ORDER BY "Date", "ID" ASC
The expenditure now appears sorted and summed by date. There still remains the question of the category, since we want corresponding balances for the individual categories of expenditure.
SELECT "ID", "Date", "Amount", "Acct_ID",
( SELECT "Acct" FROM "Acct" WHERE "ID" = "a"."Acct_ID" ) AS "Acct_name",
( SELECT SUM( "Amount" ) FROM "Cash" WHERE "Date" <= "a"."Date" AND "Acct_ID" = "a"."Acct_ID" ) AS "Balance",
( SELECT SUM( "Amount" ) FROM "Cash" WHERE "Date" <= "a"."Date" ) AS "Total_balance"
FROM "Cash" AS "a" ORDER BY "Date", "ID" ASC
This creates an editable query in which, in addition to the entry fields (Date, Amount, Acct_ID), the account name, the relevant balance, and the total balance appear together. As the correlating subqueries are partially based on previous entries ("Date" <= "a"."Date") only new entries will go through smoothly. Alterations to a previous record are initially detectable only in that record. The query must be updated if later calculations dependent on it are to be carried out.
Automatically incrementing fields are fine. However, they do not tell you definitely how many records are present in the database or are actually available to be queried. Records are often deleted and many users try in vain to determine which numbers are no longer present in order to make the running number match up.
SELECT "ID", ( SELECT COUNT( "ID" ) FROM "Table" WHERE "ID" <= "a"."ID" ) AS "Nr." FROM "Table" AS "a"
The ID field is read, and the second field is determined by a correlating sub-query, which seeks to determine how many field values in ID are smaller than or equal to the current field value. From this a running line number is created.
Each record to which you want to apply this query contains fields. To apply this query to the records, you must first add these fields to the query. You can place them in whatever order you desire in the SELECT clause. If you have the records in a form, you need to modify the form so that the data for the form comes from this query.
For example the record contains field1, field2, and field3. The complete query would be:
SELECT "ID", "field1", "field2", "field3", ( SELECT COUNT( "ID" ) FROM "Table" WHERE "ID" <= "a"."ID" ) AS "Nr." FROM "Table" AS "a"
A numbering for a corresponding grouping is also possible:
SELECT "ID", "Calculation", ( SELECT COUNT( "ID" ) FROM "Table" WHERE "ID" <= "a"."ID" AND "Calculation" = "a"."Calculation" ) AS "Nr." FROM "Table" AS "a" ORDER BY "ID" ASC, "Nr." ASC
Here one table contains different calculated numbers. ("Calculation"). For each calculated number, "Nr." is separately expressed in ascending order after sorting on the ID field. This produces a numbering from 1 upwards.
If the actual sort order within the query is to agree with the line numbers, an appropriate type of sorting must be mapped out. For this purpose the sort field must have a unique value in all records. Otherwise two place numbers will have the same value. This can actually be useful if, for example, the place order in a competition is to be depicted, since identical results will then lead to a joint position. In order for the place order to be expressed in such a way that, in case of joint positions, the next value is omitted, the query needs to be be constructed somewhat differently:
SELECT "ID", ( SELECT COUNT( "ID" ) + 1 FROM "Table" WHERE "Time" < "a"."Time" ) AS "Place" FROM "Table" AS "a"
All entries are evaluated for which the Time field has a smaller value. That covers all athletes who reached the winning post before the current athlete. To this value is added the number 1. This determines the place of the current athlete. If the time is identical with that of another athlete, they are placed jointly. This makes possible place orders such as 1st Place, 2nd Place, 2nd Place, 4th Place.
It would be more problematic, if line numbers were required as well as a place order. That might be useful if several records needed to be combined in one line.
SELECT "ID", ( SELECT COUNT( "ID" ) + 1 FROM "Table" WHERE "Time" < "a"."Time" ) AS "Place",
CASE WHEN
( SELECT COUNT( "ID" ) + 1 FROM "Table" WHERE "Time" = "a"."Time" ) = 1
THEN ( SELECT COUNT( "ID" ) + 1 FROM "Table" WHERE "Time" < "a"."Time" )
ELSE (SELECT ( SELECT COUNT( "ID" ) + 1 FROM "Table" WHERE "Time" < "a"."Time" ) + COUNT( "ID" ) FROM "Table" WHERE "Time" = "a"."Time" "ID" < "a"."ID"
END
AS "LineNumber" FROM "Table" AS "a"
The second column still gives the place order. The third column checks first if only one person crossed the line with this time. If so, the place order is converted directly into a line number. Otherwise a further value is added to the place order. For the same time ("Time" = "a"."Time") at least 1 is added, if there is a further person with the primary key ID, whose primary key is smaller than the primary key in the current record ("ID" < "a"."ID"). This query therefore yields identical values for the place order so long as no second person with the same time exists. If a second person with the same time does exist, the ID determines which person has the lesser line number.
Incidentally, this sorting by line number can serve whatever purpose the users of the database want. For example, if a series of records are sorted by name, records with the same name are not sorted randomly but according to their primary key, which is of course unique. In this way too, numbering can lead to a sorting of records.
Line numbering is also a good prelude to the combining of individual records into a single record. If a line-numbering query is created as a view, a further query can be applied to it without creating any problem. As a simple example here once more is the first numbering query with one extra field:
SELECT "ID", "Name", ( SELECT COUNT( "ID" ) FROM "Table" WHERE "ID" <= "a"."ID" ) AS "Nr." FROM "Table" AS "a"
This query is turned into the view View1. The query can be used, for example, to put the first three names together in one line:
SELECT "Name" AS "Name_1", ( SELECT "Name" FROM "View1" WHERE "Nr." = 2 ) AS "Name_2", ( SELECT "Name" FROM "View1" WHERE "Nr." = 3 ) AS "Name_3" FROM "View1" WHERE "Nr." = 1
In this way several records can be converted into adjacent fields. This numbering simply runs from the first to the last record.
If all these individuals are to be assigned the same surname, this can be carried out as follows:
SELECT "ID", "Name", "Surname", ( SELECT COUNT( "ID" ) FROM "Table" WHERE "ID" <= "a"."ID" AND "Surname" = "a"."Surname") AS "Nr." FROM "Table" AS "a"
Now that the view has been created, the family can be assembled.
SELECT "Surname", "Name" AS "Name_1", ( SELECT "Name" FROM "View1" WHERE "Nr." = 2 AND "Surname" = "a"."Surname") AS "Name_2", ( SELECT "Name" FROM "View1" WHERE "Nr." = 3 AND "Surname" = "a"."Surname") AS "Name_3" FROM "View1" AS "a" WHERE "Nr." = 1
In this way, in an address book, all members of one family ("Surname") can be collected together so that each address need be considered only once when sending a letter, but everyone who should receive the letter is listed.
We need to be careful here, as we do not want an endlessly looping function. The query in the above example limits the parallel records that are to be converted into fields to 3. This limit was chosen deliberately. No further names will appear even if the value of "Nr." is greater than 3.
In a few cases such a limit is clearly understandable. For example, if we are creating a calendar, the lines might represent the weeks of the year and the columns the weekdays. As in the original calendar only the date determines the field content, line numbering is used to number the days of each week continuously and then the weeks in the year become the records. This does require that the table contains a date field with continuous dates and a field for the events. Also the earliest date will always create an “Nr.” = 1. So, if you want the calendar to begin on Monday, the earliest date must be on Monday. Column 1 is then Monday, column 2 Tuesday and so on. The subquery then ends at "Nr." = 7. In this way all seven days of the week can be shown alongside each other and a corresponding calendar view created.
Sometimes it is useful to assemble several fields using a query and separate them by line breaks, for example when reading a complete address into a report.
The line break within the query is represented by Char(13). Example:
SELECT "Firstname"||' '||"Surname"||Char(13)||"Road"||Char(13)||"Town" FROM "Table"
This yields:
Firstname Surname
Road
Town
Such a query, with a line numbering up to 3, allows you to print address labels in three columns by creating a report. The numbering is necessary in this connection so that three addresses can be placed next to one another in one record. That is the only way they will remain next to each other when read into the report.
In some operating systems it is necessary to include char(10) alongside char(13) in the code.
SELECT "Firstname"||' '||"Surname"||Char(13)||Char(10)||"Street"||Char(13)||Char(10)||"Town" FROM "Table"
For other databases, and for newer versions of HSQLDB, the Group_Concat() command is available. It can be used to group individual fields in a record into one field. So, for example, it is possible to store first names and surnames in one table, then to present the data in such a way that one field shows the surnames as family names while a second field contains all the relevant first names sequentially, separated by commas.
This example is similar in many ways to line numbering. The grouping into a common field is a kind of supplement to this.
|
Surname |
Firstname |
|
Müller |
Karin |
|
Schneider |
Gerd |
|
Müller |
Egon |
|
Schneider |
Volker |
|
Müller |
Monika |
|
Müller |
Rita |
is converted by the query to:
|
Surname |
Firstnames |
|
Müller |
Karin, Egon, Monika, Rita |
|
Schneider |
Gerd, Volker |
This procedure can, within limits, be expressed in HSQLDB. The following example refers to a table called Name with the fields IDs, Firstname and Surname. The following query is first run on the table and saved as a view called View_Group.
SELECT "Surname", "Firstname", ( SELECT COUNT( "ID" ) FROM "Name" WHERE "ID" <= "a"."ID" AND "Surname" = "a"."Surname" ) AS "GroupNr" FROM "Name" AS "a"
You can read in the Queries chapter how this query accesses the field content in the same query line. It yields an ascending numbered sequence, grouped by Surname. This numbering is necessary for the following query, so that in the example a maximum of 5 first names is listed.
SELECT "Surname",
( SELECT "Firstname" FROM "View_Group" WHERE "Surname" = "a"."Surname" AND "GroupNr" = 1 ) ||
IFNULL( ( SELECT ', ' || "Firstname" FROM "View_Group" WHERE "Surname" = "a"."Surname" AND "GroupNr" = 2 ), '' ) ||
IFNULL( ( SELECT ', ' || "Firstname" FROM "View_Group" WHERE "Surname" = "a"."Surname" AND "GroupNr" = 3 ), '' ) ||
IFNULL( ( SELECT ', ' || "Firstname" FROM "View_Group" WHERE "Surname" = "a"."Surname" AND "GroupNr" = 4 ), '' ) ||
IFNULL( ( SELECT ', ' || "Firstname" FROM "View_Group" WHERE "Surname" = "a"."Surname" AND "GroupNr" = 5 ), '' )
AS "Firstnames"
FROM "View_Group" AS "a"
Using sub-queries, the first names of the group members are searched for one after another and combined. From the second sub-query onward you must ensure that 'NULL' values do not set the whole combination to 'NULL'. That is why a result of '' rather than 'NULL' is shown.