
Base Guide 7.3
Chapter 1
Introducing Base
This document is Copyright © 2022 by the LibreOffice Documentation Team. Contributors are listed below. You may distribute it and/or modify it under the terms of either the GNU General Public License (https://www.gnu.org/licenses/gpl.html), version 3 or later, or the Creative Commons Attribution License (https://creativecommons.org/licenses/by/4.0/), version 4.0 or later.
All trademarks within this guide belong to their legitimate owners.
|
Steve Fanning |
Vasudev Narayanan |
Robert Großkopf |
|
Martin Fox |
Robert Großkopf |
Pulkit Krishna |
|
Jost Lange |
Dan Lewis |
Hazel Russman |
|
Jochen Schiffers |
Jean Hollis Weber |
|
Please direct any comments or suggestions about this document to the Documentation Team’s forum at LibreOffice Guides - The Document Foundation Community (registration is required) or send a mail to loguides@community.documentfoundation.org
Note
Everything you post to a forum, including your email address and any other personal information that is written in the message, is publicly archived and cannot be deleted. E-mails sent to the forum are moderated.
Published August 2022. Based on LibreOffice 7.3 Community.
Other versions of LibreOffice may differ in appearance and functionality.
Some keystrokes and menu items are different on macOS from those used in Windows and Linux. The table below gives some common substitutions for the instructions in this book. For a more detailed list, see the application Help.
|
Windows or Linux |
macOS equivalent |
Effect |
|
Tools > Options menu selection |
LibreOffice > Preferences |
Access setup options |
|
Right-click |
Control+click and/or right-click depending on computer setup |
Open a context menu |
|
Ctrl (Control) |
⌘ (Command) |
Used with other keys |
|
Alt |
⌥ (Option) |
Used with other keys |
|
Ctrl+Q |
⌘+Q |
Exit / quit LibreOffice |
Base is the database front-end component of LibreOffice, a freely available, fully-featured, open-source office productivity suite. Base provides these important features:
Database creation. New embedded databases can be created using an embedded HSQLDB database engine.
Connection to other data sources. Connections can be made to many widely employed database engines and other data sources, including spreadsheets, text documents, and address books. External data sources must be created and properly configured before Base can make such a connection.
Tables. In many databases data is organized in tables with rows and columns. In general terms, the columns represent categories of data, while the rows represent individual instances. Tables in a relational database are connected by relationships and these allow the data to be shared between tables, eliminating data redundancy.
Forms. A form is a user-friendly window that is used to view and edit the data in the tables of a database. The form helps the user to enter data quickly and accurately, ensuring that data updates are implemented consistently across all affected tables within the database.
Queries. A query retrieves data from the database, calculates results where necessary, and filters records of interest from a large volume of data. Queries can bring together data from one or more tables, sometimes via another query or view.
Views. For some connected database types, it is possible to create database views. A view is a read-only, virtual table containing rows and columns. It is constructed using a query that gathers data physically stored in one or more “real” tables. Most queries created with Base are stored in the Base document, but a view’s underlying query is stored within the database engine.
Reports. A report is used to extract key data from the database and present it in an easy to read format, often for consumption by people (such as decision makers) not otherwise directly involved with the database.
Linking. Databases can be linked to other documents and external forms, including use in mail merge.
Filtering and searching. Filters are applied to limit the volume of data displayed, focusing attention on records that match specific filter criteria. Searching is used to locate records of particular interest that match specific search criteria.
Macros. LibreOffice Basic and Python macros can be used to simplify running repetitive tasks preventing input errors, increase functionality, and improve usability. LibreOffice includes the ScriptForge and Access2Base macro libraries, which provide an extensive collection of resources that can be invoked from Basic or Python scripts.
Note
At this issue, the majority of macros in this document are coded in LibreOffice Basic. More information about using Python scripts can be found in the Help system.
Database maintenance. This includes compacting a database, resetting autovalues, exporting data, and locating unnecessary entries.
In everyday office operation, spreadsheets are regularly used to aggregate sets of data and perform analyses on them. As the data in a spreadsheet is laid out in a table view, plainly visible, and easily edited or extended, many users ask why they should use a database instead of a spreadsheet. This book explains the differences between these tools and provides readers with information that will help them decide on the best solution for their specific requirements.
A database will provide advantages to many users and a well-designed database will minimize duplication, errors, and inconsistencies which may be hard to identify and eliminate in a spreadsheet. However, some potential database users may be put off by a lack of familiarity with database concepts and terminology. Users who are concerned about a steep learning curve should be reassured that:
The database concepts and terminology used in Base are largely consistent with those used in many other common database systems. This means that much of the information about database technologies that is freely available on the Internet can be helpful in understanding aspects of Base.
As a key component of the integrated LibreOffice suite, users who are familiar with the other components should have no trouble interacting with Base, which utilizes the menus and toolbars of the classic LibreOffice user interface. Because of the nature of Base, it does not provide (or need) the user interface selection options (such as tabbed variants) that are available in some of the other LibreOffice components.
Base provides wizards to help users who are new to database design (or just new to the software) to create databases, tables, queries, forms, and reports, and it comes supplied with a set of predefined table definitions for tracking assets, customers, sales orders, invoices, and many other common and useful items.
In addition there are many other sources of assistance, as described in the “Where to get more help” section of the Preface to this book.
This chapter introduces one of the sample databases that is used throughout this book – Media_without_Macros.odb. This database is designed to assist with operating a media library and everything concerned with it. Facilities include:
Capture of media details.
Capture of information about authors and borrowers.
Circulation desk management functions.
In addition, this chapter uses the sample Example_Sport.odb database, which is designed to assist with the organization of a sports competition.
You can use Base in two distinct ways:
1) Base can act as a front end for a wide range of database engines, providing a user interface that supports the creation and use of elements such as queries, forms, reports, and macros. In this role as a database front-end, core (back-end) database functions such as the storage and organization of data are carried out by the database engine rather than Base. In this way a Base user can interact with existing local or networked databases, which may be multi-user assets shared with other members of their organization.
2) Base can also operate in a standalone mode with an embedded Java-based HSQLDB (HyperSQL DataBase, version 1.8.0) relational database engine in a standard LibreOffice distribution. This is an ideal solution for everyday jobs, and for people requiring an easy-to-understand, simple-to-use, single-user database system instead of communicating with an external database engine. More information about HSQLDB can be found at http://hsqldb.org/.
Work continues to improve the integration of the non-Java Firebird relational database (version 3.0.7) as an alternative embedded engine within Base. Until this work is completed, the ability to create a database with Firebird is available only as an experimental feature. However, Base can connect to a Firebird database engine through an external server without enabling experimental features. More information about Firebird can be found at https://firebirdsql.org/.
Base can connect to some of the most widely employed multi-user database engines. The list of available database types varies according to operating system, but the following should always be included:
MariaDB – https://mariadb.org/
MySQL – https://www.mysql.com/
PostgreSQL – https://www.postgresql.org/
In addition, the built-in support for JDBC (Java Database Connectivity) and ODBC (Open Database Connectivity) standard drivers allows Base to connect to many other existing database engines. Base can also connect to other data sources, including spreadsheets, text documents, and address books.
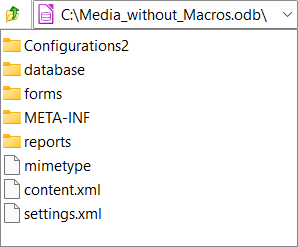
Base stores its database information in files having the extension “.odb” that are formatted in accordance with the standard Open Document Format for Office Applications (OpenDocument) Version 1.2. Part 3: Packages. ODB files created by Base contain a collection of files and folders that are compressed using ZIP lossless data compression (Figure 1). An ODB file might contain many files, including, for example, data relating to an embedded database engine, forms, queries, reports, and macros. If the file relates to an external database rather than an embedded engine, then it will contain information about the database connection rather than the data stored in the database’s tables.
Figure 1: Top-level structure of the folders and files within an ODB file
Correct operation of some Base functionality is dependent on a Java Runtime Environment (JRE). If a JRE is not available to LibreOffice, then the following facilities will be unavailable:
The embedded HSQLDB database.
The Table, Query, and Form Wizards.
The Report Builder.
Database access via Java Database Connectivity (JDBC).
Base will present appropriate error dialogs to warn of the unavailability of a JRE. If a JRE is installed but not enabled in LibreOffice, it can be enabled by selecting Tools > Options > LibreOffice > Advanced on the Menu bar and clicking the Use a java runtime environment option.
Oracle Java can be downloaded from https://www.java.com/en/download/manual.jsp. If you use the 32-bit version of LibreOffice, you should install the JRE 32-bit version. If you use the 64-bit version of LibreOffice, you should install the JRE 64-bit version.
Caution
The Oracle download site defaults to serving the 32-bit JRE – take care to follow the correct links if you need to access the 64-bit JRE download, which should contain the string “x64” within its filename. A 64-bit version of LibreOffice will not recognize a 32-bit JRE (and vice versa) and this is a common source of problems.
For macOS, you need to install Oracle’s Java Development Kit (JDK), not just the JRE. Download links can be found by selecting the macOS option at:
https://www.oracle.com/java/technologies/downloads/.
If your data is stored in a relational database, you will inevitably want to take advantage of facilities for the direct entry of SQL commands. SQL stands for Structured Query Language and is a standard language (ISO/IEC 9075) for accessing and manipulating data in relational databases. This book contains many examples of SQL statements. Do not worry if you are initially unfamiliar with the syntax and semantics of SQL, there are good, free training materials available on the Internet. For example, the SQL Tutorial provided by W3Schools at https://www.w3schools.com/sql/default.asp is a good starting point.
The main Base window is shown in Figure 2 and its features are described in the following subsections.
Figure 2: The main Base window
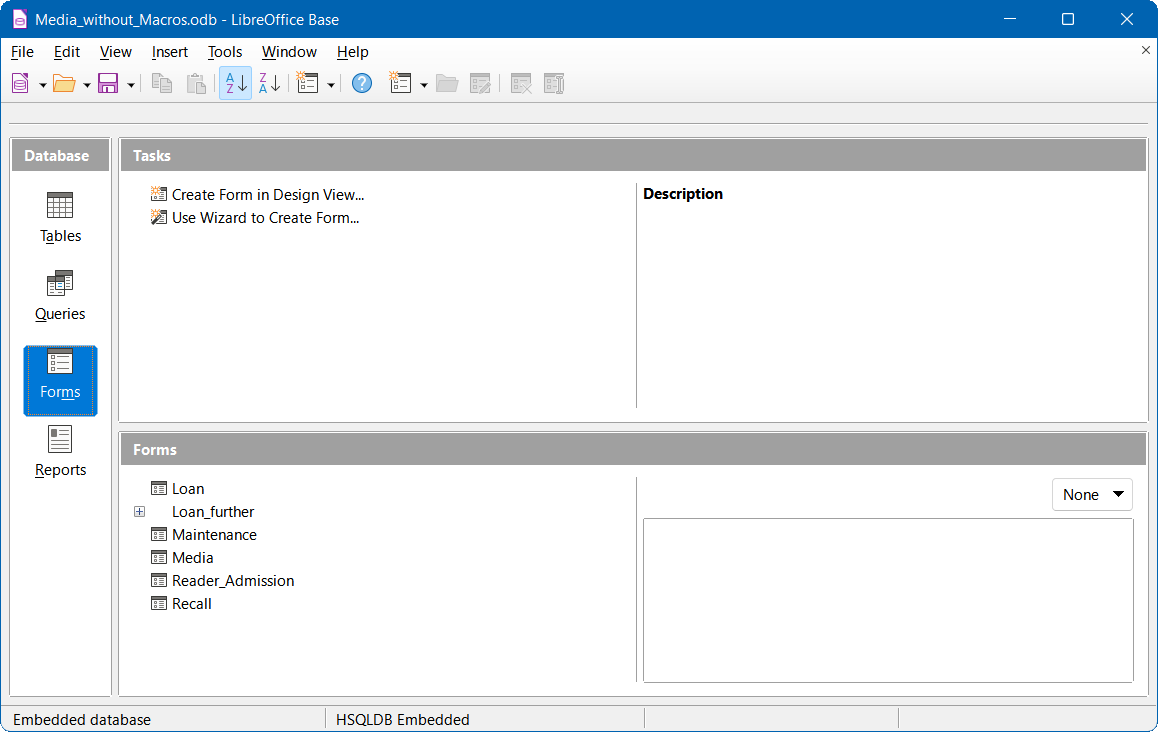
The Title bar is located at the top of the Base window. It shows the file name of the current database document.
The Menu bar is located just below the Title bar in Windows and Linux and at the top of the screen in macOS. When you select one of the menus, a submenu drops down to show further options, including:
Commands that directly cause an action, such as Close or Save, in the File menu.
Commands that open dialogs. These are indicated by an ellipsis (...) following a command, such as Open... in the File menu.
Commands that open further submenus. These are indicated by a right-pointing arrow following a command, such as Toolbars and Preview, in the View menu. Moving the cursor onto one of these options causes its submenu to open.
The default configuration of the menus on the Menu bar is likely to be suitable for most Base users. However, you can customize the Menu bar using the Menus tab of the Tools > Customize dialog – see the system Help for more details of this facility.
In addition to the Menu bar, Base provides several toolbars that provide quick access to frequently used options. Placing the mouse cursor over a toolbar icon displays a small box called a tooltip that names the button’s function. To close a tooltip, move away from the underlying component or press the Esc key.
The default setting when Base opens a database document is for the Standard toolbar to be displayed at the top of the workspace (below the Menu bar) along with the Form toolbar. The Form toolbar is replaced by either the Table, Query, or Report toolbar as different selections are made in the Database area of the main window.
The default Standard toolbar is shown in Figure 3 and provides the following options (left to right): New; Open; Save; Copy; Paste; Sort Ascending; Sort Descending; Form; LibreOffice Help.
Figure 3: Standard toolbar

The default Table toolbar is shown in Figure 4 and provides the following options (left to right): New Table Design; Open Database Object; Edit; Delete; Rename.
Figure 4: Table toolbar

The default Query toolbar is shown in Figure 5 and provides the following options (left to right): New Query (Design View); New Query (SQL View); Open Database Object; Edit; Delete; Rename.
Figure 5: Query toolbar

The default Form toolbar is shown in Figure 6 and provides the following options (left to right): Form; Open Database Object; Edit; Delete; Rename.
Figure 6: Form toolbar

The default Report toolbar is shown in Figure 7 and provides the following options (left to right): Report; Report Wizard; Open Database Object; Edit; Delete; Rename.
Figure 7: Report toolbar

Options to dock / undock and lock / unlock toolbars are provided in the menus of the main Base window. However, these are included only for consistency with toolbars in other components of LibreOffice and are not normally needed for Base.
The default configuration of the toolbars is likely to be suitable for most Base users. However, you can customize the toolbars using the Toolbars tab of the Tools > Customize dialog – see the system Help for more details of this facility.
The Status bar at the bottom of the workspace provides information about the open database, with the information displayed dependent on the type of that database. For example, Figure 8 shows the Status bar when the open database was created with the embedded HSQLDB database engine.
Figure 8: Status bar for database created using embedded HSQLDB

Figure 9 shows the Status bar when the open database is a MySQL database. Base has connected to a database called sakila (a sample database supplied as part of the MySQL distribution) that is available through a local MySQL server (connection name localhost, logged in with the root username).
Figure 9: Status bar for MySQL database

The Database area provides four buttons labeled Tables, Queries, Forms, and Reports (the same options are also available through the View menu on the Menu bar). Use these buttons to select the work area that is relevant to your current task. An alternative keyboard shortcut to action one of the buttons in the Database area is to press the Alt key together with the underlined letter in the button’s legend (for example, pressing Alt+Q on the keyboard is equivalent to clicking the Queries button with the mouse).
Depending on the work area selected, various tasks—creating new content or calling up existing elements—may be carried out. As different selections are made in the Database area, Base updates the contents of the two areas to the right to reflect the new work area.
Although tables are at the heart of any database, Base defaults to the forms work area when opening an existing database because forms are the elements most used when working with databases. With forms, you can make entries into the tables and analyze table content.
The Tasks area provides several options to select common actions within the selected work area. The options for each work area are as follows:
Tables
Create Table in Design View…
Use Wizard to Create Table…
Create View…
Queries
Create Query in Design View…
Use Wizard to Create Query…
Create Query in SQL View…
Forms
Create Form in Design View…
Use Wizard to Create Form…
Reports
Create Report in Design View…
Use Wizard to Create Report…
To the right of these links is an area entitled Description. As the mouse moves over one of the available options, this area is updated to give a brief text description of the cursor-indicated option.
The name at the top of the area below Tasks changes to reflect the selected work area and hence is one of Tables, Queries, Forms, or Reports.
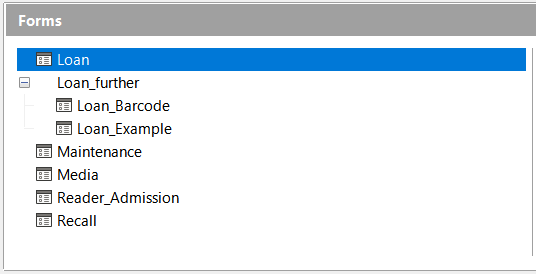
The left part of the area lists the defined elements of the relevant type. For the tables and queries work areas, this is an alphabetical list of the available elements. For the forms and reports work areas, the respective elements are arranged alphabetically within a folder structure (Figure 10). This is achieved either directly when saving the elements using the Save dialog or by creating new folders using Insert > Folder on the Menu bar.
Figure 10: Folder structure in the Forms area
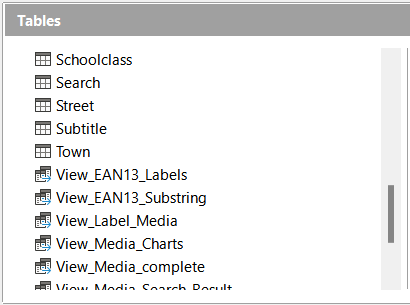
For the tables work area, if the database contains views then they are listed with the tables. The two types are distinguished by the use of different icons. Figure 11 shows both tables and views in the Media_without_Macros.odb database.
Figure 11: Tables area including views
The right section of the area provides additional information controlled by a drop-down menu of two or three options, depending on the work area selected.
For all work areas, the option None may be selected if you do not wish to clutter the screen with additional information.
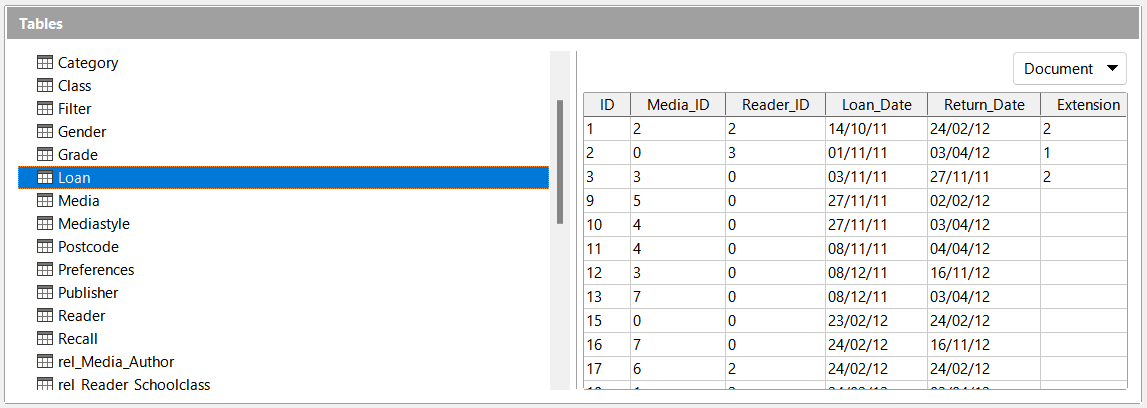
For all work areas, the option Document may be selected to provide a preview of the selected element, perhaps assisting in identification of an element of interest. Figure 12 for example shows a preview of the Loan table of the Media_without_Macros.odb database.
Figure 12: Document preview in Tables area
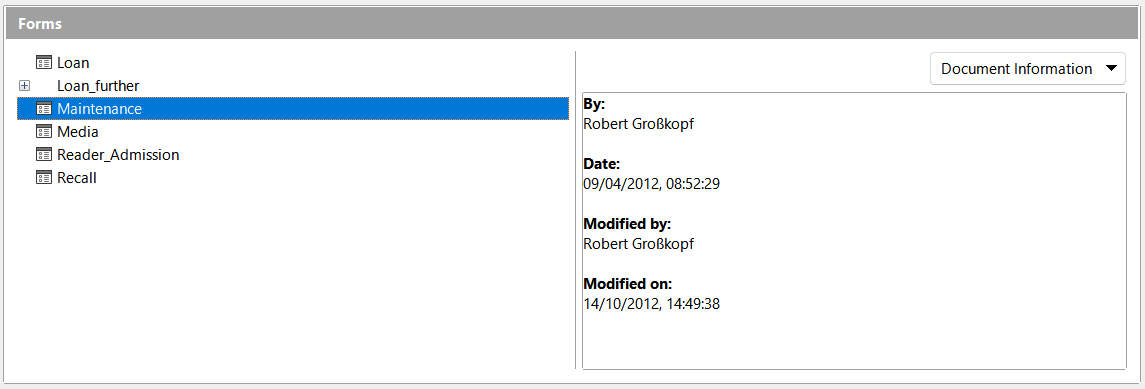
For the forms and reports work areas, an additional Document Information option is available. Figure 13 shows an example of the date and name information provided for the Maintenance form of the Media_without_Macros.odb database.
Figure 13: Document information in Forms area
A form is an element that is used to enter, display, or edit data in a database. Although it is possible to enter data directly into tables, for large tables it can sometimes be hard to be certain that the data is being placed in the correct location. An effective form can speed up and simplify the user’s tasks, reducing the possibility of entering erroneous data.
To open a form, click Forms in the Database area of the main Base window, right-click the name of the form in the Forms area, and select Open in the context menu. It is common in all LibreOffice components for the user interface to provide multiple methods to achieve the same objective. For example, once Forms has been clicked in the Database area of the main Base window, Base provides the following alternative methods to open a specific form:
1) Double-click the name of the form in the Forms area.
2) Click the name of the form in the Forms area and then click the Open Database Object icon on the Form toolbar.
3) Click the name of the form in the Forms area and then select Edit > Open Database Object on the Menu bar.
Note
To avoid unnecessary repetition, the remainder of this book will usually identify just one of the user interface methods provided to achieve a particular objective. The described method is not intended as a recommendation of “best practice” – that is a matter of personal preference.
A simple form may show information from just one table; more complex forms can contain much more. Figure 14 shows the Loan form in the Media_without_Macros.odb sample database, which has been extended to show information from multiple tables and include additional controls.
Figure 14: The Loan form
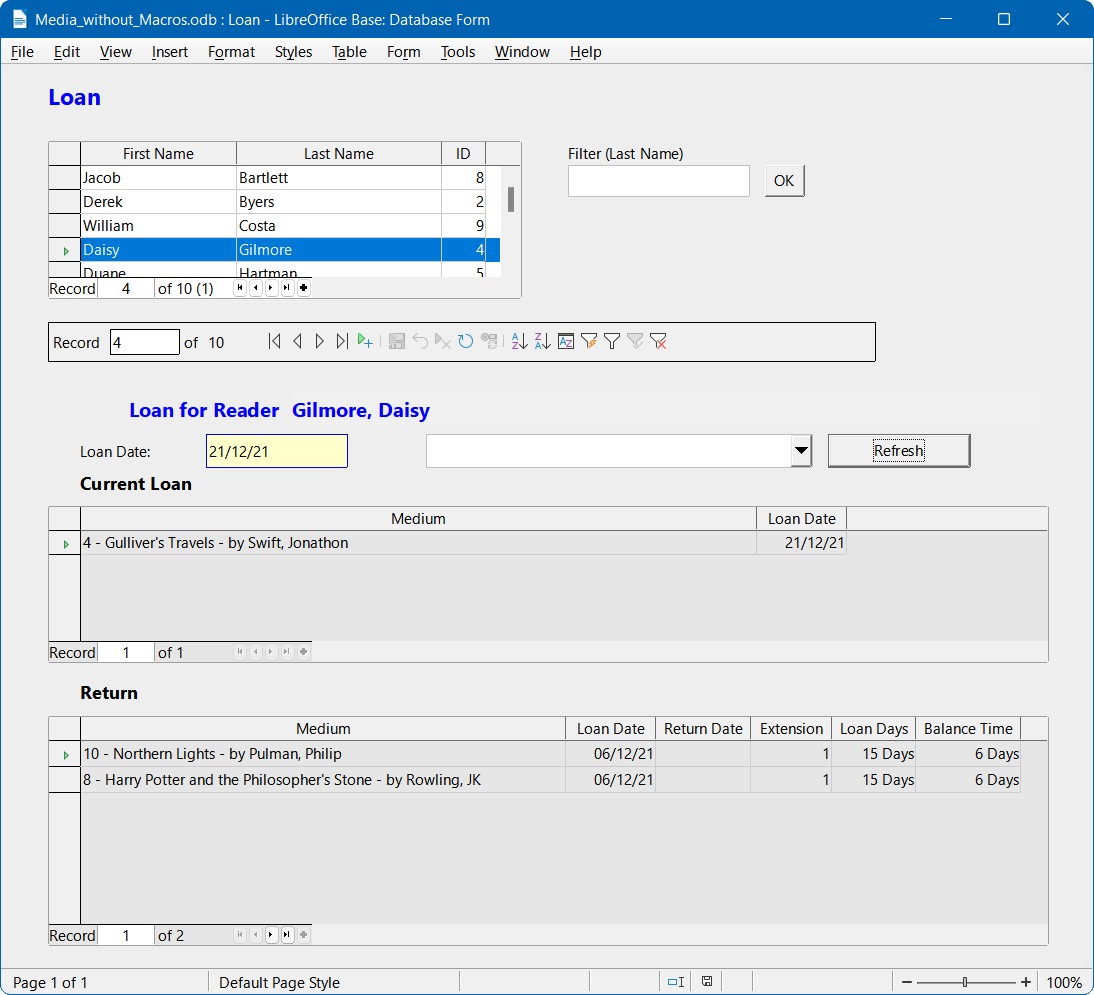
The following notes highlight some features of the Loan form:
The scrollable list of registered borrowers at the top of the form reflects the information in the Reader table, ordered first by last name and then by first name.
The number of entries shown in the list of borrowers can be reduced where necessary to make it more manageable. If a user inputs the letter “M” in the Filter (Last Name) field at the right of the list of borrowers and then clicks the OK button, only people whose last name begins with “M” will be included. Similarly, if the user inputs the letters “Mc” and then clicks the OK button, only people whose last name begins with “Mc” will be shown.
New borrower information can be input directly into the fields of the list of borrowers. Note however that a new library user registered in this way cannot borrow media items – further action would be required by the library administrator to clear a lock flag in the Reader table.
Details of items to be borrowed may be entered in the middle area of the form. After selecting the appropriate entry in the list of borrowers, the form updates to display the string “Loan for Reader” followed by the name of the selected borrower, with both written in emphasized text. If a previously borrowed item is overdue and must be returned before further loans are allowed, the middle area is locked (no input possible) and the string “Loan temporarily locked!” is appended after the borrower’s name. Items already on loan are shown in the lower area of the form.
The Loan Date is automatically set to the current date. The media items that are available for loan are listed in the drop-down menu at the left of the Refresh button, listed in ID order (ID is a field in the Media table). Items that are already on loan to any reader are not available for selection in this menu.
Media items selected for loan are added to the Current Loan area by clicking the Refresh button.
In the lower section of the form (labeled Return) it is not possible to delete a data row. Only the fields Return Date and Extension can be edited. If a borrower was previously locked and has subsequently returned the overdue item(s), the middle area can be unlocked by clicking the Refresh button.
All functions of the Loan form in this sample database are performed without using macros.
Tables are database elements that contain the data in a database, organized in rows and columns forming a grid. An important part of database design is to define the links between the various tables in the database. A relationship between two tables is created using fields that are common to both tables.
To view the relationships defined for the sample Media_without_Macros.odb database, select the Tools > Relationships option on the Menu bar. Base displays the Relation Design window, which shows the relationships graphically with lines between the tables connecting a field from each. At first sight this diagram can be daunting and so it is advisable to focus on just a part of it.
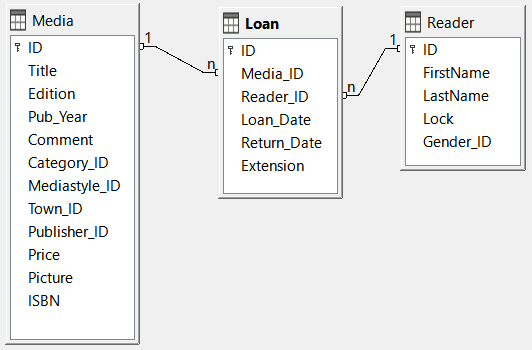
The Loan table is directly related to the Media and Reader tables, as shown in Figure 15. In both cases, the relationship is one-to-many (or many-to-one), as indicated by the “1” and “n” at each end of the joining line. This reflects that one reader may borrow multiple media items at the same time, and that one media item may be loaned out multiple times.
Figure 15: Relationships between the Loan table and the Media and Reader tables
Note
The Loan, Media, and Reader tables all have relationships with other tables but, for clarity, these are intentionally omitted from Figure 15.
When a book is borrowed, instead of its title being saved in the Loan table, only one number is saved in the Media_ID field. The ID field of the Media table stores the unique identifier for each record of this table. This field is a key field of the Media table: the primary key.
Note
The primary key uniquely determines the values for each field in each record of a table. So, when an item is borrowed, the number entered into the Media_ID field of the Loan table matches the number in the ID field of the Media table that identifies the record containing the information about the borrowed item.
The borrower’s name is not entered in the Loan table every time – this information is saved in the Reader table. It also has a primary key field which identifies each person who borrows an item. The value of this field can then be entered in the Loan table with the Reader_ID field identifying the specific person.
The relationships between the tables have the advantage that the desk work using the appropriate form is greatly reduced. Instead of having to enter the media title and first and last names without any errors, these can be entered by selecting the correct numbers for the Media_ID and Reader_ID fields, which allows the selection of the correct media items and first and last names. Finally, the same media item can be borrowed again later and the same reader can borrow several more media items at any loan event.
Figure 16 shows the Loan table of the Media_without_Macros.odb database. To open a table click Tables in the Database area of the main Base window, right-click the name of the table in the Tables area, and select Open in the context menu.
Figure 16: Loan table data structure
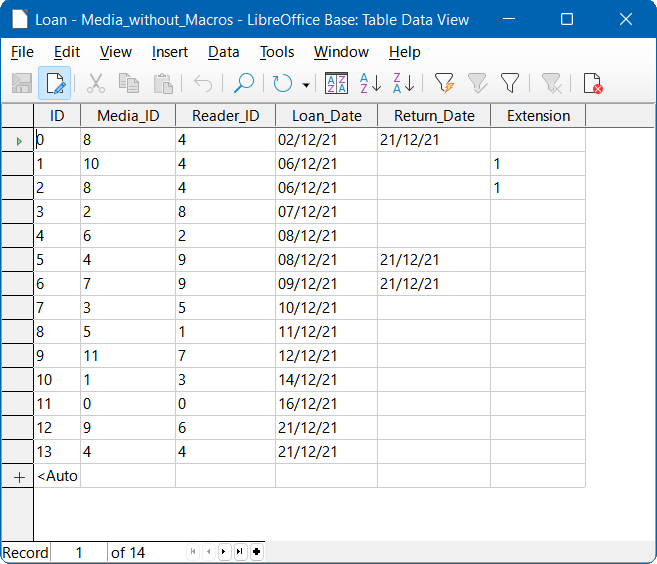
The same data can be directly input in the rows and columns of the Loan table as was previously entered using the form. The relationships between this table and other tables of the database are used in the form.
The most important field is the primary key (ID). This is generated automatically and shows the indispensable, unique content for most databases. For more on this topic, see the section “Relationships between tables” in Chapter 3, Tables.
The second field, Media_ID, stores values of the primary key of the Media table. It refers to the number in the corresponding field, ID, in the Media table. Such a reference to a primary key is called a foreign key. In the form, the title and the author will be displayed instead of the foreign key in a list box. The list box transmits the value in the background to the foreign key of the table.
The third field, Reader_ID, stores the primary key values of the Reader table. In this example, this key is only a number that refers to the reader who borrows media items. In the form, the last and first names of the reader are shown. As seen in the table, the reader with the primary key number '4' has borrowed multiple media items. The table can save the unique primary key of the Reader table as a foreign key Reader_ID many times. But in no case may a reader, who is listed in the foreign key of the Loan table, be deleted in the Reader table. Otherwise it would no longer be comprehensible as to who is now borrowing media. The database makes the default settings so that a deletion is impossible. The technical term for this is the requirement of referential integrity.
The loan date is stored in the fourth field (Loan_Date). If this date is present and does not correspond to the current date, the corresponding data set for the reader is shown in the bottom table of the form under the Return button.
The fourth field, Return_Date, stores the date on which a media item was returned from a loan period.
The Extension field contains information about extensions of the loan for an item. The meaning of the values 1, 2... is explained later. The database contains a Preferences table that defines the number of days per extension and other associated parameters.
The input of this data permits the management of a simple media library.
A query is a request to retrieve or manipulate data from a database, and that data may come from tables, views, or other queries. Queries bring together content from multiple tables in an overview format. Base stores queries using SQL, which is a standard language for accessing and manipulating databases.
Note
Queries are not the same as tables or views, even if sometimes they appear to be similar.
To open a query click Queries in the Database area of the main Base window, right-click the name of the query in the Queries area, and select Open in the context menu.
Figure 17: Media_Loan_Balance_Time query
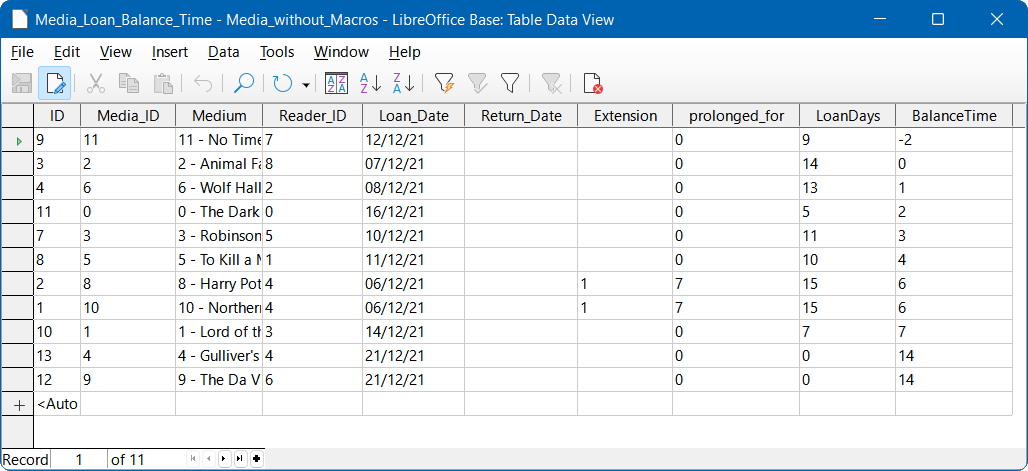
The Media_Loan_Balance_Time query shown in Figure 17 lists all media items that are currently out on loan. It calculates how long each item has been on loan and the balance of the loan period. Based on the Media_ID foreign key field, the query merges the media item’s primary key, title, and author into a single text string displayed in the Medium field. This field is used in the Loan form. Combined fields in the query also serve as connecting fields from the Loan form to the Loan table, namely through the Media_ID and Reader_ID fields.
All media items are listed for which the return date is not entered in the Loan table. The Media_ID and Medium query fields provide extra information to increase usability.
A reference to the borrower is established by including the primary key of the Reader table (Reader_ID).
The time difference in days is specified as LoanDays, calculated between the date of loan (Loan_Date) and the current date (Figure 17 shows a query that was run on 2021-12-21).
The number of LoanDays is subtracted from the loan time to give the remaining number of days in the loan period. The loan time can vary with different media types and this is controlled by fields in the Mediastyle table.
A value of 1 for the Extension field corresponds to an extension of the loan period of 7 days. In the dataset shown in Figure 17, the lines with ID set to 1 and 2 each have one extension of 7 days. The library administrator can grant multiple extensions and so values in this column are not limited to 1.
Reports enable you to retrieve data from the database and output the results in a helpful, user-friendly format. For example, your address book database may be full of details such as names, addresses, telephone numbers, dates of birth, and so on, but you might want to run a report to present only the addresses formatted for printing on labels.
Forms are not usually suitable to be used instead of reports. For example, consider the Recall form displayed in Figure 18, which is clearly not suitable for generating a cleanly formatted letter asking a borrower to return overdue media items.
Figure 18: Recall form
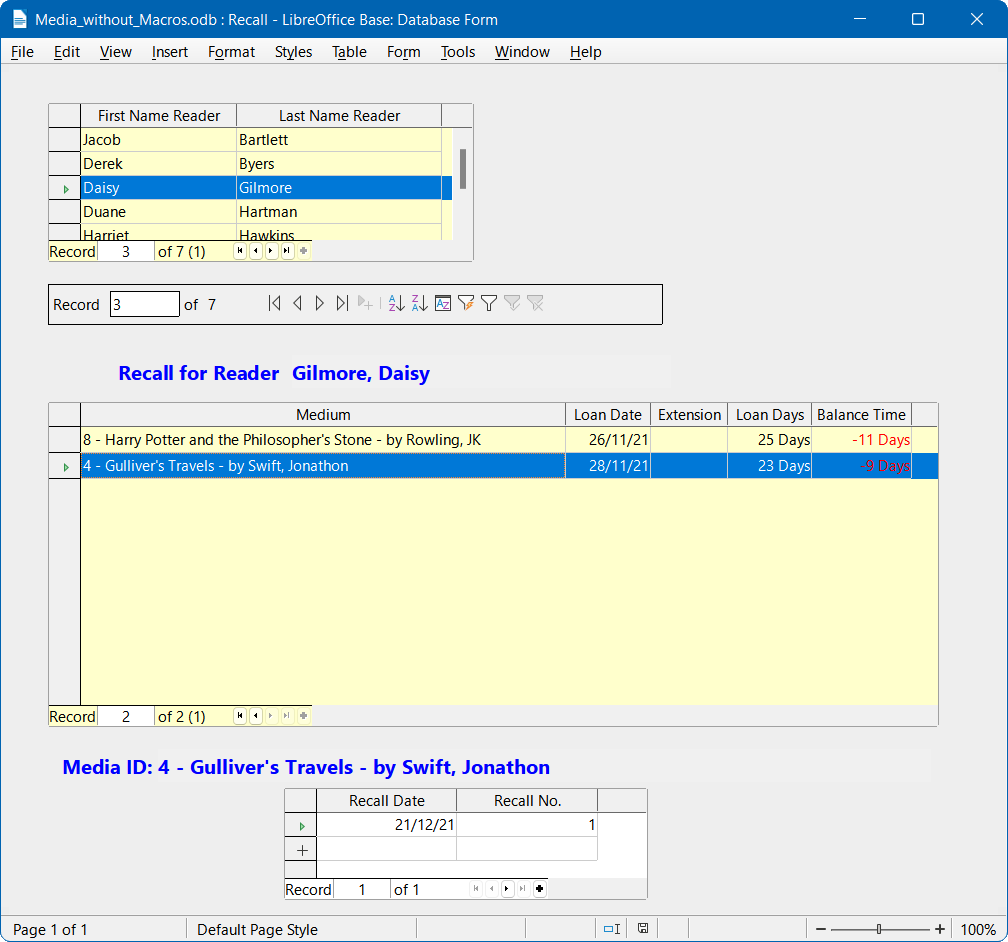
Before a report formatted as a recall notice can be printed, the recall information must be entered into the Recall form. The table in the form shows all persons who have borrowed items with a negative remaining loan time.
The recall date and recall notice number are entered for each media item to be recalled. The recall date defaults to the current date. The recall number is an integer incremented by 1 with each successive recall notice for a particular lender/media item.
This form, in the Media_without_Macros.odb database example, requires user input to create recall notices. In the macro version (Media_with_Macros.odb), the date is automatically entered and the recall notice printed.
The recall notice (Figure 19) is generated by means of a query from the previously input data. The user of the database needs only to select the Recall report and a recall letter can be printed out and sent to all persons who have a recall entry made in the form on the previous page.
To open a report click Reports in the Database area of the main Base window, right-click the name of the report in the Reports area, and select Open in the context menu.
Figure 19: Sample recall notice
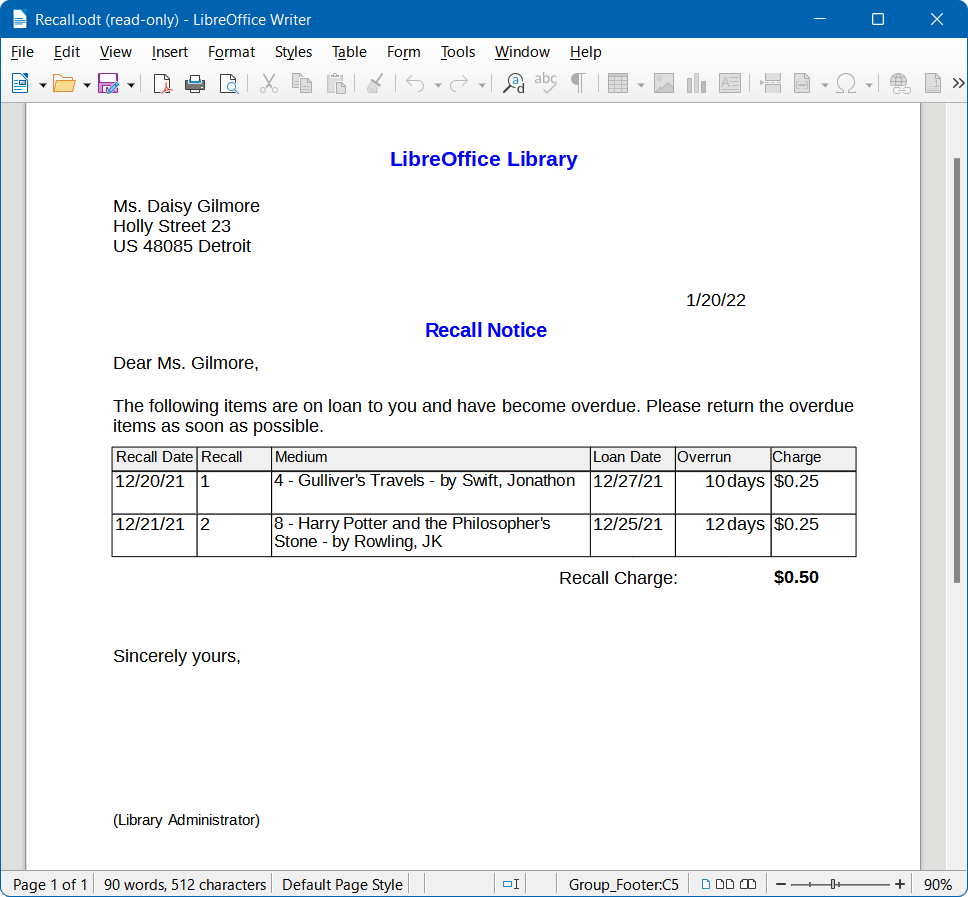
In such a report there may be multiple entries (overdue items) for a particular person. If the table containing the items for this person exceeds the space available on a page, it is extended to include an additional page.
Such a report is more powerful than a mail merge letter produced with LibreOffice Writer. It automatically gathers together the data sets for printing and arranges the necessary accompanying text accordingly.
A similar letter to that shown in the above figure can be otherwise only implemented with macros, as described in the “Creating a report” section on page 1.
Tables, queries, forms, and reports of the internal database, HSQLDB, are stored in a Base file. Because the database file is written into memory, the multiple objects in it require you to deal carefully with it. Bug reports make it clear that a database file requires just a bit more careful treatment than, for example, a text file that is written in Writer.
The following instructions should therefore be taken into consideration when dealing with a Base file:
An open database file should not be saved with a different name by using File > Save As or an equivalent interaction. When there is no other choice, the tables, queries, forms, and reports should first be closed. It is better to close the database file and create a copy of the file.
The Report Builder in Base was originally an add-on and although it no longer appears to be a separate extension, it operates largely independently of the database file. Renaming the database file removes the Report Builder of its foundation.
Because a table, query, form, or report is saved, it does not follow that the entire database file has been saved. This saving must be done separately. When an object (table, query, form, report) is saved, the information is written to the database file in memory; when the database file is saved, everything contained in the database file in memory is written to the *.odb file.
This memory behavior is especially true for working with the Report Builder. The preparation of a report is still the most unstable component inside the Base file. Therefore, after every step, the report and the *.odb file should both be saved. Once the report is created, it functions by itself without any particular problems.
Once a *.odb file is finished, data added to the database is only written in the database file in memory, but not in the *.odb file. Only when you close the *.odb file do you save the data to it. The content of the HSQLDB database will be written back into the file. A crash at this point can result in data loss. Therefore, a strategy should be developed so that backup copies are made on time. Chapter 9, Macros, includes macros to automate some of these activities.
A significantly higher level of security can be achieved using external server databases such as MySQL, MariaDB, or PostgreSQL. For this, Base can then serve as a front end, implementing the queries, forms, and reports for the database.
In the remainder of this chapter are instructions to build a database that is intended to help with organizing a sports competition into different disciplines. The functionality of this database is intentionally limited because the sole objective is to familiarize the reader with aspects of the user interface and functionality of Base. The database will be saved as Example_Sport.odb.
The creation of a database and operation of the Database Wizard are discussed in detail in Chapter 2, Creating a Database. For now, the following steps are followed to create the Example_Sport.odb database:
1) Launch the Database Wizard using one of the following methods:
a) From the LibreOffice Start Center, click on the Base Database option in the Create area.
b) In any LibreOffice component, select File > New > Database on the Menu bar or click the arrow at the right of the New icon on the Standard toolbar and select the Database option from the drop-down menu.
c) In Base, click on the New icon in the Standard toolbar or press Ctrl+N.
Tip
Like many other software applications, LibreOffice provides keyboard shortcuts for certain interactions, such as Ctrl+N in this case. For some users, these can improve efficiency, precision and accessibility. The majority of keyboard shortcuts available within Base are common across multiple components of LibreOffice. The best way to learn about the available shortcuts is while using menus and toolbars, when you can observe the equivalent key sequence that is stated within the legend written on the menu option or within the tooltip that appears when the pointer is over a toolbar icon. You can also view a list of keyboard shortcuts on the Keyboard tab of the Tools > Customize dialog (select the LibreOffice radio button).
To avoid unnecessary repetition, the remainder of this book will normally avoid identifying the key sequences associated with menu and toolbar options.
2) At step 1 of the Database Wizard, select the Create a new database option and select HSQLDB Embedded in the Embedded database menu.
3) Click on the Next > button.
4) At step 2 of the Database Wizard, select the No, do not register the database option, select the Open the database for editing option, and make sure that the Create tables using the table wizard option is not selected.
5) Click the Finish button. Base displays the Save As dialog.
6) Navigate to the folder where the new database is to be stored.
7) Enter the text “Example_Sport.odb” in the File name field.
8) Click the Save button to save the new database and close the Save As dialog.
Once the database has been saved, the main Base window is displayed, with Tables selected in the Database area on the left side of the window (Figure 20). The tables are the central storage for data; without tables, there is no database.
Figure 20: Main Base window with Tables work area selected
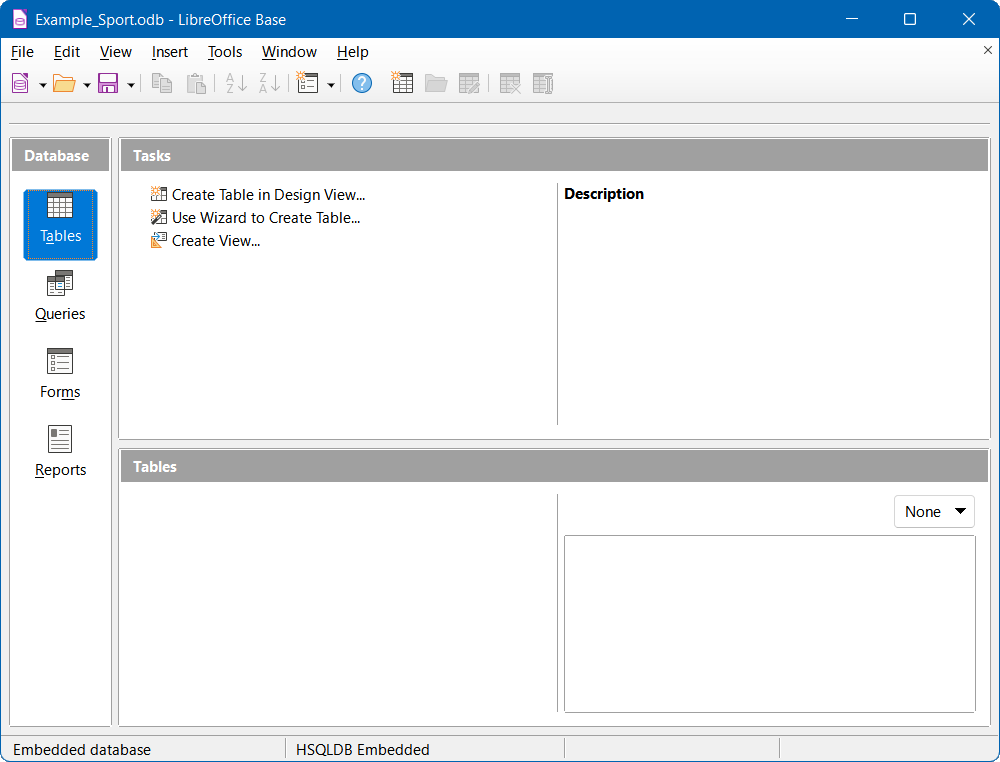
The Example_Sport.odb database will comprise three tables; one containing details of the entrants, one containing details of the available sports, and one to define which sports each entrant wishes to participate in.
Click Create Table in Design View to open the Table Design window shown in Figure 21.
Figure 21: Table Design window
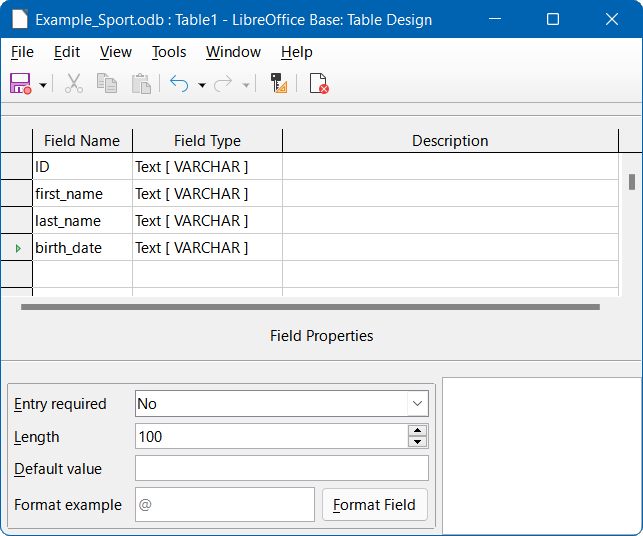
1) The first step is to enter the field names for the table. The table will eventually include both male and female entrants.
a) Enter the first field name as “ID”. The corresponding field type is set by default to Text[VARCHAR]. This field will later take a value that is unique for each record. A unique key field is necessary for the embedded database, otherwise no records can be entered in the table. This key field is called the primary key in databases.
Note
Another field could be used for this property, with the ID field omitted. However, if for example last_name was used, two people with the same last name could not be saved. It is possible to declare two fields together as one composite key but, in this table, there is no guarantee that the combination of fields would be unique. Therefore, in this case, the simple design proposed is preferred.
b) Enter the second field name as “first_name”.
c) Enter the third field name as “last_name”.
d) Enter the fourth field name as “birth_date”.
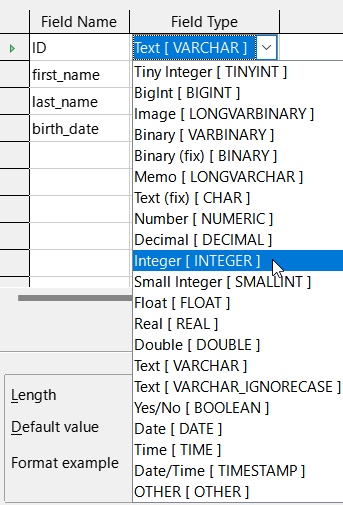
2) The next step is to select the required field types for the four named fields.
a) Set the ID field to the field type Integer[INTEGER] (Figure 22). This field type has the advantage that it can be automatically set by the embedded HSQLDB engine to the next highest integer.
Figure 22: Set ID field type to Integer[INTEGER]
b) Set the AutoValue property to Yes for the ID field, activating the automatic setting of ascending numerical values (Figure 23).
Figure 23: Set AutoValue property for ID field

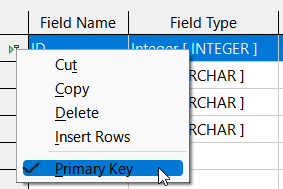
c) After setting AutoValue, a key icon should appear on the row header when leaving the Field Type selection. This indicates that this field is the primary key of the table. If AutoValue is not set, the primary key can also be selected in the context menu (Figure 24).
Figure 24 Set primary key via context menu
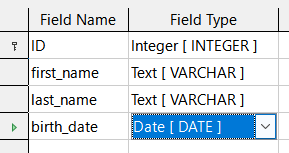
d) Select the field type for birth_date to Date[DATE] (Figure 25). This ensures that only valid date entries are added. It is also used for sorting dates, or, for example, calculating age.
Figure 25: Set birth_date field to the Date[DATE] type
e) On the Table Design window, click the Save icon on the Standard toolbar. Enter the name “tblEntrants” on the Save As dialog and click the OK button. The table is now saved under the name tblEntrants, so that subsequently data can be entered. It is not necessary to input values in the ID field because this is done automatically when you save the record.
Tip
Any non-trivial use of Base, especially with macros, can lead to confusion between the names of tables, queries, forms, and reports. To ensure a clear distinction, it can be helpful to prefix each name with a short abbreviation, such as “tbl” (for tables), “qry” (for queries), “frm” (for forms), and “rpt” (for reports).
Most of the sample databases used in this book do not follow this convention because they were developed before the guidelines were proposed. However, it is good practice to adopt this or some other naming convention before embarking on the design of any significant database.
The above naming convention is followed in the Example_Sport.odb database described in this chapter.
Note
The database file is a zipped folder of individual files. Storing a single object such as the table is therefore not directly written to the database file itself. That’s why the Save button for the database file itself must be clicked even after the creation of tables, queries, forms, and reports.
Only when leaving the data row is the entered data saved automatically.
It is now possible to enter details of athletes in the tblEntrants table. However, we have (deliberately!) neglected the requirement to be able to distinguish between male and female competitors, so another field must be added to the table as follows:
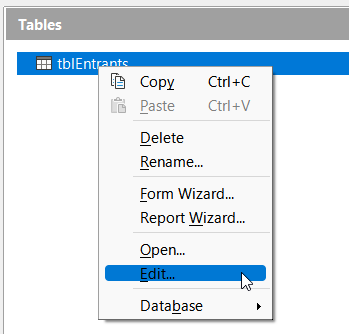
1) Open the tblEntrants table for editing by clicking Tables in the Database area of the main Base window, right-clicking the name of the table in the Tables area, and selecting Edit in the context menu.
Figure 26: Select Edit in context menu
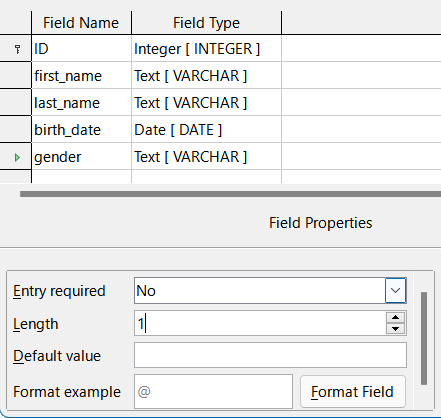
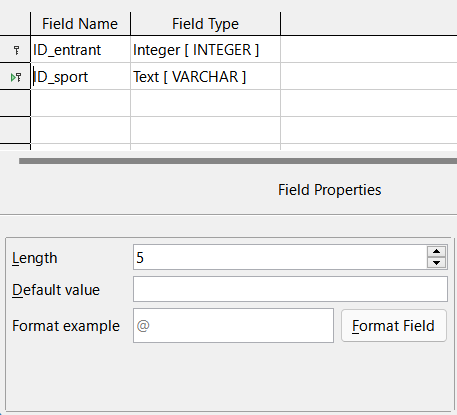
2) Add a new field gender to the table – new fields may be added only at the end of the table when using the Table Design window. Note however that it is also possible using SQL to add new fields to certain positions.
3) Leave the Field Type as Text[VARCHAR] but limit the length of the text in this field to one character by changing gender’s Length field property to 1 (Figure 27). One character is sufficient for ‘m’ and ‘f’ as input.
Figure 27: Add gender field to tblEntrants table
4) Save the updated tblEntrants table.
To define the sports that are to be included in the competition, create a tblSports table, as follows:
1) Click Create Table in Design View in the Tasks area of the main Base window to open the Table Design window again.
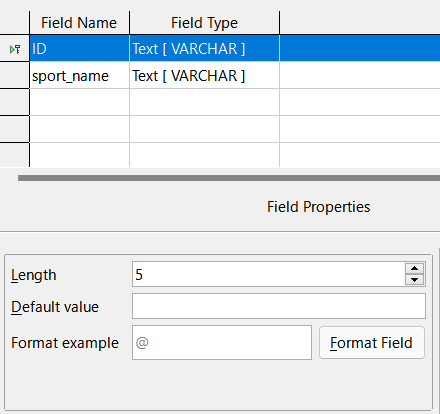
2) Create two fields named ID and sport_name. Set ID to be the primary key, using the context menu accessed by right-clicking on the field’s row header. Since there are not many different sports, the AutoValue option is not selected for the primary key. Instead, the field type is left as Text[VARCHAR], but limited to five characters. The five characters are sufficient, in order to find a suitable but unique abbreviation for each sport (Figure 28).
Figure 28: Create tblSports table
3) Save the table with the name tblSports.
A further table is needed to link the tblEntrants and tblSports tables, so that each entrant can be registered in several sports and multiple entrants can be registered for any sport. This is achieved through a third table, in which the values of the two primary keys of the tblEntrants and tblSports tables are saved. Since only the combination of these fields will be saved together, these fields are combined to form a composite key for this table. Perform the following actions:
1) Click Create Table in Design View in the Tasks area of the main Base window to open the Table Design window again.
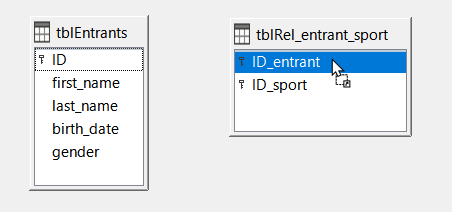
2) Create two fields named ID_entrant and ID_sport.
3) Set the field type for ID_entrant to Integer[INTEGER] to match the ID field in the tblEntrants table. Do not change the field type of the ID_sport field as it already matches the ID field in the tblSports table. However the Length property should be changed to 5 for the ID_sport field.
4) Click the row header for the ID_entrant field, then shift-click the row header for the ID_sport field; this selects both fields. Right-click either row header, then select Primary Key in the context menu to specify the composite key (Figure 29).
Figure 29: Create tblRel_entrant_sport table
5) Save the table with the name “tblRel_entrant_sport”.
Tip
The results of a competition could also be included in this table. However, if several competitions are held, a race date must be attached to the common primary key.
With the tables for the Example_Sport.odb database defined, to harness the real power of a relational database the relationships between those tables will be defined. All tables created so far are necessary for the relationship definition. The relationships allow the database to ensure that data is valid and non-repetitive, with no possibility of unexpected duplication. This can prevent a number for an entrant from appearing in the tblRel_entrant_sport table that is not listed in the tblEntrants table, for example. Carry out the following steps:
1) Select Tools > Relationships on the Menu bar.
2) Base opens the Relation Design window and the Add Tables dialog in readiness for you to start defining the relationships (Figure 30).
Figure 30: Initial configuration of Relation Design window
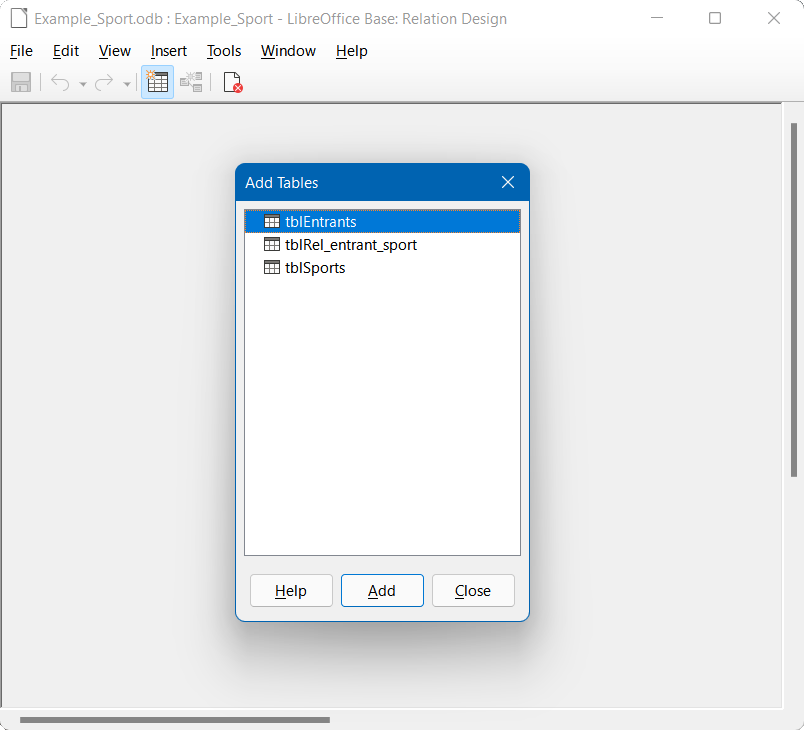
3) Click the name of the tblRel_entrant_sport table and then click the Add button. Notice how a rectangle titled tblRel_entrant_sport appears in the main area of the window.
4) Click the name of the tblSports table and then click the Add button.
5) Click the name of the tblEntrants table and then click the Add button.
6) Click the Close button.
7) Base closes the Add Tables dialog, leaving the three tables represented by rectangles in the Relation Design window (Figure 31). All the fields are listed in each of the added tables. The primary key fields are marked with a key symbol.
Figure 31: Three tables added to Relation Design window
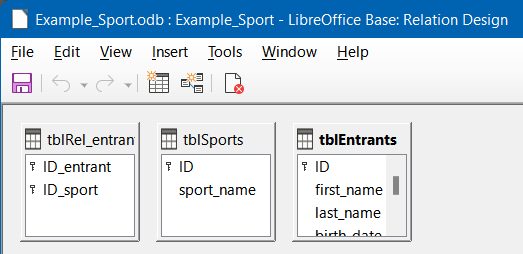
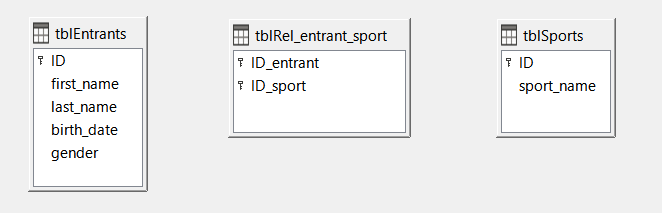
8) Move and resize the tables as required to improve the layout of the window (Figure 32).
Figure 32: Tables moved and resized
9) Left-click the ID field in the tblEntrants table. Hold the mouse button down and move the pointer to the ID_entrant field in the tblRel_entrant_sport table. The cursor changes appearance to indicate a link (Figure 33). Release the mouse button.
Figure 33: Creating a relationship
10) Base displays the Relations dialog to more fully define the nature of the relationship (Figure 34).
Figure 34: Relations dialog – tblRel_entrant_sport and tblEntrants
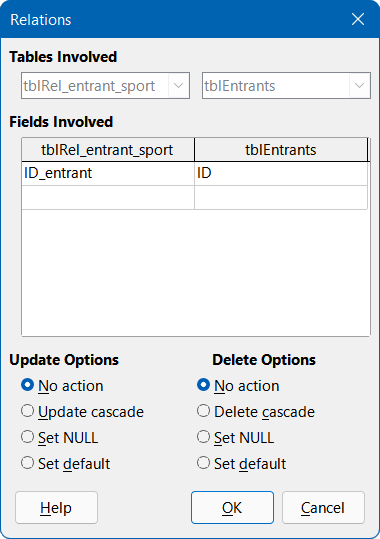
11) Make sure that the No action option is selected in the Update Options area (this is the default). The ID field for a record in the tblEntrants table is an automatically generated value.
12) Select the Delete cascade option in the Delete Options area. If this option is set on, when deleting an entry from the tblEntrants table, the database engine also deletes all records for that entrant from the tblRel_entrant_sport table, to maintain the referential integrity of the database without generating an error. With the option off, deleting an entrant could lead to orphaned records in the tblRel_entrant_sport table, which would be an error condition.
13) Click the OK button to close the Relations dialog. Base draws a line between the ID field of the tblEntrants table (labeled “1”) and the ID_entrant field in the tblRel_entrant_sport table (labelled “n”).
14) Left-click the ID field in the tblSports table. Hold the mouse button down and move the pointer to the ID_sport field in the tblRel_entrant_sport table. The cursor changes appearance to indicate a link. Release the mouse button.
15) Base displays the Relations dialog to more fully define the nature of the relationship.
Figure 35: Relations dialog - tblRel_entrant_sport and tblSports
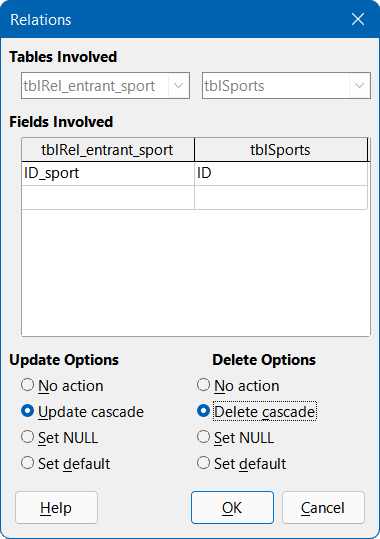
16) Select the Update cascade option in the Update Options area. If this option is set on and you change an ID field in the tblSports table to a different 5-character text string, the records in the tblRel_entrant_sport table that had ID_sport set to the ID that was being changed are also updated so that they continue to be linked to the correct sport. With the option off then changing the sport’s ID field could lead to orphaned records in the tblRel_entrant_sport table, which would be an error condition.
17) Select the Delete cascade option in the Delete Options area. If this option is set on, when deleting a sport from the tblSports table, the database engine also deletes all records for that sport from the tblRel_entrant_sport table, to maintain the referential integrity of the database without generating an error. With the option off, deleting a sport could lead to orphaned records in the tblRel_entrant_sport table, which would be an error condition.
18) Click the OK button to close the Relations dialog. Base draws a line between the ID field of the tblSports table (labeled “1”) and the ID_sport field in the tblRel_entrant_sport table (labelled “n”).
19) Save the updated relationship design.
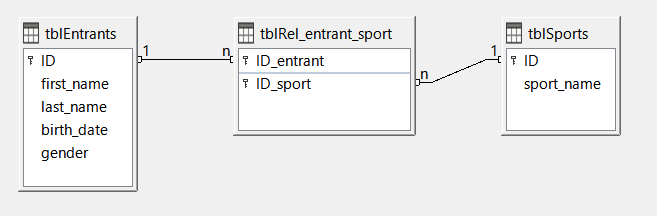
The required tables and fields are now completely connected (Figure 36). The relationships indicate that an entrant may appear repeatedly in the tblRel_entrant_sport table. A sport can also appear repeatedly in the same table. A given combination of starter and sport can appear in the table only once. From two 1:n relationships, an n:m relationship now exists through the intervening tblRel_entrant_sport table.
Such a table design can be tiresome when the database is to be filled by typing content into tables. It requires all three tables to be opened when an entrant is to be assigned to a sport. The entrant’s ID must be sought in the tblEntrants table and entered in the ID_entrant field in the tblRel_entrant_sport table. Similarly the sport’s ID must be sought in the tblSports table and entered in the tblRel_entrant_sport table. This is overly complex and a form would solve the problem more elegantly.
Figure 36: Relationships between three tables
Forms can be created directly in the design view or by using a wizard. Even experienced users find that they can quickly use the wizard and then customize its output to produce a form that meets their needs. This approach can often save time.
To use the Form Wizard to create a form, carry out the following steps.
1) On the main Base window, click Forms in the Database area.
2) In the Tasks area, click Use Wizard to Create Form.
3) Base opens the Database Form window and the Form Wizard dialog in readiness for you to start creating the form. The Form Wizard opens at step 1 of 8. You can view components of the form building up on the underlying Database Form window as you complete the steps of the Form Wizard.
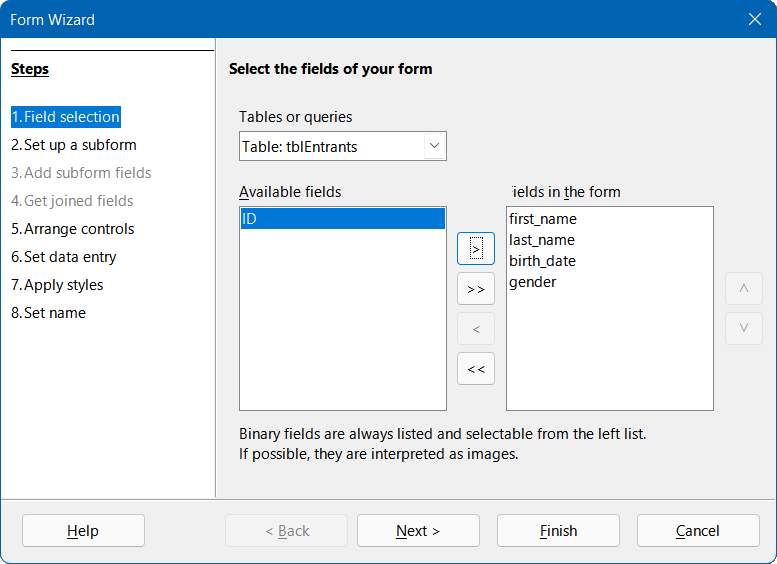
4) Select the entry for the tblEntrants table in the Tables or queries drop-down menu. The tblEntrants table data should be written in the main form. Data from the tblSports table is loaded directly with the few necessary sports and will be rarely updated.
5) Use the right arrow buttons to move all entries except ID in the Available fields area to the Fields in the form area (Figure 37). All fields except the primary key field (ID) are needed from the tblEntrants table. The primary key field is filled automatically with a unique value.
Figure 37: Form Wizard step 1
6) Click the Next > button. Base displays step 2 of the Form Wizard.
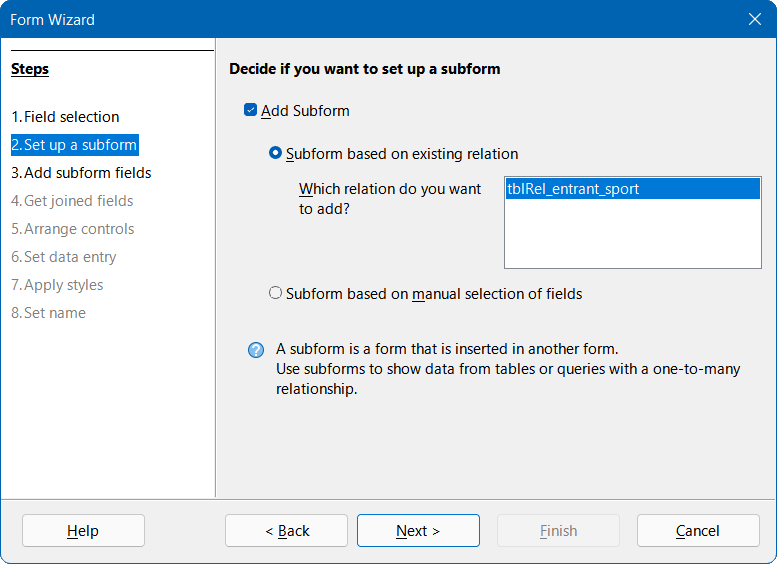
7) Select Add Subform and Subform based on existing relation. A subform should be set up where a sport can be assigned to an entrant.
8) Select the tblRel_entrant_sport entry adjacent to the Which relation do you want to add? label (Figure 38). This confirms the previously defined relationship.
Figure 38: Form Wizard step 2
9) Click the Next > button. Base displays step 3 of the Form Wizard.
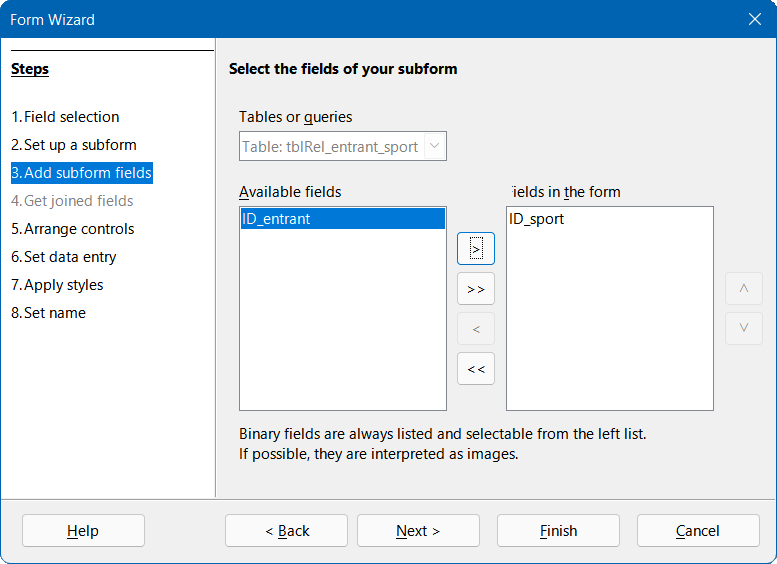
10) Use the right arrow buttons to move the ID_sport field from the Available fields area to the Fields in the form area (Figure 39). The primary key in the tblEntrants table provides the value for the ID_entrant field for the current record by the connection of the main form to the subform.
Figure 39: Form Wizard step 3
11) Click the Next > button. Base displays step 5 of the Form Wizard. Step 4 (Get joined fields) is inactive because the linkage is already in place.
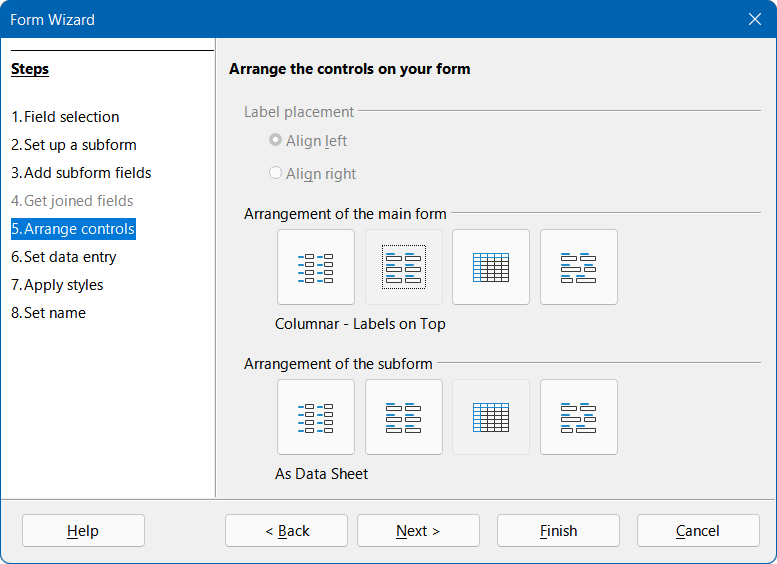
12) Click the second icon of the four under the label Arrangement of the main form. This arrangement is called Columnar – Labels on Top. How the items in the main form and subform are arranged is not of great importance for this example. However, the layout should always be clear and user-friendly to assist inexperienced users.
13) Click the third icon of the four under the label Arrangement of the subform (Figure 40). This arrangement is called As Data Sheet. The fields in the subform will later show all sports of the entrants, so the subform arrangement is best left at its default setting.
Figure 40: Form Wizard step 5
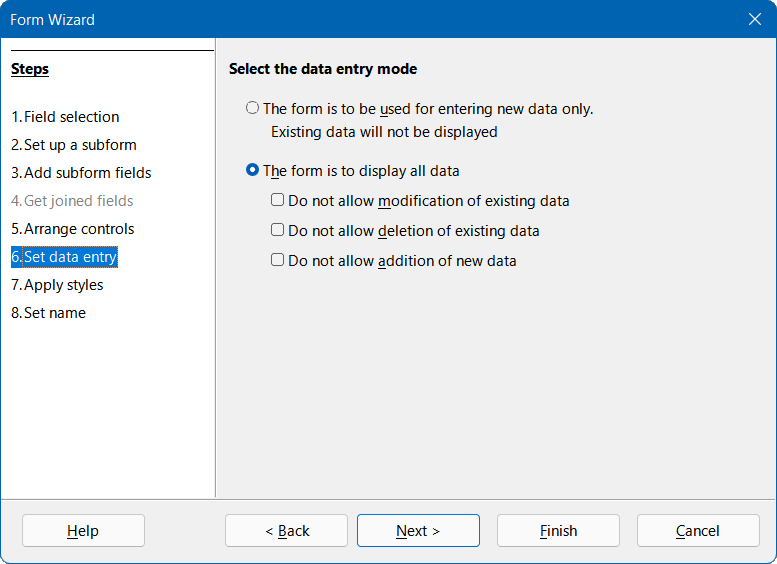
14) Click the Next > button. Base displays step 6 of the Form Wizard. Make sure that the default option The form is to display all data is selected (Figure 41). This means that new entries can be made and existing entries can be modified.
Figure 41: Form Wizard step 6
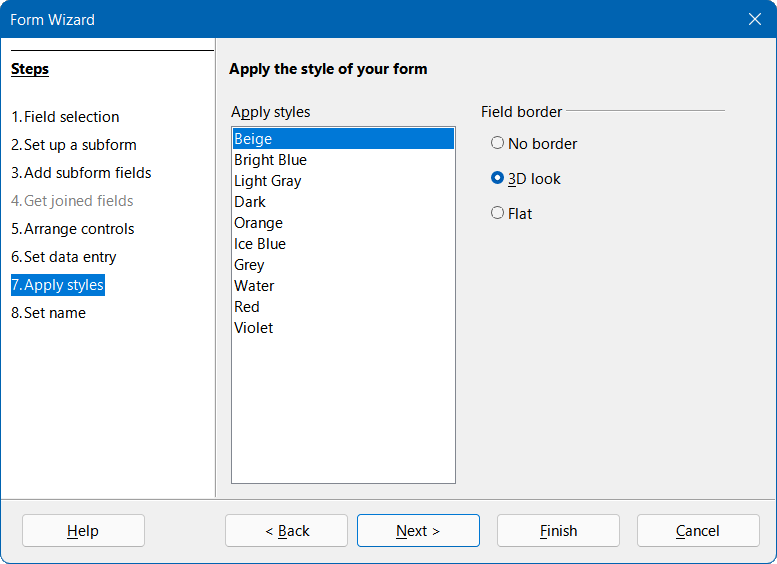
15) Click the Next > button. Base displays step 7 of the Form Wizard (Figure 42). Applying styles is a matter of taste. Just beware: some styles involve unexpectedly low-contrast images, especially in table control fields. In such cases, the font color of the data sheet fields may need to be readjusted.
Figure 42: Form Wizard step 7
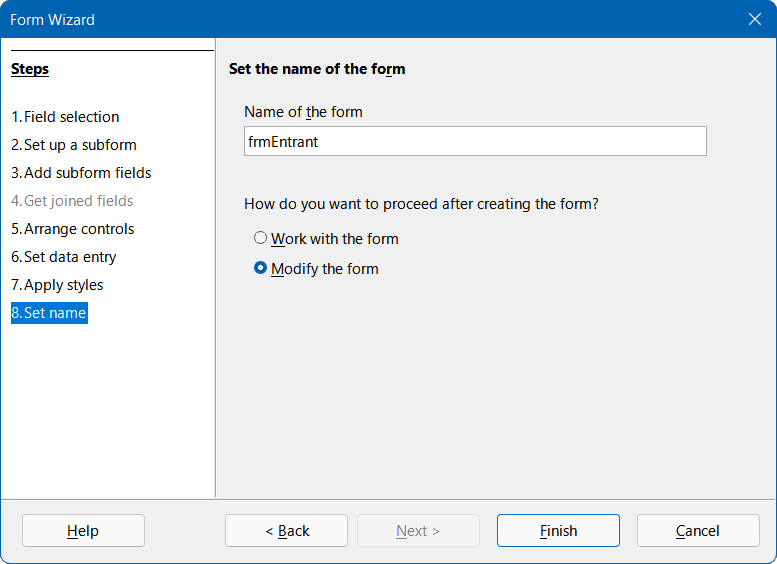
16) Click the Next > button. Base displays step 8 of the Form Wizard.
17) Type the text “frmEntrant” into the Name of the form field.
18) Select the Modify the form option (Figure 43).
Figure 43: Form Wizard step 8
19) Click the Finish button to close the Form Wizard.
On exiting the Form Wizard, you can see the initial version of your form displayed in the Database Form window. Hopefully is resembles the version shown in Figure 44.
Figure 44: Initial version of frmEntrant form
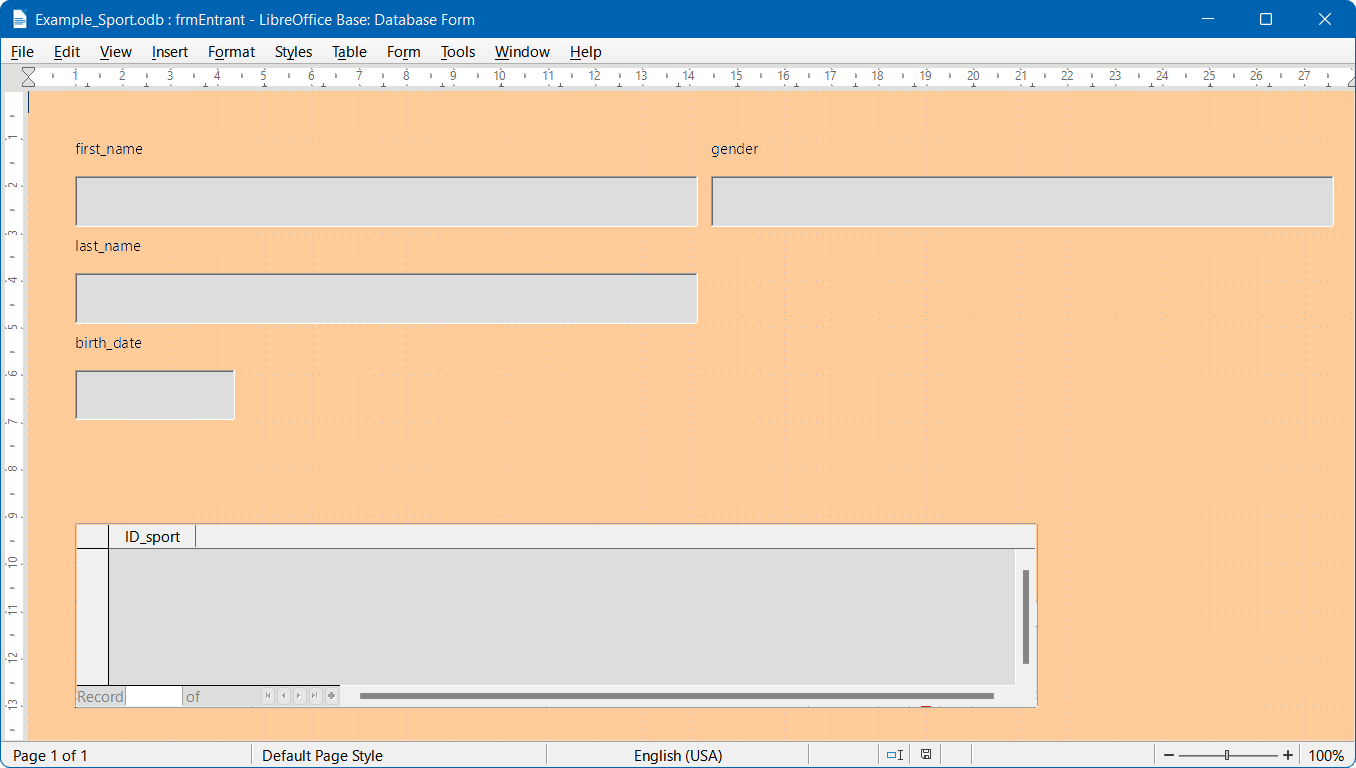
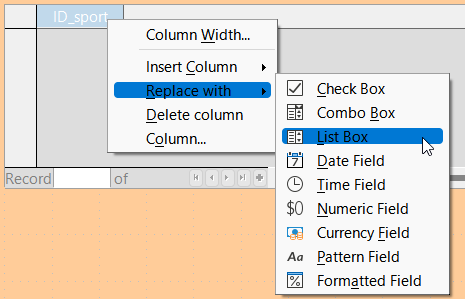
In this initial version, the subform requires the user to enter the abbreviation for each sport which the entrant wishes to compete in. A significant improvement would be to provide a menu allowing selection of sports using their full names. This is achieved through the following actions.
1) On the subform area at the bottom of the form, right-click the ID_sport table header and select Replace with > List Box in the context menu.
Figure 45: Convert ID_sport to List Box
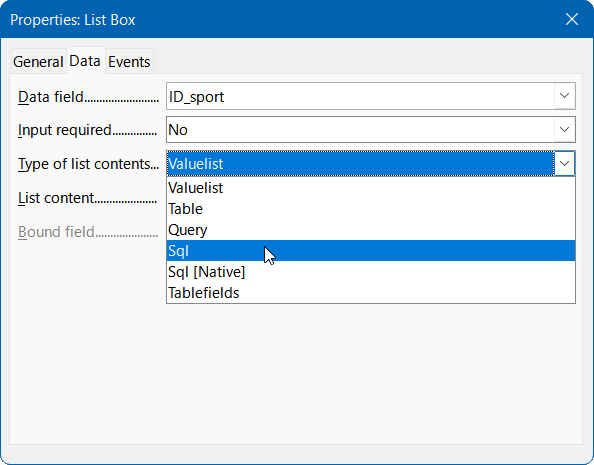
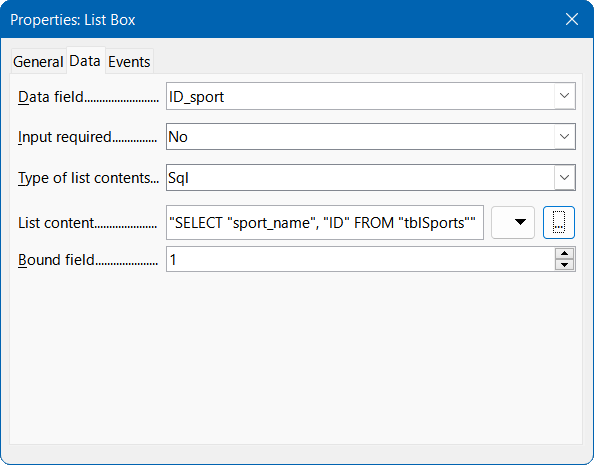
2) Next the list should be modified so that it can display the intended sports data. Right-click again on the ID_sport table heading but this time select Column in the context menu. Base displays the Properties: List Box dialog.
3) On the Data tab of the Properties: List Box dialog, change the Type of list contents to Sql (Figure 46). With the help of SQL, the list will get its content from the tblSports table.
Figure 46: Setting List Box to use an SQL query
4) Click the ellipsis button (…) to the right of the List content field to open the editor for creating queries. A suitable query will be created and finally saved in the list box itself.
5) Base opens the Query Design window and the Add Table or Query dialog (Figure 47) in readiness for you to start creating a query.
Figure 47: Add Table or Query dialog
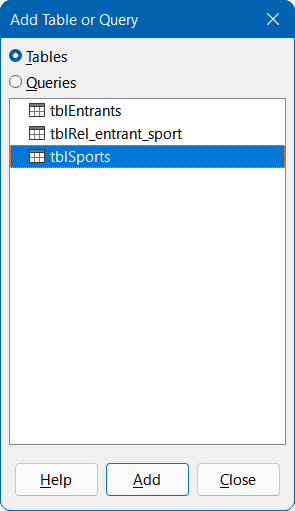
6) In the Add Table or Query dialog, select the Tables radio button and then select the tblSports entry.
7) Click the Add button and then click the Close button.
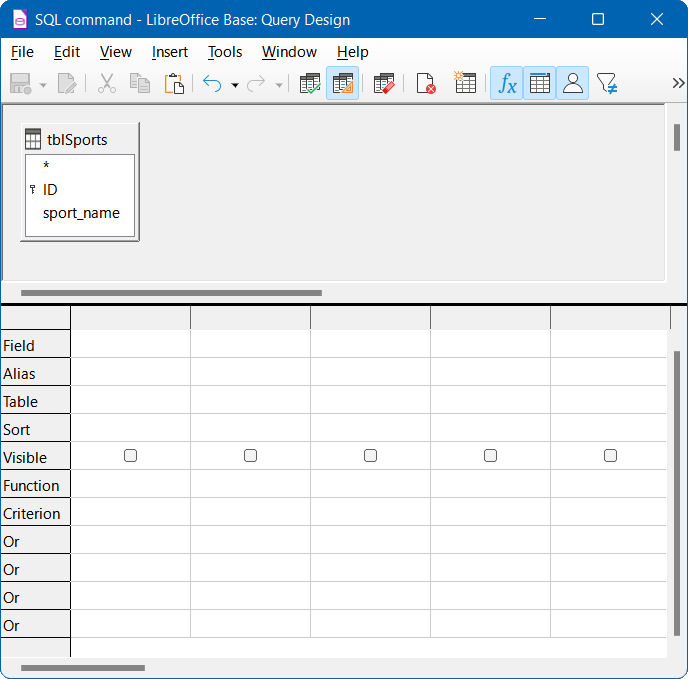
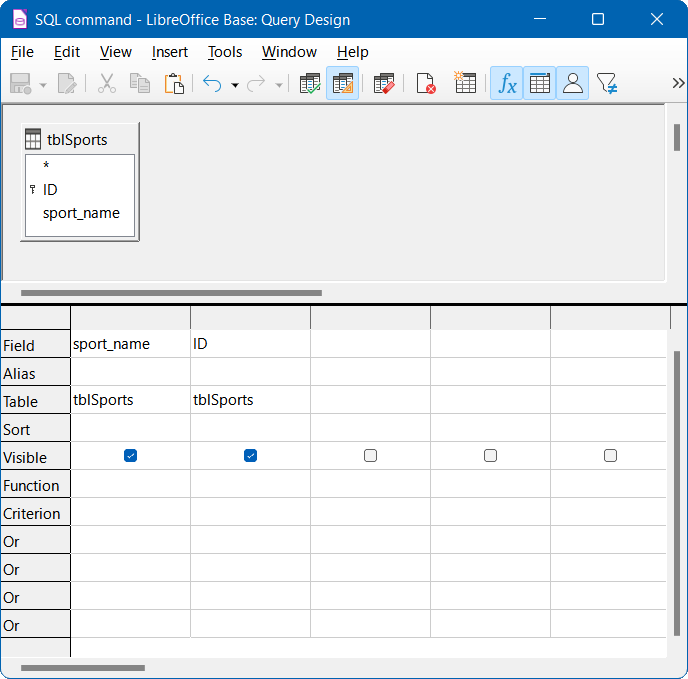
8) Base removes the Add Table or Query dialog and displays a box representing the tblSports table in the upper part of the Query Design window (Figure 48).
Figure 48: Query Design window showing the tblSports table
9) In the first column of the lower part of the window, click in the box next to Field and select tblSports.sport_name from the drop-down menu.
10) In the second column, select the tblSports.ID field (Figure 49). This field afterwards passes its value to the tblSports table, which is the data source of the subform. This allows the defined words to be displayed and the appropriate shortcuts to be stored.
Figure 49: Query design for populating ID_sport list box on frmEntrant form
11) Save the query, which is transferred to the properties of the list box. Close the query editor.
12) Now the List content field of the Properties: List Box dialog shows the SQL code that was created in the query editor (Figure 50):
SELECT "sport_name", "ID" FROM "tblSports"
This code says: From the tblSports table, select the sport_name field and the associated primary key value ID.
Tip
It is often useful to review the automatically generated SQL code so that you become more familiar with the query language.
Figure 50: SQL code in List content field
This query illustrates the minimum that should be selected. Of course, sorting could be incorporated. Saving carefully selected abbreviations gives a useful list of sports stored in ID. If records are not sorted in a specified way, the sorting is always performed by the primary key field. In order to see sports later in the list box, this content must be entered in the tblSports table.
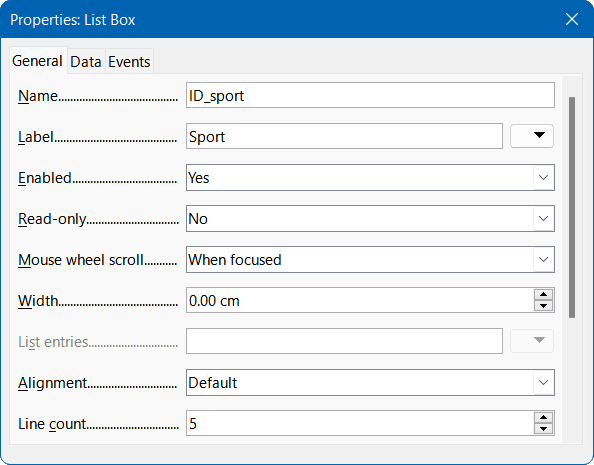
To change the label for the ID_sport field to be shown as Sport, carry out the following steps:
1) On the Properties: List Box dialog, click on the General tab.
2) Replace the contents of the Label field with “Sport” (Figure 51).
Figure 51: Changing the display label for ID_sport
3) Close the Properties: List Box dialog.
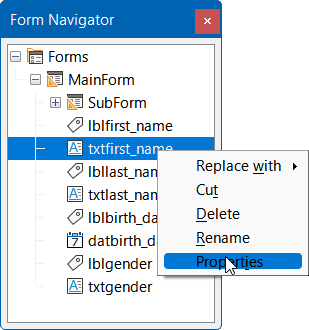
Changing the names of other fields in the form is best done through the Form Navigator. If fields are clicked, not only the fields, but also the associated labels are selected. Through the wizard, they were grouped together. This then requires further action from the selection’s context menu.
The Form Navigator is accessed by clicking an icon on the Form Design toolbar, which when visible is normally located at the bottom of the Database Form window. Figure 52 shows the position of the Form Navigator icon on the Form Design toolbar, highlighted with a red circle.
Figure 52: Location of Form Navigator icon on the Form Design toolbar

Tip
If the Form Design toolbar is not visible you can access it by selecting View > Toolbars > Form Design on the Menu bar.
Each field can be examined individually with the Form Navigator, and the field properties are then accessible in the context menu. A property entry is automatically saved after going to another property. It is possible to jump from one field to another even when the Properties dialog is open. Here also the respective intermediate level is stored.
Figure 53: Accessing the Properties dialog from the Form Navigator
If the design has now been completed, save and close the form. Then save the Base file again.
For the purposes of testing the form, assume that the tblSports table has been populated with the data listed in Table 1.
Table 1: Data entered in the tblSports table
|
ID |
sport_name |
|
disc |
discus throw |
|
dist |
long distance race |
|
high |
high jump |
|
long |
long jump |
|
shot |
shot put |
|
soft |
softball throw |
|
sprt |
sprint race |
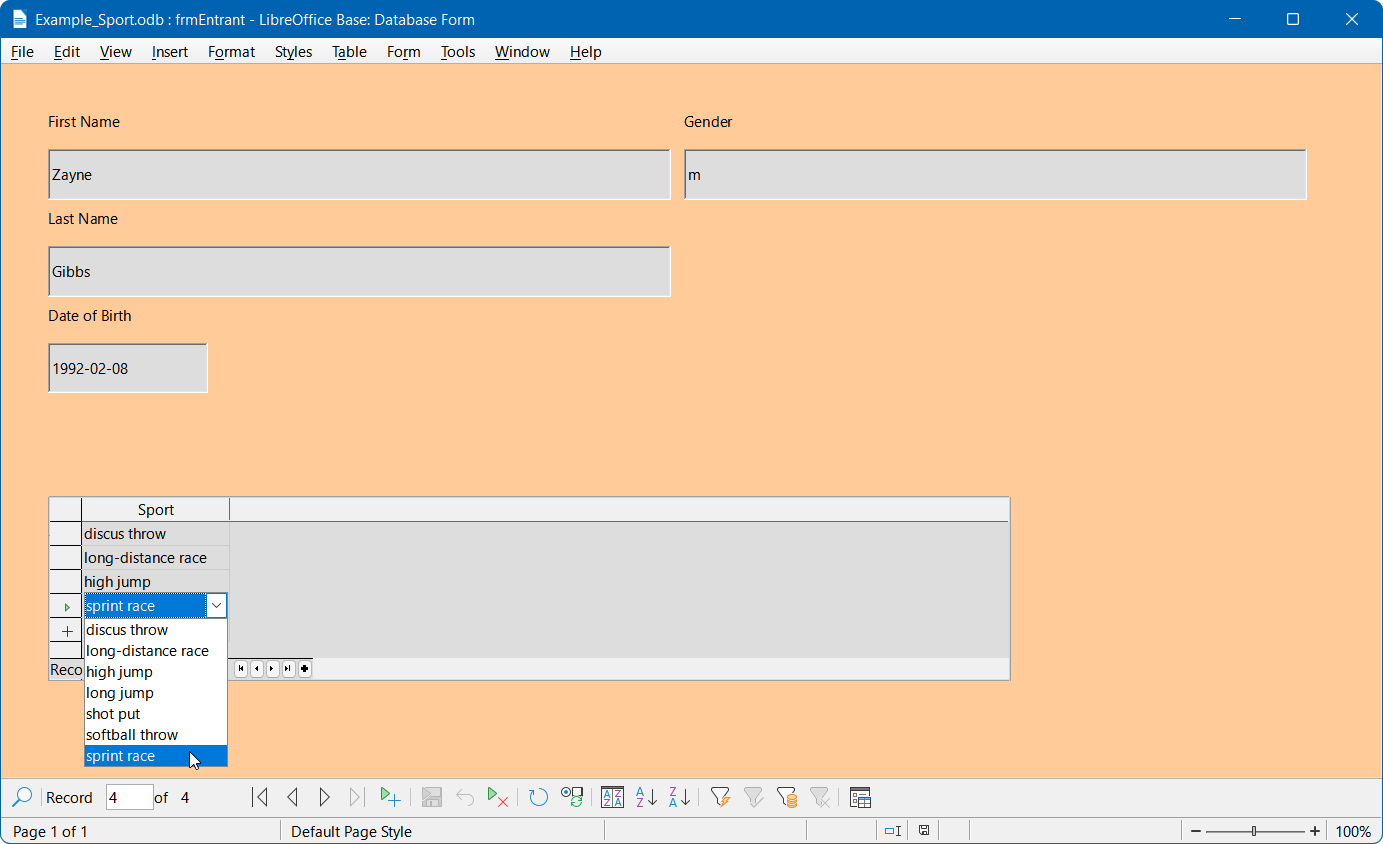
The first entrant to the competition is Zayne Gibbs and he would like to enter four events—discus throw, long-distance race, high jump, and sprint race. After entering data into the form, it might look something like that shown in Figure 54. Do not forget to save the record after entering the data.
Figure 54: Sample data in the frmEntrant form
Of course, sorting mechanisms could be incorporated in such a form.
When using the form, you may notice some inconveniences:
The Tab key provides a convenient mechanism for quickly navigating through the fields of the form as data is entered. However, with the cursor in the gender field of the form, a further press of the Tab key jumps directly to the next tblEntrants record. The subform listing sports is not directly accessible using the Tab key.
If the cursor lies within any of the four fields in the upper part of the from, the navigation bar within the Form Navigation toolbar at the bottom of the window shows the record number within the tblEntrants table. However, if working in the subform, then that navigation bar switches to showing the number of the tblSports record within the subform. This information is already present in the dedicated navigation bar within the subform area and so it would be preferable if the navigation bar within the Form Navigation toolbar always showed the record numbers of the entrant within the tblEntrants table.
When entering an entrant’s gender, the user must remember the set of possible options. Currently the only limitation defined in the tblEntrants table is the limit of one character and a safer method of entry should be provided.
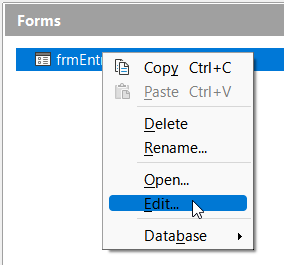
To solve each of these problems in turn, first open the form for editing rather than data entry (Figure 55).
Figure 55: Open frmEntrant form for editing
In order not to go straight to the next entrant record using the Tab key after entering the entrant’s gender, it is necessary to modify the activation sequence.
1) Click Activation Order on the Form Design toolbar, which when visible is normally located at the bottom of the Database Form window. Figure 56 shows the position of the Activation Order icon on the Form Design toolbar, highlighted with a red circle.
Figure 56: Location of Activation Order icon on the Form Design toolbar

2) Base displays the Tab Order dialog (Figure 57).
Figure 57: Tab Order dialog
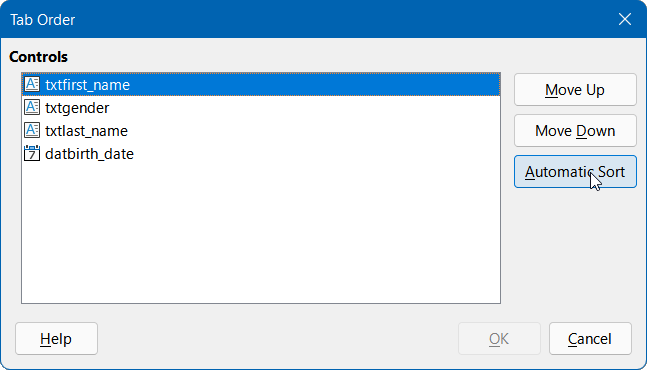
3) Click the Automatic Sort option, which affects not only sorting of the displayed controls, but also the automatic redirection into the subform. Although not obvious from the dialog, it works this way in the background.
4) Click the OK button to close the Tab Order dialog.
Later, exit edit mode, open the form for data entry, make sure that the tab order for the frmEntrant form is now as expected, and that you can tab into the subform.
1) Click the Form Navigator icon on the Form Design toolbar (Figure 52) to open the Form Navigator.
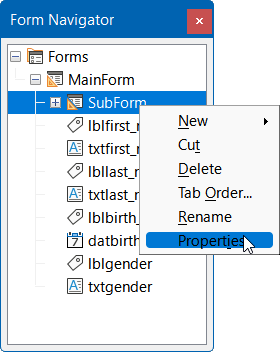
2) Right-click the SubForm entry in the Form Navigator and select the Properties item in the context menu (Figure 58).
Figure 58: Access dialog to change subform properties
3) Base displays the Form Properties dialog.
4) On the Data tab, change the setting of the Navigation bar field to Parent Form (Figure 59).
Figure 59: Change subform Navigation bar setting
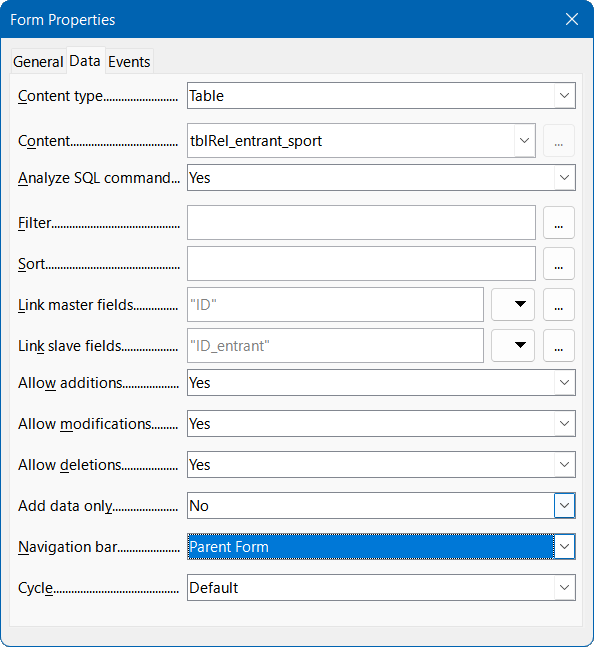
Later, exit edit mode, open the form for data entry, and make sure that the navigation bar in the Form Navigation toolbar always shows the position of the current record within the tblEntrants table, even when working in the subform.
To limit input to specified values, the control cannot be a simple text box. One solution would be to use a Group Box, as described in Chapter 4, Forms. Another solution is to present the choices in a List Box, as follows:
1) Click the Form Navigator icon on the Form Design toolbar (Figure 52) to open the Form Navigator.
2) Right-click the Text Box field for entering an entrant’s gender and select Replace > List Box in the context menu.
3) Right-click the same field again but this time select the Properties option in the context menu.
4) Base displays the Properties: List Box dialog.
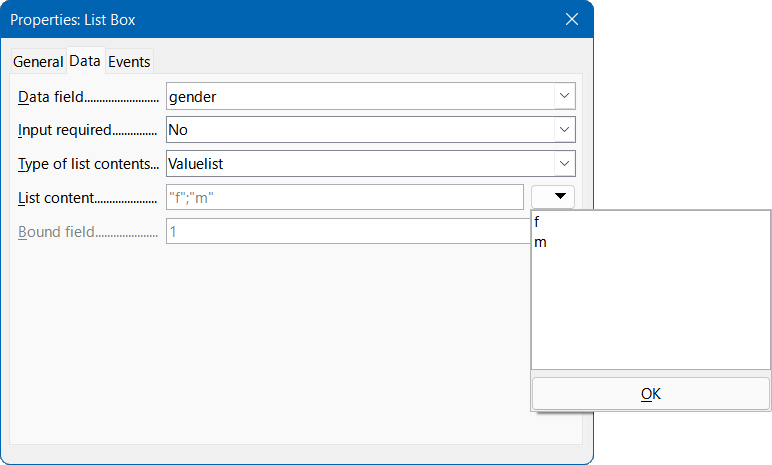
5) On the Data tab, click the down arrow at the right of the List content field. Enter the letter “f” on the first line of the text entry box that appears, type “m” on the next line, and then click the OK button (Figure 60). These abbreviations are the values that will be passed to the tblEntrants table.
Figure 60: Setting values allowed in the gender field (Data tab)
6) Click on the General tab.
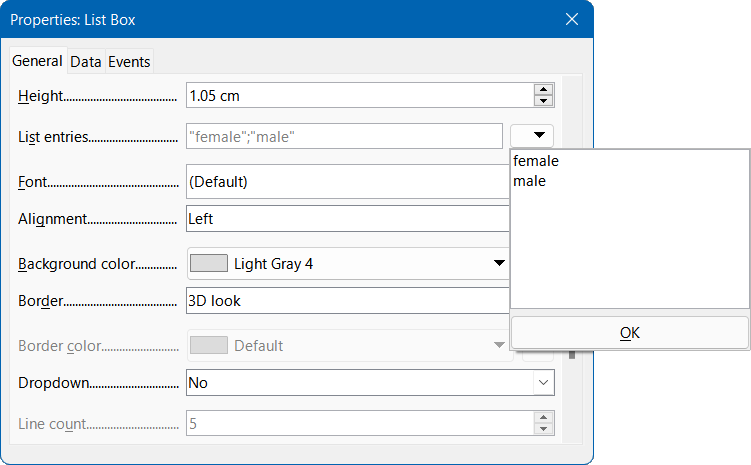
7) Scroll down this tab until you reach the List entries field. Click the down arrow at the right of the List entries field. Enter the word “female” on the first line of the text entry box that appears, type “male” on the next line, and then click the OK button (Figure 61). These are the values that the user will select from and must be in the same order as the values entered in the List content field on the Data tab.
Figure 61: Setting values allowed in the gender field (General tab)
8) In the Dropdown field that is located a little lower down the tab, select the Yes option.
9) Make sure that you have saved all changes to the form and then saved the database.
Later, exit edit mode, open the form for data entry, and make sure that only valid inputs can be made to the gender field.
The most striking inconveniences have thus been eliminated. The input for male and female entrants may begin, as well as their assignment to the sports.
The following step is useful: records should be entered only once. Take care to ensure that the entrants can also compete with each other by age and by sport. Otherwise the subsequent queries and reports may not make sense.
In a query, the contents of various tables can be grouped together. In this section, a simple query is created that displays each of the entrants together with a list of the sports that they have entered.
1) Click Queries in the Database area of the main Base window.
2) Click Create Query in Design View in the Tasks area of the main Base window.
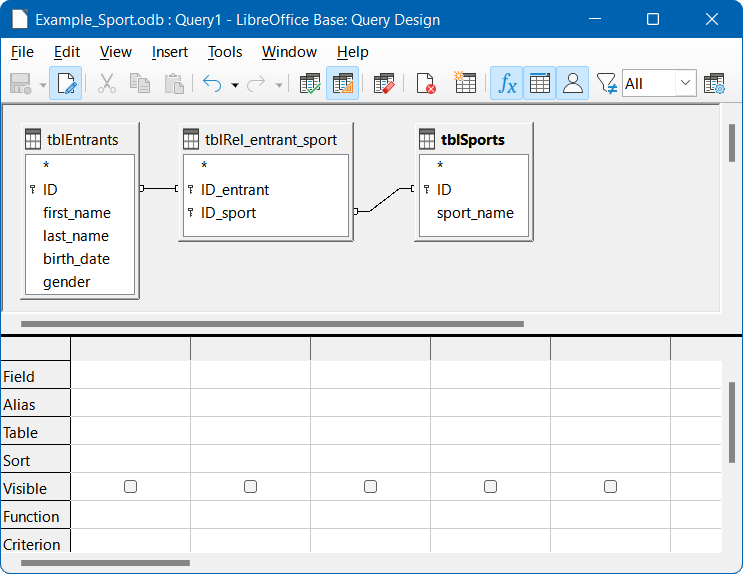
3) Base displays the Query Design window and opens the Add Table or Query dialog (Figure 47).
4) Select the tblEntrants table and click the Add button.
5) Select the tblRel_entrant_sport table and click the Add button.
6) Select the tblSports table and click the Add button.
7) Click the Close button to remove the Add Table or Query dialog from the display.
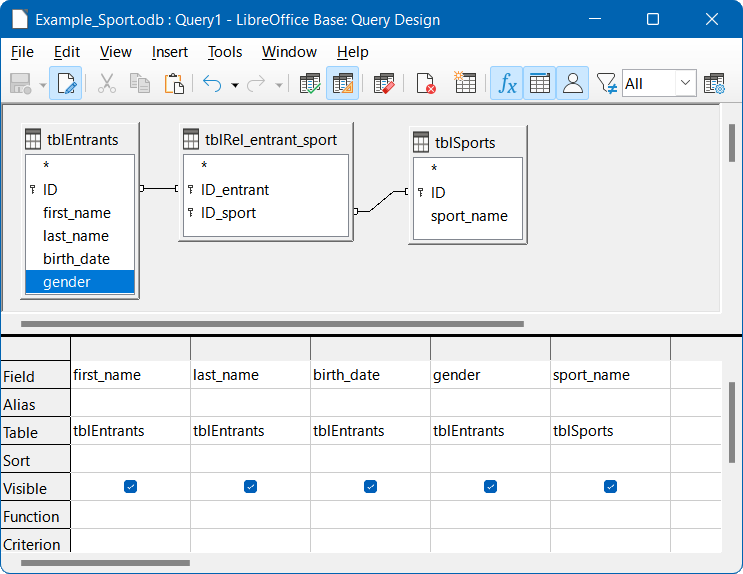
8) Note that the three tables, and the relationships between them, are represented in the upper area of the Query Design window (Figure 62).
Figure 62: Query Design window with three tables added
9) Double-click the first_name, last_name, birth_date, and gender fields in the tblEntrants table and verify that these fields are added to the columns of the query in the lower part of the Query Design window. Double-clicking is perhaps the simplest method to add a field to a query.
10) In the lower part of the Query Design window, click in the blank Field entry located to the right of gender and then click the down arrow to access a drop-down list of fields that are available for inclusion in the query. The list consists of the field names and their corresponding table names indexed by table name. In order to match the fields of the tables correctly to their tables, they are labeled "table name"."field name" in queries. If "*" is used instead of the field name, it means that all the fields of the corresponding table are displayed. Select the tblSports.sport_name entry in the list—this provides an alternative to the method of double-clicking described in the previous step (Figure 63).
Figure 63: Query Design window showing five fields added to the query
The query is complete and it is advisable to execute it before saving to see if it produces the desired results.
To run a query from the Query Design window, click the Run Query icon on the Query Design toolbar which is located by default at the top of the window (Figure 64).
Figure 64: Location of Run Query icon

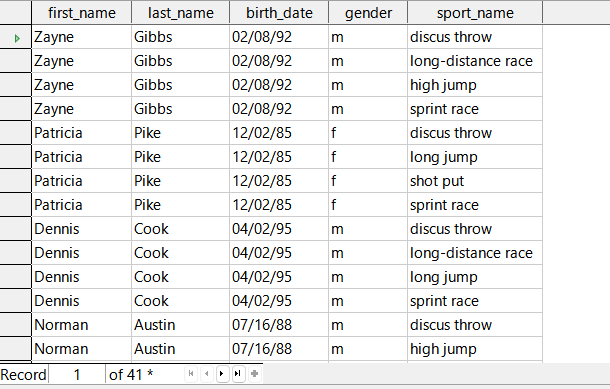
The outputs from running this simple query are displayed in a list positioned in the upper part of the Query Design window (Figure 65). The query displays all combinations of entrants and sports. If entrants have entered multiple sports, they have as many records. Entrants do not appear without sports.
Figure 65: Output of query
To extend the query a little further, suppose that age limits are to be applied to some events. In that case, it will be important to know each entrant’s age so that they can be placed in the correct age bracket for each of their events. A straightforward step to help with this would be to determine an entrant’s age based on their date of birth (held in the tblEntrants table) and the current date, including the result of that calculation in the query.
A simple way to achieve this is to use two of HSQLDB’s built-in functions:
NOW(). The NOW function returns a date-time value representing the moment the function is called, that is the current date and time.
YEAR(dt). The YEAR function extracts the year component of its argument dt, which is a date-time value.
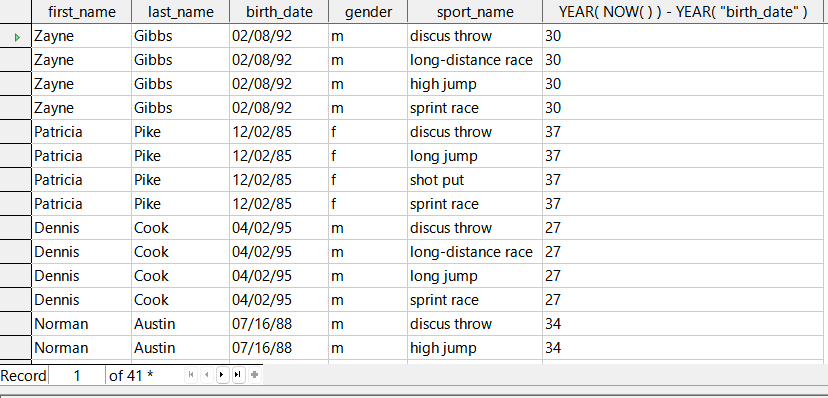
Type the formula YEAR(NOW())-YEAR("birth_date") into the next blank Field cell in the query, as shown in Figure 66.
Figure 66: Age calculation included in query

The first part of this formula, YEAR(NOW()), picks out the current year. The second part, YEAR("birth_date"), picks out the year of the entrant’s birth. A difference is formed between them, indicating (approximately) the person’s current age. The results are shown in Figure 67.
These and many other functions that work with the embedded HSQLDB database engine are described in the remainder of this book and a fuller list can be found in Chapter 9 of the HyperSQL User Guide at http://hsqldb.org/doc/1.8/guide/index.html (see the section entitled Built-in Functions and Stored Procedures).
Figure 67: Query output showing calculated age
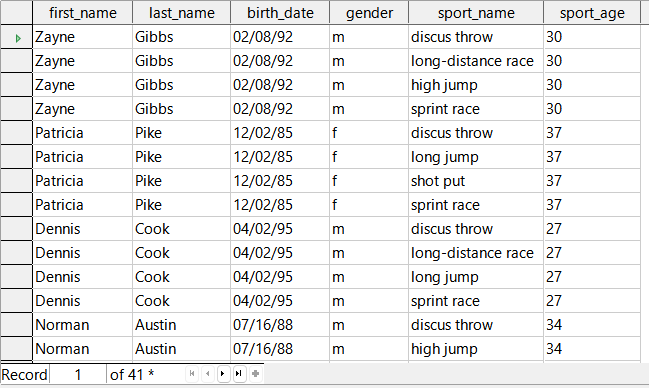
By default, the code entered in the field appears in the column heading of the query output and this isn’t particularly user-friendly. This is improved by entering an alias to be used as the column heading instead of the code. In the Alias row under the field containing the code, enter the term sport_age.
Figure 68: Using an alias to replace a formula

The alias sport_age is used to differentiate the value calculated from the person’s true age. Generally speaking, the sport_age value will match a person’s true age only when they have had a birthday in the current year.
If the query is run again, the column header no longer contains the code but instead the string sport_age.
Figure 69: Query output using an alias for the final column heading
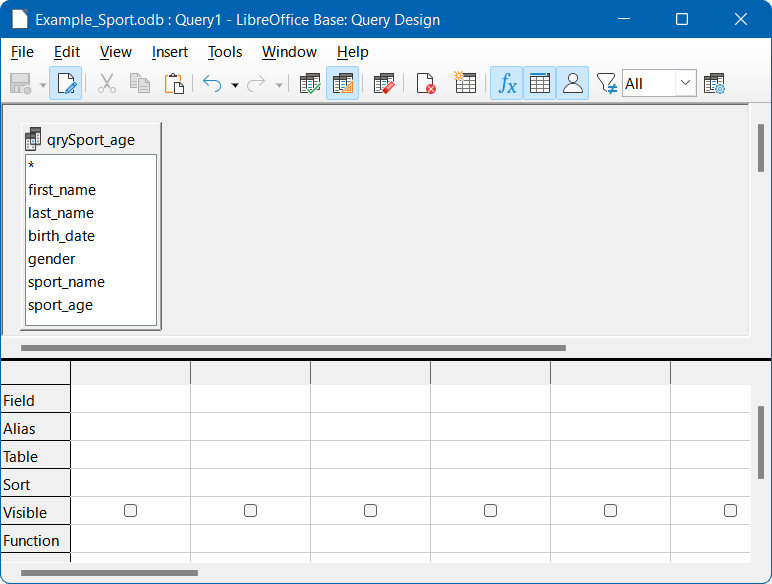
Save this query under the name qrySport_age. It is then used as the basis for the next query, where slightly more complex formulas are used to assign people to age groups.
1) Click Queries in the Database area of the main Base window.
2) Click Create Query in Design View in the Tasks area of the main Base window.
3) Base displays the Query Design window and opens the Add Table or Query dialog (Figure 47).
4) Select the Queries option at the top of the Add Table or Query dialog.
5) Select the qrySport_age query.
6) Click the Add button and then click the Close button to remove the Add Table or Query dialog (Figure 70). Note that the icon that appears in front of the title qrySport_age is not the same as that used for tables in this window (see Figure 62 for example). This different symbol is a visual indication that the basis of this query is another query rather than a table.
Figure 70: Query Design window with qrySport_age query added
7) In the qrySport_age query area, double-click on the entry comprising only an asterisk (*). This has the effect of selecting all fields in the qrySport_age query. An alternative method to achieve the same result would have been to click in the first Field entry and select qrySport_age.* in the drop-down menu.
Note
If you run the new query at this point, you will see that it produces the same output as the qrySport_age query but without using a formula.
8) Enter the following formula into the first empty Field cell: CASEWHEN( "sport_age" > 19, CEILING( "sport_age" / 10 ) * 10, "sport_age" - MOD( "sport_age", 2 ) ).
9) Enter the string “age_group” into the corresponding Alias cell (Figure 71).
Figure 71: Formula to group starters into age groups

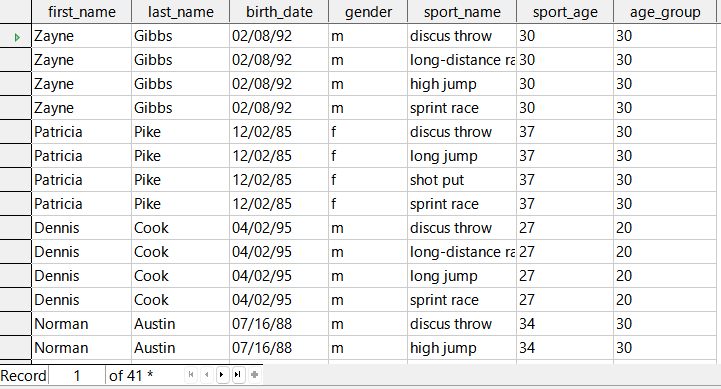
10) Click the Run Query icon in the Query Design toolbar. The output of the query is shown in Figure 72.
Figure 72: Query output showing age group for each starter
11) Save the query with the name qryRegistration.
Such formulas should not really be included in an entry-level introduction to Base and a simpler allocation of ages would be possible. However, although complex, the formula does show the power of the available facilities.
Looking at its components in a little more detail:
CASEWHEN is another built-in function of HSQLDB and it takes three arguments. In a more abstract form, a call to CASEWHEN may be written as CASEWHEN(expression, value1, value2). The function works by evaluating expression and if it is true, value1 is returned; otherwise value2 is returned.
The CEILING function takes one argument. If the call to the function is written as CEILING(d), then the function returns the smallest integer that is not less than d.
The MOD function takes two arguments. If the call to the function is written as MOD(a, b) then the function returns a modulo b (that is, the remainder after dividing a by b).
Switching off the design view on the Query Design window is not really necessary, since all entries are possible in the design view without any major problems. However, from an educational perspective, it can be instructive to look more closely at the code underlying a query.
It is also worth remembering that there are SQL expressions that fit poorly in the design view, or are not even possible there. In this case you may in the future wish to enter SQL code directly (with the design view switched off).
Click the Switch Design View On/Off icon on the Design Query toolbar (Figure 73).
Figure 73: Location of Switch Design View On/Off on Query Design toolbar

With design view switched off, the Query Design window shows the SQL code as in Figure 74.
Figure 74: SQL code for qryRegistration query

The conventions used for displaying code are as follows:
Field and table names are enclosed in double quotes and displayed in an ocher color.
SQL terms are displayed in blue.
Database function names are displayed in green.
Having already discussed the components of the formula, focus can switch more to the structure of the SQL:
Select from the qrySport_age query all the records from and in addition to those determined by the formula. Those that are determined by the formula, refer to as age_group.
The code does not distinguish between tables and queries as the basis of the data. It therefore works only in the graphical user interface of Base. A query cannot have the same name as a table; a table cannot have the same name as a query.
When the SQL icon in the SQL toolbar is clicked (to run the SQL command directly) while in SQL view, the database responds with an error message. The embedded HSQLDB engine does not know the query qrySport_age to which the qryRegistration query refers.
A report will be created showing a list of entrants, sorted by sport, gender, and age group.
1) On the main Base window, click Reports in the Database area.
2) In the Tasks area, click Create Report in Design View.
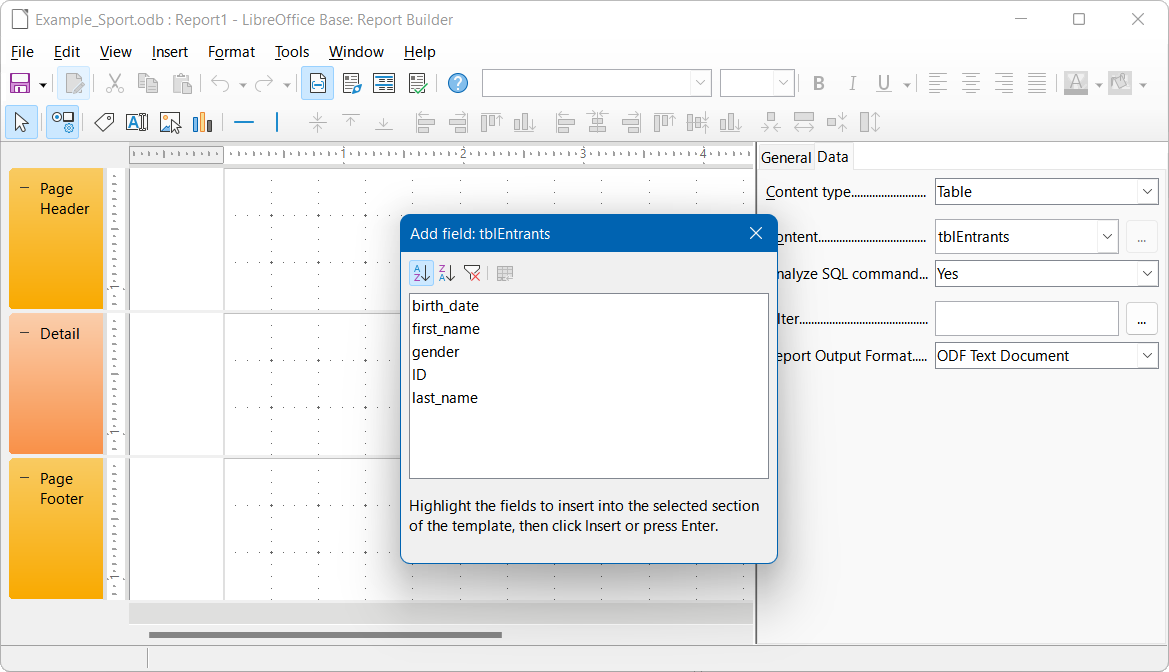
3) Base displays the Report Builder window, with the Add field dialog in the foreground.
4) On the right side of the Report Builder window, there should be an area to view and edit properties of the currently active object. If this area is not visible, select View > Properties on the Menu bar. (Figure 75). The initial configuration of the Properties area for the Example_Sport.odb database is for the Data tab to be visible; the Content type field to be set to Table; and the Content field to be set to tblEntrants (the name of the first table alphabetically). These default settings define the initial content of the Add field dialog.
Figure 75: Initial display of Report Builder window
5) On the Data tab of the Properties area, for the Content type field select Query. The qryRegistration query is used as the basis for the new report.
Note
Making a selection in the Content type drop-down sometimes causes much of the Report Builder window to turn black. If this error occurs, a simple workaround is to resize the window using the control in the window’s title bar, and to then revert the window to its previous size. This action should cause Base to re-display the window in its normal color scheme.
6) On the Data tab of the Properties area, for the Content field select qryRegistration.
7) Base updates the content of the Add field dialog to list the fields of the selected query in alphanumeric order (Figure 76).
Figure 76: Add field dialog showing fields of qryRegistration query
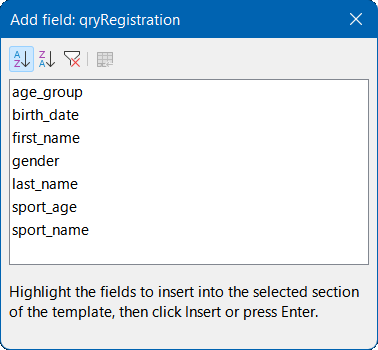
8) Click the Sorting and Grouping icon on the Standard toolbar of the Report Builder window (Figure 77).
Figure 77: Location of Sorting and Grouping icon

9) Base displays the Sorting and Grouping dialog (Figure 78).
Figure 78: Sorting and Grouping dialog
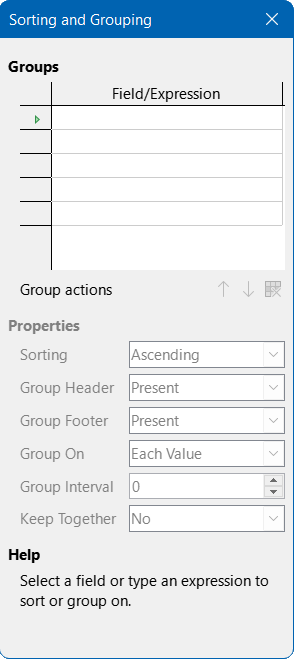
10) In the Sorting and Grouping dialog, click in the first area below the Field/Expression label and select sport_name from the drop-down menu. Note that a sport_name Header area is added to the underlying window. Use the default settings in the Properties area of the Sorting and Grouping dialog.
11) Repeat step but select gender from the drop-down menu in the next free area below the Field/Expression label.
12) Repeat step but select age_group from the drop-down menu in the next free area below the Field/Expression label.
13) Close the Sorting and Grouping dialog.
14) On the Report Builder window, select the sport_name Header group section. Base highlights the selected area with a white border.
15) If the Add field dialog is not displayed, click the Add Field icon on the Standard toolbar of the Report Builder window (Figure 79).
Figure 79: Location of Add Field icon

16) Base re-displays the Add Field dialog (Figure 76).
17) On the Add field dialog, select the sport_name entry and then click the Insert icon.
18) Base inserts a label field and a text field to display the contents of the sport_name field of the qryRegistration query in the highlighted area of the underlying report.
19) On the Report Builder window, select the gender Header group section. Base highlights the selected area with a white border.
20) On the Add field dialog, select the gender entry and then click the Insert icon.
21) Base inserts a label field and a text field to display the contents of the gender field of the qryRegistration query in the highlighted area of the underlying report.
22) On the Report Builder window, select the age_group Header group area. Base highlights the selected area with a white border.
23) On the Add field dialog, select the age_group entry and then click the Insert icon.
24) Base inserts a label field and a text field to display the contents of the age_group field of the qryRegistration query in the highlighted area of the underlying report.
25) On the Report Builder window, select the Detail group area. Base highlights the selected area with a white border.
26) On the Add field dialog, select the first_name entry and then click the Insert icon.
27) On the Add field dialog, select the last_name entry and then click the Insert icon.
28) On the Add field dialog, select the birthday entry and then click the Insert icon.
29) On the Add field dialog, select the sport_age entry and then click the Insert icon.
30) Base inserts pairs of label fields and text fields to display the contents of the first_name, last_name, birth_date, and sport_age fields of the qryRegistration query in the highlighted area of the underlying report.
31) Close the Add field dialog.
32) The draft report should now look similar to that shown in Figure 80.
Figure 80: Draft report in Report Builder window
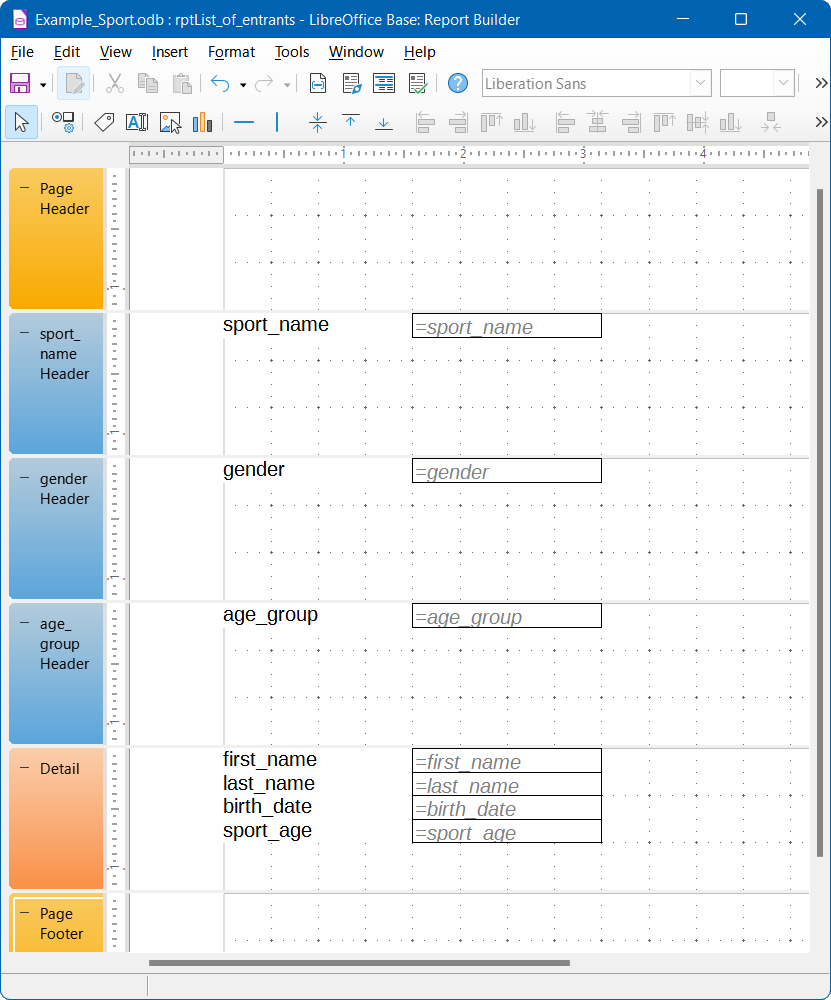
33) Save the report with the name rptList_of_entrants.
34) Save the database (otherwise, the report is stored only temporarily).
Note
When designing a report using the Report Builder, failures have been reported as instabilities of the program. Therefore it is important to save both the report and database file.
Fortunately, the later execution of a report is not usually affected by these issues.
To run this report, click Reports in the Database area of the main Base window and then double-click the name of the required report in the Reports area.
If this report is run with appropriate data, then the first part of the output should resemble that shown in Figure 81.
Figure 81: First part of draft of report output
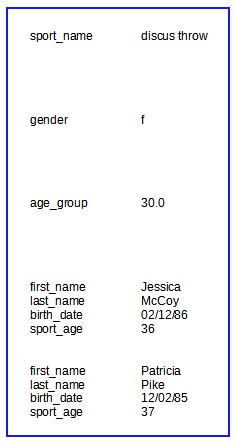
The beginning of the report shows two female entrants, Jessica and Patricia, who have entered the discus throw event and are in the age group 30-39. Many other entrant / age group / sport combinations may follow depending on the data in the tables of the database.
When running the report for the first time, it is common to recognize some features that might be improved, such as:
The distances between the group headers and before the content in the detail section are too large.
The gender is indicated by the single letters m and f. Abbreviations aren’t necessary and full words would be better.
The age_group field shows numbers to one decimal place and this granularity is unnecessary (presumably its appearance is the result of the mathematical operations carried out in the qryRegistration query).
The data in the detail section for each sport / gender / age group combination (first_name, last_name, birth_date, and age_group) would be better laid out as a table.
The following subsections improve the report by addressing each of these issues in turn.
To adjust the height of a section of the report, use the mouse to drag the borders of that section up and down as required. You can also highlight a section header and specify the Height property in the Properties area on the right of the Report Builder window.
It is not possible for a section to be smaller than the labels and fields that it contains.
Of course, the detailed layout of any report is a matter of taste. Consider when selecting the distances that a following group does not appear too close below the previous group. The label and text boxes may need a distance to the top of the section containing them. If this distance to the top is not desired, group footers rather than headers can be displayed to provide some spacing distance. Such a preference is possible in the Sorting and Grouping dialog (Figure 78) for each group. For the rptList_of_entrants report, use the following suggestions:
Set the height of the Page Header to 1 cm.
Set the height of the sport_name Header to 1.5 cm.
Set the height of the gender Header to 1 cm.
Set the height of the age_group Header to 1.7 cm.
Do not try to change the height of the Detail area at the moment.
Set the height of the Page Footer to 1.3 cm.
The designation of the gender in the table is not enough for the rptList_of_entrants report. Renaming the field could be done in the query. However, because the query has already been created, you can use functions in the report instead.
1) Highlight the text field = gender in the gender Header section of the report.
2) In the Properties area on the right side of the Report Builder window, click on the Data tab.
3) Make sure that the Data Field Type drop-down menu is set to Field or Formula.
4) Click the ellipsis (…) button to the right of the Data field.
5) Base displays the Function Wizard.
6) Select Logical in the Category drop-down menu.
7) Double-click the IF entry in the Function area. Note that once details of the IF function are selected on the right side of the Function Wizard, the contents of the Category and Function areas may change – this is a predictive behavior that should be ignored at this stage.
8) Enter [gender]=“m” in the Test field. This defines the test to be performed. The name of a field of the query from which the data is read is surrounded by square brackets. Text strings are enclosed in double quotes.
9) Enter “Male” in the Then_value field. If the field is set to “m”, then replace it with the string “Male”.
10) Enter “Female” in the Otherwise_value field (Figure 82). If the field is not set to “m”, then replace it with the string “Female”.
Figure 82: Using the Function Wizard to change the gender string
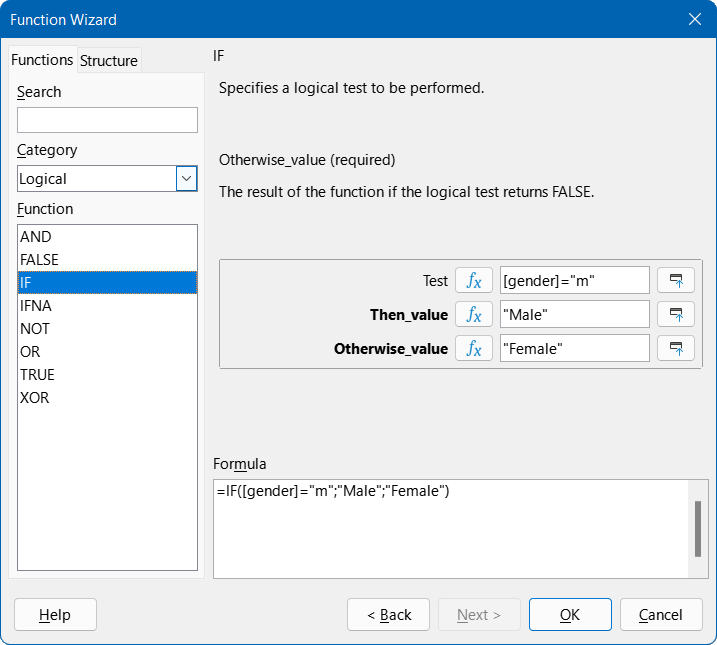
11) Click OK to confirm the entry.
Next time you run the report, the wording of the gender field is changed accordingly.
Fields that display the contents of the database are initially identified in the report as text boxes, but they can be formatted just like the fields in tables in Writer or Calc.
1) Highlight the field =age_group.
2) In the Properties area on the right of the Report Builder window, click on the General tab.
3) Notice that the Formatting field is initially set to Text. Click the button with the ellipsis (…) to the right of the Formatting field
4) Base opens the Format Number dialog. Similar dialogs are used in Calc, Writer, or when creating forms.
5) In the Category area select the Number option.
6) Make sure that the General option is selected in the Format area (Figure 83).
Figure 83: Format Number dialog
7) Click the OK button.
Next time you run the report, the format of the age group field is now displayed without decimal places.
This subsection describes how to tidy up the report a little, moving fields to more convenient positions.
Report fields can be moved beyond the boundaries of a section into another section. However, sufficient space for the field must be present in the destination section. No part of one field can exist in the same location as any part of another field.
Positioning of fields using a mouse is inaccurate, so you need to provide ample space in each section for the fields you intend to place there. After dragging a field to a new position using the mouse, more precise positioning can be achieved using the arrow keys. Alternatively, to position fields using the keyboard, modify the Position X and Position Y values on the General tab of the Properties area.
A label is added to the Page Header area by selecting Insert > Report Controls > Label on the Menu bar. The text displayed on the label is defined in the Label field of the Properties area and the font can be chosen in the Font field of the same area.
The four labels initially located in the Detail area can be moved to form a row at the bottom of the age_group Header area. The four text areas in the Detail area may now be rearranged in a row, each underneath its corresponding label. On completion, the height of the Detail area can be reduced to 0.5 cm.
To hide the Page Footer section completely, set Visible to No in the Properties area. The bottom margin of the document contains too much space. Remember that the available amount is already reduced by the size of the page margins.
Your improved report might be structured in a similar way to that shown in Figure 84
Figure 84: Updated rptList_of_entrants report
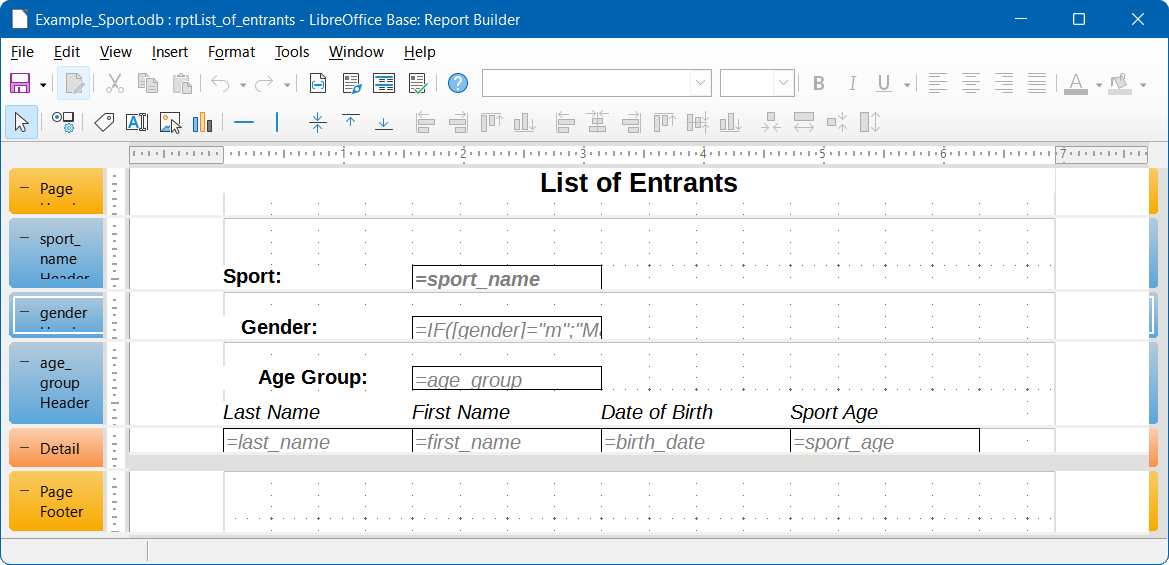
As can be seen in Figure 85, these changes have improved the layout of the report’s output.
Figure 85: First few lines of updated output from rptList_of_entrants
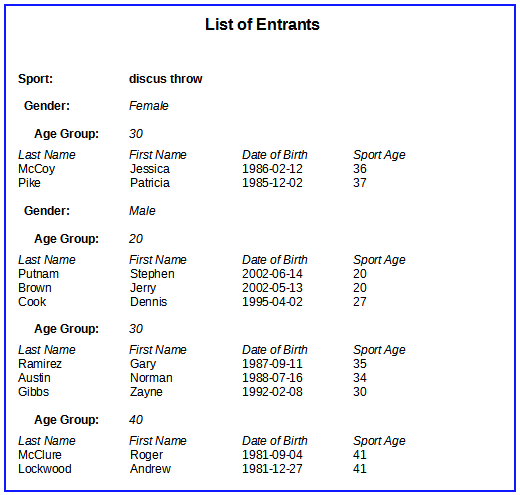
For more information about formatting options for reports, see Chapter 6, Reports.
The example database presented here is only the first step for a database to be used in the sports sector. Many useful extension could be suggested for the database:
Extra fields could be added for items of extra information that might be needed. A good place to add such fields is in the tblRel_entrant_sport table.
If running several competitions for the same sport, you might include in the tblRel_entrant_sport table a date field or another field that can be assigned to a specific competition. The field then becomes part of the table’s primary key.
Perhaps the club that an entrant is a member of could also be added. Adding a field in the tblEntrants table would be sufficient. If multiple clubs could have the same name, this suggests adding a separate tblClub table and also the corresponding foreign key in the tblEntrants table.
As with all competitions, it must be determined who should be placed in which age group and sport. Sorting is required here, which might again end up as a report with a results list.
It would be useful to design a report that could be used to give each entrant an attractively designed certificate with their personal performance and placement.
These and many other extensions are possible, using the methods described in later chapters of this guide.