
Base Guide 7.3
Chapter 2
Creating a Database
This document is Copyright © 2022 by the LibreOffice Documentation Team. Contributors are listed below. You may distribute it and/or modify it under the terms of either the GNU General Public License (https://www.gnu.org/licenses/gpl.html), version 3 or later, or the Creative Commons Attribution License (https://creativecommons.org/licenses/by/4.0/), version 4.0 or later.
All trademarks within this guide belong to their legitimate owners.
|
Steve Fanning |
Robert Großkopf |
flywire |
|
Martin Fox |
Robert Großkopf |
Pulkit Krishna |
|
Jost Lange |
Dan Lewis |
Hazel Russman |
|
Jochen Schiffers |
Jean Hollis Weber |
|
Please direct any comments or suggestions about this document to the Documentation Team’s forum at LibreOffice Guides - The Document Foundation Community (registration is required) or send a mail to loguides@community.documentfoundation.org
Note
Everything you post to a forum, including your email address and any other personal information that is written in the message, is publicly archived and cannot be deleted. E-mails sent to the forum are moderated.
Published August 2022. Based on LibreOffice 7.3 Community.
Other versions of LibreOffice may differ in appearance and functionality.
Some keystrokes and menu items are different on macOS from those used in Windows and Linux. The table below gives some common substitutions for the instructions in this book. For a more detailed list, see the application Help.
|
Windows or Linux |
macOS equivalent |
Effect |
|
Tools > Options menu selection |
LibreOffice > Preferences |
Access setup options |
|
Right-click |
Control+click and/or right-click depending on computer setup |
Open a context menu |
|
Ctrl (Control) |
⌘ (Command) |
Used with other keys |
|
Ctrl+Q |
⌘+Q |
Exit / quit LibreOffice |
Chapter 1, Introducing Base, describes how Base provides a graphical user interface for databases.
Integrated into Base are two embedded relational database engines, HSQLDB (HyperSQL DataBase) version 1.8.0 and Firebird version 3.0.7, with the latter currently accessible only as an experimental feature. Databases created using an embedded engine are accessible by only one user at a time, with all the data for the database stored in an ODB file. The basics of creating an embedded database are described in Chapter 8 of the Getting Started Guide, Getting Started with Base, and in Chapter 1 of this book. The database examples in this book refer to HSQLDB but are customized so that most functions are directly transferable to Firebird. Where appropriate, alternatives in Firebird are identified.
Base also supports connection to many types of external databases. These may be hosted either locally or at a remote network location and may support multiple concurrent users. Before Base can make a connection to an external database, the database must exist and, where appropriate, be configured to allow network connection with specific login credentials.
This chapter describes how to create a new (embedded) database using the embedded HSQLDB engine, how to create connections to several different types of external databases, and how to later modify those connections when necessary.
Note
The embedded HSQLDB engine is written in Java. When an embedded HSQLDB database contains a large amount of data, the use of Java may sometimes lead to a loss of speed. This factor is one of the motivations for the on-going work to convert the default embedded database engine from HSQLDB to Firebird.
Similar effects may be observed when accessing external databases that do not use Java, depending on the driver used. When the connection is via JDBC, which is a Java-based technology, performance can be adversely affected.
If you are planning a single-user database, or if you simply intend to gain some initial experience with a database, the embedded HSQLDB engine will meet your needs. If later your objectives change, then it is possible to transfer the database to an external server, where performance may be better and multiple users can have concurrent access to the database.
To create an embedded database, carry out the following steps.
1) Access the Database Wizard by performing one of the following actions:
a) On the LibreOffice Start Center, click the Base Database option in the Create area.
b) In any LibreOffice component, select File > New > Database on the Menu bar.
c) In Base, click the New icon on the Standard toolbar or use the equivalent keyboard shortcut Ctrl+N.
d) In any LibreOffice component, click the down arrow to the right of the New icon on the Standard toolbar and select Database in the drop-down menu.
2) Base displays Step 1 (Select database) of the Database Wizard (Figure 1).
Figure 1: Step 1 of Database Wizard: Select database
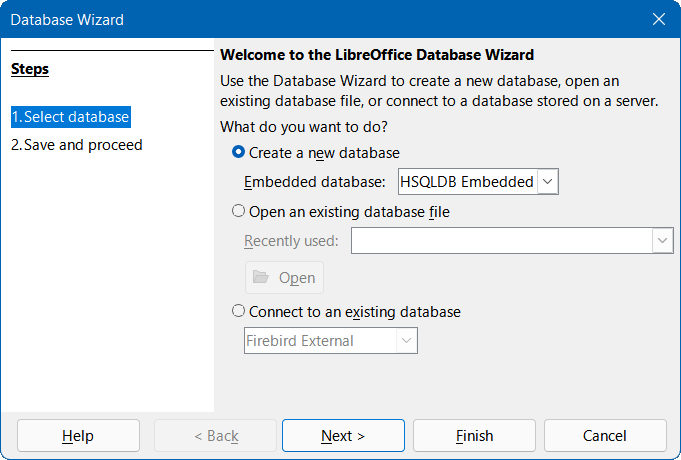
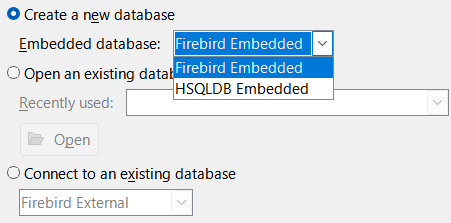
3) Click the Create a new database option. By default (with experimental features disabled), Base will create an HSQLDB database and this is reflected in the setting of the Embedded database drop-down menu, which contains no other options. However, if the Enable experimental features (may be unstable) option is selected on the Tools > Options > LibreOffice > Advanced dialog, the behavior of the Database Wizard changes so that the Embedded database menu contains two options (Figure 2), with the default being Firebird Embedded.
Figure 2: Embedded database menu with experimental features enabled
4) Click the Next > button.
5) Base displays Step 2 (Save and proceed) of the Database Wizard (Figure 3).
Figure 3: Step 2 of Database Wizard: Save and proceed
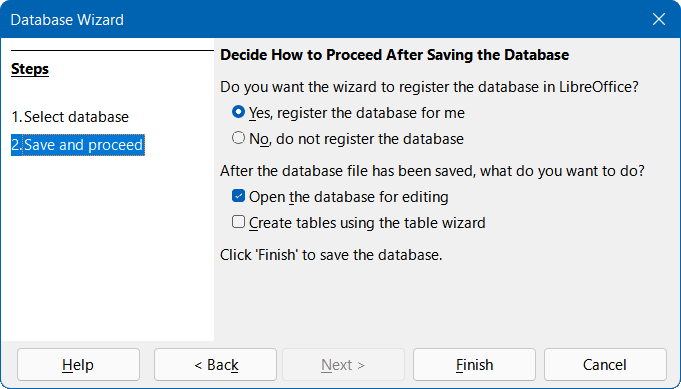
6) By default, the Yes, register the database for me option is selected. A registered database can be used by other components of LibreOffice, for example for mail merge letters in Writer. It is recommended that all databases be registered on creation, but the final choice belongs to the user.
7) By default, the Open the database for editing option is selected, as normally this will be appropriate for a new database. You may deselect the option if you do not wish to edit the database at this time.
8) By default, the Create tables using the table wizard option is deselected. Use of the Table Wizard was described in Chapter 8 of the Getting Started Guide, Getting Started with Base. The remainder of this book intentionally avoids describing the use of wizards for creating tables, queries, and so on. However, the user can choose to select this option as required.
9) Click the Finish button to save the new database.
10) Base displays the Save As dialog, where you should specify a file name and location for the ODB file.
11) Click the Save button.
The embedded database is ready for the entry of records, and the storage of views, queries, forms, and reports. Note that the file is saved before you have made any data entries, which is a different approach to that taken in other LibreOffice components.
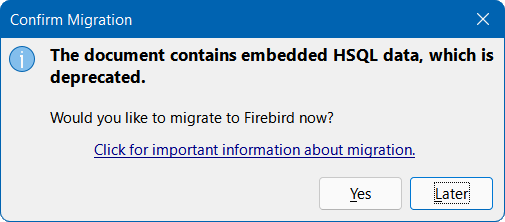
Caution
If experimental features have been enabled by selecting Enable experimental features (may be unstable) on the Tools > Options > LibreOffice > Advanced dialog and you later open an existing embedded HSQLDB database, then Base may display the Confirm Migration dialog (Figure 4) asking if you wish to migrate the database to Firebird. The link on this dialog points to the following page on The Document Foundation’s wiki:
https://wiki.documentfoundation.org/Documentation/HowTo/MigrateFromHSQLDB.
This experimental automatic migration function is started whenever an embedded HSQLDB database is opened and the first connection to the data schema is created. If you are faced with this dialog, extreme caution is advised because work continues on the development of this feature. Do not simply confirm by clicking Yes; be sure to click Later. Make sure that you carry out the preparations described on the referenced wiki page before migration is attempted.
Figure 4: Confirm Migration dialog
Note
When using Base to make a connection over the Internet, make sure that you are aware of how that connection is structured. Any database accessed over the Internet should be protected by a specific user name and password. Ask questions such as: Is the connection encrypted / secure? How is the password transferred? Is my data safe?
An external database must exist before it can be accessed using Base. If access to an external database is desired, it must be set up to allow network connections with specific login credentials before any other software (such as Base) can connect to it.
When an external database is appropriately set up, you may, depending on the type of database and the available driver software, create tables, input data, and query data. Some external data sources (for example, a connection to a spreadsheet or a text database) do not allow new data to be entered and these are used only to search for or report on existing data.
To connect to an external database, start with the following steps.
1) Access the Database Wizard by performing one of the actions listed in step of the procedure for creating a new database using the embedded database engine (page 1).
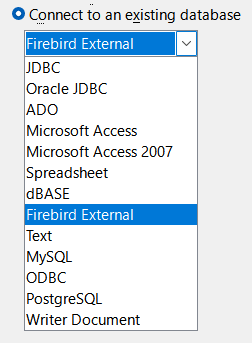
2) At Step 1 (Select database) of the Database Wizard (Figure 1), click the Connect to an existing database option. The database types listed in the adjacent drop-down menu vary according to operating system and other factors, but the following should always be available:
dBASE
Firebird
JDBC
MySQL
ODBC
Oracle JDBC
PostgreSQL
Spreadsheet
Text
Writer document.
Figure 5: External database connection options on a Windows platform
3) Select the entry for the connection type required and then click the Next > button.
The number of steps remaining and the choices provided at each step depend on the nature of the connection type selected. You can change the connection settings after the associated ODB file has been created.
The descriptions in subsequent chapters of this book primarily describe how Base is used in conjunction with an embedded HSQLDB database. Most of the database design work can be extended to databases that use Firebird, MySQL, PostgreSQL, and so on.
The remainder of this chapter provides examples of how to establish connections to typical external databases. Some users may wish to use Base to connect to an existing multi-user database and should consult their organization’s database administrator in order to gain access to the RDBMS. Other users may wish to install a RDBMS for single-user access on their own computer and then use Base as the front-end. It is beyond the scope of this document to cover all possible use cases.
Note
Depending on the driver used, it may be possible to access several databases simultaneously on a connected server. For example, if a connection to a MySQL/MariaDB database is established, other databases on the server for which the specified user has access rights may be displayed in Base at the same time. It is therefore possible to copy data from one database to another, perform related queries, and so on.
MySQL is an open-source relational database management system (RDBMS) that is provided by Oracle Corporation. More information can be found on the MySQL website at https://www.mysql.com/. The current version of the MySQL Reference Manual is accessed through the Documentation link on the MySQL website.
MariaDB is an open-source RDBMS that is compatible with MySQL. The development of MariaDB is overseen by the MariaDB Foundation and more information can be found at https://mariadb.com/. The MariaDB Server Documentation can be found at https://mariadb.com/kb/en/documentation/.
Base can connect to MySQL and MariaDB databases using one of three methods:
Direct connection using a built-in connector. This is the simplest and fastest method.
Connection using ODBC (Open Database Connectivity).
Connection using JDBC (Java Database Connectivity).
Refer to the MySQL Reference Manual or MariaDB Server Documentation as appropriate for detailed instructions about downloading and installing the database server software for your computer configuration, and for details of how to access a SQL console. After installation, follow any setup instructions specified in the documentation. These may include:
1) In both MySQL and MariaDB the user name of the administrator account is root (note that the name root in this context is not related to the root superuser account that is provided for some operating systems). Make sure that the password for the root account of the database server has been set to a string that is appropriate to maintain the security of your data.
2) Some user accounts may be provided by default, for test purposes, and some test databases may allow anonymous access. As an extra security measure, make sure that all anonymous user accounts are deleted.
Before making a connection, the database of interest must exist on the server. If your database does not yet exist, carry out the following steps to create it.
1) To create an (empty) database called libretest, type the following command at a SQL console:
2) To grant all rights on the new database to a new user called lotest with the password libre, enter the following commands at a SQL console:
On successful completion of these steps, the new database is available and Base can connect to it, as described in the following subsections.
Note
In earlier versions of Base (prior to LibreOffice 6.2), direct connection to MySQL or MariaDB required installation of an extension. Since LibreOffice 6.2, the software needed to make a direct connection is integrated within Base.
The first time that you want to make a direct connection to a particular MySQL or MariaDB database, carry out the following steps.
1) Access the Database Wizard by performing one of the actions listed in step of the procedure for creating a new database using the embedded database engine (page 1).
2) Base displays Step 1 (Select database) of the Database Wizard (Figure 1).
3) Click the Connect to an existing database option. Base enables the adjacent drop-down menu listing the available options (Figure 5).
4) Select MySQL in the drop-down menu.
5) Click the Next > button.
6) Base displays Step 2 (Set up MySQL connection) of the Database Wizard (Figure 6).
Figure 6: Step 2 of Database Wizard: Set up MySQL connection
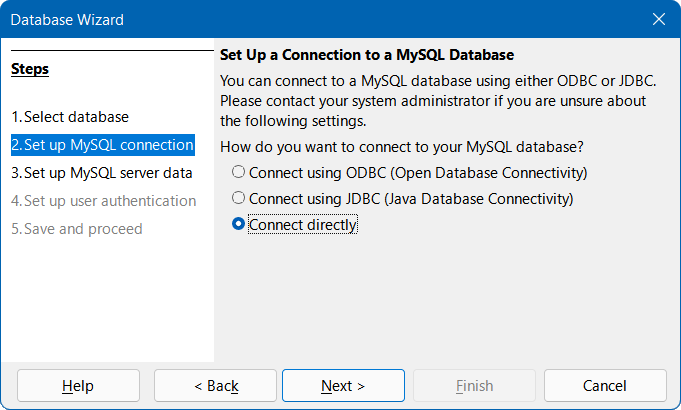
7) Click the Connect directly option.
8) Click the Next > button.
9) Base displays Step 3 (Set up MySQL server data) of the Database Wizard (Figure 7).
Figure 7: Step 3 of Database Wizard: Set up MySQL server data
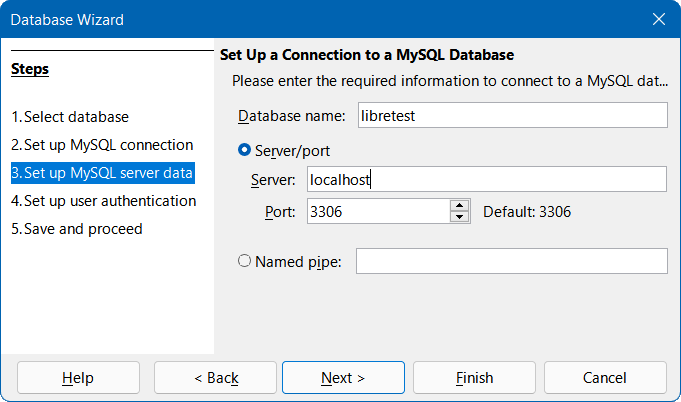
10) Enter the name of your database in the Database name field. Our example database is called libretest.
11) Click the Server/port option.
12) Enter the name of the server that runs the MySQL or MariaDB database in the Server field. If you are connecting to a database on the same computer, the server name should be localhost. If you are connecting to a remote server, then it may be an IP address, a network computer name, or an Internet address.
13) Enter the port number for the database server in the Port field. The default port number for MySQL and MariaDB databases is 3306.
Tip
At steps to , if you are unsure about the correct information to be entered, seek guidance from your database administrator.
14) Click the Next > button.
15) Base displays Step 4 (Set up user authentication) of the Database Wizard (Figure 8).
Figure 8: Step 4 of Database Wizard: Set up user authentication
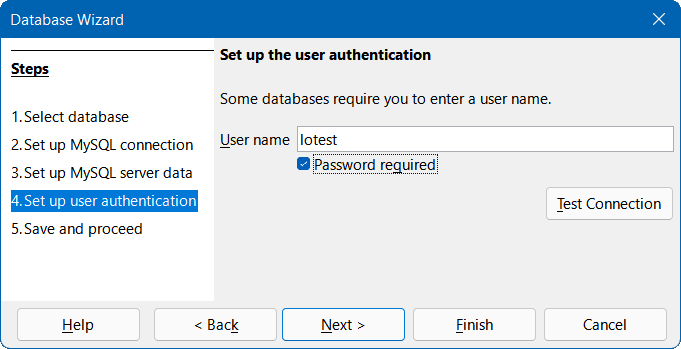
16) Enter a valid user name in the User name field. Our example user is named lotest.
17) Click the Password required option.
18) Click the Test Connection button.
19) Base displays the Authentication Required dialog (Figure 9).
Figure 9: Authentication Required dialog
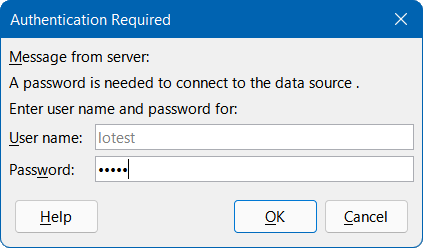
20) Enter the user name (lotest) and password (libre) required to access the database.
21) Click the OK button.
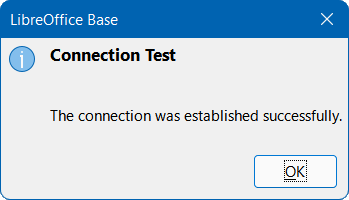
22) Base displays a dialog to inform that the connection test was successful (Figure 10). If the test was unsuccessful (for example, the database server is not currently running or you typed incorrect login credentials), an appropriate error message is displayed instead.
Figure 10: Connection test successful dialog
23) Press the OK button to remove the connection test successful dialog from the screen.
24) Click the Next > button.
25) Base displays Step 5 (Save and proceed) of the Database Wizard (with the same options as are shown in Figure 3).
26) Click the No, do not register the database option, as this is a test database.
27) Click the Open the database for editing option, as normally this will be appropriate for a new database. You may deselect the option if you do not wish to edit the database at this time.
28) Unless you wish to use the Table Wizard, leave the Create tables using the table wizard option in its default deselected state.
29) Click the Finish button.
30) Base displays the Save As dialog, where you should specify a file name and location for the ODB file.
31) Click the Save button.
32) The Database Wizard is removed from the screen, the ODB file containing the database connection information is created, and Base updates its main window to show information about the database tables under the name of the database itself (Figure 11).
Figure 11: Main Base window showing tables within libretest database
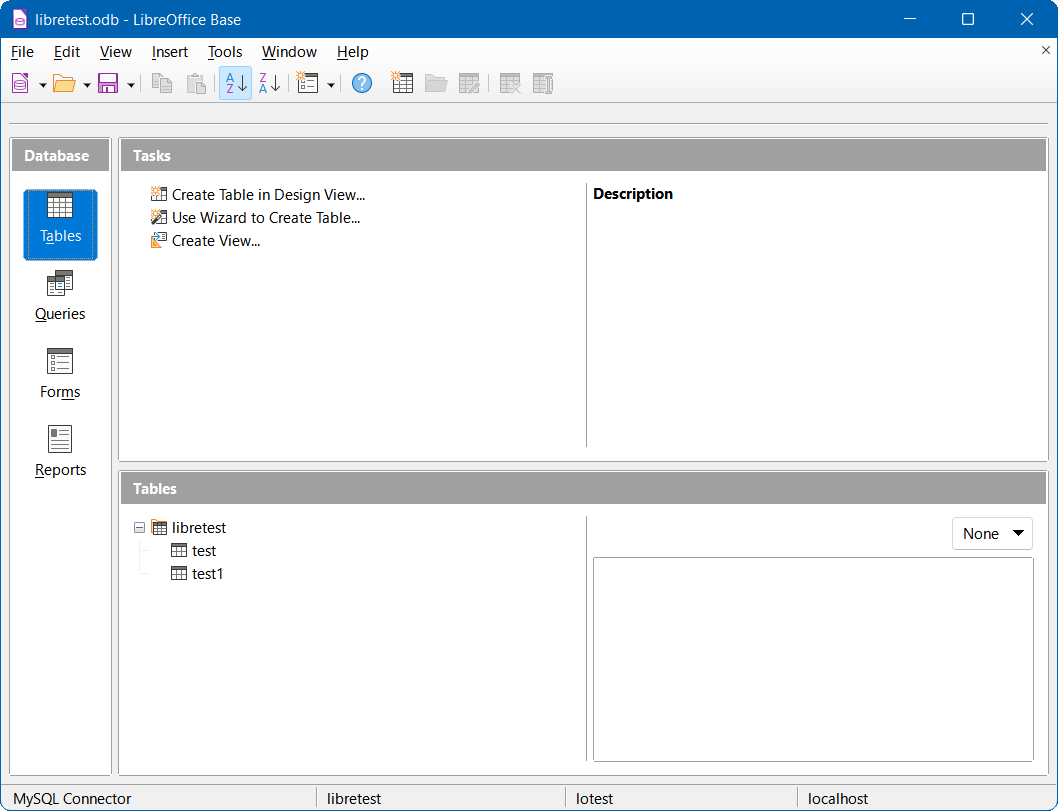
Tables can be created, edited, and deleted.
The Status bar at the bottom of Figure 11 shows:
The name of the connector used to connect to the MySQL or MariaDB database (MySQL Connector in this case).
The name of the open MySQL or MariaDB database. In this case the ODB file and the MySQL database share a common name (libretest), but this need not be the case.
The user name that is being used to connect to the MySQL or MariaDB database (lotest in this case).
The name of the server on which the MySQL or MariaDB database is running (localhost in this case).
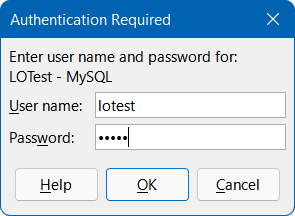
At some later time when you open this ODB file again and then use Base to access the underlying MySQL or MariaDB database, the Authentication Required dialog (Figure 12) is displayed. You do not need to reconfigure the connection but you do need to reenter your correct login credentials.
Figure 12: Authentication Required dialog
To use Base to connect to a MySQL or MariaDB database server through the Open Database Connectivity (ODBC) Application Programming Interface (API), there should be a properly configured ODBC driver installed on your computer. If the database server is already installed on your computer, then the ODBC connector may already be installed as well. If the connector is not currently available on your computer, then you will need administration rights to install the new software.
To connect to a MySQL database through ODBC, it is recommended that you use the MySQL Connector/ODBC. The correct version of the ODBC connector for your computer can be downloaded from the MySQL Community Downloads website at https://dev.mysql.com/downloads/connector/odbc/. Platform-dependent installation instructions can be found in the MySQL Connector/ODBC Developer Guide at https://dev.mysql.com/doc/connector-odbc/en/.
To connect to a MariaDB database through ODBC, it is recommended that you use the MariaDB Connector/ODBC. The correct version of the ODBC connector for your computer can be downloaded from the Downloads area of the MariaDB website at https://mariadb.com/downloads/connectors/connectors-data-access/odbc-connector. Platform-dependent installation instructions can be found in the MariaDB Knowledge Base at https://mariadb.com/kb/en/about-mariadb-connector-odbc/.
Make sure that you follow the instructions given in the connector documentation to create an ODBC Data Source Name (DSN) for your database. For the purposes of the example in the next subsection, assume that a data source has been configured as follows:
The MySQL ODBC Unicode driver is selected.
The name of the data source is set to libretest-ODBC-connection.
The database name (libretest) is included within the definition of the data source.
Login credentials for the database server are not defined within the data source.
The first time that you want to make an ODBC connection to a particular MySQL or MariaDB database, carry out the following steps.
1) Access the Database Wizard by performing one of the actions listed in step of the procedure for creating a new database using the embedded database engine (page 1).
2) Base displays Step 1 (Select database) of the Database Wizard (Figure 1).
3) Click the Connect to an existing database option. Base enables the adjacent drop-down menu listing the available options (Figure 5).
4) Select MySQL in the drop-down menu.
5) Click the Next > button.
6) Base displays Step 2 (Set up MySQL connection) of the Database Wizard (Figure 6).
7) Click the Connect using ODBC (Open Database Connectivity) option.
8) Click the Next > button.
9) Base displays Step 3 (Set up ODBC connection) of the Database Wizard (Figure 13).
Figure 13: Step 3 of Database Wizard: Set up ODBC connection
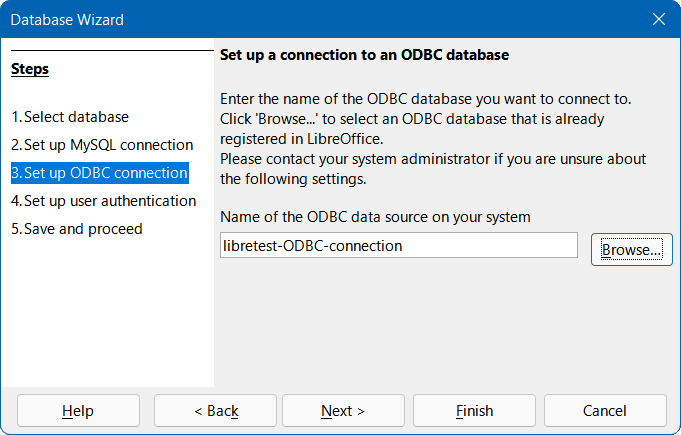
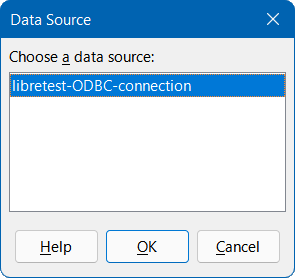
10) Enter the name of the previously defined ODBC data source that is to be used to access the MySQL or MariaDB database (libretest-ODBC-connection in our example). You can click the Browse button to access the Data Source dialog (Figure 14), where you can select the data source of interest from a list of those available and then click the OK button.
Figure 14: Data Source dialog
11) Click the Next > button.
12) Base displays Step 4 (Set up user authentication) of the Database Wizard (similar to Figure 8).
13) Enter a valid user name in the User name field. Our example user is name lotest.
14) Click the Password required option.
15) If required, test the connection by carrying out steps to of the direct connection procedure (page 1).
16) Click the Next > button.
17) Base displays Step 5 (Save and proceed) of the Database Wizard (with the same options as are shown in Figure 3).
18) Click the No, do not register the database option, as this is a test database.
19) Click the Open the database for editing option, as normally this will be appropriate for a new database. You may deselect the option if you do not wish to edit the database at this time.
20) Unless you wish to use the Table Wizard, leave the Create tables using the table wizard option in its default deselected state.
21) Click the Finish button.
22) Base displays the Save As dialog, where you should specify a file name and location for the ODB file.
23) Click the Save button.
24) The Database Wizard is removed from the screen, the ODB file containing the database connection information is created, and Base updates its main window to show information about the database tables under the name of the database itself (similar to Figure 11).
Tables can be created, edited, and deleted.
In this case, the Status bar shows the following information:
The name of the connector used to connect to the MySQL or MariaDB database (for example MySQL (ODBC)).
The name of the ODBC data source, in this case libretest-ODBC-connection.
The user name that is being used to connect to the MySQL or MariaDB database (lotest in this case).
At some later time when you open this ODB file again and then use Base to access the underlying MySQL or MariaDB database, the Authentication Required dialog (Figure 12) is displayed. You do not need to reconfigure the connection but you do need to reenter your correct login credentials.
To use Base to connect to a MySQL or MariaDB database server through the Java Database Connectivity (JDBC) Application Programming Interface (API), there should be an appropriate JDBC connector located on your computer. If the database server is already installed on your computer, then the JDBC connector may already be present as well. If the connector is not currently available on your computer, then you will need to download it and place a specific JAR (Java ARchive) file in an accessible folder.
To connect to a MySQL database through JDBC, it is recommended that you use the MySQL Connector/J. The correct version of the JDBC connector for your computer can be downloaded from the MySQL Community Downloads website at https://dev.mysql.com/downloads/connector/j/. Installation instructions can be found in the MySQL Connector/J Developer Guide, which is accessible from https://dev.mysql.com/doc/index-connectors.html.
To connect to a MariaDB database through JDBC, it is recommended that you use the MariaDB Connector/J. The correct version of the JDBC connector for your computer can be downloaded from the Downloads area of the MariaDB website at https://mariadb.org/connector-java/all-releases/. Installation instructions can be found in the MariaDB Knowledge Base at https://mariadb.com/kb/en/mariadb-connector-j/.
When downloading a JDBC connector, make sure that you choose the correct version for your operating system, database version, and Java version. Compatibility is addressed in the MySQL and MariaDB documentation specified in the previous paragraphs. A JDBC connector cannot be used if your system does not support Java.
Take the following steps to inform Base where it can find the JDBC connector.
1) Select Tools > Options > LibreOffice > Advanced on the Menu bar.
2) LibreOffice displays the Options – LibreOffice – Advanced dialog (Figure 15).
Figure 15: Options - LibreOffice - Advanced dialog
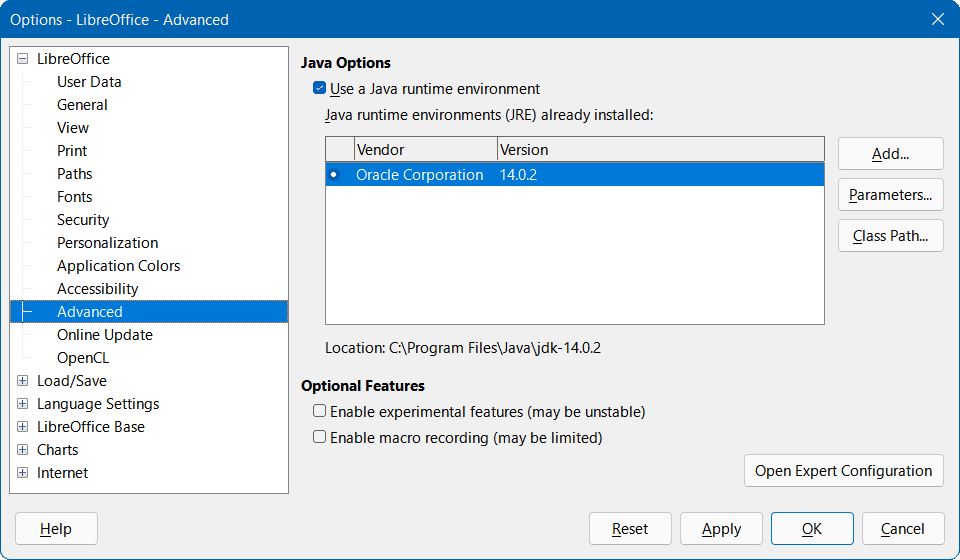
3) Click the Class Path button.
4) LibreOffice displays the Class Path dialog (Figure 16)
Figure 16: Class Path dialog
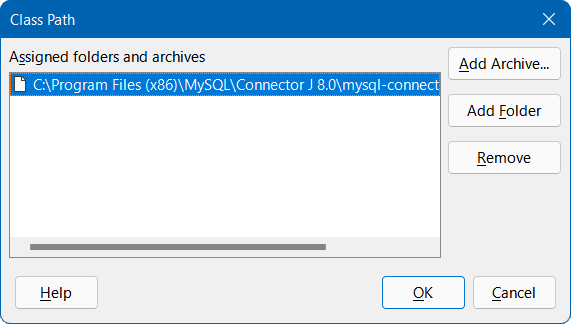
5) Click the Add Archive button.
6) LibreOffice displays the Select Archives dialog (not shown).
7) Navigate to the folder containing the JAR file for the JDBC connector, select the file, and click the Open button.
8) Make sure that the required JAR file is selected and click the OK button on the Class Path dialog.
9) Click the OK button on the Options – LibreOffice – Advanced dialog.
When you later attempt to create a JDBC connection to your database as described in the next subsection, Base should be able to find the JDBC connector.
The first time that you want to make a JDBC connection to a particular MySQL or MariaDB database, carry out the following steps.
1) Access the Database Wizard by performing one of the actions listed in step of the procedure for creating a new database using the embedded database engine (page 1).
2) Base displays Step 1 (Select database) of the Database Wizard (Figure 1).
3) Click the Connect to an existing database option. Base enables the adjacent drop-down menu listing the available options (Figure 5).
4) Select MySQL in the drop-down menu.
5) Click the Next > button.
6) Base displays Step 2 (Set up MySQL connection) of the Database Wizard (Figure 6).
7) If necessary, click the Connect using JDBC (Java Database Connectivity) option. This is the default choice for this set of three radio buttons.
8) Click the Next > button.
9) Base displays Step 3 (Set up JDBC connection) of the Database Wizard (Figure 17).
Figure 17: Step 3 of Database Wizard: Set up JDBC connection
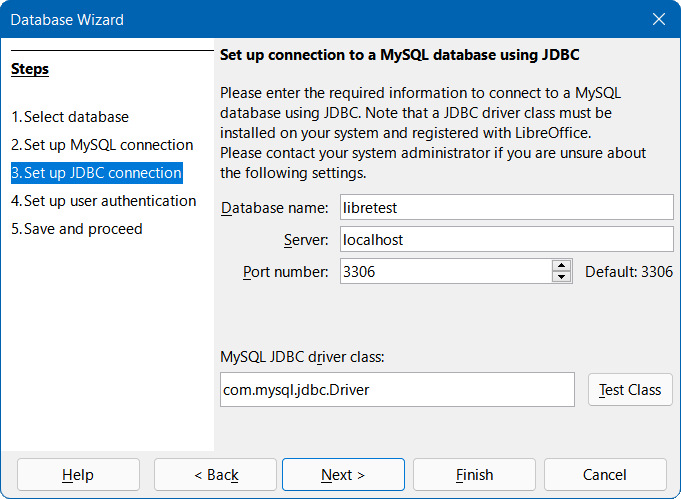
10) Enter the name of your database in the Database name field. Our example database is called libretest.
11) Enter the name of the server that runs the MySQL or MariaDB database in the Server field. If you are connecting to a database on the same computer, the server name should be localhost. If you are connecting to a remote server, then it may be an IP address, a network computer name, or an Internet address.
12) Enter the port number for the database server in the Port number field. The default port number for MySQL and MariaDB databases is 3306.
Tip
At steps to , if you are unsure about the correct information to be entered, seek guidance from your database administrator.
13) Providing that Base is aware of the JDBC connector, it automatically populates the MySQL JDBC driver class field with the name of the connector. This is either com.mysql.jbc.Driver (for MySQL Connector/J) or org.mariadb.jdbc.Driver (for MariaDB Connector/J).
14) Click the Test Class button to check that the connector’s JAR file is accessible to Base. If successful, Base displays a confirmation dialog (Figure 18). Click the OK button to remove this dialog from the screen.
Figure 18: JDBC connector successfully loaded dialog
15) Click the Next > button.
16) Base displays Step 4 (Set up user authentication) of the Database Wizard (similar to Figure 8).
17) Enter a valid user name in the User name field. Our example user is name lotest.
18) Click the Password required option.
19) If required, test the connection by carrying out steps to of the direct connection procedure (page 1).
20) Click the Next > button.
21) Base displays Step 5 (Save and proceed) of the Database Wizard (with the same options as are shown in Figure 3).
22) Click the No, do not register the database option, as this is a test database.
23) Click the Open the database for editing option, as normally this will be appropriate for a new database. You may deselect the option if you do not wish to edit the database at this time.
24) Unless you wish to use the Table Wizard, leave the Create tables using the table wizard option in its default deselected state.
25) Click the Finish button.
26) Base displays the Save As dialog, where you should specify a file name and location for the ODB file.
27) Click the Save button.
28) The Database Wizard is removed from the screen, the ODB file containing the database connection information is created, and Base updates its main window to show information about the database tables under the name of the database itself (similar to Figure 11).
Tables can be created, edited, and deleted.
In this case, the Status bar shows the following information:
The name of the connector used to connect to the MySQL or MariaDB database (MySQL (JDBC) in this case).
The name of the open MySQL or MariaDB database (libretest in this case).
The user name that is being used to connect to the MySQL or MariaDB database (lotest in this case).
The name of the server on which the MySQL or MariaDB database is running (localhost in this case).
At some later time when you open this ODB file again and then use Base to access the underlying MySQL or MariaDB database, the Authentication Required dialog (Figure 12) is displayed. You do not need to reconfigure the connection but you do need to reenter your correct login credentials.
Tip
If the Tables area of the main Base window shows INFORMATION_SCHEMA tables, these should normally be ignored by most users. The simplest approach is to collapse the information_schema node in the table tree structure. Alternatively, select Tools > Table Filter on the Menu bar, deselect the information_schema node on the Tables Filter dialog, and click the OK button. Then select View > Refresh Tables on the Menu bar, after which the information_schema node and its children should no longer be visible in the Tables area.
In MySQL and MariaDB, it is possible to enter and change data in tables without a primary key field. The Base user interface can display such tables, but offers no input or modification options.
If you want to use tables without a primary key, you can instead use the Tools > SQL option, or include macros within forms, to supply the tables with data.
Connections to MySQL or MariaDB databases may be to a local server (“localhost”), to a networked server, or to an Internet server. MySQL and MariaDB provide a wait_timeout system variable that defines the time that the server waits for an inactive connection to become active before closing it. In some cases you may feel that the current wait timeout is inappropriate for your tasks, for example when a low wait_timeout has been set to avoid exceeding the maximum number of connections.
Depending on the server settings, it may be possible to modify the value of wait_timeout. Try the following command using the Tools > SQL option:
If this is successful, wait_timeout is reset to 600 seconds or 10 minutes. As soon as any query is executed, the wait time until the next interruption is reset to 10 minutes.
If the wait_timeout cannot be reset to a suitable value, then you could consider writing a macro that makes a simple query (e.g. SELECT NOW()) at a regular rate, with the frequency selected to keep your connection open.
With a JDBC connection, you can try setting the autoReconnect configuration parameter to true. In this case, a first interruption may occur, but the connection will be restored next time contact is attempted.
With a direct connection, the database file must be closed and reopened after an interruption to re-establish contact with the server. However, connection data such as login credentials do not need to be reentered.
Both MySQL and MariaDB support stored routines (procedures and functions). A stored routine is a set of SQL commands that are stored on the database server and invoked using a CALL statement. A stored routine can have parameters so that you can pass values to it and get results back.
In Base, stored routines can be called using the Tools > SQL option. However, there is no direct way to display the output from a stored routine in Base.
A straightforward workaround to access the output of a stored routine is to write the routine’s output to a temporary table in the database, which will be visible only to the current database user. That user can then query the temporary table to access the results from the stored routine. A more automated approach to solving this issue is discussed in Chapter 9, Macros.
PostgreSQL (often simply referred to as “Postgres”) is an open-source RDBMS provided by The PostgreSQL Global Development Group. More information can be found on the PostgreSQL website at https://www.postgresql.org/. Links to current and past versions of the PostgreSQL Documentation can be found at https://www.postgresql.org/docs/.
Base can connect to a PostgreSQL database using one of three methods:
Direct connection using a built-in PostgreSQL connector.
Connection using ODBC.
Connection using JDBC. This may be a good option if a secure connection to a remote PostgreSQL database is to be established via the SSH protocol (Secure Shell).
The user interactions necessary to connect to a PostgreSQL database have some commonality with the interactions for connecting to a MySQL or MariaDB database. However, there are also significant differences. The aim of the following subsections is to highlight and explain those differences, without repeating details that are identical to those already described for MySQL/MariaDB.
Schemas are important components of a PostgreSQL database, but new users should be aware that the term schema is not always used with the same meaning in other relational database management systems. More detailed information can be found in the Schemas chapter of the PostgreSQL Documentation (https://www.postgresql.org/docs/current/ddl-schemas.html).
The following notes highlight some of the features of PostgreSQL schemas that may be reflected in the Base user interface when connected to a PostgreSQL database.
A schema is a named collection of database objects, including (but not limited to) tables and views.
A database contains one or more schemas. Two schemas within a database may contain different objects, which share a similar name.
For every new database, PostgreSQL generates a schema called public. When you create a database object without specifying the schema name, it is placed in the public schema.
For every new database, PostgreSQL generates additional schemas intended for system purposes. Some of these may be visible in Base depending on the type of connection (for example, the schemas information_schema and pg_catalog). Users should not save their database objects in schemas that are intended for system use.
Users can create their own schemas via the Tools > SQL option, but names beginning with the prefix “pg_” should be avoided. To access an object in a specific schema, qualify the object using the syntax: schema_name.object_name.
User-created schemas do not appear in the Tables area of the main Base window until they contain at least one saved database object.
If you find that that the Tables area of the main Base window becomes cluttered with too many schemas and / or tables, select Tools > Table Filter on the Menu bar and use the Tables Filter dialog to select items to be displayed or hidden. Note that you may need to select View > Refresh Tables to see the effect of any changes made through this dialog.
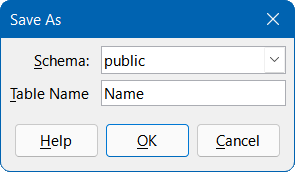
The first time you save a new table created in Design View, Base displays a Save As dialog that includes a Schema menu from which the required schema should be selected (Figure 19). A similar menu is provided on the dialog displayed when you select a query and then select Edit > Create as View on the Menu bar.
Figure 19: Save As dialog with Schema drop-down menu
Refer to the PostgreSQL Documentation for detailed instructions about downloading and installing the database server software for your computer configuration, and for details of how to access any tool that you require to enter SQL commands prior to connecting with Base. After installation, follow any setup instructions specified in the documentation. These may include making sure that the password for the default superuser account of the database server (user name postgres) has been set to a string that is appropriate to maintain the security of your data.
Before making a connection, the database of interest must exist on the server and you must have a user name and password. If your database and user name do not yet exist, the postgres user should carry out the following steps to create them. Commands may be entered through a terminal-based front-end (such as psql) or a graphical interface (such as pgAdmin).
1) To create an (empty) database called libretest, enter the following command:
2) To grant all rights on the new database to a new user called lotest with the password libre, enter the following commands:
3) If needed, to create a schema called user_area for the lotest user to save database objects, enter the following commands:
On successful completion of these steps, the new database is available and Base can connect to it, as described in the following subsections.
The first time that you make a direct connection to a particular PostgreSQL database, carry out steps similar to those for a direct connection to a MySQL/MariaDB database (see Connecting directly subsection on page 1), but with the following important differences:
After clicking the Connect to an existing database option on Step 1 (Select database) of the Database Wizard, select the PostgreSQL option in the drop-down menu (instead of MySQL).
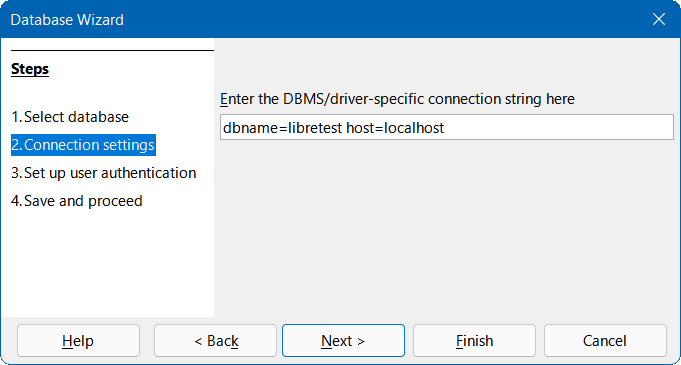
The options presented on Step 2 (Set up MySQL connection) and Step 3 (Set up MySQL server data) of the Database Wizard when making a direct connection to a MySQL/MariaDB database are not relevant to PostgreSQL. Instead, Base displays Step 2 (Connection settings) of the Database Wizard (Figure 20).
Enter the name of your database and the host name, as shown in Figure 20 (dbname=libretest host=localhost). This utilizes the plain keyword/value string format for specifying connection parameters, which is described further in the Connection Strings section of the PostgreSQL Documentation (https://www.postgresql.org/docs/current/libpq-connect.html). Under some circumstances, it is necessary to give the fully qualified host name, including the domain name.
Figure 20: Step 2 of Database Wizard: Connection settings
When the connection is established and the ODB file has been created, Base updates its main window to show information about the PostgreSQL database (Figure 21).
Figure 21: Main Base window when connected directly to PostgreSQL
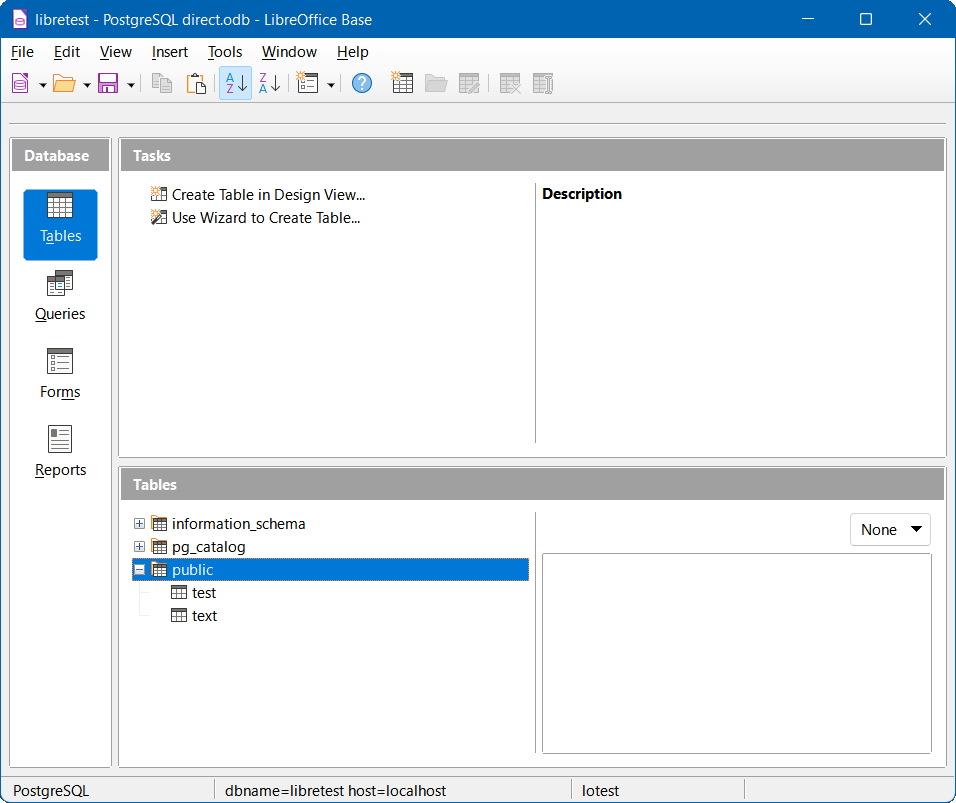
The Tables area shows three schemas, named information_schema, pg_catalog, and public. The public schema has been expanded to show its two constituent tables, test and text.
The Status bar at the bottom of Figure 21 shows:
The name of the connector used (PostgreSQL).
Details of the connection string entered at Step 2 of the Database Wizard (dbname=libretest host=localhost in this case).
The user name that was used to connect to the PostgreSQL database (lotest in this case).
At some later time when you open this ODB file again and then use Base to access the underlying PostgreSQL database, the Authentication Required dialog (similar to that shown in Figure 12) is displayed. You do not need to reconfigure the connection but you do need to reenter your correct login credentials.
To use Base to connect to a PostgreSQL database server through the ODBC API, there should be a properly configured ODBC driver installed on your computer. If the driver is not currently available on your computer, then you will need administration rights to install the new software.
To connect to a PostgreSQL database through ODBC, it is recommended that you use the official PostgreSQL ODBC driver (psqlODBC). The correct version of the ODBC driver for your computer can be downloaded from the psqlODBC website at https://odbc.postgresql.org/, where relevant documentation can also be found. For Windows, the driver is available as a standard, easy-to-use installer package. For Unix environments, you must compile the source code yourself, using instructions given on the website. No instructions are given for using psqlODBC on macOS.
Make sure that you follow the instructions given in the driver documentation to create an ODBC Data Source Name (DSN) for your database. For the purposes of the example in the next subsection, assume that a data source has been configured as follows:
The PostgreSQL Unicode driver is selected.
The name of the data source is set to libretest-PostgreSQL-ODBC.
The database name (libretest) is included within the definition of the data source.
Login credentials for the database server are not specified within the data source.
The first time that you make an ODBC connection to a particular PostgreSQL database, carry out steps similar to those for an ODBC connection to a MySQL/MariaDB database (see Using the Database Wizard subsection on page 1), but with the following important differences:
After clicking the Connect to an existing database option on Step 1 (Select database) of the Database Wizard, select the ODBC option in the drop-down menu (instead of MySQL).
The options presented on Step 2 (Set up MySQL connection) of the Database Wizard when making a connection to a MySQL/MariaDB database are not relevant to PostgreSQL.
At Step 2 (Set up ODBC connection), enter the name of the previously defined ODBC data source that is to be used to access the PostgreSQL database (libretest-PostgreSQL-ODBC in our example). You can click the Browse button to access the Data Source dialog (Figure 14), where you can select the data source of interest from a list of those available and then click the OK button.
When the connection is established and the ODB file has been created, Base updates its main window to show information about the PostgreSQL database.
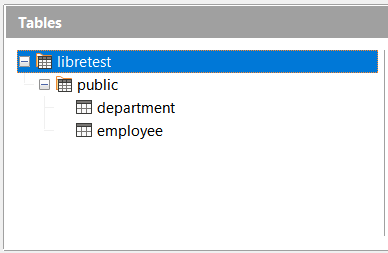
By default for an ODBC connection to PostgreSQL, the Tables area only displays objects in the public schema, even when other user-defined schemas are present.
Figure 22: Initial layout of Tables area for ODBC connection to PostgreSQL
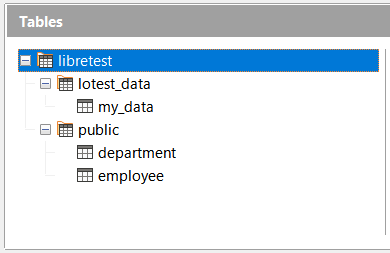
To see other defined schemas in the Tables area, it can be helpful to reset the search_path variable to the database level. One possible way to achieve this is to configure the ODBC driver to issue an appropriate command when it connects to the database. For example, on a Windows system this may be achieved using the ODBC Data Source Administrator dialog – select the driver, click Configure, click Datasource, click Page 2, and then type the command SET SEARCH_PATH TO libretest; in the Connect Settings text box. On Unix, make sure that the file “odbc.ini” contains the entry ConnSettings = SET SEARCH_PATH TO libretest;. The impact of changing search_path can be seen in Figure 23, which represents exactly the same underlying database but now the additional lotest_data schema is visible.
Figure 23: Updated layout of Tables area for ODBC connection to PostgreSQL
With an ODBC connection to PostgreSQL, the Status bar of the main Base window shows the following information:
The name of the connector used (ODBC).
The name of the ODBC data source (libretest-PostgreSQL-ODBC in this case).
The user name that was used to connect to the PostgreSQL database (lotest in this case).
At some later time when you open this ODB file again and then use Base to access the underlying PostgreSQL database, the Authentication Required dialog (similar to that shown in Figure 12) is displayed. You do not need to reconfigure the connection but you do need to reenter your correct login credentials.
To use Base to connect to a PostgreSQL database server through the JDBC API, there should be an appropriate JDBC driver located on your computer. If the driver is not currently available on your computer, then you will need to download it and place a specific JAR (Java ARchive) file in an accessible folder.
To connect to a PostgreSQL database through JDBC, it is recommended that you use the official PostgreSQL JDBC Driver. The correct version of the JDBC driver for your computer can be downloaded from the PostgreSQL JDBC Driver website at https://jdbc.postgresql.org/. Installation instructions can be found in the PostgreSQL JDBC Driver Documentation, which is accessible from https://jdbc.postgresql.org/documentation/documentation.html.
When downloading a JDBC driver, make sure that you choose the correct version for your computer configuration. A JDBC driver cannot be used if your system does not support Java.
Carry out steps similar to those for a JDBC connection to a MySQL/MariaDB database to inform Base where it can find the JAR file for the JDBC driver (see Initial preparation subsection on page 1).
The first time that you make a JDBC connection to a particular PostgreSQL database, carry out steps similar to those for a JDBC connection to a MySQL/MariaDB database (see Using the Database Wizard subsection on page 1), but with the following important differences:
After clicking the Connect to an existing database option on Step 1 (Select database) of the Database Wizard, select the JDBC option in the drop-down menu (instead of MySQL).
The options presented on Step 2 (Set up MySQL connection) of the Database Wizard when making a connection to a MySQL/MariaDB database are not relevant to PostgreSQL.
For a JDBC connection, Base displays Step 2 (Set up JDBC connection) of the Database Wizard (Figure 24).
Figure 24: Step 2 of Database Wizard: Set up JDBC connection
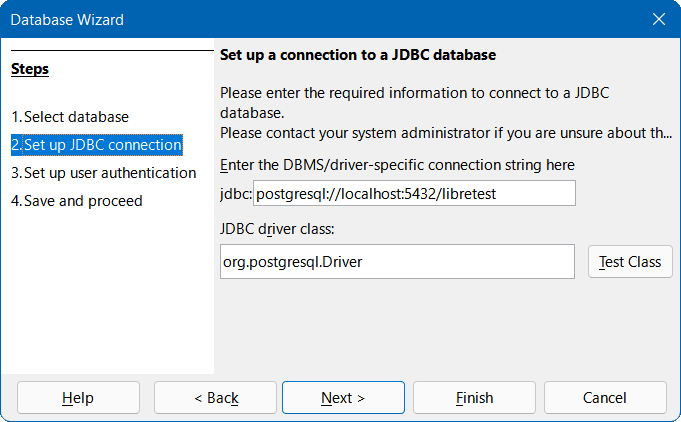
Enter the connection string using one of the forms given in the PostgreSQL JDBC Driver Documentation. In Figure 24, the jdbc:postgresql://host:port/database form is used.
Enter the name of the driver as org.postgresql.Driver in the JDBC driver class field.
Click the Test Class button to check that the driver’s JAR file is accessible to Base. If successful, Base displays a confirmation dialog (Figure 18). Click the OK button to remove this dialog from the screen.
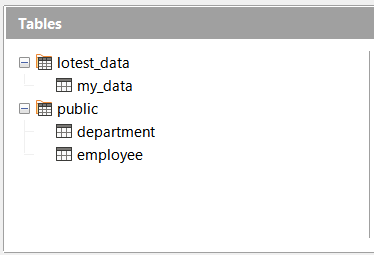
By default for a JDBC connection to PostgreSQL, the Tables area displays objects in the public schema and other user-defined schemas (such as lotest_data in Figure 25).
Figure 25: Initial layout of Tables area for JDBC connection to PostgreSQL
With a JDBC connection to PostgreSQL, the Status bar of the main Base window shows the following information:
The name of the connector used (JDBC).
The connection string entered at Step 2 of the Database Wizard (postgresql://localhost:5432/libretest in this case).
The user name that was used to connect to the PostgreSQL database (lotest in this case).
At some later time when you open this ODB file again and then use Base to access the underlying PostgreSQL database, the Authentication Required dialog (similar to that shown in Figure 12) is displayed. You do not need to reconfigure the connection but you do need to reenter your correct login credentials.
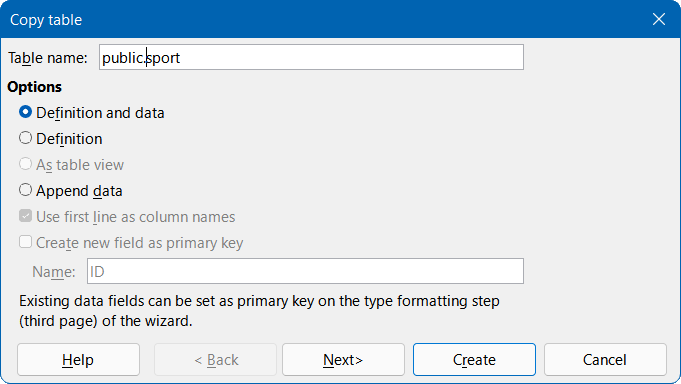
In some scenarios a user may want to use Base to copy a table from some database to a PostgreSQL database. With both databases open in Base, a simple way to achieve this is to right-click the table name in the source database and select Copy from the context menu. Moving to the PostgreSQL database, make sure that the Tables option is selected in the Database area of the main Base window and click the Paste button in the Standard toolbar. Base displays the Copy table dialog (Figure 26), in which you should add the required prefix in the Table name field (for example, “public.”). For the ODBC driver (for which we set search_path to libretest), a typical prefix would be “libretest.public”.
Figure 26: Copy table dialog
When using an embedded HSQLDB database, users may create a primary key for a table by defining a column named id (or similar), of type Integer, with its AutoValue property set to Yes. If the same approach is adopted for a table in a PostgreSQL database, it will not have the desired effect and the column values will not auto-increment – the user must enter those values.
A long-established and common method for adding an auto-incrementing primary key column in a PostgresSQL table is to use one of the non-standard BIGSERIAL, SERIAL, or SMALLSERIAL data types. For example, the following SQL code creates a simple table using the SERIAL data type:
When creating a table in Design View, with either the direct or the ODBC connection, the SERIAL data types are unavailable for selection in the Field Type column. However, they are available with the JDBC connection.
In later versions of PostgreSQL, an alternative approach is available, using a standard integer data type. In this case, the above SQL code could be refactored as follows:
In cases where you cannot select the desired type of primary key in Design View, it is recommended that you select Tools > SQL on the Menu bar, enter the SQL code necessary to create a table comprising just the required primary key. You can then switch to Design View and add the remaining columns. In the first instance, the new table may not appear in the Tables area of the main Base window, but this can be rectified by selecting View > Refresh Tables on the Menu bar.
Note
If using either a direct connection or a JDBC connection, you may encounter a problem when using the graphical user interface to run a query (Bug 130376). This problem could result in data loss, but should only arise with queries that involve an auto-incrementing field and a table alias (in the FROM clause of the SQL command). The issue can be avoided either by removing the table alias or by running any such query directly via the Tools > SQL option. If using an ODBC connection, difficulties should only arise if the option Respect the result set type from the database driver is ticked on the Special Settings tab of the Edit > Database > Advanced Settings dialog.
The normal mechanism for saving a view through Base is to select a query and then select Edit > Create as View on the Menu bar. However, the three methods of connecting to a PostgreSQL database lead to different behaviors with respect to this interaction as follows:
Direct connection. The direct driver does not allow creation of views through this interaction.
ODBC connection. The OBDC driver does not allow creation of views through this interaction as long as no view already exists. However, this can be remedied by creating a dummy view via the Tools > SQL option (for example, the following code from the PostgreSQL documentation could be used: CREATE VIEW vista AS SELECT text 'Hello World' AS hello;).
JDBC connection. The JBDC driver always allows creation of views through this interaction.
For all connection types, views can be created through the Tools > SQL option.
Firebird is an open-source RDBMS provided by the Firebird Foundation. More information can be found on the Firebird website at https://firebirdsql.org/. Links to current and past versions of the Firebird documentation can be found at https://firebirdsql.org/en/documentation/.
Base can connect to an external database via a Firebird server using one of two methods:
Connection using ODBC.
Connection using JDBC.
The user interactions necessary to establish such a connection have some commonality with the interactions for connecting to a MySQL or MariaDB database. However, there are also significant differences. The aim of the following subsections is to highlight and explain those differences, without repeating details that are identical to those already described for MySQL/MariaDB.
If access to a server database is not required, then it is possible for Base to directly open an external Firebird database file. In this case the opened database will be managed using the Firebird engine embedded within Base. It is not necessary to enable experimental features within Base to utilize this facility.
Note
The embedded engine is based on Firebird 3.0.7. The Firebird 3 Quick Start Guide states that Firebird 3 will not open databases created using earlier versions. Similarly, Firebird 4 creates databases with different on-disk structure and such databases cannot be opened directly using the embedded Firebird 3 engine.
Refer to the Firebird documentation for detailed instructions about downloading and installing the database server software for your computer configuration, and for details of how to access any tool that you require to enter SQL commands prior to connecting with Base. After installation, follow any setup instructions specified in the documentation. These may include making sure that the password for the default superuser account of the database server (user name SYSDBA) has been set to a string that is appropriate to maintain the security of your data. The default password for user SYSDBA is set to masterkey.
Note
At the time of drafting this section, no download of Firebird 4 was available for macOS. In addition, no Firebird 4 Quick Start Guide was available.
Before making a connection, the database of interest must exist and you must have a user account that gives you permissions to work with the database and the objects within it. If your database and user name do not yet exist, the SYSDBA superuser should carry out the following steps to create them. Commands may be entered using the Firebird Interactive SQL Utility (isql) – early versions of Firebird provided the gsec utility for user management, but this is now deprecated and such actions are performed using SQL commands.
Note
In some Firebird installations, isql may have been renamed to isql-fb to avoid a potential name clash.
1) To create an (empty) database in the file libretest.fdb, located in the folder c:\my_databases\, enter the following command (replacing the string “masterkey” with the password selected for user SYSDBA):
2) To create a new user called lotest with the password libre, enter the following command:
CREATE USER lotest PASSWORD 'libre';
Information about users authorized to access a specific Firebird server is stored in a security database named security3.fdb or security4.fdb, depending on the version of Firebird. These files are normally found in the installation directory.
3) To allow the new user to create and alter tables or views in the libretest database, enter the following commands:
4) Finally, it is useful to create an alias for the new database. Edit the file named databases.conf that is normally located in the installation directory so that it contains the line:
libretest=c:\my_databases\libretest.fdb
This allows the database to be referenced by its alias libretest, thus hiding the physical location of the database and reducing the possibility of typing errors.
Tip
At steps and above, you may need to adjust file permissions on the security3.fdb, security4.fdb, or databases.conf files before the specified actions can be carried out.
On successful completion of these steps, the new database is available and Base can connect to it, as described in the following subsections.
Note
If some user other than lotest creates tables in the libretest database, then lotest may not be able to fully access those tables. To enable lotest to fully access a table named Table1, enter the following command:
GRANT ALL ON TABLE "Table1" TO USER lotest;
To use Base to connect to a Firebird server through the ODBC API, there should be a properly configured ODBC driver installed on your computer. If the driver is not currently available on your computer, then you will need administration rights to install the new software.
To connect to a Firebird server database through ODBC, it is recommended that you use the official Firebird ODBC driver. The correct version of the Firebird ODBC driver for your computer can be downloaded from the Firebird website at https://dev.mysql.com/downloads/connector/odbc/. Platform-dependent installation instructions can be found in the Firebird ODBC/JDBC Driver 2.0 Manual, accessed through the Firebird Drivers Documentation page at https://firebirdsql.org/en/drivers-documentation/.
Note
At the time of drafting this section, the Firebird ODBC/JDBC Driver 2.0 Manual provided no installation instructions for macOS.
Make sure that you follow the instructions given in the driver documentation to create an ODBC Data Source Name (DSN) for your database. For the purposes of the example in the next subsection, assume that a data source has been configured as follows:
The name of the data source is set to libretest-firebird.
The alias for the database of interest is included within the definition of the data source (for example, localhost:libretest).
Login credentials for the database server are not defined within the data source.
The Sensitive Identifier extended identifier property is enabled.
The first time that you make an ODBC connection to a particular Firebird database, carry out steps similar to those for an ODBC connection to a MySQL/MariaDB database (see Using the Database Wizard subsection on page 1), but with the following important differences:
After clicking the Connect to an existing database option on Step 1 (Select database) of the Database Wizard, select the ODBC option in the drop-down menu (instead of MySQL).
The options presented on Step 2 (Set up MySQL connection) of the Database Wizard when making a connection to a MySQL/MariaDB database are not relevant to Firebird.
At Step 2 (Set up ODBC connection), enter the name of the previously defined ODBC data source that is to be used to access the Firebird database (libretest-firebird in our example). You can click the Browse button to access the Data Source dialog (Figure 14), where you can select the data source of interest from a list of those available and then click the OK button.
When the connection is established and the ODB file has been created, Base updates its main window to show information about the Firebird database.
With an ODBC connection to Firebird, the Status bar of the main Base window shows the following information:
The name of the connector used (ODBC).
The name of the ODBC data source (libretest-firebird in this case).
The user name that was used to connect to the Firebird database (lotest in this case).
At some later time when you open this ODB file again and then use Base to access the underlying Firebird database, the Authentication Required dialog (similar to that shown in Figure 12) is displayed. You do not need to reconfigure the connection but you do need to reenter your correct login credentials.
Tip
When creating tables in a Firebird database via ODBC, take care to ensure that the correct type is assigned to each field from the start. It is not possible to alter the field type once the table has been saved, although it is possible to delete unwanted fields and add new fields.
To use Base to connect to a Firebird server through the JDBC API, there should be an appropriate JDBC driver located on your computer. If the driver is not currently available on your computer, then you will need to download it and place a specific JAR (Java ARchive) file in an accessible folder.
To connect to a Firebird database through JDBC, it is recommended that you use the official Firebird JDBC driver which is called Jaybird. The correct version of Jaybird for your computer can be downloaded from the Firebird website at https://firebirdsql.org/en/jdbc-driver/. Instructions for use can be found on the Firebird Drivers Documentation page at https://firebirdsql.org/en/drivers-documentation/.
When downloading Jaybird, make sure that you choose the correct version for your computer configuration. A JDBC driver cannot be used if your system does not support Java.
Carry out steps similar to those for a JDBC connection to a MySQL/MariaDB database to inform Base where it can find the JAR file for Jaybird (see Initial preparation subsection on page 1). Use the JAR file with a name of the form jaybird-full-4.0.5.java11.jar (the digits in this name vary depending on the versions of Jaybird and Java selected on the download page).
The first time that you make a JDBC connection to a particular Firebird database, carry out steps similar to those for a JDBC connection to a MySQL/MariaDB database (see Using the Database Wizard subsection on page 1), but with the following important differences:
After clicking the Connect to an existing database option on Step 1 (Select database) of the Database Wizard, select the JDBC option in the drop-down menu (instead of MySQL).
The options presented on Step 2 (Set up MySQL connection) of the Database Wizard when making a connection to a MySQL/MariaDB database are not relevant to Firebird.
For a JDBC connection, Base displays Step 2 (Set up JDBC connection) of the Database Wizard (Figure 24).
Enter details of the database as jdbc:firebirdsql:oo://localhost/libretest?charSet=utf-8. If the character set is not specified here, an error will be displayed.
Enter the name of the driver class as org.firebirdsql.jdbc.FBDriver.
Click the Test Class button to check that the driver’s JAR file is accessible to Base. If successful, Base displays a confirmation dialog (Figure 18). Click the OK button to remove this dialog from the screen.
With a JDBC connection to Firebird, the Status bar of the main Base window shows the following information:
The name of the connector used (JDBC).
The name of the JDBC data source as entered at Step 2 of the Database Wizard (firebirdsql:oo://localhost/libretest?charSet=utf-8).
The user name that was used to connect to the Firebird database (lotest in this case).
At some later time when you open this ODB file again and then use Base to access the underlying Firebird database, the Authentication Required dialog (similar to that shown in Figure 12) is displayed. You do not need to reconfigure the connection, but you do need to reenter your correct login credentials.
Tip
When creating tables in a Firebird database via JDBC, take care to ensure that the correct type is assigned to each field from the start. It is not possible to alter the field type once the table has been saved, although it is possible to delete unwanted fields and add new fields.
To connect to a (non-server) Firebird 3 database file located in a path for which you have read and write access, carry out steps similar to those for setting up a direct connection to a MySQL/MariaDB database (see Connecting directly subsection on page 1), but with the following important differences:
After clicking the Connect to an existing database option on Step 1 (Select database) of the Database Wizard, select the Firebird External option in the drop-down menu (instead of MySQL).
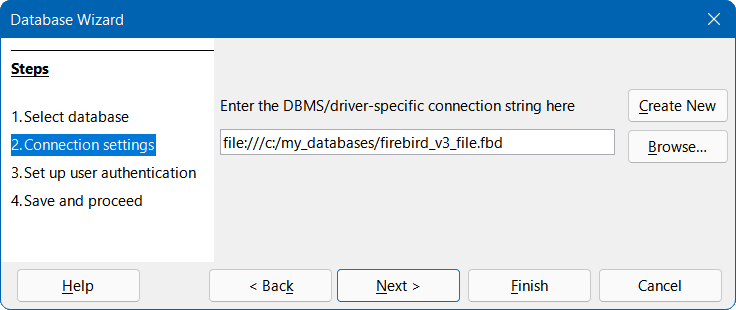
The options presented on Step 2 (Set up MySQL connection) and Step 3 (Set up MySQL server data) of the Database Wizard when making a direct connection to a MySQL/MariaDB database are not relevant to the Firebird External option. Instead, Base displays Step 2 (Connection settings) of the Database Wizard as shown in Figure 27.
Enter the name and location of your Firebird 3 file in the text field provided or use the Create New or Browse functions as required.
Figure 27: Step 2 of Database Wizard: Connection Settings (Firebird External)
At Step 3 (Set up user authentication) of the Database Wizard, click the Next > button without entering any user authentications details – these are not required to connect to a non-server Firebird 3 database.
When the connection is established and the ODB file has been created, Base updates its main window to show information about the Firebird database.
The Status bar at the bottom of screen shows:
The connection type used (Firebird External).
The file name and location entered at Step 2 of Database Wizard (for example file:///C:/my_databases/firebird_v3_file.fdb).
Note
It is possible to establish a connection to a server database via a Firebird server using the Firebird External option on Step 1 (Select database) of the Database Wizard. However, the facilities available through such a connection require further investigation and may be described in a future version of this book.
HyperSQL Database (HSQLDB) is an open-source RDBMS written in Java and provided by The HSQL Development Group. More information can be found on the HSQLDB website at https://hsqldb.org/. Links to the latest HSQLDB documentation can be found at https://hsqldb.org/web/hsqlDocsFrame.html.
Each HSQLDB database comprises between 2 to 6 files in a directory, all with the same file name but each with a different extension. The possible extensions are:
backup
data
lobs
log
properties
script
The engine embedded in Base utilizes HSQLDB version 1.8.0, which was first released in July 2005. There are several reasons why some users may instead opt to use an external HSQLDB database, including:
To utilize the additional features provided in later versions of HSQLDB. At the time of updating this chapter, HSQLDB version 2.6.1 was available (released in October 2021).
To connect to a database that cannot be embedded, such as a preexisting, multi-user database.
To avoid a potential disadvantage with embedded HSQLDB databases, arising from storing the data in an archive ODB format. Since the data is only committed when the archive is packed, there is a greater risk of data loss than when working with an external database.
It is possible to convert an existing embedded HSQLDB database, extracting it from the ODB package so that it can be used as an external database. However, instructions for this procedure are beyond the scope of this chapter.
To use an external HSQLDB database, connect using the JDBC driver that is provided in the HSQLDB JAR package. Since both Base and HSQLDB utilize Java, it is logical to make a connection between Base and an external HSQLDB database using JDBC. While it should be possible to connect Base to HSQLDB via ODBC (see Chapter 17 of the HyperSQL User Guide), details of this approach are not provided in this chapter.
The user interactions necessary to establish a JDBC connection to an external HSQLDB database have some commonality with the corresponding interactions for connecting to a MySQL or MariaDB database. However, there are also significant differences. The aim of the following subsections is to highlight and explain those differences, without repeating details that are identical to those already described for MySQL/MariaDB.
Note
Recent releases of HSQLDB typically have many more features than earlier versions. As a result, there are likely be compatibility issues when trying to convert between an embedded database created using version 1.8.0 and an external database created using a more recent version. In particular, an external database that has been edited using HSQLDB 2.0+ cannot easily be converted into an embedded database under Base.
If you need to convert your database from one HSQLDB version to another, useful information can be found in the sections entitled “Upgrading Databases” and “Backward Compatibility Issues” in the HyperSQL User Guide.
Caution
The integration of the external HSQLDB JAR package hsqldb.jar within the Java class path for LibreOffice may mean that embedded databases can no longer be accessed correctly by Base. Base may try to use the external HSQLDB for the embedded databases. While there are steps that could be taken by more advanced users to avoid such a problem (for example, writing the class path for the respective database file using a macro or inserting the path directly into the content.xml file of the ODB file), these are beyond the scope of this chapter.
If you are satisfied with the functionality of HSQLDB version 1.8.0, but simply want to use it for an external database, then no further download is needed from the Internet. You can simply utilize the hsqldb.jar file that was supplied with your version of LibreOffice, normally located in the /program/classes/ sub-folder of the program’s installation folder. This approach avoids any problems arising from incompatibility between different versions. Otherwise, you can download current and legacy versions of HSQLDB through the HyperSQL website.
Refer to the HyperSQL User Guide for detailed instructions about downloading and installing the HSQLDB software for your computer configuration, and for details of how to access any tool that you require to enter SQL commands prior to connecting with Base. After installation, follow any setup instructions specified in the documentation. These may include making sure that the password for the default admin user (SA, which stands for System Administrator) has been set to a string that is appropriate to maintain the security of your data. The default password for user SA is empty. You may also prefer to change the admin username to something other than SA. For simplicity in the remainder of this section, it is assumed that the HSQLDB database is accessed using the default SA username with an empty password, but this is not recommended for a real-world database.
HSQLDB is notable in that when a connection attempt is made to a database that does not currently exist, a new, empty database is created. This means that no specific preparatory actions are needed to create a database before connecting to it.
Identify the location of the hsqldb.jar file downloaded from the Hyper SQL website (for example, C:\Users\username\Downloads\hsqldb-2.6.1\hsqldb-2.6.1\hsqldb\lib\hsqldb.jar), moving the file to a different location if more appropriate for you. This JAR contains both the HyperSQL engine and the HyperSQL JDBC driver. Whether connecting for single-user access or for multi-user access, carry out steps similar to those for a JDBC connection to a MySQL/MariaDB database to inform Base where it can find this JAR file (see Initial preparation subsection on page 1).
Note
Currently the HSQLDB download zip package includes one version of the hsqldb.jar file that is compatible with Java 11 or later and another that is compiled with JDK 8. A further version compiled with JDK 6 can be separately downloaded from the HyperSQL website. Make sure that you use the correct version for your computer configuration.
For single-user access, use an in-process connection as described in the HyperSQL User Guide. To configure this type of connection, specify the database path in the connection URL.
The first time that you make an in-process connection to an external HSQLDB database, carry out steps similar to those for a JDBC connection to a MySQL/MariaDB database (see Using the Database Wizard subsection on page 1), but with the following important differences:
After clicking the Connect to an existing database option on Step 1 (Select database) of the Database Wizard, select the JDBC option in the drop-down menu (instead of MySQL).
The options presented on Step 2 (Set up MySQL connection) of the Database Wizard when making a connection to a MySQL/MariaDB database are not relevant to HSQLDB.
For a JDBC connection, Base displays Step 2 (Set up JDBC connection) of the Database Wizard (Figure 24).
Enter details of the database path in the following format:
jdbc:hsqldb:file:C:\my_databases\hsqldb\libretest;default_schema=true;shutdown=true.
Replace the string “C:\my_databases\hsqldb\libretest” with the path to your database.
When connecting Base to an external HSQLDB database file, the connection string should include the property "default_schema=true", which ensures that Base only works with HSQLDB’s PUBLIC schema. Also include the property "shutdown=true", which ensures that the database is shut down when its last connection is closed. See the HyperSQL User Guide for more information about these properties.
Enter the name of the driver class as org.hsqldb.jdbc.JDBCDriver.
Click the Test Class button to check that the driver’s JAR file is accessible to Base. If successful, Base displays a confirmation dialog (Figure 18). Click the OK button to remove this dialog from the screen.
At Step 3 (Set up user authentication) of the Database Wizard, enter SA in the User name field and make sure that the Password required checkbox is not ticked.
With an in-process connection to an external HSQLDB database, the Status bar of the main Base window shows the following information:
The name of the connector used (JDBC).
The path to the database file as entered at Step 2 of the Database Wizard
(hsqldb:file:C:\my_databases\hsqldb\libretest;default_schema=true;shutdown=true in this case).
The user name that was used to connect to the HSQLDB database (SA in this case).
For multi-user access, use one of the server modes described in the HyperSQL User Guide. In this example, the HyperSQL HSQL Server mode is used.
If you need to start the server, details of the steps required can be found in the HyperSQL User Guide. Typically this will require a shell or terminal command of the form:
The following points may help clarify this command:
1) The java command must lie on your shell's command search path.
2) In this example, the HSQLDB JAR package is located in the folder c:/my_databases/hsqldb/lib.
3) In this example, the database files are named mydb.* and are located in the folder c:/my_databases.
4) The name libretest can be used to reference the database when Base is connected to the server.
The first time that you make a connection using the HyperSQL HSQL Server mode, carry out steps similar to those for a JDBC connection to a MySQL/MariaDB database (see Using the Database Wizard subsection on page 1), but with the following important differences:
After clicking the Connect to an existing database option on Step 1 (Select database) of the Database Wizard, select the JDBC option in the drop-down menu (instead of MySQL).
The options presented on Step 2 (Set up MySQL connection) of the Database Wizard when making a connection to a MySQL/MariaDB database are not relevant to HSQLDB.
For a JDBC connection, Base displays Step 2 (Set up JDBC connection) of the Database Wizard (Figure 24).
Enter details of the database and server using the following format:
jdbc:hsqldb:hsql://localhost/libretest;default_schema=true;shutdown=true.
Note that there is no mention of the database file, as this was specified when running the server. Only the public name defined for dbname.0 is needed.
In server modes, the localhost is the name describing the local computer’s address. In a networked environment, this may be replaced with an IP address or computer name.
See the In-process, single-user connection subsection above for explanations of the default_schema=true and shutdown=true properties.
Enter the name of the driver class as org.hsqldb.jdbc.JDBCDriver.
Click the Test Class button to check that the driver’s JAR file is accessible to Base. If successful, Base displays a confirmation dialog (Figure 18). Click the OK button to remove this dialog from the screen.
At Step 3 (Set up user authentication) of the Database Wizard, enter SA in the User name field and make sure that the Password required checkbox is not ticked.
With a HyperSQL HSQL Server mode connection to an external database, the Status bar of the main Base window shows the following information:
The name of the connector used (JDBC).
The name of the database file as entered at Step 2 of the Database Wizard
(hsqldb:hsql://localhost/libretest;default_schema=true;shutdown=true in this case).
The user name that was used to connect to the HSQLDB database (SA in this case).
Before creating an auto-incrementing primary key field, select Edit > Database > Advanced Settings on the Menu bar and click on the Generated Values tab. Tick the Retrieve generated values checkbox, enter GENERATED BY DEFAULT AS IDENTITY(START WITH 0) in the Auto-increment statement field, enter CALL IDENTITY() in the Query of generated values field, and click the OK button (Figure 28).
Figure 28: Advanced Settings dialog, Generated Values tab for external HSQLDB connection
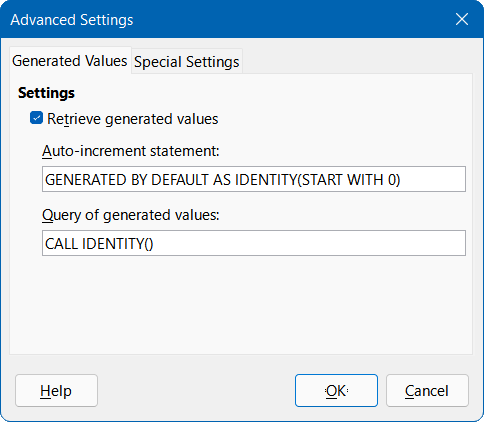
These adjustments may enable you to successfully define an auto-incrementing primary key field. If Base displays an error message indicating a NOT NULL check constraint error when entering table data, then this can often be corrected by creating a primary key field without an auto value and then executing the command ALTER TABLE "table_name" ALTER COLUMN "ID" INT GENERATED BY DEFAULT AS IDENTITY(START WITH 0) via the Tools > SQL option. table_name and ID are the names of the table and primary key field respectively.
Sometimes a HSQLDB database can be open in Base but there is no access to the tables. In this case we recommend selecting Tools > SQL on the Menu bar and entering the SHUTDOWN SCRIPT command. Hopefully, subsequently closing and then re-opening the database will clear the problem, although this may not be successful if an “error in script file” has already been reported.
SQLite is an open-source, embedded SQL database engine. Unlike the database systems covered in earlier sections of this chapter, SQLite does not have a separate server. SQLite databases consist of a single file that may be stored anywhere in the file system and can be connected to Base using an appropriate driver. More information can be found on the SQLite website at https://www.sqlite.org/. Extensive documentation about SQLite can be found at https://www.sqlite.org/docs.html.
Tip
SQLite supports a limited subset of SQL’s ALTER TABLE command. Take care when designing tables because it is difficult to modify a column’s data type once the table has been created.
Base can connect to an external SQLite database file using an ODBC driver. The user interactions necessary to establish such a connection have some commonality with the interactions for connecting to a MySQL or MariaDB database. However, there are also significant differences. The aim of the following subsections is to highlight and explain those differences, without repeating details that are identical to those already described for MySQL/MariaDB.
Base does not currently provide a direct connection to a SQLite database file.
The developers of SQLite do not supply a downloadable JDBC driver. Although there are several SQLite JDBC drivers available on the Internet, we are not currently aware of one that will support a reliable connection between Base and SQLite.
Before making a connection, the SQLite database file of interest must exist. If your database file does not exist already then you can create an empty file in several ways:
Use one of the many options provided by your operating system. For example, on Windows you could use File Explorer to navigate to the folder where you want to place the file, right-click, select New, select Text Document, and enter the name of the file. The Windows command prompt also provides commands that, when used imaginatively, are able to create empty files (for example, type nul > libretest.db). Equivalent facilities are available on Linux (for example, > libretest.db).
Use a plain text editor, such as Notepad on Windows, Vim on Linux, or TextEdit on macOS. Make sure that the size of the file is zero bytes after creation.
Use the sqlite3 command line shell for SQLite, which may be installed when a driver is installed or can be downloaded (along with other tools) from https://www.sqlite.org/download.html.
Detailed documentation for sqlite3 can be found at https://www.sqlite.org/cli.html. The following commands should suffice to create a new database file named libretest.db:
1) At a shell, terminal, or operating system prompt, enter:
sqlite3 libretest.db
2) At the sqlite> prompt, enter:
.databases
sqlite3 provides feedback of the exact location of the file that has been created.
3) At the sqlite> prompt, enter:
.exit
sqlite3 closes.
SQLite is not prescriptive about the extension of a database file – many users will utilize “.sqlite”, others will choose “.db”, but it is a personal decision.
SQLite does not provide username and password control for a database file.
To use Base to connect to a SQLite database file through the ODBC API, there should be a properly configured ODBC driver installed on your computer. If the driver is not currently available on your computer, then you will need administration rights to install the new software.
The developers of SQLite do not supply a downloadable ODBC driver. However there are several such drivers available on the Internet, some of which are open-source and others may be proprietary. One such driver is available on Christian Werner’s website at http://ch-werner.de/sqliteodbc/, where it is stated that the driver has been tested on Windows and Linux. Platform-dependent installation instructions can be found in the SQLiteODBC Documentation at http://ch-werner.de/sqliteodbc/html/index.html.
Note
At the time of drafting this section, the developer of the driver does not make builds available for macOS. However other developers have contributed several macOS builds for selected legacy versions of the driver.
Make sure that you follow the instructions given in the driver documentation to create an ODBC Data Source Name (DSN) for your database. For the purposes of the example in the next subsection, assume that a data source has been configured as follows:
The name of the data source is set to libretest-SQLite.
The data source includes the database name as C:\my_databases\libretest.db.
Login credentials for the database server are not defined within the data source.
The first time that you make an ODBC connection to a particular SQLite database file, carry out steps similar to those for an ODBC connection to a MySQL/MariaDB database (Using the Database Wizard subsection on page 1), but with the following important differences:
After clicking the Connect to an existing database option on Step 1 (Select database) of the Database Wizard, select the ODBC option in the drop-down menu (instead of MySQL).
The options presented on Step 2 (Set up MySQL connection) of the Database Wizard when making a connection to a MySQL/MariaDB database are not relevant to SQLite.
At Step 2 (Set up ODBC connection), enter the name of the previously defined ODBC data source that is to be used to access the SQLite database (libretest-SQLite in our example). You can click the Browse button to access the Data Source dialog (Figure 14), where you can select the data source of interest from a list of those available and then click the OK button.
Do not enter any information at Step 3 (Set up user authentication) of the Database Wizard.
When the connection is established and the ODB file has been created, Base updates its main window to show information about the SQLite database file.
With an ODBC connection to a SQLite database file, the Status bar of the main Base window shows the following information:
The name of the connector used (ODBC).
The name of the ODBC data source (libretest-SQLite in this case).
dBASE databases utilize the DBF file type, which is a standard format for storing structured data. Base can connect to a database comprising one or more DBF files located in a single folder. Each DBF file should have the extension “.dbf” (in lowercase on systems where file names are case-sensitive) and stores the data for one database table, including both field descriptors and data records. Tables defined in DBF files are conceptually similar to sheets in Calc.
There are no intrinsic links / relations between fields in different tables – this means, for example, that if an employee leaves your company and you delete her details from the employee table, she might still receive next month’s salary if you forget to also delete her from the salary table! If such links are required for a connected dBASE database, you can create them using Base facilities (such as forms, queries, and macros).
Tip
LibreOffice Calc can save a spreadsheet as a DBF file (although formulas and formatting are lost) and can read a DBF file into a spreadsheet. The latter facility may be helpful on occasions when you need to quickly view the data in a dBASE table that is not already connected in Base.
The first time that you make a connection to a particular dBASE database, carry out steps similar to those for a direct connection to a MySQL/MariaDB database (see Connecting directly subsection on page 1), but with the following important differences:
After clicking the Connect to an existing database option on Step 1 (Select database) of the Database Wizard, select the dBASE option in the drop-down menu (instead of MySQL).
The options presented on Step 2 (Set up MySQL connection) and Step 3 (Set up MySQL server data) of the Database Wizard when making a direct connection to a MySQL/MariaDB database are not relevant to dBASE. Instead, Base displays Step 2 (Set up dBASE connection) of the Database Wizard (Figure 29).
Enter the location of the folder containing your dBASE files. You can click the Browse button to access the Select Folder dialog, where you can navigate to the folder of interest and then click the Select Folder button.
Figure 29: Step 2 of Database Wizard: Set up dBASE connection

The options presented on Step 4 (Set up user authentication) of the Database Wizard when making a direct connection to a MySQL/MariaDB database are not relevant to dBASE.
When the connection is established and the ODB file has been created, Base updates its main window to show information about the dBASE database (Figure 30), including all DBF files in the folder. In the case shown, Base has found six DBF files in the given folder and these are named:
category.dbf
customer.dbf
employee.dbf
products.dbf
region.dbf
sales.dbf
Figure 30: Tables in a dBASE file
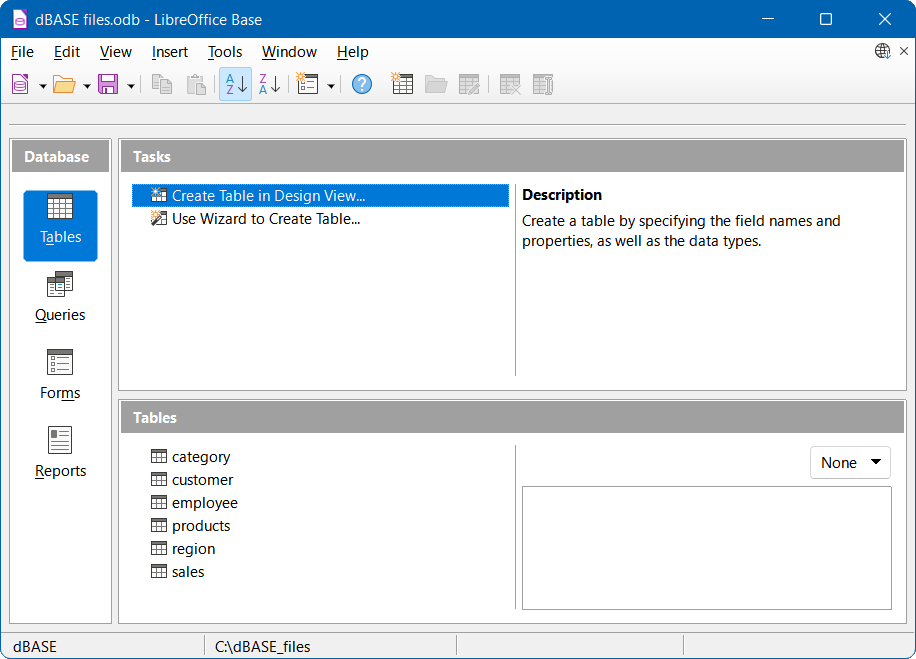
With a connection to a dBASE database, the Status bar of the main Base window shows the following information:
The name of the connector used (dBASE).
The folder containing the database files (C:\dBASE_files in this case).
New tables can be created through the Base user interface and these will appear as additional DBF files in the specified folder.
1) The DBF file format does not support the concept of declaring a table column as a primary or foreign key.
2) The DBF file format limits the length of field names in tables to ten characters.
3) The number of different field type options available when creating a new dBASE table is significantly less than when creating tables for most other databases (for example, when creating a table in an embedded HSQLDB database). This can be seen in Figure 31.
Figure 31: Field types available when creating a new dBASE table
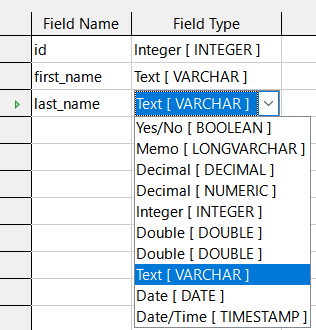
4) By default, Base adopts the character encoding of the operating system. It is therefore possible for legacy dBASE files to develop errors when special characters are imported. The character set can be corrected using the Character set menu on the Additional Settings tab of the Database Properties dialog (Figure 32), which is accessed by selecting Edit > Database > Properties on the Menu bar.
Figure 32: Database Properties dialog, Additional Settings tab – changing the character set
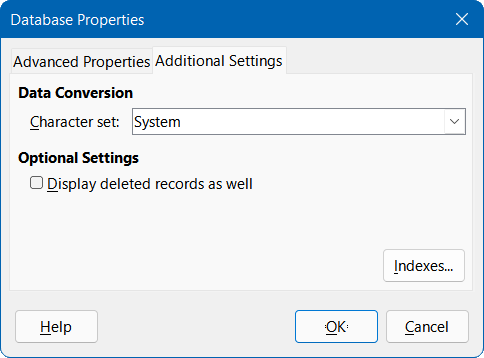
5) When copying a dBASE table into another database (for example, an embedded HSQLDB database), the import wizard has problems with automatic recognition of numeric field types and Yes/No fields (Bug 53027). This may require you to make subsequent corrections.
Base can connect to an existing spreadsheet or word processor document, using tabular data from the connected source to populate the table(s) of a database. This method of access does not allow you to modify any data in the connected document. However, Base can be used to view information, run queries, and create reports based on data that is already contained in the connected document. Base can connect to Calc spreadsheets, Microsoft Excel spreadsheets, Writer documents, and Microsoft Word documents.
The first time that you make a connection to a particular Calc or Microsoft Excel spreadsheet, carry out steps similar to those for a direct connection to a MySQL/MariaDB database (see Connecting directly subsection on page 1), but with the following important differences:
After clicking the Connect to an existing database option on Step 1 (Select database) of the Database Wizard, select the Spreadsheet option in the drop-down menu (instead of MySQL).
The options presented on Step 2 (Set up MySQL connection) and Step 3 (Set up MySQL server data) of the Database Wizard when making a direct connection to a MySQL/MariaDB database are not relevant to a Spreadsheet connection. Instead, Base displays Step 2 (Set up Writer Document or Spreadsheet connection) of the Database Wizard (Figure 33).
Enter the location and name of the spreadsheet file. You can click the Browse button to access a file explorer dialog, where you can navigate to the file of interest and then click the Open button.
If the spreadsheet of interest is password-protected, click the Password required option.
Figure 33: Step 2 of Database Wizard: Set up Writer Document or Spreadsheet connection
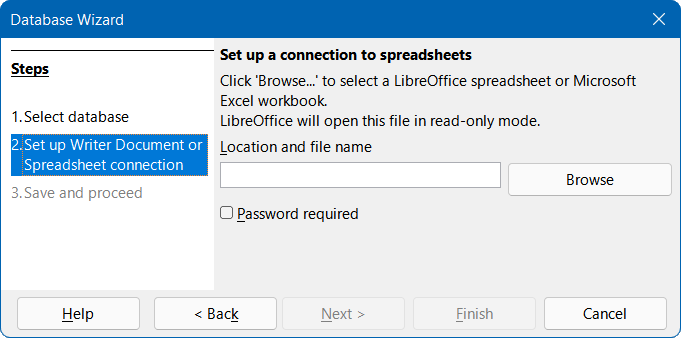
Base processes the spreadsheet data as follows:
One database table is produced for each sheet in the spreadsheet, with a database table given the same name as its corresponding sheet.
One database table is produced for each database range defined in a Calc spreadsheet, with a database table given the same name as its corresponding database range. This feature is not applicable to “standard” named ranges in Calc spreadsheets or to Microsoft Excel spreadsheets.
In addition, Base makes unavailable interactions to create tables, views, relationships, and queries that cross multiple tables.
When the connection is established and the ODB file has been created, Base updates its main window to show information from the spreadsheet.
With a connection to a spreadsheet, the Status bar of the main Base window shows the following information:
The name of the connection type (Spreadsheet).
The location and name of the connected spreadsheet (as entered at Step 2 of the Database Wizard).
At some later time when you open this ODB file again and then use Base to access the table data, the Authentication Required dialog (similar to that shown in Figure 12) may be displayed, depending whether you selected the Password required option at Step 2 of the Database Wizard. You do not need to reconfigure the connection but you do need to reenter your correct login credentials when requested.
Tip
It is possible for a Calc spreadsheet to display external data, sourced from the Internet – see Chapter 10, Linking Data, in the Calc Guide for more details. This Internet data can in turn be accessed in Base by connecting to the relevant spreadsheet.
The first time that you make a connection to a particular Writer or Microsoft Word document, carry out steps similar to those for a connecting to a spreadsheet (see Connect to spreadsheet subsection on page 1), but with the following difference:
After clicking the Connect to an existing database option on Step 1 (Select database) of the Database Wizard, select the Writer Document option in the drop-down menu (instead of Spreadsheet).
Note that the appearance of Step 2 (Set up Writer Document or Spreadsheet connection) of the Database Wizard (Figure 33), is the same whether Spreadsheet or Writer Document is selected at Step 1.
Base processes the data in the document as follows:
One database table is produced for each table in the document, with a database table given the same name as its table in the document. In Writer, table names may be viewed and modified through the Navigator, which can be accessed by selecting View > Navigator on the Menu bar.
Data in the document that is not in a table is ignored.
In addition, Base makes unavailable interactions to create tables, views, relationships, and queries that cross multiple tables.
When the connection is established and the ODB file has been created, Base updates its main window to show information from the document.
With a connection to a document, the Status bar of the main Base window shows the following information:
The name of the connection type (Writer Document).
The location and name of the connected document (as entered at Step 2 of the Database Wizard).
At some later time when you open this ODB file again and then use Base to access the table data, the Authentication Required dialog (similar to that shown in Figure 12) may be displayed, depending whether you selected the Password required option at Step 2 of the Database Wizard. You do not need to reconfigure the connection but you do need to reenter your correct login credentials when requested.
Data in a connected Calc spreadsheet cannot be edited in Base. The following steps indicate how to modify spreadsheet data with both a Base database and its connected Calc spreadsheet open simultaneously.
1) Make sure that the associated spreadsheet is NOT open and then open the Base file.
2) Open the associated spreadsheet. Calc opens the file with read-only protection – note the message in the upper part of the Calc window stating “This document is open in read-only mode”. Click the adjacent Edit Document button.
3) Open a table of interest in Base. If existing data is changed in the corresponding area within Calc, select Data > Refresh on the Menu bar of the Base Table Data View window to see the changed data in the Base file.
4) If additional data is added to the corresponding area within Calc, the previous step may not show the new data in Base. In this case close the Base Table Data View window and select View > Refresh Tables on the Menu bar of the main Base window. Then, open the table again and the new data should be visible.
Note that steps and above change the spreadsheet data without saving those changes. Extra steps would be required to save the modified Calc file with the same name and in its original location.
A similar strategy can be used to change the data in a Writer file while viewing the changes in Base.
There may be occasions when you need to read data into a database, but find that the data is not in a form directly supported by the drivers provided in Base. Such data can often be converted into CSV (comma-separated values) or other suitable text format, possibly via Calc. Base provides two different methods for including data from text files in database tables:
1) If you are using an embedded or external HSQLDB database, then you can take advantage of the HSQLDB-specific facility to create Text Tables.
2) Alternatively, you can connect to an existing set of text files using the Database Wizard.
These options are described in the following subsections.
HSQLDB Text Tables are CSV or other delimited files treated as SQL tables. A Text Table of this kind cannot be created directly through the Base graphical user interface but instead is created by issuing a CREATE TEXT TABLE command via the Tools > SQL option. For example:
CREATE TEXT TABLE "company_data" (
"Date" DATE PRIMARY KEY,
"Open" DOUBLE,
"High" DOUBLE,
"Low" DOUBLE,
"Close" DOUBLE,
"Adj Close" DOUBLE,
"Volume" BIGINT
);
creates an empty Text Table designed to contain historic data about a company’s share price.
This is followed by a SET TABLE command to specify the file and separator character that the Text Table uses. For example:
SET TABLE "company_data"
SOURCE "share_prices.csv;encoding=UTF-8;ignore_first=true";
links the file share_prices.csv to the company_data Text Table. This command assumes that the CSV file is in the same folder as the database.
For more information, see the Text Tables chapter of the HyperSQL User Guide (https://hsqldb.org/doc/2.0/guide/guide.pdf).
The following factors should be noted when using HSQLDB Text Tables within Base:
1) After creating a Text Table, you may need to select View > Refresh Tables on the Menu bar before the new table appears in the Tables area of the main Base window. In the Tables area, the appearance of the icon for a Text Table is different to that for a “normal” table.
2) It is possible for the underlying text file to be open (and edited) simultaneously by other external programs, such as spreadsheet or text editing applications. This behavior could cause confusion and loss of data.
3) When a record is modified in Base, the order of records in the underlying data file will be altered. Specifically, the original location of the record is emptied and the updated record is appended at the end of the file.
4) Be aware of the warning in the HyperSQL User Guide that Text Tables are not as resilient to machine crashes as other types of tables. This is because other table types incorporate additional mechanisms to maintain the integrity of data.
In Base you can create a complete database by accessing a set of text files in a folder. These files will often be in CSV format but this is not essential, although they must all utilize the same format. The files will be opened read-only, with no write access.
While text databases of this form are often not suitable for general use, they can be used to quickly search in a CSV file for records of interest, or to import a CSV file into another database by using the copy function. A CSV file need only be moved into the specified folder and then it can be easily searched or copied.
The first time that you make a connection to a particular text database, carry out steps similar to those for a direct connection to a MySQL/MariaDB database (see Connecting directly subsection on page 1), but with the following important differences:
After clicking the Connect to an existing database option on Step 1 (Select database) of the Database Wizard, select the Text option in the drop-down menu (instead of MySQL).
The options presented on Step 2 (Set up MySQL connection) and Step 3 (Set up MySQL server data) of the Database Wizard when making a direct connection to a MySQL/MariaDB database are not relevant to a text database. Instead, Base displays Step 2 (Set up a connection to text files) of the Database Wizard (Figure 34).
Figure 34: Step 2 of Database Wizard: Set up a connection to text files
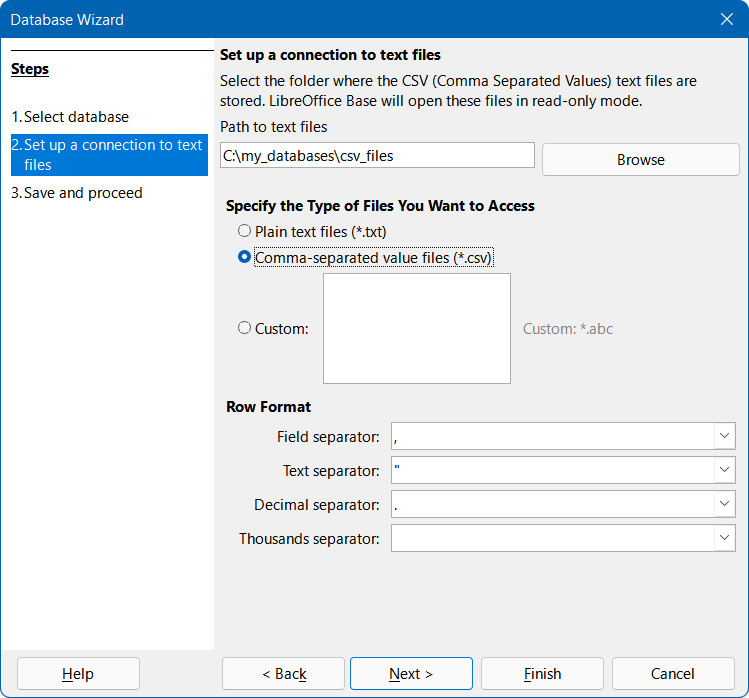
Enter the location of the folder containing your text files. You can click the Browse button to access the Select Folder dialog, where you can navigate to the folder of interest and then click the Select Folder button.
Select the type of file to be used, either Plain text files (*.txt), Comma-separated value files (*.csv), or Custom. In the latter case, specify the file extension to be used.
Adjust (where necessary) the four separators used in the rows of all the selected files.
The options presented on Step 4 (Set up user authentication) of the Database Wizard when making a direct connection to a MySQL/MariaDB database are not relevant to text databases.
When the connection is established and the ODB file has been created, Base updates its main window to show information about the text database. The Tables area will list the tables created, one for each file of the correct type located in the specified folder. The name of the table will be set to the corresponding file name (without extension). In addition, Base makes unavailable interactions to create tables, views, relationships, and queries that cross multiple tables.
With a connection to a text database, the Status bar of the main Base window shows the following information:
The name of the connector used (Text).
The folder containing the database files (C:\my_databases\csv_files in this case).
In most cases, the instructions given in previous sections of this chapter will result in a connection to an external database that operates as expected. However, occasionally the connection may not function as intended. For example, something may have changed in the basic connection parameters (such as the connection string, driver name, or database user name); a different character set may be needed; or subforms may not work correctly. Changes can be made to the connection properties by selecting Edit > Database on the Menu bar and then selecting one of three options:
1) Properties. The Database Properties dialog enables changes to the properties of the current connection, but does not support selection of an alternative connection type. It provides one or more tabs where adjustments can be made to connection parameters, most of which were originally configured through the Database Wizard.
2) Connection Type. Invokes the Database Properties Wizard which enables switching to a different connection type. For example, you can switch from an ODBC connection to a JDBC or direct connection. This may be useful if you want to test which connection type best suits your application. The options presented at each step are similar to those in the Database Wizard.
3) Advanced Settings. The Advanced Settings dialog provides one or more tabs containing controls to adjust various settings that are not configured when using the Database Wizard. The available options depend on database and connection type. Depending on the database system, there are different commands to automatically generate incrementing values – the Generated Values tab can be used to control the handling of automatically generated values for new data records – for more information, search for “Generated Values” in the Base module of the Help system. The Special Settings tab enables the specification of various detailed options that influence how Base interacts with the database – for more information, search for “Special Settings” in the Base module of the Help system.
Figure 35 provides a typical example of the Database Properties dialog for an ODBC connection to a PostgreSQL database. In this case the dialog provides two tabs, Advanced Properties and Additional Settings. On the Advanced Properties tab are controls to select an alternative ODBC data source or different login credentials. The Additional Settings tab enables selection of another character set and entry of optional ODBC settings.
Figure 35: Database Properties dialog – Advanced Properties tab (left) and Additional Settings tab (right)
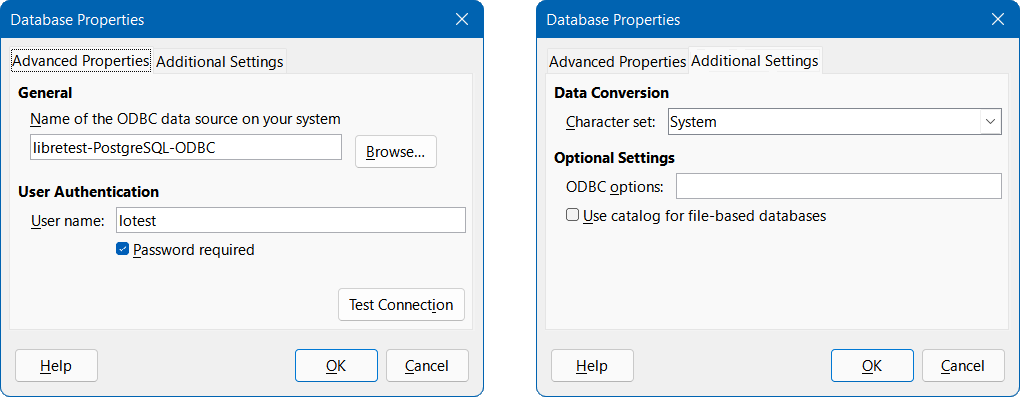
Figure 36 shows the first step of the Database Properties Wizard. By default the Database type drop-down is set to reflect the current connection type (ODBC in this example). Choose a different option from the menu to change the connection type and then click the Next button to start filling out the parameters of the new connection type, similar to the corresponding steps in the Database Wizard.
Figure 36: Step 1 of Database Properties Wizard: Advanced Properties
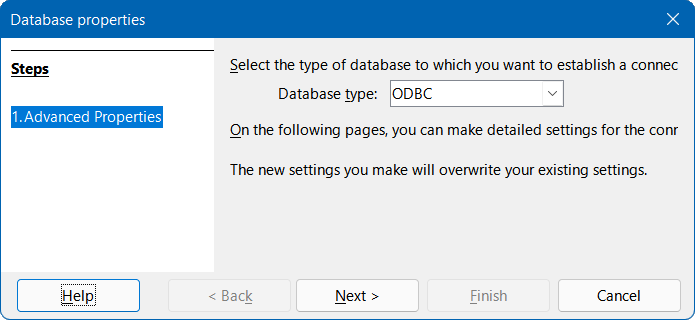
Figure 37 provides an example of the Advanced Settings dialog, for an ODBC connection to a PostgreSQL database. In this case the dialog provides two tabs, Generated Values and Special Settings. Note that some options on the Special Settings tab may be unavailable (grayed) if they cannot be changed for the underlying database (for example, the Use keyword AS before table alias names option in Figure 37).
Figure 37: Advanced Settings dialog – Generated Values tab (left) and Special Settings tab (right)
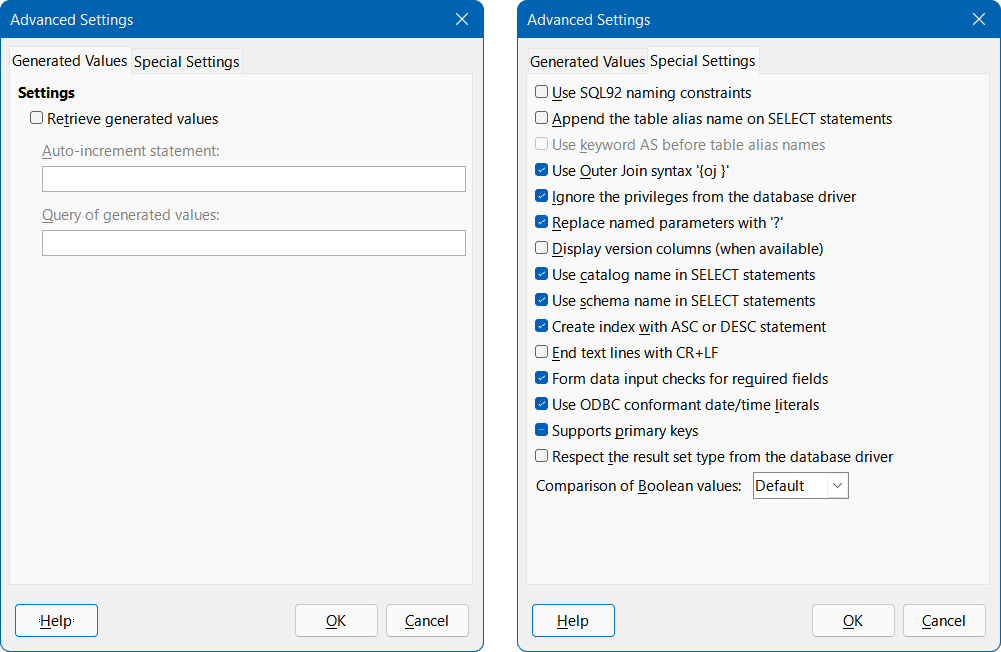
There may be some advanced settings that cannot be changed through the Base graphical user interface. However, in some circumstances, an experienced user will be able to edit the content.xml file within the database’s ODB file to fix the problem. Here is an example that caused difficulties when migrating from LibreOffice 6.0 to LibreOffice 6.1: Subqueries in MySQL were no longer working as expected because the transfer of the connecting value (parameter) was prevented. This could be remedied by opening the content.xml file and locating the code:
Changing this line to:
cured the problem that existed at the time. Alternatively, a macro could have been written to achieve the same result.