
Calc Guide 24.2
Chapter 5 Using Styles and Templates
Using consistent formatting in spreadsheets
This document is Copyright © 2024 by the LibreOffice Documentation Team. Contributors are listed below. You may distribute it and/or modify it under the terms of either the GNU General Public License (https://www.gnu.org/licenses/gpl.html), version 3 or later, or the Creative Commons Attribution License (https://creativecommons.org/licenses/by/4.0/), version 4.0 or later.
All trademarks within this guide belong to their legitimate owners.
|
Steve Fanning |
Olivier Hallot |
B. Antonio Fernández |
|
Skip Masonsmith |
Barbara Duprey |
Jean Hollis Weber |
|
John A Smith |
Peter Schofield |
Christian Chenal |
|
Dave Barton |
Kees Kriek |
Steve Fanning |
|
Leo Moons |
Randolph Gamo |
Samantha Hamilton |
|
Felipe Viggiano |
Olivier Hallot |
B. Antonio Fernández |
Please direct any comments or suggestions about this document to the Documentation Team’s forum at https://community.documentfoundation.org/c/documentation/loguides/ (registration is required) or send an email to: loguides@community.documentfoundation.org.
Note
Everything you send to a forum, including your email address and any other personal information that is written in the message, is publicly archived and cannot be deleted. Emails sent to the forum are moderated.
Published March 2024. Based on LibreOffice 24.2 Community.Other versions of LibreOffice may differ in appearance and functionality.
Some keystrokes and menu items are different on macOS from those used in Windows and Linux. The table below gives some common substitutions for the instructions in this document. For a detailed list, see the application Help and Appendix A (Keyboard Shortcuts) to this guide.
|
Windows or Linux |
macOS equivalent |
Effect |
|
Tools > Options on Menu bar |
LibreOffice > Preferences on Menu bar |
Access to setup options |
|
Right-click |
Ctrl+click and/or right-click depending on computer setup |
Opens a context menu |
|
Ctrl or Control |
⌘ and/or Cmd or Command, depending on keyboard |
Used with other keys |
|
Alt |
⌥ and/or Alt or Option depending on keyboard |
Used with other keys |
A style is a set of formats that you can apply to selected elements in a document to quickly change their appearance. Applying a style often means applying a group of formats at the same time.
Many people manually format spreadsheet cells, shapes, and pages without paying any attention to styles and are accustomed to formatting documents according to physical attributes. For example, for the contents of a cell you might specify the font family, font size, and any character formatting such as bold, italic, or underline.
Using styles means that you stop applying attributes and characteristics individually (for example, font size 14 pt, Times New Roman, bold, centered) and start using a style, for example Title. Applying attributes and characteristics is time-consuming and prone to errors. In contrast, using a style, which has been defined to include the attributes and characteristics you want, will save you time and give greater consistency in formatting.
Styles also make major formatting changes easy. For example, you may decide to change the appearance of all subtotals in a spreadsheet to be 10 pt Arial instead of 8 pt Times New Roman after you have created a 15-page spreadsheet. Assuming that you have formatted all subtotals with a specific style, you can change all of the subtotals in the document by simply changing the properties of that style.
In addition, Calc also provides drawing and page styles, as described below.
You can modify the attributes of the supplied styles and define as many new styles as you require. Creating, modifying, and accessing styles is explained in the following sections.
Direct formatting (also called manual formatting) overrides styles. You cannot remove the direct formatting by applying a style to it.
To remove manual formatting, select the object, and then do one of the following:
Right-click and choose Clear Direct Formatting in the context menu (where available).
Press Ctrl+M.
Click the Clear Direct Formatting icon on the Standard toolbar.
Select Format > Clear Direct Formatting on the Menu bar.
Calc offers three style types: cell styles, drawing styles, and page styles. These style types are explained in the following sections.
Cell styles are similar to paragraph styles used in LibreOffice Writer. They are the most basic type of style in Calc. Cell styles are used for applying fonts, alignment, borders, background, number formats (for example, currency, date, number), and cell protection to format the data in the cells.
A basic range of cell styles is supplied with Calc. Many of these styles are shown on the Styles menu on the Menu bar and all are shown in the Styles deck of the Sidebar. If you create a new cell style, it will be shown in the Sidebar. To add it to the Styles menu, see Chapter 15, Setting up and Customizing, for instructions.
Initially, the basic styles are configured so that if you change the characteristics of the Default cell style, then all of the other styles, inheriting from it, will change to match.
Drawing styles in Calc are similar to the graphic styles used in LibreOffice Draw and can be applied to shapes and comments. If the same area fill, lines, borders, and other relevant attributes are to be applied to a set of such objects, this repetitive process can be simplified by using drawing styles.
Two drawing styles (Default and Note) are supplied with Calc and these can be modified or used as the basis for new custom drawing styles, but cannot be deleted.
When a shape is added to a spreadsheet, the Default drawing style is initially applied to that shape. Shapes may be inserted using several methods – for example by going to the Insert > Shape menu on the Menu bar or by clicking icons on the Drawing toolbar.
When a comment is inserted into a spreadsheet, the Note drawing style is initially applied to that comment. Comments may be inserted using several methods – for example by going to the Insert > Comment option on the Menu bar or by clicking the Insert Comment icon on the Standard toolbar.
Tip
You can select the comment drawing object and apply another drawing style, and have notes in different background colors, fonts and font sizes, for example.
Page styles in Calc are applied to sheets. Although one sheet may print on several pages, only one page style can be applied to a sheet. If a spreadsheet file contains more than one sheet, then a different page style can be applied to each sheet. For example, a spreadsheet might contain some sheets to be printed in landscape orientation and other sheets to be printed in portrait orientation.
Two page styles are supplied with Calc: Default and Report. Page styles allow you to set page size and orientation, page margins, headers and footers, borders and backgrounds, and the sequence for printing sheets.
To apply cell styles in Calc, you can use the Styles menu on the Menu bar, the Styles deck on the Sidebar, Fill Format mode, the Apply Style list on the Formatting toolbar, and keyboard shortcuts.
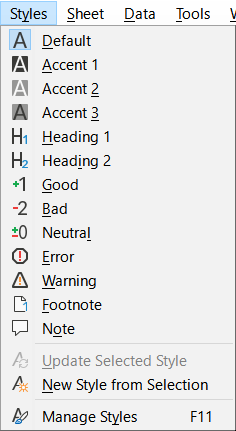
By default, the Styles menu (Figure 1) lists many of the cell styles supplied with Calc. To apply a cell style, select the cell or group of cells to be formatted, and then choose Styles and click on the required style.
Figure 1: The Styles menu
The Styles deck on the Sidebar lists and optionally shows previews of the styles available.
1) If the Styles deck in the Sidebar is not open, do one of the following to open it:
Select View > Styles on the Menu bar.
Select Styles > Manage Styles on the Menu bar.
Press the F11 function key.
If another deck of the Sidebar is open, select the Styles icon in the tab panel at the right of the Sidebar.
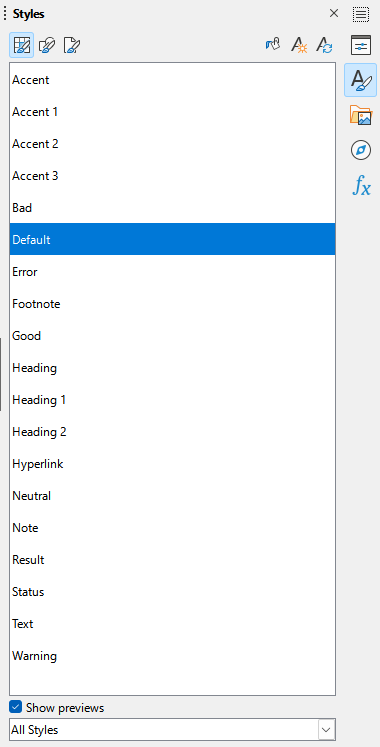
2) Click the Cell Styles icon on top of the Styles deck to open the list of cell styles. Figure 2 shows the deck with cell styles visible.
3) In the spreadsheet, highlight the cell or group of cells where you want to apply a cell style.
4) Double-click on the cell style name in the Styles deck and the formatting attributes for that style are applied to the data contained in the highlighted cells.
Figure 2: Styles deck in Sidebar, showing cell styles
Fill Format mode is useful when you want to apply the same style to many scattered cells.
1) Go to the Styles deck on the Sidebar (Figure 2).
2) Select the style you want to apply.
3) Click the Fill Format Mode icon in the top right of the Styles deck. The mouse pointer changes shape.
4) Click in each cell where you want to apply the selected style.
5) When you have finished formatting cells, click the Fill Format Mode icon to exit the mode.
Caution
When Fill Format mode is active, a right-click anywhere in the document cancels the last Fill Format action. Be careful not to accidentally right-click and thus cancel any formatting actions you want to keep.
The Apply Style drop-down list is not included by default on the Formatting toolbar in Calc, but you can add it as follows:
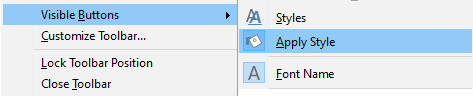
1) Right-click on any icon on the Formatting toolbar and select Visible Buttons in the context menu (Figure 3).
2) Click Apply Style. The context menu closes and the Apply Style list appears at the left end of the Formatting toolbar.
Figure 3: Adding the Apply Style list to the Formatting toolbar
To apply a style using the Apply Style list:
1) Select a cell or a group of cells in the spreadsheet.
2) Click the down arrow at the right of the Apply Style list to open the drop-down menu (Figure 4).
3) Select the required style. The formatting attributes of that style are applied to the selected cells.
Figure 4: Using the Apply Style list
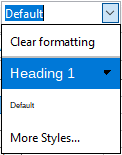
Only the styles that are in use are shown on the list. Click More Styles to go to the Styles deck where all cell styles are available.
You can create keyboard shortcuts to apply commonly-used cell, drawing, or page styles, including any custom styles that you have created. See Chapter 15, Setting up and Customizing, for more information.
To apply a different drawing style to a shape or comment:
1) Select the shape or comment to be styled.
2) Go to the Styles deck on the Sidebar (Figure 2).
3) At the top of the Styles deck, click the Drawing Styles icon.
4) Double-click on the required drawing style.
The page style applied to a sheet within a spreadsheet is indicated on the Status Bar, as shown in Figure 5.
Figure 5: Page style (Default) indicated on Status Bar

To apply a different page style:
1) Select the sheet to be styled by clicking its sheet tab.
2) Go to the Styles deck on the Sidebar (Figure 2).
3) At the top of the Styles deck, click the Page Styles icon.
4) Double-click on the required page style.
To create a new style, follow the procedure described in this section.
Note
Any new styles, and any changes to existing styles, apply only to the spreadsheet in use. To save new styles in a template, see “Creating a template” for more information.
1) Go to the Styles deck on the Sidebar (Figure 2).
2) To create a new cell style, click the Cell Styles icon; or to create a new drawing style, click the Drawing Styles icon; or to create a new page style, click the Page Styles icon.
3) Right-click in the Styles deck and select New in the context menu to open either the Cell Style dialog, the Drawing Style dialog, or the Page Style dialog.
4) Use the various tabbed pages on the dialogs to set the attributes for the new style. See “Cell style attributes”, “Drawing style attributes”, and “Page style attributes” for more information.
5) Click OK to close the dialog and save the new style.
Note
Style names are case sensitive. You can define, for example, a style called red and another style called Red. Make sure all style names are sufficiently different to prevent any confusion.
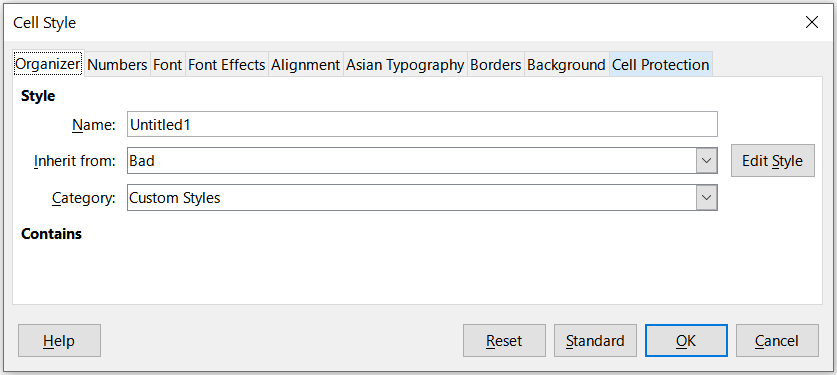
The following attributes are available on the tabbed pages of the Cell Style dialog (Figure 6).
Name – displays the name of the selected style. If you are creating or modifying a custom style, enter a name for the style. You cannot change the name of a predefined style.
Inherit from – you can choose to link the new style to an existing style and then modify some of the attributes. If you do this, any change to the parent style’s attributes will affect the new style. For example, you could make the styles identical except for the font color; if you later change the font family of the parent style, the new style’s family will also change.
Edit Style – enables you to view and edit the properties of the parent style.
Category – displays the category for the current style. If you are creating or modifying a new style, select Custom Styles from the list. You cannot change the category for a predefined style. Select Hidden Styles if you want that style to appear only in the Styles list.
Contains – describes the formatting used in the style.
Figure 6: Cell Style dialog – Organizer tab
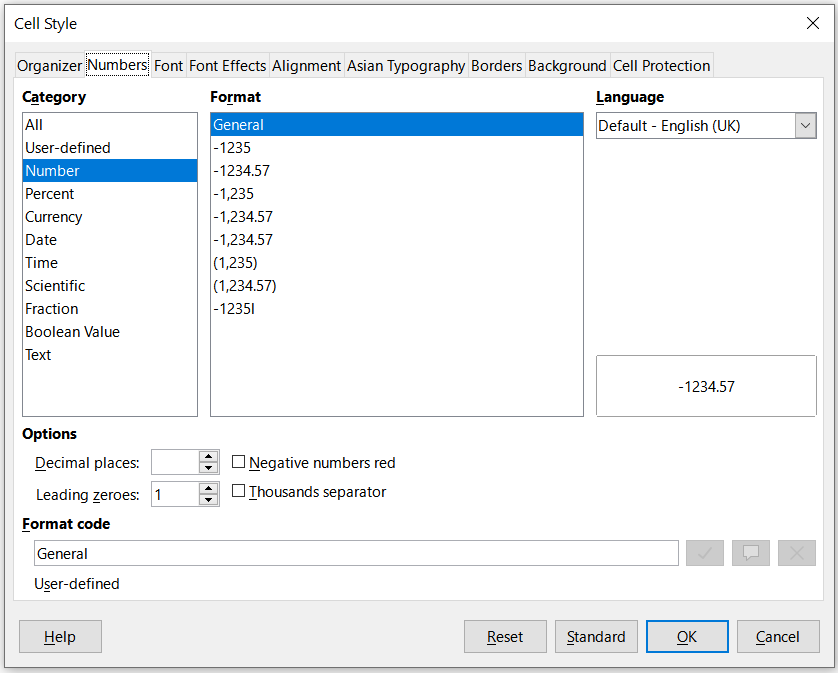
Category – select a category from the list.
Format – select how you want the contents of the selected cells to be displayed.
When you select Currency as a category, you need to select a currency in the drop-down list and then select the format to use from the options available for that currency.
The currency format is not dependent on the language that you select in the Language box. The default currency format for a cell is determined by the regional settings of your operating system.
Language – specifies the language settings for the selected cells. With the language set to the default, Calc automatically applies the number formats associated with the system default language. The language setting ensures that date and currency formats are preserved even when the document is opened in an operating system that uses a different default language setting.
Options – specify the options for the selected format:
Decimal places – enter the number of decimal places that you want to display.
Leading zeroes – enter the maximum number of zeroes to display in front of the decimal point.
Negative numbers red – select to change the font color of negative numbers to red.
Thousands separator – select to insert a separator between thousands. The type of separator (for example, a comma or a space) depends on your language settings.
Format code – displays the number format code for the selected format. You can also enter a custom format.
Add – adds the number format code that you entered to the user-defined category.
Edit Comment – adds a comment to the selected number format.
Remove – deletes the selected number format.
Preview field – displays a preview of the current selection.
Figure 7: Cell Style dialog – Numbers tab
Depending on your language settings, you can change the formatting for the following font types on this tab – Western text font (Latin character sets), Asian text font (Chinese, Japanese, or Korean character sets), and Complex text layout font (right-to-left text direction). Figure 8 shows the Font tab of the Cell Style dialog when the Asian and Complex text layout options are selected in the Default Languages for Documents area of the Tools > Options > Languages and Locales > General page. The layout of the Font and Font Effects tabs are modified if either of these two options is deselected.
Font – select an installed font in the list.
Style – select the formatting you want to apply, for example bold, Italic, or underline.
Size – select or enter the font size that you want to apply. For scalable fonts, you can also enter decimal values. If you are creating a style that is based on another style, you can enter a percentage value or a point value (for example, 2 pt or 5 pt).
Language – sets the language that the spelling checker is to use. The spelling checker works only when you have installed the corresponding language module. A language entry has a check mark in front of it if the spelling checker is activated for that language.
Features – some fonts offer special features such as Discretionary Ligatures and Horizontal Kerning. Click this button to access the Font Features dialog (not shown) to select those features.
Preview – displays a preview of the current selection.
Figure 8: Cell Style dialog – Font tab
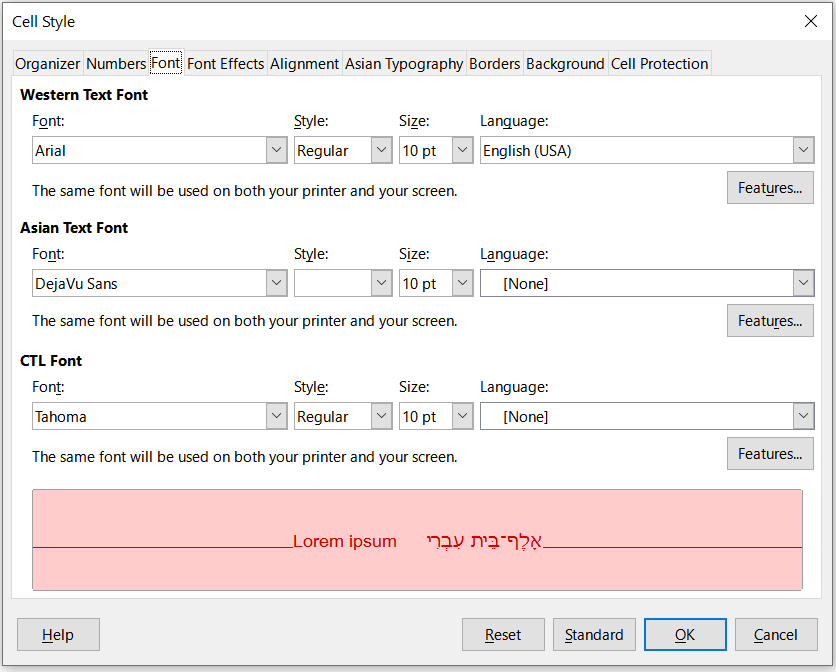
Figure 9: Cell Style dialog – Font Effects tab
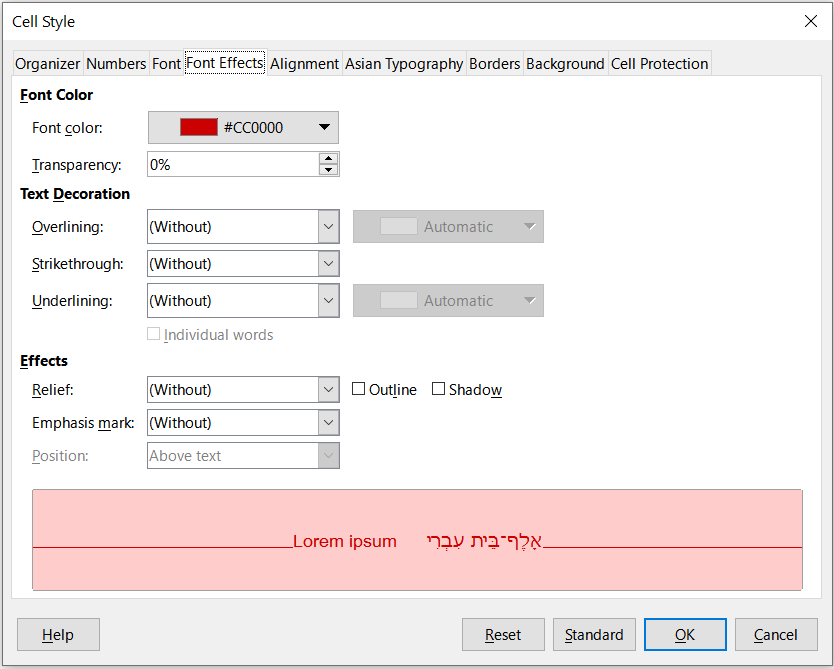
Font color – sets the color for the text. If you select Automatic, the text color is set to black for light backgrounds and to white for dark backgrounds.
Transparency – sets the transparency of the character text. The value 100% means entirely transparent, while 0% means not transparent at all.
Overlining – select the overlining style that you want to apply. To apply the overlining to words only (not the spaces between them), select the option box Individual words.
Overline color – select the color for the overlining, in the pallet when you click the button next to the Overlining field. Automatic matches the font color.
Strikethrough – select a strikethrough style for the selected text. To apply the strikethrough to words only (not the spaces between them), select Individual words.
Underlining – select the underlining style that you want to apply. To apply the underlining to words only (not the spaces between them), select Individual words.
Underline color – select the color for the underlining, in the pallet when you click the button next to the Underlining field. Automatic matches the font color.
Individual words – applies the selected effect only to words and ignores spaces.
Relief – select a relief effect to apply to the text. The Embossed relief makes the characters appear as if they are raised above the page. The Engraved relief makes the characters appear as if they are pressed into the page.
Outline – displays the outline of the characters. This effect does not work with every font.
Shadow – adds a shadow that casts below and to the right of the characters.
Emphasis Mark – select a character to display over or below the entire length of the selected text.
Position – specify where to display the emphasis marks.
Preview – displays a preview of the current selection.
Figure 10: Cell Style dialog – Alignment tab
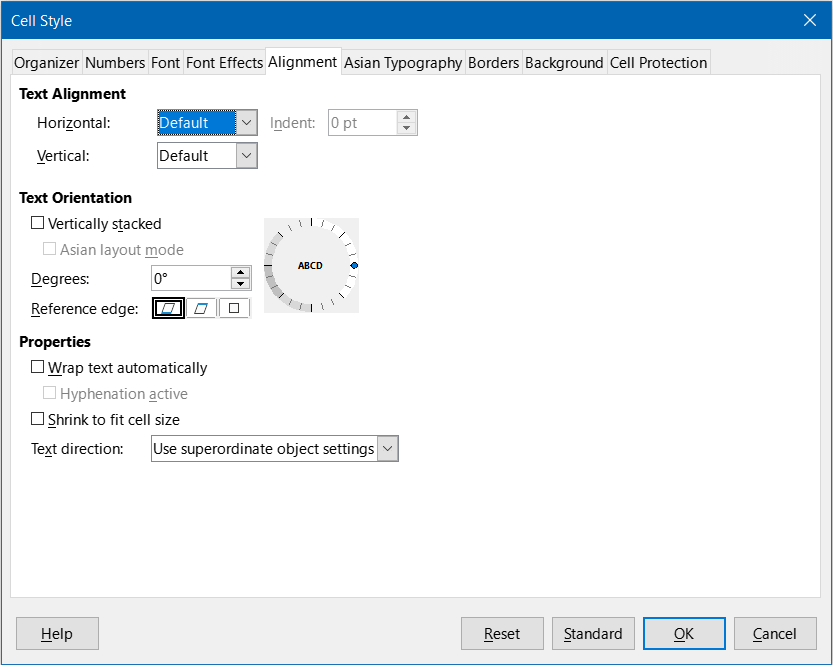
Text Alignment – sets the alignment options for the contents of the current cell, or the selected cells.
Horizontal – select the horizontal alignment option that you want to apply to the cell contents:
Default – aligns numbers to the right and text to the left.
Left – aligns the contents of the cell to the left.
Center – horizontally centers the contents of the cell.
Right – aligns the contents of the cell to the right.
Justified – aligns the contents of the cell to the left and to the right cell borders.
Filled – repeats the cell contents (number and text) until the visible area of the cell is filled. This feature does not work on text that contains line breaks.
Distributed – aligns contents evenly across the whole cell. Unlike Justified, it also justifies the very last line of text.
Indent – indents from the left edge of the cell by the amount that you enter.
Vertical – select the vertical alignment option that you want to apply to the cell contents:
Default – aligns the cell contents to the bottom of the cell.
Top – aligns the contents of the cell to the upper edge of the cell.
Bottom – aligns the contents of the cell to the lower edge of the cell.
Middle – vertically centers the contents of the cell.
Justified – aligns the contents of the cell to the top and to the bottom cell borders.
Distributed – similar to Justified, unless the text orientation is vertical. Then it behaves in a similar manner to the horizontal Distributed setting, with the very last line justified.
Text Orientation – defines the text direction of cell contents.
ABCD wheel – click anywhere in the wheel to define the text orientation. The characters “ABCD” on the wheel correspond to the new setting.
Vertically stacked – assigns vertical text orientation for cell contents.
Asian layout mode – only available if Asian language support is enabled and the text direction is set to vertical. Aligns Asian characters one below the other in the selected cell(s). If the cell contains more than one line of text, the lines are converted to text columns that are arranged from right to left. Western characters in the converted text are rotated 90 degrees to the right. Asian characters are not rotated.
Degrees – allows you to manually enter the orientation angle.
Reference edge – specify the cell edge from which to write the rotated text:
Text Extension From Lower Cell Border – writes the rotated text from the bottom cell edge outwards.
Text Extension From Upper Cell Border – writes the rotated text from the top cell edge outwards.
Text Extension Inside Cell – writes the rotated text only within the cell.
Properties – determine the text flow in a cell.
Wrap text automatically – wraps text onto another line at the cell border. The number of lines depends on the width of the cell. To enter a manual line break, press Ctrl+Enter in the cell.
Hyphenation active – enables word hyphenation for text wrapping to the next line.
Shrink to fit cell size – reduces the apparent size of the font so that the contents of the cell fit into the current cell width. You cannot apply this command to a cell that contains line breaks.
Text direction – choices are Left-to-right, Right-to-left, and Use superordinate object settings (the settings applied to the preceding cell).
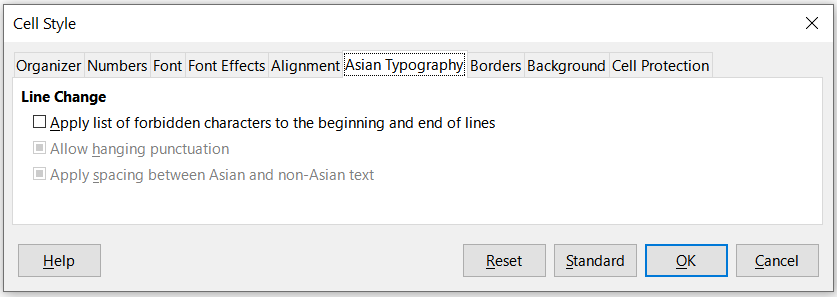
If Asian language support is enabled, the Asian Typography tab is displayed on the Cell Style dialog. For more details of the options available on this tab, see the description of the corresponding tab of the Format Cell dialog in Chapter 2, Entering and Editing Data.
Figure 11: Cell Style dialog - Asian Typography tab
Sets the border attributes for the selected cells.
Figure 12: Cell Style dialog – Borders tab
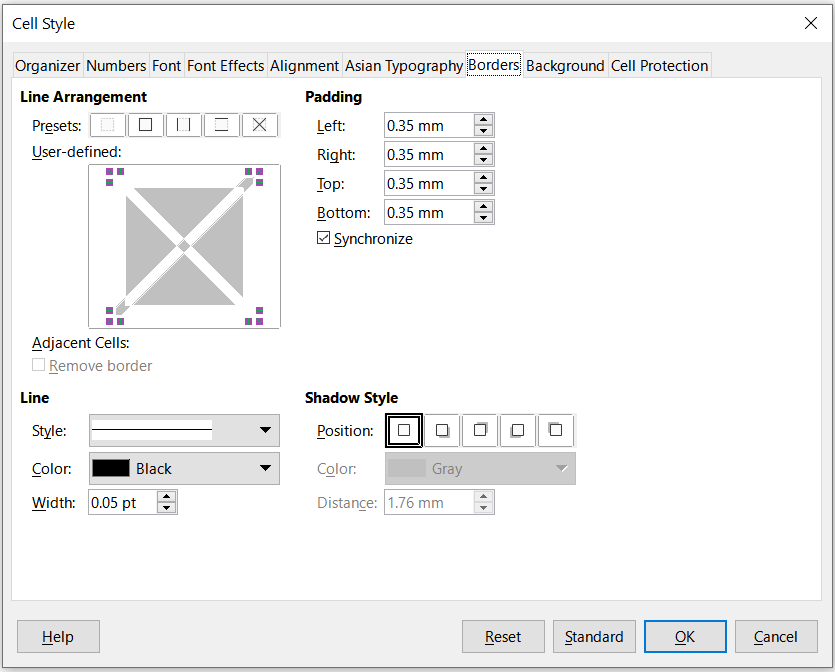
Line Arrangement – select a preset border style or define your own combination by clicking in the diagram.
Line – select the line style, width, and color that you want to apply. The style is applied to the borders selected in the preview.
Padding – specify the amount of space that you want to leave between the border and the contents of the cell. You can set each distance (left, right, top, bottom) individually or select Synchronize to apply the same padding to all four borders when you enter a new value.
Shadow Style – applies a shadow effect to borders. You can specify the position of the shadow (bottom right, top right, bottom left, or bottom right), the distance it extends, and its color.
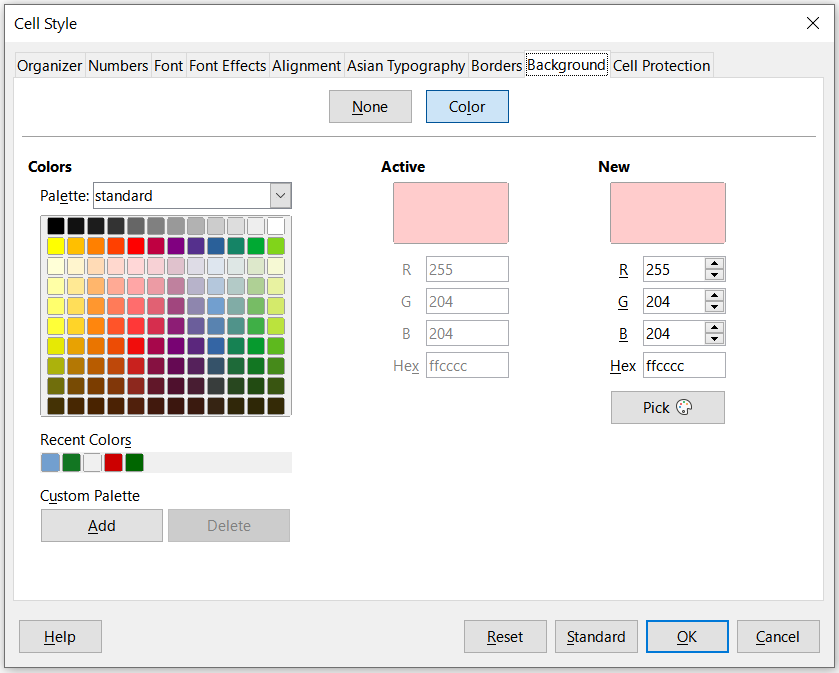
Click Color to select a color to use as a background for the formatted cells. You can choose from several palettes. To change the color, select another one. To remove the background color, select None.
Figure 13: Cell Style dialog – Background tab
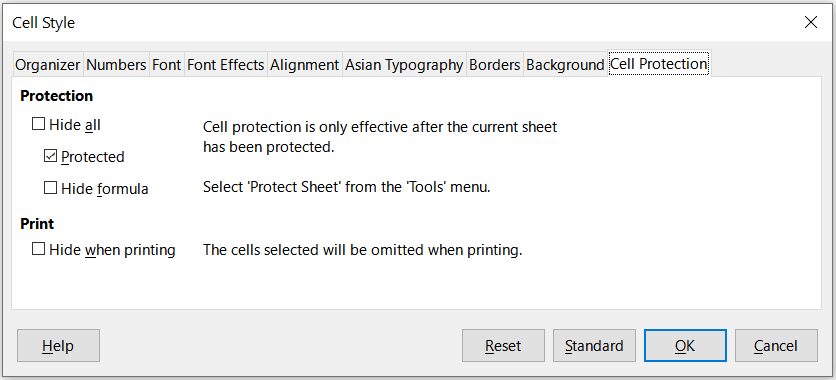
In this tab you can set some basic protection to you spreadsheet.
Protection
Hide all – hides formulas and contents of the selected cells.
Protected – prevents the selected cells from being modified. This cell protection only takes effect if you also protect the sheet.
Hide formula – hides formulas in the selected cells.
Hide when printing – prevents the selected cells from being printed.
Figure 14: Cell Style dialog – Cell Protection tab
The buttons at the bottom of the Cell Style dialog have the following functions:
Reset – returns values on the current tab to those applicable when the dialog was opened.
Standard – for a style that inherits settings from a parent style, updates the settings on the current tab to match those of the parent style.
Cancel – cancels any changes made (to all tabs in the dialog) since the last save of this dialog (by clicking OK).
OK – saves all changes made (to all tabs in the dialog).
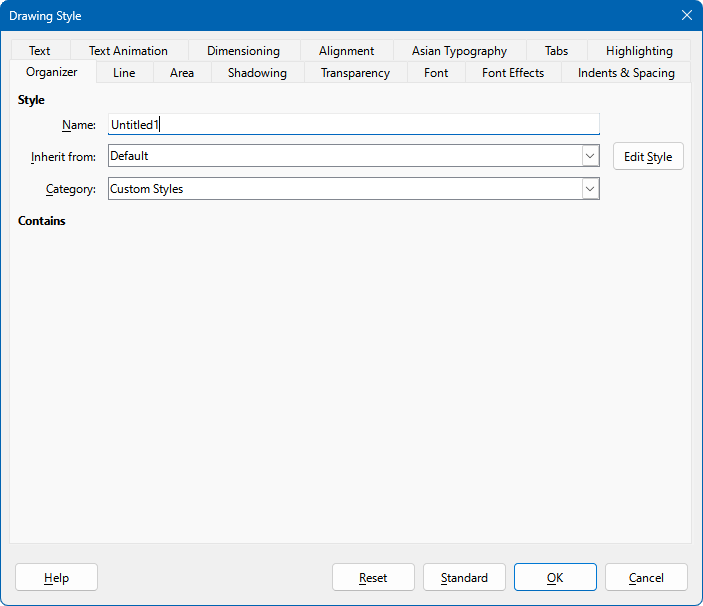
The Drawing Style dialog (Figure 15) in Calc is equivalent to the Graphics Styles dialog in LibreOffice Draw. The Graphics Styles dialog is described in the Draw Guide, Chapter 4, Changing Object Attributes, section entitled “Drawing Styles”.
The following tabbed pages are provided on the Drawing Style dialog (Figure 15).
Organizer. This tab is similar to the Organizer tab of the Cell Style dialog (Figure 6).
Line. Set line properties (style, color, width, and transparency), arrow styles, and corner and cap styles.
Area. Set the fill options (none, color, gradient, image, pattern, or hatch).
Shadowing. Add a shadow and set the properties of the shadow (position, color, distance, blur, and transparency).
Transparency. Set the area transparency mode. This may be no transparency, fixed transparency (expressed as a percentage), or gradient transparency (linear, axial, radial, ellipsoid, square, or rectangular).
Font. This tab is similar to the Font tab of the Cell Style dialog (Figure 8).
Font Effects. This tab is similar to the Font Effects tab of the Cell Style dialog (Figure 9).
Indents & Spacing. Set paragraph indenting, paragraph spacing and line spacing options.
Text. Set layout and anchoring properties for text, covering drawing object text, custom shape text, spacing to borders, and text anchor type.
Text Animation. Add a text animation effect (blink, scroll through, scroll back and forth, or scroll in) and set its properties.
Dimensioning. Set line and legend properties for dimension lines.
Alignment. Set the alignment of paragraphs relative to margins and select the text direction.
Asian Typography. This tab is similar to the Asian Typography tab of the Cell Style dialog (Figure 11).
Tabs. Set the position, type, and fill character for tab stops.
Highlighting. This tab is similar to the Background tab of the Cell Style dialog (Figure 13).
Additional information can be found in the Draw Guide and the system help.
Figure 15: Drawing Style dialog - Organizer tab
The following attributes are available on the tabs of the Page Style dialog (Figure 16).
This tab is similar to the Organizer tab for the Cell Style dialog, although page styles cannot inherit settings from other styles.
Name – displays the name of the selected style. If you are creating or modifying a custom style, you can enter or change the name of the style. You cannot change the name of a predefined style.
Category – displays the category of the current style. If you are creating or modifying a new style, select Custom Styles in the list. You cannot change the category for a predefined style.
Contains – describes the formatting used in the style.
You can define page layouts for single and multiple-page spreadsheets, as well as page numbering and paper formats.
Paper Format – select from a list of predefined paper sizes, or define a custom paper format.
Format – select a predefined paper size, or create a custom format by entering the dimensions for the paper in the Height and Width boxes.
Width – displays the width of the selected paper format. To define a custom (user) format, enter a width here.
Height – displays the height of the selected paper format. To define a custom (user) format, enter a height here.
Orientation – Portrait displays and prints the spreadsheet with the paper oriented vertically. Landscape displays and prints the spreadsheet with the paper oriented horizontally.
Text direction – select the text direction that you want to use in your document. The "right-to-left (vertical)" text flow direction rotates all layout settings to the right by 90 degrees, except for the header and footer. This option is only available if Complex text layout is selected at Tools > Options > Languages and Locales > General.
Preview Field – displays a preview of the current selection.
Paper tray – select the paper source for your printer. You can assign different paper trays to different page styles. For example, you can assign a different tray for the first page style in the spreadsheet and load the tray with your company letterhead paper.
Figure 16: Page Style dialog – Page tab
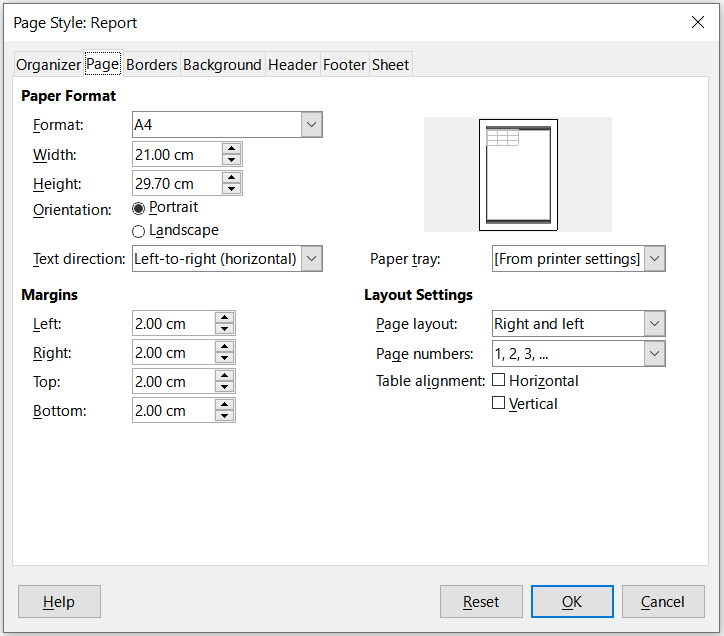
Margins – specify the amount of space to leave between the edges of the paper and the spreadsheet contents.
Left/Inner – the space between the left edge of the page and the spreadsheet. If you are using Mirrored page layout, enter the space between the inner edge of the paper and the spreadsheet. You may want to have a wider space as the left/inner margin if you will be punching or binding the pages.
Right/Outer – the space between the right edge of the paper and the spreadsheet. If you are using Mirrored page layout, enter the space between the outer edge of the paper and the spreadsheet.
Top – enter the space between the upper edge of the paper and the spreadsheet.
Bottom – enter the space between the lower edge of the paper and the spreadsheet.
Layout settings – select the page layout style to use for the spreadsheet.
Page layout – Right and left – both odd (right) and even (left) pages have the same margins on all four sides. Mirrored – odd and even pages with inner and outer margins as specified (Use this layout if you want to bind the printed pages like a book. Enter the binding space as the Inner margin). Only right – the current page style shows only odd (right) pages (Even pages are shown as blank pages). Only left – the current page style shows only even (left) pages (Odd pages are shown as blank pages).
Page numbers – select the page numbering format to use for the page style. Typically this will be 1,2,3; or a,b,c; or i,ii,iii.
Table alignment – Horizontal centers the cells horizontally on the printed page. Vertical centers the cells vertically on the printed page (the Preview Field will change according to the selected in this option).
The Borders and Background tabs of the Page Style dialog are similar to those on the cell Style dialog. See “Borders tab” and “Background tab” in “Cell style attributes” above for information on how to set the borders and background for page styles. Page styles can have a bitmap background, which is not available for cell styles.
Adds a header or footer to the page style. A header is an area in the top page margin where you can add text or graphics. A footer is a similar area in the bottom page margin. See Chapter 7, Printing, Exporting, Emailing, and Signing for details.
Specifies the elements to be included in the printout of all sheets with the page style. Additionally, you can set the print order, the first page number, and the page scale. See Chapter 7, Printing, Exporting, E-mailing, and Signing for details.
Calc comes with a predefined set of formatting themes that you can apply to spreadsheets. It is not possible to add new themes to Calc and the predefined styles cannot be modified. You can modify styles after you apply them to a spreadsheet, but the modified styles are only available for use for that spreadsheet.
To apply a theme to a spreadsheet:
1) Go to Format > Spreadsheet Theme on the Menu bar, or click the Spreadsheet Theme icon on the Tools toolbar, to open the Theme Selection dialog (Figure 17), which lists the available themes for the whole spreadsheet.
2) Select the theme that you want to apply. As soon as you select a theme, the theme styles are applied to the spreadsheet and are immediately visible.
3) Click OK.
Figure 17: Theme Selection dialog

Using spreadsheet themes is effective when you format a range in the spreadsheet as a table. Selecting a spreadsheet theme adds new cell styles to the spreadsheet and modifies the Default cell style. The added cell styles are:
“Card” cell styles: Column Header, Card, Card B (bottom), Card BL (bottom left), Card BR (bottom right), Card L (left), Card R (right), Card T (top), Card TL (top left), and Card TR (top right) of the selected range.
Background: The background style of the range. Apply this style to the table contents not in the table edges.
Input: Used for data input. This cell style has the cell protection property unchecked.
Result2: A secondary option for formula results.
If required, you can now use the Styles deck on the Sidebar to modify specific styles. These modifications do not modify the spreadsheet theme; they only change the appearance of the style in the spreadsheet you are creating.
Document themes collect various format selections into a set that can be applied and changed quickly. Theme colors have been implemented in LibreOffice 7.6; font and format settings are planned for later releases. This topic introduces the use of theme colors.
LibreOffice supplies several sets of theme colors, and you can define other sets (see Chapter 15, Setting up and Customizing). Theme colors have names like Dark 1, Light2, Accent 3, and so on. They can be used in styles or applied manually.
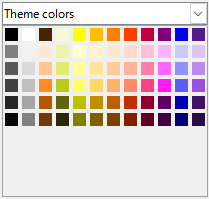
To set up a spreadsheet to use themes, choose colors for fonts, backgrounds, or objects from the Theme colors palette (Figure 18), not an ordinary color palette. The first row of the palette contains the theme colors, with other rows containing modifications. For example, the top-left color in the palette is the currently selected theme’s Dark 1 color; the leftmost color in the second row is a 50% lighter version of Dark 1; the entry at the intersection of the second column and third row is a 15% darker version of Light1; and so on. You can hover the pointer over any palette cell to see a tooltip indicating the detail of that color.
Figure 18: A palette of theme colors
To change the set of theme colors, choose Format > Theme on the Menu bar and select a different theme in the Theme dialog (Figure 19). Colors defined as theme colors change in the document. You need not change any style and need not change any object individually.
Figure 19: Theme dialog

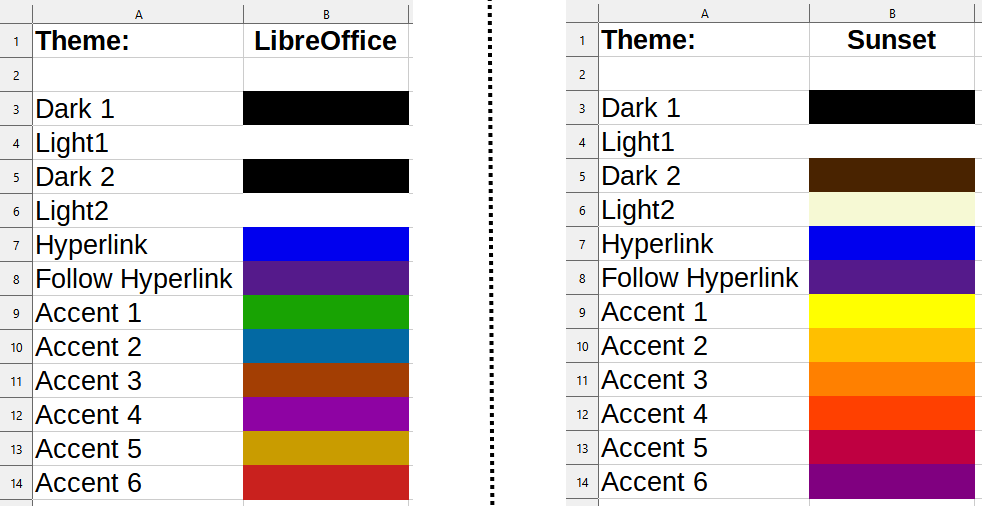
Figure 20 shows an example in which the background colors of cells in the range B3:B14 have been set to the theme color indicated by the corresponding labels in cells A3:A14. Initially, the default LibreOffice theme was applied and this is shown on the left of the figure. The transition to the configuration on the right of the figure requires only a cosmetic change to the text in cell B1 and selection of the Sunset theme via Format > Theme on the Menu bar.
Figure 20: Example of changing a document's theme
1) Go to the Styles deck on the Sidebar and click the icon for the type of style you want to modify.
2) Right-click on the name of the style and select Modify in the context menu to open either the Cell Style dialog (Figure 6), or the Drawing Style dialog (Figure 15), or the Page Style dialog (Figure 16).
3) Make the necessary changes to the style attributes. For more information on style attributes, see “Cell style attributes”, Drawing style attributes, and “Page style attributes”.
4) Click OK to save the changes and close the dialog.
Note
The Modify command is unavailable if one or more sheets are protected, even if the cell style to be modified is being used in an unprotected sheet.
You can rename custom styles, but not the styles supplied with Calc.
1) Go to the Styles panel on the Sidebar (Figure 2) and click the icon for the type of style you want to rename.
2) Right-click on the style you want to rename and select Modify in the context menu to open either the Cell Styles dialog, the Drawing Style dialog, or the Page Styles dialog.
3) On the Organizer tab, rename the style, and click OK.
You can delete custom styles, but not the styles supplied with Calc. Custom cell styles can only be deleted if they are not applied. If an applied page style is deleted, affected sheets revert to the Default page style.
1) Go to the Styles deck in the Sidebar (Figure 2) and click the icon for the type of style you want to delete.
2) Right-click on the style you want to delete and select Delete in the context menu.
3) Select Yes on the warning message, if displayed.
You can shorten the list of cell styles by hiding some of them. Only styles that are not being used in the spreadsheet can be hidden.
1) Go to the Styles deck in the Sidebar and click on the Cell Styles icon.
2) Right-click on an unused cell style and select Hide in the context menu. The style is then moved to the Hidden Styles category in the Styles deck.
1) Go to the Styles deck on the Sidebar.
2) Click on the drop-down list at the bottom of the panel and select Hidden Styles in the list.
3) To revert, right-click on the hidden style you want to show and select Show in the context menu.
You can filter the list of styles as follows:
1) Go to the Styles deck on the Sidebar.
2) Click on the drop-down list at the bottom of the panel.
3) Select the category of styles to display on the Styles deck:
Hierarchical – lists the styles in their hierarchical relationship, for example Heading 1 and Heading 2 under Heading, or Accent 1, Accent 2, Accent 3 under Accent.
All Styles – lists all the styles that are available in Calc and in the spreadsheet, except for hidden styles, in alphanumeric order.
Hidden Styles – lists all the styles that have been hidden in the spreadsheet.
Applied Styles – lists only the styles that have been applied to the spreadsheet. Not applicable for page styles.
Custom Styles – lists only the user-defined styles defined for the spreadsheet.
A template is a model that you use to create other documents in a standard format. For example, you can create a template for invoices that has your company logo and address at the top of the page. This means that any new spreadsheets (invoices) created from this template will have the company logo and address on the first page of the spreadsheet.
A significant advantage of using templates is that when a spreadsheet is created, the custom styles of the template are integrated into the new spreadsheet, so you will already have your styles defined without needing to create or modify them.
Templates can contain anything that regular documents can contain, such as text, graphics, styles; user-specific setup information such as measurement units, language, default printer; and toolbar and menu customization.
All documents in LibreOffice are based on templates. You can create, or download and install, as many templates as you wish. If you do not specify a template when you start a new spreadsheet, then that new spreadsheet is based on the included Calc default template. This default template consists of a blank spreadsheet which you can customize to your needs and then, if you wish, use as a basis to create a custom default template.
A new installation of LibreOffice may not include any spreadsheet templates other than the Calc default, but you can create your own (see “Creating a template”) or install templates obtained from other sources (see “Adding templates obtained from other sources”).
When you have an available spreadsheet template, you can use it to create a new spreadsheet from the Templates dialog or the LibreOffice Start Center.
To use a template to create a spreadsheet:
1) On the Menu bar, choose File > New > Templates, or click the small arrow next to the New icon on the Standard toolbar and select Templates, or press Ctrl+Shift+N. The Templates dialog (Figure 21) opens.
2) In the Filter lists at the top of the Templates dialog, select Spreadsheets and the category of template you want to use. All the templates in that category are then listed on the page, as shown in Figure 21.
3) Select the required template and click Open, or double-click the required template, or right-click the required template and select Open in the context menu. A new spreadsheet based on the template opens in Calc.
In the spreadsheet, the template it is based upon is listed in File > Properties > General. The connection between a template and a spreadsheet remains until that template is modified. The next time a spreadsheet based on that template is opened, you can choose either to update, or not update, the spreadsheet to match the modifications.
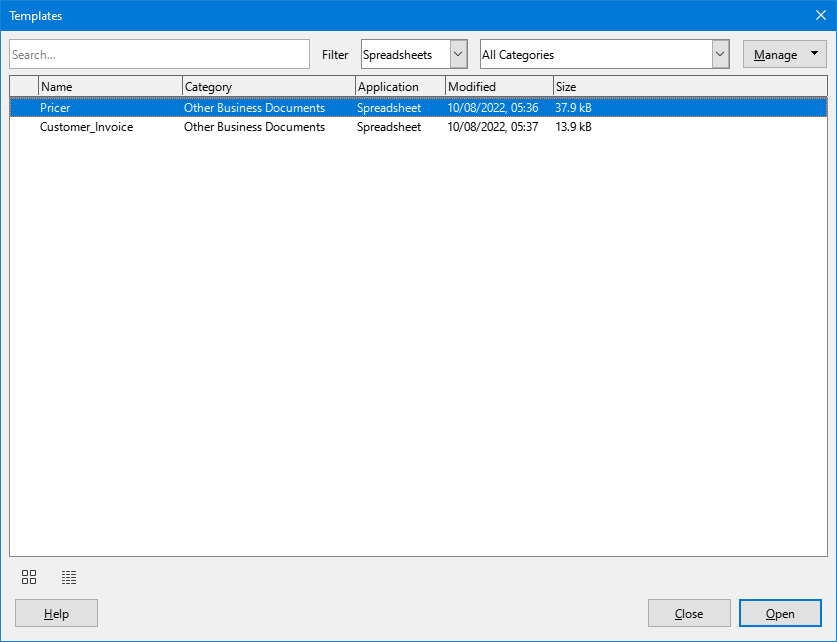
Figure 21 shows the default configuration for the Templates dialog, with the available templates represented by thumbnails. It is also possible to view the available templates in a list format that includes additional information which may help identify the template of interest, as shown in Figure 22. To switch between these two views, use the Thumbnail View and List View icons located at the bottom left of the dialog.
Figure 21: Templates dialog, showing a selected template in thumbnail view
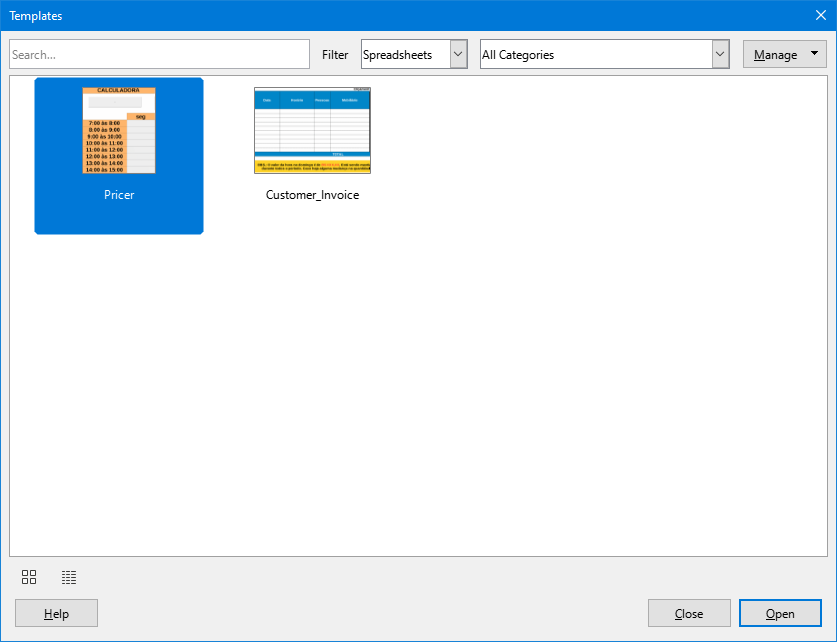
Figure 22: Templates dialog, list view
You can create a spreadsheet from the Template view of the LibreOffice Start Center, which is visible when no other document is open. (See Chapter 1, Introduction.)
Click the Templates button in the left pane and icons are displayed in the Start Center for all available LibreOffice templates. At the top left of the Start Center is a Filter drop-down list to select the templates of a given type of document. If you select the Spreadsheets option on the list, only the available spreadsheet templates are displayed in the Start Center. Click on the required template to create a new document based on that template.
You can easily create a template from any spreadsheet:
1) Open a new or existing spreadsheet that you want to use as a base for the template.
2) Add any necessary pre-defined content that you want to appear in a spreadsheet each time you use the new template, for example company logo and name, company information, page numbers, and so on. Delete any information that you do not want in the template.
3) Create or modify the cell, drawing, and page styles that you want to use in the template.
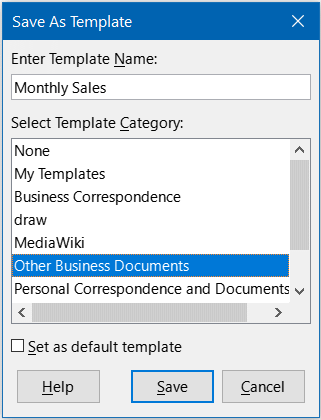
4) On the Menu bar, choose File > Templates > Save as Template, or click the down arrow at the right of the Save button on the Standard toolbar and select Save as Template, or press Shift+F11. The Save As Template dialog (Figure 23) opens, displaying the existing template categories and a name box.
5) Type a name for the new template and select the required template category. You can also choose to make this the default template (see “Setting the default template” for more information).
6) Click Save to save the new template.
Figure 23: Save As Template dialog
Note
Although the Save as Template dialog shows no document type when saving a new template of any type, the template will appear on the correct tab (Spreadsheets, in this case) when you return to the Templates dialog. It is unnecessary to save or do anything further with the spreadsheet file you have been using to create the new template. It can be safely closed without saving.
Note
You can also save a template through the Save As dialog, accessed by a variety of interactions including selecting File > Save As on the Menu bar or pressing Ctrl+Shift+S. Select the ODF Spreadsheet Template option in the Save as type menu and navigate to the appropriate template folder before clicking the Save button.
You can edit a template’s styles and content. If you wish, you can then apply the new styles to spreadsheets that were created from the original template (see below for details).
To edit a template:
1) On the Menu bar, choose File > Templates > Manage Templates, or press Ctrl+Shift+N, to open the Templates dialog. You can also manage templates from the Start Center.
2) Navigate to the spreadsheet template that you want to edit. Right-click to open the context menu and choose Edit (Figure 24). The template opens in Calc.
Figure 24: Templates dialog – Editing templates
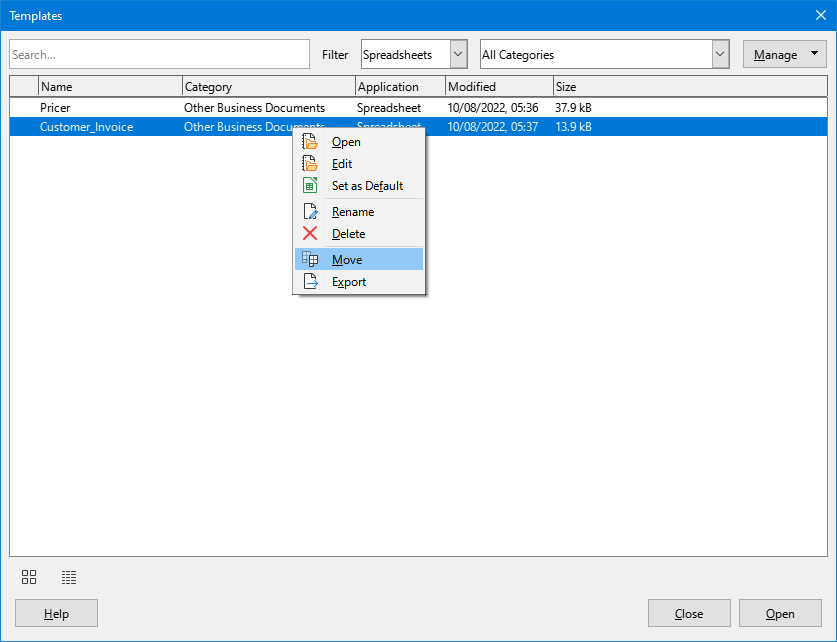
3) Edit the template as you would edit any other spreadsheet. To save the changes, choose File > Save on the Menu bar or perform any equivalent action. To save the edited template as a new template, choose File > Save As Template or perform any equivalent action.
If you make any changes to a template and its styles, the next time you open a spreadsheet that was created before you changed the template, a confirmation message is displayed.
1) Click Update Styles to apply the changed styles in the template to the spreadsheet.
2) Click Keep Old Styles if you do not want to apply the changed styles in the template to the spreadsheet.
Caution
If you select Keep Old Styles, the confirmation message will not appear again the next time you open the spreadsheet using the same changed template. Although the template is still listed under File > Properties > General, the spreadsheet is no longer connected to the template, so it will not update. You can still import styles manually from the template, but to reconnect the spreadsheet to the template, you need to use one of the procedures described in “Changing the template assigned to a document” below.
You can change the template assigned to a document, or reconnect a document to a template, in two ways: manually or using the Template Changer extension to LibreOffice.
To change or reassign a template manually, first create a new, blank document from the required template, as described above. Then copy the contents of the old document into the new document.
To use the Template Changer extension, first you need to download and install it, then restart LibreOffice to activate it. After that, you can open the document and use File > Templates > Change template (current document) on the Menu bar.
The Template Changer extension works with Writer, Calc, Draw, and Impress.
LibreOffice refers to sources of templates as repositories. A repository can be local (a directory on your computer to which you have downloaded templates) or remote (a URL from which you can download templates).
To get to the official LibreOffice template repository, type https://extensions.libreoffice.org/en in your browser’s address bar. This opens the Extensions web page. In the Search section, click the Templates tag filter. You can narrow your search by also choosing other tag filters. After setting the filters, click the Search button. In the search results, find the required template and click on its name to display a page with details; click the Download button to put the template anywhere on your computer. Proceed to “Installing templates” below.
You can also use the Extensions button in the Manage menu of the Templates dialog, as shown in Figure 25, to open an Extensions: Templates dialog, where you can scroll through a list of extensions. In this version of LibreOffice, there is no easy way to filter this list, so you may prefer to go directly to the web page, as described above.
Figure 25: Getting more templates for LibreOffice
On other websites you may find collections of templates that have been packaged into extension (.OXT) or .ZIP files.
You can import and add templates to your collection as follows:
1) Find and download the template you want to use, as described in the previous section.
2) Open the Templates dialog and click the Import button in the Manage menu.
3) In the pop-up dialog, select the category where you want to store the template. (You can change this later, as described in “Moving a template” below.)
4) A file browser opens. Navigate to the location of the downloaded template on your computer.
5) Select the template and click Open. After import, the template becomes available in the Templates dialog.
Tip
You can manually copy new templates into the template folders. The location varies with your computer’s operating system. To learn where the template folders are stored on your computer, go to Tools > Options > LibreOffice > Paths.
The Extension Manager provides an easy way to install collections of templates that have been packaged as extensions. Follow these steps:
1) Download the extension package (.OXT file) and save it anywhere on your computer.
2) In LibreOffice, select Tools > Extension Manager on the Menu bar, or press Ctrl+Alt+E. In the Extension Manager dialog, click Add to open a file browser window.
3) Find and select the package of templates you want to install and click Open. The package begins installing. You may be asked to accept a license agreement.
4) When the package installation is complete, you may need to restart LibreOffice. The templates are available for use through the Templates dialog and the extension is listed in the Extension Manager.
See Chapter 15, Setting up and Customizing, for more about the Extension Manager.
Tip
Some extensions are packaged as .ZIP files.
If you create a new spreadsheet using File > New > Spreadsheet on the Menu bar or an equivalent action, Calc creates the document from the default template for spreadsheets. You can set any template as the default template. You can also reset the default template to the Calc default template.
Most default settings, such as page size and page margins, can be changed but those changes normally apply only to the spreadsheet you are working on. To make those changes the default settings for spreadsheets, you need to replace the default Calc template with a new one.
You can set any template displayed in the Templates dialog to be the default for that document type:
1) On the Menu bar, choose File > Templates > Manage Templates or press Ctrl+Shift+N.
2) In the Templates dialog, open the category containing the template that you want to set as the default.
3) Right-click on the template and click the Set as Default option (Figure 24). The template is now indicated by a green check mark in the upper left.
The next time you create a spreadsheet by choosing File > New, by clicking the New icon on the Standard toolbar, or by pressing Ctrl+N, it will be created from this template.
To set the default spreadsheet template back to the default template supplied with Calc:
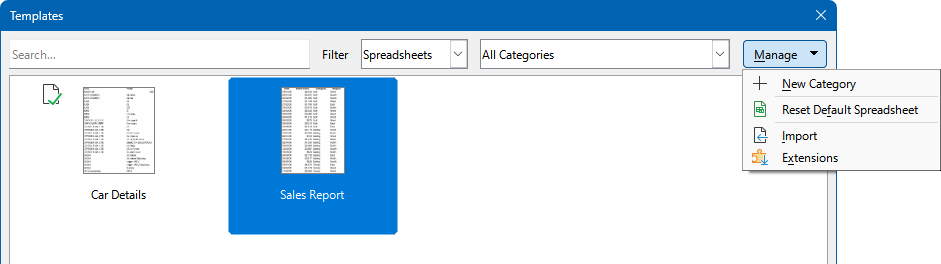
1) In the Templates dialog, click the Manage button on the upper right (Figure 26).
2) Point to Reset Default Spreadsheet in the drop-down menu. The green check mark is removed from the template.
This choice does not appear unless a custom template has been set as the default, as described in the previous section.
Figure 26: Resetting the default template for spreadsheets
You can also reset the default template as follows:
1) Go to the Templates dialog and open the category containing the template you set as default. It is indicated by a green check mark.
2) Right-click on this template and select Reset Default in the context menu. The next time that you create a new spreadsheet, it will be created using the Calc default template.
Note
Resetting the default template back to the Calc default template is only available if the default has been changed previously.
LibreOffice can only manage templates that are in its template folders (categories), although you can create a spreadsheet from a template that is not in one of these folders. You can create new template folders and use them to organize your templates and import templates into these folders. For example, you might have one template folder for sales templates and another for invoice templates. You can also export templates.
Tip
The location of template folders in LibreOffice depends on the operating system of your computer. If you want to know where the template folders are located, go to Tools > Options > LibreOffice > Paths.
To begin, choose File > Templates > Manage Templates, or press Ctrl+Shift+N, to open the Templates dialog.
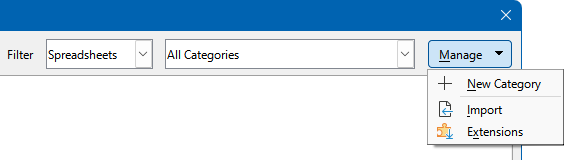
1) Click the Manage button on the Templates dialog and select New Category in the drop-down menu (Figure 27).
2) In the pop-up dialog (not shown), type a name for the new category and click OK. The new category now appears in the list of categories.
Note
You cannot create a sub-category inside a template category.
Figure 27: Creating a new category

You cannot delete template categories supplied with LibreOffice. Nor can you delete categories added by the Extension Manager unless you first remove the extension that installed them.
However, you can delete a category that you created:
1) Click the Manage button on the Templates dialog and select Delete Category in the context menu (Figure 27).
2) Select the category to be deleted in the Delete Category dialog (not shown) and click OK.
3) Select Yes in the confirmation dialog to confirm the deletion.
4) Calc displays a warning if it is unable to delete the category.
To move a template from one template category to another:
1) Open the Templates dialog and select the template you want to move.
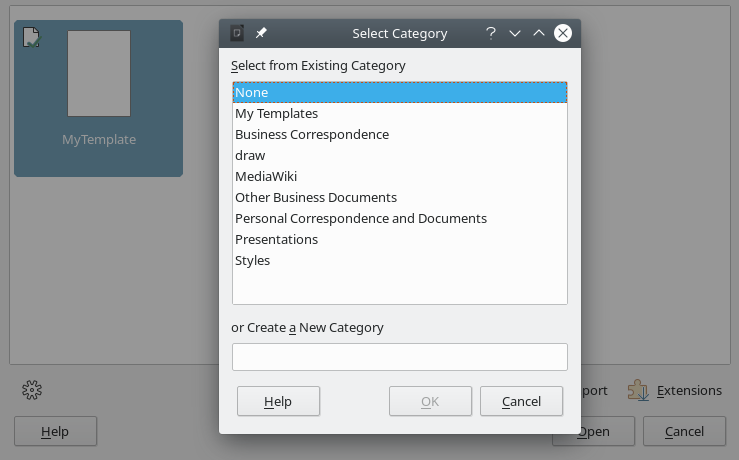
2) Right-click the template you want to move and select the Move option from the context menu, select the destination category from the popup dialog (Figure 28), and click OK. The selected template is moved to the folder. You can also create a new category into which to move the template.
Figure 28: Moving a template to another category
You cannot delete templates supplied with LibreOffice. Nor can you delete any templates installed by the Extension Manager except by removing the extension that installed them. You can only delete templates that you have created or imported.
1) In the Filter drop-down lists at the top of the Templates dialog, select the category that contains the template you want to delete.
2) Right-click on the template that you want to delete to open the context menu and click Delete (Figure 24).
3) A message box appears and asks you to confirm the deletion. Click Yes.
Note
Moving or deleting a template has no impact on any document that was created from that template. The spreadsheet will retain the style definitions that it inherited from the moved or deleted template. The Template field on the File > Properties > General page can continue to show the name of a template that no longer exists.
The easiest way to send a template to someone else, or to store it on a network, is to export it:
1) Open the Templates dialog and find the template that you want to export.
2) Right-click the template you want to export and select the Export option from the context menu.
3) The Select Folder dialog opens. Navigate to the location where you want to export the template and click Select Folder. You can also rename the template.
Note
Exporting a template does not remove it from the Templates dialog. The action places a copy of the template in the location you specify.