Calc Guide 24.2
Chapter 12 Sharing and Reviewing Spreadsheets
This document is Copyright © 2024 by the LibreOffice Documentation Team. Contributors are listed below. You may distribute it and/or modify it under the terms of either the GNU General Public License (https://www.gnu.org/licenses/gpl.html), version 3 or later, or the Creative Commons Attribution License (https://creativecommons.org/licenses/by/4.0/), version 4.0 or later.
All trademarks within this guide belong to their legitimate owners.
|
Steve Fanning |
Olivier Hallot |
B. Antonio Fernández |
|
Barbara Duprey |
Jean Hollis Weber |
Kees Kriek |
|
Leo Moons |
Steve Fanning |
Felipe Viggiano |
|
Skip Masonsmith |
Olivier Hallot |
B. Antonio Fernández |
Please direct any comments or suggestions about this document to the Documentation Team’s forum at https://community.documentfoundation.org/c/documentation/loguides/ (registration is required) or send an email to: loguides@community.documentfoundation.org.
Note
Everything you send to a forum, including your email address and any other personal information that is written in the message, is publicly archived and cannot be deleted. Emails sent to the forum are moderated.
Published March 2024. Based on LibreOffice 24.2 Community.Other versions of LibreOffice may differ in appearance and functionality.
Some keystrokes and menu items are different on macOS from those used in Windows and Linux. The table below gives some common substitutions for the instructions in this document. For a detailed list, see the application Help and Appendix A (Keyboard Shortcuts) to this guide.
|
Windows or Linux |
macOS equivalent |
Effect |
|
Tools > Options on Menu bar |
LibreOffice > Preferences on Menu bar |
Access to setup options |
|
Right-click |
Ctrl+click and/or right-click depending on computer setup |
Opens a context menu |
|
Ctrl or Control |
⌘ and/or Cmd or Command, depending on keyboard |
Used with other keys |
|
Alt |
⌥ and/or Alt or Option depending on keyboard |
Used with other keys |
This chapter covers methods for collaboration through sharing and reviewing spreadsheets: simultaneous editing, recording changes, adding comments, reviewing changes, merging and comparing documents, saving, and using document versions.
Some menu commands are not available (grayed out) when sharing or change tracking are active.
Sharing a spreadsheet allows several users to open the same file for editing at the same time. The spreadsheet needs to be on a shared drive, server, website, or similar. Some conditions must be met on operating systems with user permission management:
The shared file needs to reside in a location which is accessible by all collaborators.
The file permissions for both the document and the corresponding lock file need to be set so that all collaborators can create, delete, and change the files.
Consult your operating system’s documentation for details on setting file permissions. See also “Opening and saving files on remote servers” in the Getting Started Guide.
Tip
In order to correctly identify the changes, each collaborator should enter their name in Tools > Options > LibreOffice > User Data on the Menu bar.
With the spreadsheet open, choose Tools > Share Spreadsheet on the Menu bar to enable or disable sharing.
Figure 1: Share Document dialog
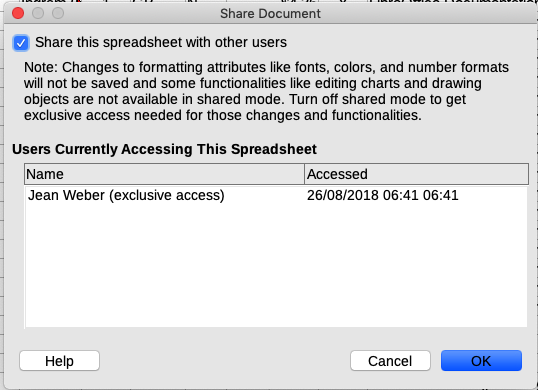
To enable sharing, select the checkbox at the top of the dialog (Figure 1) and click OK. If the spreadsheet has been saved previously, a message appears stating that you must save it to activate shared mode; click Yes to continue. If the spreadsheet has not been saved previously, the Save dialog opens. After saving, the text “(shared)” is shown on the Title bar, after the title.
Tools > Share Spreadsheet on the Menu bar can also be used to switch a spreadsheet from shared to unshared. However, this means that other users can no longer edit it. Instead, you may wish to save a copy of the shared spreadsheet using another name or path, thus creating a copy of the shared spreadsheet, and then switch the copy to unshared.
When you open a shared spreadsheet, a message appears stating that some features are not available in this mode. After reading it, click OK to remove the message and open the document. You can select the option to not show the warning again.
The following features are disabled in a shared spreadsheet:
When you save a shared spreadsheet, and if it has not been modified and saved by another user since you opened it, it is saved as usual.
If the spreadsheet has been modified and saved by another user since you opened it, one of the following will occur:
If the changes do not conflict, the document is saved, the message “Your spreadsheet has been updated with changes saved by other users” appears, and any cells modified by the other user are shown with a red border.
Figure 2: Resolve Conflicts dialog
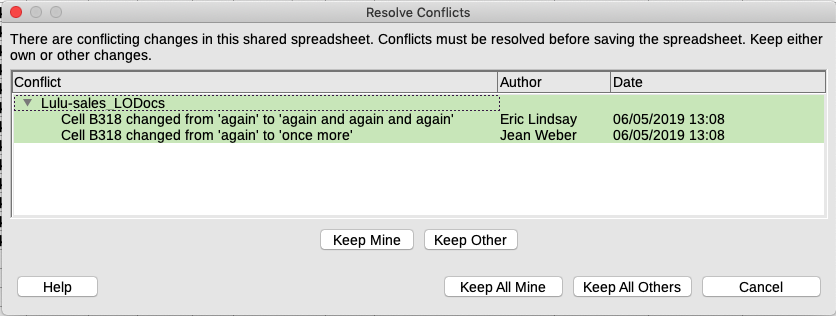
If the changes conflict, the Resolve Conflicts dialog (Figure 2) is shown. You must decide for each conflict which version to keep, yours or the other person’s. When all conflicts are resolved, the document is saved. While you are resolving the conflicts, no other user can save the shared document.
If another user is trying to save the shared spreadsheet and resolve conflicts, they see a message that the file is locked due to a merge in progress. They can cancel the Save command and retry saving later.
When you successfully save a shared spreadsheet, the document shows the latest version of all changes saved by all users.
You can use several methods to review, edit, and comment on a spreadsheet. Each reviewer works on a separate copy of the document.
You can use change marks to show added and deleted material. Later, you or another person can review the document and accept or reject each change.
You can make changes to a copy of the document (stored in a different folder, under a different name, or both), then use Calc to compare the files and show the changes. See “Comparing documents” below.
You can save versions that are stored as part of the original file. See “Saving versions” below.
Reviewers can leave comments in the document, either attached to specific changes or standalone.
Before you send a spreadsheet to someone else to review or edit, you may want to set it up so that the editor or reviewer does not have to remember to turn on the revision marks.
After you have turned on revision marks, you can optionally password protect the spreadsheet so that any user must enter the correct password in order to accept or reject changes.
1) Open the spreadsheet and select Edit > Track Changes > Record on the Menu bar. You can also use File > Properties > Security and select Record changes.
2) If you want to protect the spreadsheet, click Edit > Track Changes > Protect on the Menu bar. On the Protect Records dialog, type a password (twice) and click OK. You can also use File > Properties > Security and click the Protect button to open the similar Enter Password dialog. Both dialogs incorporate a password strength meter to indicate the strength of the entered password. This provides a colored bar to reflect password strength, with red indicating a weak password and green indicating a strong password. In addition, the longer the colored bar, the greater the strength of the password.
To record changes, open the spreadsheet and make sure that the Edit > Track Changes > Record menu item has a check mark next to it, indicating that change recording is active.
Caution
After making some changes, do not turn off change recording. Turning off change recording in Calc causes all the recorded changes to be accepted and no longer shown as changes. A message box will warn if you try to do this.
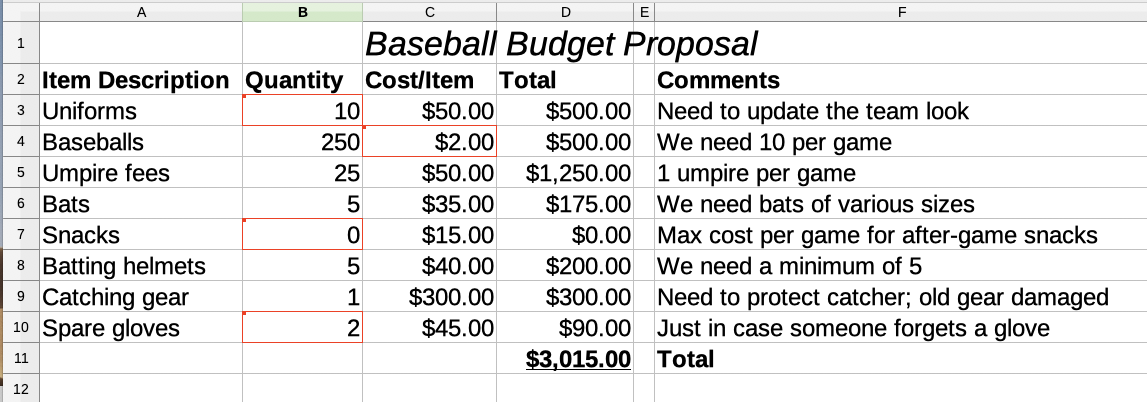
When changes are made in a cell, a colored border with a dot in the upper left-hand corner appears around the cell (Figure 3). A deleted column or row is marked by a heavy colored bar.
Figure 3: Edited document with red border on changed cells
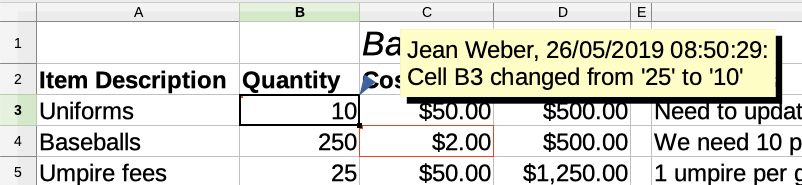
To see the changed information, hover the mouse pointer over the changed cell. See Figure 4.
Figure 4: Showing details of the change
Note
Some changes, for example cell formatting, are not recorded and marked.
Tip
To change the color that indicates a changed cell, select Tools > Options > LibreOffice Calc > Changes on the Menu bar.
You may want to explain your rationale for the changes. You can do this by adding comments to the changes you made or by adding general comments to the spreadsheet.
Calc automatically adds to any recorded change a comment that describes what was changed (for example, Cell B4 changed from ‘9’ to ‘4’). Reviewers and authors can add their own comments to explain their reasons for the changes or provide any other helpful insights.
To add a comment to a change:
1) Make the change to the spreadsheet.
2) Select the cell with the change.
3) Choose Edit > Track Changes > Comment on the Menu bar. A small dialog opens. Type your comment and click OK. See Figure 5.
Note
Do not use Insert > Comment on the Menu bar or the context menu for this purpose. Comments inserted using that method are handled differently (see “Adding other (general) comments” below) and do not appear in the Manage Changes dialog.
Figure 5: Entering a comment associated with a change
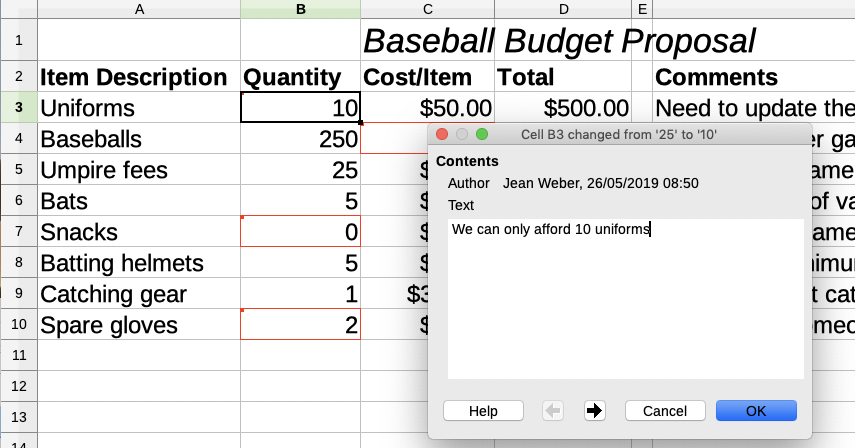
After you have added a comment to a changed cell, you can see the change and the comment by hovering the mouse pointer over the cell, as shown in Figure 6.
Figure 6: Comment added to cell B3

The comment also appears on the Manage Changes dialog when you are accepting and rejecting changes, as shown in the first line of Figure 10 on page Figure 10.
1) Select the cell with the change comment that you want to edit.
2) Choose Edit > Track Changes > Comment on the Menu bar. The box shown in Figure 5 opens.
3) Edit the comment and click OK.
The automatically-added comment provided by Calc cannot be edited.
You can move through the comments by using the arrows at the bottom of the dialog.
Calc provides another type of comment, which authors and reviewers often use to exchange ideas or ask for suggestions.
To add a general comment:
1) Select the cell that the comment applies to.
2) Select Insert > Comment on the Menu bar, or right-click and select Insert Comment in the context menu, or press Ctrl+Alt+C. The box shown in Figure 7 appears.
Figure 7: Inserting a comment
3) Type your comment in the box, then click outside the box to close it.
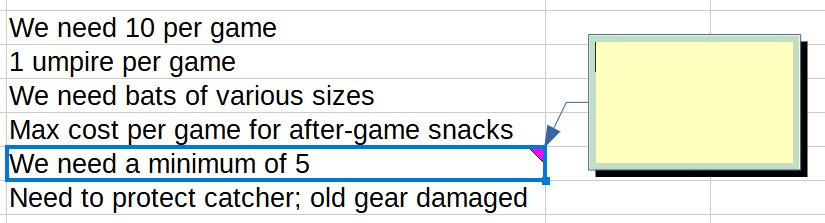
Now the cell to which you added the comment has a colored triangle in the upper right-hand corner, as shown in Figure 8. It does not have a colored border, unless the cell also has a change comment.
Figure 8: Colored triangle in cell containing a comment

Tip
You can change the colors Calc uses for comments by selecting Tools > Options > LibreOffice > Application Colors and adjusting the colors for Notes background and Comments in the Spreadsheet section.
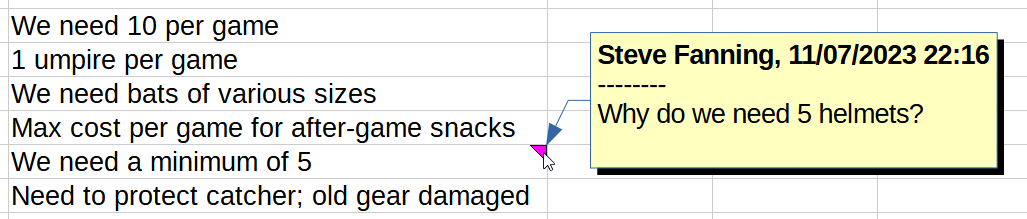
To view the comment you just added, hover the mouse pointer over the cell that has a comment. The comment appears, as shown in Figure 9.
Figure 9: Viewing a comment
Note
If you hover the mouse pointer over a cell that has both a change comment and a general comment, both comments are shown in the displayed tip.
You can edit and format the text of a general comment, just as you do for any other text.
1) Right-click on the cell containing the comment marker and choose Edit comment in the context menu, or left-click on the cell and press Ctrl+Alt+C.
2) Calc shows the cell’s comment. The pointer changes to the usual text-entry pointer, and the Formatting toolbar changes to show text attributes.
3) When editing is done, click outside the comment to deselect it.
You can change the background color, border style, transparency, and other attributes of a comment.
1) Right-click on the cell containing the comment marker, and choose Show comment in the context menu. The authorship data shown at the top of the comment in Figure 9 is not displayed when a general comment is shown via this interaction.
2) Click on the comment itself. The Formatting toolbar changes to show many of the comment formatting options. These are the same as the options for formatting graphics; see Chapter 6, Using Images and Graphics, for more information.
3) When done, click outside the comment to deselect it. To hide the comment again, right-click on the cell and choose Hide Comment in the context menu.
If the comment markers in the corners of cells are difficult to see, Calc provides two other ways to find them: by showing all comments and by using the Navigator.
1) To show all general comments, choose View > Comments on the Menu bar. To hide all comments, choose View > Comments again. The authorship data shown at the top of the comment in Figure 9 is not visible when all general comments are shown in this way.
2) If any general comments are in the spreadsheet, the Navigator shows a symbol (usually a + or an arrow) next to the word Comments. Click on this symbol to display a list of the comments. Double-click on a comment in the list to jump directly to the cell it is associated with.
Note
View > Comments and the Navigator show general comments but not the comments associated with tracked changes.
When you receive a document with changes, you can step through each change and decide how to proceed. To begin this process:
1) Open the edited document.
2) Select Edit > Track Changes > Manage on the Menu bar. The Manage Changes dialog shown in Figure 10 appears.
3) You can step through the changes one at a time, choosing to accept or reject each change as you go through. You can also accept or reject all changes at one time.
The Comment column by default contains an explanation of the change that was made. If the reviewer added a comment to the change, it is displayed, followed by the description of the change.
If a change has been superseded by a later change (by either the same person or another person), the changes are hierarchically arranged with an expansion symbol for opening up the hierarchy.
Below the list of changes to be accepted or rejected are shown any changes that have previously been dealt with.
Figure 10: Manage Changes dialog – List tab
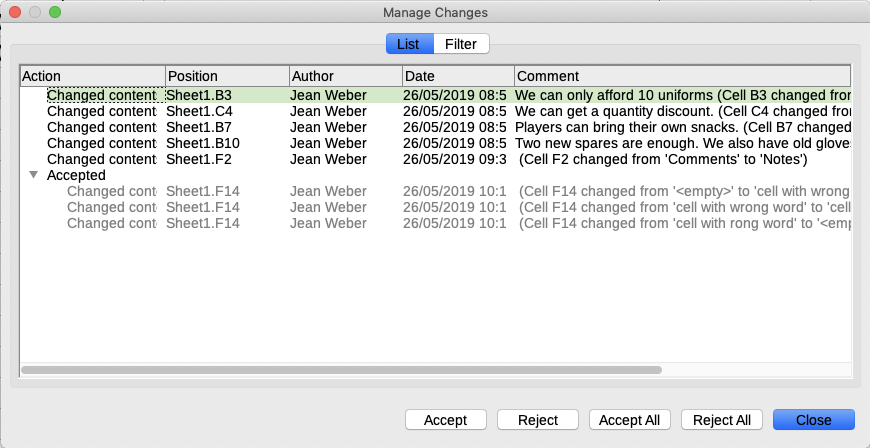
Figure 11: Manage Changes dialog – Filter tab
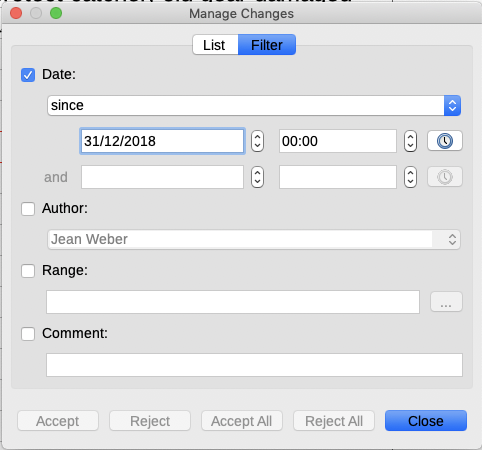
On the Filter tab of the Manage Changes dialog (Figure 11), you can choose how to filter the list of changes: by date, author, cell range, or comments containing specific terms. After selecting the filter criteria, switch back to the List tab to see the results. Filtering the changes affects only the contents of the List tab on the dialog, you will not see any filtered results in your spreadsheet.
The processes discussed to this point are effective when you have one reviewer at a time. Sometimes, however, multiple reviewers all return edited copies of a spreadsheet. In this case, it may be faster to review all of the changes at once, rather than one review at a time. For this purpose, you can merge documents in Calc.
To merge documents, all of the edited documents (but not the original document) need to have recorded changes in them.
1) Open the original document into which you want to merge all the copies.
2) Select Edit > Track Changes > Merge Document on the Menu bar.
3) A file selection dialog opens. Select a file you want to merge and click Open.
4) After the documents merge, the Manage Changes dialog opens, showing changes by more than one reviewer. If you want to merge more documents, close the dialog and then repeat steps and .
Now all of the changes are combined into one document and you can accept or reject the changes. Changes from different authors appear in cells outlined in different colors.
Sometimes reviewers may not record the changes they make. Calc can find the changes by comparing documents.
To compare documents, you need to have the original document and the one that is edited.
1) Open the edited document that you want to compare with the original document.
2) Select Edit > Track Changes > Compare Document.
3) A file selection dialog opens. Select the original document and click Open.
4) Calc opens the Manage Changes dialog showing the changes identified.
Calc finds and marks the changes as follows:
All data that occurs in the edited document but not in the original is identified as inserted.
All data in the original document that is not in the edited document is identified as deleted.
All data that is changed is marked as changed.
From this point you can go through and accept or reject changes, as described earlier.
For auditing and other purposes, you may need to save new versions of a spreadsheet. You can do this by saving a copy of the spreadsheet (under a different name) after each revision, or by using Calc’s version feature.
Caution
If you select File > Save As on the Menu bar, or press Ctrl+Shift+S, for a document with different versions stored in it, the old versions are not saved in the new file.
To use version management in Calc:
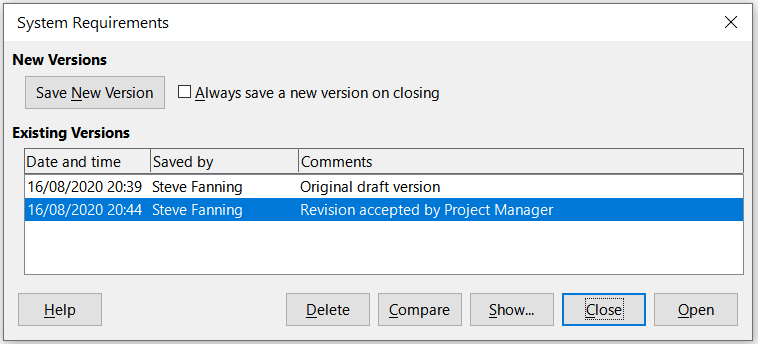
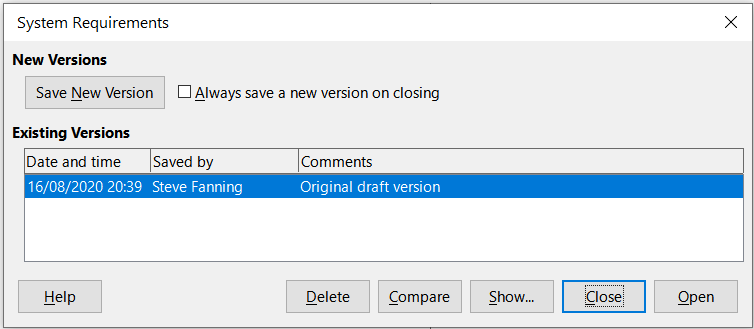
1) Choose File > Versions on the Menu bar. A version management dialog (Figure 12) opens, showing a list of the existing versions saved in this file.
Figure 12: Version management dialog
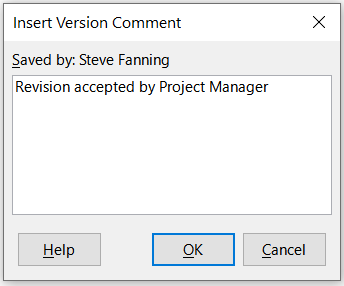
2) Click the Save New Version button to save a new version. The Insert Version Comment dialog (Figure 13) opens where you can enter comments about this version.
Figure 13: Insert Version Comment dialog
3) After you enter your comment and click OK, the new version is included in the Existing Versions list (Figure 14).
4) Save the file. Both versions are now included in the same file.
From this point you can:
View an old version – Select the version and click Open. A read-only copy of a previous version opens.
Compare all versions – Clicking Compare performs an action similar to merging documents. A Manage Changes dialog opens, showing all of the changes through the different versions.
Review the version comments – Select a version and click Show to display the full comments made by yourself or other reviewers.
Delete a version – Select a version and click Delete. Be careful with this option, when deleting a version, there is no request for confirmation.
Figure 14: Updated version list