
Calc Guide 25.2
Chapter 14
Macros
Automating repetitive tasks
This document is Copyright © 2025 by the LibreOffice Documentation Team. Contributors are listed below. You may distribute it and/or modify it under the terms of either the GNU General Public License (https://www.gnu.org/licenses/gpl.html), version 3 or later, or the Creative Commons Attribution License (https://creativecommons.org/licenses/by/4.0/), version 4.0 or later.
All trademarks within this guide belong to their legitimate owners.
|
Olivier Hallot |
B. Antonio Fernández |
|
|
Andrew Pitonyak |
Barbara Duprey |
Jean Hollis Weber |
|
Simon Brydon |
Steve Fanning |
Leo Moons |
|
Felipe Viggiano |
Olivier Hallot |
Kees Kriek |
|
Vasudev Narayanan |
Rafael Lima |
Skip Masonsmith |
|
B. Antonio Fernández |
|
|
Please direct any comments or suggestions about this document to the Documentation Team’s forum at https://community.documentfoundation.org/c/documentation/loguides/ (registration is required) or email: loguides@community.documentfoundation.org.
Note
Everything you send to a forum, including your email address and any other personal information that is written in the message, is publicly archived and cannot be deleted. Emails sent to the forum are moderated.
Published June 2025. Based on LibreOffice 25.2 Community.
Other versions of LibreOffice may differ in appearance and functionality.
Some keystrokes and menu items are different on macOS from those used in Windows and Linux. The table below gives some common substitutions for the instructions in this document. For a detailed list, see the application Help and Appendix A (Keyboard Shortcuts) to this guide.
|
Windows or Linux |
macOS equivalent |
Effect |
|
Tools > Options on Menu bar |
LibreOffice > Preferences on Menu bar |
Access to set up options |
|
Right-click |
Ctrl+click and/or right-click depending on computer setup |
Opens a context menu |
|
Ctrl or Control |
⌘ and/or Cmd or Command, depending on keyboard |
Used with other keys |
|
Alt |
⌥ and/or Alt or Option depending on keyboard |
Used with other keys |
Chapter Getting Started with Macros of the Getting Started Guide is an introduction to the macro facilities that are available in LibreOffice. The current chapter provides further introductory information about the use of macros within a Calc spreadsheet.
A macro is a set of commands or keystrokes that are stored for later use.
An example of a simple macro is one that enters your address into the current cell of an open spreadsheet. You can use macros to automate both simple and complex tasks, and they enable you to introduce new features that are not built into Calc.
The simplest way to create a macro is to record a series of actions through Calc’s user interface. Calc saves recorded macros using the open-source LibreOffice Basic scripting language, which is a dialect of the well-known BASIC programming language. Such macros can be edited and enhanced after recording using the built-in LibreOffice Basic Integrated Development Environment (IDE).
The most powerful macros in Calc are created by writing code using one of the four supported scripting languages (LibreOffice Basic, Python, JavaScript, and BeanShell). This chapter provides an overview of Calc’s macro facilities, mostly focused on its default macro scripting language, LibreOffice Basic. Some examples are included for the Python, JavaScript, and BeanShell scripting languages but fuller descriptions of the facilities for these languages are beyond the scope of this document.
The LibreOffice Basic programming language and the VBA programming language – found in many Microsoft Office documents including Excel spreadsheets – are dialects of the BASIC language. If you want to use macros written in Microsoft Excel using the VBA macro code in LibreOffice, you must first edit the code in the LibreOffice Basic IDE. Some tips for converting Excel macros written in VBA are detailed at the end of this chapter.
Chapter Getting Started With Macros, of the Getting Started Guide includes examples showing how to use the macro recorder and understand the generated LibreOffice Basic scripts.
Note
Use Tools > Options > LibreOffice > Advanced on the Menu bar and select the Enable macro recording (maybe limited) option to enable the macro recorder.
The following steps give a further example, specific to a Calc spreadsheet, without the more detailed explanations of the Getting Started Guide. A macro is created and saved which performs a paste special with multiply operation across a range of spreadsheet cells.
Use File > New > Spreadsheet on the Menu bar to create a new spreadsheet.
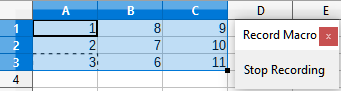
Enter the numbers shown in Figure 1 into cells A1:C3 of Sheet1 in the new spreadsheet.
Figure 1: Enter numbers into cells A1:C3

Select cell A3, which contains the number 3, and use Edit > Copy on the Menu bar to copy the value to the clipboard.
Select all cells in the range A1:C3.
Use Tools > Macros > Record Macro on the Menu bar to start the macro recorder. Calc displays the Record Macro dialog, which includes a Stop Recording button (Figure 2).
Figure 2: Record Macro dialog with Stop Recording button
Use Edit > Paste Special > Paste Special on the Menu bar to open the Paste Special dialog (Figure 3).
Figure 3: Paste Special dialog
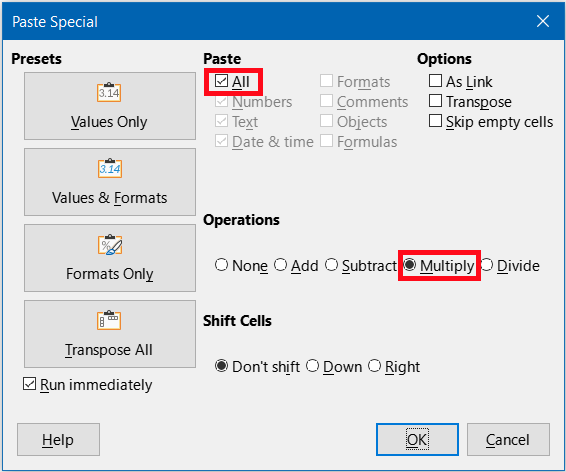
Select the All option in the Paste area and Multiply in the Operations area (both options are highlighted with a red box in Figure 3), and click OK. The values in cells A1:C3 are now multiplied by 3 (Figure 4).
Figure 4: Cells A1:C3 multiplied by 3
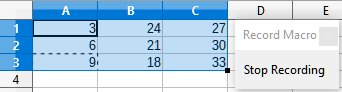
Click the Stop Recording button to stop the macro recorder. Calc displays a variant of the Basic Macros dialog (Figure 5).
Note
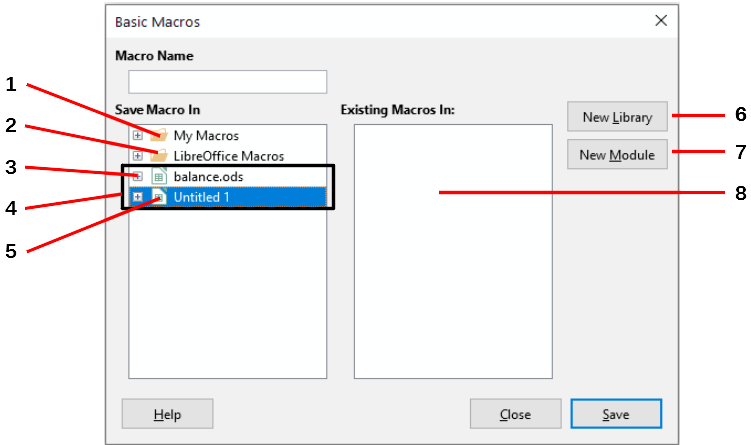
The Save Macro In area of the Basic Macros dialog shows the existing LibreOffice Basic macros, hierarchically structured into library containers, libraries, modules, and macros as described in the Getting Started Guide. Figure 5 shows the My Macros library container, the LibreOffice Macros library container, the library container for the open balance.ods file, and the library container for the untitled file created at step 1). Use the expand/collapse icons to the left of each library container name to view the libraries, modules, and macros within that container.
Figure 5: Parts of the Basic Macros dialog
|
|
Select the entry for the current document in the Save Macro In area. As the current document in this example has not been saved, it is referred to by its default name Untitled 1.
Documents that have been saved include a macro library named Standard. This library is not created until the document is saved, or the library is needed, so at this point in the example procedure your new document does not contain a library. You can create a new library to contain the macro you have just created, but this is not necessary.
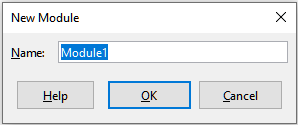
Click the New Module button. Calc displays the New Module dialog (Figure 6). Type a name for the new module or leave the name as the default Module1.
Figure 6: New Module dialog
Note
The libraries, modules, and macro names must follow some strict rules. Following the main rules, the names must:- Comprise lower case letters (a..z), upper case letters (A..Z), digits (0..9), and underscore characters (_)
- Begin with a letter or an underscore
- Not contain any other spaces, punctuation symbols, or special characters (including accents)
Click the OK button to create a new module. As no macro libraries exist in our current document, Calc automatically creates and uses a Standard library.
On the Basic Macros dialog, select the entry for the newly created module in the Save Macro In area, type the text PasteMultiply in the Macro Name box, and click the Save button (Figure 7).
Figure 7: Select the module and name the macro
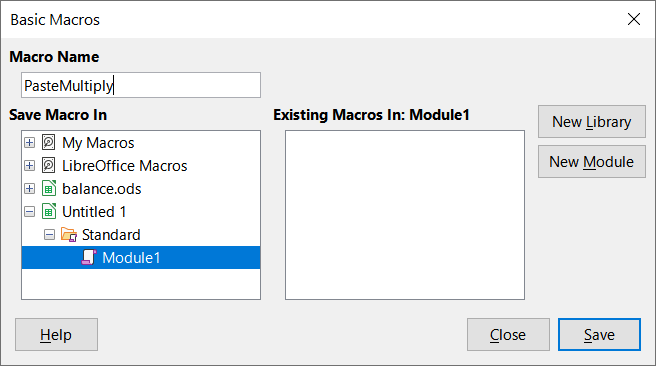
The macro is saved with the name PasteMultiply in the newly created module within the Standard library of the Untitled 1 document. Listing 1 shows the contents of the macro.
Listing 1. Paste special with multiply macro
1|Sub PasteMultiply
2| ' --------------------------------------------------------------
3| ' define variables
4| dim document as object
5| dim dispatcher as object
6| ' --------------------------------------------------------------
7| ' get access to the document
8| document = ThisComponent.CurrentController.Frame
9| dispatcher = createUnoService("com.sun.star.frame.DispatchHelper")
10|
11| ' --------------------------------------------------------------
12| dim args1(5) as new com.sun.star.beans.PropertyValue
13| args1(0).Name = "Flags"
14| args1(0).Value = "A"
15| args1(1).Name = "FormulaCommand"
16| args1(1).Value = 3
17| args1(2).Name = "SkipEmptyCells"
18| args1(2).Value = false
19| args1(3).Name = "Transpose"
20| args1(3).Value = false
21| args1(4).Name = "AsLink"
22| args1(4).Value = false
23| args1(5).Name = "MoveMode"
24| args1(5).Value = 4
25|
26| dispatcher.executeDispatch(document, ".uno:InsertContents", "", 0, args1())
27|
28|End Sub
Note
The component model used in LibreOffice is Universal Network Objects (UNO) and the macro recorder uses the UNO dispatcher for most commands. However, there are two problems associated with this technical approach. One is that the dispatches are not fully documented and may be subject to change. Another is that the recorder ignores some values from dialogs that are opened while recording a macro – it is possible, therefore, that you will record a complicated macro that will not actually execute everything as expected. For more information, search for “macro recording – limitations” in the Help index.
You can write a macro and then call it as you would call a Calc function. Use the following steps to create a simple function macro:
Use File > New > Spreadsheet on the Menu bar to create a new spreadsheet, save it with the name CalcTestMacros.ods, and leave it open in Calc.
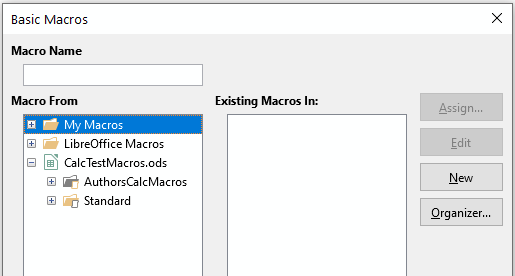
Access Tools > Macros > Organize Macros > Basic on the Menu bar to open the Basic Macros dialog (Figure 8). Note that the layout of the Basic Macros dialog in this circumstance is different from the version that Calc displays when the user clicks the Stop Recording button on the Record Macro dialog (Figure 5).
Figure 8: Basic Macros dialog
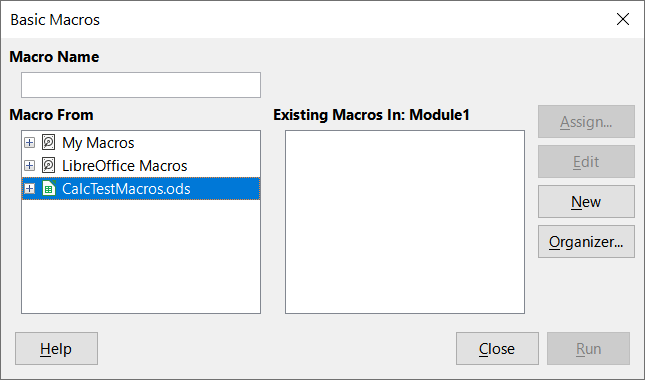
The Macro From area lists the available macro library containers, including those relating to any LibreOffice documents that are currently open. My Macros contains macros that you write or add to LibreOffice and are available to more than one document. LibreOffice Macros contains macros that were included with your LibreOffice installation and should not be changed.
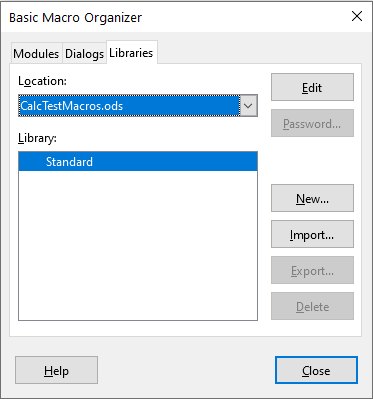
Click Organizer to open the Basic Macro Organizer dialog (Figure 9).
Figure 9: Basic Macro Organizer
Click New to open the New Library dialog to create a new library for this document (Figure 10).
Figure 10: New Library dialog
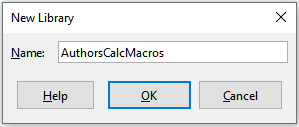
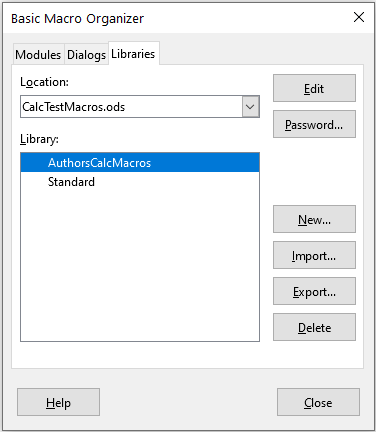
Enter a descriptive library name (such as AuthorsCalcMacros) and click OK to create the library. The Library area of the Basic Macro Organizer dialog updates to include the name of the newly created library (Figure 11). A library name can comprise up to 30 characters. Note that in some cases, the dialog may show only a portion of the name.
Figure 11: The new library is shown in the Library area
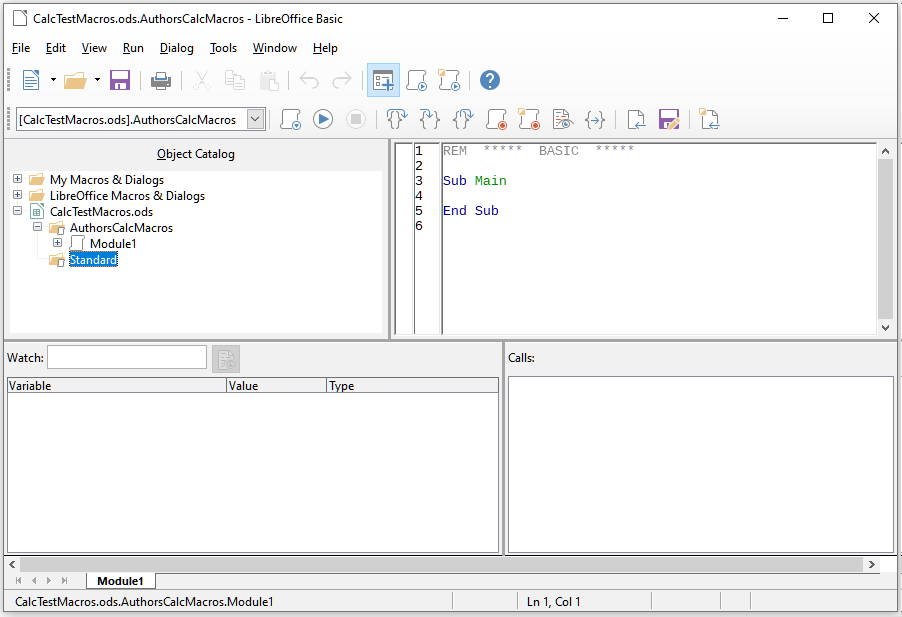
Select the AuthorsCalcMacros entry in the Library area and click Edit to edit the library. Calc automatically creates a module named Module1 and a macro named Main. Calc displays the LibreOffice Basic Integrated Development Environment (IDE), shown in Figure 12.
Figure 12 shows the default configuration for the LibreOffice Basic IDE. This comprises:
A menu bar.
Two toolbars (Macro and Standard). The Macro toolbar provides various icons for editing and testing programs.
The Object Catalog, enabling the selection of the required library container, library, module, and macro.
The Editor Window, in which you can edit the LibreOffice Basic program code. The column on the left side is used to set breakpoints in the program code.
The Watch Window (located at the left, below the Object Catalog and Editor Window) displays the contents of variables or arrays during a single step process.
Figure 12: LibreOffice Basic Integrated Development Environment
The Calls Window (located to the right, below the Object Catalog and Editor Window) provides information about the call stack of procedures and functions when a program runs.
A tab control area.
A status bar.
The LibreOffice Basic IDE provides powerful facilities for the development and debugging of LibreOffice Basic macros. A fuller description of this facility is beyond the scope of this document, but more information can be found in the Help system.
In the Editor Window, modify the code so that it is the same as that shown in Listing 2. The important addition is the creation of the Volume function, which returns the product of 3 cells.
Tip
The Option Explicit statement forces all variables to be declared before they are used. If Option Explicit is omitted, variables are automatically defined at first use as type Variant.
Within the LibreOffice Basic IDE select File > Save on the Menu bar, or click the Save icon on the Standard toolbar, or press Ctrl+S, to save the modified Module1.
Listing 2. Function that returns the volume of a cube.
1|' ***** BASIC *****
2|Option Explicit
3|Sub Main
4|
5|End Sub
6|
1| Function Volume (Height As Double, Width As Double, Depth As Double) As Double
2| Volume = Height * Width * Depth
3| End Function
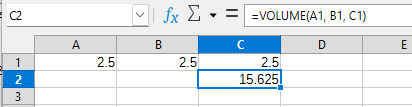
Using your newly created CalcTestMacros.ods spreadsheet, select a cell and enter the formula =Volume(A1, B1, C1) (Figure 13). Calc finds the macro, calls it, and displays the result (15.625) in that cell.
Figure 13: Use the Volume macro as a Calc function
Tip
Function names are not case-sensitive. In Figure 13, the function name was entered as Volume but Calc displays it as VOLUME in the Formula bar.
You should now save the Calc document, close it, and open it again. Depending on your settings in the Macro Security dialog accessed using Tools > Options > LibreOffice > Security > Macro Security on the Menu bar, Calc may display the warning shown in Figure 14.
Figure 14: Warning that a document contains macros
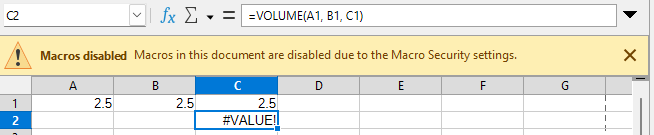
In the case of the warning shown in Figure 14, you must set the macro security level in Tools > Options > LibreOffice > Security > Macro Security to a level that let you execute the macro.
When the document loads with macros disabled, Calc will not be able to find any macro functions and will indicate an error in any affected cell by displaying the text #VALUE? in that cell.
When it opens a spreadsheet, Calc does not open all macro libraries that it can find in the available library containers because this would be a waste of resources. Instead, Calc automatically loads just the Standard library within the My Macros library container and the document’s own Standard library.
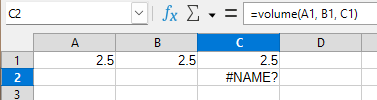
When you re-open your CalcTestMacros.ods spreadsheet, Calc does not contain a function named Volume(), so it checks all visible, loaded macro libraries for the function. Loaded libraries in LibreOffice Macros, My Macros, and the document are checked for an appropriately named function. In our initial implementation, the Volume() function is stored in the AuthorsCalcMacros library, which is not automatically loaded when the document is opened. Hence, the Volume() function is not found, and an error condition appears in the cell where it is called (Figure 15).
Figure 15: The macro function is not available
Use Tools > Macros > Organize Macros > Basic on the Menu bar to open the Basic Macros dialog (Figure 16). The icon for a loaded library (for example, Standard) has a different appearance to the icon for a library that is not loaded (for example, AuthorsCalcMacros).
Click the expand icon next to AuthorsCalcMacros to load the library. The icon changes appearance to indicate that the library is now loaded. Click Close to close the Basic Macros dialog.
Figure 16: Different symbols for loaded and unloaded libraries
Unfortunately, the cell containing =Volume() in our initial implementation is still in error. Calc does not recalculate cells in error unless you edit them or somehow change them. The usual solution is to store macros used as functions in the Standard library. If the macro is large or if there are many macros, a stub with the desired name is stored in the Standard library. The stub macro loads the library containing the implementation and then calls the implementation. The following steps illustrate this method.
Use Tools > Macros > Organize Macros > Basic on the Menu bar to open the Basic Macros dialog. Select the Volume macro and click Edit to open the macro for editing (Figure 17).
Figure 17: Select a macro and click Edit

Calc displays the LibreOffice Basic IDE (Figure 12), with the input cursor in the Editor Window at the line Function Volume (). Change the name of Volume to Volume_Implementation so that the function’s code matches Listing 3.
Listing 3. Change the name of Volume to Volume_Implementation
1| Function Volume_Implementation (Height As Double, Width As Double, Depth As Double) As Double
2| Volume_Implementation = Height * Width * Depth
3| End Function
Click the Select Macro button in the Standard toolbar of the LibreOffice Basic IDE to open the Basic Macros dialog (Figure 17).
Select the Standard library in the CalcTestMacros.ods document and click the New button to create a new module. Enter a meaningful name such as CalcFunctions and click OK. Calc automatically creates a macro named Main and opens the module for editing.
Create a macro in the CalcFunctions module of the Standard library that loads the AuthorsCalcMacros library if it is not already loaded, and then calls the implementation function. See Listing 4.
Listing 4. Create a new Volume function to call the Volume_Implementation function.
1|Function Volume(Height As Double, Width As Double, Depth As Double) As Double
2| If NOT BasicLibraries.isLibraryLoaded("AuthorsCalcMacros") Then
3| BasicLibraries.LoadLibrary("AuthorsCalcMacros")
4| End If
5| Volume = Volume_Implementation(Height, Width, Depth)
6|End Function
Save, close, and reopen the Calc document. This time, if macros are enabled, the Volume() function works as expected.
Arguments passed to a macro from Calc are always values. In other words, values are copied to the macro, and it is not possible to know what cells, if any, are used. For example, =Volume(A1, B1, C1) passes the value of cells A1, B1, C1, and Volume has no way of knowing that cell A1 (or B1 or C1) was used.
If you must know which cells are referenced rather than the values in the cells, pass the range as a string, parse the string, and obtain the values in the referenced cells. See ”Accessing cells directly” below.
Although Calc finds and calls macros as normal functions, they do not really behave as built-in functions. For example, macros do not appear in the function lists. It is possible to write functions that behave as regular functions by writing an Add-In. However, this is an advanced topic that is for experienced programmers and is beyond the scope of this guide. Some information, along with links to more detailed reading, is available in the Help.
Use the following steps to delete an unwanted macro:
Use Tools > Macros > Organize Macros > Basic on the Menu bar to open the Basic Macros dialog (Figure 17).
Select the macro to be deleted and click the Delete button.
Calc displays a confirmation dialog. Click Yes to continue.
Click the Close button to remove the Basic Macros dialog from the screen.
Use the following steps to delete an unwanted module:
Use Tools > Macros > Organize Macros > Basic on the Menu bar to open the Basic Macros dialog (Figure 17).
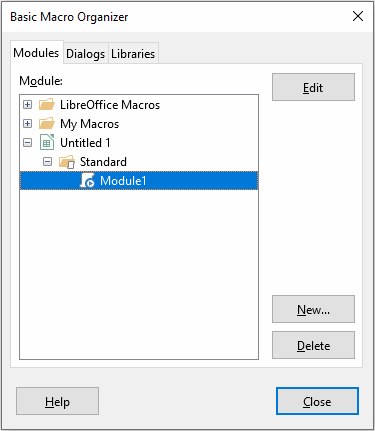
Click the Organizer button to open the Basic Macro Organizer dialog (Figure 18).
Make sure that the Modules tab is selected.
Select the module to be deleted in the Module area.
Click the Delete button.
Calc displays a confirmation dialog. Click Yes to continue.
Click the Close button to remove the Basic Macro Organizer dialog from the screen.
Click the Close button to close the Basic Macros dialog.
Figure 18: Basic Macro Organizer dialog, Modules tab
You can access the LibreOffice internal objects directly to manipulate a Calc document. For example, the macro in Listing 5 adds the values in cell A2 from every sheet in the current document. ThisComponent is automatically set to reference the current document when the macro starts. A Calc document contains sheets and the macro accesses these via a call to ThisComponent.getSheets(). Use getCellByPosition(col, row) to return a cell at a specific row and column.
Listing 5. SumCellsAllSheets adds the values in cell A2 of every sheet.
1|Function SumCellsAllSheets()
2| Dim TheSum As Double
3| Dim i As integer
4| Dim oSheets
5| Dim oSheet
6| Dim oCell
7|
8| TheSum = 0
9| oSheets = ThisComponent.getSheets()
10| For i = 0 To oSheets.getCount() - 1
11| oSheet = oSheets.getByIndex(i)
12| oCell = oSheet.getCellByPosition(0, 1) ' GetCell A2
13| TheSum = TheSum + oCell.getValue()
14| Next
15| SumCellsAllSheets = TheSum
16|End Function
Tip
A cell object supports the methods getValue(), getString(), and getFormula() to get the numerical value, the string value, or the formula used in a cell. Use the corresponding set functions to set appropriate values.
Use oSheet.getCellRangeByName("A2") to return a range of cells by name. If a single cell is referenced, then a cell object is returned. If a cell range is given, then an entire range of cells is returned (see Listing 6). Notice that a cell range returns data as an array of arrays, which is more cumbersome than treating it as an array with two dimensions.
Listing 6. SumCellsAllSheets adds the values in cells A2:C5 of every sheet.
1|Function SumCellsAllSheets()
2| Dim TheSum As Double
3| Dim iRow As Integer, iCol As Integer, i As Integer
4| Dim oSheets, oSheet, oCells
5| Dim oRow(), oRows()
6|
7| TheSum = 0
8| oSheets = ThisComponent.getSheets()
9| For i = 0 To oSheets.getCount() - 1
10| oSheet = oSheets.getByIndex(i)
11| oCells = oSheet.getCellRangeByName("A2:C5")
12|
13| ' The getDataArray() method returns strings and numbers
14| ' but is not used in this function.
15|
16| ' The getData() method returns only numbers and is applicable
17| ' to this function.
18|
19| oRows() = oCells.getData()
20| For iRow = LBound(oRows()) To UBound(oRows())
21| oRow() = oRows(iRow)
22| For iCol = LBound(oRow()) To UBound(oRow())
23| TheSum = TheSum + oRow(iCol)
24| Next
25| Next
26| Next
27| SumCellsAllSheets = TheSum
28|End Function
Tip
When a macro is called as a Calc function, the macro cannot modify any value in the sheet from which the macro was called, except the value of the cell that contains the function.
Many programmers may not be familiar with LibreOffice Basic and so Calc supports macros written in three other languages that may be more familiar. These are BeanShell, JavaScript, and Python.
The primary macro scripting language for Calc is LibreOffice Basic and the standard LibreOffice installation provides a powerful integrated development environment (IDE) together with more options for this language.
Macros are organized in the same way for all four scripting languages. The LibreOffice Macros container holds all the macros that are supplied in the LibreOffice installation. The My Macros library container holds your macros that are available to any of your LibreOffice documents. Each document can also contain your macros that are not available to any other document.
When you use the macro recording facility, Calc creates the macro in LibreOffice Basic. To use the other available scripting languages you must write the code yourself.
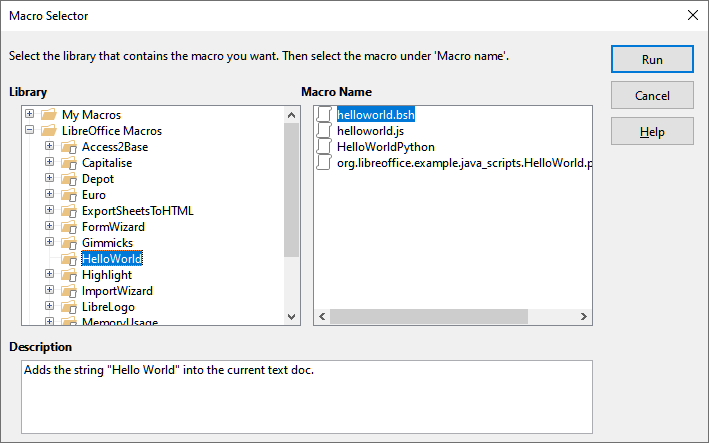
When you select to run a macro using Tools > Macros > Run Macro on the Menu bar, Calc displays the Macro Selector dialog. This dialog enables the selection and running of any available macro, coded in any of the available languages (Figure 19).
When you select to edit a macro using Tools > Macros > Edit Macros on the Menu bar, Calc displays the LibreOffice Basic IDE. This dialog enables selection and editing of any available LibreOffice Basic macro, but not macros in other languages.
The component model used in LibreOffice is known as Universal Network Objects or UNO. LibreOffice macros in any scripting language use a UNO runtime application programming interface (API). The XSCRIPTCONTEXT interface is provided to macro scripts in all four languages and provides a means of access to the various interfaces which they might need to perform some action on a document.
Figure 19: Macro Selector dialog
BeanShell is a Java-like scripting language that was first released in 1999.
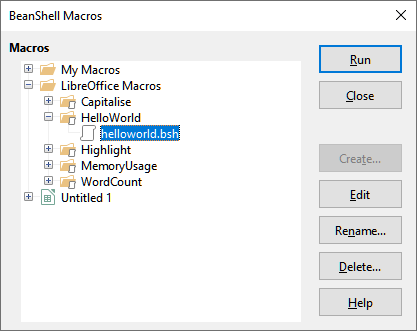
When you select Tools > Macros > Organize Macros > BeanShell on the Menu bar, Calc displays the BeanShell Macros dialog (Figure 20).
Figure 20: BeanShell Macros dialog
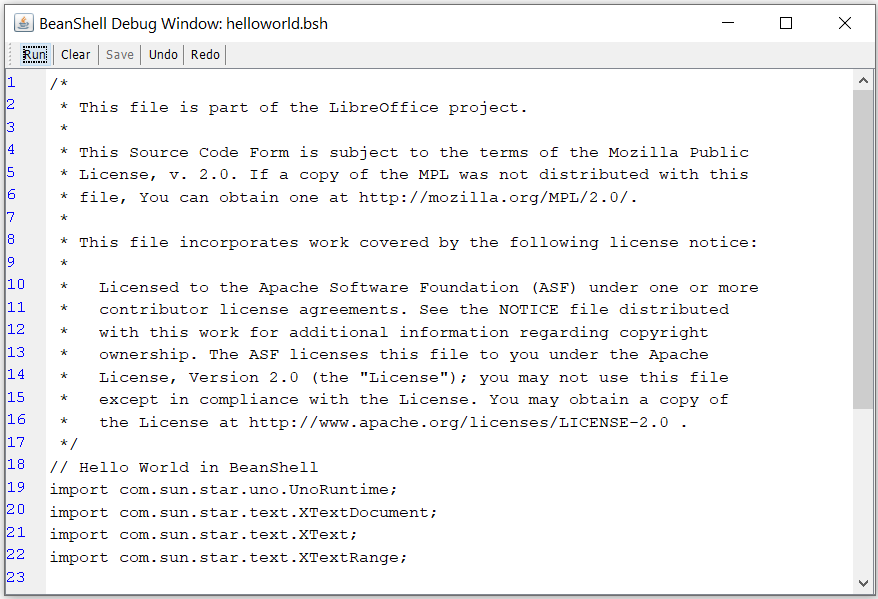
Click the Edit button on the BeanShell Macros dialog to access the BeanShell Debug Window (Figure 21).
Figure 21: BeanShell Debug Window
Listing 7 is an example of a BeanShell macro that inserts the text “Hello World from BeanShell” in cell A1 of the active Calc spreadsheet.
Listing 7. Sample BeanShell macro.
1| import com.sun.star.uno.UnoRuntime;
2| import com.sun.star.sheet.XSpreadsheetView;
3| import com.sun.star.text.XText;
4| model = XSCRIPTCONTEXT.getDocument();
5| controller = model.getCurrentController();
6| view = UnoRuntime.queryInterface(XSpreadsheetView.class, controller);
7| sheet = view.getActiveSheet();
8| cell = sheet.getCellByPosition(0, 0);
9| cellText = UnoRuntime.queryInterface(XText.class, cell);
10| textCursor = cellText.createTextCursor();
11| cellText.insertString(textCursor, "Hello World from BeanShell", true);
12| return 0;
JavaScript is a high-level scripting language that was first released in 1995.
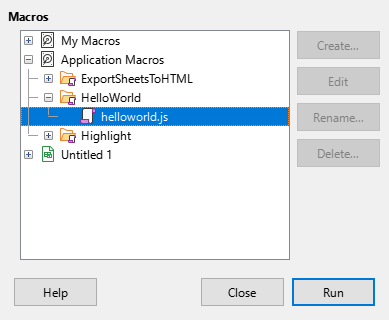
When you select Tools > Macros > Organize Macros > JavaScript on the Menu bar, Calc displays the JavaScript Macros dialog (Figure 22).
Figure 22: JavaScript Macros dialog
Note
You cannot edit JavaScript macros inside LibreOffice. You must edit the macro on an external editor.
Listing 8 is an example of a JavaScript macro that inserts the text “Hello World from JavaScript” in cell A1 of the first sheet in a Calc spreadsheet.
Listing 8. Sample JavaScript macro.
1| importClass(Packages.com.sun.star.uno.UnoRuntime);
2| importClass(Packages.com.sun.star.sheet.XSpreadsheetDocument);
3| importClass(Packages.com.sun.star.container.XIndexAccess);
4| importClass(Packages.com.sun.star.table.XCellRange);
5| importClass(Packages.com.sun.star.table.XCell);
6| documentRef = XSCRIPTCONTEXT.getDocument();
7| spreadsheetInterface = UnoRuntime.queryInterface(XSpreadsheetDocument, documentRef);
8| allSheets = UnoRuntime.queryInterface(XIndexAccess, spreadsheetInterface.getSheets());
9| theSheet = allSheets.getByIndex(0);
10| Cells = UnoRuntime.queryInterface(XCellRange,theSheet);
11| cellA1 = Cells.getCellByPosition(0,0);
12| theCell = UnoRuntime.queryInterface(XCell,cellA1);
13| theCell.setFormula("Hello World from JavaScript");
Python is a high-level, general-purpose programming language that was first released in 1991. In recent years it has grown in popularity and is commonly used by data scientists
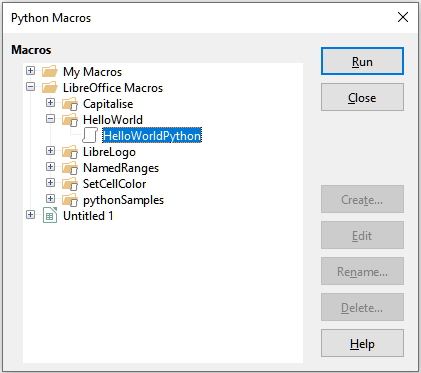
When you select Tools > Macros > Organize Macros > Python on the Menu bar, Calc displays the Python Macros dialog (Figure 23).
Figure 23: Python Macros dialog
Facilities to edit and debug Python scripts are not currently integrated into the standard LibreOffice user interface. However, you can edit Python scripts with your preferred text editor or an external IDE. The Alternative Python Script Organizer (APSO) extension eases the editing of Python scripts, in particular when embedded in a document. Using APSO you can configure your preferred source code editor, start the integrated Python shell and debug Python scripts.
For more information search for “Python macros” in the LibreOffice Help system and visit the Designing & Developing Python Applications section of The Document Foundation’s wiki (https://wiki.documentfoundation.org/Macros/Python_Design_Guide).
Listing 9 is an example of a Python macro that sets cell A1 of the first sheet in a Calc spreadsheet to the text “Hello World from Python”.
Listing 9. Sample Python macro
1|import uno
2|
3|def HelloWorld():
4| doc = XSCRIPTCONTEXT.getDocument()
5| cell = doc.Sheets[0]['A1']
6| cell.setString('Hello World from Python')
7| return
Macro programmers frequently need to perform tasks such as creating and opening files, accessing form controls, reading data from databases embedded in LibreOffice Base documents, and so forth. The objective of the ScriptForge library is to simplify the creation of macros by making it easier to execute such commands without having to learn the required LibreOffice APIs (Application Programming Interfaces) and commands, which may be difficult for casual programmers.
The ScriptForge library supports both LibreOffice Basic and Python. It is organized into a set of services, each of which provides methods and properties related to a specific topic. For example, the Dialog service provides access to dialogs available in script modules and the Database service allows execution of SQL commands in Base documents.
Chapter Getting Started with Macros, of the Getting Started Guide contains additional introductory material about the ScriptForge library and includes a simple example. More detailed information and many examples can be found in the LibreOffice Help system, by searching for the term “ScriptForge” in the index.
LibreOffice has an extensive API (Application Programming Interface) that can be used by macro programmers to automate almost any aspect of its applications. However, one of the main challenges for programmers is to discover UNO (Universal Network Objects) object types as well as their supported services, methods, and properties.
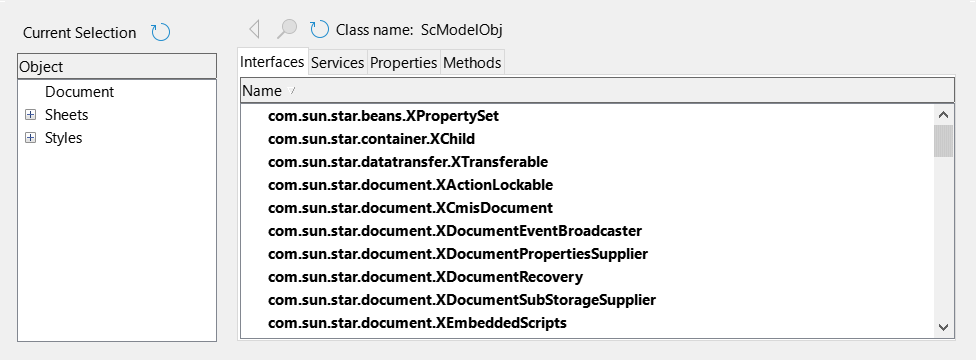
The built-in object inspector can be used to help macro developers inspect objects and discover how they can be accessed and used. To access this tool, go to Tools > Development Tools on the Menu bar and an object inspector window (Figure 24) will be opened. By default, this window is docked at the bottom of the user interface.
The left portion of the window consists of the Document Object Model (DOM) navigator, which allows the user to navigate through all the objects in the document. When an object is selected, the following information about the object is shown on tabs within the right portion of the window:
The names of all implemented interfaces.
The names of all services supported by the object.
The names and types of all properties available in the object.
The names, arguments and return types of all methods that can be called by the object.
Instead of inspecting objects using the DOM navigator, it is possible to directly inspect the currently selected object in the document by toggling the Current Selection button.
Figure 24: Object inspector window
“Getting Started with Macros” in the Getting Started Guide contains additional information about the built-in object inspector. More detailed information and examples can be found in the LibreOffice Help system, by searching for the term “development tools” in the help index.
For the Excel/VBA programmer, LibreOffice Basic is a programming language very similar to VBA. The primary reason that VBA does not work in Calc, even though Calc can read the Excel workbook, is that Calc uses a different mechanism to access the workbook (called spreadsheet in Calc) components, such as cells on the worksheet (called sheet in Calc). Specifically, the objects, attributes, and methods use different names and the corresponding behavior is sometimes slightly different.
To convert VBA code, you must first load the VBA code in LibreOffice.
On the VBA Properties page (Tools > Options > Load/Save > VBA Properties), you can choose whether to keep any macros in Microsoft Office documents that are opened in LibreOffice.
Figure 25: Choosing Load/Save VBA Properties
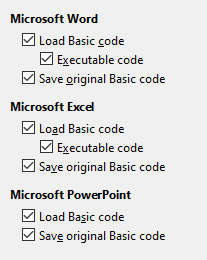
If you choose Load Basic code, you can edit the macros in LibreOffice. The changed code is saved in an ODF document but is not retained if you save it into a Microsoft Office format.
If you choose Save original Basic code, the macros will not work in LibreOffice but are retained unchanged if you save the file into Microsoft Office format.
If you are importing a Microsoft Word or Excel file containing VBA code, you can select the option Executable code. Whereas normally the code is preserved but rendered inactive (if you inspect it with the Basic IDE you will notice that it is all commented), with this option the code is ready to be executed.
Save original Basic code takes precedence over Load Basic code. If both options are selected, and you edit the disabled code in LibreOffice, the original VBA code will be saved when saving in a Microsoft Office format.
To remove any possible macro viruses from the Microsoft Office document, deselect Save original Basic code. The document will be saved without the VBA code.
The Option VBASupport statement specifies that LibreOffice Basic will support some VBA statements, functions, and objects. The statement must be added before the executable program code in a module.
Note
The support for VBA is not complete but covers a large portion of the common usage patterns.
When VBASupport is enabled, LibreOffice Basic function arguments and return values are the same as their VBA counterparts. When the support is disabled, LibreOffice Basic functions may accept arguments and return values different from their VBA counterparts.
Listing 10. Option VBASupport usage.
1|Option VBASupport 1
2|Sub Example
3| Dim sVar As Single
4| sVar = Worksheets("Sheet1").Range("A1")
5| Print sVar
6|End Sub
Without the Option VBASupport statement, the code in Listing 10 must be converted to the LibreOffice Basic of Listing 11.
Listing 11. Converted VBA code.
1|Sub Example
2| Dim sVar As Single
3| Dim oSheet as Object
4| Dim oCell as Object
5| ' Worksheets(“Sheet1”).
6| oSheet = ThisComponent.getSheets().getByIndex(0)
7| ' Range("A1")
8| oCell = oSheet.getCellByPosition(0, 0)
9| sVar = oCell.getValue()
10| Print sVar
11|End Sub
Option VBASupport may affect or assist in the following situations:
Allow special characters as identifiers. All characters that are defined as letters in the Latin-1 (ISO 8859-1) character set, are accepted as part of identifiers. For example, variables with accented characters in their names.
Create VBA constants including non-printable characters (vbCrLf, vbNewLine,...).
Support Private/Public keywords for procedures.
Compulsory Set statement for objects.
Default values for optional parameters in procedures.
Named arguments when multiple optional parameters exist.
Preload of LibreOffice Basic libraries.
UserForms (Dialogs) appear frequently in macros that demand your interaction and parameter selections. The code snippet below is a recipe for such conversions, which are not handled automatically by VBA options.
Listing 12. VBA display of a UserForm [Dialog] called “MyForm”,
1|Sub MyProc
2| MyForm.Show
3|End Sub
Listing 13. LibreOffice Basic display of a UserForm [Dialog] called “MyForm”
' oDlg should be visible at the module level
1|Dim oDlg As Object
2|Sub MyProc
3| DialogLibraries.LoadLibrary("Standard")
4| oDlg = CreateUnoDialog(DialogLibraries.Standard.MyForm)
5| oDlg.execute()
6|End Sub
Note
The oDlg variable is visible at the module level to all other procedures that are accessing controls on the dialog. This means all the procedures manipulating or accessing controls on this dialog panel are housed in a single module.
This chapter provides an overview of how to create libraries and modules, using the macro recorder, using macros as Calc functions, writing your own macros without the macro recorder, and converting VBA to LibreOffice Basic. Each topic deserves at least one chapter, and writing your own macros for Calc could easily fill an entire book. In other words, this is just the beginning of what you can learn.
If you are already familiar with the BASIC language (or with one programming language), the LibreOffice Extensions website (https://extensions.libreoffice.org) has a set of LibreOffice Basic quick reference cards. These can be located quickly by selecting the Documentation and Macro tag filters.
Additional detail about Calc’s macro facilities can be obtained from the LibreOffice Help system (search for “macros” in the index for general information, or search for “VBA Support” to find some specific VBA Support information), The Document Foundation’s wiki pages (https://wiki.documentfoundation.org/Macros) and other Internet sources (for example the https://ask.libreoffice.org/ Q&A site).