Calc Guide 7.2
Chapter 14
Setting up and Customizing
This document is Copyright © 2021 by the LibreOffice Documentation Team. Contributors are listed below. You may distribute it and/or modify it under the terms of either the GNU General Public License (https://www.gnu.org/licenses/gpl.html), version 3 or later, or the Creative Commons Attribution License (https://creativecommons.org/licenses/by/4.0/), version 4.0 or later.
All trademarks within this guide belong to their legitimate owners.
|
Steve Fanning |
Kees Kriek |
|
|
Barbara Duprey |
Jean Hollis Weber |
Simon Brydon |
|
Mark Morin |
Kees Kriek |
Steve Fanning |
|
Leo Moons |
Felipe Viggiano |
|
Please direct any comments or suggestions about this document to the Documentation Team’s mailing list: documentation@global.libreoffice.org.
Note
Everything you send to a mailing list, including your email address and any other personal information that is written in the message, is publicly archived and cannot be deleted.
Published November 2021. Based on LibreOffice 7.2 Community.
Other versions of LibreOffice may differ in appearance and functionality.
Some keystrokes and menu items are different on macOS from those used in Windows and Linux. The table below gives some common substitutions for the instructions in this document. For a more detailed list, see the application Help and Appendix A (Keyboard Shortcuts) to this guide.
|
Windows or Linux |
macOS equivalent |
Effect |
|
Tools > Options menu selection |
LibreOffice > Preferences |
Access setup options |
|
Right-click |
Control+click and/or right-click depending on computer setup |
Open a context menu |
|
Ctrl (Control) |
⌘ (Command) |
Used with other keys |
|
F11 |
⌘+T |
Open the Styles deck in the Sidebar |
This chapter presents some of the setup options found under Tools > Options on the Menu bar (LibreOffice > Preferences on macOS). Additional options, and more details about those given here, are covered in the Help and in Chapters 2 (Setting up LibreOffice) and 14 (Customizing LibreOffice) in the Getting Started Guide.
This chapter also describes some common customizations to menus, toolbars, and keyboard shortcuts. Other customizations are made easy by extensions that you can install from the LibreOffice website or from other providers.
This section covers some of the settings that apply to all the components of LibreOffice and are of particular interest to users of Calc.
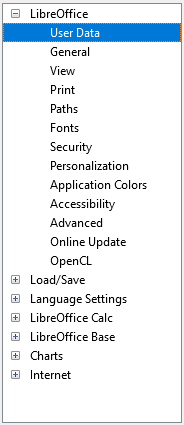
1) Choose Tools > Options to open the Options dialog. The list on the left-hand side varies depending on which LibreOffice component is open. The illustrations in this chapter show the list as it appears when Calc is open.
2) Click the expansion symbol (+ or triangle) next to LibreOffice. A list of subsections drops down.
Figure 1: LibreOffice options
Note
The Reset button, located in the lower right of the full Options dialog, has the same effect on all pages of the dialog. It resets the options to the values that were in place when you opened the dialog.
User data is used by templates and wizards in LibreOffice. For example, Calc uses the first and last name stored here to fill in the Created and Modified fields in the document properties. These fields may also be used in the footer of a printed spreadsheet or as the name associated with comments. If you want your name to appear, then fill in the form on the LibreOffice – User Data page.
The options on the LibreOffice – View page affect how the document window looks and behaves, including the size and style of toolbar and Sidebar icons. Set these options to suit your personal preferences.
On the LibreOffice – Print page, you can set the print options to suit your default printer and your most common printing method. You can change these settings at any time, either through this dialog or during the printing process (through the Print dialog).
Calc-specific print options are described in “Print options” below.
See Chapter 6, Printing, Exporting, Emailing, and Signing, for more about these options.
On the LibreOffice – Paths page, you can change the location of files associated with, or used by, LibreOffice to suit your needs. For example, you might want to store spreadsheets by default on a shared server. Some items can have at least two paths listed: one to a shared folder (which might be on a network) and one to a user-specific folder (normally on the user’s personal computer).
Use the LibreOffice – Security page to choose security options for saving documents and for opening documents that contain macros.
Figure 2: Choosing security options for opening and saving documents
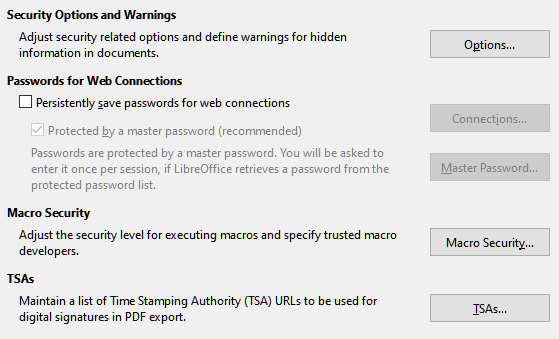
Security Options and Warnings
Passwords for Web Connections
Macro Security
Certificate Path
Note
The Certificate Path option appears only on Linux and macOS systems. On Windows, LibreOffice uses the default Windows location for storing and retrieving certificates.
TSAs –Time Stamping Authorities
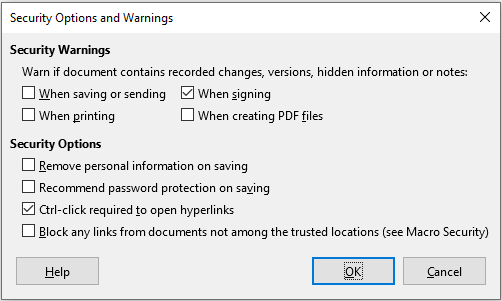
The following options are on the Security Options and Warnings dialog (Figure 3).
Remove personal information on saving
Ctrl-click required to open hyperlinks
The other options on this dialog should be self-explanatory.
Figure 3: Security Options and Warnings dialog
On the LibreOffice – Application Colors page (Figure 4), you can specify which user interface elements are visible and the colors used to display them. Scroll down the list until you find the section headed Spreadsheet. To change the default color for Grid lines or other on-screen indicators, click the down-arrow by the color and select a new color in the drop-down list.
Figure 4: Changing the color of elements in Calc
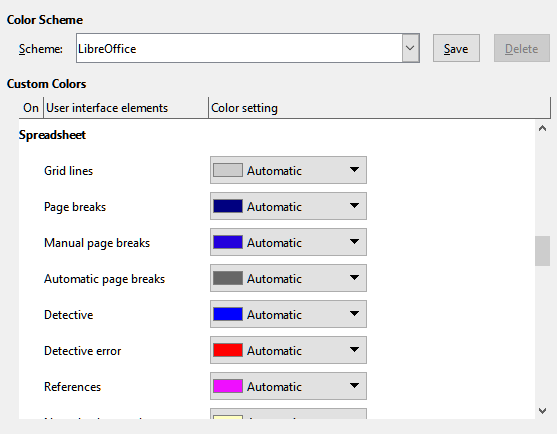
If you wish to save your color changes as a color scheme, click Save, type a name in the Name of color scheme box in the pop-up dialog, and then click OK.
LibreOffice is supplied with a default color scheme (entitled “LibreOffice”) and an alternative preset color scheme (entitled “LibreOffice Dark”). The latter may be preferable in some working environments where a reduction in the amount of bright white light on the screen could be beneficial. Use the Scheme drop-down menu to select one of these schemes, or some alternative scheme that you have already created and saved. As you make selections in this menu, the Custom Colors area on the dialog is updated to show the settings for the chosen scheme and the underlying Calc window is also updated accordingly – if you subsequently press the Cancel button, the previously selected color scheme is re-applied.
Two items of interest on this page are found under Optional Features:
Enable experimental features (may be unstable)
Enable macro recording (may be limited)
You can set the Load/Save options to suit the way you work. This chapter describes only a few of the options, those most relevant to working with Calc. See Chapter 2, Setting up LibreOffice, in the Getting Started Guide for a description of the other options.
If the Options dialog is not already open, click Tools > Options on the Menu bar. Click the expansion symbol (+ or triangle) by Load/Save on the left-hand side to display the list of load/save options pages.
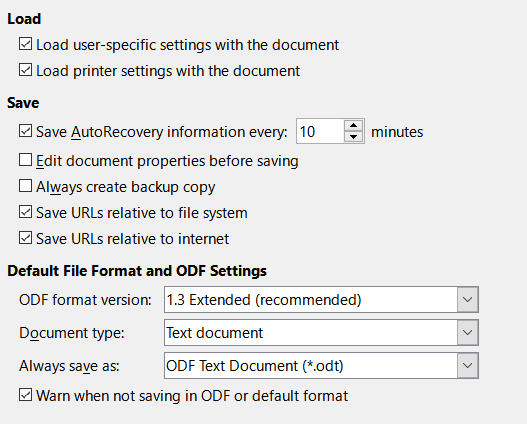
Many of the choices on the Load/Save – General page (Figure 5) are familiar to users of other office suites. Those of most interest to Calc users are in the Default File Format and ODF Settings section.
Default File Format and ODF Settings
Figure 5: Choosing Load and Save general options
On the Load/Save – VBA Properties page (Figure 6), you can choose whether to keep any VBA (Visual Basic for Applications) macros in Microsoft Office documents that are opened in LibreOffice.
Figure 6: Choosing Load/Save VBA Properties
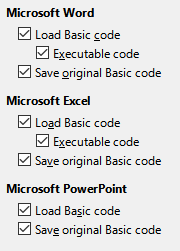
If you choose Load Basic code, you can edit the macros in LibreOffice. The changed code is saved in an ODF document but is not retained if you save into a Microsoft Office format.
If you choose Save original Basic code, the macros will not work in LibreOffice but are retained unchanged if you save the file into Microsoft Office format.
If you are importing a Microsoft Word or Excel file containing VBA code, you can select the option Executable code. Whereas normally the code is preserved but rendered inactive (if you inspect it with the LibreOffice Basic IDE you will notice that it is all commented), with this option the code is ready to be executed.
Save original Basic code takes precedence over Load Basic code. If both options are selected and you edit the disabled code in LibreOffice, the original Microsoft Basic code will be saved when saving in a Microsoft Office format.
To remove any possible macro viruses from the Microsoft Office document, deselect Save original Basic code. The document will be saved without the Microsoft Basic code.
On the Load/Save – Microsoft Office page (Figure 7), you can choose what to do when importing or exporting Microsoft Office OLE objects (linked or embedded objects or documents such as spreadsheets or equations): convert them into or from the corresponding LibreOffice OLE object or load and save them in their original format.
Select the [L] options to convert Microsoft OLE objects into the corresponding LibreOffice OLE objects when a Microsoft document is loaded into LibreOffice.
Select the [S] options to convert LibreOffice OLE objects into the corresponding Microsoft OLE objects when a document is saved in a Microsoft format.
Figure 7: Choosing Load/Save Microsoft Office options
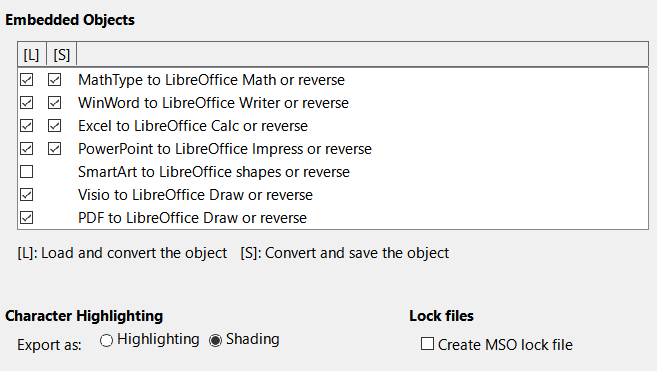
The Character Highlighting options enable you to select between the two text highlighting (character background) attributes that Microsoft Office provides, Highlighting or Shading. Shading is the initial default.
The Create MSO lock file option improves interoperability with Microsoft Office for shared spreadsheets. When enabled, Calc writes two lock files when opening a Microsoft Office format file, one LibreOffice lock file and one Microsoft Office lock file. This enables users of both suites to be made aware that the file is in use. The option is initially disabled by default.
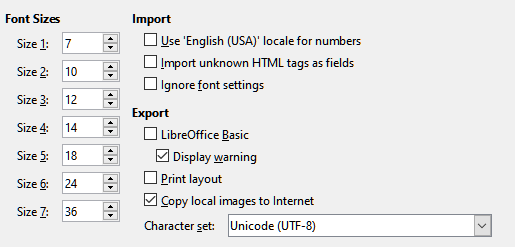
Choices made on the Load/Save – HTML Compatibility page (Figure 8) affect how LibreOffice imports or exports HTML pages. See Chapter 2, Setting up LibreOffice, in the Getting Started Guide, and “HTML documents importing/exporting” in the Help, for more information.
The main items of interest for Calc users are in the Export section.
LibreOffice Basic
Display warning
Print layout
Copy local images to Internet
Character set
Figure 8: Choosing HTML compatibility options
Calc must be open in order for the LibreOffice Calc options to be displayed in the Options dialog. Click the expansion symbol (+ or triangle) by LibreOffice Calc. A list of subsections drops down (Figure 9).
The choices on the LibreOffice Calc – General page (Figure 10) affect the units used for rulers and other measurements, the default tab stop positions, the updating of links and fields, and various input settings.
Metrics section
Update links when opening section
Figure 9: Calc options
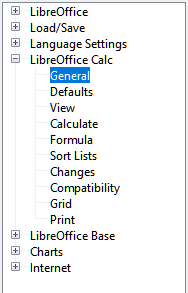
Figure 10: Selecting general options for Calc
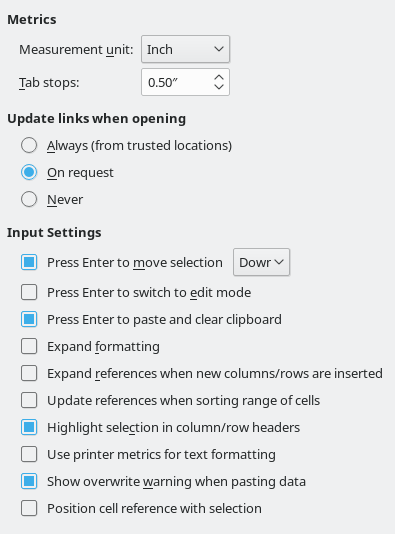
Press Enter to move selection
Press Enter to switch to edit mode
Press Enter to paste and clear clipboard
Expand formatting
Expand references when new columns/rows are inserted
Update references when sorting range of cells
Highlight selection in column/row headers
Use printer metrics for text formatting
Show overwrite warning when pasting data
Position cell reference with selection
On the LibreOffice Calc – Defaults page you can enter the number of sheets to be opened by default when you start a new spreadsheet, and either accept the default sheet prefix or type a new one. After a spreadsheet has been created, you can add new sheets and change the label of any tab; see Chapter 1, Introduction, for more information.
The options on the LibreOffice Calc – View page (Figure 11) affect the way the document window looks and behaves when viewed onscreen.
Display section
Select various options for the display.
Formulas
Zero values
Comment indicator
Figure 11: Selecting view options for Calc
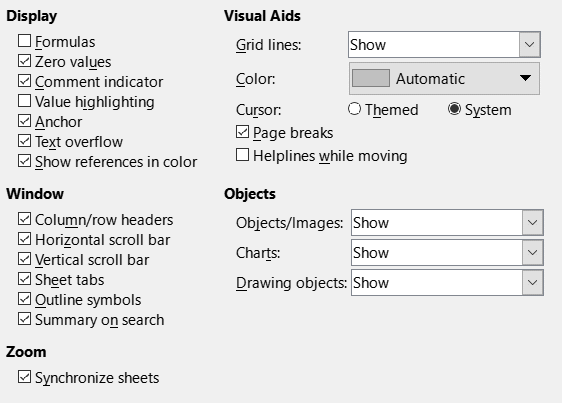
Value highlighting
Anchor
Text overflow
Show references in color
Figure 12: Formula references – visual aids

Grid lines
Note
To print grid lines, choose Format > Page Style > Sheet > Print > Grid.
Page breaks
Helplines while moving
Objects section
Figure 13: Helplines visible when moving a graphic
Use the LibreOffice Calc – Calculate page (Figure 14) to define the calculation settings for spreadsheets.
Figure 14: Calc calculation options
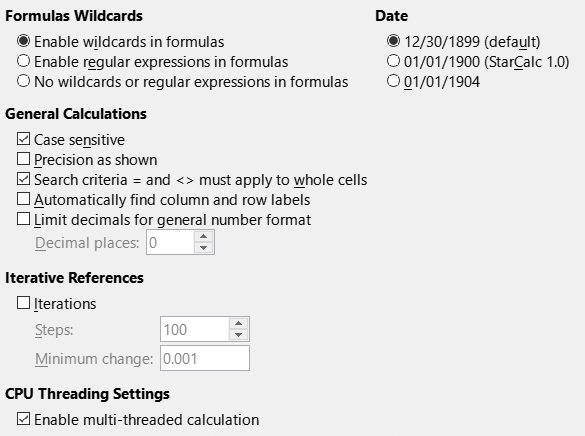
Formulas Wildcards section
Enable wildcards in formulas
Enable regular expressions in formulas
No wildcards or regular expressions in formulas
The options listed above are mutually exclusive. For more information about them, see Chapter 7, Using Formulas and Functions.
Date section
General Calculations section
Case sensitive
Precision as shown
Search criteria = and <> must apply to whole cells
Automatically find column and row labels
Limit decimals for general number format
Iterative References section
Iterations
Steps
Minimum change
CPU Threading Settings section
Enable multi-threaded calculation
Caution
When calculations involve a range that includes an empty cell, take note of the setting for Zero values in the LibreOffice Calc > View options. If this option is not selected, a value of zero will display as an empty cell. Empty cells and the value zero are treated differently by many functions. For example, COUNT will not include an empty cell as an item to be counted. The average of eight cells, one of which contains the value zero, is not the same as the average of eight cells, one of which is empty (an empty cell is not included in determining the average).
Use the LibreOffice Calc – Formula page (Figure 15) to specify the following formula options.
Formula syntax
Figure 15: Formula options
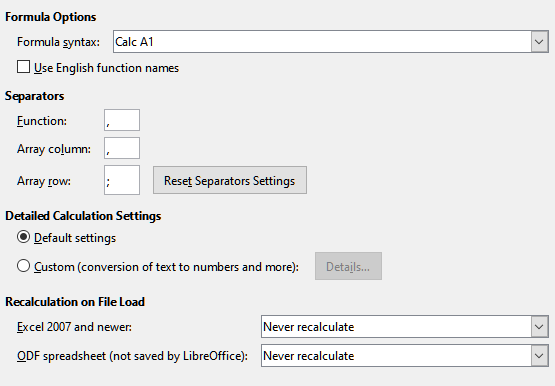
Use English function names
Separators
Detailed Calculation Settings
Recalculation on File Load
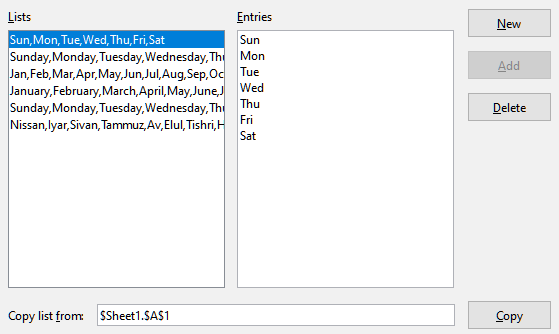
View, define, delete, and edit sort lists on the LibreOffice Calc – Sort Lists page. Sort lists are used for more than sorting, for example filling a series of cells during data entry. They are lists that are sorted in a particular order but not alphabetically or numerically; for example, days of the week. In addition to the supplied lists, you can define and edit your own lists, as described in Chapter 2, Entering, Editing, and Formatting Data.
Figure 16: Defining sort lists in Calc
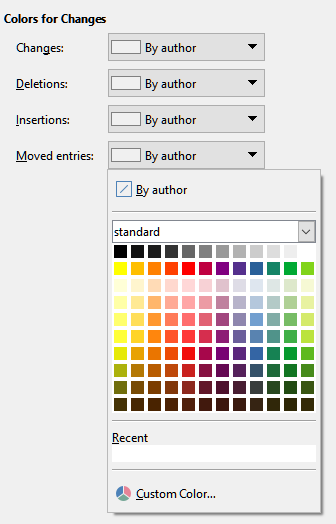
On the LibreOffice Calc – Changes page you can assign specific colors for insertions, deletions, and other changes, or you can let Calc assign colors based on the author of the change; in the latter case, one color will apply to all changes made by that author. The selections made here are applied when change recording is enabled by Edit > Track Changes > Record on the Menu bar.
Figure 17: Calc options for highlighting changes
The LibreOffice Calc – Compatibility page provides a quick way to switch between LibreOffice’s default key bindings and OpenOffice.org’s legacy default key bindings for Calc. Most of the defaults are identical, but there are some differences.
The actions associated with the two key binding choices are shown in the table below.
|
Key Binding |
Default |
OpenOffice.org legacy |
|
Backspace |
Opens Delete Contents dialog |
Immediately deletes contents |
|
Delete |
Immediately deletes contents |
Opens Delete Contents dialog |
|
Control+D |
Fills cell content down within selection |
Opens the Selection List dialog |
|
Alt+DownArrow |
Select header of range; |
Increases row height |
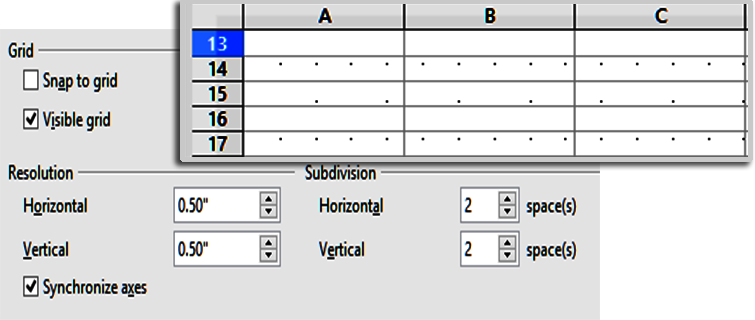
The LibreOffice Calc – Grid page defines the grid settings for spreadsheets. Using a grid helps you determine the exact position of any charts or other objects you may add to a spreadsheet. You can also set this grid in line with the snap grid.
If you have activated the snap grid but wish to move or create individual objects without snap positions, you can press the Ctrl key to deactivate the snap grid for as long as needed.
Resolution and Subdivision sections
Figure 18: Calc grid options
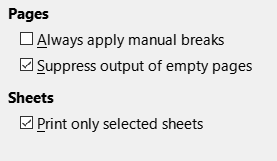
Use the LibreOffice Calc – Print page to choose defaults for printing spreadsheets. You can override these for individual print jobs.
Figure 19: Calc Print options
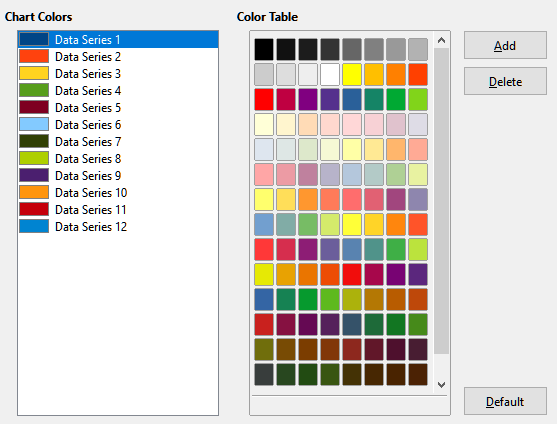
Use Tools > Options > Charts > Default Colors to change the default colors used for charts or to add new data series to the list provided.
To add new colors to the choices, see “Adding custom colors” below.
To change the default color for a data series, select it in the left-hand column and then click on the required color in the color table.
To add another data series, click Add, then select the new series and click on the required color.
Click Default to restore the color settings that were defined when the program was installed.
Figure 20: Defining chart colors
You can customize menus, toolbars, keyboard shortcuts, and the tabbed interface; add new menus and toolbars; and assign macros to events.
Tip
Changes to menus and toolbars can be saved in a template. First, save them in a document; then, save that document as a template, as described in Chapter 4, Using Styles and Templates.
You can add and rearrange menus on the Menu bar or context (right-click) menus; add, rearrange, and remove commands on menus; and make other changes.
To customize menus, choose Tools > Customize on the Menu bar. On the Customize dialog, go to the Menus tab (Figure 21) or the Context Menus tab. The following examples focus on the Menus tab but the Context Menus tab is similar in appearance and behavior.
Figure 21: The Menus tab of the Customize dialog
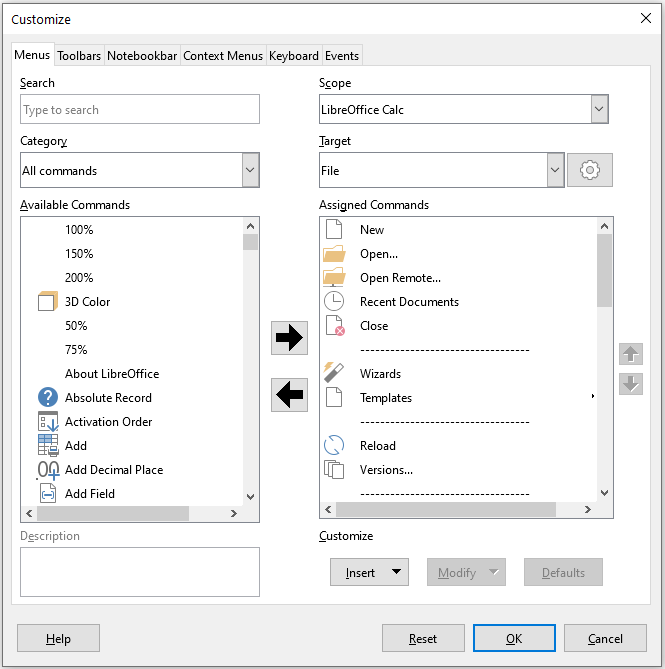
1) In the Scope drop-down list in the upper right of the Customize dialog, choose whether to save this changed menu for Calc or for a selected document.
2) In the Target drop-down list, select the menu that you want to customize. The list includes all the sub-menus as well as the main menus. The commands on the selected menu are shown in the Assigned Commands list below.
3) To add a command to the selected menu, click on a command in the Available Commands list and then click the right arrow. You can narrow the search by using the Search box on the top left or selecting the Category in the drop-down list. Use the up and down arrows on the far right-hand side to move the command into the place where you want it in the Assigned Commands list.
4) To remove a command from the selected menu, click on it in the Assigned Commands list and then click the left arrow.
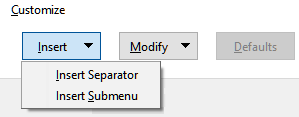
5) To insert a separator or submenu, use the commands in the Insert drop-down under Customize at the bottom right.
Figure 22: Customize dialog, Menus tab, Insert drop-down
6) To rename a menu item, select it in the Assigned Commands list and choose Rename in the Modify drop-down below.
Figure 23: Customize dialog, Menus tab, Modify drop-down

7) Use the Reset button to reset Calc’s menu configuration to the default settings.
8) When you have finished making all your changes, click OK to save them.
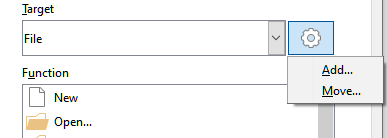
1) On the Menus tab of the Customize dialog, click the button next to the Target field (Figure 24) and select Add in the drop-down list, to display the New Menu dialog (Figure 25).
Figure 24: Location of command to add a new menu
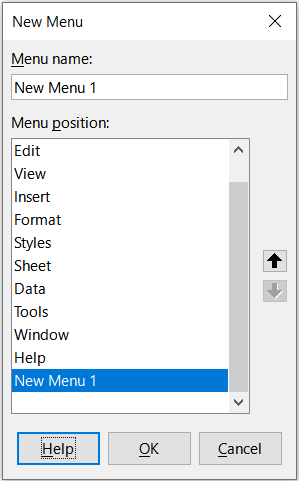
2) In the New Menu dialog, type a name for the new menu in the Menu name box.
3) Use the up and down arrow buttons to move the new menu into the required position on the Menu bar. Click OK to save and return to the Customize dialog.
The new menu now appears on the list of menus in the Customize dialog. It will appear on the Menu bar itself after you save your customizations.
After creating a new menu, you need to add some commands to it, as described above for modifying a menu.
Figure 25: Adding a new menu
You can allocate a letter in a custom menu’s name to be used as a keyboard shortcut. (That letter will become underlined.) When you press Alt+that letter, that menu or command will be invoked. Existing submenus can also be edited to change the letter which is used to select them using the keyboard when the menu is open.
To create an accelerator:
1) On the Customize dialog, select a menu item in the Assigned Commands list.
2) Click the Modify button and select Rename.
3) Add a tilde (~) in front of the letter to use as an accelerator.
4) Click OK to save the change.
For example. if you enter “~Art”, the “A” in the menu item Art is now underlined. Press Alt+A and the Art menu will open.
Caution
When assigning an accelerator, be careful not to use a letter that is already assigned to a menu or command associated with a menu item. The same letter-key combinations can be used for commands associated with different menu items but not for those associated with the same menu or menu item.
You can customize toolbars in several ways, including choosing which icons are visible and locking the position of a docked toolbar, as described in Chapter 1, Introducing LibreOffice, of the Getting Started Guide. This section describes how to create new toolbars and add or delete icons (commands) on a toolbar.
To get to the toolbar customization dialog (Figure 26), do any of the following:
On the toolbar, right-click in the toolbar and choose Customize Toolbar.
Choose View > Toolbars > Customize on the Menu bar and go to the Toolbars tab.
Choose Tools > Customize on the Menu bar and go to the Toolbars tab.
Figure 26: The Toolbars tab of the Customize dialog
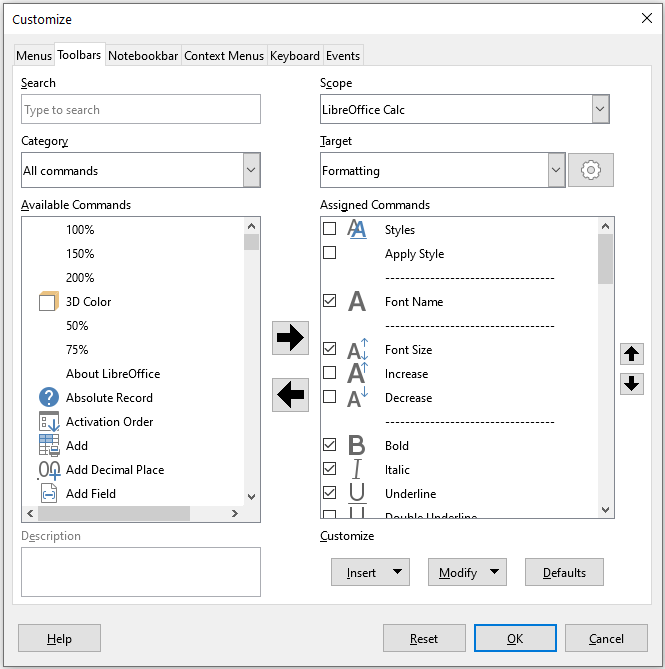
To customize a toolbar:
1) In the Scope drop-down list on the upper right of the Customize dialog, choose whether to save this changed toolbar for Calc or for a selected document.
2) In the Target drop-down list, select the toolbar that you want to customize. The current toolbar content is displayed in the Assigned Commands list.
3) Select the command to be added in the Available Commands list. You can narrow your search by using the Search box on the top left or choosing a category in the drop-down list just below.
4) Click on the large right arrow to add the command to the Assigned Commands list for the toolbar. Use the up and down arrows in the far right to position the command in the toolbar.
5) To remove a command from a toolbar, select it in the Assigned Commands list and click the large left arrow.
6) To show or hide a command assigned to a toolbar, mark or clear the checkbox next to its icon in the Assigned Commands list.
7) To insert a separator, use the command in the Insert drop-down under Customize at the bottom right.
8) To rename a toolbar item, select it in the Assigned Commands list and choose Rename in the Modify drop-down.
9) Use the Reset button to reset Calc’s toolbar configuration to the default settings.
10) When you have finished making all your changes, click OK to save them.
To create a new toolbar:
1) Choose Tools > Customize on the Menu bar.
2) On the Toolbars tab of the Customize dialog, click the button next to the Target field and select Add in the drop-down list, to display the Name dialog.
3) On the Name dialog, type the new toolbar's name and choose in the Save In drop-down list where to save this new toolbar – for Calc or for the open document.
The new toolbar now appears on the list of toolbars in the Customize dialog.
To add commands to the new toolbar, follow the instructions earlier for modifying a toolbar.
Toolbar buttons can be displayed with Icon only, Text only, or Icon and text. This selection is made through the menu that drops down from the button to the right of the Target field. However, not all of the commands have associated icons.
To choose an icon for a command, select the command and click Modify > Change Icon. On the Change Icon dialog (Figure 27), scroll through the available icons, select one, and click OK to assign it to the command.
Figure 27: Change Icon dialog
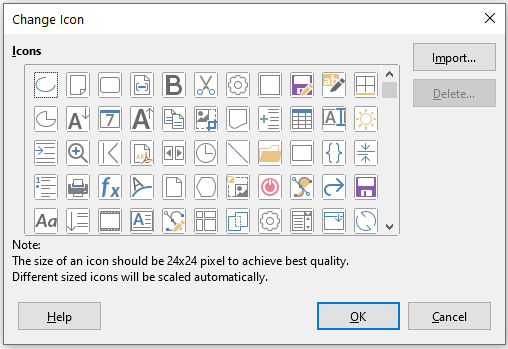
To use a custom icon, create it in a graphics program and import it into LibreOffice by clicking the Import button on the Change Icon dialog. For best quality, custom icons should be 24 x 24 pixels in size; other sizes will be scaled automatically.
Select Modify > Reset Icon to revert to the option’s default icon.
By default, Calc’s commands are grouped in cascading menus and in toolbars filled with icons. In addition, LibreOffice provides other user interface variants, displaying contextual groups of commands and contents. You can find more information about these variants and how to switch between them in Chapter 15, User Interface Variants.
Three of LibreOffice’s user interface variants utilize a notebook bar and these are the Tabbed, Tabbed Compact, and Groupedbar Compact options. In these variants, the area at the top of the workspace is divided into tabs, where each tab displays a set of icons grouped by context. The context can change depending on the object selected in the document, for example a table or an image.
Use the checkboxes on the Notebookbar tab of the Customize dialog (Figure 28) to show and hide the individual options on the various tabs that are provided in the most recently selected of the three tabbed user interfaces (with Tabbed being the initial default).
Figure 28: The Notebookbar tab of the Customize dialog
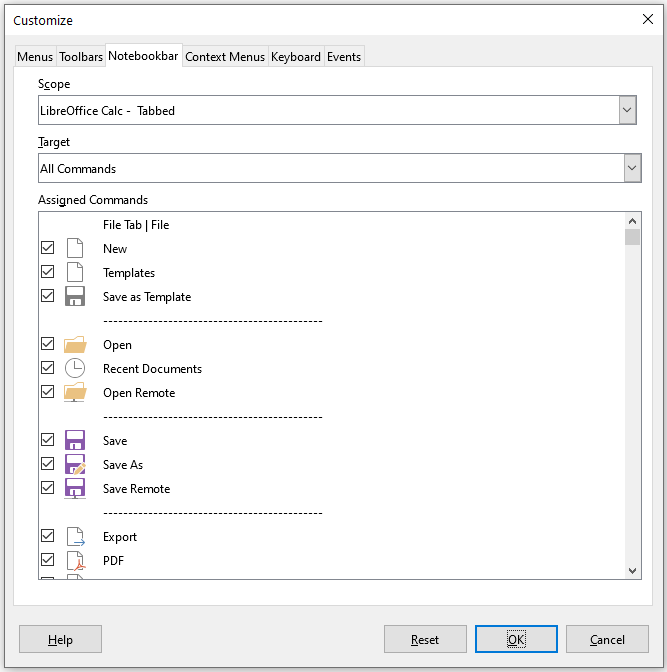
Use the Reset button to reset the displayed configuration to the default settings.
In addition to using the built-in keyboard shortcuts (listed in Appendix A), you can define your own. You can assign shortcuts to standard LibreOffice functions or your own macros and save them for use with the entire LibreOffice suite or only for Calc.
Caution
Avoid reassigning your operating system’s predefined shortcut keys.
Note
Shortcut keys that are grayed out in the listing on the Customize dialog, such as F1 and F10, are not available for reassignment.
To adapt shortcut keys to your needs, use the Customize dialog, as described below.
1) Select Tools > Customize on the Menu bar and select the Keyboard tab. (Figure 29).
Figure 29: Customizing a keyboard shortcut
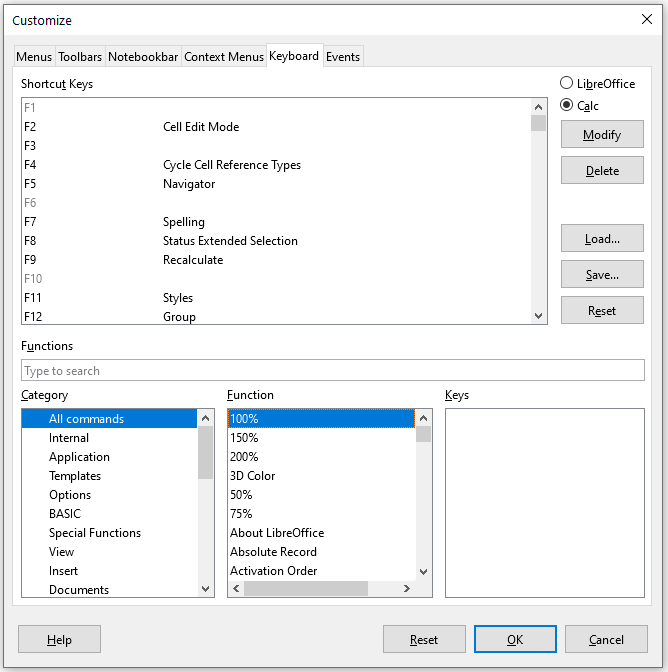
2) To have the shortcut key assignment available only with Calc, select Calc in the upper right corner of the page; otherwise select LibreOffice to make it available to every component.
3) Next select the required function in the Category and Function lists.
4) Now select the desired shortcut keys in the Shortcut Keys list and click the Modify button at the upper right.
5) Click OK to accept the change. Now the chosen shortcut keys will execute the function chosen in step ) above whenever they are pressed.
Note
All existing shortcut keys for the currently selected Function are listed in the Keys selection box. If the Keys list is empty, it indicates that the chosen key combination is free for use. If it were not, and you wanted to reassign a shortcut key combination that is already in use, you must first delete the existing key.
Changes to the shortcut key assignments can be saved in a keyboard configuration file for use at a later time, thus permitting you to create and apply different configurations as the need arises, or to create a standard keyboard configuration file to be distributed among many users. To save keyboard shortcuts to a file:
1) After making your keyboard shortcut assignments, click the Save button on the right of the Customize dialog (Figure 29).
2) In the Save Keyboard Configuration dialog, enter a name for the keyboard configuration file in the File name box, or select an existing file (the file extension is .cfg for Configuration).
3) Click Save. A confirmation dialog appears if you are about to overwrite an existing file, otherwise there will be no feedback and the file will be saved.
To load a saved keyboard configuration file and replace your existing configuration, click the Load button on the right of the Customize dialog, and then select the configuration file from the Load Keyboard Configuration dialog.
To reset all of the keyboard shortcuts to their default values, click the Reset button on the right of the Customize dialog (adjacent to the Load and Save buttons). Use this feature with care as no confirmation dialog will be displayed; the defaults will be set without any further notice or user input.
You can also define shortcut key combinations that will run macros. These shortcut keys are strictly user-defined; none are built in. For more information on macros, see Chapter 12, Macros.
In LibreOffice, when something happens, we say that an event occurred. For example, a document was opened, a key was pressed, or the mouse moved. You can associate a macro with an event, so the macro is run when the event occurs. A common use is to assign the “open document” event to run a macro that performs certain setup tasks for the document.
To associate a macro with an event, use the Events tab of the Customize dialog. For more information, see Chapter 13, Getting Started with Macros, in the Getting Started Guide.
An extension is a package that can be installed into LibreOffice to add new functionality.
Although individual extensions can be found in different places, the official LibreOffice extension repository is at https://extensions.libreoffice.org/. These extensions are free of charge. Extensions from other sources may be free or may be available for a fee. Check the descriptions to see what licenses and fees apply to the ones that interest you.
To install an extension that is listed in the repository, follow these steps:
1) In LibreOffice, select Tools > Extension Manager on the Menu bar, or press Ctrl+Alt+E. In the Extension Manager dialog, click the Get more extensions online link.
2) A browser window will open. Find the extension you want and download it to your computer.
3) After the extension is downloaded and saved, return to the Extension Manager dialog and click Add. Find and select the extension you want to install and click Open. The extension begins installing. You may be asked to accept a license agreement.
4) When the installation is complete, the extension is listed in the Extension Manager dialog.
To install an extension that is not listed in the repository, download the extension, then continue with step ) above.
Click the Check for Updates button on the Extension Manager dialog to check for updates to installed extensions.
To remove (uninstall) an extension that you installed, select the extension in the main window of the Extension Manager dialog and click the Remove button.
To disable an extension without removing (uninstalling) it, select the extension in the main window of the Extension Manager dialog and click the Disable button, which then changes to Enable.
Tip
Extensions can be installed from some other places in Calc, such as the Gallery on the Sidebar, the Templates dialog, the Language Settings > Writing Aids page of the Tools > Options dialog and the Icon Style section in the View page of the Tools > Options dialog. In each of these places you will find a small button leading to a filtered view of the items in the Extensions dialog.
Note
In some cases, the Remove and Disable buttons may be unavailable, for example when you have selected one of the extensions that was bundled with your LibreOffice installation.
Figure 30: The Extension Manager dialog

The method for defining a custom color is as follows:
1) Insert any drawing object, such as a square, into any document.
2) Right-click on the object and choose Area in the context menu.
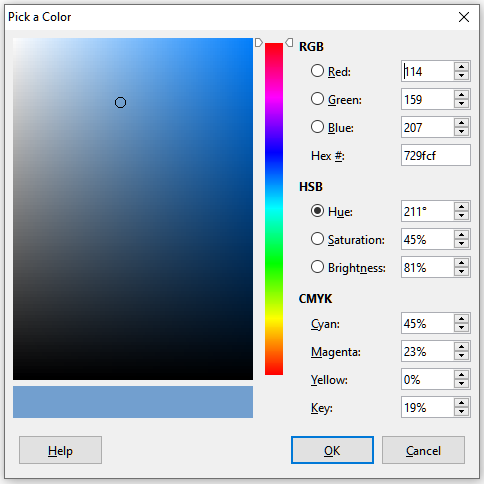
3) Click on the Color button on the Area tab (Figure 31). In the Palette drop-down in the Colors area, choose which palette you wish to add the new color to. Under New, define the new color using RGB or Hex notation, or click the Pick button to select the color on the Pick a Color dialog (Figure 32).
4) Click Add in the lower left corner, enter a name for the new color in the pop-up dialog, and click OK to save.
5) Delete the drawing object from the document, if it is not needed.
Figure 31: Defining a new color
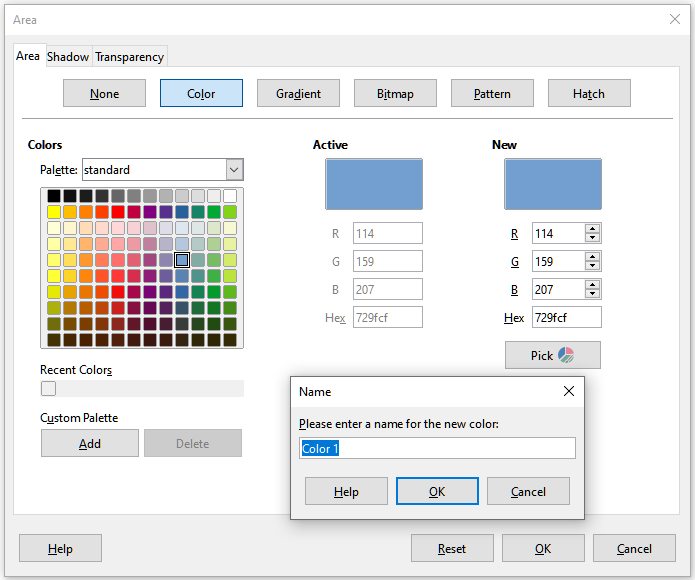
Figure 32: Defining a color by picking it from a color chart