
Calc Guide 7.2
Chapter 15
User Interface Variants
This document is Copyright © 2021 by the LibreOffice Documentation Team. Contributors are listed below. You may distribute it and/or modify it under the terms of either the GNU General Public License (https://www.gnu.org/licenses/gpl.html), version 3 or later, or the Creative Commons Attribution License (https://creativecommons.org/licenses/by/4.0/), version 4.0 or later.
All trademarks within this guide belong to their legitimate owners.
|
Steve Fanning |
Rachel Kartch |
Kees Kriek |
|
- |
|
|
Please direct any comments or suggestions about this document to the Documentation Team’s mailing list: documentation@global.libreoffice.org.
Note
Everything you send to a mailing list, including your email address and any other personal information that is written in the message, is publicly archived and cannot be deleted.
Published November 2021. Based on LibreOffice 7.2 Community.
Other versions of LibreOffice may differ in appearance and functionality.
Some keystrokes and menu items are different on macOS from those used in Windows and Linux. The table below gives some common substitutions for the instructions in this document. For a more detailed list, see the application Help and Appendix A (Keyboard Shortcuts) to this guide.
|
Windows or Linux |
macOS equivalent |
Effect |
|
Tools > Options menu selection |
LibreOffice > Preferences |
Access setup options |
|
Right-click |
Control+click and/or right-click depending on computer setup |
Open a context menu |
|
Ctrl (Control) |
⌘ (Command) |
Used with other keys |
|
F11 |
⌘+T |
Open the Styles deck in the Sidebar |
By default, LibreOffice’s commands are grouped in cascading menus and in toolbars filled with icons and this is the classic user interface described in Chapter 1, Introduction and assumed in the task descriptions contained in many other chapters throughout this guide.
The classic interface is very flexible, allowing the user to: show, hide, or reposition many of the user interface components; redefine the commands assigned to toolbars, menus, and context menus; create new menus and toolbars; redefine the functions assigned to individual shortcuts; and so on.
A further level of flexibility is provided through six alternative user interface variants which can be selected to match an individual user’s work flows and preferences. The seven available variants are:
Standard Toolbar
Tabbed
Single Toolbar
Sidebar
Tabbed Compact
Groupedbar Compact
Contextual Single
Four of these options (Standard Toolbar, Single Toolbar, Sidebar, and Contextual Single) can be considered as alternative configurations of the components used in the classic interface. However the other three options (Tabbed, Tabbed Compact, and Groupedbar Compact) are based on using the notebook bar. The notebook bar uses a different way to organize controls and icons, displaying contextual groups of commands and contents for quicker use and improved user experience.
It should be noted that the brief description of each variant above refers to the default setup for that variant. There are many ways to adjust the configuration of any variant, and even create a user interface that utilizes different aspects of multiple variants.
When you set up Calc the default user interface is the Standard Toolbar, but you can choose one of these user interfaces, and you can switch between them at any time.
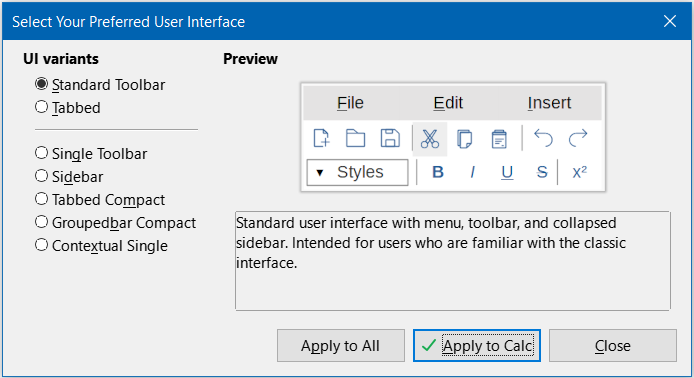
1) Choose View > User Interface on the Menu bar.
2) On the Select Your Preferred User Interface dialog (Figure 1), choose one of the variants on the left. An example of the variant is shown in the Preview box on the right, along with a short description.
3) Choose the relevant button to apply your selection to all components of LibreOffice, or only to Calc. The Calc window changes to match your selection.
4) Click Close to close the dialog.
Figure 1: Select Your Preferred User Interface dialog
If you have activated experimental features (Tools > Options > LibreOffice > Advanced > Enable experimental features (may be unstable)), several more choices appear on the left-hand side. These choices are not described here.
The Standard Toolbar, Single Toolbar, and Sidebar interfaces are closely related. The following notes describe the initial default configuration for these options.
The visibility of elements on each of these three variants can be modified using the View menu on the Menu bar. The configuration of menus, toolbars, and keyboard shortcuts can be modified through the tabs on the Tools > Customize dialog. Because these variants are not based on the notebook bar, there are no configuration options available in the Notebookbar tab of the Tools > Customize dialog.
The initial configuration for the Contextual Single interface variant is for the Menu bar to be visible but for no toolbars to be displayed. Toolbars are automatically shown and hidden, dependent on the user’s current context. For example, if an image is selected then the Image toolbar is displayed, or if a drawing object is selected then the Drawing Object Properties toolbar is displayed.
Figure 2 shows an example of the default Contextual Single interface when an image is selected, with the context-sensitive Image toolbar shown and hidden automatically.
Figure 2: Contextual Single interface

The “x” symbol at the right end of the Menu bar is an icon for the Close Document command.
When switching to this user interface variant, Calc automatically opens the Sidebar if it is not already open.
The visibility of elements on this variant can be modified using the View menu on the Menu bar. The configuration of menus, toolbars, and keyboard shortcuts can be modified through the tabs on the Tools > Customize dialog. Because this variant is not based on the notebook bar, there are no configuration options available in the Notebookbar tab of the Tools > Customize dialog.
The Tabbed interface (Figure 3) provides a familiar interface for users coming from proprietary office suites such as Microsoft Office. It includes a Menu bar, an Icon bar, a Tab bar, icons for the active tab, one or more tab-specific menus, and a Quick menu. On Windows and Linux, the Menu bar can be hidden or displayed by clicking on the Menu Bar icon in the Icon bar (Figure 4).
Figure 3: Tabbed interface with Menu bar hidden
1 Icon bar 2 Active tab 3 Tab bar 4 Icons on active tab 5 Tab menus 6 Quick menu

In Calc, this user interface variant includes nine fixed tabs that are always visible, and six additional tabs that are sometimes displayed. Each tab displays a set of icons grouped by context. The context can change depending on the location of the cursor or the item selected. Each tab also includes one or more tab-specific drop-down menus at the right-hand end. The Quick menu is the same for all tabs.
The Tabbed interface can be customized using the Notebookbar tab of the Tools > Customize dialog to show and hide the individual icons on the various tabs. See Chapter 14, Setting up and Customizing, for more information. In addition, the size of icons used can be adjusted through Tools > Options > LibreOffice > View > Icon Size > Notebookbar.
If the icons on a tab do not fit into the width of the Calc window, two right-pointing angle brackets (>>) appear at the right end of the row. Press the >> button to view additional options that are not currently visible (see, for example, Figure 7).
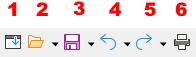
The Icon bar (Figure 4) is located at the top left of the tabs.
Figure 4: Icon bar
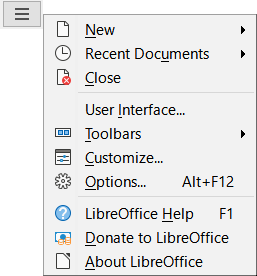
To the right of the tabs is a Quick menu (Figure 5) containing some commonly used commands and links. Some of the Quick menu items have submenus, indicated by arrows on the right.
Figure 5: Quick menu
The fixed tabs in Calc are File, Home, Insert, Layout, Data, Review, View, Extension, and Tools. The nine fixed tabs are shown individually in the following subsections.
Each fixed tab has an associated menu, accessed through a button located at the right end of the tab. This button is labeled with the same name as the tab. Some options available in the tab menu may replicate options that are available on the tab; others may be extra options.
The appearance of a tab depends on both the configuration of your computer system and the setup of your Calc installation. The following points should be noted about the illustrations that follow:
To increase readability of this chapter, the screen shots of tabs have been taken using a relatively small Calc window. This means that the >> icon appears on most of the tabs, indicating that some options are not visible.
Left and right ends of the tabs are shown separately, making the illustrations large enough to see the commands more easily.
For each tab that shows a >> icon, a separate figure is included to show the additional options that appear when the >> icon is pressed.
A further figure is included to show the content of the menus at the right end of the tab.
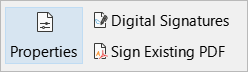
Figure 6 shows the File tab and Figure 7 shows the additional options that are presented when the >> icon is pressed.
Figure 6: File tab
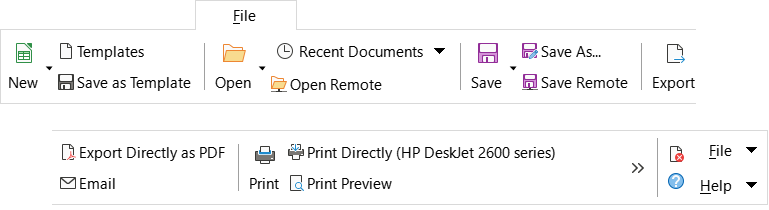
Figure 7: File tab - additional options
The File tab has two menus, File and Help, and these are shown in Figure 8. Close and LibreOffice Help icons are located adjacent to the File and Help menu buttons.
Figure 8: File tab menus
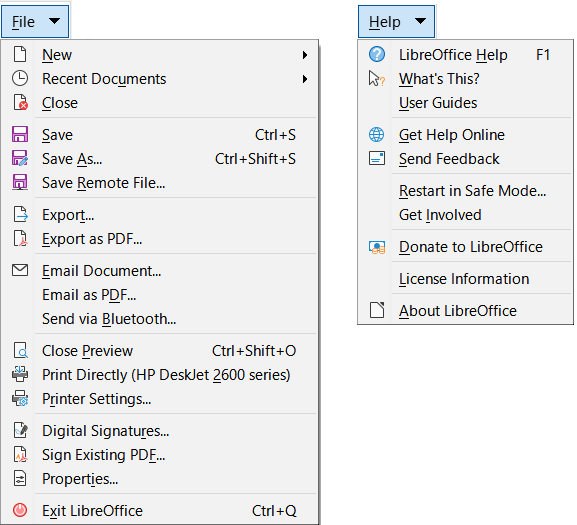
Figure 9 shows the Home tab and Figure 10 shows the additional options that are presented when the >> icon is pressed.
Figure 9: Home tab
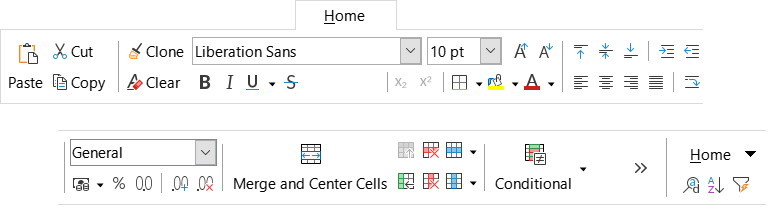
Figure 10: Home tab - additional options

The Home tab has one menu, Home, and this is shown in Figure 11. Find and Replace (Ctrl+H), Sort Ascending and AutoFilter (Ctrl+Shift+L) icons are located adjacent to the Home menu button.
Figure 11: Home tab menu
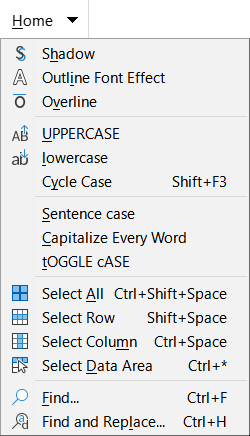
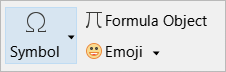
Figure 12 shows the Insert tab and Figure 13 shows the additional options that are presented when the >> icon is pressed.
Figure 12: Insert tab
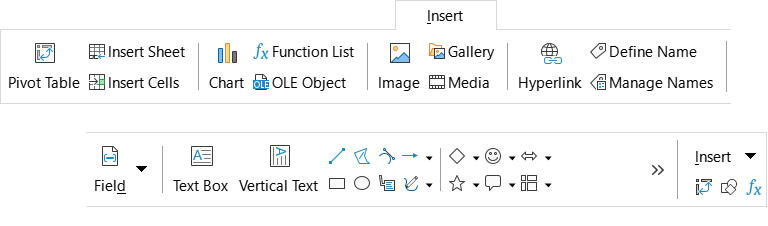
Figure 13: Insert tab - additional options
The Insert tab has one menu, Insert, and this is shown in Figure 14. Insert or Edit Pivot Table, Show Draw Functions, and Function List icons are located adjacent to the Insert menu button.
Figure 14: Insert tab menu
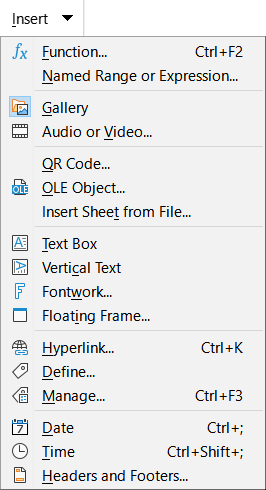
Figure 15 shows the Layout tab and Figure 16 shows the additional options that are presented when the >> icon is pressed.
Figure 15: Layout tab

Figure 16: Layout tab - additional options

The Layout tab has one menu, Layout, and this is shown in Figure 17. A Format Page icon is located adjacent to the Layout menu button.
Figure 17: Layout tab menu
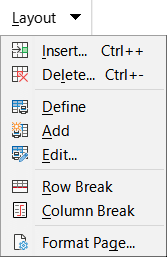
Figure 18 shows the Data tab and Figure 19 shows the additional options that are presented when the >> icon is pressed.
Figure 18: Data tab
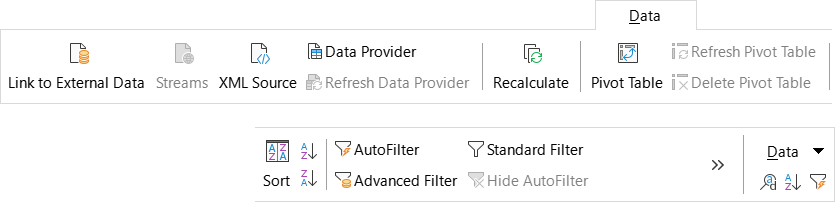
Figure 19: Data tab - additional options

The Data tab has one menu, Data, and this is shown in (Figure 20). Find and Replace (Ctrl+H), Sort Ascending, and AutoFilter (Ctrl+Shift+L) icons are located adjacent to the Data menu button.
Figure 20: Data tab menu

Figure 21 shows the Review tab and Figure 22 shows the additional options that are presented when the >> icon is pressed.
Figure 21: Review tab
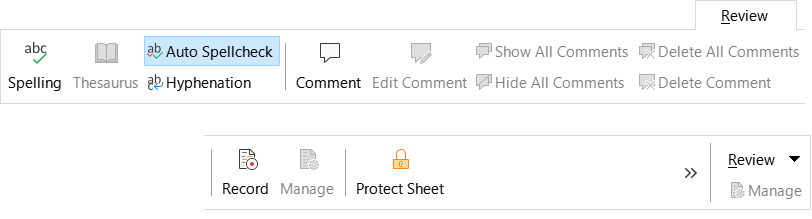
Figure 22: Review tab - additional options

The Review tab has one menu, Review, and this is shown in Figure 23. A Manage Track Changes icon is located adjacent to the Review menu button.
Figure 23: Review tab menu
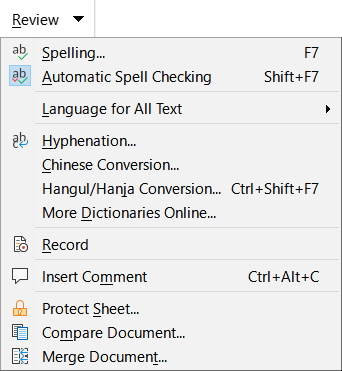
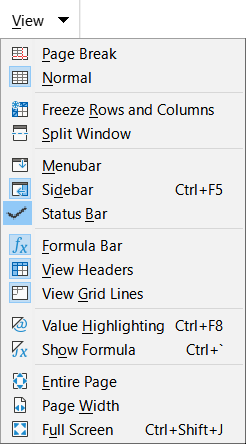
Figure 24 shows the View tab and Figure 25 shows the additional options that are presented when the >> icon is pressed.
Figure 24: View tab
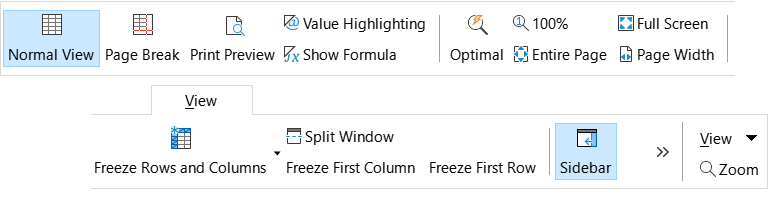
Figure 25: View tab - additional options

The View tab has one menu, View, and this is shown in Figure 26. A Zoom icon is located adjacent to the View menu button.
Figure 26: View tab menu
The Extension tab contains only the Extension tab menu, which contains the Extension Manager (Ctrl+Alt+E) option (Figure 27).
Figure 27: Extension tab menu

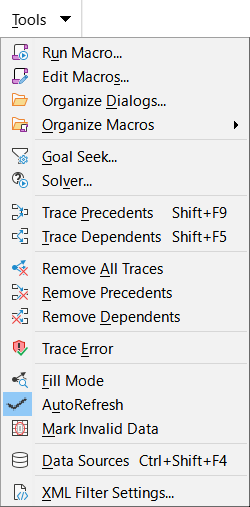
Figure 28 shows the Tools tab and Figure 29 shows the additional options that are presented when the >> icon is pressed.
Figure 28: Tools tab
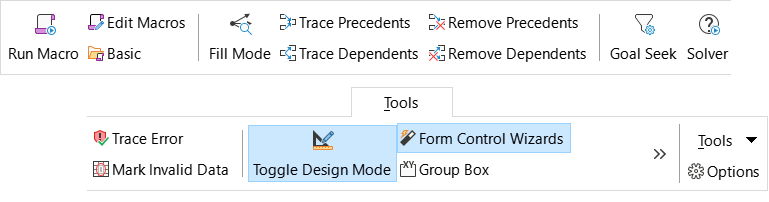
Figure 29: Tools tab - additional options

The Tools tab has one menu, Tools, and this is shown in Figure 30. An Options icon is located adjacent to the Tools menu button.
Figure 30: Tools tab menu
Additional tabs appear when an item is selected; they are displayed between the View and Extension tabs. The additional tabs in Calc are Draw, Form, Image, Media, Object, and Print.
Figure 31 shows the Draw tab and Figure 32 shows the additional options that are presented when the >> icon is pressed. The Draw tab is displayed when a drawing object is selected.
Figure 31: Draw tab
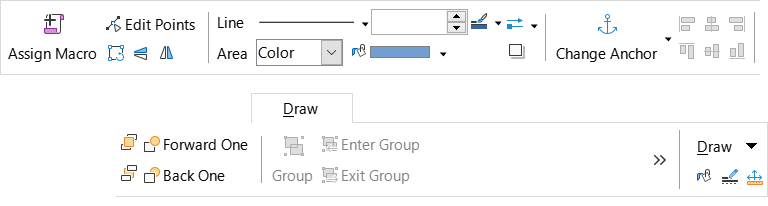
Figure 32: Draw tab - additional options

The Draw tab has one menu, Draw, and this is shown in Figure 33. Area, Line, and Position and Size icons are located adjacent to the Draw menu button.
Figure 33: Draw tab menu
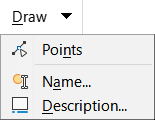
Figure 34 shows the Form tab, which is displayed when a form component is selected in design mode.
Figure 34: Form tab
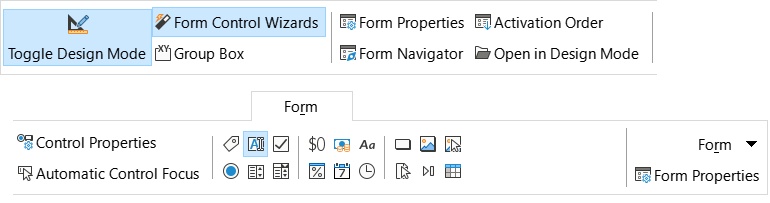
The Form tab has one menu, Form, and this is shown in Figure 35. A Form Properties icon is located adjacent to the Form menu button.
Figure 35: Form tab menu
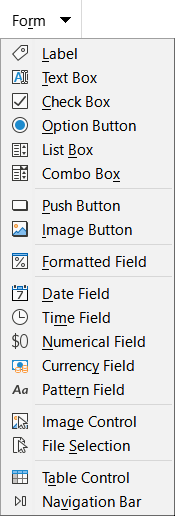
Figure 36 shows the Image tab and Figure 37 shows the additional options that are presented when the >> icon is pressed. The Image tab is displayed when an image is selected.
Figure 36: Image tab
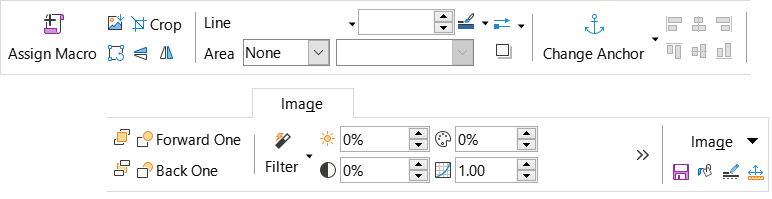
Figure 37: Image tab - additional options

The Image tab has one menu, Image, and this is shown in Figure 38. Save, Area, Line, and Position and Size icons are located adjacent to the Image menu button.
Figure 38: Image tab menu
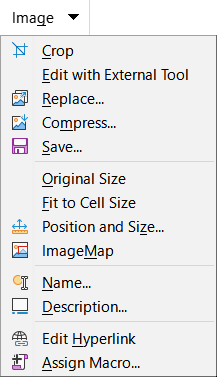
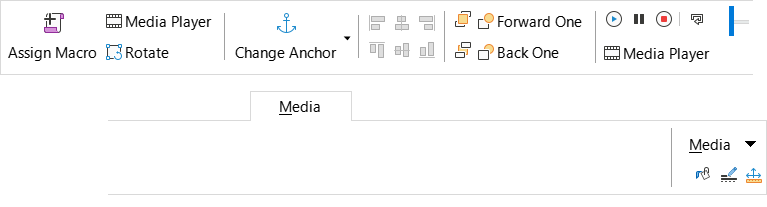
Figure 39 shows the Media tab, which is displayed a media object is selected.
Figure 39: Media tab
The Media tab has one menu, Media, and this is shown in Figure 40. Area, Line, and Position and Size icons are located adjacent to the Media menu button.
Figure 40: Media tab menu
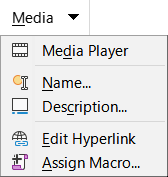
Figure 41 shows the Object tab, which is displayed when an object (for example, an OLE object) is selected.
Figure 41: Object tab
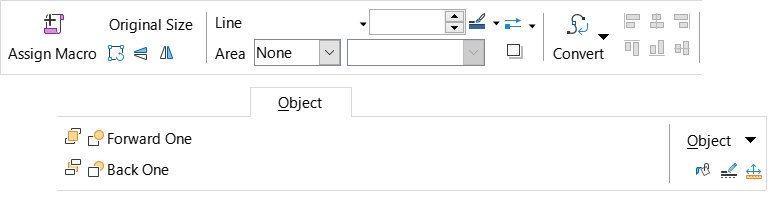
The Object tab has one menu, Object, and this is shown in Figure 42. Area, Line, and Position and Size icons are located adjacent to the Object menu button.
Figure 42: Object tab menu
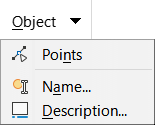
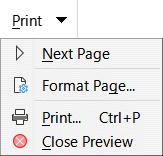
Figure 43 shows the Print tab, which is displayed when a print preview is selected.
Figure 43: Print tab
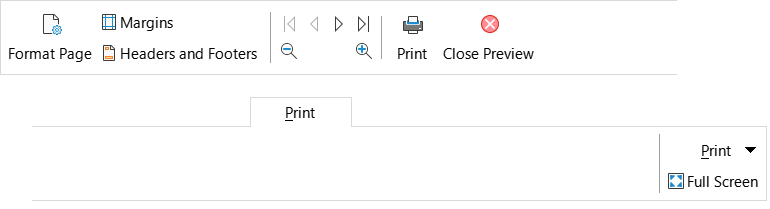
The Print tab has one menu, Print, and this is shown in Figure 44. A Full Screen icon is located adjacent to the Print menu button.
Figure 44: Print tab menu
As its name suggests, the Tabbed Compact interface is a more compact version of the Tabbed interface described in the previous section. The Tabbed Compact interface provides the same nine fixed tabs (File, Home, Insert, Layout, Data, Review, View, Extension, and Tools) and six additional tabs (Draw, Form, Image, Media, Object, and Print). However, in this case the commands on each tab are displayed in a single row, using less vertical screen space.
Figure 45 shows an example of the Tabbed Compact interface for the File tab. Similar to the behavior of the Tabbed interface, pressing the >> button provides access to additional options, as shown in Figure 46 for this tab.
Figure 45: Tabbed Compact interface, File tab
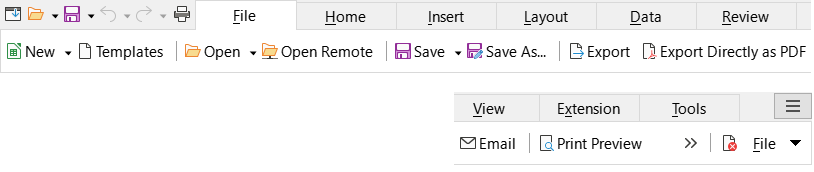
Figure 46: Tabbed Compact interface, File tab, additional options

The content of individual tabs and tab menus is similar to the corresponding components of the Tabbed interface and is not described further in this guide.
The Tabbed Compact interface can be customized using the Notebookbar tab of the Tools > Customize dialog to show and hide the individual icons on the various tabs. See Chapter 14, Setting up and Customizing, for more information. In addition, the size of icons used can be adjusted through Tools > Options > LibreOffice > View > Icon Size > Notebookbar.
The Groupedbar Compact interface is a different type of user interface which does not utilize toolbars or tabs to partition the available commands. Instead the commands are organized into context-sensitive groups, visually separated by vertical lines. Each group contains icons, menus, and other controls as appropriate. Figure 47 shows the default configuration of the Groupedbar Compact commands (displayed, for example, when an empty cell is selected).
Figure 47: Groupedbar Compact interface
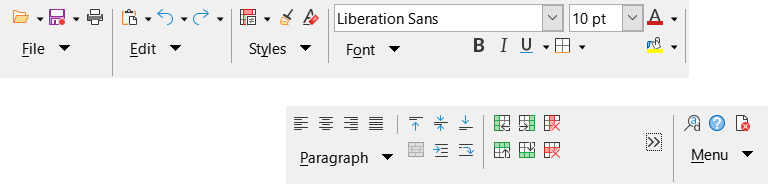
Similar to the behavior of the Tabbed interface, if the groups do not all fit into the width of the Calc window, two right-pointing angle brackets (>>) appear toward the right (see Figure 47). Press the >> button to access the additional groups that are not currently visible−see, for example, Figure 48 which shows the hidden groups corresponding to Figure 47.
Figure 48: Groupedbar Compact - additional groups

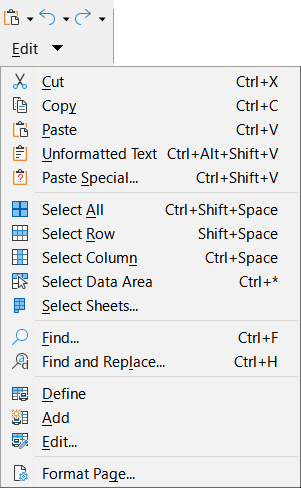
As is evident from Figures Figure 47 and Figure 48, many groups provide several icons located above a menu button. Press the menu button to access a menu of commands relating to the group, as shown in Figure 49 for example.
Figure 49: Groupedbar Compact interface - Edit group and menu
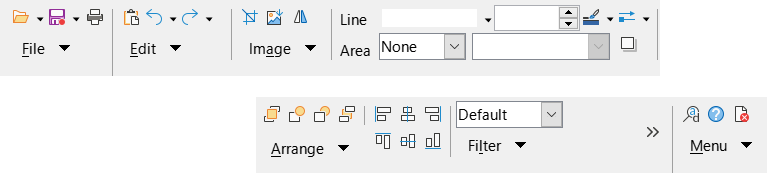
The groups displayed in the Groupedbar Compact interface vary depending on context. For example, if an image is currently selected then the groups shown in Figure 50 are displayed.
Figure 50: Groupedbar Compact interface with image selected
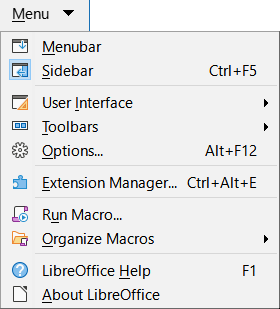
At the right end of the Groupedbar Compact interface is a small area containing Find and Replace (Ctrl+H), LibreOffice Help, and Close icons, above a button labeled Menu. The content of this menu is not context-sensitive and always contains the commands shown in Figure 51.
Figure 51: Groupedbar Compact menu
The Groupedbar Compact interface can be customized using the Notebookbar tab of the Tools > Customize dialog to show and hide the individual icons on the various groups. See Chapter 14, Setting up and Customizing, for more information. In addition, the size of icons used can be adjusted through Tools > Options > LibreOffice > View > Icon Size > Notebookbar.