
Calc Guide 7.4
Chapter 7
Printing, Exporting, Emailing, and Signing
This document is Copyright © 2022 by the LibreOffice Documentation Team. Contributors are listed below. You may distribute it and/or modify it under the terms of either the GNU General Public License (https://www.gnu.org/licenses/gpl.html), version 3 or later, or the Creative Commons Attribution License (https://creativecommons.org/licenses/by/4.0/), version 4.0 or later.
All trademarks within this guide belong to their legitimate owners.
|
Skip Masonsmith |
|
|
|
Barbara Duprey |
Jean Hollis Weber |
John A Smith |
|
Peter Schofield |
Christian Chenal |
Martin Saffron |
|
Kees Kriek |
Steve Fanning |
Leo Moons |
|
Felipe Viggiano |
Annie Nguyen |
Rafael Lima |
Please direct any comments or suggestions about this document to the Documentation Team’s forum at https://community.documentfoundation.org/c/documentation/loguides/ (registration is required) or send an email to: loguides@community.documentfoundation.org.
Note
Everything you post to a forum, including your email address and any other personal information that is written in the message, is publicly archived and cannot be deleted. E-mails sent to the forum are moderated.
Published October 2022. Based on LibreOffice 7.4 Community.
Other versions of LibreOffice may differ in appearance and functionality.
Some keystrokes and menu items are different on macOS from those used in Windows and Linux. The table below gives some common substitutions for the instructions in this document. For a more detailed list, see the application Help and Appendix A (Keyboard Shortcuts) to this guide.
|
Windows or Linux |
macOS equivalent |
Effect |
|
Tools > Options menu selection |
LibreOffice > Preferences |
Access setup options |
|
Right-click |
Control+click and/or right-click depending on computer setup |
Open a context menu |
|
Ctrl (Control) |
⌘ (Command) |
Used with other keys |
|
F11 |
⌘+T |
Open the Styles deck in the Sidebar |
To quickly print a spreadsheet, click on the Print Directly icon (not visible by default) on the Standard toolbar to send the entire spreadsheet to the default printer that is defined for your computer.
Note
You can change the action of the Print Directly icon to send a document to the printer defined for the document instead of the default printer for the computer. Go to Tools > Options > Load/Save > General and select the Load printer settings with the document option.
For more control over printing, select File > Print on the Menu bar, or click the Print icon on the Standard toolbar, or press Ctrl+P, to open the Print dialog (Figure 1).
Note
The options selected on the Print dialog apply to this printing of this document only.
To specify default printing settings for LibreOffice, go to Tools > Options > LibreOffice > Print and Tools > Options > LibreOffice Calc > Print. For details, see Chapter 15, Setting up and Customizing.
The Print dialog has multiple tabs where you can choose a range of options, as described in the following sections. Depending on your computer’s operating system, the number of tabs and the layout of each tab may be different from the illustrations shown in this chapter.
The Print dialog includes a Preview checkbox which enables you to turn on/off a preview of how your data will appear on the printed page. The preview appears on the left hand side of the dialog. Adjacent controls allow you to navigate through multiple pages.
On the General tab of the Print dialog (Figure 1), you can choose from the following options:
Printer
Select the printer to use, from the list of those available.
Click the Properties button to change any required settings of the selected printer. The options available through this interaction will depend on your printer and system.
Range and Copies
Select which sheets and pages to print; single or double sided printing; the number of copies to print; whether to collate multiple copies; and the page order for printing. (See “Selecting what to print” on page 1.)
Page Layout
Select page layout properties such as paper size, portrait, or landscape orientation; how many pages are printed per sheet of paper; the order in which the pages are printed on a sheet of paper; and whether a border is drawn around each page.
Figure 1: Print dialog – General tab

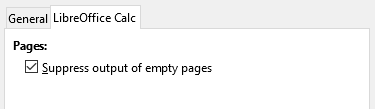
On the LibreOffice Calc tab of the Print dialog (Figure 2), you can select whether to suppress the output of empty pages when you print the spreadsheet.
Figure 2: Print dialog – LibreOffice Calc tab
To print multiple pages of a spreadsheet on one piece of paper:
1) Use File > Print on the Menu bar, or click the Print icon on the Standard toolbar, or press Ctrl+P, to open the Print dialog.
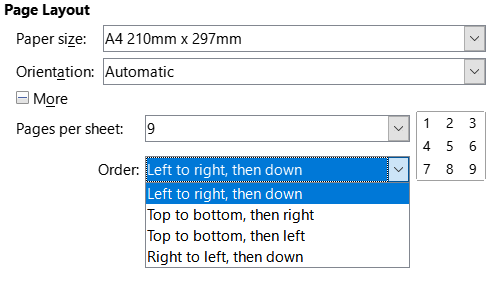
2) In the Page Layout section of the General tab, select the number of spreadsheet pages to print per sheet of paper in the Pages per sheet drop-down list. The preview panel on the right shows how the pages will look in the printed document.
3) When printing more than one page per sheet, select the order in which the pages are printed on a sheet in the Order drop-down list (Figure 3).
4) To distinguish each page on a sheet, select the Draw a border around each page option.
5) Click Print.
Figure 3: Printing more than one spreadsheet page per sheet of paper
Tip
To access some of the options on the General tab of the Print dialog, you may need to click one of the More buttons. For simplicity, these clicks are deliberately omitted from the descriptions in this chapter.
In the Range and Copies area of the General tab of the Print dialog, choose Print All Sheets in the From which drop-down to print all sheets in the document. In addition to printing a full spreadsheet document, you can choose single sheets, multiple sheets, and selections of cells for printing.
To print an individual sheet:
1) In the spreadsheet, click on the sheet tab to select the sheet you want to print.
2) Choose File > Print on the Menu bar, or click the Print icon on the Standard toolbar, or press Ctrl+P, to open the Print dialog.
3) In the Range and Copies area of the General tab of the Print dialog, choose Print Selected Sheets in the From which drop-down.
4) Click Print.
To print a range of sheets:
1) In the spreadsheet, select the sheets to print. For details on how to select multiple sheets, see Chapter 1, Introduction.
2) Choose File > Print on the Menu bar, or click the Print icon on the Standard toolbar, or press Ctrl+P, to open the Print dialog.
3) In the Range and Copies area of the General tab of the Print dialog, choose Print Selected Sheets in the From which drop-down.
4) Click Print.
To print a selection of cells:
1) In the spreadsheet, select the cells to print.
2) Choose File > Print on the Menu bar, or click the Print icon on the Standard toolbar, or press Ctrl+P, to open the Print dialog.
3) In the Range and Copies area of the General tab of the Print dialog, choose Print Selected Cells in the From which drop-down.
4) Click Print.
You may wish to print a spreadsheet in grayscale on a color printer. You can do this in two ways.
Note
Some color printers may print in color regardless of the settings you choose.
For an individual file, you can change the printer settings to print in black and white or grayscale:
1) Choose File > Print on the Menu bar, or click the Print icon on the Standard toolbar, or press Ctrl+P, to open the Print dialog.
2) Click Properties to open the Properties dialog for the printer. The available choices vary from one printer to another, but you should find options for the color settings. See your printer’s help or user manual for more information.
3) The choices for color might include black and white, or grayscale. Choose grayscale.
4) Click OK to confirm your choice and return to the Print dialog.
5) Click Print to print the document.
You can change the LibreOffice settings to print all color text and graphics as grayscale:
1) Choose Tools > Options > LibreOffice > Print.
2) In the Defaults section, select Convert colors to grayscale. Click OK to save the change.
Caution
This changes the print settings for all components of LibreOffice, not just Calc
To preview the sheets in Calc before printing:
1) Choose File > Print Preview on the Menu bar, or click the Toggle Print Preview icon on the Standard toolbar, or press Ctrl+Shift+O.
2) The Calc window now displays the Print Preview toolbar instead of the Formatting toolbar.
Figure 4: Print Preview toolbar

3) To print the document from this view, select File > Print on the Menu bar, or click the Print icon on the Standard toolbar, or press Ctrl+P, to open the Print dialog.
4) Choose the print options and click the Print button.
5) Click the Toggle Print Preview icon again, or click the Close Preview icon on the right-hand side of the Print Preview toolbar, to return to the normal spreadsheet view.
You can define which range of cells on a spreadsheet are to be printed or exported to a PDF. The cells on the sheet that are not part of the defined print range are not printed or exported. Also, any sheets without a defined print range are not printed or exported. Creating a user-defined print range will replace any existing defined print range.
To set a user-defined print range:
1) Select the range of cells to be used in the print range.
2) Go to Format > Print Ranges > Define on the Menu bar. If Tools > Options > LibreOffice Calc > View > Page breaks is enabled, then automatic page break lines are displayed on the screen, defining the cells included in the print range.
3) Click on the Print Directly icon on the Standard toolbar to print the defined print range, or open the Print dialog and click Print to print the defined print range.
Tip
You can check the print range by using Toggle Print Preview or the Preview pane in the Print dialog. Calc will display only the cells in the print range. See “Viewing print ranges” on page 1.
At any time, you can edit the print range, For example to add or remove cells, or define rows and columns to repeat (such as column or row headings). For more details on how to define repeated rows and/or columns, see “Repeat printing of rows or columns” on page 1.
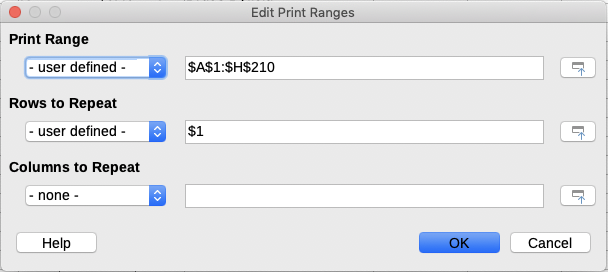
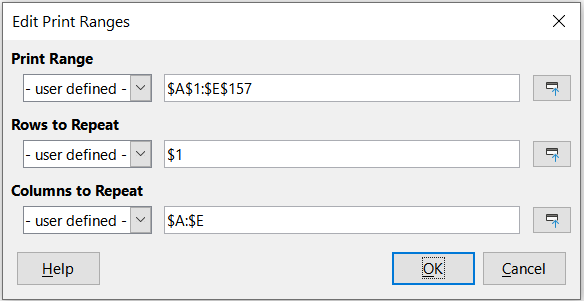
1) Go to Format > Print Ranges > Edit on the Menu bar to open the Edit Print Ranges dialog (Figure 5).
Figure 5: Edit Print Ranges dialog
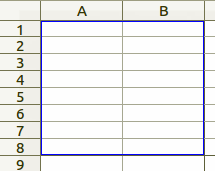
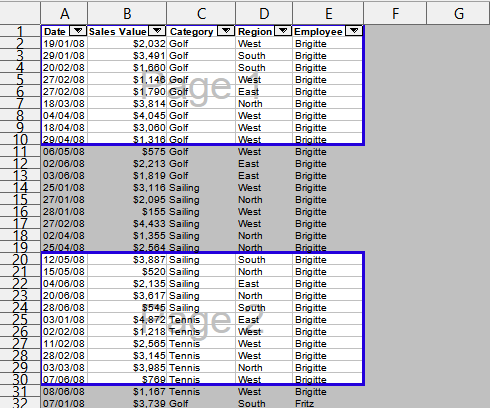
2) If only a single range is defined, then clicking anywhere in the Print Range text box displays the defined print range bounded in blue, as shown in Figure 6.
Figure 6: Single print range marked by a bounding box
3) Multiple cell ranges can also be defined by separating each range with a single comma. This can be done with the keyboard by typing in a comma and the cell references, using the same format as the print ranges already defined in the Print Range text box. Remember to separate the cell references with a colon. New cell ranges can also be added by holding Ctrl as you select the cell range using the cursor.
4) To remove a print range, select the print range in the Print Range text box and delete it. Make sure the remaining print ranges are separated by a single comma and there is not a comma at the end of the sequence.
5) Click OK to save your changes and close the dialog.
After print ranges have been defined, they are formatted with automatic page breaks. To view the page breaks, go to View > Page Break on the Menu bar to open the preview (Figure 7).
The print ranges are outlined by default with a blue border and contain a pale gray page number in the center of each page. The non-printing area of the spreadsheet normally has a gray background.
To exit the page break preview, go to View > Normal on the Menu bar.
Figure 7: Page break preview
In addition to defining a print range for each print job, you can also define a range of cells to be used repeatedly, without having to select a range of cells every time. This is useful if different areas of a large spreadsheet have to be printed for different reports; several named print ranges can be defined to meet this need.
Figure 8: Define Name dialog
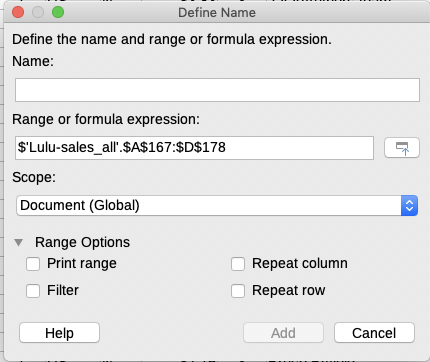
1) Select the cells you want to define and name as a print range, then go to Sheet > Named Ranges and Expressions > Define on the Menu bar to open the Define Name dialog (Figure 8). The selected cells are displayed in the Range or formula expression box.
Alternatively, open the Define Name dialog, then select the cells you want to define and name. The selected cells are then displayed in the Range or formula expression box.
2) Type a name for the range in the Name box. Use only letters, numbers, and underscores in the name; no spaces, hyphens, or other characters are allowed.
3) If necessary, you can edit or set the range of selected cells for the print range in the Range or formula expression box. See “Editing a print range” on page 1 for more information.
4) Make sure Document (Global) is selected in the Scope drop-down list.
5) Select Print range from Range Options to define the settings as a print range.
6) Click Add to accept the data and close the dialog.
To select a named range for printing:
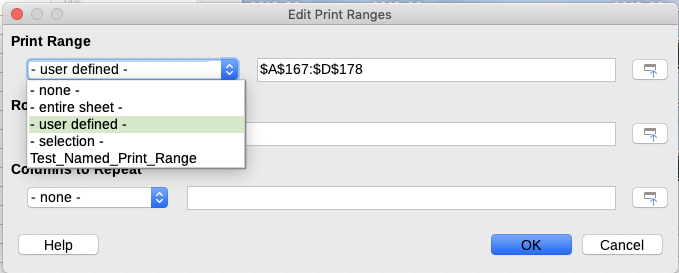
1) Go to Format > Print Ranges > Edit on the Menu bar to open the Edit Print Ranges dialog (Figure 9).
2) Select the defined and named print range in the Print Range drop-down list.
3) Click OK to close the dialog.
4) Open the Print dialog, which will show only the named range in the preview area. Click Print.
Figure 9: Choosing a named range for printing
To delete a named print range if it is no longer required:
1) Go to Sheet > Named Ranges and Expressions > Manage on the Menu bar, or press Ctrl+F3, to open the Manage Names dialog (Figure 10).
Figure 10: Manage Names dialog
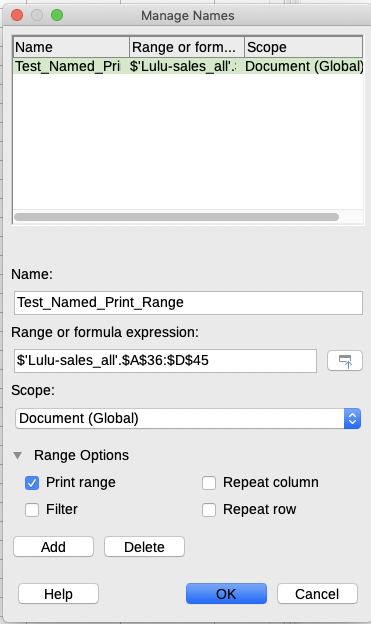
2) Select the named print range you want to delete and confirm it is a print range by checking the options from the Range Options.
3) Click Delete and then click OK to close the dialog.
It may become necessary to remove a defined print range, for example if the whole sheet needs to be printed later, or you no longer want to print some of the added ranges.
Go to Format > Print Ranges > Clear on the Menu bar to remove all of the defined print ranges in the spreadsheet, except for named print ranges. After the print range is removed, the default page break lines for the selected paper size will appear on the screen (assuming that Tools > Options > LibreOffice Calc > View > Page breaks is enabled).
To remove named print ranges, see “Deleting a named print range” above.
If a spreadsheet is printed on multiple pages, you can define specific rows or columns (for example, headings) to repeat print on each printed page.
Figure 11: Repeat printing of rows and columns
1) Go to Format > Print Ranges > Edit to open the Edit Print Ranges dialog (Figure 11).
2) In the Rows to Repeat box, type the references for the rows to be repeat printed. For example, to repeat rows 1, 2 and 3, type $1:$3. This automatically changes the Rows to Repeat drop-down from - none - to - user defined -.
You can also place the cursor in the Rows to Repeat box and then, using the mouse, select a cell in each row you want to be repeat printed. It is not necessary to select the whole row.
3) In the Columns to Repeat box, type the references for the columns to be repeat printed. For example, to repeat column A, type $A. This automatically changes the Columns to Repeat drop-down from - none - to - user defined -.
You can also place the cursor in the Columns to Repeat box and then, using the mouse, select a cell in each column you want to be repeat printed.
4) Click OK to save your changes and close the dialog.
You can also define named print ranges to use for repeat printing of rows or columns as follows:
1) Define and name the rows and/or columns you want to repeat print. See “Named print ranges” on page 1 for more information. Similar to user defined print ranges, it is sufficient to select one cell from the row or column you want to be repeat printed.
2) Select Repeat column and / or Repeat row from Range Options to define the columns and/or rows for repeat printing in the Define Name dialog (Figure 8 above).
3) Click Add to accept the data and close the dialog.
4) Go to Format > Print Ranges > Edit to open the Edit Print Ranges dialog (Figure 11).
5) Select the defined and named print ranges from the Rows to Repeat and/or Columns to Repeat drop-down lists.
6) Click OK to save your changes and close the dialog.
While defining a print range can be a powerful tool, you may sometimes need to manually adjust the page breaks to make sure the spreadsheet prints the way you want it to look. You can insert two types of page breaks into a spreadsheet:
Row break – inserts a horizontal page break above a selected cell in a row. For example, if the selected cell is H15, then a row break is created between rows 14 and 15.
Column break – inserts a vertical page break to the left of the selected cell in a column. For example, if the selected cell is H15, then a column break is created between columns G and H.
When a manual break is inserted, it appears as a blue line or as a bold line between the rows or columns on the display. The actual appearance depends on your computer setup. To see manual break lines more easily on your display, you can change their appearance. Go to Tools > Options > LibreOffice > Application Colors and scroll down to the Spreadsheet section where you can change how page breaks appear.
1) Select the cell where you want to insert a manual break in the spreadsheet.
2) Go to Sheet > Insert Page Break on the Menu bar.
3) Select Row Break to insert a row break above the cell or Column Break to insert a column break to the left of the cell.
Alternatively, go to View > Page Break on the Menu bar. Select the cell where you want to insert a manual break, right-click in the spreadsheet and select Row Break or Column Break in the context menu. Remember to go to View > Normal on the Menu bar and return to the standard spreadsheet view.
1) Select the cell where you want to delete a manual break from the spreadsheet.
2) Go to Sheet > Delete Page Break on the Menu bar.
3) Select Row Break to delete a row break from above the cell or Column Break to delete a column break from the left of the cell.
Note
The Column Break or Row Break options are grayed if an appropriate cell has not been selected, either to the right of a column break or below a row break.
Multiple manual row and column breaks can exist in the same spreadsheet. If you want to remove all breaks from the spreadsheet:
1) Go to View > Page Break on the Menu bar.
2) Right-click in the spreadsheet and select Delete Page Breaks in the context menu to remove all manual breaks from your spreadsheet.
3) Go to View > Normal on the Menu bar to return to the standard spreadsheet view.
When using page styles for your spreadsheets, you can include printing options within the page style. For example, page order, details, scale to be printed, and so on. Using page styles allows you to quickly set up and change the printing options of different sheets within your spreadsheet. See Chapter 5, Using Styles and Templates, for more information about page styles.
Figure 12: Page Style dialog – Sheet tab
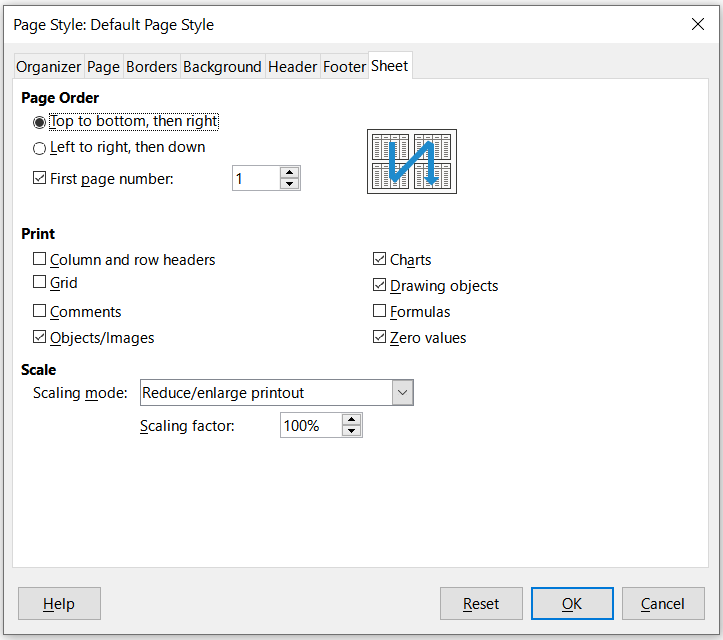
Make sure you have selected the correct sheet within the spreadsheet before setting the print options. Go to Format > Page Style on the Menu bar to open the Page Style dialog, then click on the Sheet tab (Figure 12) to set the printing options for a page style. The dialog title indicates the name of the page style you are about to change.
Tip
You can also open the Page Style dialog by going to the Styles deck of the Sidebar, right-clicking the relevant page style, and selecting Modify in the context menu. Another alternative is to double-click the name of the page style on the Status Bar.
Page Order – defines the order in which data in a sheet is numbered and printed when it does not fit on one printed page. A preview of the page order is shown in the graphic on the top right of the dialog in Figure 12.
Top to bottom, then right – prints vertically from the left column to the bottom of the sheet.
Left to right, then down – prints horizontally from the top row of the sheet to the right column.
First page number – select this option if you want the first page to start with a number other than 1. Enter the number of the first page in the box.
Print – defines which elements of the spreadsheet are to be printed.
Column and row headers – prints the column and row headers.
Grid – prints the borders of the individual cells as a grid. For the view on screen, make your selection under Tools > Options > LibreOffice Calc > View > Grid lines.
Comments – prints the comments defined in the spreadsheet. Comments will be printed on a separate page, along with the corresponding cell reference.
Objects/Images – includes all inserted objects (if printable) and graphics with the printed spreadsheet.
Charts – prints the charts that have been inserted into your spreadsheet.
Drawing objects – includes all drawing objects in the printed spreadsheet.
Formulas – prints the formulas contained in the cells, instead of the results of any formulas used in the spreadsheet.
Zero values – specifies that cells with a zero value are printed with a zero (0) in the cell.
Scale – defines a page scale for the printed spreadsheet.
Scaling mode – select a scaling mode in the drop-down list. Appropriate controls for the scaling mode selected will be shown below the drop-down list box.
i) Reduce/enlarge printout – specifies a scaling factor to scale all printed pages. Enter the scaling factor as a percentage in the box, in the range 10% to 400%. Factors less than 100% reduce the pages, while higher factors enlarge the pages.
ii) Fit print range(s) to width/height – specifies the maximum number of pages horizontally (width) and vertically (height) on which every sheet with the current page style is to be printed.
iii) Fit print range(s) on number of pages – specifies the maximum number of pages to be printed for each sheet that uses the same page style. The scale will be reduced as necessary to fit the defined number of pages.
Headers and footers are predefined pieces of text that are printed at the top or bottom of a sheet outside of the sheet area. Headers and footers are set the same way and you can have different content on left and right pages that use the same page style.
To turn the headers or footers on in your spreadsheet:
1) Select the sheet where you want to turn on the header or footer.
2) Open the Page Style dialog using one of the following methods:
Select Format > Page Style on the Menu bar.
Go to the Styles deck of the Sidebar, right-click the relevant page style, and select Modify in the context menu.
Double-click the name of the page style on the Status Bar.
3) Select the Header (or Footer) tab (Figure 13). The Header and Footer tabs on the Page Style dialog are identical.
4) Select the Header on or Footer on option.
5) Enter the values for the other options according to your requirements. These options are described below.
6) Click OK to save your changes and close the dialog.
Figure 13: Page Style dialog – Header tab
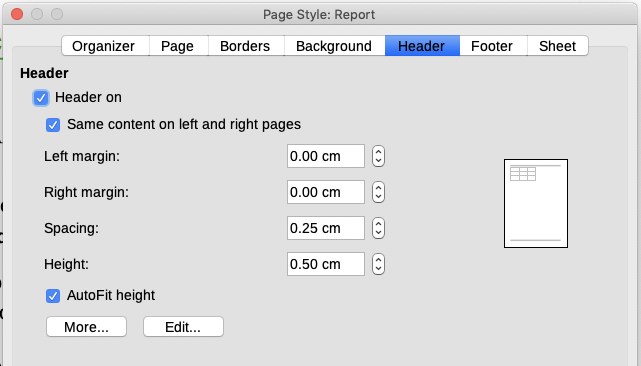
Header on or Footer on – adds a header or footer to the current page style.
Same content on left and right pages – causes left and right pages to share the same header or footer content. To assign a different header or footer to left and right pages, deselect this option and then click Edit. See “Header or footer contents” on page 1 for more information.
Left margin – enter the amount of space to leave between the left page margin and the left edge of the header or footer.
Right margin – enter the amount of space to leave between the right page margin and the right edge of the header or footer.
Spacing – enter the amount of space to maintain between the bottom edge of the header and the top edge of the spreadsheet, or the top edge of the footer and the bottom edge of the spreadsheet.
Height – enter the height for the header or footer.
AutoFit height – automatically adjusts the height of the header or footer to fit the content.
Preview box – shown on the right side of Figure 13, this area displays a preview of the current selection.
More – opens the Border/Background dialog, where you can define the appearance of borders and background colors or images for headers or footers. See Chapter 5, Using Styles and Templates, for more information.
Edit – opens the Header or Footer dialog where you can add, edit, or format text that is placed in the header or footer. See “Header or footer contents” below for more information.
The headers and footers in a Calc spreadsheet have three columns for text. Each column can either be empty or have different contents than the other columns.
1) Select the sheet where you want to turn on the header or footer.
2) Open the Page Style dialog (Figure 13), then select Header on or Footer on and the options for the header or footer. See “Setting headers and footers” above.
3) Click Edit to open the Header or Footer dialog (Figure 14). If Same content on left and right pages is deselected in the Page Style dialog, the Header or Footer dialog will have tabbed pages where you can set the header or footer contents for right and left pages.
Figure 14: Header dialog
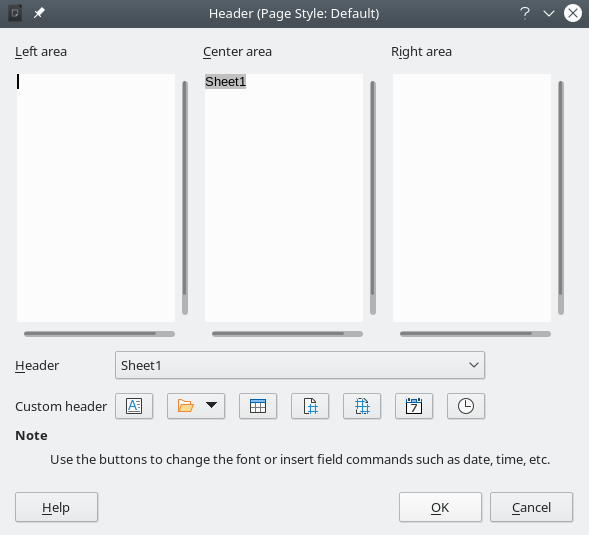
4) To enter standard contents into the header or footer, select an option from the Header or Footer drop-down list.
5) To enter customized contents into the header or footer, click in one of the area boxes and type your text, or click in one of the area boxes and click one of the Custom header or Custom footer icons. These icons are explained below.
6) To change the appearance of the text in the header or footer, click the Text Attributes icon to open the Text Attributes dialog, where you can set the font, font effects and font position.
7) Click OK to save the changes to text attributes and close the Text Attributes dialog.
8) Click OK to save the changes to the contents of the header or footer and close the Header or Footer dialog.
9) Click OK to save the changes to your header or footer and close the Page Style dialog.
The options available for a Custom header or Custom footer are as follows:
Text Attributes – opens a Text Attributes dialog where you can assign formats to new or selected text. The Text Attributes dialog contains tabs for Font, Font Effects, and Position.
Title – inserts a file name placeholder in the selected area. Click and select either Title, File Name, or Path/File Name in the drop-down menu that opens. If a title has not be assigned to the spreadsheet, the file name for the spreadsheet will be inserted instead.
Sheet Name – inserts a placeholder in the selected area for the sheet name of the selected sheet in the spreadsheet.
Page – inserts a placeholder in the selected area for the page number. This allows continuous page numbering in a spreadsheet.
Pages – inserts a placeholder in the selected area for the total number of pages in the spreadsheet.
Date – inserts a placeholder in the selected area for the current date, which will be repeated in the header/footer on each page of the spreadsheet.
Time – inserts a placeholder in the selected area for the current time, which will be repeated in the header/footer on each page of the spreadsheet.
Calc can export documents to PDF (Portable Document Format). This industry-standard file format is ideal for sending a file to someone else, for viewing using Adobe Acrobat Reader or any other PDF viewer.
Caution
By default, a document in PDF format is not protected against contents tampering or editing. The PDF document contents can be edited by specialized software tools, including LibreOffice Draw.
Tip
Unlike Save As, the Export command writes a copy of the current document in a new file with the chosen format, but keeps the current document and format open in your session.
Click the Export Directly as PDF icon on the Standard toolbar to export the entire spreadsheet using the PDF settings most recently selected on the PDF Options dialog (see below). You are asked to enter the file name and location for the PDF, but you do not get a chance to choose a page range, image compression, or other options.
For more control over the content and quality of the resulting PDF, use File > Export as PDF. The PDF Options dialog opens. This dialog has six tabs (General, Initial View, User Interface, Links, Security, and Digital Signatures). Select the appropriate settings, and then click Export. Then enter the location and file name of the PDF to be created, and click Save to export the file.
Tip
You can also access the PDF Options dialog by going to File > Export on the Menu bar and then then selecting the PDF - Portable Document Format entry in the Save as type drop-down menu.
On the General tab (Figure 11), you can choose which pages to include in the PDF, the type of compression to use for images (which affects the quality of images in the PDF), and other options. For more information, see the Getting Started Guide or the Help. In most cases, the defaults will be what you need.
Figure 15: PDF Options dialog – General tab
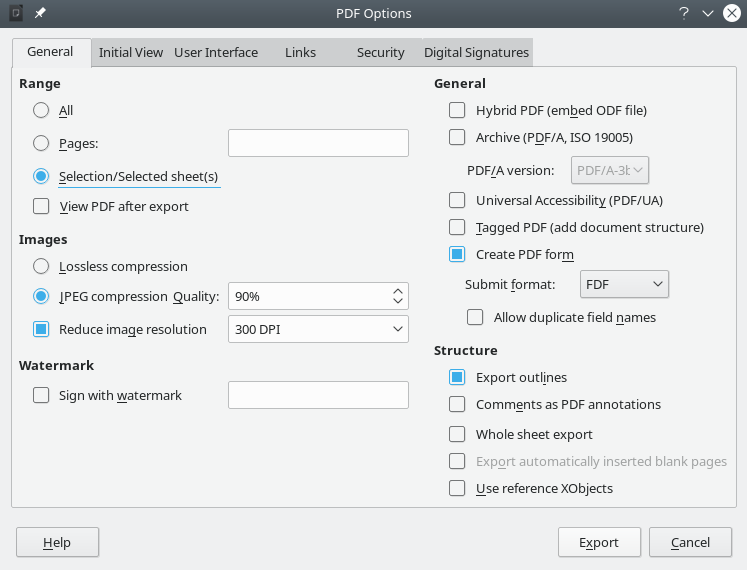
Range section
All: Exports the entire document to PDF.
Pages: To export a range of pages within a selected sheet, use the format 3-6 (pages 3 to 6). To export single pages, use the format 7;9;11 (pages 7, 9, and 11), or a combination of the two formats.
Selection/Selected sheet(s): Exports the selected material (one or more sheets or part of a sheet).
View PDF after export: If selected, your default PDF viewer will open and display the newly exported PDF.
Images section
Lossless compression: Images are stored without any loss of quality. This option can lead to large files when used with photographs. Recommended for other kinds of images or graphics.
JPEG compression: Allows for varying degrees of quality, in the range 1 to 100%. A setting of 90% works well with photographs (small file size, little perceptible loss of quality).
Reduce image resolution: Select the required value from the options in the drop-down menu. Lower DPI (dots per inch) images have lower quality. Higher DPI settings can greatly increase the size of the exported file.
Watermark section
Sign with watermark: When this option is selected, a transparent overlay of the text you enter into the text box will appear on each page of the PDF.
General section
Hybrid PDF (embed ODF file): Use this setting to export the document as a PDF file containing two file formats: PDF and ODF. In PDF viewers it behaves like a normal PDF file, and it remains fully editable in LibreOffice.
Archive (PDF/A, ISO 19005): PDF/A is an ISO standard for long-term preservation of documents, by embedding all the information necessary for faithful reproduction (such as fonts) while forbidding other elements (including forms, security, and encryption). PDF tags are written. Also select which version of the standard to use, PDF/A-1b, PDF/A-2b, or PDF/ A-3b.
Universal Accessibility (PDF/UA): Use this setting to create a universal accessibility-compliant PDF file that follows the requirements of the PDF/UA standard (formerly ISO 14289).
Tagged PDF: Tagged PDF contains information about the structure of the document’s contents. This can help to display the document on devices with different screens, and when using screen reader software. Some tags that are exported are table of contents, hyperlinks, and controls. This option can increase file sizes significantly.
Create PDF form – Submit format: Use the drop-down menu to choose the format of submitting forms from within the PDF file (FDF, PDF, HTML, or XML).
Allow duplicate field names – If enabled, the same field name can be used for multiple fields in the generated PDF file. If disabled, field names will be exported using generated unique names.
Structure section
Export outlines: Generally not used in Calc.
Comments as PDF annotations: Exports comments as PDF notes. You may not want this!
Whole Sheet Export: The setting allows you to export your Calc spreadsheet to PDF, with the content of a sheet exported as one page in the PDF. This facility is not intended for printing but allows you to easily see and review the full content of a spreadsheet document in a PDF form, without the usual slicing of the sheets into printable pages. Preview pages will have different sizes, as do the source sheets.
Note:
Selecting the Whole Sheet Export option causes Calc to disregard many of the other settings on the PDF Options dialog.
Export automatically inserted blank pages: Not available in Calc.
Use reference XObjects: Reference XObjects enable one PDF file to import content from another. More information can be found in the ISO 32000 standard that defines the core specifications of PDF files. If you are not familiar with reference XObjects, leave this box unchecked.
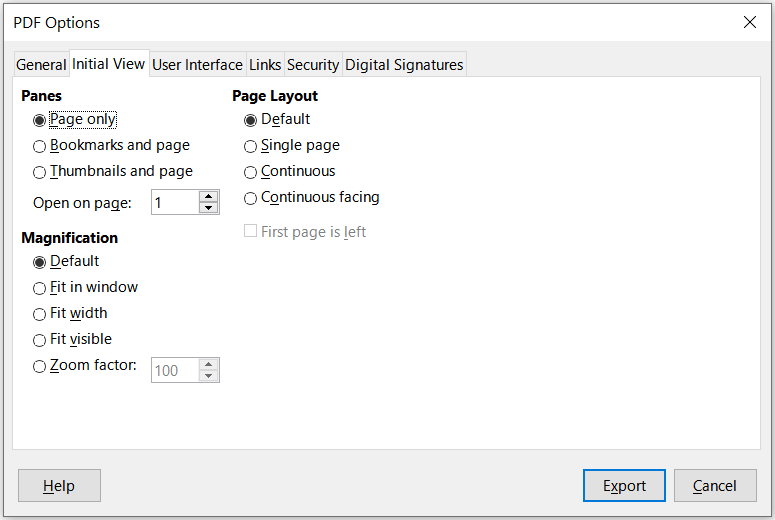
On the Initial View tab (Figure 16), you can select how the PDF file opens by default in a PDF viewer. The options should be self-explanatory.
Figure 16: PDF Options dialog – Initial View tab
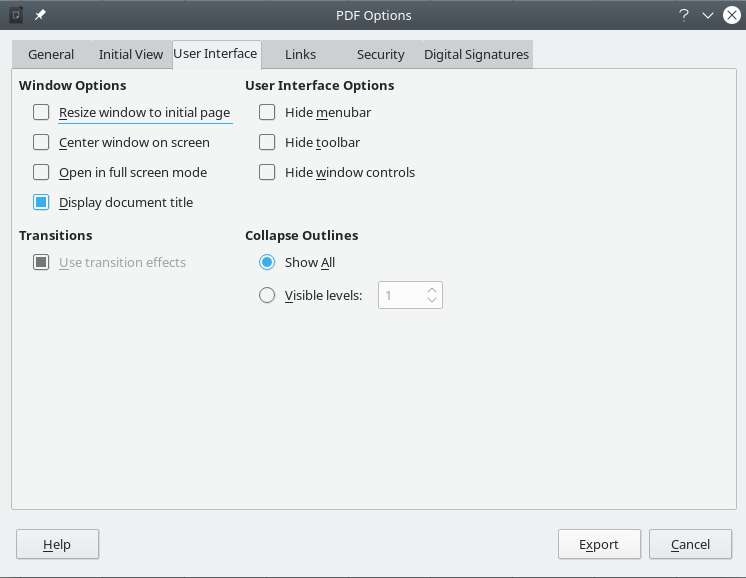
On the User Interface tab (Figure 17), you can select options to control how a PDF viewer displays the file. Some of these options are useful when you are creating a PDF to be used as a presentation or a kiosk-type display.
Window Options
Resize window to initial page: the PDF reader window displays the whole first page.
Center window on screen: the PDF is shown in a reader window centered on screen.
Open in full screen mode: the PDF reader window is in front of all other windows.
Display document title: the PDF is shown with the document title in the reader title bar.
Transitions
User Interface Options
Hide menubar: hides the reader menu bar when the document is active.
Hide toolbar: hides the reader toolbar when the document is active.
Hide window controls: hides the reader controls when the document is active.
Collapse Outlines
Show All: shows all outline levels when the reader opens the PDF.
Visible levels: shows outline levels down to the selected level (in the range 1 to 10) when the reader opens the PDF.
Figure 17: PDF Options dialog – User Interface tab
Note
Outlines are generally not used in Calc.
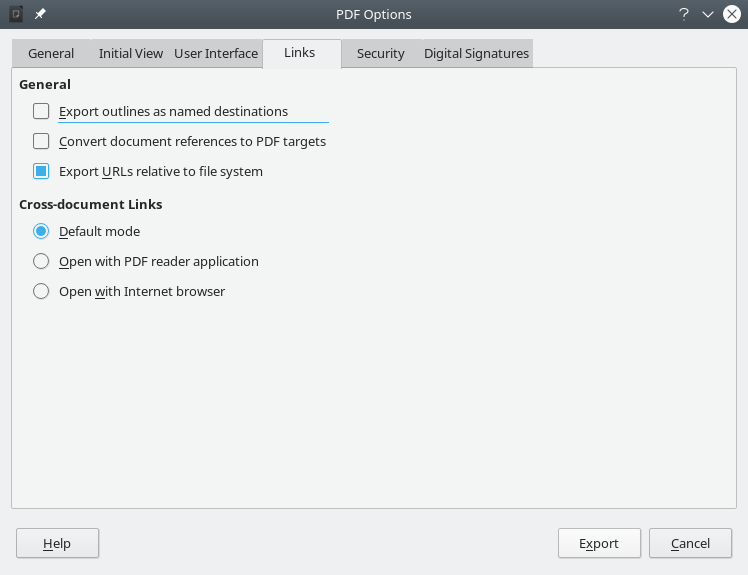
On the Links tab (Figure 18) you can select how bookmarks and hyperlinks are exported to PDF.
General
Export outlines as named destinations: If you have defined Calc sheet names, this option exports them as “named destinations” to which Web pages and PDF documents can link. Generally not used in Calc.
Convert document references to PDF targets: If you have defined links to other documents with OpenDocument extensions (such as .odt, .ods, and .odp), this option converts the file extensions to .pdf in the exported PDF document.
Export URLs relative to file system: If you have defined relative links in a document, this option exports those links to the PDF. See Relative hyperlinks in the Calc Help for more information.
Cross-document links
Default mode: The PDF links will be handled as specified in your operating system.
Open with PDF reader application: Use the same application used to display the PDF document to open linked PDF documents.
Open with Internet browser: Use the default Internet browser to display linked PDF documents.
Figure 18: PDF options dialog - Links tab
Use the Security tab (Figure 19) to encrypt and set passwords when you export your spreadsheet and create the PDF file. Setting encryption and passwords also allows you to apply restrictions on printing and if changes or copying can be carried out on the PDF file.
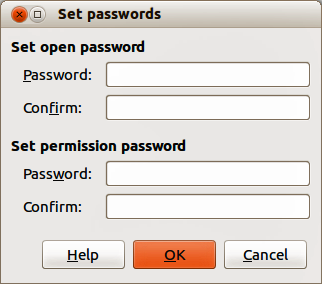
Click the Set Passwords button to open the Set Passwords dialog (Figure 20), where you enter the passwords. You can enter a password (Set open password) to open the file and an optional password (Set permission password) to restrict what readers can do with the PDF file.
With an open password set, the PDF can only be opened with the password. Once opened, there are no restrictions on what the user can do with the document (for example, print, copy, or change it).
With a permission password set, the PDF can be opened by anyone, but its permissions can be restricted. See Figure 19. After you set a password for permissions, the other choices on the right half of the Security tab become available.
With both the open password and permission password set, the PDF can only be opened with the correct password, and its permissions can be restricted.
The options on the Security tab become available only when passwords have been set.
Note
Permissions settings are effective only if the user’s PDF viewer respects the settings.
Figure 19: PDF Options dialog – Security tab
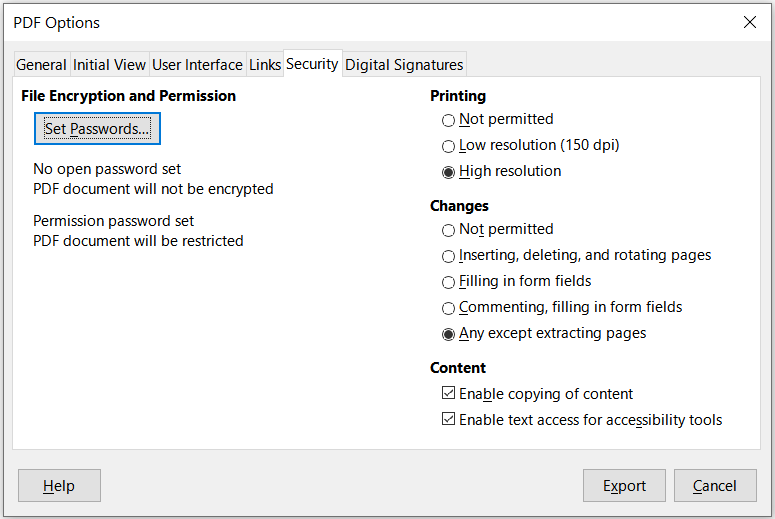
Figure 20: Set Passwords dialog
The Digital Signatures tab contains the options related to exporting a digitally signed PDF.
Digital signatures are used to ensure that the PDF was really created by the original author (that is, you), and that the document has not been modified since it was signed.
The signed PDF export uses the keys and X.509 certificates already stored in your default key store location or on a smartcard. The key store to be used can be selected under Tools > Options > LibreOffice > Security > Certificate Path. (Not available on Microsoft Windows systems, where LibreOffice will access the system certificate storage.) When using a smartcard, it must already be configured for use by your key store. This is usually done during installation of the smartcard software. Details about using these features is outside the scope of this chapter.
Figure 21: PDF Options dialog – Digital Signatures tab
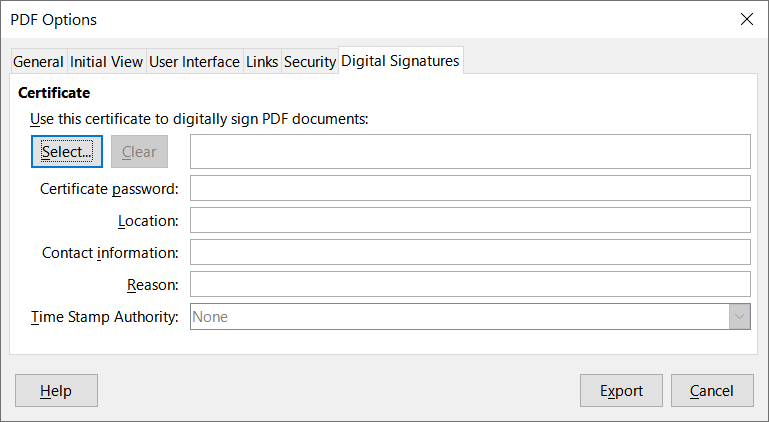
Use this certificate to digitally sign PDF documents: Click Select to open the Select X.509 Certificate dialog, where all certificates found in your selected key store are displayed. If the key store is protected by a password, you are prompted for it. When using a smartcard that is protected by a PIN, you are also prompted for that.
Certificate password: Enter the password used for protecting the private key associated with the selected certificate. Usually this is the key store password. If the key store password has already been entered in the Select X.509 Certificate dialog, the key store may already be unlocked and not require the password again.
Location, Contact information, Reason: Optionally enter additional information about the digital signature that will be applied to the PDF. This information will be embedded in the appropriate PDF fields and will be visible to anyone viewing the PDF. Each or all of the three fields may be left blank.
Time Stamp Authority: Optionally select a Time Stamping Authority (TSA) URL. During the PDF signing process, the TSA will be used to obtain a digitally signed timestamp that is then embedded in the signature. Anyone viewing the PDF can use this timestamp to verify when the document was signed.
LibreOffice uses the term “export” for some file operations involving a change of file type. If you want to use another spreadsheet file format (for example, Microsoft Excel), use File > Save As. If you want to create web pages from your spreadsheet, use File > Export.
LibreOffice provides several ways to send a document quickly and easily as an email attachment in OpenDocument format (LibreOffice default format), other spreadsheet formats, or as a PDF file. You can also email a document to several recipients. For more information, see the Getting Started Guide.
To send the spreadsheet as an email attachment:
1) Go to File > Send on the Menu bar and select from the following options. LibreOffice opens your default email program (if set) with the spreadsheet attached in the selected format.
Email Document: the spreadsheet is sent in its current format.
Email as OpenDocument Spreadsheet: the spreadsheet is sent in the ODF format (.ods).
Email as Microsoft Excel: the spreadsheet is sent in the Excel format (.xlsx).
Email as PDF: The PDF Options dialog opens. Select the parameters to be used for the PDF file. See “Controlling PDF content and quality” on page 1.
2) In your email program, enter the recipient, subject, and any text you want to add, then send the email.
To sign a document digitally, you need a personal key, also known as a certificate. A personal key is stored on your computer as a combination of a private key, which must be kept secret, and a public key, which you add to your documents when you sign them. You can get a certificate from a certification authority, which may be a private company or a governmental institution.
When you apply a digital signature to a document, a checksum is computed from the document’s content plus your personal key. The checksum and your public key are stored together with the document.
When someone later opens the document on any computer with a recent version of LibreOffice, the program will compute the checksum again and compare it with the stored checksum. If both are the same, the program will signal that you see the original, unchanged document. In addition, the program can show you the public key information from the certificate. You can compare the public key with the public key that is published on the web site of the certificate authority.
Whenever someone changes something in the document, the change breaks the digital signature.
On Windows operating systems, the Windows features for validating a signature are used. On Linux systems, files that are supplied by Mozilla Thunderbird or Firefox are used to validate the signature. For a more detailed description of how to get and manage a certificate, and signature validation, see About Digital Signatures in the LibreOffice Help.
The following procedure is only an example of how to digitally sign a document. The actual procedure depends on how your computer is set up and the computer’s operating system.
1) Open the file that you want to digitally sign.
2) Go to File > Digital Signatures > Digital Signatures on the Menu bar.
If you have set LibreOffice to warn you when the document contains certain types of information (see “Removing personal data” on page 1), you may see a message box asking whether you want to continue signing the document. Click Yes to continue, or click No to exit and take appropriate action to remove the private information and restart this procedure.
If you have not saved the document since the last change, a message box appears. Click Yes to save the file. When you have saved the file, the Digital Signatures dialog opens (Figure 22). It lists existing signatures and their descriptions (if they have any).
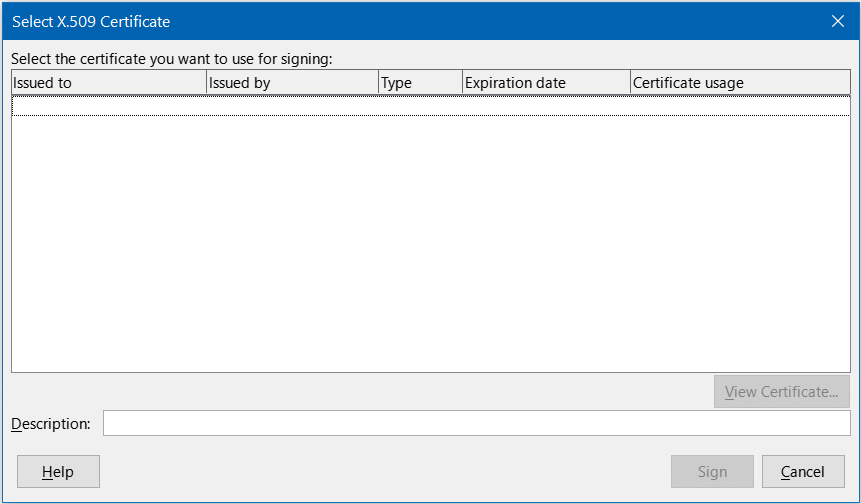
3) On the Digital Signatures dialog, click Sign Document to open the Select X.509 Certificate dialog (Figure 23).
Select the certificate you want to use and click Sign to close the Select X.509 Certificate dialog.
The certificate used is displayed in the Digital Signatures dialog with an icon next to its name. This icon indicates the status of the digital signature.
An icon with a red seal indicates that the document was signed and the certificate was validated.
An icon with a yellow caution triangle overlaying the red seal indicates that the document is signed but that the certificate could not be validated.
An icon with a yellow caution triangle by itself indicates an invalid digital signature.
4) Click Close to close the Digital Signatures dialog and digitally sign your file.
A signed document shows an icon in the status bar. You can double-click the icon to view the certificate. More than one signature can be added to a document.
Note
If you make any changes to the document after digitally signing, the digital signature is removed automatically and you have to repeat the above procedure to digitally sign it again.
Figure 22: Digital Signatures dialog
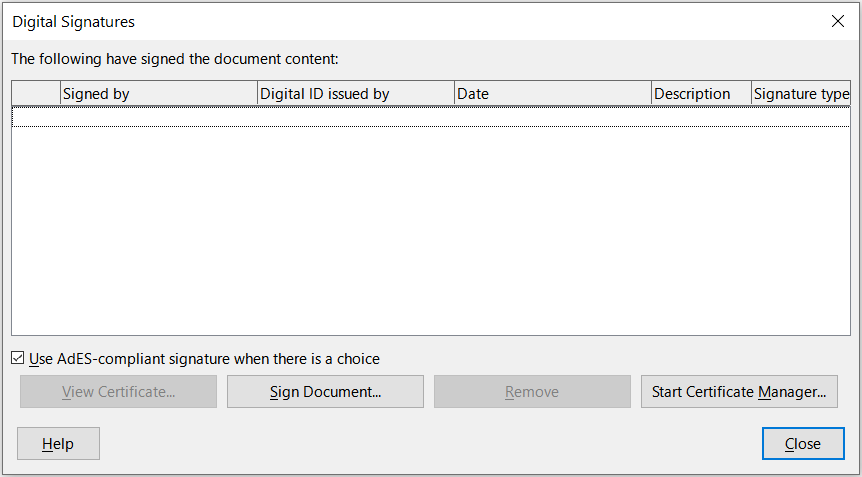
Figure 23: Select X.509 Certificate dialog
In the past, LibreOffice prohibited creating multiple signatures by the same author on a document, because there was no semantic meaning of signing the same document multiple times. LibreOffice now provides a signature description, so multiple signatures from the same author are allowed, because each signature can have a different meaning.
When you select File > Digital Signatures > Digital Signatures, the dialog (Figure 22) lists existing signatures together with their description (if they have any).
When you click the Sign Document button, the dialog (Figure 23) for certificate selection now also asks for an optional description.
Changing the value of an existing description invalidates the signature.
Normally, macros are part of a document. If you sign a document, the macros inside the document are signed automatically. If you want to sign only the macros, but not the document, go to Tools > Macros > Digital Signature on the Menu bar and apply the signature as described above.
You may wish to ensure that personal data, versions, notes, hidden information, or recorded changes are removed from files before you send them to other people or create PDFs from them.
In Tools > Options > LibreOffice > Security > Options, you can set Calc to remind you when files contain certain information and to remove personal information automatically on saving.
To remove personal and some other data from a file, go to File > Properties. On the General tab, deselect Apply user data and then click Reset Properties. This removes any names in the created and modified fields, deletes the modification and printing dates, and resets the Total editing time to zero, the creation date to the current date and time, and the Revision number to 1.
To remove version information, either go to File > Versions on the Menu bar, select the versions from the list and click Delete, or go to File > Save As and save the file with a different name.