
Draw Guide 7.4
Chapter 10,
Printing, Exporting and Emailing
This document is Copyright © 2023 by the LibreOffice Documentation Team. Contributors are listed below. This document maybe distributed and/or modified under the terms of either the GNU General Public License (https://www.gnu.org/licenses/gpl.html), version 3 or later, or the Creative Commons Attribution License (https://creativecommons.org/licenses/by/4.0/), version 4.0 or later. All trademarks within this guide belong to their legitimate owners.
Contributors for this edition:
Peter Schofield
Contributors for previous editions:
Claire Wood
Hazel Russman
Jean Hollis Weber
John A Smith
Kees Kriek
Peter Schofield
Ron Faile Jr.
Please direct any comments or suggestions about this document to the Documentation Team mailing list: loguides@community.documentfoundation.org.
Note
Everything sent to a mailing list, including email addresses and any other personal information that is written in the message, is publicly archived and cannot be deleted.
Published January 2023. Based on LibreOffice 7.4 Community.
Other versions of LibreOffice may differ in appearance and functionality.
Some keystrokes and menu items are different on macOS from those used in Windows and Linux. The table below gives some common substitutions used in this document. For a detailed list, see LibreOffice Help.
|
Windows or Linux |
macOS equivalent |
Effect |
|
Tools > Options |
LibreOffice > Preferences |
Access setup options |
|
Right-click |
Control+click, Ctrl+click, or right-click depending on computer setup |
Open a context menu |
|
Ctrl or Control |
⌘ and/or Cmd or Command, depending on keyboard |
|
|
Alt |
⌥ and/or Alt or Option depending on keyboard |
Used with other keys |
|
F11 |
⌘+T |
Open the Styles deck in the Sidebar |
The procedures in this chapter for printing, exporting and emailing drawings from LibreOffice Draw are examples only. Actual procedures do depend on the following:
Type of computer.
Computer operating system and software application being used.
Type of printer connected to the computer.
How the printer is connected to the computer.
Note
Due to the different ways a computer can be setup, the print dialog that opens may differ from the dialogs shown in this chapter.
Before printing any drawings from LibreOffice Draw, it is recommended to setup a default printer. An example printer setup procedure for LibreOffice Draw is as follows:
1) Go to File > Printer Settings on the Menu bar to open the Printer Setup dialog. An example Printer Setup dialog is shown in Figure 1.
2) Select the required printer from the printers listed in the Name drop-down list.
3) Click OK to save the printer selection and close the Printer Setup dialog.
To quickly print a document or drawing, without changing any print settings, click on Print Directly on the Standard toolbar (Figure 2) to send the entire document to the default printer that is defined for the computer.
If Print Directly is not visible on the Standard toolbar, it can be added as follows:
1) Right-click in an empty area on the Standard toolbar and select Visible Buttons from the context menu.
2) Select Print Directly from the list of available tools and the Print Directly tool is added to the Standard toolbar (highlighted in Figure 2).
Figure 1: Example Printer Setup dialog
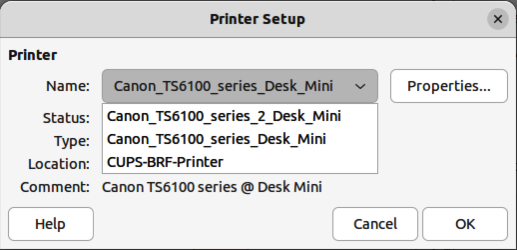
Figure 2: Standard toolbar — Print Directly installed

Notes
The options selected in the Print dialog only apply to the printing of the current document that is open in Draw. To specify default print settings for LibreOffice, go to Tools > Options > LibreOffice > Print (macOS LibreOffice > Preferences > LibreOffice > Print) on the Menu bar to open the Options LibreOffice Print dialog.
Any print options selected in the Print dialog when printing from Draw overrides the default printer settings that have been set using Tools > Options > LibreOffice > Print (macOS LibreOffice > Preferences > LibreOffice > Print) and Tools > Options > LibreOffice Draw > Print (macOS LibreOffice > Preferences > LibreOffice Draw > Print).
For more control over printing when using a Linux, or Windows, open and use the Print dialog (Figure 3) using one of the following methods.
Go to File > Print on the Menu bar.
Use the keyboard shortcut Ctrl+P.
Click on Print on the Standard toolbar.
The following options are an example of what may be available on the General page of the Print dialog (Figure 3).
Printer
Status:
Indicates if the selected printer is the default printer.
Properties
Click on Properties to open the properties dialog for the printer being used. The options available in this dialog depends on the type of printer connected to the computer and the computer operating system being used.
Range and Copies
All Pages
Prints all the pages in the document.
Selection
Prints the pages selected in LibreOffice Draw.
Pages
Select the page number(s) to print. For multiple pages, use the format 1, 3, 7 or 1 – 5, 7, 9 for page number selection.
Figure 3: Print dialog — General page — Windows and Linux
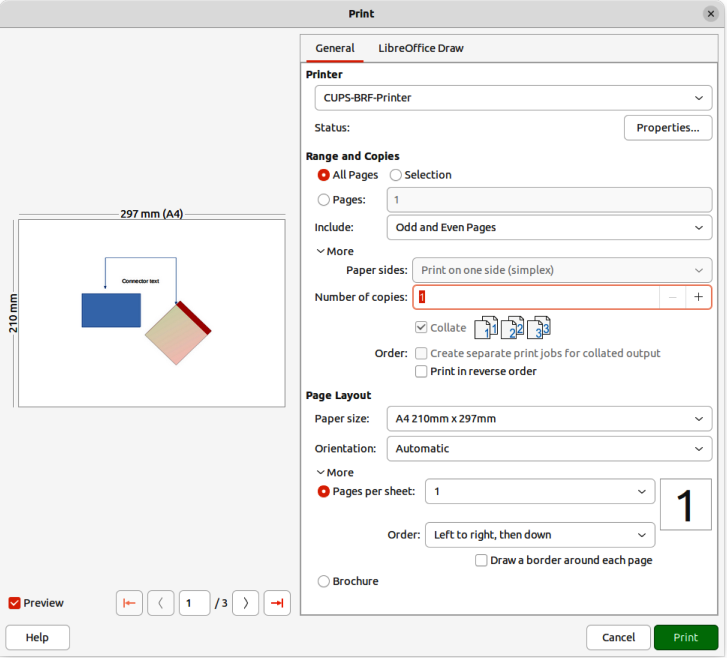
Include
Select from the drop-down list Odd and Even Pages, Odd Pages, or Even Pages.
More > Paper sides
Select from the drop-down list Print on one side (simplex), Print on both sides (duplex long edge), or Print on both sides (duplex short edge).
More > Number of copies
Enter number of printed copies required for the document.
More > Collate
Collates multiple printed copies into separate documents.
More > Order
Select from Create separate print jobs for collated output (only available when more than one copy is being printed), or Print reverse order.
Page Layout
Paper size
Select the paper size to use from drop-down list.
Orientation
Select from the drop-down list Automatic, Portrait, or Landscape.
More > Pages per sheet
Select from the drop-down list how many pages are printed on one sheet of paper.
More > Order
Select from the drop-down list the printing order of multiple pages on one sheet of paper.
More > Draw a border around each page
When multiple pages are printed on one sheet of paper, a border is drawn around each page.
More > Brochure
Prints the document so the pages can be folded into a brochure or booklet.
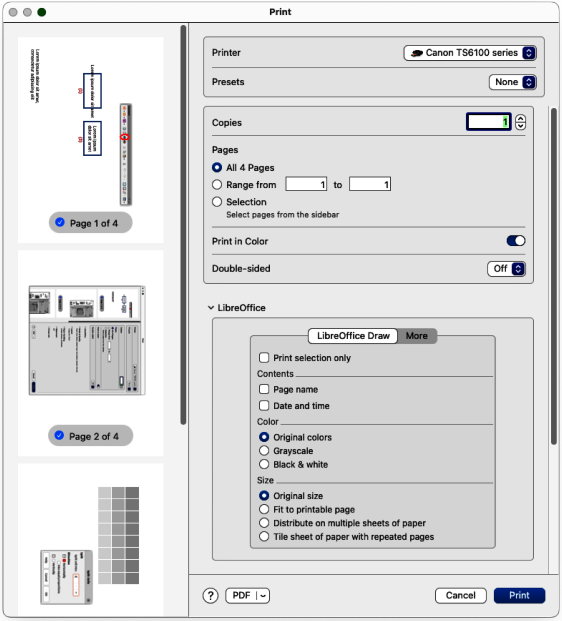
The following options are available on the LibreOffice Draw page of the Print dialog (Figure 4) providing options that are only specific to the current drawing being printed:
Contents
Color
Size
Original size
Prints the drawing using its original size.
Fit to printable page
Drawing size is changed so that it fits on the paper size used for printing.
Distribute on multiple sheets of paper
Used if the drawing is too large for the paper size being used.
Tile sheet of paper with repeated pages
Used to print multiple copies of a drawing on a page.
Figure 4: Print dialog — LibreOffice Draw page — Windows or Linux
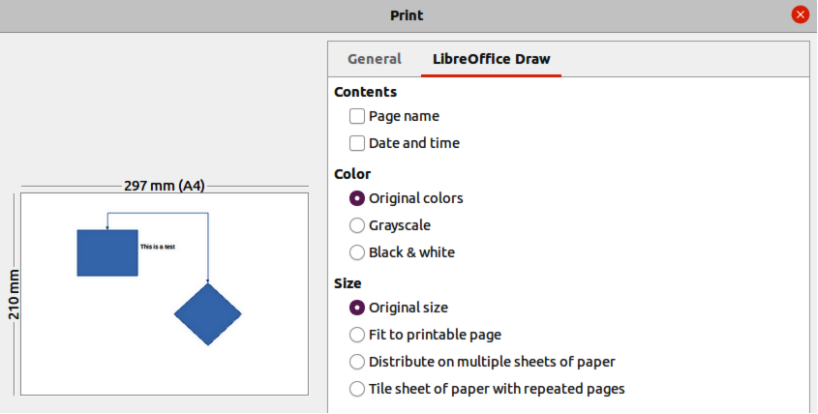
Figure 5: Print dialog — General printing — macOS
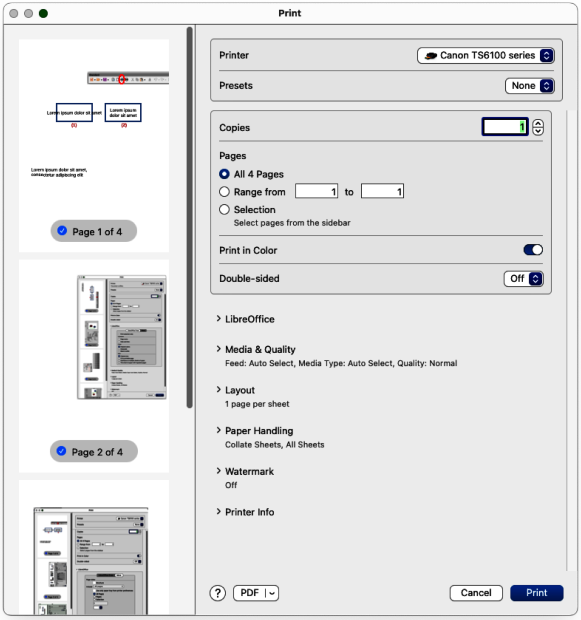
For more control over printing using macOS, open and use the Print dialog (Figure 5) using one of the following methods.
Go to File > Print on the Menu bar.
Use the keyboard shortcut ⌘+P.
Click on Print on the Standard toolbar.
The Print dialog in macOS has the following options are available for general printing (Figure 5).
Printer
Presets
Copies
Pages
All
Prints all the pages in the document.
Range from
Select a range of page number(s) to print.
Selection
Select the pages to print from the Pages pane.
Print in Color
Double-sided
On
When selected, prints the drawing pages double-sided using long edge binding.
On (Short)
When selected, prints the drawing pages double-sided using short edge binding.
Media & Quality
Feed from
Select from the drop-down list the paper tray to use if the printer has more than one paper tray.
Media Type
Select from the drop-down list the paper type that has been loaded into the paper tray being used, for example Envelope, Photo, Plain Paper.
Quality
Select the level of printing quality required.
Layout
Pages per sheet
Select from the drop-down list how many pages are printed on one sheet of paper.
Layout Direction
Select the printing order of multiple pages on one sheet of paper.
Border
When multiple pages are printed on one sheet of paper, a border is drawn around each page.
Reverse page orientation
If LibreOffice prints the pages in the wrong order, select this option and print the document again.
Flip horizontally
If LibreOffice prints the pages in the wrong orientation, select this option and print the document again.
Paper Handling
Collate Sheets
When selected collates multiple printed copies into separate documents.
Pages to Print
Select which pages in the document to print from the drop-down list: All pages; Odd only; Even only.
Page Order
Select the page printing order from the drop-down list: Automatic; Normal; Reverse.
Scale to fit paper size
Adjusts the printed page to fit the paper size.
Destination Paper Size
Select a paper size from the options available in the drop‑down list. Only available if Scale to fit paper size has been selected.
Scale Down Only
Scales down the drawing to fit the page size. Only available if the selected page size is smaller than the drawing size.
Watermark
Click on LibreOffice to open the printing options available for LibreOffice Draw (Figure 6).
Print selection only
Contents
Color
Size
Original size
Prints the drawing using its original size.
Fit to printable page
Drawing size is changed so that it fits on the paper size used for printing.
Figure 6: Print dialog — LibreOffice Draw options — macOS
Distribute on multiple sheets of paper
Used if the drawing is too large for the paper size being used.
Tile sheet of paper with repeated pages
Used to print multiple copies of a drawing on a page.
To access more printing options in LibreOffice Draw, click on More to open the More page for more LibreOffice Draw options (Figure 7).
Brochure
Figure 7: Print dialog — LibreOffice Draw More page — macOS
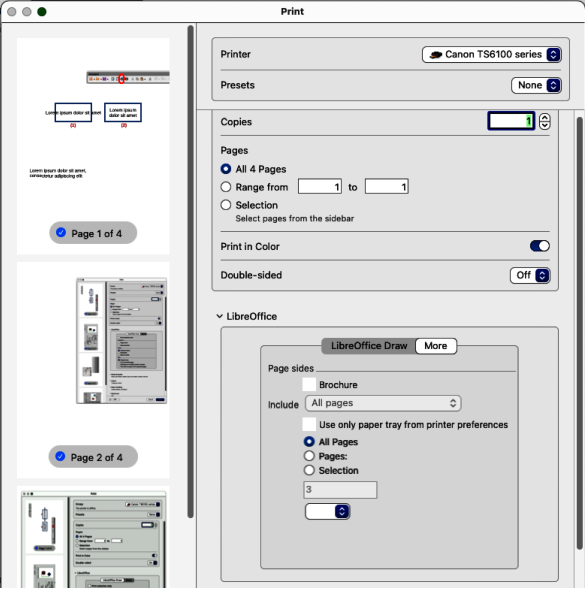
Include
Use only paper tray from printer preferences
All Pages
Pages
Selection
The following printing instructions are examples only. Actual method of printing may differ from these examples because printing depends on computer operating system, computer setup, and the printer being used. For more information on printing, see the Writer Guide.
1) Open the Print dialog, see “Linux or Windows printing” on page 1,or “macOS printing” on page 1.
2) Select the printer to use if more than one printer is connected to the computer.
3) In Page Layout, select the number of pages to print per sheet of paper from the Pages per sheet drop-down list. The preview panel on the right shows how the pages will look on a printed sheet of paper.
4) In Page Layout, select how the multiple pages are printed on the sheet of paper from the Order drop-down list.
5) If necessary, select Draw a border around each page to distinguish each page printed on a sheet of paper.
6) Click OK to print the document and close the Print dialog.
1) Open the Print dialog, see “Linux or Windows printing” on page 1,or “macOS printing” on page 1.
2) Select the printer to use if more than one printer is connected to the computer.
3) In Ranges and Copies, select Pages and enter the page number of the page to print.
4) Click OK to print the individual pages and close the Print dialog.
1) Open the Print dialog, see “Linux or Windows printing” on page 1,or “macOS printing” on page 1.
2) Select the printer to use if more than one printer is connected to the computer.
3) In Ranges and Copies, select Pages and enter the page numbers of the pages to print using the format, for example, 1,3,7 or 2–5,7,9 for page number selection.
4) Click OK to print the pages and close the Print dialog.
1) Select the pages in the Pages panel in LibreOffice Draw.
2) Open the Print dialog, see “Linux or Windows printing” on page 1,or “macOS printing” on page 1.
3) Select the printer to use if more than one printer is connected to the computer.
4) In Ranges and Copies, select Selection and then select Odd and Even Pages, Even Pages, or Odd Pages from the drop-down list.
5) Click OK to print the pages and close the Print dialog.
In Writer, Impress, and Draw, a document can be printed as a brochure (also known as booklet printing). The pages are arranged so that when the printed pages are folded in half, the pages are in the correct order to form a brochure or booklet.
Tip
Plan the document to make it look good when printed as a brochure. Choose appropriate margins, font sizes, and so on as the pages are normally printed at half size on a sheet of paper. Experiment to get the best document format to match the capabilities of the printer being used.
1) Open the Print dialog, see “Linux or Windows printing” on page 1,or “macOS printing” on page 1.
2) Select the printer to use if more than one printer is connected to the computer.
3) In Printer, click Properties to open the properties dialog for the selected printer.
4) Make sure the printer is set to the same orientation (portrait or landscape) as specified in the page setup for the document. Usually the orientation does not matter, but it does for brochures.
5) Click OK to close the properties dialog and return to the Print dialog.
6) In Page Layout, select More, then select the Brochure option.
7) In Range and Copies, select Even pages, or Odd pages from the Selection drop-down list.
8) Click OK to print the even or odd pages.
9) Take the printed pages out of the printer and put back into the printer in the correct orientation to print on the blank side. This may require some testing to find out what the correct arrangement is for the selected printer.
10) If Even Pages was selected, now select Odd Pages in Range and Copies. If Odd Pages was selected, now select Even Pages in Range and Copies.
11) Click OK to finish printing the document as a brochure and close the Print dialog.
12) Make sure the printed pages create a brochure when all the pages are placed in the correct order.
1) Open the Print dialog, see “Linux or Windows printing” on page 1,or “macOS printing” on page 1.
2) Select the printer to use if more than one printer is connected to the computer.
3) In Printer, click Properties to open the properties dialog for the selected printer.
4) Make sure the printer is set to the same orientation (portrait or landscape) as specified in the page setup for the document. Usually the orientation does not matter, but it does for brochures.
5) Click OK to close the properties dialog and return to the Print dialog.
6) In Range and Copies, select More, then select Print on both sides (duplex long edge) from the Paper sides drop-down list. Actual options available for duplex printing depend on the printer model and the computer system being used.
7) In Page Layout, Select More, then select the Brochure option.
8) In Range and Copies, select the All Pages option.
9) Click OK to print the document as a brochure and close the Print dialog.
The following example procedure explains how to print documents in black and white or grayscale on a color printer:
1) Open the Print dialog, see “Linux or Windows printing” on page 1,or “macOS printing” on page 1.
2) Select the printer to use if more than one printer is connected to the computer.
3) Click on LibreOffice Draw to open the printing options page for LibreOffice Draw.
4) In Color, select Grayscale, or Black & white.
5) Click OK to print the document and close the Print dialog.
Note
Some color printers may only allow printing in color regardless of the settings selected. More details can be found in the information that came with the selected printer.
Tip
Grayscale is the best option for printing any colored text or graphics in a document on a monochrome printer. Colors printed in shades of gray give more detail. When printing color in black and white some of this detail maybe lost.
To change the LibreOffice settings to print all colored text and graphics as grayscale, or black and white:
1) Go to Tools > Options > LibreOffice Draw > Print (macOS LibreOffice > Preferences > LibreOffice Draw > Print) on the Menu bar to open the Options LibreOffice Draw Print dialog (Figure 8).
Figure 8: Options LibreOffice Draw Print dialog
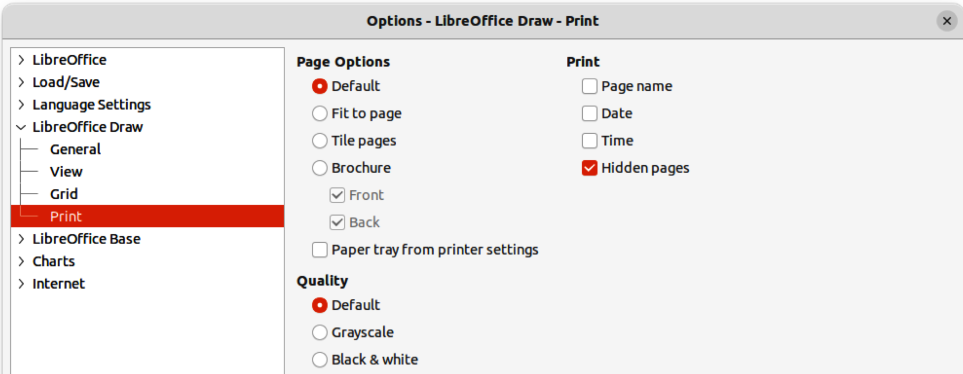
2) In Quality, select either the option Grayscale, or Black & white.
3) Click OK to save the change and close the Options LibreOffice Draw Print dialog.
4) Print the document using one of the above procedures and the document is printed as grayscale, or black and white.
LibreOffice can export documents to PDF (Portable Document Format). This industry wide standard of file format is ideal for sending a file to be viewed on another computer using PDF viewing software.
Export the entire document using default PDF settings as follows:
1) Click on Export Directly as PDF on the Standard toolbar, or got to File > Export As > Export Directly as PDF on the Menu bar.
2) Enter a file name and location for the PDF file and click on Save to export the file as PDF.
Note
Note that page range, image compression, or other printing options are not available when creating a PDF file using this method.
For more control over the content and quality of the resulting PDF, use the options available in the PDF Options dialog (Figure 9). For more information on available options, see the Getting Started Guide.
Figure 9: PDF Options dialog
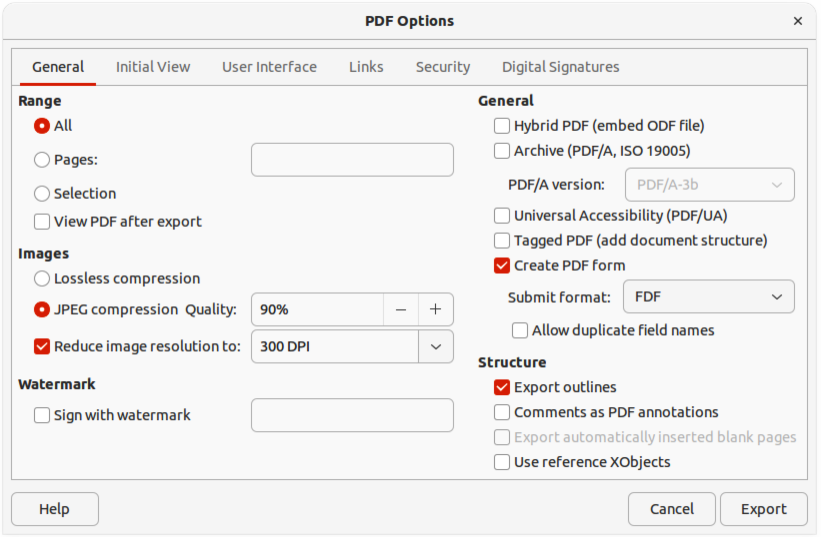
1) Go to File > Export As > Export as PDF on the Menu bar to open the PDF Options dialog.
2) Select the required options available in the available pages in the PDF Options dialog.
3) Click on Export and a file browser window opens.
4) Navigate to the location and enter a file name for the PDF being created.
5) Click on Save to export the file as PDF. The file browser window and the PDF Options dialog close.
LibreOffice can export files in various formats, which are listed in the drop-down list of the file browser window. For more information on exporting graphics, see Chapter 6, Editing Pictures.
1) Go to File > Export on the Menu bar to open a file browser window.
2) Navigate to the directory where the drawing is going to be saved.
3) Specify a file name for the exported drawing in the Name text box.
4) Select the required file format from the drop-down list.
5) Click on Save to save the file and close the file browser window.
Note
The content of the exported file depends on the elements selected on the drawing. If no elements are selected, the entire drawing is exported.
To export a multi-page Draw document as a series of web pages:
1) Go to File > Export on the Menu bar to open a file browser window.
2) Select HTML Document (Draw) (.html;.htm) as the file format and click on Save to open the HTML Export dialog (Figure 10).
Figure 10: HTML Export dialog
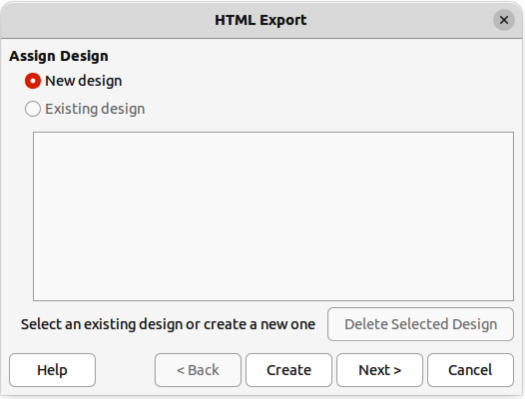
3) In Assign Design, select New Design to create a new design, or select an Existing design to use an existing HTML design.
4) Click on Next and follow the prompts to create the web pages and save the drawing as an HTML file. For more information on how to create HTMl file, see the Getting Started Guide.
LibreOffice provides several ways to send documents quickly and easily as an email attachment in ODF format (LibreOffice default format), or as a PDF. For more information on emailing documents, see the Getting Started Guide.
To email the current document in ODF format:
1) Go to File > Send > Email Document on the Menu bar. LibreOffice opens the default email program with the document attached to a new email.
2) In the email program, enter the recipient, subject, and message, then send the email.
To email the current document as a PDF file:
1) Go to File > Send > E-mail as PDF on the Menu bar. and the PDF Options dialog (Figure 9 above) opens.
2) Create a PDF file of the drawing using the options available in the PDF Options dialog, see “PDF format” on page 1 for more information. The default email application opens with the PDF file attached to a new email.
3) In the email application, enter the recipient, subject, and message, then send the email.
A digital signature is a mathematical scheme for verifying the authenticity of digital versions of drawings or documents.
To sign a drawing digitally, a personal key, also known as a certificate, is required. This personal key is stored on the computer being used as a combination of a private key, which must be kept secret, and a public key. These keys are added to a drawing when a digital signature is applied. A certificate is obtained from a certification authority, which may be a private company or a government institution.
When a digital signature is applied to a drawing, a checksum is computed from the drawing content plus the personal key being used. The checksum and public key are stored together with the drawing.
When the drawing is opened on another computer with a recent version of LibreOffice, the program computes the checksum again and compares it with the stored checksum. If both checksums are the same, the program opens the original, unchanged drawing.
In addition, the program can display the public key information from the certificate. This information can then be compared with the public key that is published on the web site of the certificate authority. Whenever the drawing is changed, this change breaks the digital signature.
For a more detailed description of how to obtain, use and manage a certificate and signature validation, see the Getting Started Guide and Applying Digital Signatures in the LibreOffice Help (https://help.libreoffice.org/7.1/en-US/text/shared/guide/digitalsign_send.html?&DbPAR=WRITER&System=UNIX).
It maybe necessary to remove any personal data, versions, notes, hidden information, or recorded change from drawings before being distributed, or PDFs files created.
1) In Tools > Options > LibreOffice > Security (macOS LibreOffice > Preferences > LibreOffice > Security), to open Options LibreOffice Security dialog (Figure 11).
2) Click on Options to open the Security Options and Warnings dialog (Figure 12).
3) Select the required options to allow LibreOffice to warn when drawings contain certain information and/or automatically remove personal information on saving.
4) Click OK to close the Security Options and Warnings dialog and save the selected options.
5) Click OK to close the Options LibreOffice Security dialog.
Figure 11: Options LibreOffice Security dialog
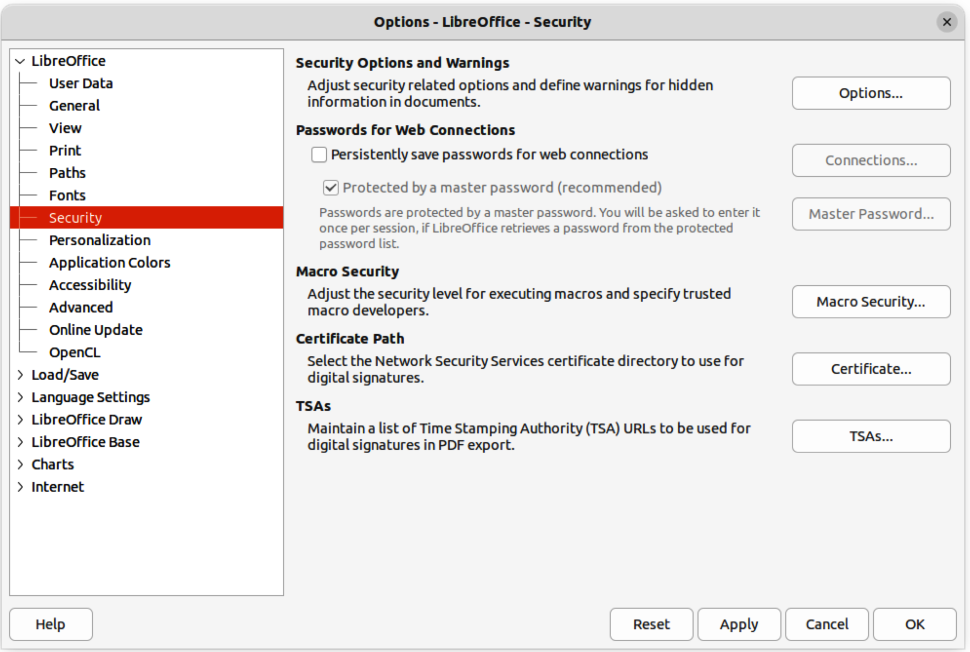
Figure 12: Security Options and Warnings dialog
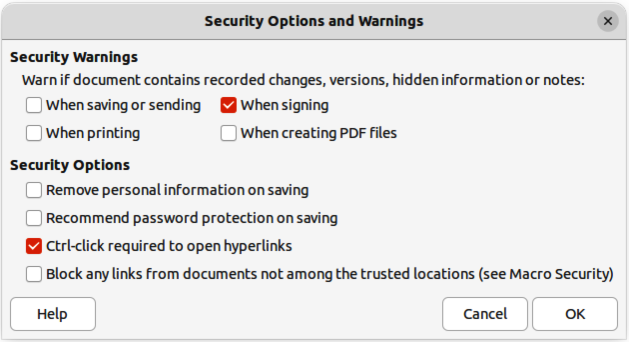
Figure 13: Properties dialog
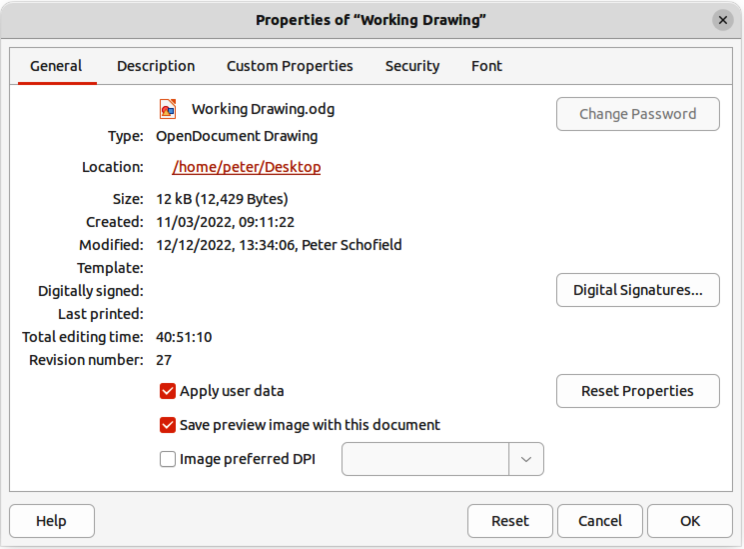
1) Open the drawing file and go to File > Properties on the Menu bar to open the Properties dialog (Figure 13).
2) Make sure the General page is selected and deselect the option Apply user data.
3) Click on Reset Properties to change the following file properties:
Remove any information in the created and modified fields.
Delete the modification and printing dates.
Reset the editing time to zero.
Reset the creation date to the current date and time.
Reset the version number to 1.
4) Click OK to save the changes and close the Properties dialog.
To remove any version information from a drawing, use one of the following methods:
Go to File > Versions on the Menu bar to open a properties dialog for the drawing, then select the versions from the Existing Versions list for deletion and click Delete. The dialog automatically closes.
Go to File > Save As on the Menu bar and save the drawing with a different name.
Documents can be redacted to remove or hide any sensitive information allowing the selective disclosure of information in a document while keeping other parts of the document secret.
When a redacted document is exported to a new document, any redacted portions are removed and replaced by redaction blocks of pixels. This prevents any attempt to restore or copy the original contents. A redacted document is often exported in PDF format for publication, or sharing.
Any documents that are redacted in LibreOffice Writer, Calc, or Impress are automatically transferred as a copy to LibreOffice Draw where the redaction is carried out.
1) Open the document to be redacted in LibreOffice Writer, Calc or Impress, then go to Tools > Redact on the Menu bar and the following happens:
The document is copied, prepared and transferred to LibreOfficeDraw as an untitled file.
LibreOffice Draw opens with the untitled document displayed.
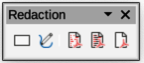
The Redaction toolbar (Figure 14) automatically opens. If the Redaction toolbar is not displayed, go to View > Toolbars on the Menu bar in LibreOffice Draw and select Redaction.
2) Go to Tools > Redact on the Menu bar and select either Rectangle or Freeform, or click on Rectangle Redaction or Freeform Redaction in the Redaction toolbar.
3) Draw the required shapes to redact the sensitive areas in the document. The redaction shape is gray allowing the sensitive areas in the document to be visible before they are redacted.
Figure 14: Redaction toolbar
4) If necessary, click on Export Preview PDF to create a PDF copy of the document, then save as a PDF file. Any sensitive information in the redacted areas can then be reviewed before redaction is finalized.
5) If necessary, delete the PDF copy after reviewing the redaction areas in the file.
6) Go to Tools > Redact on the Menu bar and select either Redacted Export (White), or Redacted Export (Black), or click on Redacted Export (White), or Redacted Export (Black) in the Redaction toolbar.
7) Navigate to the folder in the file browser window that opens where the redact document is going to be saved and enter a name for the document.
8) Click on Save to create the redacted PDF file as follows:
The gray redaction shapes are converted to white, or black shapes and the document is exported as a PDF
There is no selectable text in the PDF file and any redacted content is non‑existent.
Open a drawing in Draw, then use Steps 2) thru 8) in “Documents, spreadsheets, or presentations” on page 1 to create a redacted PDF copy of the drawing file.
Note
When a redacted document is exported as a new PDF file, any redacted portions are removed from the new document and replaced by redaction blocks of pixels. This prevents any attempt to restore, or copy the original contents that have been redacted.