
Getting Started Guide 24.8
This document is Copyright © 2024 by the LibreOffice Documentation Team. Contributors are listed below. This document maybe distributed and/or modified under the terms of either the GNU General Public License (https://www.gnu.org/licenses/gpl.html), version 3 or later, or the Creative Commons Attribution License (https://creativecommons.org/licenses/by/4.0/), version 4.0 or later. All trademarks within this guide belong to their legitimate owners.
Contributors for this edition:
Contributors for previous editions:
Please direct any comments or suggestions about this document to the Documentation Team forum at https://community.documentfoundation.org/c/documentation/loguides/ (registration is required) or send an email to: loguides@community.documentfoundation.org.
Note
Everything sent to a forum, including email addresses and any other personal information that is written in the message, is publicly archived and cannot be deleted. Emails sent to the forum are moderated.
Published August 2024. Based on LibreOffice 24.8 Community.
Other versions of LibreOffice may differ in appearance and functionality.
Some keystrokes and menu items are different on macOS from those used in Windows and Linux. The table below gives some common substitutions used in this document. For a detailed list, see LibreOffice Help.
|
Windows or Linux |
macOS equivalent |
Effect |
|
Tools > Options |
LibreOffice > Preferences |
Access setup options |
|
Right-click |
Control+click, Ctrl+click, or right-click depending on computer setup |
Open a context menu |
|
Ctrl or Control |
⌘ and/or Cmd or Command, depending on keyboard |
|
|
Alt |
⌥ and/or Alt or Option depending on keyboard |
Used with other keys |
|
F11 |
⌘+T |
Open the Styles deck in the Sidebar |
To ensure formatting consistency in LibreOffice documents, users can control text and other elements by using templates, styles and direct formatting. Direct formatting is also known as manual formatting. Understanding how to format documents unlocks the power of LibreOffice.
Styles
Templates
Direct (or manual) formatting
A style allows you to apply a set of common formatting elements to pages, text, frames, cells, graphic objects, and so on. Each style has a name such as “Body Text” and “Document Title.” Using styles can quickly change the format, or appearance, of selected elements.
If you do not use styles and manually format paragraphs, words, tables, page layouts, and other elements in documents, this can increase user workload and introduce format errors into a document. Styles provide consistency in documents. LibreOffice recommend the use of styles to reduce the workload and increase the accuracy of producing good documents with ease.
Since LibreOffice styles may work differently from other office software programs, some planning may be needed, but that effort will save time and effort over the longer term. Also, Writer relies on heading styles (or other styles if specified) when compiling a table of contents.
Note
Manual formatting overrides any applied styles and once an element has been formatted manually, it cannot be modified by a style. To remove direct formatting, select the text, then right-click and select Clear Direct Formatting from the context menu. Alternatively, use the keyboard shortcut Ctrl+M (macOS ⌘+M) to clear direct formatting from selected text, or go to Format > Clear Direct Formatting on the Menu bar.
See Table 1 on which style categories are available for each module. For more information, see the specific user guide for each LibreOffice module. All the styles are defined as:
Page styles
Paragraph styles
Character styles
Table styles
Frame styles
List styles
Cell styles
Drawing styles
Presentation styles
Table 1: Style categories available in LibreOffice modules
|
Style Category |
Writer |
Calc |
Draw |
Impress |
|
Page |
Yes |
Yes |
|
|
|
Paragraph |
Yes |
|
|
|
|
Character |
Yes |
|
|
|
|
Frame |
Yes |
|
|
|
|
List |
Yes |
|
|
|
|
Table |
Yes |
|
|
|
|
Cell |
|
Yes |
|
|
|
Presentation |
|
|
|
Yes |
|
Drawing |
|
|
Yes |
Yes |
See Table 2 on which style types are available for each module. For more information on styles, see the user guide for that LibreOffice module. Generally, the LibreOffice style types are:
Hierarchical
All Styles
Hidden Styles
Applied Styles
Custom Styles
Automatic
Text Styles
Chapter Styles
List Styles
Index Styles
Special Styles
HTML Styles
Conditional Styles
Table 2: Style types available in LibreOffice modules
|
Style Type |
Writer |
Calc |
Draw |
Impress |
|
Hierarchical |
Yes |
Yes |
Yes |
Yes |
|
All Styles |
Yes |
Yes |
Yes |
Yes |
|
Hidden Styles |
Yes |
Yes |
Yes |
Yes |
|
Applied Styles |
Yes |
Yes |
Yes |
Yes |
|
Custom Styles |
Yes |
Yes |
Yes |
Yes |
|
Automatic |
Yes |
|
|
|
|
Text Styles |
Yes |
|
|
|
|
List Styles |
Yes |
|
|
|
|
Index Styles |
Yes |
|
|
|
|
Special Styles |
Yes |
|
|
|
|
HTML Styles |
Yes |
|
|
|
|
Conditional Styles |
Yes |
|
|
|
LibreOffice provides several ways to select and apply styles, as seen below:
Select the Styles deck in the Sidebar.
Use View > Styles on Menu bar.
Select Styles on the Menu bar (Writer and Calc).
Choose Set Paragraph Style on the Formatting toolbar (Writer).
Select Apply Style on the Formatting toolbar (Calc).
Right-click to bring up the context menu and select Character, Paragraph, or List (Writer).
Right-click to bring up the context menu and select Styles (Calc).
Fill Format Mode in Styles deck on Sidebar (Writer and Calc).
Keyboard shortcuts where available.
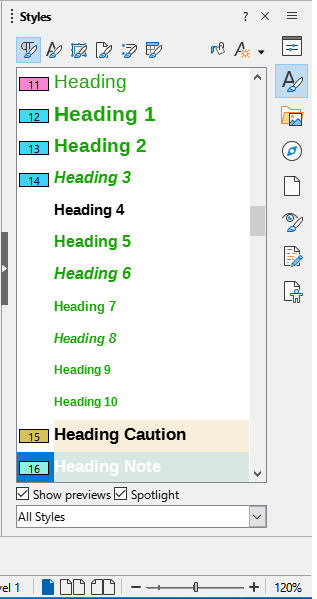
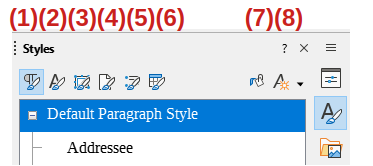
The Styles deck allows you to view all available styles for a document (Figure 1). To access the deck, perform these steps:
Open the Styles deck on the Sidebar using one of the following methods:
Go to View > Styles on the Menu bar.
For Writer or Calc only, go to Styles > Manage Styles on the Menu bar.
Use the keyboard shortcut F11 (macOS ⌘+T).
Click on Styles on the right of the Sidebar.
To display a preview of styles in the Styles deck, select Show previews at the bottom of the Styles deck.
To select a style category, click on one of the icons at the top of the Styles deck to display the styles available in the selected category. See “Style categories” above for more information on available style categories for each LibreOffice module.
To select a style type, click on the drop-down list to open it and select the style type required. The style types available depends on which LibreOffice module is open and the type of document being edited. See “Style types” above for more information on available style types for each LibreOffice module.
Figure 1: Styles deck on Sidebar — Writer
To apply a style to an element, position the cursor in text, or select an object, in the document, then double click on the required style in the Styles deck on the Sidebar.
LibreOffice Styles deck on the sidebar also provides a tool to spotlight paragraph and character styles as well as direct formatting present in the document. The Spotlight tool is handy to assist in housekeeping the document with respect to the styles in use and direct formatting. To enable the spotlight feature proceed as follow:
Open the Styles deck on the Sidebar as indicated above.
Mark the Spotlight checkbox at the bottom of the Styles deck (Figure 1).
The paragraph spotlight indicator is codified using numbers and colors displayed in the left margin. They correspond to the numbers and colors displayed in the Styles deck.
The character spotlight indicator is codified using number and colors displayed in a call-out. They also correspond to the numbers and colors displayed in the Styles deck.
Paragraphs with direct formatting are indicated by a hatch pattern in the Spotlight colored indicators on the margin.
Figure 2: Spotlighting paragraphs and characters styles.
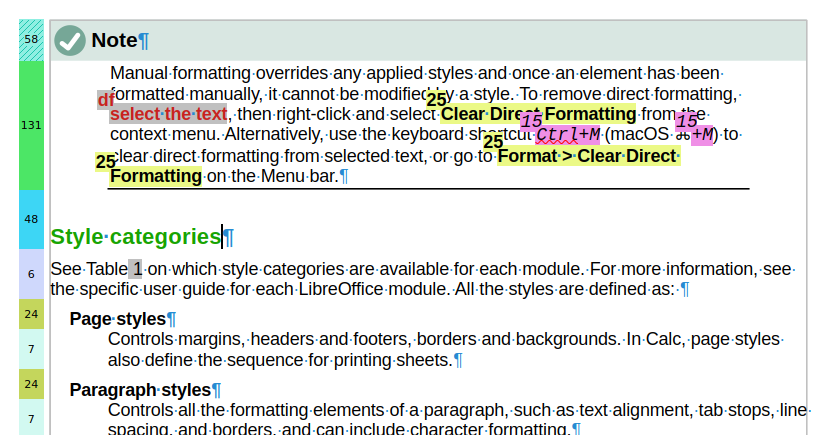
Characters direct formatting are indicated by a call-out with string "df" next to the text (Figure 2).
Note
Choose Format > Spotlight > Character Direct Formatting to activate the character direct formatting visual indicator.
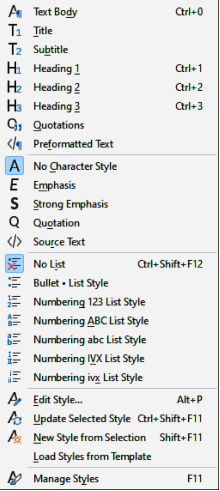
The Styles menu is available in LibreOffice's Writer and Calc modules. It displays the default set of styles available in the Styles deck on the Sidebar (Figure 4 for Writer and Figure 3 for Calc). These styles are factory set and available in all LibreOffice installations.
Locate the text or element where the style will be applied. If necessary, select it.
Go to Styles on the Menu bar.
Click on the style name to apply its attributes to the selected text, or element.
Figure 3: Style submenu in Calc
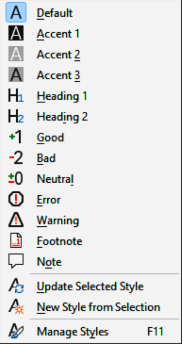
Figure 4: Styles submenu in Writer
This module’s context menu can apply styles to selected text. Right-click on text to bring up the context menu. Then select either Paragraph, Character, or List and choose the appropriate style from a sub‑context menu.
In this module, select cells, right-click to bring up the context menu, then select Styles to apply a style to those cells.
If a paragraph style has been created and applied to text, the style name will appear in the Set Paragraph Style drop‑down list at the left-hand end of the Formatting toolbar.
Click in a paragraph to select that style.
Click on Set Paragraph Style on the Formatting toolbar to open the drop‑down list.
Select the required paragraph style from the options available in the drop‑down list to apply it to the selected paragraph.
Tip
Enable the Formatting (Styles) toolbar in View – Toolbars to get the same style commands as the Styles menu for Writer.
After a style has been created in Calc and applied to one or more cells, the style name appears in the Apply Style drop‑down list at the left-hand end of the Formatting toolbar.
Click in a cell to select it.
Click on Apply Style on the Formatting toolbar to open the drop‑down list.
Select the required cell style from the options available in the drop‑down list to apply it to the selected cell.
If you need to apply a style to multiple elements in the Writer and Calc modules without using the Styles deck and double‑clicking, the Fill Format Mode is available.
Open the Styles deck on the Sidebar and select the required style.
Click on Fill Format Mode at the top of the Styles deck and the cursor changes shape to indicate Fill Format Mode.
Position the cursor on the element where a style is going to be applied.
Click and the style is applied to the selected element. To apply a character style, click and drag to select the characters, then release the cursor.
Repeat step 4 until the style has been applied to all required elements.
To quit Fill Format Mode, click on Fill Format Mode again, or press the Esc key.
In Writer, keyboard shortcuts can apply paragraph styles to selected paragraphs and also allow users to perform some edits on styles, as shown in Figure 3.
Table 3: Paragraph style and style editing keyboard shortcuts
|
Style name & editing function |
Windows & Linux |
macOS |
|
Body Text |
Ctrl+0 |
⌘+0 |
|
Heading 1 |
Ctrl+1 |
⌘+1 |
|
Heading 2 |
Ctrl+2 |
⌘+2 |
|
Heading 3 |
Ctrl+3 |
⌘+3 |
|
No List |
Ctrl+Shift+F12 |
⌘+Shift+F12 |
|
Edit Style |
Alt+P |
⌥+P |
|
Update Selected Style |
Ctrl+Shift+F11 |
⌘+Shift+F11 |
|
New Style from Selection |
Shift+F11 |
Shift+F11 |
|
Manage Styles |
F11 |
F11 |
A style can be created with the Styles deck. For more information on creating styles, refer to the guide for that LibreOffice module.
Open the Styles deck on the Sidebar.
Click on the icon for the required style category at the top of the Styles deck to open the list of styles available in the style category.
Right‑click on a style and select New from the context menu to open a style dialog applicable for the selected style category. Figure 6 shows an example of the Paragraph Styles dialog.
Click on General to open the General page in the styles dialog.
In Name, enter a name for the new style.
For text documents paragraph styles only, select a style from the Next Style drop‑down list that will be available after you press Enter closing a paragraph.
If necessary, in Inherit from, select a style from the drop‑down list that will be used for basic formatting of the new style in the document.
In Category, select a style category from the drop‑down list that the new style will use. By default, Custom Styles is the selected category.
Use the various options available on the other dialog pages to format the new style to the document requirements. If available, changes to a style can be checked in the preview box on the dialog page.
When all formatting options have been carried out, click on OK to save the new style and close the dialog.
Note
If a style has been selected in Inherit from on the dialog General page, any formatting changes to this style are also carried out on the new style that is created.
LibreOffice can use the format of selected text or a selected cell to create a new style. Styles created with this method are only available in the document it was created. Also, those styles will not be included in a template created from that document.
For more information on creating styles with this method, refer to the user guide for the appropriate LibreOffice module.
Open the Styles deck on the Sidebar if it is not already open (Figure 5).
Click on the icon for the required style category at the top of the Styles deck to open the list of styles in the style category.
In the document, select the element to be used as a basis for a new style.
Create the new style using one of the following steps to open the New Style from Selection dialog:
In Writer, click on Styles actions on the Sidebar title bar and select New Style from Selection from the context menu.
In Calc, Draw, or Impress, click on New Style from Selection.
In the New Style from Selection dialog, enter a name for the new style in Enter new style name text box.
Click OK to create the new style in the selected style category using the selected formatting options and close the dialog.
Figure 5: Styles categories and action buttons
|
|
|
Note
The New Style from Selection dialog displays a list of custom styles that are available in the document. By default, a new style created from a selection is placed in the Custom Styles.
In Writer and Calc, users can create a style by dragging and dropping a selected element into the Styles deck on the Sidebar. The new style is based on the formatting of the selected text or the selected cell. To use this method, perform the following steps:
Open the Styles deck on the Sidebar.
Open the list of styles in the style category by clicking on the icon for the required style category at the top of the Styles deck.
Select text or a cell in the open document, then drag and drop that element onto the Styles deck on the Sidebar.
Open the New Style from Selection dialog and enter a name for the new style in Enter new style name text box.
Click OK to create the new style in the selected style category and close the dialog. The new style is based on the formatting of the selected element and it is placed in Custom Styles.
When LibreOffice is installed onto a computer, a default set of styles is included. It provides a starting point for creating documents with styles. These default styles cannot be deleted, but can be edited to match the formatting requirements for documents.
All user-created styles can be edited or deleted. For more information on creating styles, see “Creating new styles” above.
Styles can be edited using one of the following methods:
Dragging and dropping a formatted element into the Styles deck in the Sidebar.
Select a formatted element and edit its style.
Use AutoUpdate to edit paragraph and frame styles only.
Add styles from another document or template into a document.
Note
Any editing, or changes made to a style are effective only in the current document. To edit or change styles in more than one document, the template has to be changed, or styles loaded from another document.
A style can be edited with the Styles dialog. For more information on editing styles in a module, refer to the appropriate LibreOffice user guide.
Open the Styles deck on the Sidebar.
Click on the icon for the required style category at the top of the Styles deck to open the list of styles available in the selected style category.
Right‑click on a style and select Edit Style from the context menu to open a style dialog applicable for the selected style category. Figure 6 shows an example of the Paragraph Styles dialog.
Use the various options available on the dialog pages to edit the selected style. If available, changes to a style can be checked in the preview box on the dialog page.
When changes are complete, click on OK to save the changes and close the dialog.
A style can also be edited with Set Paragraph Style for Writer or Apply Style for Calc on the Formatting toolbar by performing the following steps:
Select a paragraph in Writer or a cell in Calc.
On the Formatting toolbar, open a drop‑down list of styles by clicking on the chevron ˅ or triangle ▼ next to Set Paragraph Style for Writer or Apply Style for Calc.
Figure 6: Paragraph Style dialog
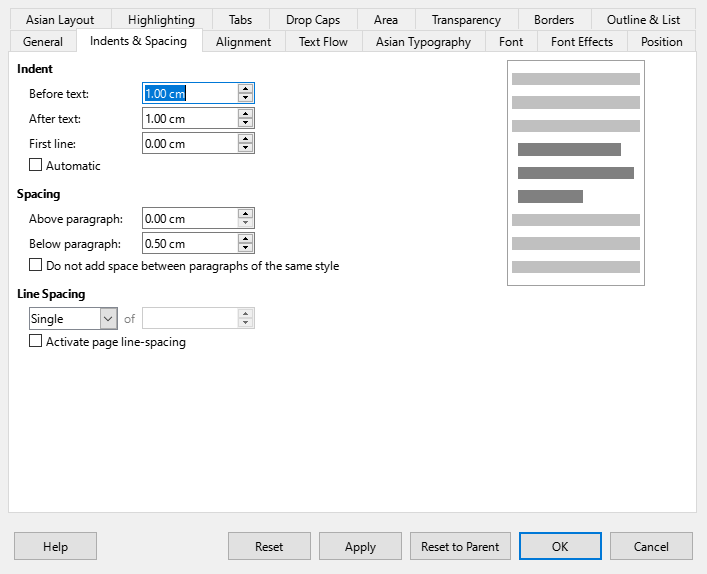
Select a style and click on the chevron ˅, or triangle ▼next to the style name, then select Edit Style from the context menu to open the Paragraph Style dialog (Figure 6).
Edit the selected style by using various options available on the dialog pages. Changes to a style can be checked in the preview box on the dialog page.
When changes have been completed, click on OK to save the changes and close the dialog.
Open the Styles deck on the Sidebar.
Select the element that is formatted with the attributes of the desired style.
On the Styles deck, select the style that is going to be updated from the selection.
Update the style using one of the following methods:
At the top of the Sidebar, click on the chevron ˅, or triangle ▼next to Styles actions and select Update Selected Style from the context menu.
In Writer or Calc, go Styles > Update Selected Style on the Menu bar.
Using Set Paragraph Style for Writer, or Apply Style for Calc, click on the chevron ˅, or triangle ▼next to the selected style and select Update to Match Selection from the context menu.
Use the keyboard shortcut Ctrl+Shift+F11 (macOS ⌘+Shift+F11).
When the AutoUpdate option is selected on the General page of the Paragraph Style, or Frame Style dialog, a style is updated whenever you directly format a paragraph or frame that is in that style. In Writer, AutoUpdate only applies to paragraph and frame styles. See the Writer Guide for more information on AutoUpdate.
In LibreOffice, only custom styles can be renamed.
Open the Styles deck on the Sidebar.
In the Styles drop‑down list at the bottom of the Sidebar, select Custom Styles so you can see any custom styles that are available in the document.
Select the style that is going to be renamed from the displayed list of custom styles.
Right‑click on the selected style and select Edit Style from the context menu to open the style dialog for the selected type of of style.
Note
If Modify is grayed out in the context menu, then the selected style cannot be renamed.
Click on General to open the General page in the style dialog.
In the Name text box, enter a new name for the selected style.
Click on Apply to rename the selected style, then click OK to close the style dialog.
Only custom styles can be deleted.
If not already open, open the Styles deck on the Sidebar.
In the styles category drop‑down list at the bottom of the Sidebar, select Custom Styles to display any custom styles that are available in the document.
Select the style that is going to be deleted from the displayed list of custom styles. To delete multiple styles, hold down the Ctrl key (macOS ⌘) while selecting styles.
Right‑click on the selected style and select Delete from the context menu.
Click on Apply to delete the selected style, then click OK to close the style dialog.
Note
If Delete is grayed out in the context menu, then the selected style cannot be deleted.
If a style is deleted that is in use, all elements that used the deleted style will return to the default style.
Page styles can be created in Writer or Calc. For more information on page styles, see the Writer Guide and the Calc Guide. For example, you can create a style that is only applied to the first page.
To create a new page style in Writer, do the following:
Open a new text document and open the Styles deck on the Sidebar.
Open the Page Styles panel and select Page Styles at the top of the Styles deck.
Click on Styles actions at the top of the Styles deck and select New Style from Selection from the context menu to open the New Style from Selection dialog.
Add the name of the new page style in the Enter new style name text box and click OK. This closes the New style from Selection dialog and the new page style appears in the Page Styles panel.
Right‑click on the new page style in the Page Styles panel and select Edit Style from the context menu to open the Page Style dialog.
Modify and format the page with the options available on the Page Style dialog.
Click OK to save the changes and close the Page Style dialog.
To apply the new page style, double‑click on the required page style.
A template is a document that contains user-specified formatting styles, graphics, tables, objects, and other information. LibreOffice can use a template to generate new documents with a common content and a common format. For example, you can add the outline of a report and also define paragraph and character styles in a document, save the document as a template, and then use the template to create a new document with the same report outline and styles.
All documents in LibreOffice are based on templates. The software has a number of predefined templates that can be used to create different types of documents, including business letters, presentations, or drawings. Templates can be created to suit your requirements. Also, templates can be downloaded from the LibreOffice website using the following link: https://extensions.libreoffice.org.
If a blank document is created in LibreOffice, then the software uses the appropriate LibreOffice default template. If required, this default template can be replaced by a custom template to suit user requirements, see “Setting default template” below for more information.
User-created templates are located in the My Templates folder and the next time LibreOffice is started, those templates appear in the LibreOffice startup window and the Select a Template dialog.
Figure 7: Templates dialog
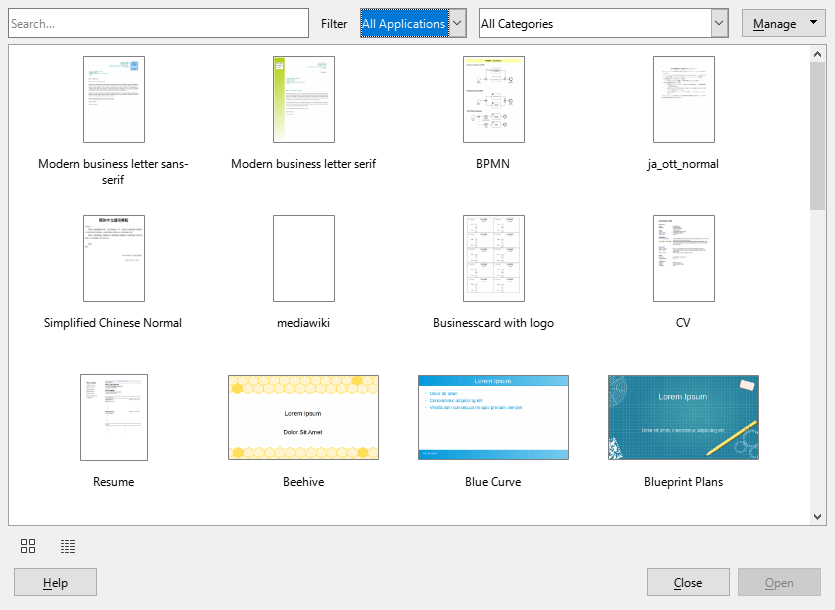
A new document can be created in the Templates dialog by doing these steps:
Open the Templates dialog (Figure 7) by:
Select File > New > Templates on the Menu bar.
Select File > Templates > Manage Templates on the Menu bar.
Use the keyboard shortcut Ctrl+Shift+N (macOS ⌘+Shift+N).
Click on the triangle ▼ next to New on the Standard toolbar and select Templates from the context menu.
Click on Templates in the LibreOffice Start Center.
Determine where to display the template and select the LibreOffice application and template category in the Filter drop‑down lists.
Generate a document with the template with one of the following methods:
Double‑click on the selected template.
Right‑click on the template and select Open from the context menu.
Click on Open on the Template dialog.
Any formatting element in a document can be saved in a template: for example, printer settings; file paths; text or object colors; and so on. Also, predefined text and graphics can be added to a template.
Open an existing document, or create a new document of the type required for a template.
Add any content that is required for the new template; for example company logo, copyright statement, and so on.
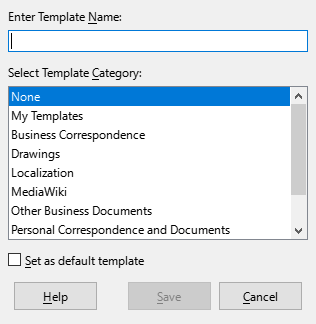
Figure 8: Save As Template dialog
Format any content added to the template requirements.
Create, or modify, any styles required for the new template.
Go to File > Templates > Save as Template on the Menu bar to open the Save As Template dialog (Figure 8).
Enter a name for the new template in the Enter Template Name text box.
Select a template category, from the categories available in Select Template Category.
If necessary, select Set as default template to change the default template for the required document type.
Click on Save to save template and close the Save As Template the dialog.
Writer has a Template Wizard which speeds up the template creation process. For more information on the Template Wizard, see the Writer Guide.
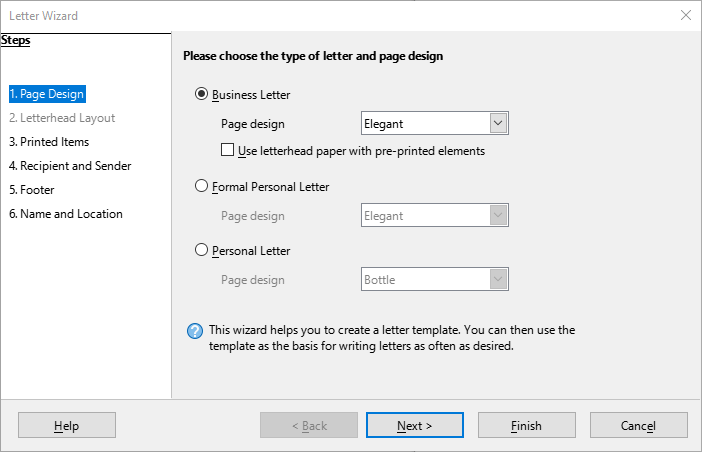
Go to File > Wizards on the Menu bar and select Letter, Fax, or Agenda to start a template for one of those types of documents. The Letter Wizard dialog is shown in Figure 9.
Go through the wizard and go through the steps as the wizard instructs.
Click on Finish and a Save as dialog opens.
Navigate to the required folder where the template is going to be saved.
Enter a file name in the text box using the file extension OTT for document templates.
Click on Save to save the new template and close the Save as dialog. The new template appears in the list of templates available.
Figure 9: Letter Wizard dialog
LibreOffice allows you to specify a specific template as the default document. The template has to be in a location visible in the Save as Template dialog so that LibreOffice can find it, and you can always reset to the original LibreOffice default template if necessary.
Go to File > New > Templates or File > Templates > Manage Templates on the Menu bar to open the Templates dialog.
Select the document type from the Filter drop‑down list.
Select the template to use as the default LibreOffice template for the selected document type.
Right-click on the selected template and select Set as Default from the context menu. A default template icon appears at the top right of the new default template.
Click on Open and a new document opens using the new default template. The next time a new document is created without selecting a different template, that document uses th new default template.
Go to File > New > Templates or File > Templates > Manage Templates on the Menu bar to open the Templates dialog.
Select the presentation template that is being used as the default presentation template in the Select a Template dialog.
Right-click on the template and select Reset Default from the context menu.
Click on Close to close the Templates dialog. The next time that a new document is created and a specific template is not selected, the document is created using the original default LibreOffice template for that document type.
Default LibreOffice templates cannot be edited. Only templates that are created or imported can be edited.
Go to File > New > Templates or File > Templates > Manage Templates on the Menu bar to open the Templates dialog.
Right-click on the template to be edited and select Edit from the context menu and the template opens in the relevant LibreOffice module.
Edit and update the styles, text and/or objects on the selected template.
Go to File > Save on the Menu bar or use the keyboard shortcut Ctrl+S (macOS ⌘+S) to save the changes.
Close the template, or create a document, using the edited template.
Note
Any document created from a template before editing can be updated to show the changed template settings the next time the document is opened. A confirmation dialog opens asking if the updated styles are to be used or keep the old styles. If keep the old styles is selected, then the document continues to use the old styles without any confirmation.
LibreOffice templates must be in specific LibreOffice template folders. New LibreOffice template categories can be created and used to organize LibreOffice templates. For example, separate template categories for different projects or clients. Templates can also be imported and exported.
Tip
The location of folders used LibreOffice template categories varies with computer operating systems. To learn where the template folders are stored on a computer, go to Tools > Options > LibreOffice > Paths (macOS LibreOffice > Preferences > LibreOffice > Paths).
Go to File > New > Templates or File > Templates > Manage Templates on the Menu bar to open the Templates dialog.
Click on Manage at the top right of the Templates dialog and select New Category from the context menu.
Enter a category name in Enter new category name box in the New Category dialog (Figure 10).
Click OK to save the new category and the category appears in the Filter drop-down list for categories at the top of the Templates dialog.
Go to File > New > Templates or File > Templates > Manage Templates on the Menu bar to open the Templates dialog.
Select the custom category for deletion from the drop-down list of categories at the top of the Templates dialog.
Click on Manage at the top right of the Template dialog and select Delete Category from the context menu.
Click Yes to confirm the deletion of the custom category.
Figure 10: New Category dialog
Note
LibreOffice’s default template categories or categories using the Extension Manager cannot be deleted. Only custom categories that have been created in Impress can be deleted.
Go to File > New > Templates or File > Templates > Manage Templates on the Menu bar to open the Templates dialog.
Right-click on the template that is going to be moved and select Move from the context menu.
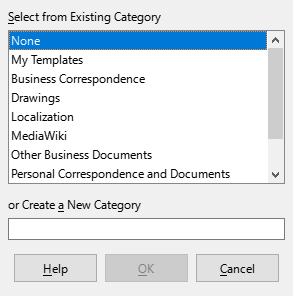
In the Select Category dialog (Figure 11), select a category from the displayed list of categories, or enter a name in the Create a New Category box to create a new category for the template.
Click OK to move the template to its new category and close the Select Category dialog.
Figure 11: Select Category dialog
Note
Only custom templates can be moved between categories. Templates supplied with LibreOffice or installed with the Extension Manager cannot be moved.
Go to File > New > Templates or File > Templates > Manage Templates on the Menu bar to open the Templates dialog.
Right-click on the template being deleted and select Delete from the context menu.
Click on Yes to confirm the deletion.
Note
Templates supplied with LibreOffice, or installed using the Extension Manager, cannot be deleted. Only templates that have been created in LibreOffice, or imported from other sources, can be deleted.
Go to File > New > Templates or File > Templates > Manage Templates on the Menu bar to open the Templates dialog.
Right-click on the template being renamed and select Rename from the context menu.
Enter a new template name in the text box that has opened, then click on OK to save the new template name.
Note
Templates supplied with LibreOffice or installed with the Extension Manager, cannot be renamed. Only templates that have been created in LibreOffice or imported from other sources can be renamed.
LibreOffice uses the term “repositories” when it refers to sources for templates. A repository can be a directory on a computer or a location on the internet. The community-created template repository for LibreOffice is at https://extensions.libreoffice.org/.
If a template is in a different location on the computer, then the template must be imported into a LibreOffice category for LibreOffice to recognize the template.
To import a template onto the computer, go to https://extensions.libreoffice.org/ or another internet location and download the required template to your computer.
Open the Templates dialog by selecting File > New > Templates or File > Templates > Manage Templates on the Menu bar.
Find the Filter drop‑down lists then select the required document type and template category.
Click on Manage at the top right of the Template dialog and open the Open dialog by selecting Import from the context menu.
Use the Open dialog, to find the folder where the template is located on the computer.
Display the available templates by selecting the Templates in the File type box.
Select the template and click Open to import template into the selected category.
Open the Templates dialog by selecting File > New > Templates or File > Templates > Manage Templates on the Menu bar.
Activate the context menu by right-clicking on the template to be exported then select Export from the menu. A file browser window will appear.
Navigate to the folder where the template will be exported and click on OK. The template is exported to the selected location and the browser closes.
In LibreOffice, hyperlinks allow you to create references to web pages and other elements in remote locations.
There are two types of hyperlinks: absolute and relative.
An absolute hyperlink links to a web page, or file, that is outside the current domain or file location. It must contain the full address of the target file, or web site, such as https://libreoffice.org. An absolute hyperlink will stop working if its target is moved to a new location in the internet.
A relative hyperlink contains an address that is relative to the document’s current file location. A relative hyperlink stops working if the document is removed from the current location.
Select the location where the hyperlink will be inserted.
Go to Insert > Hyperlinks on the Menu bar or use the keyboard shortcut Ctrl+K (macOS ⌘+K) to open the Hyperlink dialog (Figure 12).
On the left hand side, determine whether the hyperlink will be absolute or relative.
Click Apply to insert the hyperlink into the document.
Click Close or OK to close the dialog.
Tips
LibreOffice automatically converts website URLs into hyperlinks. To turn off this function, go to Tools > AutoCorrect Options > Options and deselect URL Recognition.
To change the color of hyperlinks, go to Tools > Options > LibreOffice > Application Colors (macOS LibreOffice > Preferences > LibreOffice > Application Colors), and scroll to the Unvisited links and/or Visited links checkboxes. Select them, choose new colors from the color palettes for the links, and click OK. Note that this color change changes the color for all hyperlinks across all LibreOffice modules.
Note
In Writer and Calc, the Navigator can be used to insert hyperlinks. For information, see the Writer Guide and Calc Guide.
Internet
Figure 12: Hyperlink dialog — Internet page
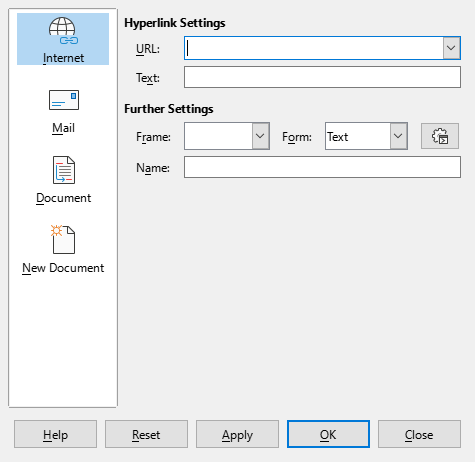
Figure 13: Hyperlink dialog — Mail page

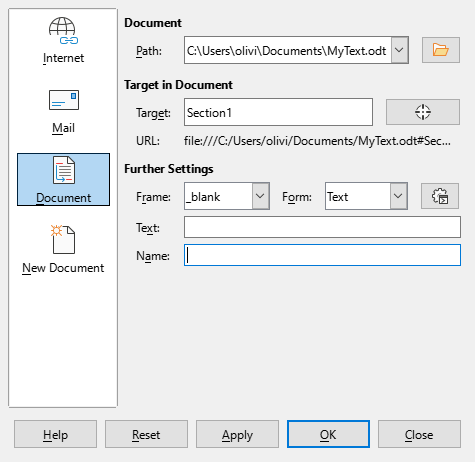
Document
Figure 14: Hyperlink dialog — Document page
New Document
Figure 15: Hyperlink dialog — New Document page

Further Settings
Frame
Set the value to determine how the hyperlink opens. This applies to documents that open in a web browser.
Form
Specifies if the link is to be presented as text or as a button.
Text
Specifies the text that will be visible to the user.
Name
Applicable to HTML documents. It specifies text that will be added as a NAME attribute in the HTML code behind the hyperlink.
Select a hyperlink using one of the following methods (depends on the module):
Click anywhere in the hyperlink text.
Click and drag a selection marquee over the hyperlink text to display a text box border and selection handles.
Double‑click on a hyperlink to open an editing box.
Select editing mode and open the Hyperlink dialog using one of the following methods:
Click on Insert Hyperlink on the Standard toolbar.
Go to Edit > Hyperlink on the Menu bar.
Use the keyboard shortcut Ctrl+K (macOS ⌘+K).
Right‑click and select Edit Hyperlink from the context menu.
Modify the link in the Hyperlink dialog then click Apply to save the changes. The Hyperlink dialog remains open.
Once you have finished editing hyperlinks, click on OK to close the Hyperlink dialog.
To turn a hyperlink into plain text, right-click on the link and select Remove Hyperlink from the context menu. To delete a hyperlink, select the hyperlink and press the Delete or Backspace key.