
Getting Started Guide 25.2
Chapter 1,
LibreOffice Basics
This document is Copyright © 2025 by the LibreOffice Documentation Team. Contributors are listed below. This document may be distributed and/or modified under the terms of either the GNU General Public License (https://www.gnu.org/licenses/gpl.html), version 3 or later, or the Creative Commons Attribution License (https://creativecommons.org/licenses/by/4.0/), version 4.0 or later. All trademarks within this guide belong to their legitimate owners.
Contributors for this edition:
Edward Olson, Dione Maddern,B. Antonio Fernandez, Olivier Hallot.
Contributors for previous editions:
Amanda Labby, Dave Barton, Hazel Russman, Jean Hollis Weber, Jeremy Cartwright, John A Smith, Jorge Rodriguez, Kees Kriek, Martin Saffron, Olivier Hallot, Paul Figueiredo, Ron Faile Jr., Skip Masonsmith, Steve Fanning, Peter Schofield, Rob Thornton.
Please direct any comments or suggestions about this document to the Documentation Team forum at https://community.documentfoundation.org/c/documentation/loguides/ (registration is required), or send an email to: loguides@community.documentfoundation.org.
Note
Everything sent to a forum, including email addresses and any other personal information that is written in the message, is publicly archived and cannot be deleted. Emails sent to the forum are moderated.
Published April 2025. Based on LibreOffice 25.2Community.
Other versions of LibreOffice may differ in appearance and functionality.
Some keystrokes and menu items are macOS-specific (see the table below). For a detailed list, see LibreOffice Help.
|
Windows or Linux |
macOS equivalent |
Effect |
|
Tools > Options |
LibreOffice > Preferences |
Access setup options |
|
Right-click |
Control+click, Ctrl+click, or right-click depending on computer setup |
Open a context menu |
|
Ctrl or Control |
⌘ and/or Cmd or Command, depending on keyboard |
|
|
Alt |
⌥ and/or Alt or Option depending on keyboard |
Used with other keys |
|
F11 |
⌘+T |
Open the Styles deck in the Sidebar |
The process for installing LibreOffice differs by operating system. Table 1 shows the effect of installation on each supported operating system.
Table 1: Results after installation in supported systems
|
Operating System |
Installation Effect |
|
Windows |
A desktop icon is created |
|
Linux |
Entries for LibreOffice and each of the LibreOffice modules appear in Applications. |
|
macOS |
An entry for LibreOffice is added to Applications. |
Use the desktop icon or click on LibreOffice in your Applications folder to launch the LibreOffice Start Center. The Start Center lists available modules, recent documents and templates.
Figure 1: LibreOffice Start Center
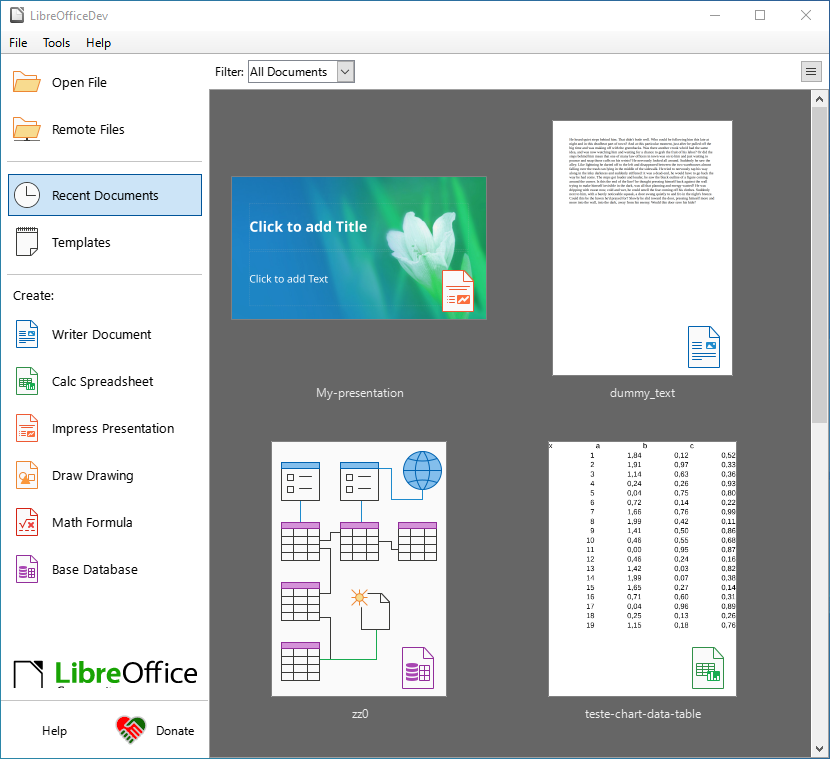
Select a module from the Filter dropdown to filter available files by the application they open in.
TIP
To pin a document in the Start Center so it is always visible, hover over the corresponding document and click on the pin icon in the top left corner. The pinned document is shown on a separate line at the beginning of the list, along with other pinned documents.
To open a LibreOffice module:
Click on the name of the module.
Click on a file that is displayed in the Start Center to open the file in the associated module. For example, clicking on an ODS file opens the file in Calc.
Select Templates in the Start Center and choose a template for a new file, which will open the LibreOffice module associated with that template.
Select Open File, to open the file browser, then navigate to the desired file’s location. Select the file, then click on the Open button to open the file in the associated LibreOffice module.
Select Remote File, to open the Remote Files browser. Navigate to the file location, select it, then click on the Open button to launch the associated LibreOffice module.
Note
If a LibreOffice module is the application associated with a specific file type, clicking on the file in a folder or file browser launches the associated LibreOffice module. For more information on opening files, see Opening an existing document below
There are multiple methods for closing LibreOffice:
Go to File > Exit LibreOffice on the Menu bar.
Use the keyboard shortcut Ctrl+Q.
If only one LibreOffice document is open, click on the 🗙 on the right side of the title bar to close the application.
Go to LibreOffice > Quit LibreOffice on the Menu bar.
Use the keyboard shortcut ⌘+Q
Note
If any documents have not been saved since the last change, a warning message is displayed. Select whether to save or discard the changes.
The user interface of each LibreOffice module follows the same basic design, with variations depending on the module’s features.
Each module has a Title bar, Menu bar, and Standard Toolbar at the top of the window and the Status bar at the bottom of the window (Figure 2).
Note
By default, LibreOffice commands are grouped in the Standard Toolbar user interface. Other user interface variants are available. Go to View > User Interface on the Menu bar to change the user interface. For more information, see Chapter 13, Customizing LibreOffice.
Figure 2: The main LibreOffice window in Writer
The Title bar is located at the top of the LibreOffice window (Figure 2). It shows the name of the current file. When a document is created the document name will be Untitled X, where X is a number. New documents are numbered in the order in which they are created.
The Menu bar is located below the Title Bar in Windows and Linux (Figure 2) and at the top of the desktop in macOS. Clicking a menu item causes a drop‑down menu to appear directly below the item in the Menu Bar. Menu items perform one of the following actions:
Directly cause an action, for example File > Close or File > Save.
Open a dialog. Any command that opens a dialog has three dots following that command, for example: the command Edit > Find and Replace on the Menu bar opens a dialog.
Open another submenu. Any command that opens yet another submenu has a right-pointing chevron ˃ that follows the command’s name. Moving the mouse’s arrow over one of these commands opens another submenu that contains additional commands, for example View > Rulers > Rulers, or Vertical Ruler.
Contains keyboard shortcuts for some commands.
Some menu items are illustrated by an icon representing the command, or a checkbox or radio button, indicating that a selection can be made.
The default Menu bar in Writer includes the controls described in Table 2.
Table 2: Menu bar entries
|
Control |
Description |
|
File |
Lists commands that apply to the entire document, for example Open, Save, and Print. |
|
Edit |
Lists commands for editing a document, including Undo, Find and Replace, Cut, Copy, Paste, and Track Changes. |
|
View |
Lists commands that control how a document is displayed, such as User Interface, Toolbars, Text Boundaries, Rulers, and Zoom. |
|
Insert |
Lists commands that insert elements into a document, for example Image, Comment, Header and Footer, and Table of Contents and Index. |
|
Format |
Lists commands that are used to format a document’s layout. |
|
Styles |
Lists commands that handle type styles. It includes commands that apply common styles and manage styles as well as commands for editing, loading, and creating styles. |
|
Table |
Lists commands for inserting and editing tables. |
|
Form |
Lists commands inserting and editing form fields. |
|
Tools |
Lists Writer functions that handle specific tasks, including Spelling, AutoCorrect, Customize, and Options. |
|
Window |
Lists commands that affect the display window. |
|
Help |
Links to the LibreOffice Help, What’s This?, and other information about LibreOffice. |
Note
Table 2 shows the default Menu bar controls for the Writer module. The default controls for other modules may vary.
LibreOffice’s toolbars can be in one of two states: docked or floating. When a toolbar is docked, it is attached to the document’s main window. When a toolbar is floating, it is not attached to the main window and can be moved anywhere on the screen.
The Standard toolbar is docked to the top of the window by default, with a second toolbar docked below the Standard toolbar. The second toolbar varies depending on context and which LibreOffice module is loaded.
For example, in Writer the Formatting toolbar appears below the Standard toolbar by default. However, when an image is selected, the Drawing Object Properties toolbar appears instead. When the object is deselected, the Drawing Object Properties toolbar closes and the Formatting toolbar appears again.
Note
To reduce the number of toolbars displayed and provide more space for a document, change the user interface to a single-toolbar as an alternative to the default double-toolbar user interface. This single-toolbar user interface contains the most-used commands.
To activate a single toolbar user interface, go to View > User Interface and select Single Toolbar from the Select Your Preferred User Interface dialog. For more information, see Chapter 13, Customizing LibreOffice.
To display a toolbar, choose View > Toolbars on the Menu bar, then select the name of a toolbar from the submenu. Active toolbars have a check-mark next to their name.
To close a toolbar, either:
Choose View > Toolbars on the Menu bar and deselect the toolbar, or
Right-click in an empty space between the icons on a toolbar and choose Close Toolbar from the context menu.
Note
The View menu does not include floating toolbars that are created from tool palettes, but they are displayed in the LibreOffice window.
Submenus
If a toolbar item has submenus, a small triangle ▼ appears to the right of the tool’s icon. Clicking on the triangle displays submenus containing additional commands, tool palettes, or methods of selecting items.
Tool palettes
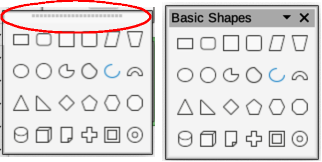
A tool palette is a pop-up collection of tools attached to a single tool on a toolbar. Tool palettes can be made into floating toolbars using the following method:
Click on Basic Shapes on the Drawing toolbar to open the tool palette.
Click on the toolbar handle (highlighted in Figure 3) and drag the tool palette onto the open document.
Release the toolbar handle and the tool palette becomes a floating toolbar.
Figure 3: Example of creating floating sub-toolbar from a tool palette
Note
If the toolbar handle is not visible, the tool palette, or toolbar, is locked into its docked position and has to be unlocked. See Locking and unlocking toolbars below for more information.
To lock all toolbars and prevent them from being moved, choose View > Toolbars on the Menu bar and select Lock Toolbars on the submenu, then restart LibreOffice. If the command Lock Toolbars has a check mark next to it, all toolbars will be locked.
To unlock all toolbars and allow all toolbars to be re-positioned, or turned into floating toolbars, go to View > Toolbars on the Menu bar and select Lock Toolbars on the submenu. To finish unlocking all toolbars, LibreOffice has to be restarted to complete this task. Once you have finished unlocking the toolbars, the check mark will be removed from the command Lock Toolbars.
However, if you single toolbar to prevent it from being re-positioned, or turned into a floating toolbar, right‑click in an empty space on the toolbar and select Lock Toolbar Position from the submenu that opens. A check mark appears against Lock Toolbar Position.
To unlock a single toolbar so that it can be re-positioned, or used as a floating toolbar, right‑click in an empty space on the toolbar and select Lock Toolbar Position from the submenu that opens. The check mark next to Lock Toolbar Position is removed.
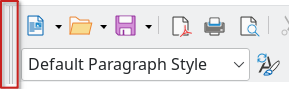
If a toolbar is docked and unlocked, a toolbar handle appears at the left end of the toolbar. This dotted toolbar handle is highlighted in Figure 4. This handle is used to control the location of the toolbar. The appearance of the toolbar handle varies depending on operation and theme settings.
Figure 4: Example of toolbar handles
Move the cursor over the toolbar handle until it changes to the move selection cursor. The exact appearance varies depending on operating system and theme settings.
Click on the toolbar handle and drag the toolbar to a new docked position, or create a floating toolbar, then release the toolbar. The toolbar handle disappears when the toolbar becomes a floating toolbar.
To move a floating toolbar, use one of the following methods:
Click in the title bar of the toolbar and drag the toolbar to a new floating position, then release the toolbar.
Select the toolbar title bar and drag the toolbar to a docked location. LibreOffice supports docking toolbars at the top, bottom, or left side of the main window.
Select the downward triangle ▼ on the toolbar title bar, then choose Dock Toolbar to dock the toolbar in its default position. For example, the default position of the Bullets and Numbering toolbar is at the bottom of the main window.
Note
When moving a toolbar to a docked location, LibreOffice indicates that the toolbar is in a docked position when a hashed border appears around the toolbar. Once the hashed border appears, release the toolbar to dock it.
To dock the selected floating toolbar in its default position, select Dock Toolbar. The toolbar can be moved to a different docked position.
To dock all floating toolbars in their default positions, select Dock All Toolbars. The toolbars can be moved to different docked positions.
To lock a docked toolbar into its docked position, select Lock Toolbar Position.
To close the selected toolbar, click on the 🗙 on the right of the toolbar title bar or select Close Toolbar.
Some toolbars in LibreOffice are context‑sensitive and only open when an object is selected, or the cursor is positioned in text. For example:
The Table toolbar opens when the cursor is placed within a table.
The Bullets and Numbering toolbar opens when the cursor is placed in an ordered or unordered list.
The Image toolbar appears when an image is selected.
There are a number of ways to customize toolbars in LibreOffice.
Visible Buttons
Use the Visible Buttons submenu to show or hide buttons on a toolbar.
Right-click on the toolbar.
Select Visible Buttons on the context menu.
In the Visible Buttons submenu, click on a button to show or hide it. Visible buttons have a check-mark next to them (✓).
The Visible Buttons menu only shows or hides buttons that have already been added to the toolbar. To add more tools to the toolbar or remove existing buttons, use the Customize Toolbar dialog.
Customize Toolbar dialog
Choose View > Toolbars > Customize or right-click on the toolbar and select Customize Toolbar from the context menu.
Select the module name from the Scope dropdown to modify the toolbar for all documents in the module. Select the document name to modify the toolbar only for a specific document.
Select a toolbar to customize from the Target dropdown.
Select a tool from the Available Commands menu and click the right arrow button to add it to the toolbar. Select a tool from the Assigned Commands list and click the left arrow button to remove it from the toolbar.
Click OK.
To quickly find a specific tool in the Available Commands list, start typing the name in the Search box.
Use the Category dropdown to filter available commands by category. For example, select the Drawing category to display a list of tools related to creating and editing drawing objects.
Context menus provide quick access to many menu functions. Right-click on a paragraph, graphic, or other object. When a context menu is opened, the available functions or options depend on the object that has been selected. A context menu is the easiest way to use a function or option, especially if its location in the menus or toolbars is not known.
Context menus can be customized using the Context Menu tab of the Customize dialog.
Choose Tools > Customize and select the Context menus tab.
Select the module name from the Scope dropdown to modify the context menu for all documents in the module. Select the document name to modify the context menu only for a specific document.
Select a context menu to customize from the Target dropdown.
Select a command from the Available Commands menu and click the right arrow button to add it to the context menu. Select a tool from the Assigned Commands list and click the left arrow button to remove it from the context menu.
Click OK.
To quickly find a specific command in the Available Commands list, start typing the name in the Search box.
Use the Category dropdown to filter available commands by category. For example, select the Drawing category to display a list of commands related to creating and editing drawing objects.
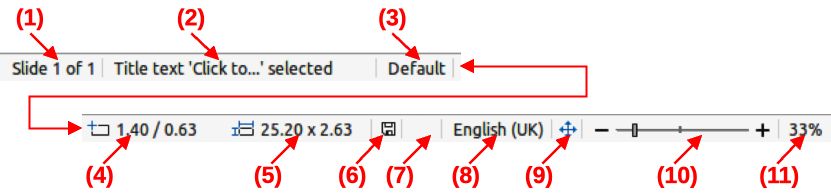
The Status bar is located at the bottom of the workspace. It provides information about the document and also include convenient ways to change some features quickly. It is similar in Writer, Calc, Impress, and Draw, but each LibreOffice module includes some module-specific items. To hide the Status bar, choose View on the Menu bar and deselect Status Bar.
The Impress Status bar is shown in Figure 5. It has the following components:
Slide number
Information area
Table 3: Examples of information
|
Example selection |
Examples of information shown |
|
Text area |
Text Edit: Paragraph x, Row y, Column z |
|
Charts, spreadsheets |
Embedded object (OLE) “ObjectName” selected |
Figure 5: The Impress Status bar
|
|
|
Master slide
Cursor position/Object size
When no object is selected, Impress displays the current position (X and Y coordinates) of the cursor.
When an object is selected and being resized, this area of the Impress Status bar shows the size of the object (width and height).
If an object is currently selected in Impress, the position numbers shows X and Y coordinates of the upper‑left corner and the object size number pair displays the size of the object. These numbers do not relate to the object itself, but to the selection outline, which is the smallest possible rectangle that can contain the visible parts of the object.
When an object is selected, clicking in these areas opens the Position and Size dialog.
Unsaved changes
Digital signatures
Text language
Fit slide
Zoom slider
Zoom percentage
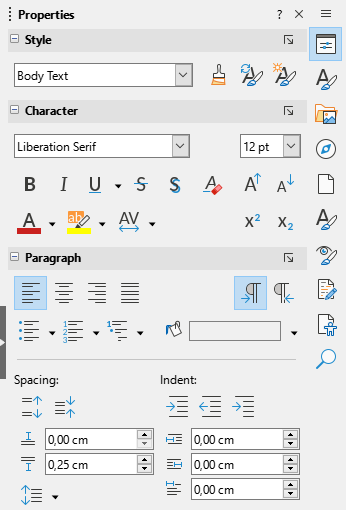
The Sidebar is an expandable/collapsible toolbar that is, by default, positioned on the right side of a LibreOffice module’s Workspace. The sidebar consists of several decks that contain tools and options available for use in the open LibreOffice module. Decks are organized into panels with an icon bar on the right side of the Sidebar. The icon bar allows switching between the different decks. The Sidebar may be expanded and collapsed using the Hide/Show button on the left of the Sidebar. It may also be removed completely using the View > Sidebar control on the Menu bar. Figure 6 below shows the Properties deck of the Writer Sidebar.
Figure 6: Example of Properties deck in Writer Sidebar
The Sidebar can be undocked and redocked using the hamburger menu (≡) in the top right corner of the Sidebar, or by using the keyboard shortcut Ctrl+Shift+F10 (macOS ⌘+Shift+F10).
All LibreOffice modules have Properties, Styles, Gallery, and Navigator deck in the Sidebar. The Writer, Draw, and Calc modules have the additional decks listed in below:
Writer |
Draw |
Calc |
|
|
|
|
|
|
|
|
|
|
|
|
|
|
|
|
|
|
There are multiple ways to create a new document in LibreOffice.
Open the LibreOffice Start Center then click on the name of a LibreOffice module. For example, click on Impress Presentation and a new presentation is created.
Click on Templates in the Start Center and the available LibreOffice templates are displayed. Click on the required template to create a new file and the LibreOffice module opens with a new document.
Choose File > New on the Menu bar and select the type of document from the submenu that opens. The applicable LibreOffice module also opens.
Choose File > Wizards on the Menu bar and select the type of document from the options available in the submenu.
Click on the downward triangle ▼ next to New on the Standard toolbar and select the type of document from that context menu. For example, click on Drawing and a new drawing is created. The applicable LibreOffice module also opens.
Click on New on the Standard toolbar and a new document is created by the LibreOffice module. For example, if Writer is open and active, this icon will create a new Writer document.
Use the keyboard shortcut Ctrl+N (macOS ⌘+N) to create a new document. The type of document created depends on which LibreOffice module is open and active. For example, if Calc is open and active, a new spreadsheet is created.
To open an existing LibreOffice document in the appropriate module, use one of the following methods.
Click Open File in the Start Center and select the file.
Go to File > Open on the Menu bar and select the file.
Click on Open on the Standard toolbar and select the file.
Use the keyboard shortcut Ctrl+O (macOS ⌘+O) and select the file.
Click Recent Documents in the Start Center and select a recent file from the Center.
Choose File > Recent Documents on the Menu bar and select the file from the files displayed in the context menu.
Choose File > Open Remote on the menu bar and select the file from the list of files made available by the remote server service. If asked, enter the relevant server credentials.
Notes
Files that have previously been renamed or moved may still be listed in the Start Center, and clicking on those types of filenames will generate an error. To remove the file from the Start Center, hover the cursor over the thumbnail until an 🗙 appears in the upper right corner, and then click on the 🗙.
When selecting a LibreOffice file from the Start Center, Open dialog, or file browser you can limit the files seen by file type. For example, selecting Text Documents as the file type, limits the files displayed to documents that Writer can open.
See Chapter 10, Working with File Formats, Security, and Exporting for more information about working with files on remote servers.
LibreOffice can open files compatible with the Open Document Format (ODF), which includes many formats from Microsoft. For example, LibreOffice can open MS Word files (*.doc or *.docx) in Writer, MS Excel files (*.xls or *.xlsx) can be opened in Calc; MS PowerPoint files (*.ppt or *.pptx) can be opened in Impress, and so on. See Chapter 10, Working with File Formats, Security and Exporting for more information about working with different file types.
LibreOffice documents can be saved with one of the following methods:
Saves all changes made, keeping the current filename and location of the file. To save a file:
Go to File > Save on the Menu bar.
Use the keyboard shortcut Ctrl+S (macOS ⌘+S).
Click on Save on the Standard toolbar.
Click on the Save icon in the Status bar.
Creates a new document, with the option to change the filename or file format, or save the file in a different location.
Go to File > Save As on the Menu bar.
Use the keyboard shortcut Ctrl+Shift+S (macOS ⌘+Shift+S).
Click on the downward triangle ▼ next to Save on the Standard toolbar and select Save As from the context menu.
Saves a copy of the current document, for example, in a different location on the computer system. The current document remains open for more editing.
Go to File > Save a Copy on the Menu bar.
Click on the downward triangle ▼ next to Save on the Standard toolbar and select Save a Copy from the context menu.
Saves all the files that are open in LibreOffice. Go to File > Save All on the Menu bar. This option is only available when more than one LibreOffice document is open.
Saves the file in a remote server. The remote server settings must exist prior to the Save Remote command. If not, you can define the remote server settings and protocols in the Remote Files dialog. Some servers require the correct credentials to allow the files to be saved.
The AutoRecovery feature in LibreOffice saves files automatically to help prevent loss of data in the event of a software crash, power outage, or other event which causes LibreOffice to terminate in an unusual way. When files are saved automatically, LibreOffice overwrites the last saved state of the file. To set up automatic file saving, do the following:
Go to Tools > Options > Load/Save > General (macOS LibreOffice > Preferences > Load/Save > General) on the Menu bar.
In Save, select the AutoRecovery information every option and set the time interval in the box, for example 10 minutes.
Optionally, you can save the whole file instead by checking the Automatically save the document too checkbox. The time interval is the same as the AutoRecovery information every time interval.
Click OK to save the selection and close the dialog.
Reloading a document in LibreOffice causes all the changes made in an editing session after the last save to be discarded. To reload a document, go to File > Reload on the Menu bar.
Note
If you reload a document, a confirmation dialog will open and warn the user that reloading will discard the last unsaved changes.
Close a LibreOffice document with one of the following methods:
Go to File > Close on the Menu bar.
In Windows or Linux — click on the 🗙 at the right end of the window title bar.
In macOS — click on the red button at the left end of the title bar.
If the document to be closed is the only document that is open, another 🗙 icon shows at the end of the menu bar. When clicking on this icon, following happens:
In Windows and Linux — the document closes and the LibreOffice Start Center opens.
In macOS — the document closes and the Menu bar remains at the top of the screen.
Note
If the document has not been saved since the last change, a confirmation dialog opens with a warning message. Select whether to save, or discard, the changes before closing.
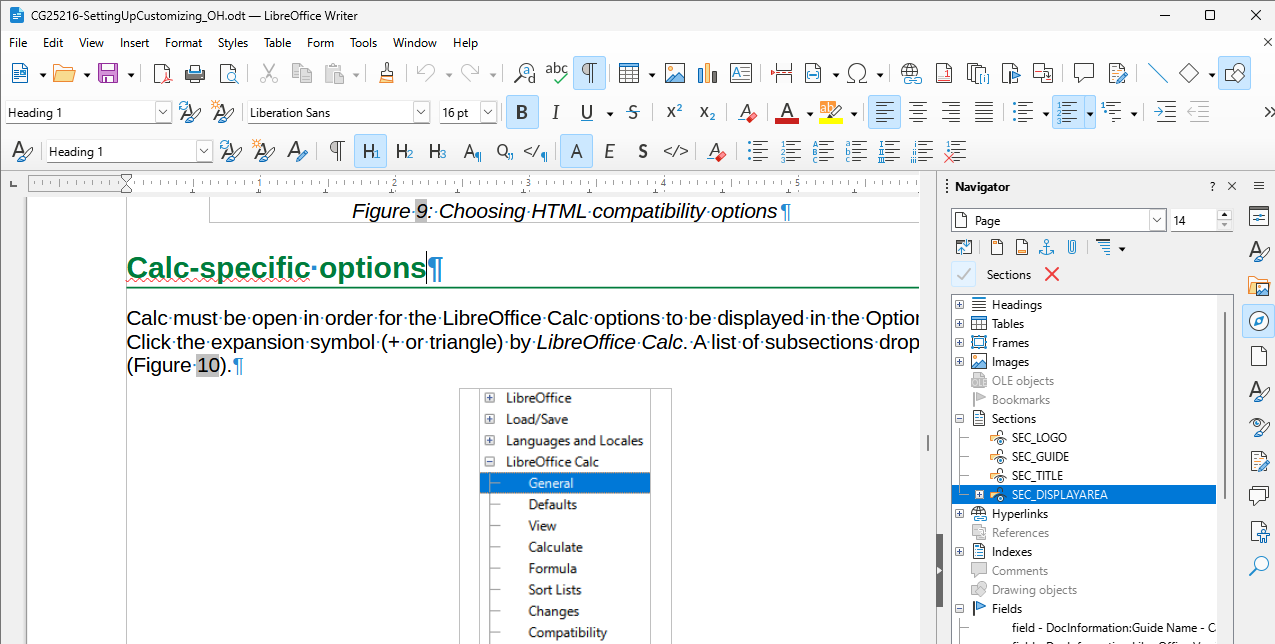
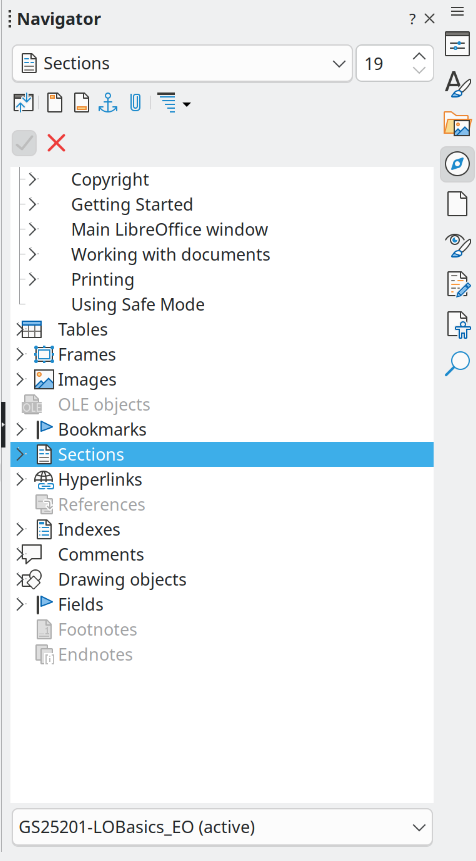
The Navigator lists all objects contained in a document in categories. It is available as a dialog or Sidebar deck. Figure 7 Figure 8 show the Navigator in Impress and Writer respectively.
The Navigator provides an easy method of locating and selecting objects in a document. If possible, give each object unique and descriptive name so that you can easily locate an object. To rename an object, right‑click on the object name in Navigator and select Rename from the context menu.
The Navigator can be opened with one of the following methods:
Navigator dialog: go to View > Navigator on the Menu bar, or use the keyboard shortcut F5 for Windows and macOS, or Ctrl+Shift+F5 for Linux.
Navigator deck on the Sidebar: click on the Navigator icon on the right of the Sidebar, or use the keyboard shortcut Alt+Ctrl+4 for Windows and Linux, or ⌥+⌘+4 for macOS.
To close the Navigator, click on the on the right of the title bar, or use the keyboard shortcut. The categories are specific to each LibreOffice module. Click on the right chevron > next to each category name to open the list of objects contained in it. Also, the Navigator provides some functions that are specific to each LibreOffice module.
Figure 7: Example of Impress Navigator dialog
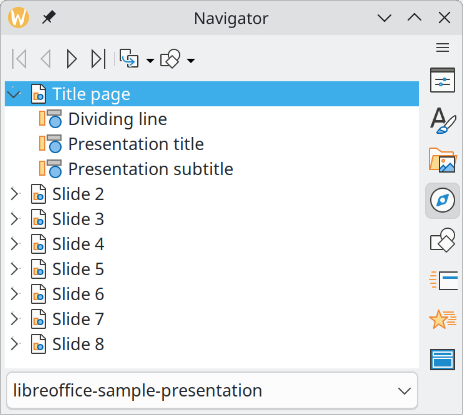
Figure 8: Example of Navigator deck in Writer Sidebar
LibreOffice supports opening multiple views of the same document. For example, when using Writer, separate views of a document can be used for copying or moving information from one page to another.
Each view is displayed in its own window and LibreOffice can show different pages, use different zoom levels, or use other settings. Changes to a document in one window are automatically reflected in the other windows.
To open a document in a new window, choose Window > New Window on the Menu bar. The filename of each document is displayed in the title bar of each window. Figure 9 shows how separate views of one document can be open at the same time.
The Windows menu displays a list of open documents, with a check-mark or radio button next to the active document. Switch between windows by clicking on a name in the list or by clicking on the window itself if it is visible on the display.
Figure 9: Example of separate windows list
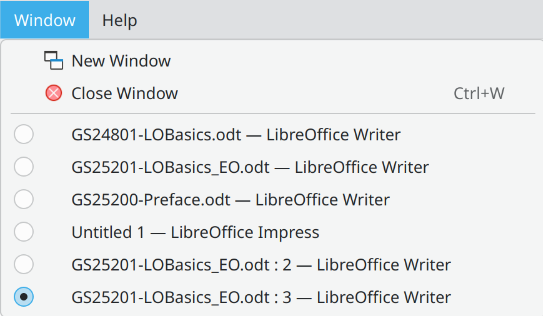
To close a window, go to Window > Close Window on the Menu bar, use the keyboard shortcut Ctrl+W (macOS ⌘+W).
To undo the most recent change in a document, use one of these methods:
Use the keyboard shortcut Ctrl+Z (macOS ⌘+Z).
Click on Undo in the Standard toolbar.
Go to Edit > Undo on the Menu bar.
Click the small triangle ▼ to the right of Undo on the Standard toolbar to open a list of changes that can be undone. Multiple consecutive changes can be selected and deleted at the same time.
After changes have been undone, changes can be redone using one of the following methods:
Use the keyboard shortcut Ctrl+Y (macOS ⌘+Y).
Click on Redo in the Standard toolbar.
Go to Edit > Redo on the Menu bar.
Click the small triangle ▼ to the right of Redo on the Standard toolbar to open a list of undo commands that can be redone. LibreOffice can select multiple consecutive undo commands and redo them at the same time.
Repeating undo and redo commands can save several repetitive menu navigation clicks, or keyboard shortcuts, especially when a command is taken from a context menu or sub‑menu. To repeat the last undo or redo command applied to a document, use one of the following methods:
Use the keyboard shortcut Ctrl+Shift+Y (macOS ⌘+Shift+Y).
Go to Edit > Repeat on the Menu bar.
This section provides some examples of how to set up a default printer on a computer in LibreOffice. The exact method varies depending on the computer and operating system in use.
Note
When printing, the name of the default printer installed on a computer appears in the Print tool name, Print Directly tool name, Print dialog, and Printer Settings dialog.
For more information about printing the different types of documents that LibreOffice can create, see the user guides for each LibreOffice module.
Printing options are not available when viewing a LibreOffice Base table or query.
Open Settings, then go to Devices > Printers & scanners.
Select a printer from the displayed list.
Select Manage > Set as default and then close Settings.
Open Settings, then go to Printers.
Select a printer from the displayed list.
Click on the settings icon on the right of the printer name.
Select Use Printer by Default from the drop-down list and close Settings.
Open System Settings, then open Printers & Scanners.
In Default printer select the printer to use as default printer from the drop-down list, then close Settings.
The Print Directly feature prints the entire open document using the computer’s default printer. To quick print a document, click on Print Directly on the Standard toolbar.
If Print Directly is not visible on the Standard toolbar, it can be added to the toolbar using the following method:
Right-click in a blank area on the Standard toolbar to open a context menu.
Select Visible Buttons from the context menu.
Select Print Directly from the list of available tools to install it on the Standard toolbar. Figure 10 shows the Standard toolbar.
Figure 10: Draw Standard toolbar with Print Directly visible

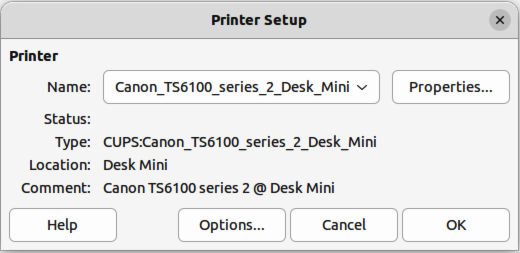
Table 4 lists the options that are available in the Printer Setup dialog:
Table 4: Options for printer setup
|
Option |
Description |
|
Printer |
Lists information that applies to the selected printer. If the list is empty, install a default printer for the computer. Refer to the printer and computer user guides for more information on connecting printers. |
|
Name |
Lists the installed printers on the computer. To change the default printer, select a printer name from the drop-down list. |
|
Status |
Describes the current status of the selected printer. |
|
Type |
Displays the type of printer that is selected. |
|
Location |
Displays the computer connection for the selected printer. |
|
Comments |
Displays additional information for the printer. |
|
Properties |
Changes the printer settings of the computer operating system for the current document. Make sure that the layout orientation (Landscape or Portrait) matches the page format set in Format > Page on the Menu bar. |
|
Options |
Opens the Printer Options dialog box allowing the global printer options set in Tools > Options > LibreOffice Writer or LibreOffice Calc > Print (macOS LibreOffice > Preferences > LibreOffice Writer or LibreOffice Calc > Print) to be overridden when printing the current document. |
Note
Options in the Printer Settings dialog is only available in LibreOffice Writer and Calc.
Here is an example of setting up a printer on a computer for LibreOffice:
Connect the printer to the computer. Refer to the printer and computer user guides for more information on connecting printers.
Go to File > Printer Settings on the Menu bar to open a Printer Setup dialog. Figure 11 shows an example of a Printer Setup dialog.
Figure 11: Example of a Printer Setup dialog
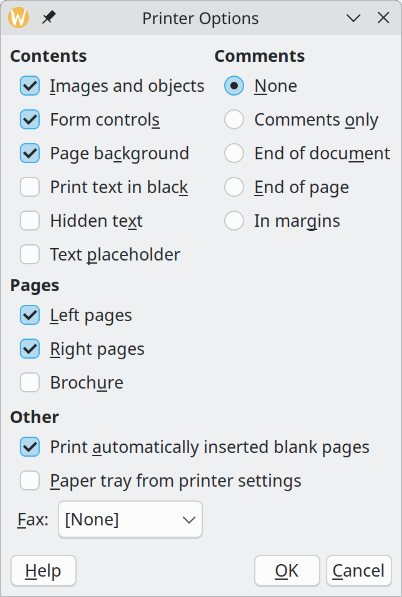
Click on Options in Printer Setup dialog to open the Printer Options dialog. Figure 12 shows an example of a Printer Options dialog.
Select the desired printer options, then click on OK to save the selection and close the Printer Options dialog.
Figure 12: Example of Printer Options dialog
If necessary, click on Properties in the Printer Setup dialog to open a properties dialog for the default printer.
Select the required properties, then click on OK to save the selection and close the Properties dialog.
Click OK to save the printer setup and close the Printer Setup dialog.
After you install a printer on a computer, the general printing options for LibreOffice can be customized. Go to Tools > Options > LibreOffice > Print (macOS LibreOffice > Preferences > LibreOffice > Print) to open the Options LibreOffice Print dialog (Figure 13). The available general print options for LibreOffice are as follows:
Settings for
Defaults
Convert colors to grayscale
Specifies that all colors in a document are printed only as grayscale.
Include transparent objects
When selected, the reduction in print quality for bitmaps also applies to the transparent areas of objects.
Figure 13: Options LibreOffice Print dialog
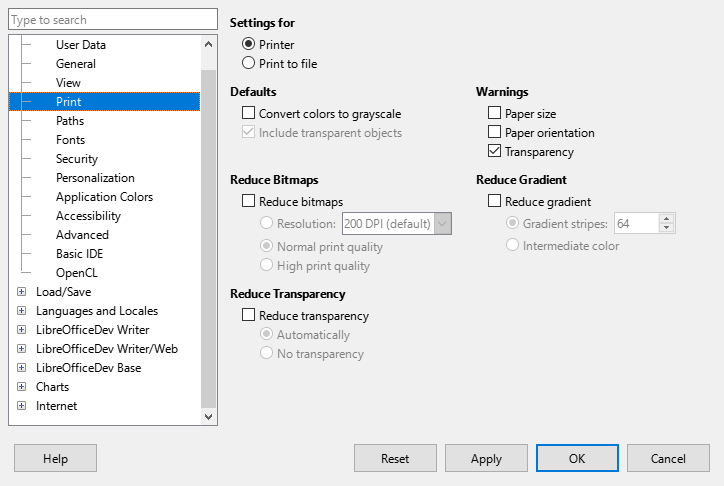
Reduce bitmaps
Resolution
Specifies the maximum print quality in DPI. The resolution can only be reduced and not increased.
High print quality
High print quality sets the print resolution to 300dpi.
Normal print quality
Normal print quality sets the print resolution to 200dpi.
Note
Reducing the amount of data sent by LibreOffice to the printer increases the print speed because the print files are smaller. This makes it easier for printers with a smaller memory when printing large files. However, reducing print data can result in slightly lower print quality.
Reduce transparency
Automatically
Specifies that the transparency is only printed if the transparent area covers less than a quarter of the entire page.
No transparency
When selected, a transparency does not print.
Note
Transparencies cannot be sent directly to a printer. Transparencies must be visible to be calculated by LibreOffice as bitmaps and sent to the printer. Depending on bitmap size and the print resolution, a large amount of data may be generated.
Warnings
Paper size
Select this option if a certain paper size is required for printing the current document. If the paper size used in the document is not provided by the current printer, an error message opens.
Paper orientation
Select this option if a certain paper orientation is required for printing the current document. If the format used by the current document is not available from the printer, an error message opens.
Transparency
Select this option if a warning is required if transparent objects are contained in the document. When printing a document with transparencies, a dialogue box opens to enable selection if the transparency is to be printed.
Reduce gradient
If selected, gradients are printed with reduced quality.
Gradient stripes
Specifies the maximum number of gradient stripes for printing.
Intermediate color
Specifies that gradients are only printed in a single intermediate color.
To open the printing options dialog for each LibreOffice module, go to Tools > Options > LibreOffice module name > Print (macOS LibreOffice > Preferences > LibreOffice module name > Print). The different print settings for each LibreOffice module are summarized in Table 5. For more information, refer to the specific user guide for each module.
Table 5: Print options for LibreOffice modules
|
Feature |
Writer |
Calc |
Impress |
Draw |
Math |
|
Select pages, sheets, or slides to print |
Yes |
Yes |
Yes |
Yes |
Yes |
|
Print multiple pages, sheets, or slides on one page |
Yes |
Yes |
Yes |
Yes |
No |
|
Print a brochure |
Yes |
No |
Yes |
Yes |
No |
|
Print envelopes |
Yes |
No |
No |
No |
No |
|
Print labels or business cards |
Yes |
No |
No |
No |
No |
|
Preview pages or sheets before printing |
Yes |
Yes |
No |
No |
No |
To set printing options for a file, open the Print dialog using one of the following methods:
Go to File > Print on the Menu bar.
Click on Print on the Standard toolbar.
Use the keyboard shortcut Ctrl+P (macOS ⌘+P).
The following options are available in the General tab of the Print dialog (Figure 14).
Printer
Properties
Range and Copies
All Pages (All Slides in Impress)
Prints all the pages or slides in the document.
Selection
Prints the slides selected in LibreOffice Impress.
Pages (Slides in Impress)
Select the page number(s) to print. For multiple pages, use the format 1, 3, 7 or 1–5, 7, 9 for page number selection.
Include
Select from the drop-down list:
Odd and Even Pages, Odd Pages, or Even Pages.
More > Paper sides
Select from the drop-down list Print on one side (simplex), Print on both sides (duplex long edge), or Print on both sides (duplex short edge).
More > Number of copies
Enter number of printed copies required for the document.
More > Collate
Collates multiple printed copies into separate documents.
More > Order
Select from Create separate print jobs for collated output (only available when more than one copy is being printed) or Print in reverse order.
Page Layout
Paper size
Orientation
Select from the drop-down list Automatic, Portrait, or Landscape.
More > Pages per sheet
Select from the drop-down list how many pages are printed on one sheet of paper.
More > Order
Select from the drop-down list the printing order of multiple pages on one sheet of paper.
More > Draw a border around each page
When multiple slides are printed on one sheet of paper, a border is drawn around each slide.
More > Brochure
Prints the document, so the pages can be folded into a brochure or booklet.
Figure 14: Impress Print dialog — General page in Windows or Linux
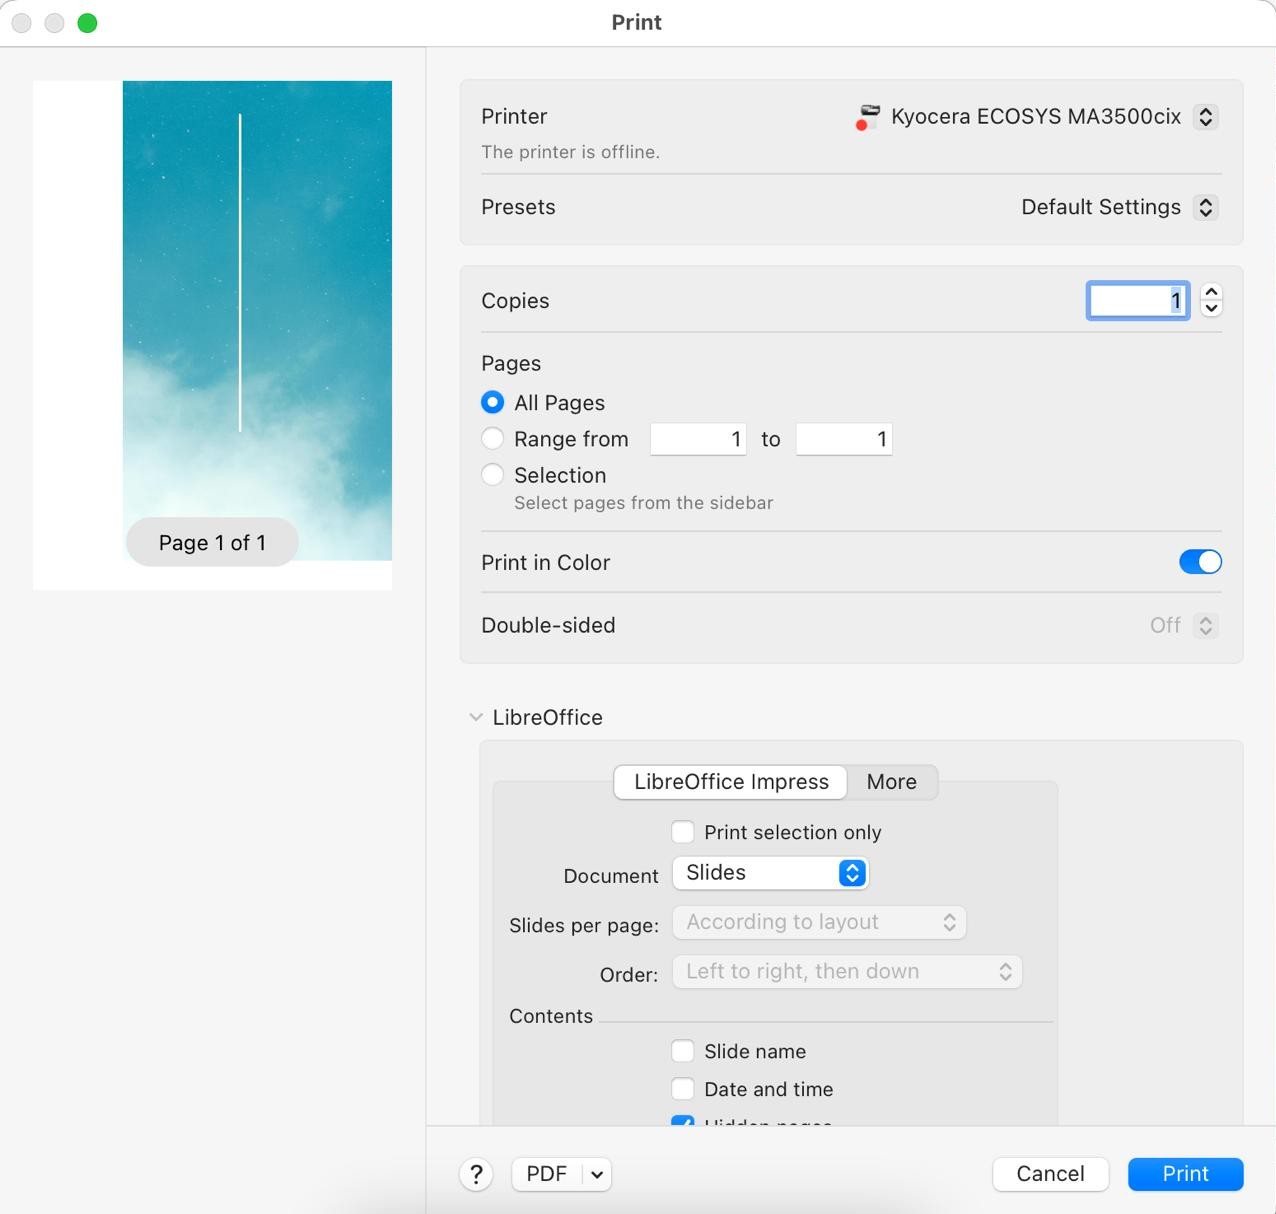
The following general options are an example of the options available on the General page of the Print dialog in macOS (Figure 15).
Printer
Select the printer to be used from the drop-down list. If the default printer is being used, then this printer will already be selected.
Presets
Select from the drop-down list a printing preset. The presets available depend on the type of printer connected to the computer. This also includes any custom presets that have been created.
Copies
Enter the number of copies to be printed.
Pages
All
Prints all the pages in the document.
From: to:
Select the page number(s) to print. For multiple pages, use the format 1, 3, 7 or 1–5, 7, 9 for page number selection.
Print in Color
Double-Sided
Media & Quality
Feed from
Select which paper tray to use from a drop-down list (if the printer has more than one paper tray).
Media Type
Select the paper type that is loaded in the paper tray from the drop-down list. For example: Envelope, Photo, or Plain Paper.
Quality
Select the required level of printing quality.
Layout
Pages per sheet
Select how many slides are printed on one sheet of paper from the drop-down list.
Layout Direction
Select the printing order of multiple slides on one sheet of paper.
Border
When multiple slides are printed on one sheet of paper, a border is drawn around each slide.
Two-Sided
Specifies how a multipage document will be bound. Select one of the following options from the drop-down list: Off; Long-Edge binding; Short-Edge binding, Booklet.
Reverse page orientation
If LibreOffice prints the slides in the wrong order, select this option and print the document again.
Flip horizontally
If LibreOffice prints the pages in the wrong orientation, select this option and print the document again.
Paper Handling
Collate sheets
Allows selected multiple printed copies to be collated into separate documents.
Sheets to Print
Select which slides in the document to print from the drop-down list: (All pages; Odd only; Even only).
Sheet Order
Selects the page printing order from the drop-down list: Automatic; Normal; Reverse.
Scale to fit paper size
Adjusts the printed slide to fit the paper size.
Destination Paper Size
Only available if Scale to fit paper size has been selected. Selects a paper size from the options available in the included drop‑down list.
Scale down only
Select this option to reduce slide size to fit the paper. Only available if the paper size is smaller than the slide size.
Figure 15: Impress Print dialog — General page in macOS
Watermark
Printer info
For more information on using specific printing options available in each LibreOffice module, see the User Guide for each LibreOffice module. For example, specific printing could be for:
Individual pages, slides, or drawings.
Range of pages, slides, or drawings.
Selection of text, or graphics (Writer).
Individual sheets, range of sheets, or selected cells (Calc).
Handouts, outlines, or notes (Impress).
Envelopes, labels, or business cards (Writer).
In Writer, Impress, and Draw, documents can be printed in the correct order to form a booklet or brochure. Below are some examples. Actual brochure printing procedure depends on the computer operating system and type of printer being used. You may need to experiment to find the correct method for brochure printing.
This is an example of how you can create a brochure or booklet with a printer that can only print single sided pages.
Open the Print dialog using one of the following methods:
Go to File > Print on the Menu bar.
Use the keyboard shortcut Ctrl+P (macOS ⌘+P).
Click on Print on the Standard toolbar.
Click on General to open the page for general print options and, if necessary, select a printer from the Printer drop-down list of printers available.
Click on Properties to open the printer properties dialog for the printer being used and check the printer is set to the same page orientation as specified for the page setup for the pages. Usually page orientation does not matter, but it is important for brochures.
Click OK to close the properties dialog and return to the Print dialog.
In Range and Copies, select All Slides. A minimum of four slides is required to create a brochure.
In Range and Copies, select the Number of copies required to match the required number of brochures.
In Layout, select Brochure.
In Range and Copies, select Even slides option in Include.
Click OK to print the even slides in the presentation.
Take the printed pages out of the printer and put them back into the printer in the correct orientation to print on the other side of the paper. It may be necessary to experiment to find out the correct arrangement for the printer being used.
In Range and Copies, select Odd slides option in Include.
In Range and Copies, select the same Number of copies used for printing the even slides.
Click OK to print the odd slides in the presentation and close the Print dialog.
Assemble the brochures and bind them, if necessary.
Printing a brochure with a printer that is capable of double-sided, or duplex printing, makes the task of creating brochures simpler.
Open the Print dialog using one of the following methods:
Go to File > Print on the Menu bar.
Use the keyboard shortcut Ctrl+P (macOS ⌘+P).
Click the Print icon on the Standard toolbar.
Click on General to open the page for general print options and, if necessary, select a printer from the Printer drop-down list of printers available.
Click on Properties to open the printer properties dialog for the printer being used and check the printer is set to the same page orientation (as specified for the page setup for the slides). Page orientation is especially important for brochures.
Click OK to close the properties dialog and return to the Print dialog.
In Range and Copies, select All Slides. A minimum of four slides is required to create a brochure.
In Range and Copies, select Print on both sides (duplex long edge) or Print on both sides (duplex short edge) option. Normally, long edge binding is used for portrait printing and short edge binding is used for landscape printing.
In Range and Copies, select the Number of copies required to match the required number of brochures.
In Range and Copies, select the Collate option. This option is only active when printing multiple copies of the same document.
In Layout, select Brochure.
Click OK to close to the Print dialog and print the required number of pages for the brochures.
If necessary, bind the brochures to match either long edge or short edge binding.
Figure 16: Print Preview toolbar

A document can be previewed before it is printed in the Writer and Calc modules. Print previewing is useful, especially when printing a document double-sided to check that there are no errors before the document is printed. Print previewing is opened as follows:
Open Print Preview using one of the following methods:
Go to File > Print Preview on the Menu bar.
Click on Toggle Print Preview on the Standard toolbar.
Use the keyboard shortcut Ctrl+Shift+O (macOS ⌘+Shift+O).
Opening Print Preview causes the Print Preview toolbar (Figure 15) to open and the Formatting toolbar to close.
Select a preview option from the available options: Single Page Preview, Two Pages Preview, Book Preview, or Multiple Pages Preview.
To print the document from Print Preview, click Print on the Print Preview toolbar to open the Print dialog, then select the printing options and click OK (macOS Print).
To close the preview, click on Close Preview on the Print Preview toolbar. The document switches back to normal view and the Formatting toolbar reopens replacing the Print Preview toolbar.
Note
When a document is in Print Preview mode, the document cannot be edited. If necessary, click on Book view in the Status Bar to display the document in book format. The document can be edited when using Book view on the Status bar. Click on Single page view to return the document to normal view.
Safe Mode is used to restore LibreOffice after it has stopped working, fails to launch correctly, or a file has become corrupted. It starts LibreOffice with a fresh user profile and disables hardware acceleration.
Go to Help > Restart in Safe Mode on the Menu bar to open the Safe Mode dialog (Figure 17).
Note
It is recommended to use Safe Mode options from the top down (Figure 17) because the options get more extreme from the top down.
Restore from backup
Configure
Extensions
Reset to factory settings
Reset settings and user interface modifications
Reset entire user profile
Continue in Safe Mode
Figure 17: Safe Mode dialog
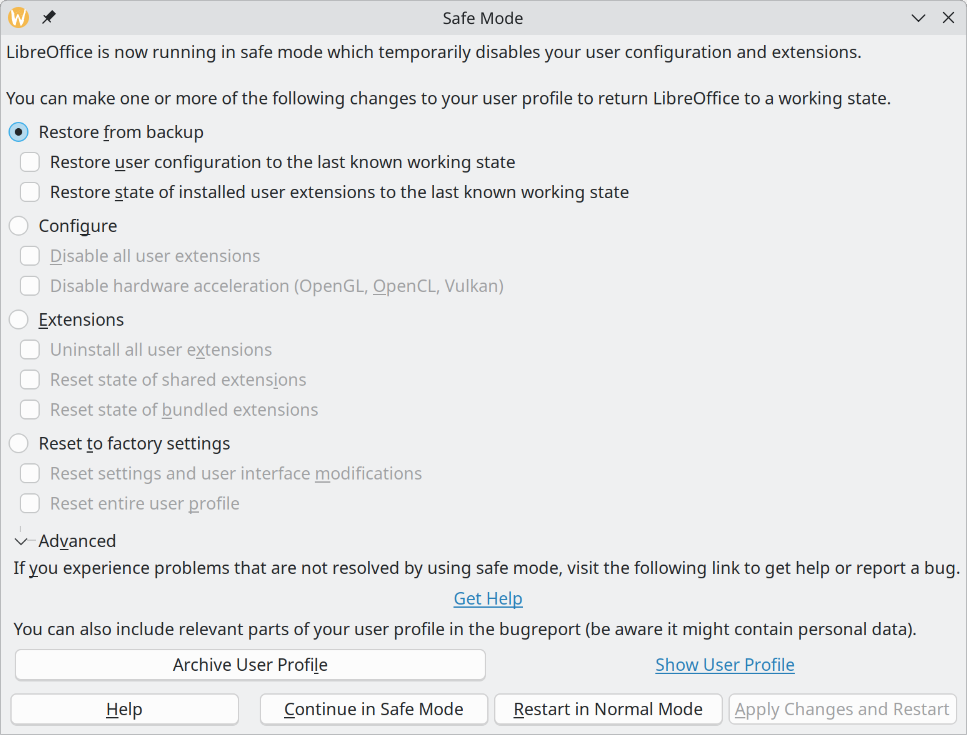
Restart in Normal Mode
Apply Changes and Restart
Note
If problems are not solved using Safe Mode, selecting Advanced provides instructions on receiving further aid.
Advanced allows you to create a zip file of a corrupted user profile. This file can be uploaded to the bug tracking system for further investigation by the LibreOffice developers. Remember that an uploaded user profile may also contain sensitive information such as installed extensions, personal dictionaries, and user‑specific settings.