Getting Started Guide 7.0
Chapter 10
Printing, Exporting, Emailing and Signing Documents
This document is Copyright © 2020 by the LibreOffice Documentation Team. Contributors are listed below. You may distribute it and/or modify it under the terms of either the GNU General Public License (https://www.gnu.org/licenses/gpl.html), version 3 or later, or the Creative Commons Attribution License (https://creativecommons.org/licenses/by/4.0/), version 4.0 or later.
All trademarks within this guide belong to their legitimate owners.
|
Jean Hollis Weber |
Kees Kriek |
Winston Min Tjong |
|
Jean Hollis Weber |
Steve Fanning |
Kees Kriek |
|
Dave Barton |
Olivier Hallot |
Paul Figueiredo |
|
John A Smith |
Miklos Vajna |
Hazel Russman |
|
Ron Faile Jr. |
|
|
Please direct any comments or suggestions about this document to the Documentation Team’s mailing list: documentation@global.libreoffice.org
Note
Everything you send to a mailing list, including your email address and any other personal information that is written in the message, is publicly archived and cannot be deleted.
Published January 2021. Based on LibreOffice .
Some keystrokes and menu items are different on macOS from those used in Windows and Linux. The table below gives some common substitutions for the instructions in this document. For a detailed list, see the application Help.
|
Windows or Linux |
macOS equivalent |
Effect |
|
Tools > Options |
LibreOffice > Preferences |
Access setup options |
|
Right-click |
Control+click or right-click depending on computer setup |
Open a context menu |
|
Ctrl (Control) |
⌘ (Command) |
Used with other keys |
|
F11 |
⌘+T |
Open the Styles deck in the Sidebar |
If the Print Directly icon is visible on the Standard toolbar, you can click it to print the entire document using the current default print settings. If the icon is not visible, you can show it by right-clicking on the toolbar, pointing to Visible Buttons, and selecting Print Directly.
Note
The Print Directly and other printing options are not available when viewing a Base table or query.
You can specify the default printer on the Printer Setup dialog; go to File > Printer Settings on the Menu bar. When further printing options are available, click the Options button on the Printer Setup dialog to access them. The same options are available through Tools > Options > [LibreOffice Component] > Print, and more general print options through Tools > Options > LibreOffice > Print. See Chapter 2, Setting Up LibreOffice, for more information.
For more control over printing, use the Print dialog (File > Print, Ctrl+P (⌘+P for macOS), or the Print icon on the Standard toolbar).
Note
The appearance of the Print dialog is different on macOS and may include extra printer controls not described in this chapter.
The Print dialog (Figure 1) has two tabs, from which you can choose a range of options as described in the following sections. The first tab is General; it is similar in all LibreOffice components although some of the options available in Writer are unavailable in other components. The second tab is component-specific.
The different components of LibreOffice have different print settings available, as summarized in Table 1.
Table 1: Print options in LibreOffice components
|
Feature |
Writer |
Calc |
Impress |
Draw |
Math |
|
Select pages/sheets/slides to print |
Yes |
Yes |
Yes |
Yes |
Yes |
|
Print multiple pages/sheets/slides on one page |
Yes |
Yes |
Yes |
Yes |
No |
|
Print a brochure |
Yes |
No |
Yes |
Yes |
No |
|
Print envelopes |
Yes |
No |
No |
No |
No |
|
Print labels or business cards |
Yes |
No |
No |
No |
No |
|
Preview pages/sheets before printing |
Yes |
Yes |
No |
No |
No |
Base forms and reports are printed using the Writer version of the Print dialog and hence provide the facilities in the Writer column of Table 1.
Figure 1: The Print dialog in Writer
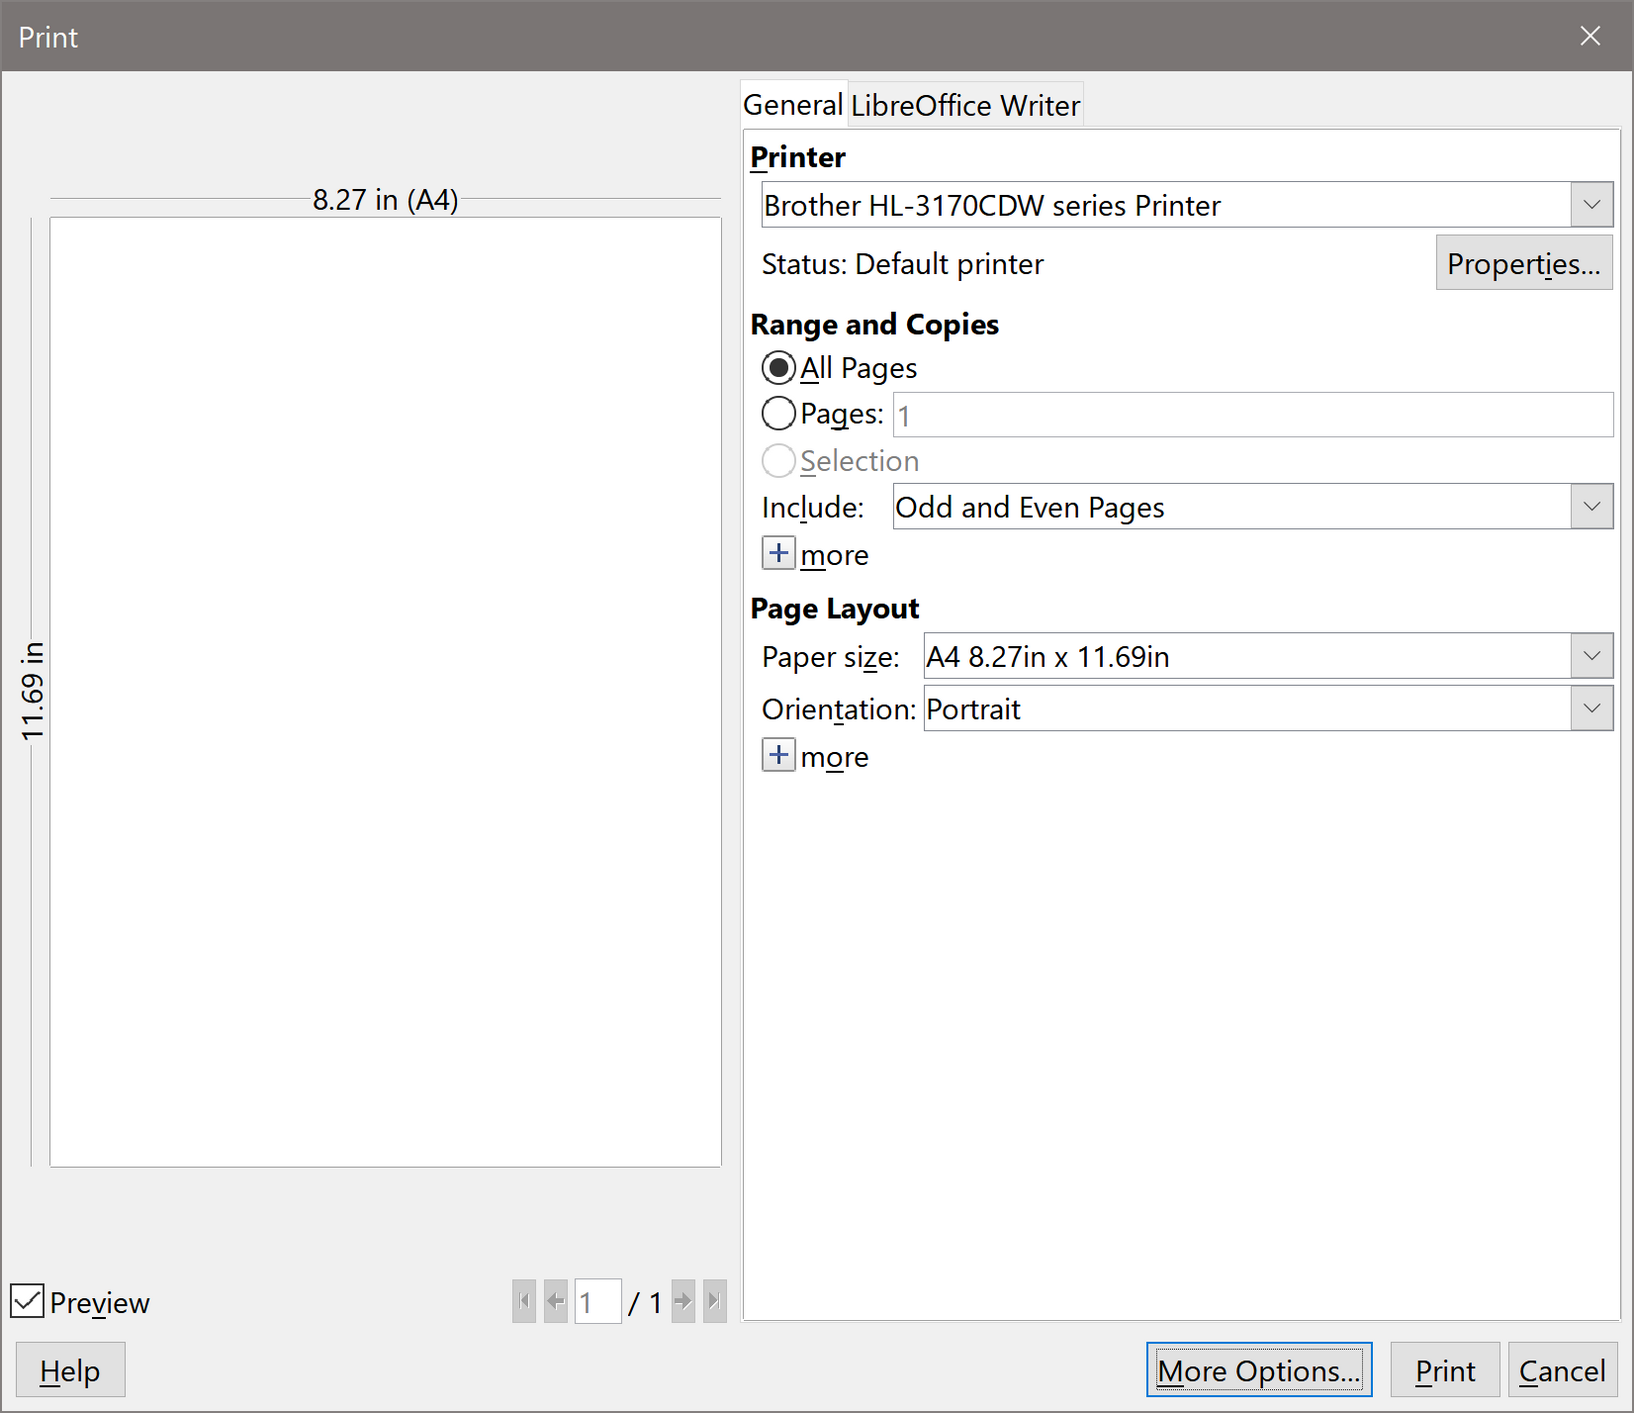
On the General tab of the Print dialog, you can choose:
The printer, from the list of available printers
Which pages to print, the number of copies to print, and whether to collate multiple copies (Range and Copies section; see below)
Paper size and print orientation (Page Layout section)
How many pages to print on one sheet of paper and whether to draw a border around each page (Page Layout section)
Whether to print a brochure (see below)
In the Printer section of the General tab, click the Properties button to display the selected printer’s properties dialog where you can choose portrait or landscape orientation, which paper tray to use, and the paper size to print on.
Click the More Options button at the bottom of the Print dialog to choose whether to create separate print jobs for collated output, instead of one print job containing all the collated pages (not relevant if only one copy of a document is printed).
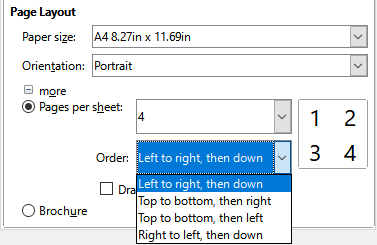
You can print multiple pages of a document on one sheet of paper. To do this, in the Page Layout section of the General tab, click more and select from the Pages per sheet drop-down list the number of pages to print per sheet of paper. The preview panel on the left of the Print dialog shows how the printed document will look. This facility is not available in Math.
When printing more than two pages per sheet, you can choose the order in which they are printed across and down the paper (see Figure 2).
Tip
In Writer, to print two pages per sheet in “facing pages” (book layout) style, print from Print Preview instead. See below.
Figure 2: Print order choices
In addition to printing a full document, in the Range and Copies section of the General tab, you can choose to print individual pages/sheets/slides, ranges of pages/sheets/slides, or a selection of a document. The details vary slightly between Writer, Calc, Draw, Impress, and Math, as described below.
Printing an individual page:
1) In the Print dialog, in the Range and Copies section, select the Pages option. The text box shows the current page number.
2) Enter the page number of the page you want to print. The preview box on the left changes to show the selected page.
Printing a range of pages:
1) In the Print dialog, in the Range and Copies section, select the Pages option.
2) Enter the page numbers of the pages to print (for example, 1–4 or 1,3,7,11).
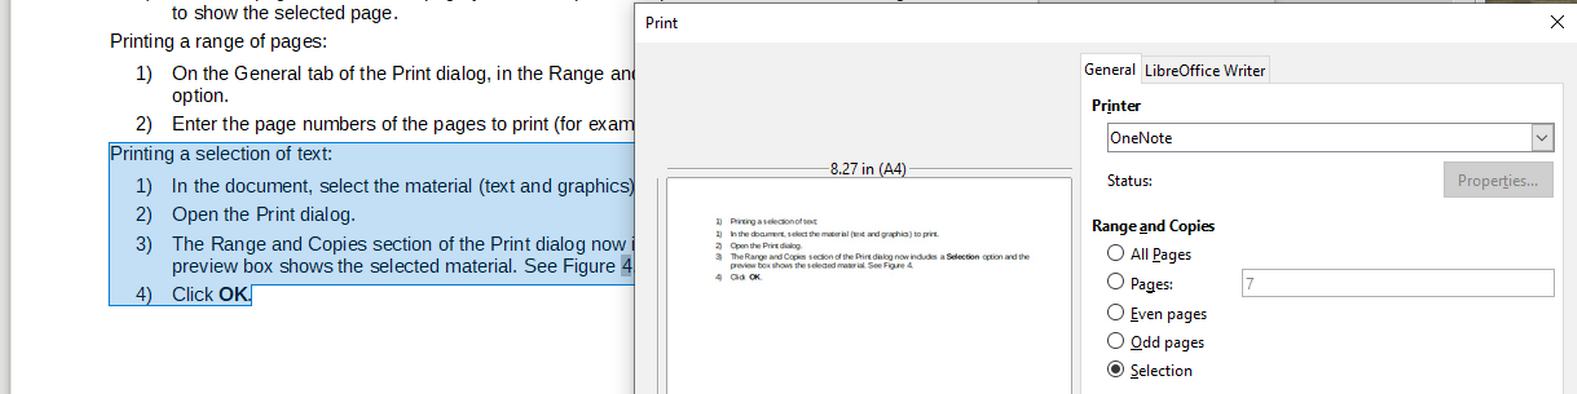
Printing a selection of text or graphics (Writer only):
1) In the document, select the material to print, then open the Print dialog.
2) In the Range and Copies section of the Print dialog, the Selection option is now active and selected and the preview box shows the selected material. See Figure 3.
Figure 3: Printing a selection of text
You can choose individual sheets, ranges of sheets, or selections of sheets for printing.
Figure 4: Choosing what to print in Calc
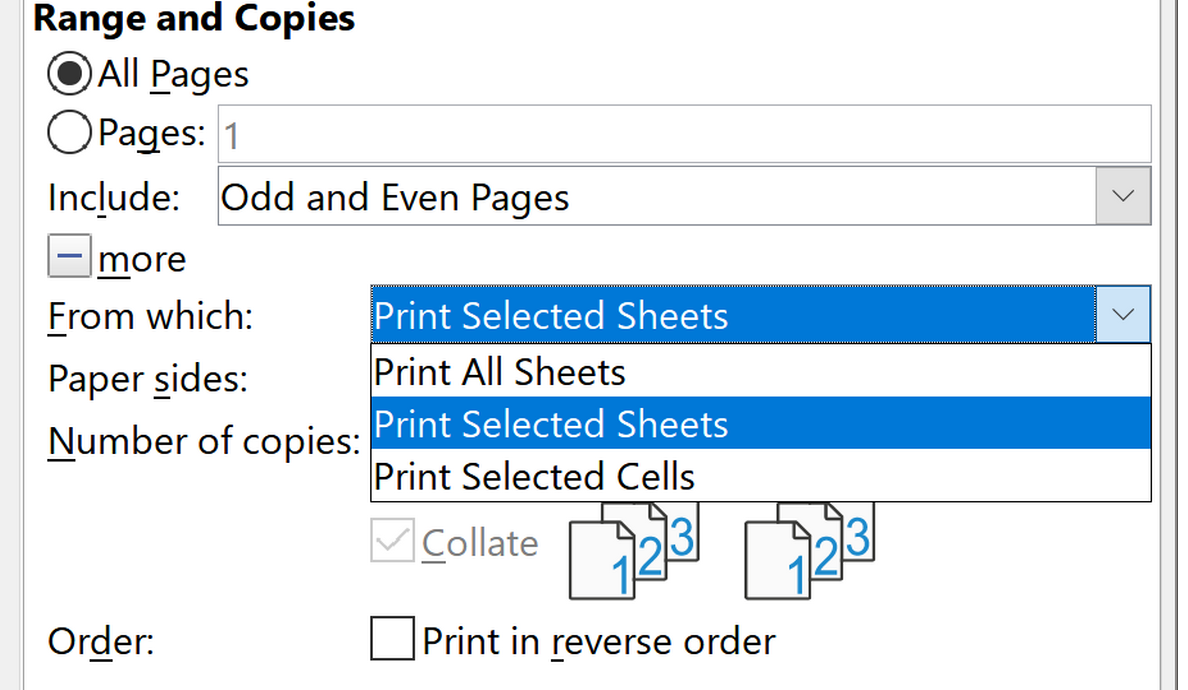
Printing an individual sheet:
1) In the spreadsheet, click on the sheet tab to select the sheet you want to print.
2) Open the Print dialog and choose the General tab.
3) In the Range and Copies section, click more and choose Print Selected Sheets in the From which drop-down.
Printing a range of sheets:
1) In the spreadsheet, select the sheets to print.
a) Select the first sheet.
b) Hold down the Control key.
c) Click on the additional sheet tabs.
d) Release the Control key when all required sheets are selected.
2) Open the Print dialog and choose the General tab.
3) In the Range and Copies section, click more and choose Print Selected Sheets in the From which drop-down.
Caution
After printing, be sure to deselect the extra sheets. If you keep them selected, the next time you enter data on one sheet, you enter data on all the selected sheets. This might not be what you want.
Printing a selection of cells:
1) In the document, select the cells to print.
2) Open the Print dialog and choose the General tab.
3) In the Ranges and Copies section, choose Print Selected Cells in the From which drop-down.
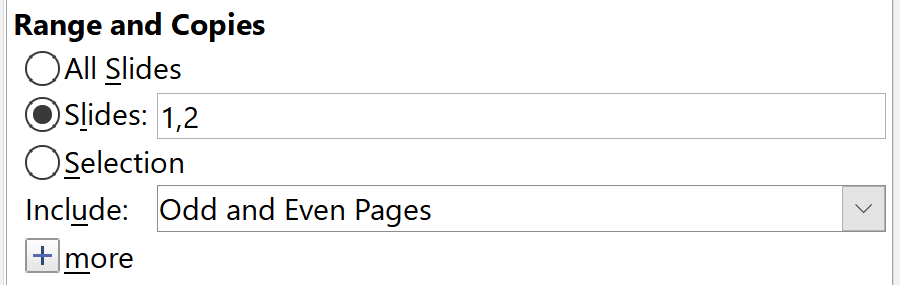
You can choose individual slides, ranges of slides, or selections of slides for printing.
To print an individual slide or a range of slides, do one of the following:
In the Print dialog, select the Slides option in the Range and Copies section (Figure 5) and then enter the numbers of the slides to print (for example, 1-4 or 1,3,7,11).
Select the slides first and then open the Print dialog, which will show the slide numbers in the box. See Chapter 6, Getting Started with Impress, for information on selecting slides.
Figure 5: Choosing what to print in Impress and Draw
To print a selection from a slide, or a selection from multiple slides:
1) In the document, select the section of the slide to print.
2) Open the Print dialog.
3) Choose the Selection option in the Range and Copies section.
You can also choose to print only even-numbered slides or only odd-numbered slides.
Choices on the LibreOffice [Component] tab vary with the component.
On the LibreOffice Writer tab (Figure 6) you can choose to print a subset of contents (for example, images or hidden text), print text in black (even if a color is defined for the text), whether to print automatically inserted blank pages, and whether and where to print any comments that are in the document (Figure 7).
Figure 6: LibreOffice Writer tab of Print dialog
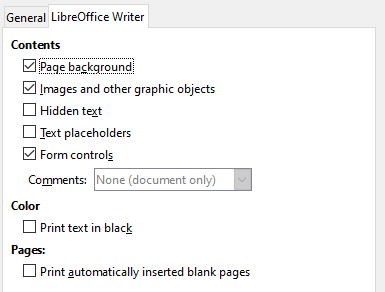
Some selections may not be available all the time. For example, if the document contains no comments, the Comments drop-down list is disabled.
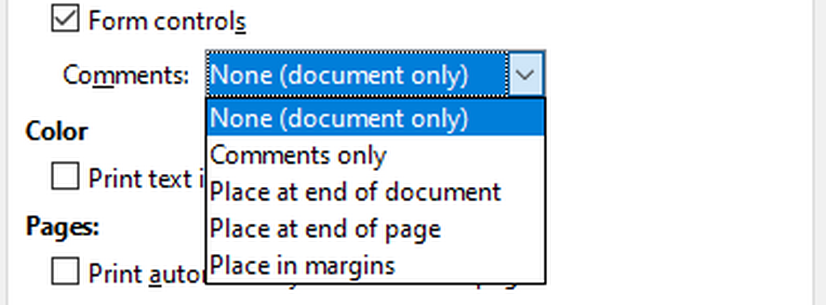
Figure 7: Choosing whether and where to print comments
The only choice on the LibreOffice Calc tab is whether to suppress the printing of blank sheets.
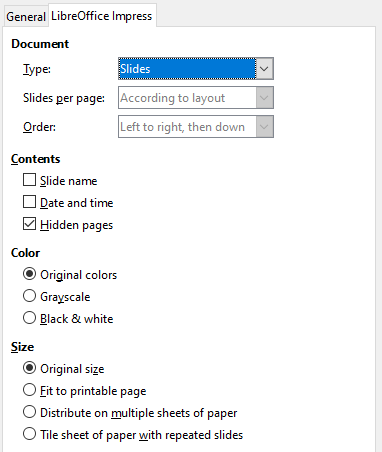
On the LibreOffice Impress tab (Figure 8), you can choose to print slides, handouts, notes, or an outline. See Chapter 6, Getting Started with Impress, for more information on these features.
Handouts prints the slides in reduced size on the page, from one to nine slides per page. The slides can be printed horizontally (landscape orientation) or vertically (portrait orientation) on the page.
Notes prints a single slide per page with any notes entered for that slide in Notes View.
Outline prints the title and headings of each slide in outline format.
Figure 8: LibreOffice Impress tab of Print dialog
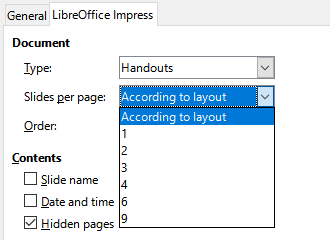
To print slides, handouts, notes, or outlines:
1) In the Document section, select the required option under Type.
2) For Handouts, you can then choose how many slides to print per page, and the order in which they are printed (see Figure 9).
Figure 9: Handouts
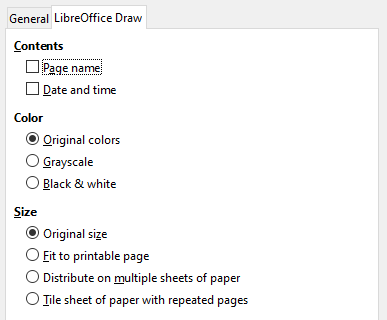
On the LibreOffice Draw tab (Figure 10), you can choose print options as shown.
Figure 10: LibreOffice Draw tab of Print dialog
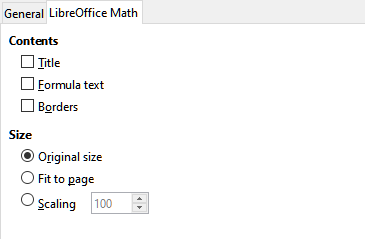
On the LibreOffice Math tab (Figure 11), you can choose print options as shown.
Figure 11 - LibreOffice Math tab of Print dialog
In Writer, Impress, and Draw, you can print a document with two pages on each side of a sheet of paper, arranged so that when the printed pages are folded in half, the pages are in the correct order to form a booklet or brochure.
Tip
Plan your document so it will look good when printed half size; choose appropriate margins, font sizes, and so on. You may need to experiment.
To print a brochure:
1) In the Page Layout section of the General tab, click more and select the Brochure option. The preview on the left changes to show the sequence in which the pages will be printed. (See Figure 12.)
Figure 12: Settings for printing a brochure on a simplex printer
2) Depending on your language settings (Tools > Options > Language Settings > Languages), the Writer variant of the Print dialog may include a drop-down menu adjacent to the Brochure button (not shown in Figure 12). This provides Left-to-right script and Right-to-left script options. Select the required setting in this menu.
3) If your printer can print double-sided (duplex) pages automatically, choose All pages in the Range and Copies section, then click OK to print.
4) If your printer can print only single-sided pages automatically, follow these steps:
a) Select Even pages in the Range and Copies section, then click OK to print.
b) Take the printed pages out of the printer and put them back in the correct orientation to print on the blank side. You may need to experiment to find the correct arrangement for your printer.
c) On the Print dialog, in the Range and Copies section, select Odd pages. Click OK.
Printing envelopes, labels, or business cards using Writer involves two steps: setup and printing.
For details, see Chapter 14, Using Mail Merge, in the Writer Guide.
You can use the previewing options in Writer and Calc to view the document as it will be printed. Several viewing options are available.
The normal page view in Writer shows you what each page will look like when printed and you can edit the pages in that view. If you are designing a document to be printed double-sided, you may want to see what facing pages look like. Writer provides two ways to do this:
View Layout (editable view): use the Book view button on the status bar.

Print Preview (read-only view).
To use Print Preview:
1) Choose File > Print Preview on the Menu bar, or click the Toggle Print Preview button on the Standard toolbar, or press Ctrl+Shift+O (Shift+⌘+O for macOS).
Writer now displays the Print Preview toolbar instead of the Formatting toolbar.
Figure 13: Print Preview toolbar (Writer)

2) Select the required preview icon: Single Page, Two Pages, Multiple Pages, or Book Preview.
3) To print the document from this view, click the Print icon to open the Print dialog. Choose the print options and click OK or Print (macOS).
To preview the sheets in Calc before printing:
1) Choose File > Print Preview on the Menu bar, or click the Toggle Print Preview button on the Standard toolbar, or press Ctrl+Shift+O (Shift+⌘+O for macOS).
The Calc window now displays the Print Preview toolbar instead of the Formatting toolbar.
Figure 14: Print Preview toolbar (Calc)

2) To print the document from this view, click the Print icon to open the Print dialog.
LibreOffice can export documents to PDF (Portable Document Format). This standard file format is ideal for sending the file to someone else to view using Adobe Reader or other PDF viewers.
Warning
A document in PDF format is not protected against contents tampering or editing by default. The PDF document contents can be edited by specialized software tools, including LibreOffice Draw.
The process and dialogs are the same for Writer, Calc, Impress, and Draw, with a few minor differences mentioned in this section.
Tip
Unlike Save As, the Export command writes a copy of the current document in a new file with the chosen format, but keeps the current document and format open in your session.
Click the Export Directly as PDF icon on the Standard toolbar to export the entire document using the PDF settings you most recently selected on the PDF Options dialog (see below). In Writer, Impress, and Draw, you can also use File > Export As > Export Directly as PDF. You are asked to enter the file name and location for the PDF file, but you do not get a chance to choose a page range, the image compression, or other options.
For more control over the content and quality of the resulting PDF, use File > Export As > Export as PDF (Writer, Impress, and Draw) or File > Export as PDF (Calc and Math) on the Menu bar. The PDF Options dialog opens. This dialog has six tabs (General, Initial View, User Interface, Links, Security, and Digital Signatures). Select the appropriate settings, and then click Export. Then you are asked to enter the location and file name of the PDF to be created, and click Save (Windows and Linux) or Export (macOS) to export the file.
Note
You can also export to PDF from File > Export (not Math). On the Export dialog, select the PDF file format, the file name and location, and click Save or Export (macOS). The PDF Options dialog then opens. Select the appropriate settings and then click Export. The only difference between the two export methods is the sequence in which steps occur.
On the General tab (Figure 15), you can choose which pages to include in the PDF, the type of compression to use for images (which affects the quality of images in the PDF), and other options. Figure 15 shows the Writer variant of the General tab – the corresponding tabs for other LibreOffice components have minor differences from this figure.
Figure 15: General tab of PDF Options dialog (Writer)
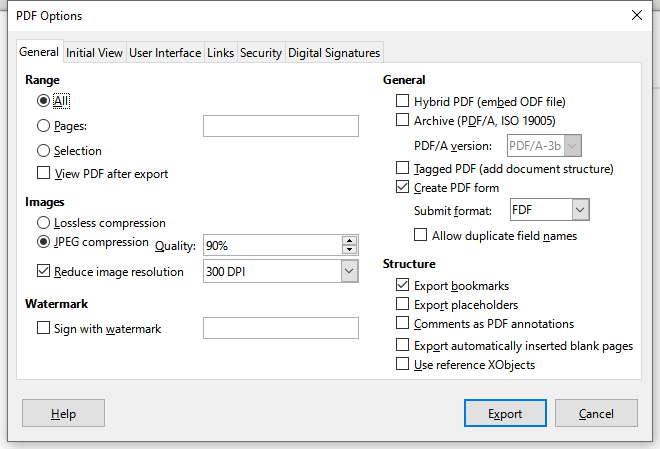
All: Exports the entire document to PDF.
Pages: To export a range of pages, use the format 3-6 (pages 3 to 6). To export single pages, use the format 7;9;11 (pages 7, 9 and 11). You can also export a combination of page ranges and single pages, by using a format like 3-6;8;10;12.
Selection: Exports all the selected material.
View PDF after export: Your default PDF viewer will open and display the newly exported PDF.
Lossless compression: Images are stored without any loss of quality. Tends to make large files when used with photographs. Recommended for other kinds of images or graphics.
JPEG compression: Allows for varying degrees of quality. A setting of 90% works well with photographs (small file size, little perceptible loss of quality).
Reduce image resolution: Lower DPI (dots per inch) images have lower quality. For viewing on a computer screen, generally a resolution of 72dpi (for Windows) or 96dpi (GNU/Linux) is sufficient, while for printing it is generally preferable to use at least 300 or 600dpi, depending on the capability of the printer. Higher DPI settings greatly increase the size of the exported file.
Watermark section
Sign with watermark: When this option is selected, a transparent overlay of the text you type in the Sign with watermark text box will appear on each page of the PDF.
Note
EPS (Encapsulated PostScript) images with embedded previews are exported only as previews. EPS images without embedded previews are exported as empty placeholders.
General section
Hybrid PDF (embed ODF file): Use this setting to export the document as a PDF containing two file formats: PDF and ODF. In PDF viewers it behaves like a normal PDF file, and it remains fully editable in LibreOffice.
Archive (PDF/A, ISO 19005): PDF/A is an ISO standard for long-term preservation of documents, by embedding all the information necessary for faithful reproduction (such as fonts) while forbidding other elements (including forms, security, and encryption). PDF tags are written. If you select PDF/A, the forbidden elements are grayed-out (not available). The PDF/A-1b option refers to the minimum compliance level with PDF/A-1, while the PDF/A-2b option refers to the minimum compliance level with PDF/A-2.
Tagged PDF: Tagged PDF contains information about the structure of the document’s contents. This can help to display the document on devices with different screens, and when using screen reader software. Some tags that are exported are table of contents, hyperlinks, and controls. This option can increase file sizes significantly.
Create PDF form – Submit format: Choose the format of submitting forms from within the PDF file. This setting overrides the control’s URL property that you set in the document. There is only one common setting valid for the whole PDF document: PDF (sends the whole document), FDF (sends the control contents), HTML, and XML. Most often you will choose the PDF format.
Allow duplicate field names: If enabled, the same field name can be used for multiple fields in the generated PDF file. You can enter data in the first occurrence of the named field in the PDF document and all fields with the same name will carry your entry. If disabled, field names will be exported using generated unique names.
Structure section
Export bookmarks: Exports headings in Writer documents, and page or slide names in Impress and Draw documents, as “bookmarks” (a table of contents list displayed by most PDF viewers, including Adobe Reader).
Export placeholders: The PDF will include any defined placeholder fields, which can be filled in by users. This option is only available in Writer.
Comments as PDF annotations: If selected, comments are included in the PDF as annotations.
Export automatically inserted blank pages: If selected, automatically inserted blank pages are exported to the PDF. This is best if you are printing the PDF double-sided. For example, books usually have chapters set to always start on an odd-numbered (right-hand) page. When the previous chapter ends on an odd page, LibreOffice inserts a blank page between the two odd pages. This option controls whether to export that blank page.
Use reference XObjects: If you don’t know what this means, leave this box unchecked.
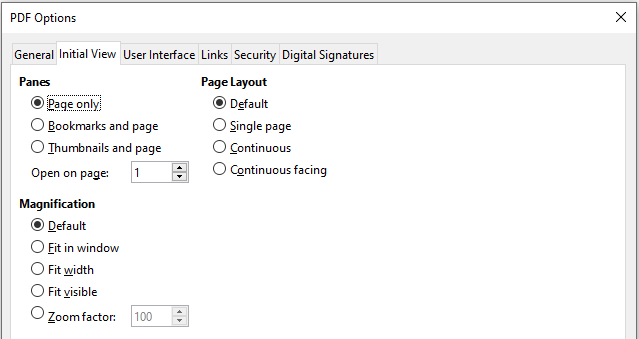
On the Initial View tab (Figure 16), you can choose how the PDF opens by default in a PDF viewer. The selections should be self-explanatory.
If you have Complex Text Layout enabled (in Tools > Options > Language Settings > Languages), an additional selection is available under the Continuous facing button: First page is left (normally, the first page is on the right when using the Continuous facing option).
Figure 16: Initial View tab of PDF Options dialog
On the User Interface tab (Figure 17), you can choose more settings to control how a PDF viewer displays the file. Some of these choices are particularly useful when you are creating a PDF to be used as a presentation or a kiosk-type display.
Figure 17: User Interface tab of PDF Options dialog
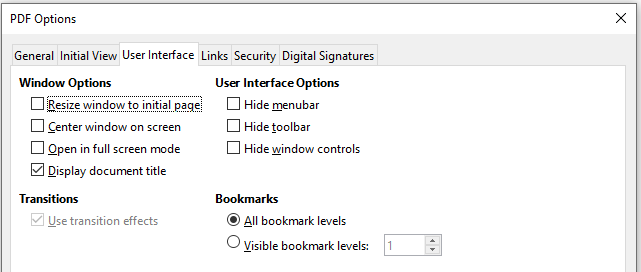
Window Options section
Resize window to initial page: The PDF viewer window will resize to fit the first page of the PDF.
Center window on screen: The PDF viewer window will be centered on the computer screen.
Open in full screen mode: The PDF viewer will open full-screen instead of in a smaller window.
Display document title: The PDF viewer will display the document’s title in the title bar.
User Interface Options section
Hide menubar: The PDF viewer will hide the menu bar.
Hide toolbar: The PDF viewer will hide the toolbar.
Hide window controls: The PDF viewer will hide other window controls.
Transitions
Bookmarks
On the Links tab (Figure 18), you can choose how links are exported to PDF.
Figure 18: Links tab of PDF Options dialog
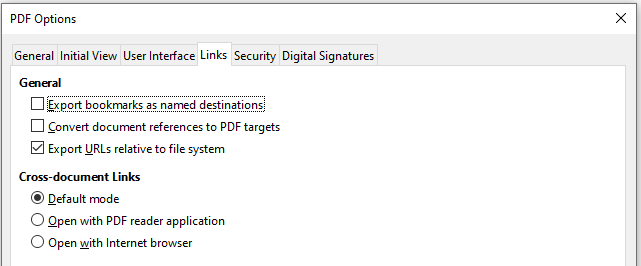
Export bookmarks as named destinations
Convert document references to PDF targets
Export URLs relative to file system
Cross-document Links
Default mode: The PDF links will be handled as specified in your operating system.
Open with PDF reader application: Use the same application used to display the PDF document to open linked PDF documents.
Open with Internet browser: Use the default Internet browser to display linked PDF documents.
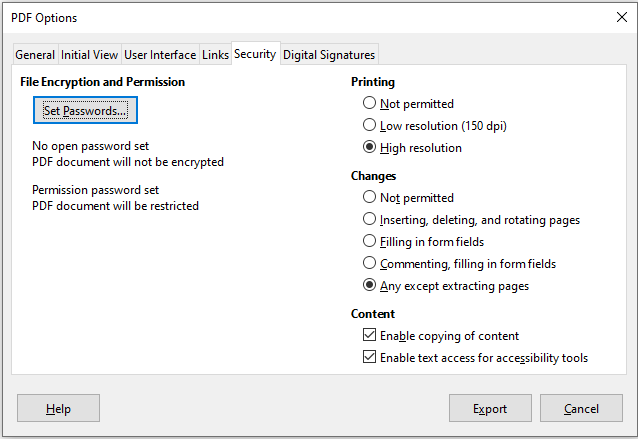
PDF export includes options to encrypt the PDF (so it cannot be opened without a password) and apply some digital rights management (DRM) features.
With an open password set, the PDF can only be opened with the password. Once opened, there are no restrictions on what the user can do with the document (for example, print, copy, or change it).
With a permissions password set, the PDF can be opened by anyone, but its permissions can be restricted. See Figure 19. After you set a password for permissions, the other choices on the Security page become available.
With both the open password and permission password set, the PDF can only be opened with the correct password, and its permissions can be restricted.
Note
Permissions settings are effective only if the user’s PDF viewer respects the settings.
Figure 19: Security tab of PDF Options dialog
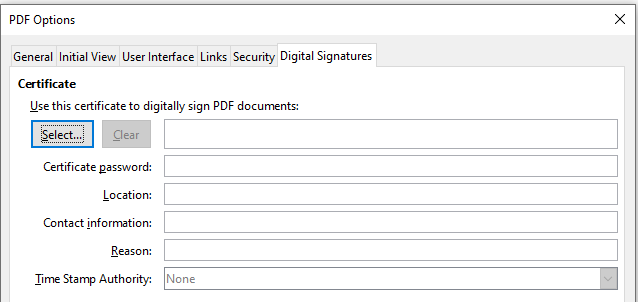
The Digital Signatures tab (Figure 20) contains the options related to exporting a digitally signed PDF.
Figure 20: Digital Signatures tab of PDF Options dialog
Digital signatures are used to ensure that the PDF was really created by the original author (that is, you), and that the document has not been modified since it was signed.
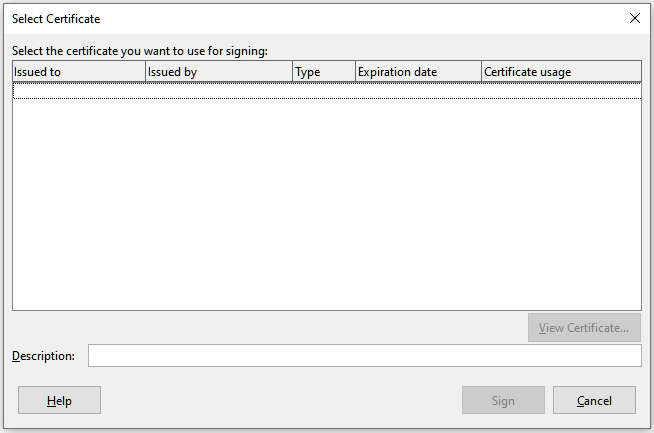
The signed PDF export uses the keys and X.509 certificates already stored in your default key store location or on a smartcard. The key store to be used can be selected under Tools > Options > LibreOffice > Security > Certificate (macOS and Linux only). When using a smartcard, it must already be configured for use by your key store. This is usually done during installation of the smartcard software. Details about using these features is outside the scope of this chapter.
Use this certificate to digitally sign PDF documents: Click Select to open the Select Certificate dialog, where all certificates found in your selected key store are displayed. If the key store is protected by a password, you are prompted for it. When using a smartcard that is protected by a PIN, you are also prompted for that.
Select the certificate to use for digitally signing the exported PDF, then click Sign.
All other fields on the Digital Signatures tab are accessible only after a certificate has been selected.
Certificate password: Enter the password used for protecting the private key associated with the selected certificate. Usually this is the key store password. If the key store password has already been entered in the Select Certificate dialog, the key store may already be unlocked and not require the password again.
When using a smartcard, enter the PIN here. Some smartcard software will prompt you for the PIN again before signing.
Location, Contact information, Reason: Optionally enter additional information about the digital signature that will be applied to the PDF. This information will be embedded in the appropriate PDF fields and will be visible to anyone viewing the PDF. Each or all of the three fields may be left blank.
Time Stamp Authority: Optionally select a Time Stamping Authority (TSA) URL. During the PDF signing process, the TSA will be used to obtain a digitally signed timestamp that is then embedded in the signature. Anyone viewing the PDF can use this timestamp to verify when the document was signed.
The list of TSA URLs that can be selected is maintained under Tools > Options > LibreOffice > Security > TSAs. If no TSA URL is selected (the default), the signature will not be timestamped, but will use the current time from your local computer.
EPUB format has become popular since mobile devices such as smartphones, tablets, and e‑readers appeared on the market. The EPUB format is implemented as an archive file consisting of HTML files carrying the content, along with images and other supporting files. Writer can export a file to EPUB.
Choose File > Export As > Export Directly as EPUB to export the entire document using the EPUB settings you most recently selected on the EPUB Export dialog (see below). You are asked to enter the file name and location for the EPUB file, but you do not get a chance to select other options.
For more control over the content and quality of the resulting EPUB file, use File > Export As > Export as EPUB. The EPUB Export dialog opens (Figure 21).
Figure 21: EPUB Export dialog

The EPUB Export dialog has the following fields:
Version
Split method
Layout method
Customize - Cover image
Customize - Media directory
Metadata
LibreOffice uses the term “export” for some file operations involving a change of file type. If you cannot find what you want under File > Save As, look under File > Export (not available in Math) as well.
LibreOffice can export files to XHTML. In addition, Draw and Impress can export to a range of image formats.
To export to one of these formats, choose File > Export. On the Export dialog, specify a file name for the exported document, then select the required format in the Save as type or File format (macOS) list and click the Save or Export (macOS) button.
LibreOffice provides several ways to send documents quickly and easily as email attachments in one of three formats: OpenDocument (LibreOffice’s default format), Microsoft Office formats, or PDF.
To send the current document in OpenDocument format:
1) Choose File > Send > Email Document. LibreOffice opens your default email program. The document is attached to a new email.
2) In your email program, enter the recipient, subject, and any text you want to add, then send the email.
File > Send > Email as OpenDocument [Text, Spreadsheet] has the same effect in Writer or Calc.
If you choose Email as Microsoft [Word, Excel] in Writer or Calc, LibreOffice first creates a file in one of those formats and then opens your email program with the file attached to a new email.
Similarly, if you choose Email as PDF, LibreOffice first creates a PDF using your default PDF settings (as when using the Export Directly as PDF function) and then opens your email program with the PDF file attached to a new email.
To email a document to several recipients, you can use the features in your email program or you can use LibreOffice Writer’s mail merge facilities to create the document and send it. See Chapter 14, Mail Merge, in the Writer Guide for details.
To sign a document digitally, you need a personal key, also known as a certificate. A personal key is stored on your computer as a combination of a private key, which must be kept secret, and a public key, which you add to your documents when you sign them. You can get a certificate from a certification authority, which may be a private company or a governmental institution.
When you apply a digital signature to a document, a checksum is computed from the document’s content plus your personal key. The checksum and your public key are stored together with the document.
When someone later opens the document on any computer with a recent version of LibreOffice, the program will compute the checksum again and compare it with the stored checksum. If both are the same, the program will signal that you see the original, unchanged document. In addition, the program can show you the public key information from the certificate. You can compare the public key with the public key that is published on the web site of the certificate authority. Whenever someone changes something in the document, this change breaks the digital signature.
For a more detailed description of how to get and manage a certificate, and signature validation, see “Applying Digital Signatures” in the LibreOffice Help.
The following procedure is an example of how to digitally sign a document. The actual procedure depends on how your computer is set up and its operating system.
1) Choose File > Digital Signatures > Digital Signatures.
If you have set LibreOffice to warn you when the document contains comments (see “Removing personal data” below), you may see a message box asking whether you want to want to continue signing the document. Click Yes to continue.
If you have not saved the document since the last change, a message box appears. Click Yes twice: once to continue and again to save the file.
2) The Digital Signatures dialog (Figure 27) opens. It lists existing signatures together with their description (if they have any). Click the Sign Document button to add a new signature to the document.
3) In the Select Certificate dialog, select your certificate, add an optional description, and click Sign to return to the Digital Signatures dialog.
4) Click Close in the Digital Signatures dialog to apply the digital signature.
A signed document shows an icon in the status bar. You can double-click the icon to view the certificate. More than one signature can be added to a document.
Changing an existing description invalidates the signature. However, multiple signatures from the same author are allowed, because each signature can have a different description.
Figure 22: Signatures of the document
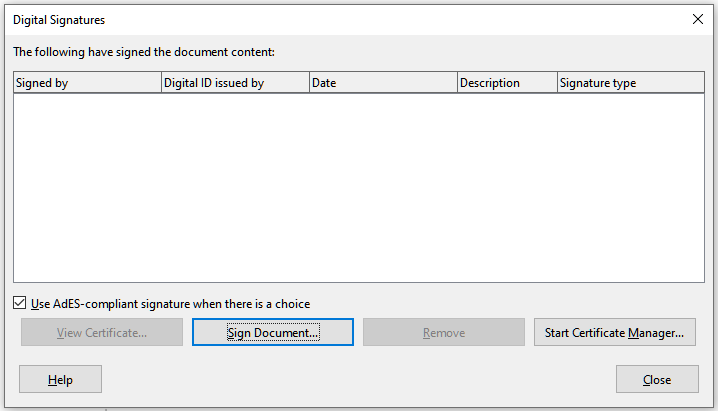
Figure 23: Signatures can have a description
You can generate a graphic box representing a signature line using Insert > Signature Line (see Figure 24), and you can optionally sign the signature line using a digital certificate.
Figure 24: Creating a signature line for a document
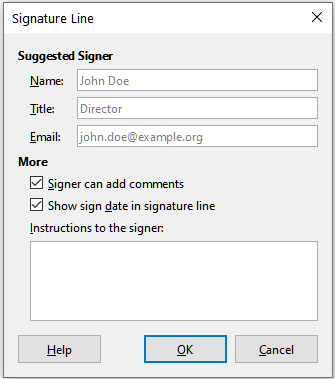
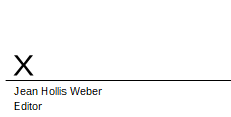
Figure 25: Signature line example
You may wish to ensure that personal data, versions, notes, hidden information, or recorded changes are removed from files before you send them to other people or create PDFs from them.
In Tools > Options > LibreOffice > Security, click the Options button to display a dialog where you can set LibreOffice to warn you when files contain certain information and/or automatically remove personal information on saving.
To remove personal and some other data from a file, go to File > Properties. On the General tab, uncheck Apply user data and click the Reset Properties button. This removes any names in the created and modified fields, deletes the modification and printing dates, and resets the editing time to zero, the creation date to the current date and time, and the version number to 1.
To remove version information, either go to File > Versions, select the versions from the list and click Delete; or use File > Save As and save the file with a different name.
You can redact documents to remove or hide sensitive information, to allow the selective disclosure of information in a document while keeping other parts of the document secret. For example, when a document is subpoenaed in a court case, information not specifically relevant to the case at hand is often redacted.
To redact a document:
1) Open the document in LibreOffice.
2) Click Tools > Redact on the Menu bar, and wait for the document to be prepared for redaction and transferred to Draw. The Redaction toolbar (Figure 26) opens.
Figure 26: Redaction toolbar
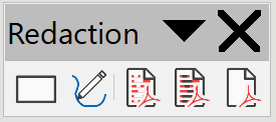
3) Do the redaction by using the Rectangle Redaction and Freeform Redaction tools on the Redaction toolbar. The shapes will be transparent and in gray so you can see what you are redacting.
4) Optionally use the Export Directly as PDF tool to make an in-redaction copy of the document in PDF to use as a verbatim copy for review. The redacted items will be in transparent grey.
5) To finalize the redaction, select the desired option (black or white) on the Redacted Export tool. The transparent grey shapes are converted to opaque black or white shapes and the document is exported as a pixellized PDF. There will be no selectable text in it, and the redacted content will be non-existent.
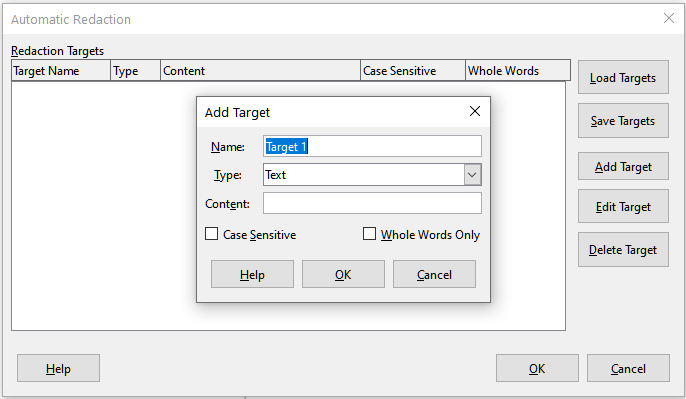
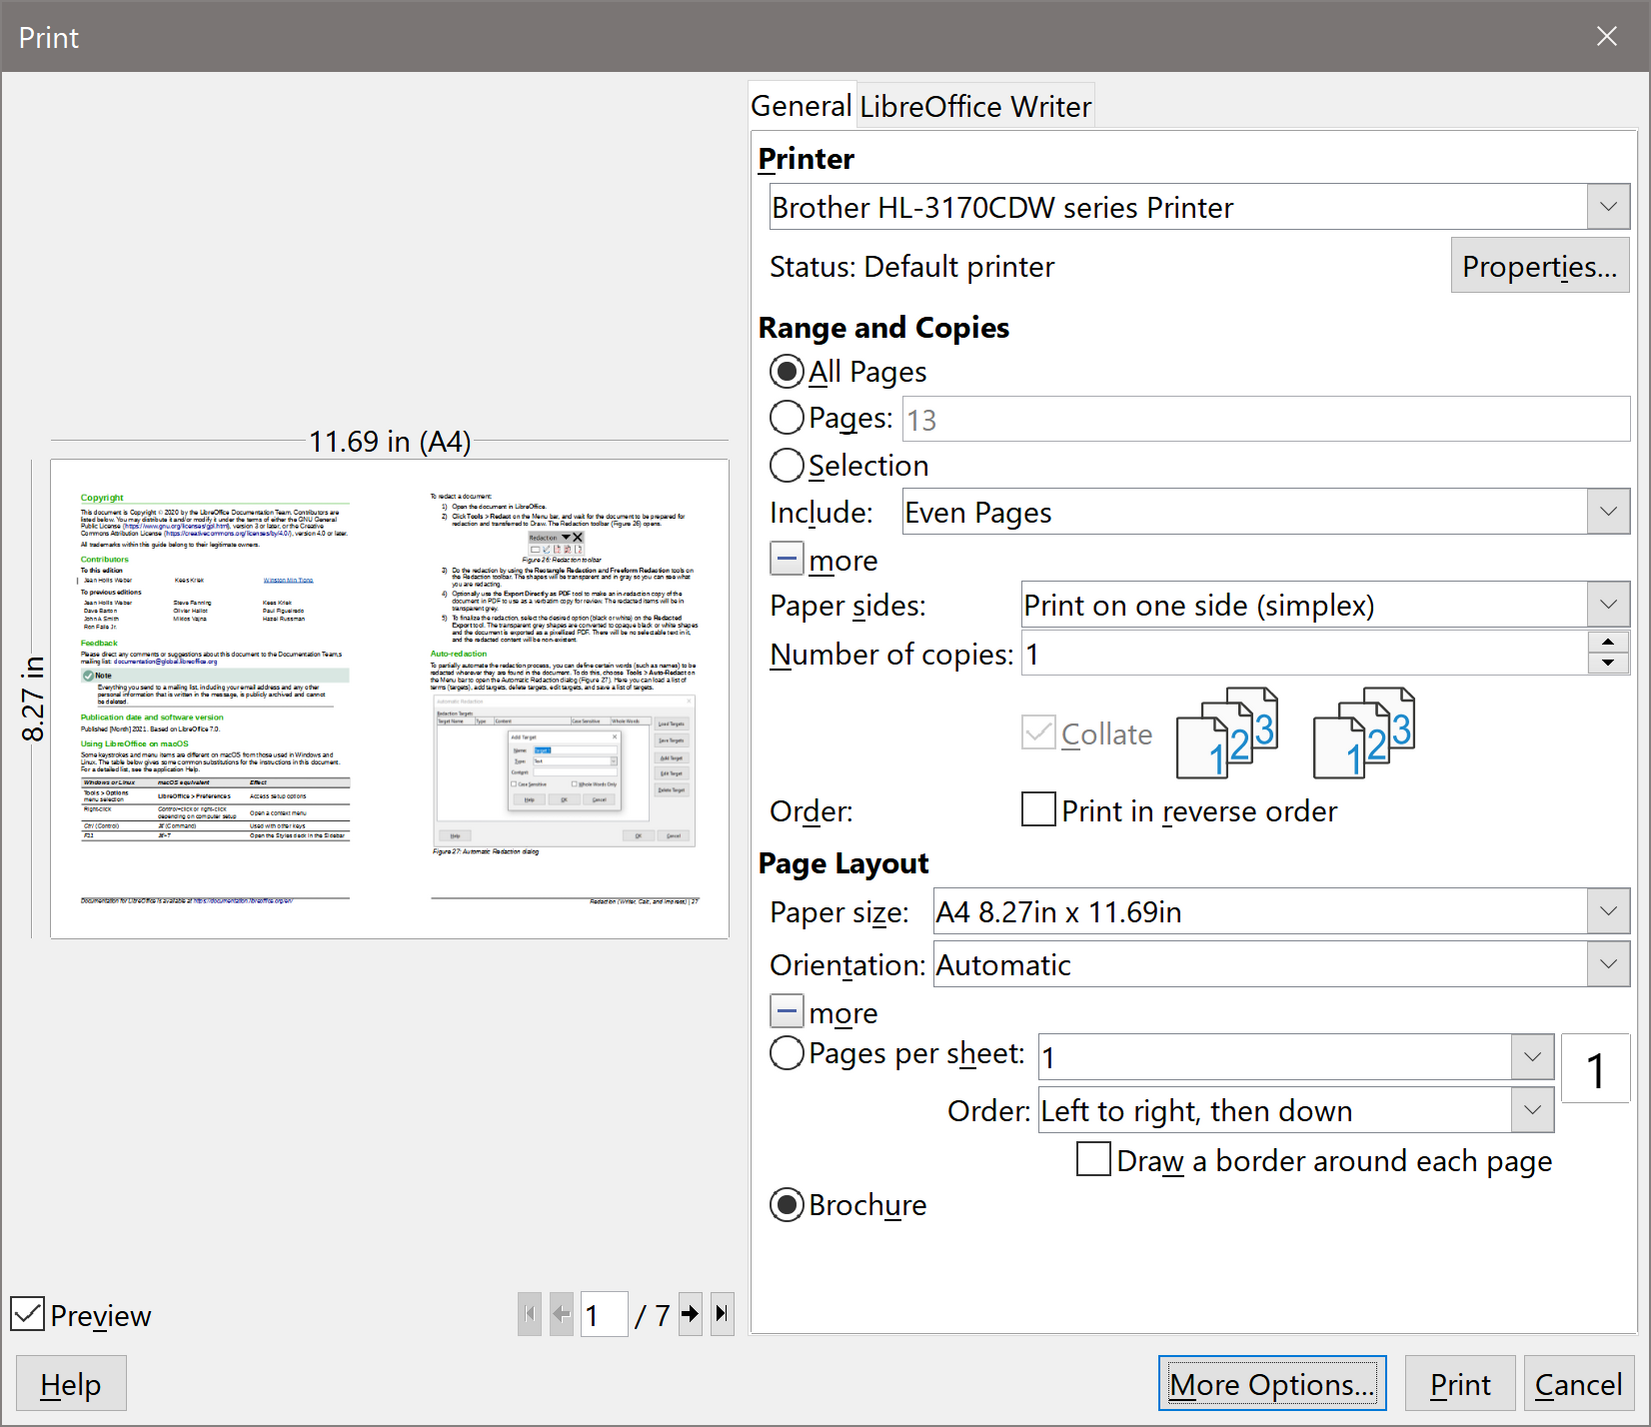
To partially automate the redaction process, you can define certain words (such as names) to be redacted wherever they are found in the document. To do this, choose Tools > Auto-Redact on the Menu bar to open the Automatic Redaction dialog (Figure 27). Here you can load a list of terms (targets), add targets, delete targets, edit targets, and save a list of targets.
Figure 27: Automatic Redaction dialog