
Getting Started Guide 7.0
Chapter 14
Customizing LibreOffice
This document is Copyright © 2020 by the LibreOffice Documentation Team. Contributors are listed below. You may distribute it and/or modify it under the terms of either the GNU General Public License (https://www.gnu.org/licenses/gpl.html), version 3 or later, or the Creative Commons Attribution License (https://creativecommons.org/licenses/by/4.0/), version 4.0 or later.
All trademarks within this guide belong to their legitimate owners.
|
Jean Hollis Weber |
Kees Kriek |
Rafael Lima |
|
Jean Hollis Weber |
Steve Fanning |
Kees Kriek |
|
Jorge Rodríguez |
John A Smith |
Ron Faile Jr. |
|
Olivier Hallot |
|
|
Please direct any comments or suggestions about this document to the Documentation Team’s mailing list: documentation@global.libreoffice.org
Note
Everything you send to a mailing list, including your email address and any other personal information that is written in the message, is publicly archived and cannot be deleted.
Published January 2021. Based on LibreOffice .
Some keystrokes and menu items are different on macOS from those used in Windows and Linux. The table below gives some common substitutions for the instructions in this document. For a detailed list, see the application Help.
|
Windows or Linux |
macOS equivalent |
Effect |
|
Tools > Options |
LibreOffice > Preferences |
Access setup options |
|
Right-click |
Control+click or right-click depending on computer setup |
Open a context menu |
|
Ctrl (Control) |
⌘ (Command) |
Used with other keys |
|
F11 |
⌘+T |
Open the Styles deck in the Sidebar |
This chapter describes some common customizations that you may wish to carry out.
You can customize menus, toolbars, and keyboard shortcuts in LibreOffice, add new menus and toolbars, and assign macros to events.
Other customizations are made easy by extensions that you can install from the LibreOffice website or from other providers.
Note
Customized menus and toolbars can be saved in a template. To do so, first save them in a document and then save the document as a template as described in Chapter 3, Using Styles and Templates.
You can add and rearrange menus on the Menu bar or context (right-click) menus; add, rearrange, and remove commands on menus, and make other changes.
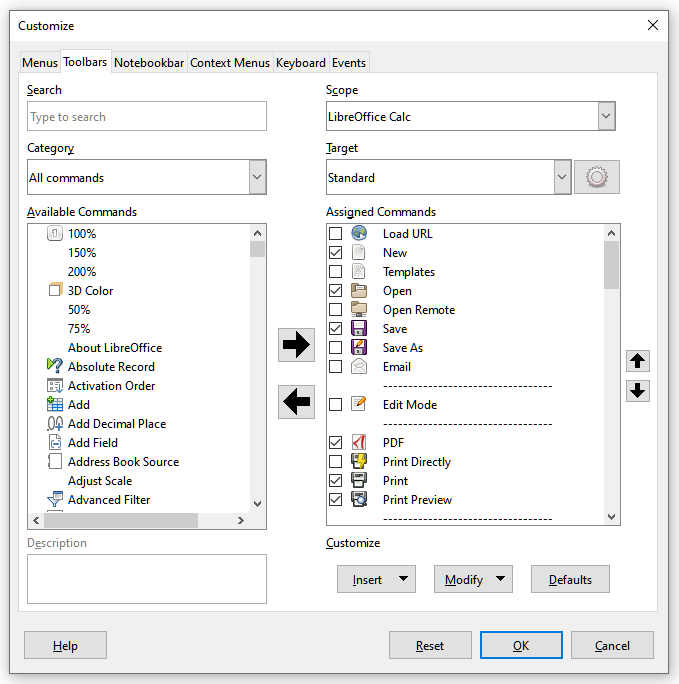
To customize menus, choose Tools > Customize on the Menu bar. On the Customize dialog, go to the Menus tab (Figure 1) or the Context Menus tab.
Figure 1: The Menus tab of the Customize dialog
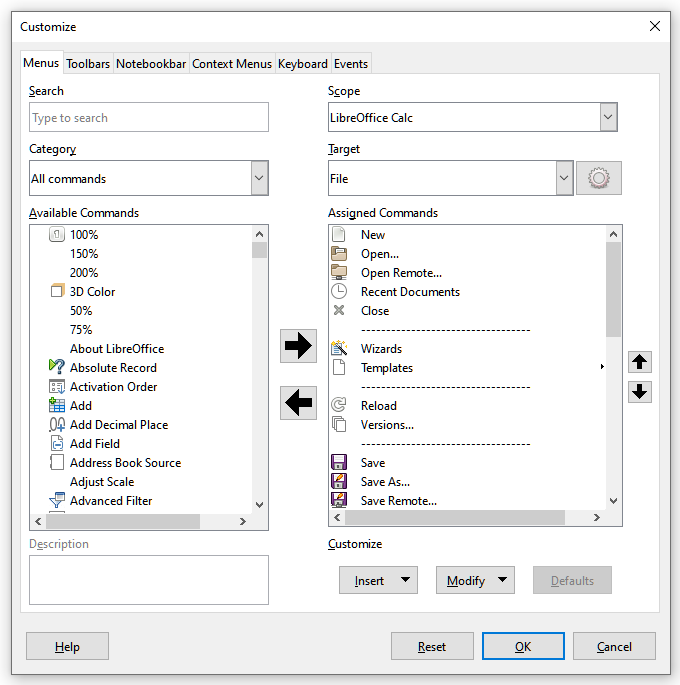
In this example, we are customizing a menu in the Calc component of LibreOffice.
1) In the Scope drop-down list in the upper right of the Customize dialog, choose whether to save this changed menu for Calc or for a selected document.
2) In the Target drop-down list, select the menu that you want to customize. The list includes all the submenus as well as the main menus. The commands on the selected menu are shown in the Assigned Commands list.
3) To add a command to the selected menu, click on a command in the Available Commands list and then click the large right arrow. You can narrow the search by using the Search box on the top left or selecting the Category in the drop-down list. Use the up and down arrows on the far right-hand side to move the command into the position where you want it in the list.
4) To remove a command from the selected menu, click on it in the Assigned Commands list and then click the large left arrow.
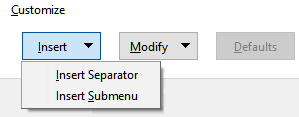
5) To insert a separator or submenu, select the item directly before where you want the inserted item to appear, and use the commands in the Insert drop-down list.
Figure 2: Insert drop-down list
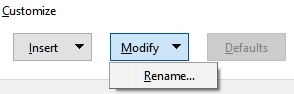
6) To rename a menu item, select it in the Assigned Commands list and choose Rename in the Modify drop-down list.
Figure 3: Modify drop-down
7) When you have finished making all your changes, click OK to save them.
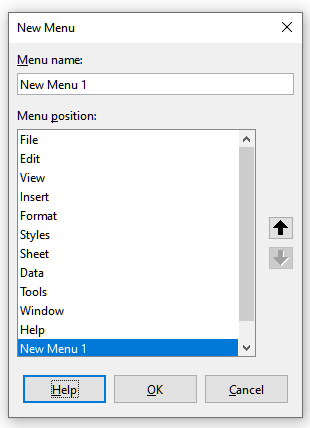
On the Menus tab of the Customize dialog, click the button next to Target and select Add in the drop-down list (Figure 4), to display the New Menu dialog shown in Figure 5.
1) Type a name for the new menu in the Menu name box.
2) Use the up and down arrow buttons to move the new menu into the required position on the Menu bar. Click OK to save and return to the Customize dialog.
Figure 4: Location of command to add a new menu
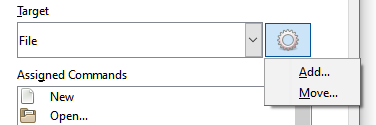
Figure 5: Adding a new menu
The new menu now appears on the list of menus in the Customize dialog. It will appear on the Menu bar itself after you save your customizations.
After creating a new menu, you need to add some commands to it, as described above for modifying a menu.
You can allocate a letter in a custom menu’s name to be used as a keyboard shortcut. That letter will become underlined. When you press Alt+that letter, the corresponding menu or command will be invoked. Existing submenus can also be edited to change the letter which is used to select them using the keyboard when the menu is open.
To create an accelerator:
1) Select a menu item from the Assigned Commands list on the Customize dialog.
2) Click the Modify button and select Rename.
3) Add a tilde (~) in front of the letter to use as an accelerator.
4) Click OK to save the change.
If for example you put a tilde before the “A” in a menu item Art, the “A” would now be underlined. Press Alt+A and either the Art submenu will open or the Art button will be actioned (as appropriate).
Caution
When assigning an accelerator, be careful not to use a letter that is already assigned to a menu or command associated with a menu item. The same letter-key combinations can be used for commands associated with different menu items but not for those associated with the same menu or menu item.
You can customize toolbars in several ways, including choosing which icons are visible and locking the position of a docked toolbar (as described in Chapter 1, Introducing LibreOffice), and adding or deleting icons (commands) in the list of those available on a toolbar. You can also create new toolbars. This section describes how to create new toolbars and add or delete icons on existing toolbars.
To get to the Toolbars tab of the Customize dialog (Figure 6), do any of the following:
On the toolbar, right-click in the toolbar and choose Customize Toolbar.
Choose View > Toolbars > Customize on the Menu bar.
Choose Tools > Customize on the Menu bar and click on the Toolbars tab.
Figure 6: The Toolbars tab of the Calc Customize dialog
The procedures for creating and modifying a toolbar are similar to those for menus. In this example, we are customizing a toolbar in the Calc component of LibreOffice.
To modify an existing toolbar:
1) In the Scope drop-down list on the upper right of the Customize dialog, choose whether to save this changed toolbar for Calc or for a selected document.
2) In the Target drop-down list, select the toolbar that you want to customize. The current toolbar content is displayed in the Assigned Commands list.
3) Select a command in the Available Commands list on the left. You can narrow your search by using the Search box on the top left or choosing a category in the drop-down list just below.
4) Click on the large right arrow to add the selected command to the Assigned Commands list for the toolbar (on the right). Use the up and down arrows in the far right to position the command in the toolbar.
5) To remove a command from a toolbar, select it in the Assigned Commands list on the right and click the large left arrow.
6) To show or hide a command assigned to a toolbar, select or clear the checkbox by its icon in the Assigned Commands list on the right.
7) To insert a separator, select the item directly before where you want the separator to appear, and use the command in the Insert drop-down list.
8) To rename a toolbar item, select it in the Assigned Commands list and choose Rename in the Modify drop-down list.
9) When you have finished making all your changes, click OK to save them.
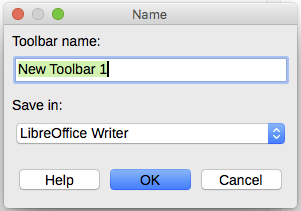
To create a new toolbar:
1) Choose Tools > Customize on the Menu bar.
2) On the Toolbars page of the Customize dialog, click the button next to Target and select Add from the list, to display the Name dialog (Figure 7).
3) On the Name dialog, type the new toolbar's name and choose in the Save In drop-down list where to save this new toolbar: for the application (for example, Writer) or for a selected document.
The new toolbar now appears on the list of toolbars in the Customize dialog. After creating a new toolbar, you need to add some commands to it, as described above.
Figure 7: Naming a new toolbar
Toolbar buttons usually have icons, not words, on them, but not all of the commands have associated icons.
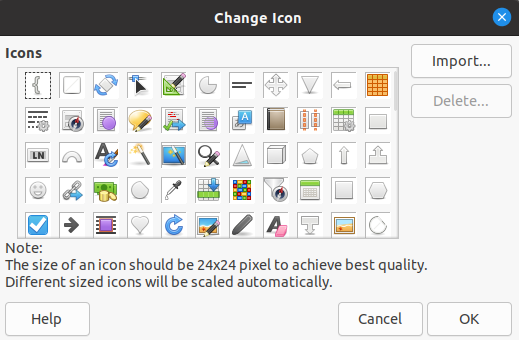
To choose an icon for a command, select the command and click Modify > Change Icon. On the Change Icon dialog (Figure 8), scroll through the available icons, select one, and click OK to assign it to the command.
To use a custom icon, create it in a graphics program and import it into LibreOffice by clicking the Import button on the Change Icon dialog. Custom icons should be 24 x 24 pixels in size to achieve the best quality and should not contain more than 256 colors.
Figure 8: Change Icon dialog
By default, LibreOffice’s commands are grouped in cascading menus and in toolbars filled with icons. The Notebook bar provides a different way to organize controls and icons, displaying contextual groups of commands and contents. You can find more information about the Notebook bar in the Help system, by searching for “notebook bar” in the index.
One of the available Notebook bar modes is Tabbed. In this mode, the bar is divided into tabs, where each tab displays a set of icons grouped by context. The context can also change depending on the object selected in the document, for example a table or an image.
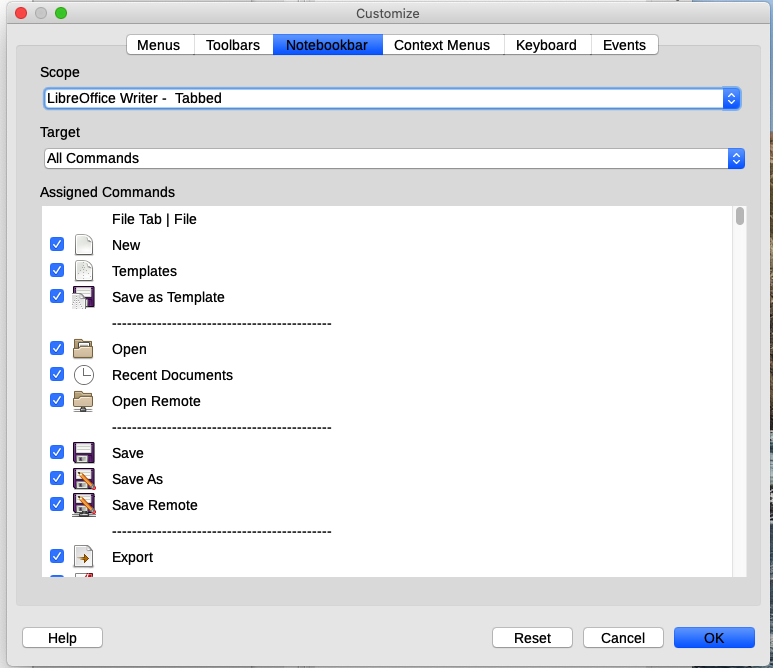
Checkboxes are provided on the Notebookbar tab of the Customize dialog (Figure 9) to show and hide the individual options on the various tabs that are provided in the Tabbed mode user interface.
Use the Reset button to reset the Tabbed mode of the notebook bar configuration to the default settings.
Caution
The notebook bar is common to Writer, Calc, Draw, and Impress modules. A change in the notebook bar in one module affects the notebook bar of the other modules.
Note
LibreOffice has three notebook bar modes that can be selected through the View > User Interface menu – Tabbed, Tabbed Compact, and Groupedbar Compact. However, only the first of these can be modified using the Notebookbar tab of the Customize dialog.
Figure 9: The Notebookbar tab of the Customize dialog
In addition to using the built-in keyboard shortcuts (listed in Appendix A), you can define your own. You can assign shortcuts to standard LibreOffice functions or your own macros and save them for use with the entire LibreOffice suite.
Caution
Be careful when reassigning your operating system’s or LibreOffice’s predefined shortcut keys. Many key assignments, such as F1 for Help, are always expected to provide certain results. Although you can easily reset the shortcut key assignments to the LibreOffice defaults, changing some common shortcut keys can cause confusion, especially if other users share your computer.
To adapt shortcut keys to your needs, use the Customize dialog, as described below.
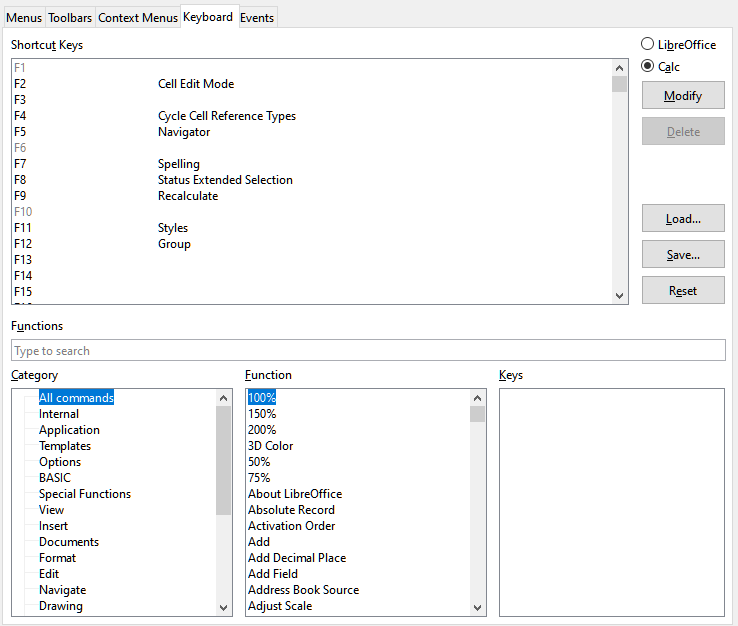
1) Select Tools > Customize and then click the Keyboard tab (Figure 10).
2) To have the shortcut key assignment available in all components of LibreOffice, select LibreOffice in the upper right section of the dialog.
3) Next select the required function in the Category and Function lists.
4) Now select the desired shortcut keys in the Shortcut Keys list and click the Modify button.
5) Click OK to accept the change. Now the chosen shortcut keys will execute the function chosen in step 3 above whenever they are pressed.
Note
All existing shortcut keys for the currently selected function are listed in the Keys selection box. If the Keys list is empty, it indicates that the chosen key combination is free for use. If it were not, and you wanted to reassign a shortcut key combination that is already in use, you must first delete the existing key.
Shortcut keys that are grayed-out in the listing on the Customize dialog, such as F1, F6, and F10 for Calc on a Windows 10 installation, are not available for reassignment.
Figure 10: Customizing a keyboard shortcut
Changes to the shortcut key assignments can be saved in a keyboard configuration file for use at a later time, thus permitting you to create and apply different configurations as the need arises, or in another way, create a standard keyboard configuration file to be distributed among many users in a company. To save keyboard shortcuts to a file:
1) After making your keyboard shortcut assignments, click the Save button at the right side of the Customize dialog (Figure 10).
2) In the Save Keyboard Configuration dialog, enter a name for the keyboard configuration file in the File name box, or select an existing file from the list. If you need to, browse to find a file from another location (the file extension is .cfg for Configuration).
3) Click Save. A confirmation dialog appears if you are about to overwrite an existing file, otherwise there will be no feedback and the file will be saved.
To load a saved keyboard configuration file and replace your existing configuration, click the Load button at the right side of the Customize dialog, and then select the configuration file from the Load Keyboard Configuration dialog.
To reset all of the keyboard shortcuts to their default values, click the Reset button near the bottom right of the Customize dialog. Use this feature carefully; no confirmation dialog will be displayed.
In LibreOffice, when something happens, we say that an event occurred. For example, a document was opened, a key was pressed, or the mouse moved. You can associate a macro with an event, so the macro is run when the event occurs. A common use is to assign the “open document” event to run a macro that performs certain setup tasks for the document.
To associate a macro with an event, use the Events tab of the Customize dialog. For more information, see Chapter 13, Getting Started with Macros.
An extension is a program that can be installed into LibreOffice to add new functionality and improve your productivity. Template sets, spelling dictionaries, clipart galleries, macros, and dialog libraries can be packaged as LibreOffice extensions.
Several extensions are shipped bundled with LibreOffice and are installed with the program. These can only be removed by changing the installation options. Others can be downloaded from various websites. The official extension repository is located at https://extensions.libreoffice.org/. These extensions are free of charge.
Some extensions from other sources are free of charge; others are available for a fee. Check the descriptions to see what licenses and fees apply to the ones that interest you.
Download the extension to your computer in any folder that you want (usually folder Download).
To install an extension that is listed in the repository, follow these steps:
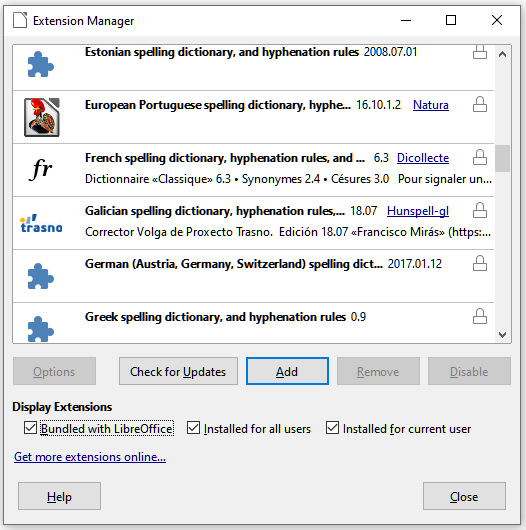
1) In LibreOffice, select Tools > Extension Manager on the Menu bar. In the Extension Manager dialog (Figure 11), click the Get more extensions online link.
2) A browser window will open. Find the extension you want and download it to your computer.
3) After the extension is downloaded and saved, return to the Extension Manager dialog and click Add. Find and select the extension you want to install and click Open. The extension begins installing. You may be asked to accept a license agreement.
4) When the installation is complete, the extension is listed in the Extension Manager dialog.
To install an extension that is not listed in the repository, download the extension, then continue with step 3 above.
Click the Check for Updates button on the Extension Manager dialog to check for updates to installed extensions.
To remove (uninstall) an extension that you installed, select the extension in the main window of the Extension Manager dialog and click the Remove button.
To disable an extension without removing (uninstalling) it, select the extension in the main window of the Extension Manager dialog and click the Disable button, which then changes to Enable.
Figure 11: Extension Manager dialog
To add custom colors to a color palette, for example to exactly match a corporate color scheme, follow this procedure:
1) Insert any drawing object, such as a square, into any document.
2) Right-click on the object and choose Area in the context menu.
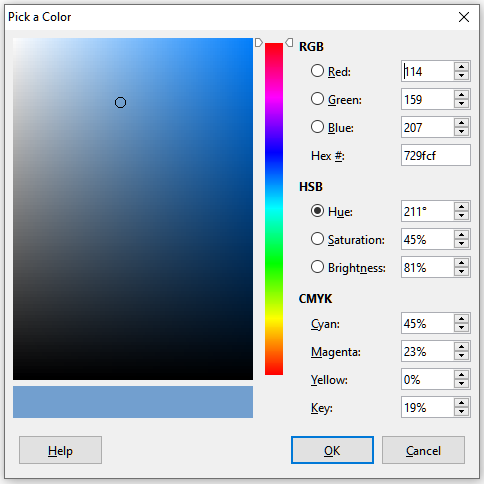
3) Go to the Color tab (Figure 12). In the Palette drop-down list in the Colors area, choose which palette you wish to add the new color to. Under New, define the new color using RGB or Hex notation, or click the Pick button to select the color on the Pick a Color dialog (Figure 13).
4) Click Add in the lower left corner, enter a name for the new color in the pop-up dialog, and click OK to save.
5) Delete the drawing object from the document, if it is not needed.
Figure 12: Defining a new color
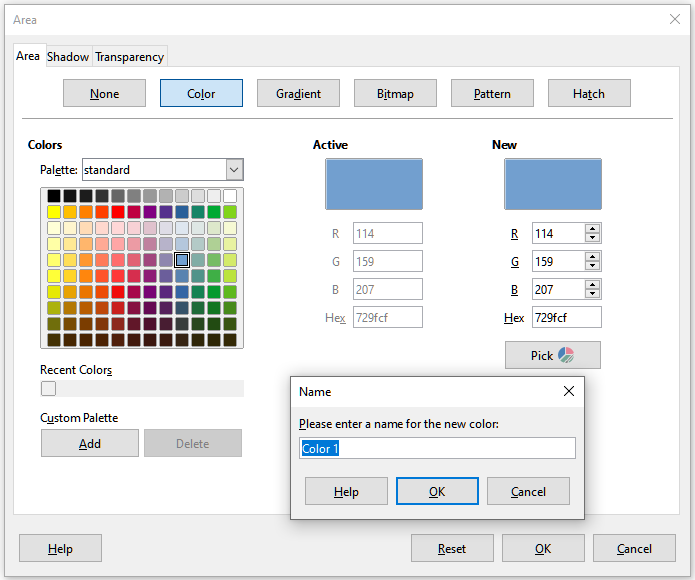
Figure 13: Defining a color by picking it from a color chart
LibreOffice supports PostScript (.pfb), TrueType (.ttf), and OpenType (.otf) font file formats. Other font formats exist, and may be supported by your operating system, but these formats may be limited in selection and quality.
If you have administration privileges, you can install additional fonts through your operating system; they will then be available for use by all components of LibreOffice.
In addition to proprietary fonts from sources like Adobe, hundreds of free-licensed fonts are available. You can use, share, and edit free-licensed fonts as you please. Most are available at no cost. Many are clones or near-variations of classic fonts, but some are original fonts.
Many Linux distributions include a few free-licensed fonts in their package repositories. Other places where you can find free-licensed fonts include The League of Movable Type (theleagueofmoveabletype.com), Open Font Library (fontlibrary.org).