
Getting Started Guide 7.1
Chapter 3
Styles and Templates
Using consistent formatting in your documents
This document is Copyright © 2021 by the LibreOffice Documentation Team. Contributors are listed below. You may distribute it and/or modify it under the terms of either the GNU General Public License (https://www.gnu.org/licenses/gpl.html), version 3 or later, or the Creative Commons Attribution License (http://creativecommons.org/licenses/by/4.0/), version 4.0 or later.
All trademarks within this guide belong to their legitimate owners.
|
Jean Hollis Weber |
Kees Kriek |
|
|
Jean Hollis Weber |
Kees Kriek |
Felipe Viggiano |
|
Steve Fanning |
Olivier Hallot |
Dave Barton |
|
Paul Figueiredo |
|
|
Please direct any comments or suggestions about this document to the Documentation Team’s mailing list: documentation@global.libreoffice.org
Note
Everything you send to a mailing list, including your email address and any other personal information that is written in the message, is publicly archived and cannot be deleted.
Published June 2021. Based on LibreOffice 7.1 Community.
Other versions of LibreOffice may differ in appearance and functionality.
Some keystrokes and menu items are different on macOS from those used in Windows and Linux. The table below gives some common substitutions for the instructions in this document. For a detailed list, see the application Help.
|
Windows or Linux |
macOS equivalent |
Effect |
|
Tools > Options |
LibreOffice > Preferences |
Access setup options |
|
Right-click |
Control+click or right-click depending on computer setup |
Open a context menu |
|
Ctrl (Control) |
⌘ (Command) |
Used with other keys |
|
F11 |
⌘+T |
Open the Styles deck in the Sidebar |
There are two basic ways to format text and other elements. Understanding these two alternatives is essential for unlocking the power of LibreOffice:
Direct (or manual) formatting
Styles
LibreOffice is a styles-based program. It may work somewhat differently from other programs you are familiar with. Using styles effectively requires some planning, but the time spent in planning can save time and effort over the longer term.
Because styles apply whole groups of attributes at the same time, you can easily format a document consistently and change the formatting of an entire document with minimal effort. Styles are also used by LibreOffice for many processes, even if you are not aware of them. For example, Writer relies on heading styles (or other styles you specify) when it compiles a table of contents. Some common uses of styles are given in “Other ways to manage templates” below.
Note
Direct formatting overrides styles. You cannot remove manual formatting by applying a style to it. To remove direct formatting, select the text, right-click, and choose Clear Direct Formatting in the context menu. Alternatively you can clear direct formatting from selected text by pressing Ctrl+M (Ctrl+Shift+M in Impress), by selecting Format > Clear Direct Formatting on the Menu bar, by selecting the Clear Direct Formatting icon on Writer’s Formatting toolbar, or by selecting the Clear Direct Formatting icon on Calc’s Standard toolbar.
A style is a set of formats that you can apply to selected elements such as pages, text, frames, cells, and others in a document to quickly set or change their appearance. Applying a style often means applying a group of formats at the same time.
Many people manually format paragraphs, words, tables, page layouts, and other parts of their documents without paying any attention to styles. They are accustomed to manually applying attributes such as the font family, font size, and any formatting such as bold or italic.
Using styles means that instead of applying “font size 14pt, Times New Roman, bold, centered” you can apply (for example) a “Title” style, because you have defined the “Title” style to have those characteristics. In other words, using styles means that you shift the emphasis from what the text (or page, or other element) looks like, to what the text is.
LibreOffice supports the following types of styles:
Page styles include margins, headers and footers, borders and backgrounds. In Calc, page styles also define the sequence for printing sheets.
Paragraph styles control all aspects of a paragraph’s appearance, such as text alignment, tab stops, line spacing, and borders, and can include character formatting.
Character styles affect selected text within a paragraph, such as the font and size of text, or bold and italic formats.
Table styles apply predefined formats to tables and table elements in a text document.
Frame styles are used to format graphic and text frames, including text wrap, borders, backgrounds, and columns.
List styles allow you to select, format, and position numbers or bullets in lists.
Cell styles include fonts, alignment, borders, background, number formats (for example, currency, date, number), and cell protection.
Drawing styles in drawings and presentations include line, area, shadowing, transparency, font, connectors, dimensioning, and other attributes.
Presentation styles include attributes for font, indents, spacing, alignment, and tabs.
Different styles are available in the various components of LibreOffice, as listed in Table 1. Details are given in the user guide for each component.
LibreOffice comes with many predefined styles. You can use the styles as provided, modify them, or create new ones, as described in this chapter.
Table 1. Styles available in LibreOffice components
|
Style Type |
Writer |
Calc |
Draw |
Impress |
|
Page |
X |
X |
|
|
|
Paragraph |
X |
|
|
|
|
Character |
X |
|
|
|
|
Frame |
X |
|
|
|
|
List |
X |
|
|
|
|
Table |
X |
|
|
|
|
Cell |
|
X |
|
|
|
Presentation |
|
|
X |
X |
|
Drawing |
|
|
X |
X |
LibreOffice provides several ways for you to select and apply styles:
Styles deck on the Sidebar
Styles menu on the Menu bar (Writer and Calc)
Set Paragraph Style list (Writer) and Apply Style list (Calc) on the Formatting toolbar
Right-click context menu (Writer and Calc)
Fill Format mode (Writer and Calc)
Keyboard shortcuts
The Styles deck includes the most complete set of tools for styles. To use it for applying styles:
1) Select View > Styles or Styles > Manage Styles on the Menu bar, or press F11 (⌘+T on macOS), or click the Styles tab on the Sidebar (View > Sidebar to open it).
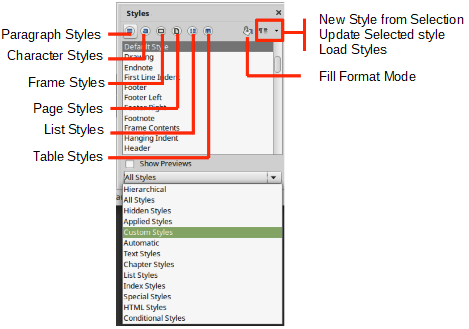
The Styles deck optionally shows previews of the styles available. Figure 1 shows the panel for Writer, with Paragraph Styles visible and with previews off.
2) Select one of the icons at the top left of the Styles deck to display a list of styles in that category.
3) To apply an existing style, position the cursor in the paragraph, frame, page, word, or cell, and then double-click the name of the style in one of these lists. To apply a character style to more than one word, select the characters first.
Tip
At the bottom of the Styles deck is a drop-down list where you can select what styles will be listed in the Styles panel. In Figure 1 the list shows All Styles defined for the document. It could show Applied Styles (only the styles used in the document) or other groups of styles, for example Custom Styles.
Figure 1: The Styles deck for Writer, showing paragraph styles and filter
In Writer, the Styles menu has the most commonly used paragraph, character, and list styles for text documents, as well as entries for style management. The Styles menu does not have styles for frames, pages, or tables.
To apply a paragraph style, position the cursor anywhere in the paragraph, and then select one of the paragraph styles in the Styles menu. To apply a character style to several characters or more than one word, select the characters first and apply the character style from the menu.
In Calc, the Styles menu has cell styles and style management entries. To apply a cell style, select the cell or group of cells to be formatted, and then select the required style.
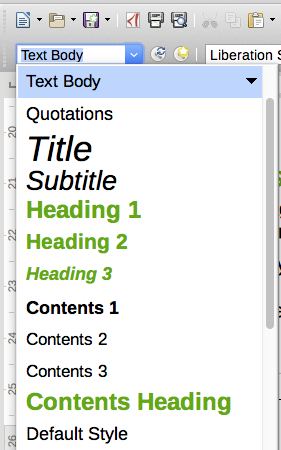
In Writer, after you have used a paragraph style at least once in a document, the style name appears in the Set Paragraph Style list at the left-hand end of the Formatting toolbar.
In Calc, after you have used a cell style at least once in a spreadsheet, the style name appears in the Apply Style list at the left-hand end of the Formatting toolbar. If the Apply Style list is not visible, you can enable it using one of the methods given in “Customizing toolbars” in Chapter 1, Introducing LibreOffice.
You can open this list and click the style you want, or you can use the up and down arrow keys to move through the list and then press Enter to apply the highlighted style.
Tip
Select More Styles at the bottom of the list to open the Styles deck on the Sidebar.
Figure 2: The Set Paragraph Style list in Writer
In Writer, right-click anywhere in a paragraph to open the context menu; choose Paragraph. Or, right-click in a word and choose Character in the context menu. In Calc, right-click in a cell and choose Styles in the context menu.
In each case, the submenu includes some commonly used styles. You can add styles to this submenu; see Chapter 14, Customizing LibreOffice.
You can use Fill Format mode to apply a style to many different areas quickly without having to go back to the Styles deck and double-click every time. This method is quite useful when you need to format many scattered paragraphs, cells, or other items with the same style.
1) Open the Styles deck on the Sidebar and select the style you want to apply.
2) Click the Fill Format Mode icon at the top of the Styles deck.
3) To apply a paragraph, page, frame, or cell style, hover the mouse over the paragraph, page, frame, or cell and click.
To apply a character style, hold down the mouse button while selecting the characters.
Clicking on a word applies the character style to that word.
4) Repeat step 3 until you have applied that style everywhere you desire.
5) To quit Fill Format mode, click the Fill Format Mode icon again or press the Esc key.
Some keyboard shortcuts for applying styles are predefined. For example, in Writer Ctrl+0 applies the Text Body style, Ctrl+1 applies the Heading 1 style, and Ctrl+2 applies the Heading 2 style. You can modify these shortcuts and create your own; see Chapter 14, Customizing LibreOffice, for more details.
LibreOffice includes some predefined styles, but you can also create custom styles (see page below). You can modify both predefined and custom styles in several ways:
Change a style using the Styles deck on the Sidebar
Update a style from a selection
Use AutoUpdate (paragraph and frame styles only)
Load styles from another document or template
Note
Any changes you make to a style are effective only in the current document. To change styles in more than one document, you need to change the template or load styles from one document to another.
To change an existing style using the Styles deck on the Sidebar, right-click on the required style and select Modify in the context menu.
A Style dialog is displayed with title, content, and layout dependent on the type of style selected. Each variant of the dialog has several tabs. See the chapters on styles in the component user guides for more information.
Tip
You can also access the relevant Style dialogs through the Set Paragraph Style (Writer) and Apply Style (Calc) lists. Click the arrow at the right of the entry for the style to be modified and select Edit Style in the context menu. You can access the appropriate Style dialog for the style of the current selection by going to Styles > Edit Style on the Menu bar.
To update a style from a selection:
1) Open the Styles deck on the Sidebar.
2) In the document, select an item that has the format you want to adopt as a style.
Caution
When updating a paragraph style, make sure that the selected paragraph contains unique properties. If it mixes font sizes or font styles, those mixed properties will remain the same as before.
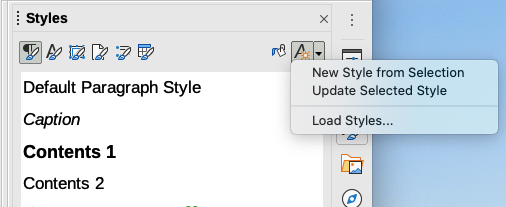
3) On the Styles deck, select the style to update, then click on the arrow next to the Styles actions icon and select Update Selected Style (Figure 3).
Figure 3: Updating a style from a selection
Tip
Other ways to modify the current style include pressing Ctrl+Shift+F11 (Writer), selecting Styles > Update Selected Style on the Menu bar (Writer and Calc), or clicking the Update Selected Style icon on the Formatting toolbar (Writer).
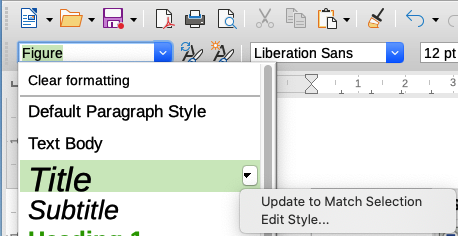
You can also modify a style through the Set Paragraph Style (Writer) and Apply Style (Calc) lists. Click the arrow at the right of the entry for the style to be modified and select Update to Match Selection in the drop-down menu (Figure 4).
Figure 4: Modifying a style from the Set Paragraph Style list
AutoUpdate applies to paragraph and frame styles only. If the AutoUpdate option is selected on the Organizer page of the Paragraph Style or Frame Style dialog, applying direct formatting to a paragraph or frame using this style in the document automatically updates the style itself.
Tip
If you are in the habit of manually overriding styles in your document, be sure that AutoUpdate is not enabled.
You may want to add some new styles. You can do this by using the Style dialog, or the New Style from Selection tool, or by dragging and dropping, as explained below.
To create a new style using the Style dialog, open the Styles deck on the Sidebar and select the category of the style you wish to create by clicking one of the icons at the top of the deck. Then right-click on any style name and select New in the context menu.
The new style will inherit characteristics from the style that you selected. If you later change the base style (for example, by changing the font from Times to Helvetica), all the linked styles will change as well. Sometimes this is exactly what you want; other times you do not want the changes to apply to all the linked styles. You can change any of those characteristics using the Style dialog.
The dialogs and choices are the same for defining new styles and for modifying existing styles. See the chapters on styles in the user guides for details.
You can create a new style by copying an existing manual format. This new style applies only to this document; it will not be saved in the template.
1) Open the Styles deck on the Sidebar and choose the category of style you want to create.
2) In the document, select the item you want to save as a style.
3) On the Styles deck, click on the Styles actions icon and click the New Style from Selection menu item in Writer or the New Style from Selection icon in Calc, Draw, and Impress.
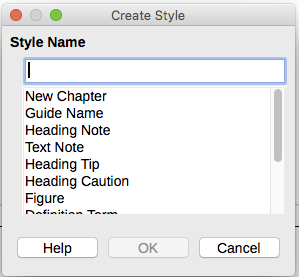
4) In the Create Style dialog, type a name for the new style. The list shows the names of existing custom styles of the selected category. Click OK to save the new style.
Figure 5: Naming a new style created from a selection
Tip
You can also create a new style from a selection by pressing Shift+F11 (Writer), by selecting Styles > New Style from Selection (Writer, Calc), or by clicking the New Style from Selection icon on the Formatting toolbar (Writer).
You can drag and drop a selection into the Styles deck to create a new style. The element to drag depends upon the LibreOffice application.
Writer
Calc
Table styles are stored in the LibreOffice user profile, and are available to all Writer documents. You can define new table styles following these steps:
1) Create a table and apply formatting for cells, backgrounds, borders, and more.
2) Select the whole table.
3) Drag the table and drop it in the Table Styles category of the Styles deck on the Sidebar.
Alternatively:
1) Create a table and apply formatting for cells, backgrounds, borders, and more.
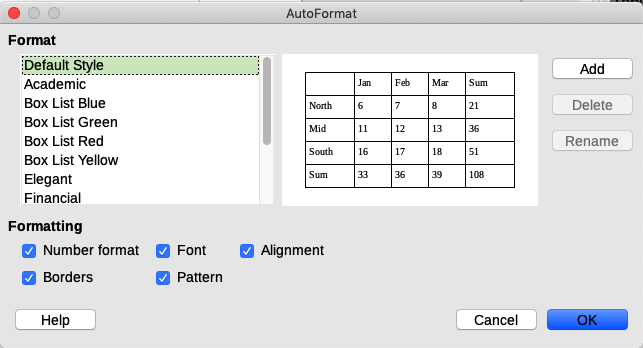
2) Click in the table and select Table > AutoFormat Styles on the Menu bar. On the AutoFormat dialog (Figure 6), click the Add button.
3) In the pop-up dialog, enter a name for the new table style, and then click OK.
4) The new table style is now listed in the left pane of the AutoFormat dialog. Click OK again to close the dialog.
The new table style can be applied to tables as described in “Applying styles” above.
Figure 6: Table AutoFormat dialog
In Writer, you can copy styles into a document by loading them from a template or from another document:
1) Open the document you want to copy styles into.
2) On the Styles deck, click the Style actions icon, and then select Load Styles.
3) On the Load Styles dialog (Figure 7), find the template from which to copy styles. To copy styles from a document that is not a template, click the From File button to open a file selection dialog and locate the required document.
4) Select the categories of styles to copy from the checkboxes at the bottom of the Load Styles dialog.
5) Select Overwrite if you want to replace styles in the original document that have the same name as styles in the document from which you are importing styles. If this box is not selected, you will only copy styles whose names are not used in the original document.
6) Click OK to copy the styles.
Figure 7: Copying styles from a template into the open document

Tip
You can also access the Load Styles dialog by selecting Styles > Load Styles on the Menu bar.
You can rename custom styles, but not the styles supplied with LibreOffice. To do so, go to the Styles panel on the Sidebar and click the icon for the type of style you want to rename. Right-click on the style and select Modify in the context menu to open the Styles dialog. On the Organizer tab, rename the style and click OK.
You cannot delete any of LibreOffice’s predefined styles from a document or template, even if they are not in use.
You can delete any user-defined (custom) styles; but before you do, you should make sure the styles are not in use in the current document.
To delete any unwanted styles, on the Styles deck select each one to be deleted (hold down the Control key while selecting multiple styles), and then right-click on a selected style and select Delete in the context menu.
If the style is not in use, it is deleted immediately without confirmation. If the style is in use, you receive a warning message asking you to confirm deletion. Select Yes to continue with the deletion.
Caution
If you delete a style that is in use, all objects with that style will return to the default style.
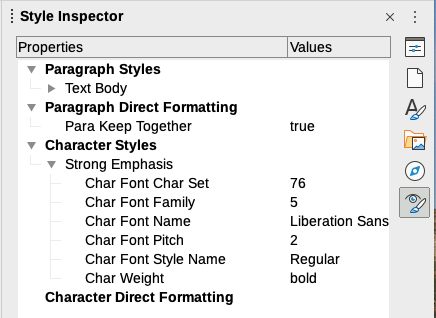
The Style Inspector (Figure 8) is located on the Sidebar in Writer. It displays all the attributes of the styles (paragraph and character) and any direct formatting present in the paragraph or word where the cursor is located. For more information, see the Writer Guide.
Figure 8: Style Inspector example
A template is a model document that you use to create other documents. For example, you can create a template for business reports that has your company’s logo on the first page. New documents created from this template will always have your company’s logo on the first page.
Templates can contain anything that regular documents can contain, such as text, graphics, a set of styles, and user-specific setup information such as measurement units, language, the default printer, and toolbar and menu customization.
All documents in LibreOffice are based on templates. You can create, or download and install, as many templates as you wish, and you can specify a template as the default for each type of document (text, spreadsheet, drawing, presentation). If you do not choose a template when you start a new document, then the new document is based on the default template for that type of document. If you have not specified a default template, LibreOffice uses the blank template for that type of document that is installed with LibreOffice. See “Setting a default template” below for more information.
In Writer, you can create templates for master documents as well as for ordinary documents.
A new installation of LibreOffice may not include many templates, but you can create your own (see “Creating a template” below) or install templates obtained from other sources (see “Adding templates obtained from other sources” below).
To create a document from a template:
1) Select File > New > Templates on the Menu bar, or select File > Templates > Manage Templates on the Menu bar, or press Ctrl+Shift+N, or click on the small arrow next to the New icon on the Standard toolbar and select Templates in the drop-down menu, or select Templates > Manage Templates in the Start Center. The Templates dialog opens.
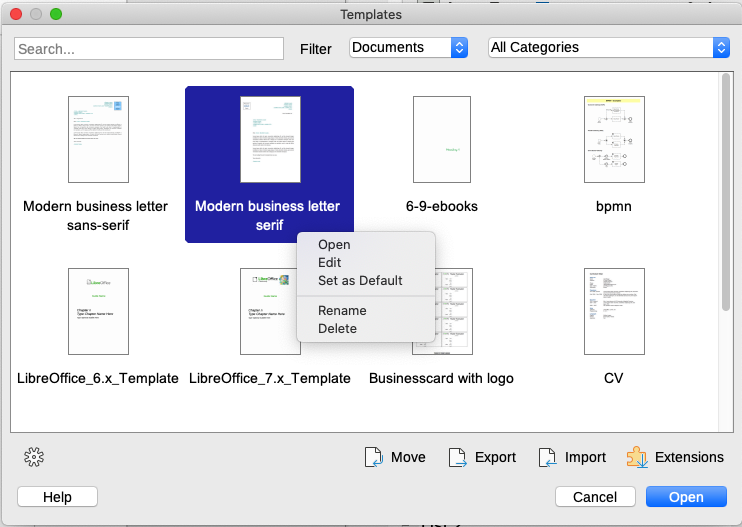
2) In the Filter lists at the top of the Templates dialog, you can select the type and category of template you want to use. The relevant templates are listed on the dialog (as shown in Figure 9).
3) Select the required template and click Open, or double-click on the selected template. A new document based on the template opens in LibreOffice.
The template the document is based upon is listed in File > Properties > General. The connection between the template and the document remains until the template is modified and, the next time that the document is opened, you choose not to update it to match the template.
Tip
You can also create a document from a template by double-clicking the template in the system's file explorer window. However, the template is then not associated with the document. See “Other ways to manage templates” below.
Tip
In the Start Center, you can click on the Templates button to view the available templates without opening the Templates dialog. Click on the required template to create a new document.
Figure 9: Templates dialog, showing context menu for a selected template
You can create templates by saving a document as a template or (in Writer) by using a wizard.
In addition to formatting, any settings that can be added to or modified in a document can be saved within a template. For example, you can also save printer settings; general behaviors set from Tools > Options, such as paths and colors; and menu and toolbar customizations.
Templates can also contain predefined text, saving you from having to type it every time you create a new document. For example, a letter template may contain your name, address, and salutation.
To create a template from a document:
1) Open a new or existing document of the type you want to make into a template (text document, spreadsheet, drawing, or presentation).
2) Add any content that you want to appear in any document you create from the new template, for example company logo, copyright statement, and so on.
3) Create or modify any styles that you want to use in the new template.
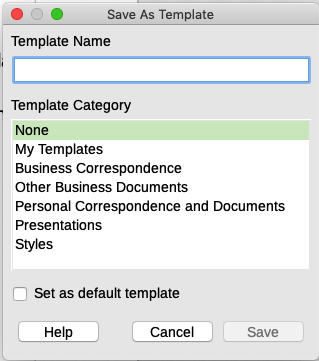
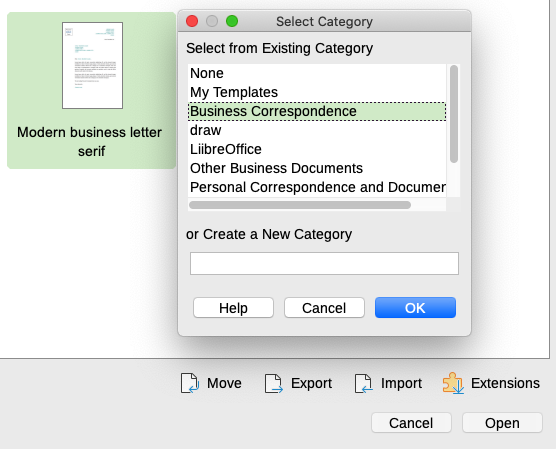
4) On the Menu bar, choose File > Templates > Save as Template. The Save As Template dialog (Figure 10) opens, displaying the existing categories and a name box.
5) Optionally select a Template category, such as My Templates or Business Correspondence. You can also set this template as a default template at this time or do it later.
6) Click Save. The template is saved and the dialog closes.
Figure 10: Save As Template dialog
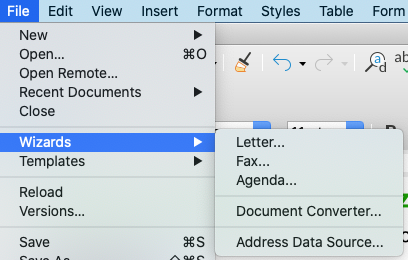
You can use wizards to create templates for letters, faxes, and agendas.
1) On the Menu bar, choose File > Wizards > [type of template required] (Figure 11).
2) Follow the instructions on the pages of the wizard. This process is slightly different for each type of template, but the format is similar.
Figure 11: Creating a template using a wizard
3) In the last section of the wizard, you can specify the template name that will show in the Templates dialog, and also the name and location for saving the template. The two names can be different but this may later cause confusion. The default location is your user templates directory, but you can choose a different location.
4) To set the file name or change the directory, select the Path button (the three dots to the right of the location). The Save As dialog opens. Make your selections and click Save to close the dialog.
5) Finally, you can choose whether to create a new document from the template immediately, or manually change the template. Click Finish to save the template.
LibreOffice refers to sources for templates as repositories. A repository can be local (a directory on your computer to which you have downloaded templates) or remote (a URL from which you can download templates).
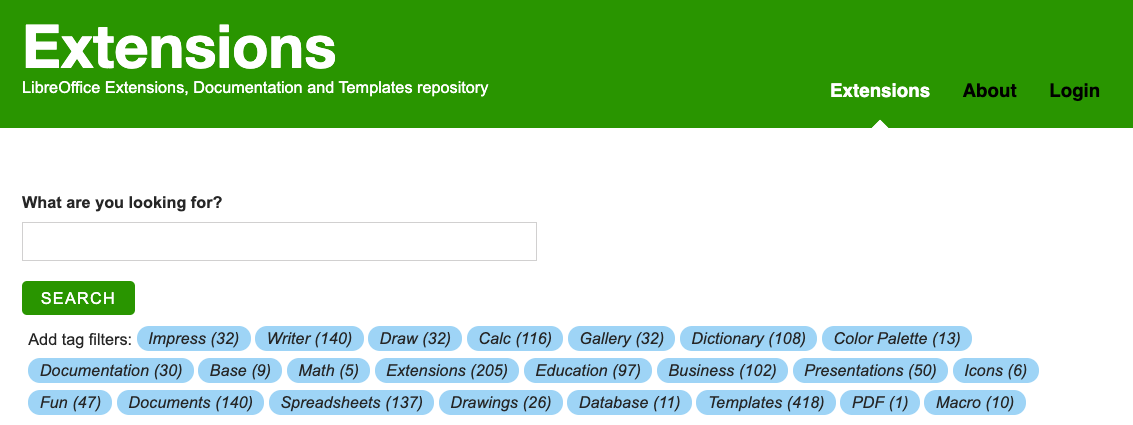
To get to the official LibreOffice template repository, type https://extensions.libreoffice.org/ in your browser’s address bar or click the Get more extensions online... link in the Extension Manager, described in Chapter 14, Customizing LibreOffice. This opens the Extensions web page (Figure 12). In the Search section, click the Templates tag filter. You can narrow your search by also choosing other tag filters. such as Writer.
After setting the filters, click the Search button. In the search results, find the required template and click on its name to display a page with details; click the Download button to put the template anywhere on your computer. Proceed to “Installing templates” below.
Figure 12: Searching for templates in the repository
You can also use the Extensions button in the lower left of the Templates dialog, as shown in Figure 13, to open an Extensions: Templates dialog, where you can scroll through a list of extensions. In this version of LibreOffice, there is no easy way to filter this list, so you may prefer to go directly to the web page, as described above.
Figure 13: Getting more templates for LibreOffice

On other websites, you may find collections of templates that have been packaged into extension (.OXT) files.
You can install templates using either the Templates dialog or the Extension Manager dialog.
To install templates using the Templates dialog:
1) Download the template or package and save it anywhere on your computer.
2) In the Templates dialog, click the Import button on the bottom right (Figure 13). The Select Category dialog appears.
3) Select the category where you want to import the template and click OK. A standard file browser window opens.
4) Find and select the template that you want to import and click Open. The file browser window closes and the template is imported and appears in the selected category.
To install templates using the Extension Manager:
1) Download the template or package and save it anywhere on your computer.
2) In LibreOffice, select Tools > Extension Manager on the Menu bar. In the Extension Manager dialog, click Add to open a file browser window.
3) Find and select the template or package of templates you want to install and click Open. The package begins installing. You may be asked to accept a license agreement.
4) When the package installation is complete, restart LibreOffice. The templates are available for use through the Templates dialog and the extension is listed in the Extension Manager.
See Chapter 14, Customizing LibreOffice, for more information about the Extension Manager.
Tip
You can manually copy new templates into the template folders. The location varies with your computer’s operating system. To learn where the template folders are stored on your computer, go to Tools > Options > LibreOffice > Paths. You can also add new template folders in other locations; see Chapter 2, Setting up LibreOffice, for more information.
You can edit a template’s styles and content, and then, if you wish, you can reapply the template’s styles to documents that were created from that template. You cannot reapply content. To edit a template:
1) Open the Templates dialog, as described in step of “Creating a document from a template” above.
2) In the Templates dialog, find the template that you want to edit. Right-click on it and then click Edit in the context menu (Figure 9). The template opens in LibreOffice.
3) Edit the template and save your changes as you would for any other document.
If you make any changes to a template and its styles, the next time you open a document that was created from the template before the changes, a confirmation message is displayed.
To update the document:
1) Click Update Styles to apply the changed styles in the template to the document.
2) Select Keep Old Styles if you do not want to apply the changed styles in the template to the document (but see the Caution notice below).
Caution
If you choose Keep Old Styles, the document is no longer connected to the template, even though the template is still listed under File > Properties > General. To connect the document to the template again, use the procedure described in “Changing the template assigned to a document” below.
At times you might want to associate a document with a different template, or perhaps you’re working with a document that did not start from a template or one that has become detached from its template.
You can change the template assigned to a document, or reconnect a document to a template, in two ways: manually or using the Template Changer extension to LibreOffice.
To change or reassign a template manually, first create a new, blank document from the required template, as described above. Then copy the contents of the old document into the new document.
To use the Template Changer extension, first you need to download and install it, then restart LibreOffice to activate it. After that, you can open the document and use File > Templates > Change template (current document) on the Menu bar.
Note
Changing or updating a template affects only the formatting used in styles. It does not affect any content. You may also need to manually update content, for example a logo, copyright notice, or the layout of a copyright page.
If you create a Writer, Calc, Impress, or Draw document by choosing File > New > [Type of Document] on the Menu bar, or by selecting one of the buttons in the Create area of the Start Center, LibreOffice creates the document from the default template for that type of document. You can, however, change the default whenever you choose.
Most default settings, such as page size and page margins, can be changed in Tools > Options, but those changes apply only to the document you are working on. To make those changes the default settings for that document type, you need to replace the default template with a new one.
You can set any template displayed in the Templates dialog to be the default for that document type:
1) Open the Templates dialog, as described in step of “Creating a document from a template” above.
2) In the Templates dialog, open the category containing the template that you want to set as the default, then select the template.
3) Right-click on the selected template and click Set as Default in the context menu (Figure 9). An icon marks the template as the default.
The next time that you create a document of that type by choosing File > New (or equivalent), the document will be created from this template.
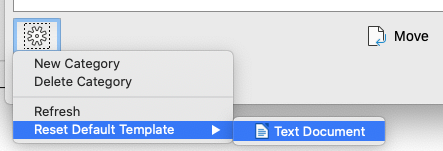
To re-enable LibreOffice’s original default template for a document type as the default for that type:
1) In the Templates dialog, click the Settings button on the bottom left (Figure 14).
2) Point to Reset Default Template in the drop-down menu, and click Text Document (or other required template type). These choices do not appear unless a custom template has been set as the default, as described in the previous section.
Figure 14: Resetting the default template for text documents
You can also reset the default template as follows:
1) Go to the Templates dialog and open the category containing the template you set as default. It is indicated by a green check mark.
2) Right-click on this template and select Reset Default in the context menu.
The next time that you create a document by choosing File > New (or equivalent), the document will be created from the original default template for the document type.
LibreOffice can manage only those templates that are in its template folders (categories), although you can create a document from a template that is not in one of these folders. You can create new template categories and use them to organize your templates. For example, you might have one template category for report templates and another for letter templates. You can also import and export templates.
To begin, open the Templates dialog as described in step of “Creating a document from a template” above.
To create a template category:
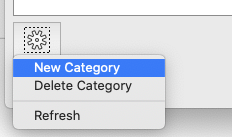
1) Click the Settings icon in the lower left of the Templates dialog.
2) Click New Category on the context menu (Figure 15).
3) In the pop-up dialog, type a name for the new category and click OK. The new category now appears in the list of categories.
Figure 15: Creating a new template category
You cannot delete template categories supplied with LibreOffice. Nor can you delete any categories added by the Extension Manager unless you first remove the extension that installed them.
However, you can delete a category that you created. Open the Templates dialog, click the Settings icon and select Delete Category in the pop-up menu (Figure 15). On the Delete Category dialog, select the category to be deleted and click OK. When a message box appears asking you to confirm the deletion, click Yes. If you attempt to delete a supplied cateogry, you will receive an error message and the category will not be deleted.
You cannot rename template categories supplied with LibreOffice. You can only rename categories that you created.
Open the Templates dialog, select the category in the Filter list at the top, then click the Settings icon and select Rename Category in the pop-up menu. In the Rename Category dialog, type the new name and click OK. If you attempt to rename a supplied cateogry, you will receive an error message and the category will not be renamed.
You cannot rename templatees supplied with LibreOffice. You can only rename a template that you have created or imported.
Open the Templates dialog, find and select the template you want to rename, then right-click on the template and select Rename in the context menu. In the small dialog that opens, type a name in the Enter New Name text box and click OK. If you attempt to rename a supplied template, you will receive an error message and the template will not be renamed.
This action changes the Title on the Description tab of the template’s document properties. It does not change the file name of the template.
To move a template from one template category to another, select it in the Templates dialog, and click the Move button near the bottom of the dialog. In the Select Category dialog (Figure 16), select the destination category and click OK. The selected template is moved to the folder. You can also create a new category into which to move the template.
Figure 16: Moving templates to another category
You cannot delete templates supplied with LibreOffice. Nor can you delete any templates installed by the Extension Manager except by removing the extension that installed them.
However, you can delete templates that you have created or imported:
1) In the Filter drop-down lists at the top of the Templates dialog, select the category that contains the template you want to delete.
2) Select the template to delete.
3) Right-click on the template to open the context menu and click Delete (Figure 9).
4) A message box appears and asks you to confirm the deletion. Click Yes. If you attempt to delete a supplied template, you will receive an error message and the template will not be deleted.
Tip
You can also press the Delete key on the keyboard to delete the selected template in the Templates dialog.
To export a template from a template category to another location in your computer or network:
1) In the Templates dialog, select the template that you want to export.
2) Click the Export button in the bottom right of the dialog. A file browser window opens.
3) Find the folder where you want to export the template and select Select Folder or OK.
4) Click OK on the displayed information dialog.
Note
Exporting a template does not remove it from the Templates dialog. The action places a copy of the template in the location you specify.
You can create and use templates stored anywhere on your computer, without using the Templates dialog. However, some results are different from those described earlier in this chapter.
You can create a document from a template by double-clicking the template in your computer’s file browser window.
The resulting document is not associated with (linked to) the template from which it was created. The template is not listed in the document’s properties and any changes to the template cannot be directly applied to the document. For many purposes, such as writing a letter, this may be what you want.
You can create a template from a document using File > Save As and selecting the relevant template file type, then saving it anywhere you want, for example in a project folder.
The resulting template will not be visible in the Templates dialog, unless you import it or add the project folder to the locations shown for templates on the LibreOffice – Paths page of the Tools > Options dialog (see “Paths” in Chapter 2, Setting Up LibreOffice).
The following examples of common use of page and paragraph styles are taken from Writer. There are many other ways to use styles; see the guides for the various components for details.
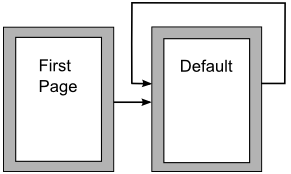
Many documents, such as letters and reports, have a first page that is different from the other pages in the document. For example, the first page of a letterhead typically has a different header, or the first page of a report might have no header or footer, while the other pages do. With LibreOffice, you can define the page style for the first page and specify the style for the following pages to be applied automatically.
As an example, we can use the First Page and Default Style page styles that come with LibreOffice. Figure 17 shows what we want to happen: the first page is to be followed by the default page, and all the following pages are to be in the default page style. Details are in Chapter 5, Formatting Pages: Basics, in the Writer Guide.
Figure 17: Flow of page styles
In a similar way, you can divide a document into chapters. Each chapter might start with the First Page style, with the following pages using the Default Style page style, as above. At the end of the chapter, insert a manual page break and specify the next page to have the First Page style to start the next chapter, as shown in Figure 18.
Figure 18: Dividing a document into chapters using page styles

A Writer document can contain pages in more than one orientation. A common scenario is to have a landscape page in the middle of a document, where the other pages are in a portrait orientation. This setup can also be created with page breaks and page styles.
To insert a landscape page in the middle of your document, position the cursor at the point where you want to start the new (landscape) page. Click Insert > More Breaks > Manual Break on the Menu bar. In the Insert Break dialog, select Page Break under Type, and select a page style with landscape orientation in the Page Style list. Click OK to insert the page. To go back to the portrait page style, insert another page break and select the portrait page style you are using (which may be Default Page Style, if you haven’t selected or created a different one). See the Writer Guide for more information.
Writer automatically flows text from one page to the next. If you do not like the default settings, you can change them. For example, you can require a paragraph to start on a new page or column and specify the style of the new page. A typical use is for chapter titles to always start on a new right-hand (odd-numbered) page.
To compile an automatic table of contents, first apply styles to the headings you want to appear in the contents list, then use Tools > Chapter Numbering to tell Writer which styles go with which level in the table of contents. By default, tables of contents use Heading styles, but you can use whatever combination of styles you prefer. See Chapter 4 in this guide for more information.
You can set up one paragraph style so that when you press Enter at the end of that paragraph, the following paragraph automatically has the style you wish applied to it. For example, you could define a Heading 1 paragraph to be followed by a Text Body paragraph. A more complex example would be: Title followed by Author followed by Abstract followed by Heading 1 followed by Text Body. By setting up these sequences, you can usually avoid having to apply styles manually.