Getting Started Guide 7.2
Chapter 4
Getting Started with Writer
Word processing with LibreOffice
This document is Copyright © 2021 by the LibreOffice Documentation Team. Contributors are listed below. You may distribute it and/or modify it under the terms of either the GNU General Public License (https://www.gnu.org/licenses/gpl.html), version 3 or later, or the Creative Commons Attribution License (https://creativecommons.org/licenses/by/4.0/), version 4.0 or later.
All trademarks within this guide belong to their legitimate owners.
|
Jean Hollis Weber |
Kees Kriek |
|
|
Jean Hollis Weber |
Steve Fanning |
Kees Kriek |
|
Dave Barton |
Jorge Rodríguez |
Rafael Lima |
|
Paul Figueiredo |
Cathy Crumbley |
Amanda Labby |
Please direct any comments or suggestions about this document to the Documentation Team’s mailing list: documentation@global.libreoffice.org
Note
Everything you send to a mailing list, including your email address and any other personal information that is written in the message, is publicly archived and cannot be deleted.
Published September 2021. Based on LibreOffice 7.2 Community.
Other versions of LibreOffice may differ in appearance and functionality.
Some keystrokes and menu items are different on macOS from those used in Windows and Linux. The table below gives some common substitutions for the instructions in this document. For a detailed list, see the application Help.
|
Windows or Linux |
macOS equivalent |
Effect |
|
Tools > Options |
LibreOffice > Preferences |
Access setup options |
|
Right-click |
Control+click or right-click depending on computer setup |
Open a context menu |
|
Ctrl (Control) |
⌘ (Command) |
Used with other keys |
|
F11 |
⌘+T |
Open the Styles deck in the Sidebar |
Writer is the word processor component of LibreOffice. In addition to the usual features of a word processor (spelling check, thesaurus, hyphenation, autocorrect, find and replace, automatic generation of tables of contents and indexes, mail merge, and others), Writer provides these important features, which are covered in detail in the Writer Guide:
Templates and styles (see Chapter 3)
Page layout methods, including styles, frames, columns, and tables
Automated tables of contents and indexes
Embedding or linking of images, equations, spreadsheets, and other objects
Built-in drawing tools
Master documents, to group a collection of documents into a single document
Change tracking during revisions
Lists
Tables of data
Database integration, including a bibliography database
Mail merge
Export to PDF and EPUB (see Chapter 10)
Document digital signatures
Form design and filling
And many more
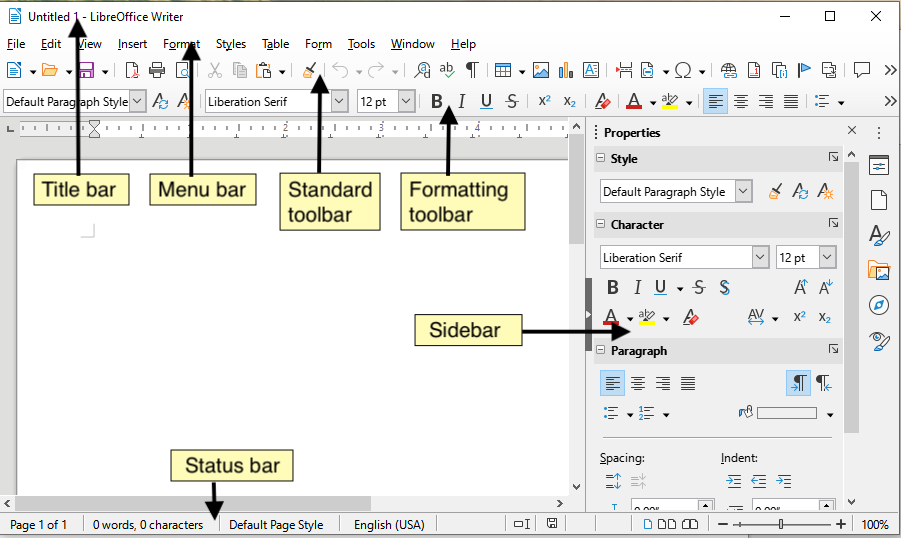
The main Writer workspace is shown in Figure 1. The default menus and toolbars are described in Chapter 1, Introducing LibreOffice. Some other features of the Writer interface are covered in this chapter. Other user interface variants are described in Chapter 14, Customizing LibreOffice.
Figure 1: The main Writer workspace
The Writer Status bar provides information about the document and convenient ways to change some document features quickly.
Figure 2: Writer Status bar components
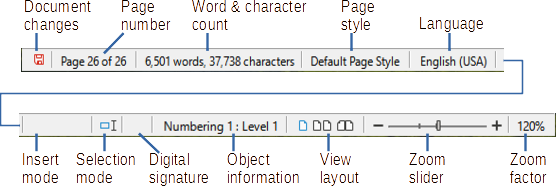
Page number
Word and character count
Page style
Caution
Changing the page style here may affect the styles of subsequent pages, depending on how the page styles are set up. See the Writer Guide for details.
Text language
Insert mode
Selection mode
|
Mode |
Effect |
|
Standard selection |
Click in the text where you want to position the cursor and drag to where you want the selection to end. Any previous selection is deselected. |
|
Extending selection (F8) |
Clicking in the text extends or crops the current selection. |
|
Adding selection (Shift+F8) |
A new, separate selection is added to an existing selection. The result is a multiple selection. |
|
Block selection (Alt+Shift+F8) |
A block of text can be selected. |
Digital signature
Section or object information
View layout
Figure 3: View layouts: single page, multiple pages, book
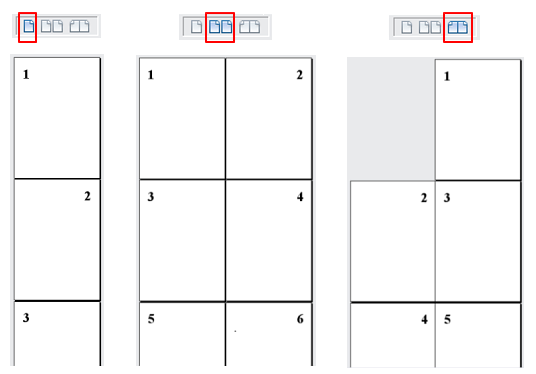
To change the view magnification, drag the Zoom slider, or click on the + and – signs, or right-click on the zoom level percent (Zoom factor) to pop up a menu of magnification values from which to choose, or click on the zoom level percent to pop up the Zoom & View Layout dialog where you can specify other magnification values.
The Sidebar is normally open by default on the right side of the Writer window. If necessary, select View > Sidebar on the Menu bar, or press Ctrl+F5, to display it. An example is shown in Chapter 1, Introducing LibreOffice.
The Writer Sidebar contains five decks by default: Properties, Page, Styles, Gallery, Navigator, and Style Inspector. Each deck has a corresponding icon on the Tab bar on the right of the Sidebar, allowing you to switch between them.
Each deck consists of a title bar and one or more content panels. Some panels contain a small More Options button, which opens a dialog to give greater choice of editing controls. When a dialog is open, the document is locked for editing until the dialog is closed.
The decks are described below.
Contains tools for direct formatting of content.
Style: Apply a paragraph style at the cursor position. Create or update a style.
Character: Modify text by the font type, size, color, weight, style, and spacing.
Paragraph: Modify the paragraph by alignment, lists or bullets, background color, indent, and spacing.
Table: If the cursor is in a table, this panel also appears. You can insert, select, delete rows and columns; split/merge cells; set row height and column width; others.
Area: Modify the image background fill and transparency. Further colors, gradients, hatching, patterns, and bitmap selection and importing are available in More Options.
Wrap: Modify wrap and spacing where these are available.
Image: Modify the image brightness, contrast, color mode, and transparency.
Position and Size: Modify width, height, rotation, and flip attributes.
Area: Modify fill and transparency.
Wrap: Modify wrap and spacing where these are available.
Position and Size: Modify width, height, rotation, and flip attributes.
Effect: Add and adjust a Glow or Soft Edge effect to the object.
Line: Modify style, width, color, and transparency.
Media Playback: Control for play, pause, stop, seek, loop, and volume.
Position and Size: Modify width and height.
Modifies the page style to change the most commonly used page properties. It has four panels:
Format modifies the size, width, height, orientation, and page margins.
Styles modifies the numbering scheme, background, page layout (specifies whether the page style should apply to odd or even pages or to both), and columns.
Header and Footer activate/deactivate and modify the respective margins, spacing, and content.
Caution
Be aware that by changing the options on the Page deck, you will change the page style in use, modifying not only the current page but all pages in the document using the same page style.
Manages the styles used in the document. This includes applying existing styles, modifying them, or creating new ones. See Chapter 3, Styles and Formatting, for more information.
Contains images and diagrams included in the Gallery themes. The Gallery has two sections. The first lists the themes by name (Arrows, Bullets, Diagrams, etc.) and the second displays the images in the selected category. Select the New button to create new categories. To insert an image into a file, or add a new image to the new category, drag and drop the selected image. See Chapter 11, Images and Graphics, for more information.
Makes it easy to navigate to specific types of content and to reorganize contents based on categories, such as headings, tables, frames, images, and so on. See page 1 for more information.
Displays all the attributes of paragraph styles, character styles, and manual (direct) formatting for selected text. For more information, see Chapter 7, Working with Styles, in the Writer Guide.
Writer has three ways to view a document: Normal, Web, and Full Screen. To change the view, go to the View menu and select the desired view.
Normal view
Web view
Full Screen view
Chapter 1, Introducing LibreOffice, includes instructions on creating new documents, opening existing documents, saving documents, accessing remote servers, and password-protecting documents. Chapter 3, Styles and Templates, covers how to create a document from a template.
By default, LibreOffice creates and saves files in the OpenDocument format (ODF). Writer documents have the extension .ODT.
Tip
Whenever it is possible to choose the document file format, you should choose to work with the default ODF format. This reduces the likelihood of errors and compatibility issues.
You may need to open, edit, and save documents in Microsoft Word formats. You can also create and edit .ODT files and then save them as .DOCX or .DOC files. To do this:
1) Important—First save your document in the file format used by LibreOffice Writer (.ODT). If you do not, any changes you made since the last time you saved will appear only in the Microsoft Word version of the document. Also, saving in ODF format enables you to re-save or modify the document if the recipient of your document experiences trouble with the Microsoft format.
2) Then choose File > Save As.
3) On the Save As dialog, in the File type drop-down menu, select the type of Word format you need. You may also choose to change the file name.
4) Click Save.
This creates a separate document with a different file extension (such as .DOCX). From this point on, all changes you make to the document will occur only in the new document. If you want to go back to working with the .ODT version of your document, you must open it again.
Tip
To have Writer save documents by default in a Microsoft Word file format, go to Tools > Options > Load/Save > General. In the section named Default File Format and ODF Settings, under Document type, select Text document, then under Always save as, select your preferred file format.
The Navigator provides several convenient ways to move around a document and find items in it. It lists the headings, tables, text frames, graphics, bookmarks, and other objects in the document.
When a category is showing the list of objects in it, double-click on an object to jump directly to that object’s location in the document.
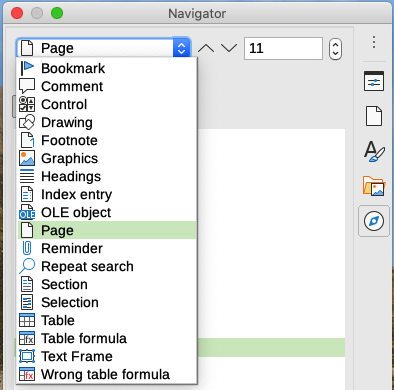
In the top left of the Navigator is a Navigate By drop-down list. You can pick a type of object (such as a bookmark, table, or index entry) and then use the Previous (^) and Next (v) buttons to jump from one to the next. See Figure 4.
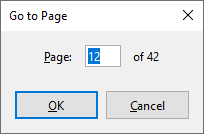
On the top right of the Navigator is a Go to Page field, which you can use to jump directly to a specific page.
For more uses of the Navigator in Writer, see Chapter 1 of the Writer Guide.
Figure 4: Navigate By list on Navigator
To jump to a specific page in the document:
Use the Go to Page field on the top right of the Navigator (see above).
Use the Go to Page dialog (Figure 5), which shows the current page number and the number of pages in the document. Type the number of the destination page in the text box and click OK. To open this dialog, do any of the following:
Click on the page number field in the Status bar.
Choose Edit > Go to Page on the Menu bar.
Press Ctrl+G on the keyboard.
Figure 5: Go to Page dialog
Selecting, copying, pasting, or moving text in Writer is similar to working with text in other programs. LibreOffice also has some convenient ways to select items that are not next to each other, select a vertical block of text, and paste unformatted text.
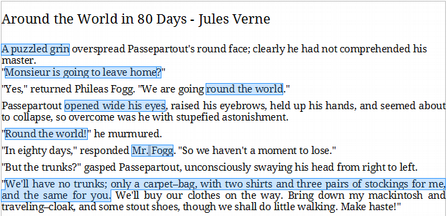
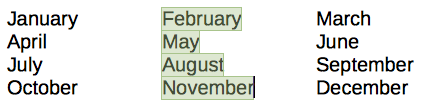
To select non-consecutive items (as shown in Figure 6) using the mouse:
1) Select the first piece of text.
2) Hold down the Ctrl key and use the mouse to select the next piece of text.
3) Repeat as often as needed.
To select non-consecutive items using the keyboard:
1) Select the first piece of text.
2) Press Shift+F8. This puts Writer in “Adding selection” mode.
3) Use the arrow keys to move to the start of the next piece of text to be selected. Hold down the Shift key and select the next piece of text.
4) Repeat as often as required.
Now you can work with the selected text (copy it, delete it, change the style, and so on).
Press Esc to exit from this mode.
Figure 6: Selecting items that are not next to each other
For more information about keyboard selection of text, see the topic “Navigating and selecting with the keyboard” in LibreOffice Help (F1).
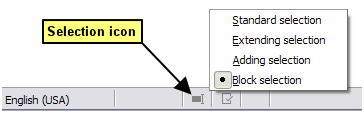
You can select a vertical block or “column” of text that is separated by spaces or tabs (as you might see in text pasted from e-mails, program listings, or other sources), using Block selection mode. To change to Block selection mode, use Edit > Selection Mode > Block Area, or press Alt+Shift+F8, or right-click on the Selection icon on the Status bar and select Block selection in the pop-up menu.
Figure 7: Selection icon
Now highlight the selection, using mouse or keyboard, as shown below.
Figure 8: Selecting a vertical block of text
Cutting and copying text in Writer is similar to cutting and copying text in other applications. You can use the mouse or the keyboard. You can copy or move text within a document, or between documents, by dragging or by using menu selections, toolbar buttons, or keyboard shortcuts. You can also copy text from other sources such as Web pages and paste it into a Writer document.
To move (drag and drop) selected text using the mouse, drag it to the new location and release it. To copy selected text, hold down the Ctrl key while dragging. The text retains the formatting it had before dragging.
To move (cut and paste) selected text, use Ctrl+X to cut the text, insert the cursor at the paste-in point and use Ctrl+V to paste. Alternatively, use the Copy / Paste buttons on the Standard toolbar, or the options under Edit on the Menu bar.
When you paste text, the result depends on the source of the text and how you paste it. If you click on the Paste button on the Standard toolbar or use Ctrl+V, any formatting the text has (such as bold or italics) is retained. Text pasted from websites and other sources may also be placed into frames or tables. If you do not like the results, click the Undo button or press Ctrl+Z.
To make the pasted text inherit the paragraph style at the insertion point:
Choose Edit > Paste Special
Click the arrow on the Paste button on the Standard toolbar
Double click the Paste button without releasing the left mouse button
Press Ctrl+Shift+V
Then select Paste Unformatted Text or Unformatted text in the resulting menu. Unformatted text can also be pasted directly by pressing Ctrl+Alt+Shift+V on the keyboard.
Writer has two ways to find text and formatting within a document: the Find toolbar for fast searching and the Find and Replace dialog. In the dialog, you can:
Find and replace words and phrases
Find and replace specific attributes or formatting
Find and replace paragraph styles
By default, the Find toolbar is docked at the bottom of the LibreOffice window (just above the Status bar) as shown in Figure 9, but you can float it or dock it in another location. If the Find toolbar is not visible, you can display it by choosing View > Toolbars > Find on the Menu bar, selecting Edit > Find on the Menu bar, or by pressing Ctrl+F. For more information on floating and docking toolbars, see Chapter 1, Introducing LibreOffice.
Figure 9: Docked position of Find toolbar
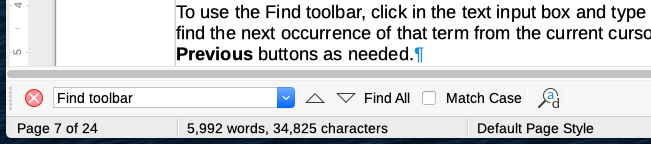
To use the Find toolbar, click in the box and type your search text, then press Enter to find the next occurrence of that term. Click the Find Next or Find Previous (arrow) buttons as needed.
Click the Find All button to select all instances of the search term within the document. Select Match Case to find only the instances that also match the case (capitalization). To open the Find and Replace dialog, click the icon to the right of Match Case.
To close the Find toolbar, click the X button on the left, or press Esc on the keyboard when the cursor is in the search box.
To display the Find & Replace dialog (Figure 10), use any of the following methods:
Press Ctrl+H on the keyboard.
Choose Edit > Find and Replace on the Menu bar.
Click the Find and Replace icon on the Find toolbar.
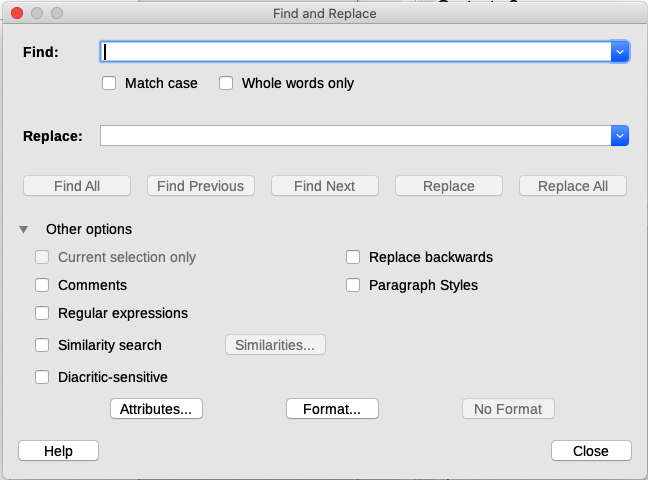
When the Find and Replace dialog is open, optionally click Other options to expand it.
1) Type the text you want to find in the Find box.
2) To replace the text with different text, type the new text in the Replace box.
3) You can select various options such as matching the case or matching whole words only.
4) When you have set up the search, click Find Next. To replace the found text, click Replace. If you click Find All, LibreOffice selects all instances of the search text in the document. Similarly, if you click Replace All, LibreOffice replaces all matches, without stopping for you to accept each instance.
Caution
Use Replace All with caution; otherwise, you may end up with mistakes that you won’t be able to undo later if you save and close the file. (Ctrl+Z works only before the file is saved.) A mistake with Replace All might require a manual, word-by-word, search to fix.
Tip
Regular expressions offer powerful ways to search and replace text. For example, they can find all instances where any number is followed by specific letters. However, they can be challenging to understand. Refer to the Help files for guidance.
For more information on using Find and Replace, see the Writer Guide.
Figure 10: Expanded Find & Replace dialog
A special character is one not found on a standard user’s keyboard. For example, © ¾ æ ç ñ ö ø ¢ are all special characters not available on an English keyboard.
To insert one or more special characters, place the cursor where you want the character to appear. Then do one of the following:
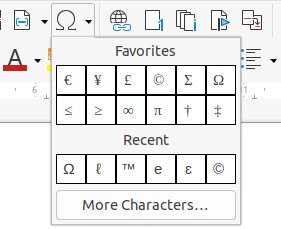
Click the Special Character icon on the Standard toolbar to open a list of favorite and recently used characters and click on the one you wish to insert (Figure 11). You can also open the Special Characters dialog (Figure 12) by clicking the More Characters button.
Figure 11: Insert Special Characters in the standard toolbar
Choose Insert > Special Character on the Menu bar, to open the Special Characters dialog (Figure 12). Double-click the characters (from any font or mixture of fonts) you wish to insert, in order, then click Insert.
Figure 12: The Special Characters dialog
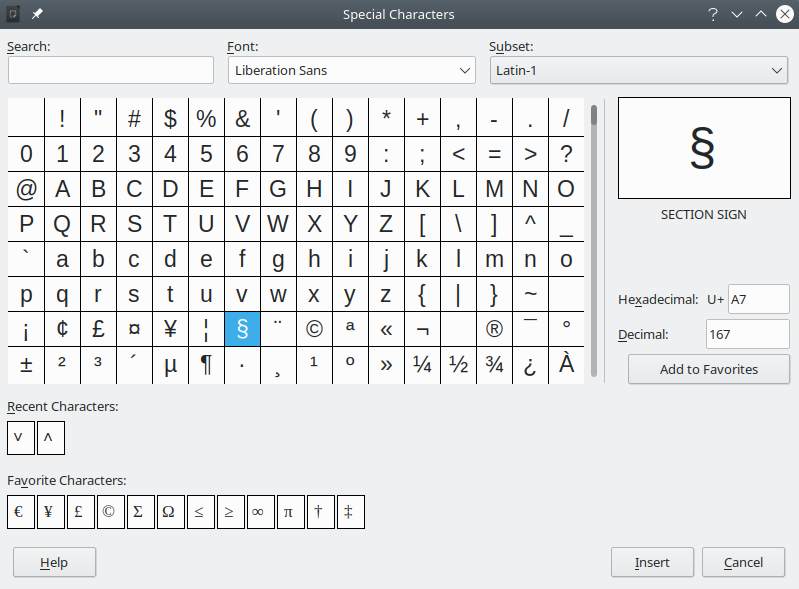
The Special Characters dialog (Figure 12) includes areas to select Recent Characters and Favorite Characters. To add a new character to the Favorite Characters list, click on a character and click the Add to Favorites button.
Tip
Different fonts have their own distinct special characters. If you do not find a particular special character, try changing the Font selection.
To enter en and em dashes as you type, you can use Replace dashes on the Options tab in the AutoCorrect dialog (Tools > AutoCorrect > AutoCorrect Options). This option replaces one or two hyphens, under certain conditions, with the corresponding dash. See the Help or the Writer Guide for more details and other methods of inserting dashes.
– An en-dash is a dash the width of the letter “n” in the font you are using. Type at least one character, a space, a hyphen, another space, and at least one more letter. The hyphen will be replaced by an en-dash.
— An em-dash is a dash the width of the letter “m” in the font you are using. Type at least one character, two hyphens, and at least one more character. The two hyphens will be replaced by an em-dash. Exception: if the characters are numbers, as in a date or time range, the two hyphens are replaced by an en-dash.
By default, four dictionaries are installed for each language: a spelling checker, a grammar checker, a hyphenation dictionary, and a thesaurus (assuming it is available for that language). The spelling checker determines if each word in the document is in the installed dictionary. The grammar checker works in combination with the spelling checker. You can choose to check spelling and grammar automatically as you type, or at any other time, or both.
When Automatic Spell Checking is selected in the Tools menu, Standard toolbar, or Options dialog, each word is checked as it is typed and a wavy red line appears under any unrecognized words. If Check grammar as you type has also been enabled, errors are marked with a wavy blue underline. See “Checking grammar” on page 1.
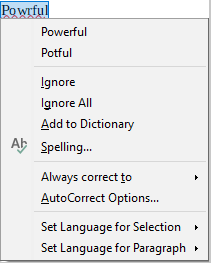
At any time, you can right-click on an unrecognized word to open a context menu (Figure 13), where you can choose one of the suggested words to replace it. When the word is corrected, the line disappears. If the word is correct but not in the dictionary, you can chose Add to dictionary. If the list does not contain the word you want, click Spelling to open the Spelling dialog (Figure 14).
Figure 13: Spelling context menu
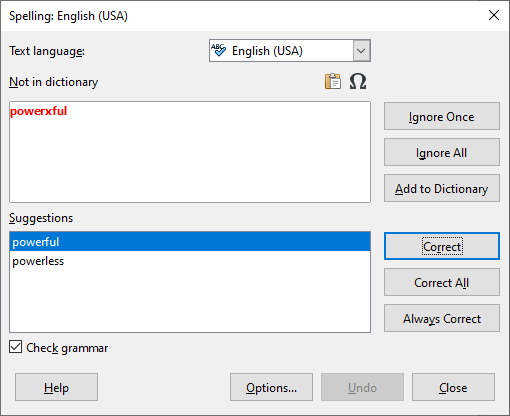
In addition to automatic checking, or in place of it, you can perform a combined spelling and grammar check on the document (or a text selection). Click the Check Spelling button on the Standard toolbar, or choose Tools > Spelling, or press F7 on the keyboard. This checks the document or selection and opens the Spelling dialog if any unrecognized words are found. To also identify potential grammar problems, select the Check grammar checkbox.
Figure 14: Spelling dialog
Here are some more features of the spelling checker:
Text language
Add a word to the dictionary
Choose text for spell checking
Manage custom dictionaries
Specify language for specific paragraphs
See the Writer Guide for more information about the spelling and grammar checking options.
If any grammar errors are detected, they are shown underlined by a wavy blue line. Right-click on this line to open a context menu.
The first entry in the context menu describes the suspected broken grammatical rule.
Figure 15: Context menu for grammar errors
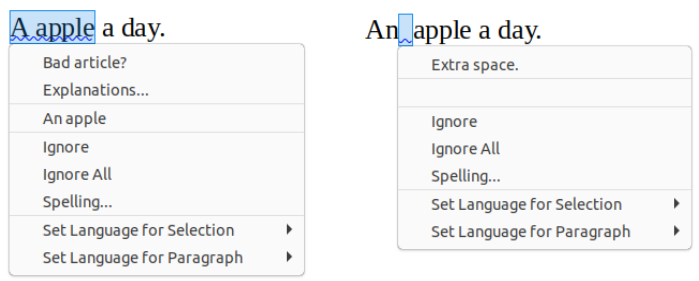
The second menu item may be Explanations, which opens your browser to a web page offering more information about the error. Next may be the suggested correction. Clicking this changes the text to the suggestion.
In the third section of the context menu, you can choose to ignore the indicated error, or open the Spelling dialog (Figure 14). In the final section of the menu, you can set the language for the selection or the paragraph.
You can select additional grammar checking rules through Tools > Options > Language Settings > English Sentence Checking, or through Tools > Extension Manager > English spelling dictionaries > Options. See Chapter 2, Setting up LibreOffice, for details.
To access a short list of synonyms, right-click on a word and point to Synonyms in the context menu. A submenu of alternative words and phrases is displayed. Click on a word or phrase in the submenu to have it replace the highlighted word or phrase in the document.
The thesaurus gives a more extensive list of alternative words and phrases. To use the thesaurus, click on Thesaurus in the Synonyms submenu. If the current language does not have a thesaurus installed, this feature is disabled.
Writer’s AutoCorrect function has a long list of common misspellings and typing errors, which it corrects automatically. It also includes codes for inserting special characters, emoji, and other symbols.
AutoCorrect is turned on by default. You may wish to disable some of its features, modify others, or turn it off completely. To turn AutoCorrect off, uncheck Tools > AutoCorrect > While Typing.
You can add your own corrections or special characters or change those supplied with LibreOffice. Choose Tools > AutoCorrect > AutoCorrect Options to open the AutoCorrect dialog. On the Replace tab, you can define which strings of text are corrected and how. In most cases, the defaults are fine.
To stop Writer replacing a specific spelling, go to the Replace tab, highlight the word pair, and click Delete. To add a new spelling to the list, type it into the Replace and With boxes on the Replace tab, and click New.
See the different tabs of the dialog for the other options available to fine-tune AutoCorrect.
Tip
LibreOffice has an extensive list of special characters accessible with AutoCorrect. For example, type :smiling: and AutoCorrect will replace it with ☺. Or, (c) will be changed to ©. You can add your own special characters.
If Word Completion is enabled, Writer tries to guess which word you are typing and offers to complete the word for you. To accept the suggestion, press Enter. Otherwise, continue typing.
To turn off Word Completion, select Tools > AutoCorrect > AutoCorrect Options and deselect Enable word completion on the Word Completion tab.
Options for customizing word completion from the AutoCorrect dialog include:
Add (append) a space automatically after an accepted word.
Show the suggested word as a tip (hovering over the word) rather than completing the text as you type.
As you add words when working on documents, you can either save them for later use in other documents or select the option to remove them from the list when closing documents.
Change the maximum number of words remembered for word completion and the length of the smallest words to be remembered.
Delete specific entries from the word completion list.
Change the key that accepts a suggested entry—the options are right arrow, End key, Return (Enter), Space bar, and Tab.
Note
Automatic word completion only occurs after you type a word for the second time in a document.
Use AutoText to store text, tables, fields, and other items for reuse and assign them to a key combination for easy retrieval. For example, rather than typing “Senior Management” every time you use that phrase, you can set up an AutoText entry to insert those words when you type “sm” and press F3.
To store some text as AutoText:
1) Type the text into your document, then select the text.
2) Choose Tools > AutoText on the Menu bar (or press Ctrl+F3).
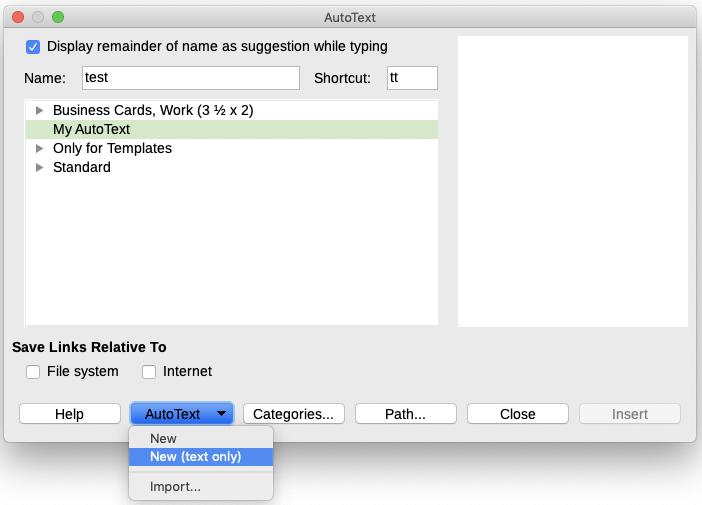
3) In the AutoText dialog (Figure 16), type a name for the AutoText in the Name box. Writer will suggest a one-letter shortcut, which you can change.
4) Choose the category for the AutoText entry, for example My AutoText.
5) Click the AutoText button at the bottom of the dialog and select in the menu either New, to have the AutoText retain specific formatting, no matter where it is inserted, or New (text only), to have the AutoText take on the existing formatting around the insertion point.
6) Click Close to return to your document.
To insert AutoText, type the shortcut and press F3.
Tip
If the only option under the AutoText button is Import, either you have not entered a name for your AutoText or there is no text selected in the document.
Figure 16: Creating an AutoText entry
AutoText is especially powerful when assigned to fields. See Chapter 17, Fields, in the Writer Guide for more information.
To quickly change the case of text, select it, choose Format > Text on the Menu bar, and then choose one of the items on the submenu. The most common are:
UPPERCASE, where all letters are capitalized.
lowercase, where no words (except proper nouns) are capitalized.
Sentence case, where only the first word is capitalized (together with any proper nouns).
Capitalize Every Word, where every word is capitalized.
Small capitals, which capitalizes all letters in a reduced font size.
Writer does not have an automated way to do Title Case, where all words are capitalized except for certain subsets defined by rules that are not universally standardized. However, you can use Capitalize Every Word and then restore those words that you do not want capitalized.
You can format text in two ways. See Chapter 4, Formatting Text, in the Writer Guide for details.
Direct (or Manual) formatting
Styles
Writer is a style-based program. Because styles apply whole groups of formats at the same time, you can easily format a document consistently and change the formatting of an entire document with minimal effort. In addition, LibreOffice uses styles for many processes, even if you are not aware of them. For example, Writer relies on heading styles (or other styles you specify) when it compiles a table of contents.
Writer defines six types of styles: paragraph, character, frame, page, list, and table. See Chapter 3, Styles and Templates, in this book and also refer to the Writer Guide.
Styles can be applied to paragraphs in several ways:
Styles drop-down selection list at the left end of the Formatting toolbar
Styles deck of the Sidebar
Styles menu on the Menu bar (limited to common styles)
Keyboard shortcuts Ctrl+1 to Ctrl+5 (paragraph styles Heading 1 to Heading 5)
You can also open a Formatting (Styles) toolbar using View > Toolbars > Formatting (Styles); see Figure 17.
Figure 17: Formatting (Styles) toolbar

You can manually apply many direct formats to paragraphs using the buttons on the Formatting toolbar and by using the Paragraph panel of the Sidebar’s Properties deck. Not all buttons are visible in a standard installation, but you can customize the toolbar to include those you use regularly. These buttons and formats include:
Set Paragraph Style
Bullets On/Off (with a palette of bullet styles)
Numbering On/Off (with a palette of numbering styles)
Align Left, Align Center, Align Right, Justified
Align Top, Center Vertically, Align Bottom
Line Spacing (choose from 1, 1.15, 1.5, 2, or custom spacing)
Increase Paragraph Spacing, Decrease Paragraph Spacing
Increase Indent, Decrease Indent, Hanging Indent
Paragraph (to open the Paragraph dialog)
Set Line Spacing
Note
Direct formatting (also called manual formatting) overrides styles. This means that when a new style is applied, direct formatting is not removed and still determines the displayed format.
To remove direct formatting, select the text and choose Format > Clear Direct Formatting on the Menu bar, or right-click and choose Clear Direct Formatting in the context menu, or press Ctrl+M on the keyboard, or select the Clear Direct Formatting icon on the Formatting toolbar.
Note
When clearing direct formatting, the text formatting will return to the applied paragraph and character style and not the default paragraph style or default character style (unless these styles are actually applied to the text).
To apply a character style, highlight the characters or words and apply the selected character style from the Character Styles tab of the Styles deck on the Sidebar, in the Styles menu on the Menu bar (limited), or from the right-click context menu (limited).
It is recommended that you use styles to format characters as much as possible rather than formatting characters directly, as described in this section.
You can directly apply many formats to characters using the buttons on the Formatting toolbar and by using the Character panel of the Sidebar’s Properties deck. Not all buttons are visible in a standard installation, but you can customize the toolbar to include those you use regularly. These buttons and formats include:
Font Name, Font Size
Bold, Italic, Underline, Overline, Double Underline, Strikethrough, Outline
Superscript, Subscript
Uppercase, Lowercase
Increase Font Size, Decrease Font Size
Font Color (with a palette of colors)
Background Color (with a palette of colors)
Highlighting (with a palette of colors)
Note
Just as direct paragraph formatting overrides the current paragraph style, applying direct character formatting to characters overrides the current character style formatting.
Tables in a Writer document share the same sets of formatting elements as the spreadsheets in LibreOffice Calc.
To apply table styles, click in the table to be formatted and double-click on a style listed in the Table Styles tab of the Sidebar’s Styles deck. Alternatively, click in the table to be formatted, choose Table > AutoFormat Styles on the Menu bar and select a style from the dialog that opens. For more information, refer to Chapter 13, Tables of Data, in the Writer Guide.
You can set Writer to format or correct parts of a document automatically as you type, according to the choices made on the Options and Localized Options tabs of the AutoCorrect dialog (Tools > AutoCorrect > AutoCorrect Options).
Autoformatting on the Options tab includes URL recognition, bulleted and numbered lists, capitalizing the first letter of every sentence, and correcting two initial capitals on words.
A bulleted list is created when you type a hyphen (-), star (*), or plus sign (+), followed by a space or tab at the beginning of a paragraph. A numbered list is created when you type a number followed by a period (.), followed by a space or tab at the beginning of a paragraph.
The Localized Options tab controls the formatting of quotation marks and apostrophes (which look like a closing single quote). Most fonts include curly quotation marks (also known as “smart quotes”), but for some purposes (such as marking minutes and seconds of latitude and longitude) you may wish to format them as straight quotes.
|
Straight quotes |
Smart quotes |
|
' ' " " |
‘ ’ “ ” |
Tip
If you notice unexpected formatting changes occurring in your document, this is the first place to look for the cause. In most cases Edit > Undo (Ctrl+Z) fixes the issue.
For more about creating lists using styles, see Chapter 12, Lists: Tips and Tricks, in the Writer Guide.
Whenever possible, use paragraph styles for creating bulleted (unordered) and numbered (ordered) lists. Writer comes with two sets of paragraph styles for this purpose. However, these styles do not include options for settings such as the type of bullet or position of numbers. Those settings come from list styles, which are a different type of style than paragraph styles. It is recommended to use them together in these ways:
Use paragraph styles List 1, List 2, List 3, and so on for creating bulleted lists. These styles use Bullet list styles.
Use paragraph styles Numbering 1, Numbering 2, Numbering 3, etc, for creating numbered lists. These styles use the list styles called Numbering 1, Numbering 2, etc.
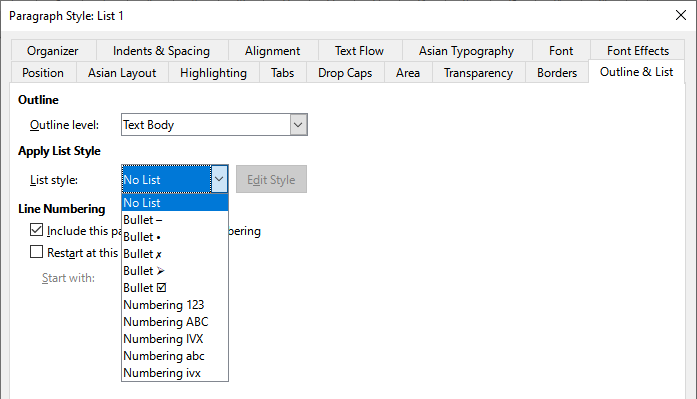
To assign a list style to one of these paragraph styles, go to the Styles deck in the Sidebar, right-click on the paragraph style you want to use, then choose Modify. On the Outline & List tab on the Paragraph Style dialog, in the List style drop-down list, choose the appropriate list style (Figure 18).
Paragraph styles such as List 1 Start and List 1 End enable you to adjust specific properties (such as the space between paragraphs) for items at the beginning or end of the list.
Note
List styles are not meant to be used on their own. Rather, they are designed to be attached to paragraph styles.
Figure 18: Assigning a list style to a paragraph style
With paragraph styles, you can easily create nested lists, in which list items have sub-items under them, as in an outline. This requires specifying the settings for the additional levels. To do this, right-click on the list style (not the paragraph style) on the Styles deck in the Sidebar, select Modify, and specify how each level will be labeled, using the Customize tab. Also specify the position and spacing for each level on the Position tab. Refer to the Writer Guide for details.
Once you have set up nested lists, you can readily change the hierarchy of an item. To demote an item one level, position the cursor at the beginning of the line (after the bullet or number) and press the Tab key. To promote an item one level, press Shift+Tab.
Bullets and numbers can be manually applied in three ways:
Use AutoCorrect to autoformat text, as described above
Use the Toggle Unordered List and Toggle Ordered List buttons on the Formatting toolbar
Use the Paragraph panel of the Sidebar’s Properties deck
Bullets and numbering can be applied to already selected text or they can be applied as you type.
Tip
Bullets and numbering applied in these ways cannot be removed with Format > Clear Direct Formatting on the Menu bar, or with the Clear Direct Formatting icon on the Formatting toolbar, or by using Ctrl+M. Rather, they are turned off or removed from selected text by toggling the relevant buttons on the Formatting toolbar, or on the Sidebar’s Properties deck.
Use the buttons on the Bullets and Numbering toolbar to move items up or down the list, create sub-items, change the style of bullets, and access the Bullets and Numbering dialog, which contains more detailed controls. Use View > Toolbars > Bullets and Numbering to see the toolbar.
Note
If numbering or bullets are being applied automatically in a way that you find inappropriate, you can switch them off temporarily by unchecking Tools > AutoCorrect > While Typing.
The Toggle Unordered List and Toggle Ordered List buttons on the Sidebar’s Properties deck can also be used to create nested lists. Click the down arrow next to the relevant button, then click More Bullets/Numbering to access the Bullets and Numbering dialog. However, the Sidebar does not include tools for promoting and demoting items in the list, as found on the Bullets and Numbering toolbar.
The horizontal ruler shows the tab stops. Any tab stops that you have defined will overwrite the default tab stops. Tab settings affect indentation of full paragraphs (using the Increase Indent and Decrease Indent buttons on the Formatting toolbar) as well as indentation of parts of a paragraph (by pressing the Tab key on the keyboard).
Using the default tab spacing can cause formatting problems if you share documents with other people. If you use the default tab spacing and then send the document to someone else who has chosen a different default tab spacing, tabbed material will change to use the other person’s settings. Instead of using the defaults, define your own tab settings, as described in this section.
To define indents and tab settings for one or more selected paragraphs, right-click and choose Paragraph > Paragraph. On the Paragraph dialog, go to the Tabs tab.
A better strategy is to define tabs for the paragraph style. This is done on the Tabs tab of the Paragraph Style dialog.
Tip
Using tabs to space out material on a page is not recommended. Depending on what you are trying to accomplish, a table or frame might be a better choice.
Caution
Any changes to the default tab setting will affect the existing default tab stops in any document you open afterward, as well as tab stops you insert after making the change.
To set the spacing of default tab stop intervals, go to Tools > Options > LibreOffice Writer > General.
Figure 19: Selecting a default tab stop interval

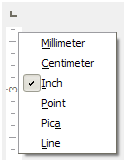
Change the measurement unit for rulers in the current document by right-clicking on the ruler to open a list of units. Click on one of them to change the ruler to that unit. The selected setting applies only to that ruler.
Figure 20: Changing the measurement unit for a ruler
You can hyphenate words at the end of a line in two ways: let Writer do it automatically (using styles and its hyphenation dictionaries), or insert soft hyphens manually where needed. Or, you can choose to not hyphenate at all.
To turn automatic hyphenation of words on or off:
1) On the Styles deck on the Sidebar, go to Paragraph Styles, right-click on Default Paragraph Style (or another style you want to use) and select Modify.
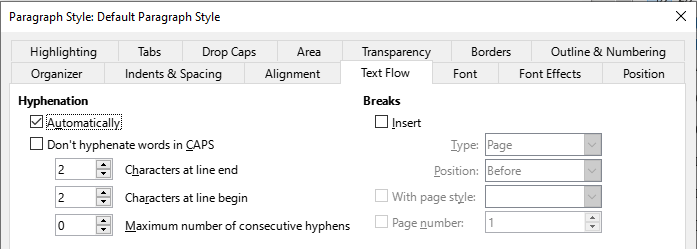
2) On the Paragraph Style dialog (Figure 21), go to the Text Flow tab.
3) Under Hyphenation, select or deselect Automatically. When automatic hyphenation is on, you can also set the criteria for when it should occur. Click OK to save.
Note
Turning on hyphenation for the Default Style paragraph style affects all other paragraph styles that are based on Default Style. You can individually change other styles so that hyphenation is not active; for example, you might not want headings to be hyphenated.
Any styles not based on Default Style are not affected. See Chapter 3, Styles and Templates, for more about styles based on styles other than Default Style.
Figure 21: Turning on automatic hyphenation in a paragraph style
You can also set hyphenation options through Tools > Options > Language Settings > Writing Aids. These choices apply when there is no specific setting in a paragraph style.
In Options, near the bottom of the dialog, scroll down to find the hyphenation settings.
Figure 22: Setting hyphenation options
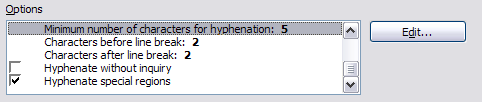
To change the minimum number of characters for hyphenation, or the minimum number of characters before or after a line break, select the item, and then click the Edit button in the Options section.
Note
Hyphenation options set in Writing Aids are effective only if hyphenation is turned on through paragraph styles.
Manually hyphenate words when you want only a specific word hyphenated at the end of a line. Do not use a normal hyphen, which will remain visible even if the word is no longer at the end of a line when you add or delete text, or change margins or font size. Instead, use a soft hyphen, which is visible only when required.
To insert a soft hyphen inside a word, click where you want the hyphen to appear (when needed) and press Ctrl+hyphen or use Insert > Formatting Mark > Insert soft Hyphen. When the word is at the end of the line it will be hyphenated at this position, even if automatic hyphenation for this paragraph is switched off.
Every page in Writer is based on a page style. Page styles define basic layout, including page size, margins, headers and footers, borders, backgrounds, and so on. Changes to these settings automatically change the page style. This means that, in contrast to paragraph styles, these settings cannot be used to directly format individual pages.
As with other styles, Writer comes with a number of page styles. You can modify these styles or create new ones. The Default Style page style is used when no other page style has been specified.
In addition to page styles, several features enable you to further control page layouts, including columns, frames, tables, and sections. For more information, see Chapter 5, Formatting Pages: Basics, and Chapter 6, Formatting Pages: Advanced, in the Writer Guide.
Tip
Page layout is usually easier if you show text, object, table, and section boundaries in Tools > Options > LibreOffice > Application Colors, and paragraph ends, tabs, breaks, and other items in Tools > Options > LibreOffice Writer > Formatting Aids.
A header is an area that appears at the top of a page above the margin. A footer appears at the bottom of the page below the margin. Information such as a page number is placed in the header or footer of a page style. That information is then displayed on every page with the same page style (unless the page style specifies separate settings for the first page or for left and right pages).
You can insert a header in several ways. Here is the easiest:
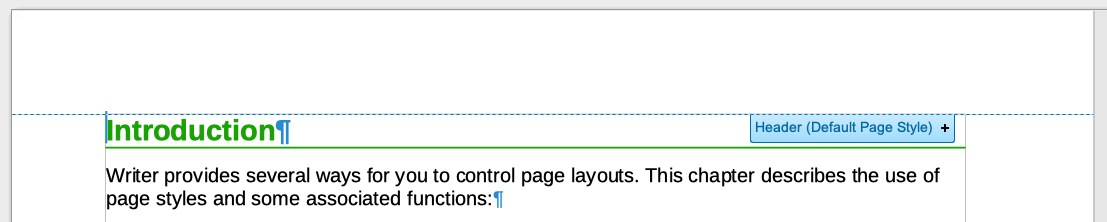
Click above the top margin (or below the bottom margin) to make the Header or Footer marker appear (Figure 23), and then click on the + sign.
Figure 23: Header marker at top of text area
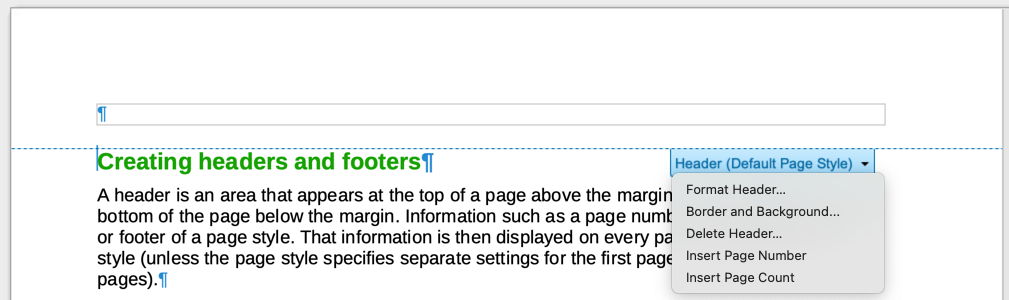
After a header/footer has been created, a down-arrow appears on the marker. Click on this arrow to drop down a menu of choices for working with the header (Figure 24).
Alternatively, you can choose Insert > Header and Footer > Header > Default Page Style (or some other page style, if not Default Page Style).
Figure 24: Header menu
Page styles can be set up to have the facing left and right pages mirrored or only right (first pages of chapters are often defined to be right-page only) or only left. When you insert a header on a page style set up for mirrored pages or right-and-left pages, you can have the contents of the header be the same on all pages or be different on the right and left pages. For example, you can put the page number on the left-hand edge of the left pages and on the right-hand edge of the right pages, put the document title on the right-hand page only, or make other changes.
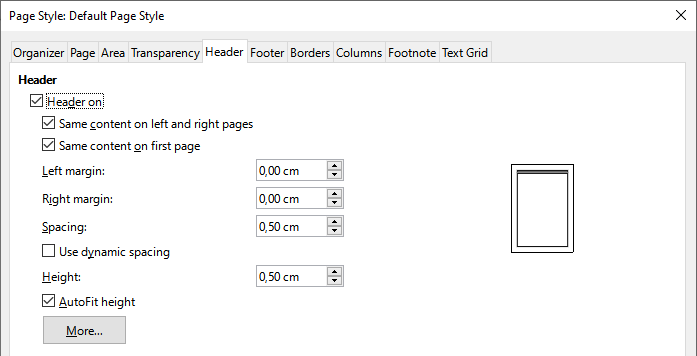
To format a header (use similar settings for a footer), you can either click on Format Header in the menu shown in Figure 24 or go to Format > Page Style, Header tab. Both methods take you to the same tab on the Page Style dialog.
Here you can specify if headings on the left and right pages should be the same or different. You can also specify whether the first page will have no header or a different header than other pages.
In this dialog, you can also turn the header on or off, set the margins, and set the spacing between the header and document text.
Figure 25: Page Style dialog, Header tab
Information such as a document title is often put into the header or footer. These items are best added as fields. That way, if something (such as the name) changes, the headers and footers are updated automatically. Here is one common way to use fields to insert the document title into the header:
1) Choose File > Properties. On the Description tab, type a title for your document, and click the OK button.
2) Place the cursor in the header area at the top of the page.
3) Choose Insert > Field > Title. The title may appear on a gray background. The background does not show when printed and can be turned off in Tools > Options > LibreOffice > Application Colors.
For more about headers, footers, and fields, see the Writer Guide.
To display page numbers automatically:
1) Insert a header or footer as described in “Creating headers and footers” on page 1.
2) Place the cursor in the header or footer where you want the page number to appear and choose Insert > Page Number.
3) Change the alignment of the number if you wish (left, right, or center).
To include the total number of pages (as in “page 1 of 12”):
1) Type the word “page” and a space, then insert the page number as above.
2) Press the space bar once, type the word “of” and a space, then choose Insert > Field > Page Count.
Note
The Page Count field inserts the total number of pages in the document, as shown on the Statistics tab of the document’s Properties dialog (File > Properties). If you restart page numbering anywhere in the document, then the total page count may not be what you want. See the Writer Guide for more information.
Often you will want to restart the page numbering at 1, for example on the page following a title page or a table of contents. In addition, many documents have the “front matter” (such as the table of contents) numbered with Roman numerals and the main body of the document numbered in Arabic numerals, starting with 1. To restart page numbering:
Place the cursor in the first paragraph of the new page.
1) Choose Format > Paragraph.
2) On the Text Flow tab of the Paragraph dialog (Figure 21 on page 1), select Insert in the Breaks area, and then select With page style and specify the page style to use.
3) Specify the page number to start from, and then click OK.
Tip
This is also useful for numbering the first page of a document with a page number greater than 1.
Line numbers in the margin are often used in legal documents, poetry, and lists of programming code. Writer can insert line numbers in an entire document or for selected paragraphs. Line numbers are included when you print the document.
You can choose how many lines are numbered (for example, every line or every tenth line), the numbering type, and whether numbers restart on each page.
To add line numbers to a document, choose Tools > Line Numbering and select the Show numbering option in the top left corner of the Line Numbering dialog. Then select any options you want and click OK.
You can also create a paragraph style that includes line numbering, and apply it to the paragraphs that you want to add line numbers to. For example, to number the lines of example code in a document, you will probably want to use a font or indentation that is different from normal text.
You can change page margins in three ways:
Using the page rulers—quick and easy, but does not allow fine control.
Using the Page Style dialog—you can specify margins with precision of up to two decimal places.
Using the Page deck of the Sidebar.
Caution
When you change the margins, the page style is also changed and the changed margins apply to all pages using that style.
To change margins using the rulers:
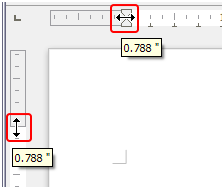
1) The gray sections of the rulers are the margins. Put the mouse cursor over the line between the gray and white sections. The pointer turns into a double-headed arrow and displays the current setting in a tool-tip.
2) Hold down the left mouse button and drag the mouse to move the margin.
Caution
The two small gray triangles on the ruler are used for indenting paragraphs. The double-headed arrows shown in Figure 26 are mouse cursors shown in the correct position for moving the margin markers. Because the triangles and arrows are often in the same place, when changing page margins you need to be careful to move the arrows, not the gray triangles.
Figure 26: Moving the margins
To change margins using the Page Style dialog:
1) Right-click anywhere in the text area on the page and select Page Style in the context menu.
2) On the Page tab of the dialog, type the required distances in the boxes in the Margins area.
To change margins using the Page deck of the Sidebar:
1) On the Sidebar, open the Page deck.
2) On the Format panel, use the Margins drop-down list to select the desired margins from the defaults provided. Click the More Options button to open the Page Style dialog where you can enter exact margin distances.
You can apply backgrounds to many elements in Writer, including pages. On the Area tab of the Page Style dialog, choose a background type (color, gradient, bitmap, pattern, or hatch). On the Page tab of the dialog, you can choose whether the background covers only the text area (the area inside the margins) or the entire page. For more about backgrounds, see Chapter 6, Formatting Pages: Advanced in the Writer Guide.
To add a watermark to a page background:
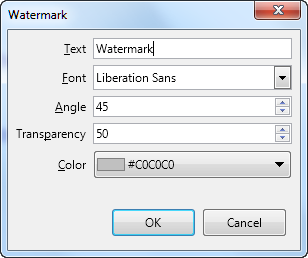
1) Choose Format > Watermark.
2) In the Watermark dialog (Figure 27), type the text and select the font, angle, transparency and color of the watermark. Then click OK.
Note
The watermark will automatically become part of the page style where it is inserted and all other pages of the same style will have the watermark. Pages with different or no watermarks need different Page Styles for those pages.
Figure 27: The Watermark dialog
Many documents, such as letters and memos, have a first page that is different from the other pages in the document. For example, the first page of a letterhead typically has a different header, or the first page of a report might have no header or footer, while the other pages do.
You can do this in several ways, as described in Chapter 5, Formatting Pages, in the Writer Guide:
Use the Default (or any other) page style for your document. Deselect the Same content on first page option on the Header/Footer tabs in the Page Style dialog, and then add different headers/footers to the first page and to the other pages of the document.
Use different page styles for the first page and for the following pages. Set the Next Page attribute for the first page so the next page automatically becomes the style for following pages.
Add a title page at the beginning of the document. Writer provides a fast and convenient way to add one or more title pages to a document and optionally to restart the page number at 1 for the body of the document, using Format > Title Page on the Menu bar.
Authors and reviewers often use comments to exchange ideas, ask for suggestions, or mark items needing attention.
You can connect a comment to multiple paragraphs or a single point. To insert a comment, select the text, or place the cursor in the place the comment refers to, and choose Insert > Comment on the menu bar, click the Insert Comment icon on the Standard toolbar, or press Ctrl+Alt+C. The anchor point of the comment is connected by a dotted line to a box on the right-hand side of the page where you can type the text of the comment. A Comments button is also added to the right of the horizontal ruler at the top of the page; you can click this button to toggle the display of the comments.
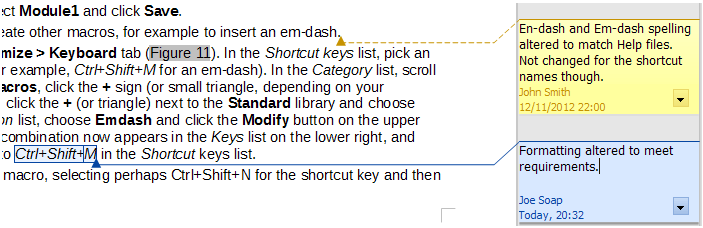
At the bottom of the comment, Writer automatically adds the author’s name and a time stamp indicating when the comment was created. If more than one person edits the document, each author is automatically allocated a different background color. Figure 28 shows an example of text with comments from two different authors.
Figure 28: Example of comments
Choose Tools > Options > LibreOffice > User Data to provide the name you want to appear in the Author field of comments.
Right-click on a comment to open a context menu where you can delete the current comment, all the comments from the same author, or all the comments in the document. On this menu, you can also reply to a comment, open a dialog to apply some basic formatting to the text, and mark comments as Resolved. These options are also available on a drop-down menu accessed by clicking the down arrow icon at the bottom right of the comment.
To navigate from one comment to another, open the sidebar Navigator, expand the Comments section, and click on the comment text to move the cursor to the anchor point of the comment in the document. Click the comment directly to edit it and right-click on the comment to delete it.
You can also navigate through the comments using the keyboard. Use Ctrl+Alt+Page Down to move to the next comment and Ctrl+Alt+Page Up to move to the previous comment.
When a document contains comments, the print dialog has an option for comments to be printed next to the text in the right margin, as they appear on the screen. In that case, the text on each page is scaled down to make space for the comments. The Print dialog also has options for placing comments at the end of the page or at the end of the document, or for printing only the comments.
Writer provides some tools that make work easier if you use more than one language in the same document or if you write documents in various languages. Changing the language for specific text enables you to use the correct dictionaries and rules to check spelling, grammar, and hyphenation. It also applies the localized versions of AutoCorrect replacement options and uses the appropriate thesaurus.
Tip
The language used at the location of the cursor is shown in the Status bar, next to the page style in use.
Languages can be set on the Font tab of the Paragraph Style dialog or the Character Style dialog. See the Writer Guide for information on how to manage the language settings of a style.
Caution
Be careful when changing a language in character or paragraph styles, as this will change the language for all characters or paragraphs using that style. It may be useful to include the language in the name of the style.
Languages set with direct formatting will override languages set using styles.
The language of a whole document can be set by using Tools > Options > Language Settings > Languages. In the Default Languages for Documents section, you can choose the language for all the text that is not explicitly marked as a different language.
Set the language for the whole document, for individual paragraphs, or even for individual words and characters, in Tools > Language on the Menu bar, and select For Selection, For Paragraph or For All Text. If the required language is not available in the submenu, click More. The Tools > Options > Language Settings > Languages menu opens, where you can select the language as described above.
Alternatively, you can set the language for individual paragraphs and characters by selecting text or putting the cursor in a paragraph and changing the language on the Status bar. There is also an option More, in case the text is not directly available.
Note
Although these methods are a type of direct formatting, they cannot be cleared by using Format > Clear Direct Formatting on the Menu bar, clicking the Clear Direct Formatting icon on the Formatting toolbar, selecting Clear Direct Formatting in the context menu, or using Ctrl+M.
You can set the language for a paragraph or a group of characters as None (Do not check spelling) using any of the methods described above. This option is especially useful for text such as web addresses or programming language snippets that you do not want to check for spelling.
The spelling checker works only for those languages in the Spelling dialog list that have a dictionary installed. You can install additional dictionaries using Tools > Language > Writing Aids > More Dictionaries Online.
Writer can generate a table of contents from the headings in your document. Before you start, make sure that the headings are styled consistently. For example, you can use the Heading 1 style for chapter titles and the Heading 2 and Heading 3 styles for chapter subheadings.
Although tables of contents can be customized extensively in Writer, often the default settings are all you need. Creating a quick table of contents is simple:
1) When you create your document, use the following paragraph styles for hierarchical heading levels (such as chapter and section headings): Heading 1, Heading 2, Heading 3, and so on. These headings are what will appear in your table of contents.
2) Place the cursor where you want the table of contents to appear.
3) Choose Insert > Table of Contents and Index > Table of Contents, Index or Bibliography.
4) Change nothing in the Table of Contents, Index, or Bibliography dialog (unless you want to change the number of levels shown). Click OK.
If you add or delete text (so that headings move to different pages) or you add, delete, or change headings, you need to update the table of contents. To do this, right-click anywhere within the table of contents and choose Update index in the context menu.
You can define your own heading styles and set them up in Tools > Chapter Numbering. You can also include other paragraph styles in the table of contents by assigning outline levels to those styles on the Outline & Numbering tab of the paragraph style dialog.
You can customize an existing table of contents at any time. Right-click anywhere in it and choose Edit Index in the context menu. Chapter 15, Tables of Contents, Indexes, Bibliographies, in the Writer Guide describes in detail all the customization options you can choose.
Indexes and bibliographies work in a similar way to tables of contents. In addition to alphabetical indexes, other types of index supplied with Writer include those for illustrations, tables, and objects.
You can also create a user-defined index. For example, you might want an index containing only the scientific names of species mentioned in the text, and a separate index containing only the common names of species.
Before creating an index, you first need to create index entries in your Writer document. Chapter 15, Tables of Contents, Indexes, Bibliographies, in the Writer Guide describes how to do this.
Footnotes appear at the bottom of the page on which they are referenced. Endnotes are collected at the end of a document.
To work effectively with footnotes and endnotes, you need to:
Insert footnotes and define their format.
See Chapter 3, Working with Text: Advanced, in the Writer Guide for more details.
Define the location of footnotes on the page, and the color and line styles for separator lines, if the defaults do not meet your needs. These are found on the Footnote tab of the Page Style dialog; see Chapter 5, Formatting Pages: Basics, in the Writer Guide.
You may wish to reuse material from other files in the document you are writing. For example, you might be writing a set of instructions that include some common paragraphs. You could, of course, retype or copy and paste the common paragraphs into each document. However, if the common paragraphs are edited, you may need to update that information in every document where it occurs.
Writer provides some tools for making these tasks easier:
The Section dialog, described in Chapter 6, Formatting Pages: Advanced, in the Writer Guide.
Two items in the Navigator’s drag modes: Insert as Link and Insert as Copy. See Chapter 3, Working with Text: Advanced, in the Writer Guide.
Images in Writer are of these basic types:
Image files, including photos, drawings, and scanned images
Diagrams created using LibreOffice’s drawing tools
Artwork created using clip art or Fontwork
Charts created using LibreOffice’s Chart facility
See Chapter 11, Images and Graphics, in this book and Chapter 11 in the Writer Guide.
Tables are a useful way to organize and present large amounts of information. A well-designed table can often help readers understand better what you are saying. In addition to using tables for text or numbers, you could put other objects, such as pictures, in cells. Writer’s tables can often be used as an alternative to spreadsheets, and they provide limited spreadsheet functions.
To directly insert a table with the default properties, click the Insert Table icon on the Standard toolbar. On the drop-down graphic, choose the size of the table.
To insert a new table using the Insert Table dialog, where you can specify the properties for the table, position the cursor where you want the table to appear, then use any of the following methods to open the dialog:
Choose Table > Insert Table on the Menu bar.
Press Ctrl+F12.
On the Standard toolbar, click the Insert Table icon and select More Options at the bottom of the drop-down graphic.
Writer provides many methods to format tables and the contents of cells. Refer to Chapter 13, Tables of Data, in the Writer Guide.
See Chapter 10, Printing, Exporting, Emailing, and Signing Documents, in this book and Chapter 7 in the Writer Guide for details on:
Previewing pages before printing, selecting print options, printing in black and white on a color printer, printing brochures, and other printing features.
Exporting a Writer document to PDF (Portable Document Format) or EPUB (a popular ebook format).
Writer provides very useful features to create and print:
Multiple copies of a document to send to a list of different recipients (form letters)
Mailing labels
Envelopes
All these features use data from a registered data source (a spreadsheet or database containing name and address records or other information). Chapter 14 in the Writer Guide describes the merge processes.
You can use several methods to keep track of changes made to a document. Details are in Chapter 3, Working with Text: Advanced, in the Writer Guide.
Method 1 (Recommended)
Use Writer’s change marks (often called “redlines” or “revision marks”) to show added or deleted material or changed formatting. Comments can be recorded to explain the changes; these are handled a bit differently from the comments discussed in “Adding comments to a document” on page 1.
1) Open the document and choose Edit > Track Changes > Record before starting to edit.
2) Later, you or another person can review and accept or reject each change. Choose Edit > Track Changes > Show. Right-click on an individual change and choose Accept Change or Reject Change in the context menu, or choose Edit > Track Changes > Manage to view the list of changes and accept or reject them. You can also use the icons on the Track Changes toolbar.
Method 2
Make your changes to a copy of the document (stored in a different folder, or under a different name, or both), then use Writer to combine the two files and show the differences. Choose Edit > Track Changes > Compare Document or Edit > Track Changes > Merge Document.
Method 3
Save versions that are stored as part of the original file. However, this method can cause problems with documents of non-trivial size or complexity, especially if you save a lot of versions.
Note
Not all changes are recorded. For example, changing a tab stop from align left to align right, and changes in formulas (equations) or linked graphics are not recorded. Also, changes of a paragraph’s profile are not recorded.
Caution
A document with track changes activated but with the changes not shown carries an invisible history of document editing that the current user may not be aware of. Contents deleted or modified can be recovered. While this is a feature, it is also a potential privacy risk.
Fields are extremely useful features of Writer. You can use them for data that changes (such as the current date or the total number of pages) and for inserting document properties such as name, author, and date of last update. Fields are the basis of cross-referencing (see below); automatic numbering of figures, tables, headings, and other elements; and a wide range of other functions. See Chapter 17, Fields, in the Writer Guide for details.
If you manually type in cross-references to other parts of a document, those references can easily get out of date if you reorganize the order of topics, add or remove material, or reword a heading. Writer provides two ways to ensure that your references are up to date: hyperlinks and cross-references.
Both methods insert links to other parts of the same document or to an external source, taking you directly to the cross-referenced item. However, they have major differences:
The text in a hyperlink does not automatically update if you change the text of the linked item (although you can change it manually), but changed text does automatically update in a cross-reference.
When using a hyperlink, you do not have a choice about the type of content linked to (such as text or page number), but when using a cross-reference, you have several choices, including bookmarks.
To hyperlink to an object such as a graphic, and have the hyperlink show useful text such as Figure 6, you need to give such an object a useful name (instead of a default name like Graphics6), or use the Hyperlink dialog to modify the visible text. In contrast, cross-references to figures with captions can automatically show useful text, and you have a choice of several variations of the name.
If you save a Writer document to HTML, hyperlinks remain active but cross-references do not. Both remain active when the document is exported to PDF.
See Chapter 12, Creating HTML Files, for details on creating hyperlinks within a document and to other documents and websites.
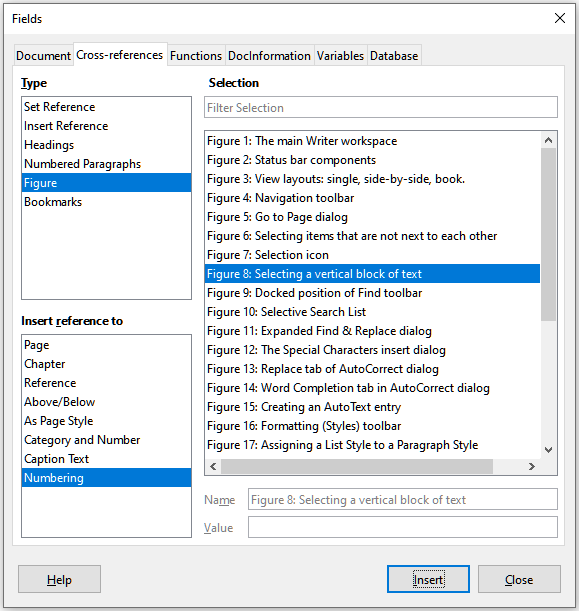
The Cross-references tab of the Fields dialog lists some items, such as headings, bookmarks, figures, tables, or numbered items such as steps in a procedure. You can also create your own reference items; see Chapter 17, Fields, in the Writer Guide.
1) In the document, place the cursor where you want the cross-reference to appear.
2) If the Fields dialog is not open, click Insert > Cross-reference. On the Cross-references tab (Figure 15), in the Type list, select the type of item to be referenced (for example, Headings or Figure).
3) Click on the required item in the Selection list, which shows all the items of the selected type. You can type some characters in the top box under Selection to filter the list in the selection box.
4) In the Insert reference to list, select the option needed. The options determine the text inserted for the hyperlink and how it is formatted. The list varies according to the Type chosen. The most commonly used options are Reference (to insert the full text of a heading or caption), Category and Number (to insert a figure number preceded by the word Figure or Table, but without the caption text), Numbering (to insert only the figure or table number, without the word Figure or Table), or Page (to insert the number of the page the referenced text is on).
5) Click Insert.
You can leave this dialog open while you insert many cross-references.
You cab use bookmarks to rapidly navigate or link to specific locations in a document. They are listed in the Navigator and can be accessed directly from there with a single mouse click. You can cross-reference to bookmarks and create hyperlinks to bookmarks, as described above.
To create a bookmark:
1) Select the text you want to bookmark. Click Insert > Bookmark.
2) On the Insert Bookmark dialog, the larger box lists any previously defined bookmarks. Type a name for this new bookmark in the top box, and then click Insert.
A master document joins separate text documents into one larger document, and unifies the formatting, table of contents, bibliography, index, and other tables or lists. Master documents are typically used for producing long documents such as a book, thesis, or long report. They are especially handy when different people are writing different sections of a document, eliminating the need to continually share the full document. For details on using master documents, see Chapter 16 in the Writer Guide.
In a standard text document, such as a report, any text can be edited. By contrast, a form has sections that are not to be edited, and other sections that are designed for the reader to fill in information. For example, a questionnaire has an introduction and questions (which do not change) and spaces for the reader to enter answers.
Forms are used in three ways:
To create a simple document for the recipient to complete, such as a questionnaire sent out to a group of people who fill it in and return it.
To enter information directly into a database or data source. Someone taking orders might enter the information for each order into a database using a form.
To view information held in a database or data source. A librarian might call up information about books.
Writer offers several ways to organize information fields in a form, including check boxes, option buttons, text boxes, pull-down lists, and spinners. Two toolbars are used to create forms: Form Controls and Form Design. See Chapter 18, Forms, in the Writer Guide for more information.