
Getting Started Guide
Chapter 6
Getting Started with Impress
Presentations in LibreOffice
This document is Copyright © 2021 by the LibreOffice Documentation Team. Contributors are listed below. You may distribute it and/or modify it under the terms of either the GNU General Public License (https://www.gnu.org/licenses/gpl.html), version 3 or later, or the Creative Commons Attribution License (https://creativecommons.org/licenses/by/4.0/), version 4.0 or later.
All trademarks within this guide belong to their legitimate owners.
To this edition
|
Jean Hollis Weber |
Peter Schofield |
Kees Kriek |
|
Dave Barton |
Amanda M Labby |
Jorge Rodríguez |
|
Drew Jensen |
Peter Schofield |
Hazel Russman |
|
Kevin O’Brien |
Ron Faile Jr. |
Olivier Hallot |
|
Jean Hollis Weber |
Claire Wood |
|
Please direct any comments or suggestions about this document to the Documentation Team’s mailing list: documentation@global.libreoffice.org
Note
Everything sent to a mailing list, including email addresses and any other personal information that is written in the message, is publicly archived and cannot be deleted.
Published September 2021. Based on LibreOffice 7.2 Community.
Other versions of LibreOffice may differ in appearance and functionality.
Some keystrokes and menu items are different on macOS from those used in Windows and Linux. The table below gives some common substitutions for the instructions in this document. For a detailed list, see the application Help.
|
Windows or Linux |
macOS equivalent |
Effect |
|
Tools > Options |
LibreOffice > Preferences |
Access setup options |
|
Right-click |
Control+click or right-click depending on computer setup |
Open a context menu |
|
Ctrl (Control) |
⌘ (Command) |
Used with other keys |
|
F11 |
⌘+T |
Open the Styles deck in the Sidebar |
Impress is the presentation (slide show) program included in LibreOffice. Impress creates presentations in the ODP format, which can be opened by other presentation software or can be exported in different presentation formats.
You can create slides that contain many different elements, including text, bulleted and numbered lists, tables, charts, and a wide range of graphic objects such as clipart, drawings, and photographs. Impress also includes a spelling checker, a thesaurus, and styles for drawings, text, and backgrounds.
This chapter introduces some features of Impress and does not attempt to cover all of the features available in Impress that can be used to create presentations. See the Impress Guide and LibreOffice Help for more information.
To use Impress for more than very simple slide shows requires some knowledge of the elements which the slides contain. Slides that contain text use styles to determine the appearance of that text. Creating drawings in Impress is similar to the Draw component of LibreOffice. For more information, refer to Chapter 3, Using Styles and Templates, and Chapter 7, Getting Started with Draw, in this guide. It is recommended to consult the Draw Guide for more details on how to use the drawing tools.
Start Impress using any of the methods described in Chapter 1, Introducing LibreOffice. The main Impress window opens and, by default, the Select a Template dialog (Figure 1) is displayed.
Figure 1: Select a Template dialog
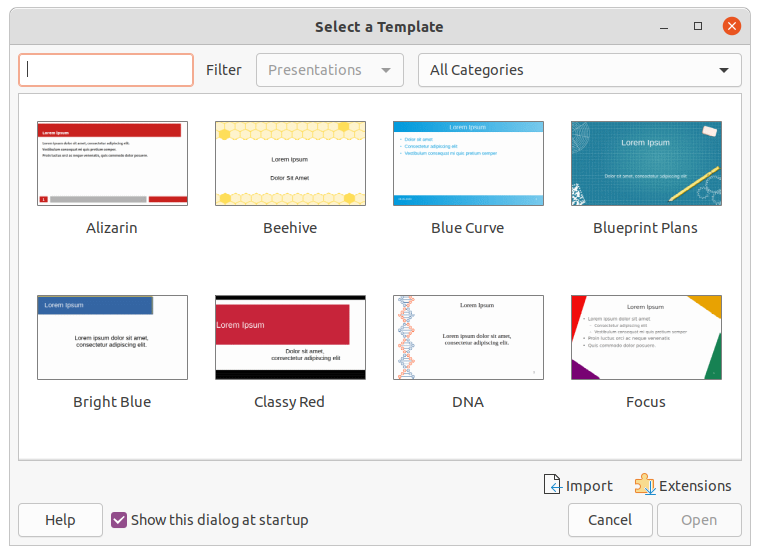
Templates included with Impress are designed to fit the two standard sizes of presentation slides: 4:3 and 16:9 ratios. However, templates will adapt to other available sizes, which can be selected by going to Slide > Properties > Paper Format on the Menu bar or Format in the Slide panel in the Properties deck on the Sidebar.
Tip
To start Impress without the Select a Template dialog, deselect Show this dialog at startup in the lower left of the dialog.
In Windows or Linux, go to Tools > Options > LibreOffice Impress > General on the Menu bar and deselect Start with Template Selection under New Document.
In macOS, go to LibreOffice > Preferences > LibreOffice Impress > General on the Menu bar and deselect Start with Template Selection under New Document.
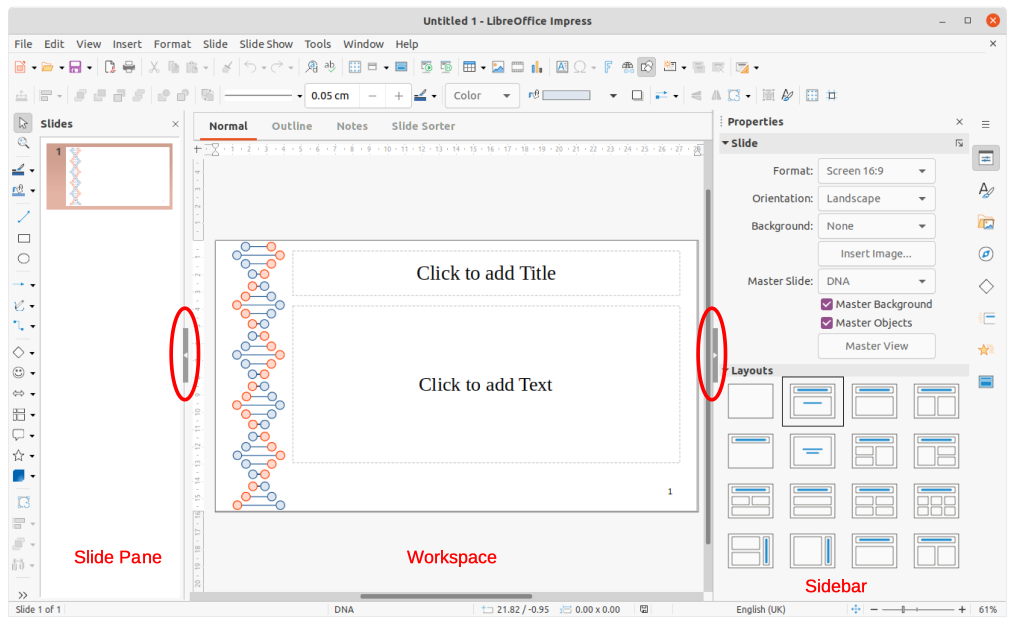
The main Impress window (Figure 2) has three main sections: Slides pane, Workspace, and Sidebar. At the top is the Menu bar and toolbars. Toolbars can be displayed, hidden, locked in position, or floating during the creation of a presentation.
Tip
You can close the Slides pane or Sidebar by clicking the X in the upper right corner of each pane or go to View > Slide Pane or View > Sidebar on the Menu bar to deselect the pane. To reopen a pane, select View > Slide Pane or View > Sidebar on the Menu bar.
Figure 2: Impress main window
Tip
To maximize the Workspace area, click on the Hide/Show marker in the middle of the vertical separator line (highlighted in Figure 2). Using the Hide/Show marker hides, but does not close, the Slides pane or Sidebar. To restore a pane, click again on its Hide/Show marker.
The Impress Menu bar, at the top of the main window, provides several menus common to all LibreOffice modules. In each LibreOffice module, the commands may differ for File, Edit, View, Insert, Format, Tools, Window, and Help. Impress has two extra menus for Slide and Slide Show. When a menu item is selected, a submenu drops down to show commands. The Menu bar can be customized; see Chapter 14, Customizing LibreOffice.
The Workspace (normally the center of the main window) opens in Normal view. It has four standard views of Normal, Outline, Notes, and Slide Sorter. These views are selected using tabs at the top of the Workspace. For more information, see “Workspace views” on page 1.
The Slides pane contains thumbnail images of slides in a presentation in the order in which the slides are shown. Clicking on a slide image in the Slides pane selects it and places the slide in the Workspace where you can make changes to the displayed slide.
To display or close the Slides pane, go to View > Slide Pane on the Menu bar.
To close the Slides pane, click on the X in the right top corner of the Slides Pane.
To display or hide the Slides pane, use the Hide/Show marker on the left of the Workspace.
You can carry out several additional operations on one or more slides in the Slides pane. These additional operations are available from a context menu when you right-click in the Slides pane.
Add new slides to a presentation.
Hide a slide so that it will not show in a presentation.
Delete a slide from a presentation.
Rename a slide.
Duplicate a slide (copy and paste).
Move a slide to another position in the slide order by dragging and dropping it to the desired position.
You can also carry out the following operations, although there are more efficient methods than using the Slides pane:
Change the slide transition following the selected slide or after each slide in a group.
Change the sequence of slides in the presentation.
Change the slide design.
Change slide layout for a group of slides simultaneously.
The Impress Sidebar, normally located on the right side of the Workspace, is similar to the Sidebar in the other LibreOffice modules. It consists of seven decks, as described below. To open a deck, use one of the following methods:
Click on its icon on the right side of the Sidebar.
Click on Sidebar Settings at the top of the Sidebar and select a deck from the drop‑down list.
Go to View on the Menu bar and select the deck required from the drop-down menu.
The Properties deck has nine panels, allowing you to change the slide layout and format any objects on a slide.
When a slide is selected and appears in the Workspace, the Properties deck opens with the Slide and Layouts panels available.
When an object on a slide is selected, the Properties deck has the following panels available: Character, Paragraph, Area, Lists, Shadow, Line, and Position and Size.
On the Styles deck, you can apply drawing and presentation styles to a selected object, create new styles for drawing and presentation, and modify both types of styles. When you save changes to a style, the changes are applied to all of the elements formatted with that style in the presentation. See “Styles” on page 1.
On the Gallery deck, you can insert an object into a presentation either as a copy or as a link. A copy of an object is independent of the original object. Changes to the original object have no effect on the copy. A link remains dependent on the original object. Changes to the original object are also reflected in the link. See the Impress Guide for more information.
The Navigator deck displays all objects contained in a presentation. It provides a convenient way to move between slides in a presentation or select an object on a slide. It is recommended to give slides and objects in a presentation meaningful names so that you can easily identify them when using the Navigator. See the Impress Guide for more information.
The Shapes deck provides quick selection of most items that are available on the Drawing toolbar: Lines and Arrows, Curves and Polygons, Connectors, Basic Shapes, Symbol Shapes, Block Arrows, Flowchart, Callouts, Stars and Banners, and 3D Objects.
The Slide Transition deck provides a selection of slide transitions available in Impress, transition speed, automatic or manual transition, and how long a selected slide is shown (automatic transition only). See “Slide transition” on page 1.
The Animation deck provides an easy way to add, change, or remove animations to different elements or objects on a slide and how they appear during a slide show. See “Animation effects” on page 1.
Using the Master Slides deck, you can select the slide design for a presentation. Impress includes several designs of master slides. The default master slide is blank, but the remaining master slides have backgrounds and styled text. See “Working with master slides” on page 1.
Rulers are positioned on the upper and left-hand sides of the Workspace. If they are not visible, go to View > Rulers on the Menu bar. The rulers show the size of a selected object on the slide using double lines (highlighted in Figure 3). You can also use the rulers to manage object handles and guide lines when positioning objects.
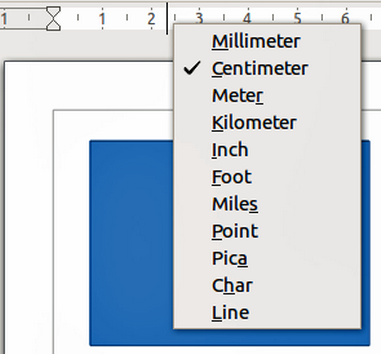
To change the measurement units of the rulers, right-click on a ruler and select the measurement unit from the drop-down list, as shown in Figure 4 for the horizontal ruler. The horizontal and vertical rulers can be set to different measurement units.
Figure 3: Rulers showing object size
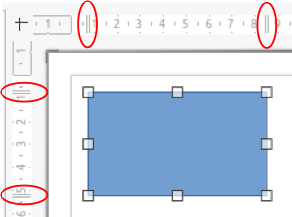
Figure 4: Changing ruler units
Note
The sizes are given in the current measurement unit and might not be the same as the ruler units. The measurement unit on the Status bar is defined in Tools > Options > LibreOffice Impress > General.
The Status bar (Figure 5), located at the bottom of the Impress window, contains information that may be useful when working on a presentation. Several of the fields are the same as those in other components of LibreOffice. Some Impress-specific fields are described briefly below.
Figure 5: Status bar

For details on the contents and use of these fields, see Chapter 1, Introducing LibreOffice, in this guide and the Impress Guide. To hide the Status bar, go to View on the Menu bar and deselect Status Bar.
Information area
Table 1: Examples of information
|
Example selection |
Examples of information shown |
|
Text area |
Text Edit: Paragraph x, Row y, Column z |
|
Charts, spreadsheets |
Embedded object (OLE) “ObjectName” selected |
|
Graphics |
Bitmap with transparency selected |
Master slide name
Cursor position/Object size
When no object is selected, the position numbers show the current position (X and Y coordinates) of the mouse cursor.
When an object is selected and being resized with the mouse, the object size numbers show the size of the object (width and height).
If an object is selected, the position numbers shows X and Y coordinates of the upper‑left corner and the object size number pair displays the size of the object. These numbers do not relate to the object itself, but to the selection outline, which is the smallest possible rectangle that can contain the visible parts of the object.
When an object is selected, clicking in either of these areas opens the Position and Size dialog.
Fit slide
Many toolbars can be used during slide creation. To display or hide them, go to View > Toolbars on the Menu bar and select them in the submenu. For more information on toolbars and how to use them, see Chapter 1, Introducing LibreOffice, and the Impress Guide.
Note
The icons used on toolbars vary depending on the computer operating system and the selection of icon size and style in Tools > Options > LibreOffice > View.
The Impress workspace has four standard views selected using tabs: Normal, Outline, Notes, and Slide Sorter. These tabs are normally displayed at the top of the Workspace. If the tabs are not displayed, then go to View > Views Tab Bar on the Menu bar. You can also select different workspace views by going to View on the Menu bar and selecting a view from the drop-down menu. Each of the workspace views is designed to ease the completion of certain tasks.
Note
Each workspace view displays a different set of toolbars when selected. To customize these toolbar sets, go to View > Toolbars on the Menu bar, then check or uncheck the toolbars you want to add or remove.
Normal view is the main view for creating individual slides in a presentation. In Normal view you can design and add slides, add and format any text or graphics, and add any animation effects to text or graphics.
To place a slide in Normal view of the Workspace, either click on the slide thumbnail in the Slides pane or click on the slide name in the Navigator.
Outline view (Figure 6) contains all the slides of the presentation in their numbered sequence. It shows topic titles, bulleted lists, and numbered lists for each slide in outline format. Only the text contained in the default text boxes in each slide is shown. If you have added text boxes or graphic objects to the slides, then these objects are not displayed. Slide names are not included.
Figure 6: Example of Outline view in Workspace
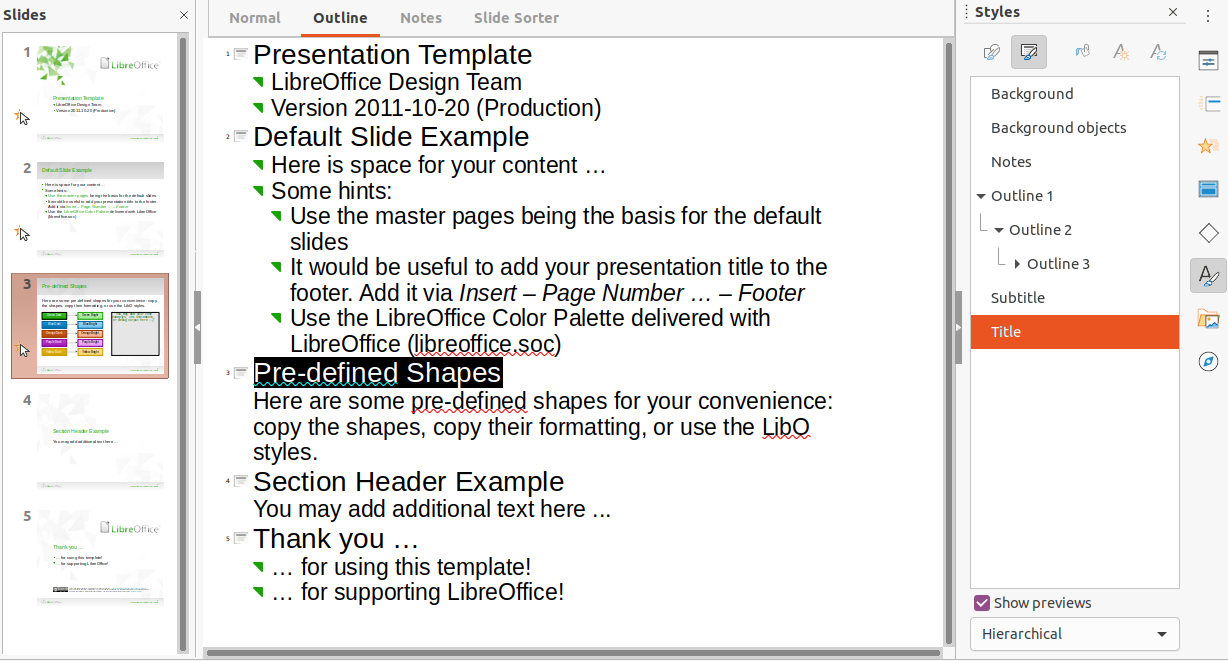
Figure 7: Outline toolbar

Use Outline view for the following tasks:
Make changes in the text of a slide:
Add or delete text in a slide as in Normal view.
Move a paragraph in a slide up or down by using the movement arrows on the Outline toolbar (Figure 7).
Change the outline level of a paragraph in a slide using the left and right arrow buttons on the Outline toolbar.
Compare slides with in an outline. If it is noticed in an outline that another slide is required, create it directly in Outline view, or return to Normal view to create it.
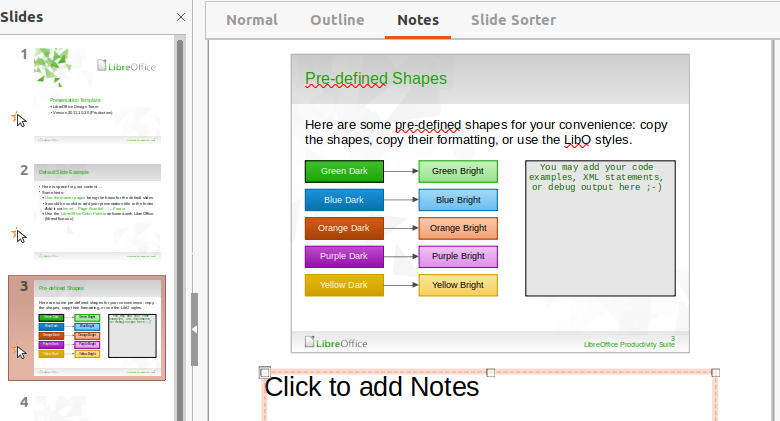
Use Notes view (Figure 8) to add notes to a slide. These notes are not seen when the presentation is shown to an audience using an external display connected to a computer. Click on the words Click to add Notes and begin typing.
You can resize the Click to add Notes text box using the resizing handles which appear when you click on the border of the box. You can also move or change the size of the box by clicking and dragging on the box border.
When text is inserted in the Click to add Notes text box, it is automatically formatted using the predefined Notes style that is in Presentation Styles in the Styles deck on the Sidebar. You can format the Notes style to suit the presentation. For more information on editing styles, see Chapter 3, Styles and Templates, in this guide and the Impress Guide.
Figure 8: Example of Notes view in Workspace
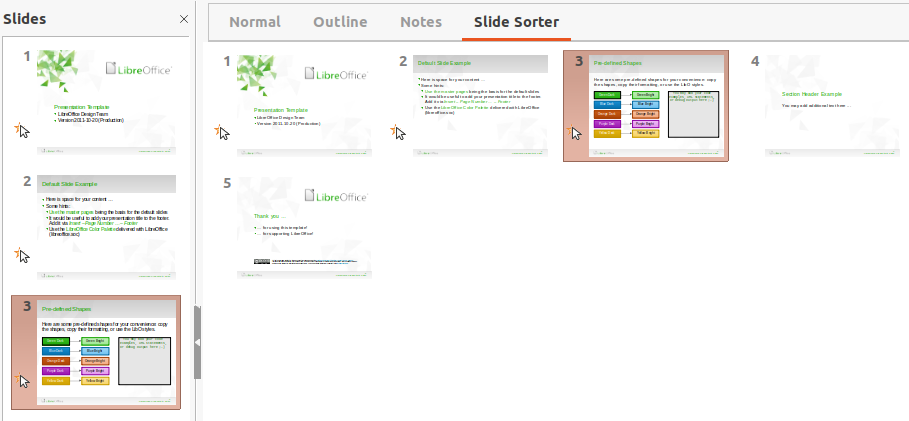
Slide Sorter view (Figure 9) contains all the thumbnails of slides used in a presentation. Use this view to work with one slide or a group of slides.
Figure 9: Example of Slide Sorter view in Workspace
To change the number of slides per row in Slide Sorter view:
1) Go to View > Toolbars > Slide View on the Menu bar to show the Slide View toolbar (Figure 10).
2) Adjust the number of slides, up to a maximum of 15, in the Slides per Row box.
Figure 10: Slide View toolbar

To change the slide order of one or a group of slides in a presentation using Slide Sorter view:
1) Select a slide or a group of slides.
2) Drag and drop the slide or group of slides at the location required.
To select a group of slides, use one of these methods:
Ctrl key – click on the first slide and, while holding the Ctrl key, select the other slides. The selected slides do not have to be next to each other.
Shift key – click on the first slide, and while holding the Shift key, select the final slide for the group. This selects all of the slides between the first and the last slide selected.
Mouse – position the cursor slightly outside the first slide, then click and hold the left mouse button and drag the cursor until all of the slides required for the group are selected.
Working with slides in Slide Sorter view is the same as working in the Slides pane. To make changes, right-click on a slide and choose an option in the context menu:
Cut – removes the selected slide and saves it to the clipboard.
Copy – copies the selected slide to the clipboard without removing it.
Paste – inserts a slide from the clipboard after the selected slide.
New Slide – adds a new slide after the selected slide.
Duplicate Slide – creates a duplicate of the selected slide and places the new slide immediately after the selected slide.
Rename Slide – renames the selected slide.
Hide Slide – any slides that are hidden are not shown in the slide show.
Delete Slide – deletes the selected slide.
Layout – allows changes to the layout of the selected slide.
Move – allows moving or repositioning the slide in the presentation order.
When you create a new presentation, Impress shows only one slide in the Slides pane and Workspace.
By default, Impress opens with the Select a Template dialog (Figure 1 on page 1) displayed where you can select a template to use in the presentation. To create a new presentation without using a template, click Cancel in the Select a Template dialog and a blank slide appears in the Workspace and Slides pane.
To insert a new slide into a presentation, use one of the following methods.
Go to Slide > New Slide on the Menu bar.
Right-click in the Slides pane and select New Slide in the context menu.
Use the keyboard shortcut Ctrl+M.
Go to Slide Sorter view in the Workspace, right-click on a slide and select New Slide in the context menu.
Click on New Slide in the Presentation toolbar (Figure 11). If the Presentation toolbar is not visible, go to View > Toolbars on the Menu bar and select Presentation in the drop-down list.
Figure 11: Presentation toolbar

Note
A new slide is inserted after the selected slide in the presentation. If a slide is not selected, then the new slide is inserted as the last slide in the presentation.
To duplicate a slide, select a slide for duplication in the Slides pane and use one of the following methods. A duplicate slide is inserted after the selected slide in the presentation.
Right-click on a slide in the Slides pane and select Duplicate Slide in the context menu.
Go to Slide Sorter view in the Workspace, right-click on a slide and select Duplicate Slide in the context menu.
Go to Slide > Duplicate Slide on the Menu bar.
Click on the Duplicate Slide icon on the Presentation toolbar.
By default in Impress, the Title Slide layout is used for the first slide when a new presentation is created. The layouts included in Impress range from a blank slide to a slide with six contents boxes and a title. You can use either a blank layout or one of the title layouts as a title slide. For more information on slide layouts ands slide contents, see the Impress Guide.
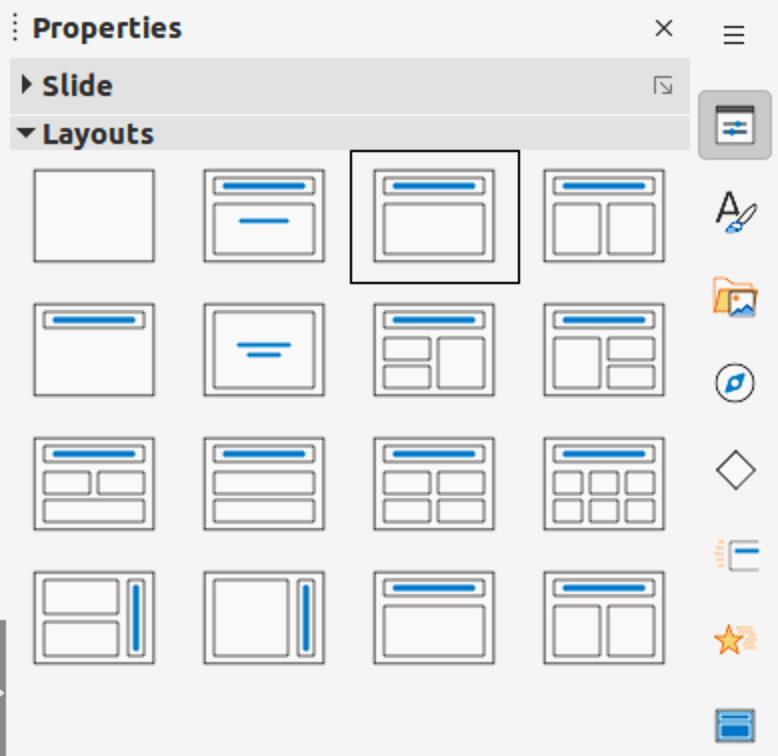
The available layouts are shown in the Layouts panel on the Properties deck on the Sidebar. After selecting a slide, you can select the slide layout using one of the following methods:
Go to the Properties deck on the Sidebar to open the Layouts panel (Figure 12).
Click on Slide Layout on the Presentation toolbar to open the Layouts panel on the Properties deck on the Sidebar.
Click on Slide > Layout on the Menu bar to open a drop-down list showing the layouts by name.
Right-click on the selected slide and select Layouts in the context menu.
Figure 12: Layouts panel in Properties deck on Sidebar
Tip
To view the names for slide layouts, position the cursor on a layout in the Layouts panel on the Properties deck on the Sidebar; its name is displayed in a tooltip.
Change the slide layout for a slide in a presentation as follows:
1) Select a slide in the presentation.
2) Select a new layout for the slide using one of the methods described in “Slide layout” on page 1.
Note
Text and graphic elements can be readjusted at any time during the preparation of a presentation, but changing the layout of a slide that already has contents can have a dramatic effect. It is recommended to pay particular attention to the layout being selected before making a selection. If the layout is changed after contents have been added, the contents are not lost, but they may need to be reformatted.
When a slide is inserted into a presentation, it contains elements that were included in the selected slide layout. However, it is unlikely that predefined layouts will suit all requirements for a presentation. You may want to remove elements that are not required or add objects such as text or graphics.
Impress does not have functionality to create custom layouts. However, different elements can be resized and moved in a slide layout to suit the requirements for a slide layout. It is also possible to add slide elements without being limited to the size and position of content boxes.
Note
It is recommended that changes to slide elements in the layouts included in Impress are only made using Normal view, which is the default. Attempting any changes to a slide element when in Master view is possible, but may produce unpredictable results and requires extra care as well as a certain amount of trial and error.
1) Click on the outer frame of the contents box so that the selection handles are displayed.
2) Place the mouse cursor on the frame so the cursor changes shape. This is normally a clenched hand, but depends on the computer setup.
3) Click the left mouse button and drag the contents box to its new position on the slide, then release the mouse button.
1) Click on the outer frame of the contents box so that the selection handles are displayed.
2) Place the mouse cursor on a selection handle of the frame so the cursor changes shape.
3) Click the left mouse button and drag the selection handle on the frame to resize the contents box, then release the mouse button.
Top and bottom selection handles change the height of a contents box.
Left and right selection handles change the width of a contents box.
Corner selection handles change width and height of a contents box.
1) Click a contents box or an element to highlight it and the selection handles are displayed.
2) Press the Delete or Backspace key to remove the contents box or element.
To add text to a slide that contains a text frame, click on Click to add text in the text frame and type the text required. Impress outline styles are automatically applied to the text as it is inserted. You can change outline level of each paragraph as well as its position within the text by using the arrow buttons on the Outline toolbar (see “Outline view” on page 1), or position the cursor at the beginning of a paragraph and press the Tab key. For more information, see “Adding and formatting text” on page 1 and the Impress Guide.
To add images or objects to a slide, for example a picture, clipart, drawing, photograph, or spreadsheet, click on Insert on the Menu bar and select in the drop-down menu the image or object type required. See “Inserting images, tables, charts, or media” on page 1 and the Impress Guide.
To change the background and other characteristics of all slides in the presentation, you need to modify the master slide or choose a different master slide, as explained in “Working with master slides” on page 1.
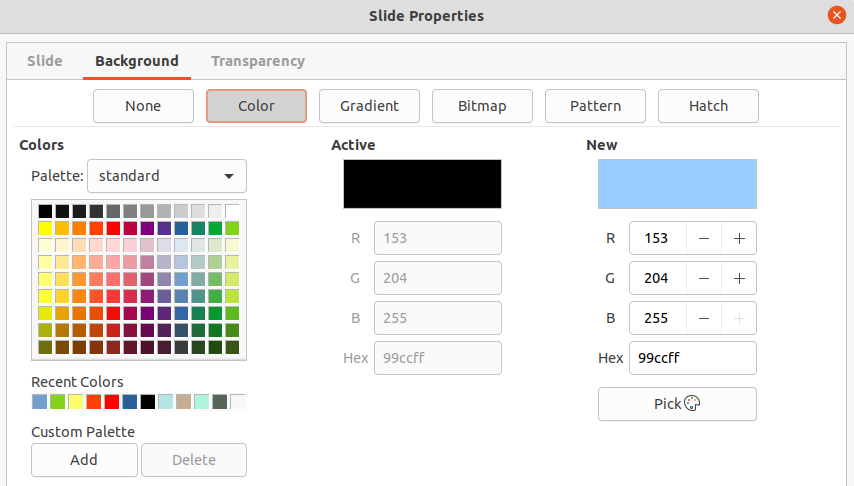
Figure 13: Slide Properties dialog - Background page
A master slide has a specified set of characteristics that acts as a template and is used as the starting point for creating other slides. These characteristics include slide background, objects in the background, formatting of any text used, and any background graphics.
Impress has a range of master slides, which are found in the Master Slides deck on the Sidebar. You can also create and save additional master slides or import more from other sources. See the Impress Guide for more information.
To change only a slide background, you can use a shortcut:
1) Select a slide in Normal or Slide Sorter view on the Workspace.
2) Go to Slide > Slide Properties on the Menu bar to open the Slide Properties dialog (Figure 13).
3) Click on the Background tab.
4) Select the desired background from Color, Gradient, Bitmap, Pattern, or Hatch.
5) Click OK to save the change and close the dialog.
For more information on inserting, formatting, and changing a background, see the Impress Guide or Draw Guide.
Most of the slides in a presentation are likely to contain some text. This section gives some guidelines on how to add text and change its appearance. Text used in slides is contained in text boxes. For more information on adding and formatting text, see the Impress Guide.
Two types of text boxes (AutoLayout text box and text box) are available in Impress for use on slides. Both types of text boxes can be moved, resized, and deleted.
Choose a predefined layout from the Layouts panel on the Properties deck on the Sidebar and do not select any special content type. These text boxes are called AutoLayout text boxes.
Use the Insert Text Box tool on the Standard toolbar, Drawing toolbar, or Text toolbar (Figure 14) to create text boxes on a slide.
Use the keyboard shortcut F2 to create text boxes on a slide (Windows and Linux only).
When adding and formatting text, the Text Formatting toolbar (Figure 15) normally opens, automatically providing a range of tools to add and format text.
Figure 14: Text toolbar

Figure 15: Text Formatting toolbar

Note
If the toolbars are not visible, go to View > Toolbars on the Menu bar and select the required toolbars in the drop-down list.
1) Make sure Normal view is selected in the Workspace.
2) Select the slide where text is to be added into an AutoLayout text box.
3) Click in the AutoLayout text box and start typing the text. An AutoLayout text box is indicated by the text Click to add Title or Click to add text.
1) Make sure Normal view is selected in the Workspace.
2) Select the slide where the text is to be added.
3) On the selected slide, create a text box in edit mode using one of the following methods:
Insert Text Box (Windows, Linux and macOS): select Insert Text Box, click on the slide and then type or paste the text to create a single line text box. The width of a single line text box increases as text is added.
Keyboard shortcut F2 (Windows and Linux only): press F2, click on the slide and then type or paste the text to create a single line text box.
Insert Text Box, or keyboard shortcut F2 (Windows, Linux and macOS): click on the slide and drag to the approximate width required for the text box, then type or paste the text to create a multiple line text box. The width of the text box is fixed and the height of the text box increases automatically as text is added creating multiple lines.
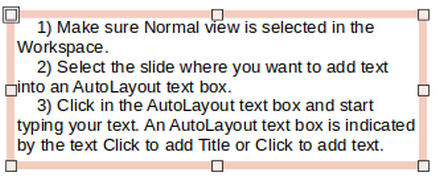
4) Release the mouse button and the cursor appears in the text box, which is now in edit mode and indicated by a colored border (Figure 16). The width and final position of the text box can be adjusted after adding text into the text box.
5) Click outside the text box to deselect it.
Figure 16: Example of a text box in edit mode
Note
You can create multiple lines of text in a single-line text box by pressing Enter to create a new paragraph, or use Shift+Enter to create a line break in the text.
In addition to normal text boxes where text is horizontally aligned, it is possible to insert text boxes where the text is vertically aligned. Vertical text is available only when Asian languages are enabled in Tools > Options > Language Settings > Languages.
Creating vertical text boxes is similar to creating horizontal text boxes. Use the Insert Vertical Text tool on the Standard, Drawing, or Text toolbars to create a vertical text box with single or multiple lines. The height of the text box is fixed and the width of a vertical text box increases automatically as text is added to a multi-line text box.
You can quickly increase or decrease the font size of selected text by using the tools Increase Font Size (Ctrl+]) and Decrease Font Size (Ctrl+[) on the Text Formatting toolbar. The amount by which the font size changes depends on the standard sizes available for the font in use.
Note
AutoLayout text boxes automatically adjust font size of any text inserted into the AutoLayout text box. For example, if a long piece of text is inserted into an AutoLayout text box, the font size may decrease in size to fit into the box.
You can add text to an AutoLayout or normal text box by copying it from another document and pasting it into Impress. However, the formatting of the pasted text will probably not match the formatting of the surrounding text or that of the other slides in the presentation. This may be what you want on some occasions. However, to make sure that the presentation style is consistent and does not become a patchwork of different styles, font types, bullet points, and so on, you should format the text to match the rest of the presentation.
It is good practice to paste text without formatting and apply the formatting later.
1) Highlight and copy the text from another document or slide.
2) Create a text box on a slide and make sure the text cursor is flashing in the text box. See “Text boxes” on page 1 and the Impress Guide for more information.
Alternatively, select an AutoLayout text box on your slide. See “AutoLayout text boxes” on page 1 and the Impress Guide for more information.
3) Paste unformatted text into the text box using one of the following methods:
Go to Edit > Paste Special > Paste Unformatted Text on the Menu bar.
Click on the small triangle ▼to the right of the Paste tool on the Standard toolbar and select Unformatted Text in the context menu.
Use the keyboard shortcut Ctrl+Shift+V and select Unformatted text on the dialog that opens.
Text is pasted at the cursor position in the text box formatted using the Default Drawing Style or Presentation Style if text was pasted into an AutoLayout text box.
4) Format the text to the presentation requirements using the tools on the Text Formatting toolbar or the options in Format on the Menu bar.
Note
The Presentation style used in AutoLayout text boxes cannot be changed by selecting another presentation style. Make sure the AutoLayout text box uses the presentation style required. Change outline levels and outline styles using the Tab key or Shift+Tab key combination. See the Impress Guide for more information.
If you are pasting text into an AutoLayout text box, you need to apply the appropriate outline style to the text to give it the same look and feel as the rest of the presentation.
1) Highlight and copy the text from another document or slide.
2) Paste formatted text into the AutoLayout text box.
3) Select the pasted text.
4) Select Format > Clear Direct Formatting on the Menu bar to make sure any formatting is removed from the pasted text.
5) Use the four arrow buttons on the Outline toolbar to move the text to the appropriate position and give it the appropriate outline level.
Left arrow promotes a list entry by one level (for example from Outline 3 to Outline 2). You can get the same result by placing the cursor at the beginning of the paragraph and pressing the Shift+Tab keys.
Right arrow demotes a list entry by one level. You can get the same result by placing the cursor at the beginning of the paragraph and pressing the Tab key.
Up arrow moves a list entry up in the list order.
Down arrow moves a list entry down in the list order.
6) If necessary, modify the presentation style to format the text to the presentation requirements to change font attributes, tabs, and so on. See the Impress Guide for more information. Alternatively, apply any necessary manual or direct formatting to the text.
Pasting formatted text into a text box overwrites any formatting and replaces the text box style.
1) Highlight and copy the text from another document or slide.
2) If necessary, create a text box on a slide and make sure the text cursor is flashing in the text box. See “Text boxes” on page 1 and the Impress Guide for more information.
3) Paste formatted text into the text box. Text is pasted at the cursor position in the text box and the text formatting of the pasted text overwrites any style formatting of the text box.
4) Select Format > Clear Direct Formatting on the Menu bar to make sure any formatting is removed from the pasted text.
5) Select the required drawing style to format the text from the available drawing styles.
6) If necessary, modify a drawing style or create a new drawing style to format the text to the presentation requirements. See the Impress Guide for more information.
Note
You can create drawing styles in Impress. These drawing styles are only available for the Impress presentation in which you have created and saved them. You can also create templates that include any drawing styles required. For more information, see the Impress Guide.
The procedure to create a bulleted or numbered list is slightly different depending on the type of text box used, although the tools to manage the list and customize the appearance are the same.
In AutoLayout text boxes, the outline styles use bulleted lists.
For normal text boxes, an additional step is required to create a bulleted list.
In both cases, you can create numbered lists or change bulleted lists to numbered lists. Methods for changing the appearance of a list are explained in “Changing list appearance” on page 1.
In AutoLayout text boxes, the outline styles available are formatted as bulleted lists. An example of these outline styles is shown in Figure 17. These outline styles are presentation styles and cannot be deleted, but they can be modified or updated to the presentation requirements. See the Impress Guide for more information.
Figure 17: Example of outline bulleted lists
Create a slide using an AutoLayout text box with a bulleted list as follows:
1) Go to View > Normal on the Menu bar to open Normal view.
2) Select a layout for the slide using one of the following methods:
Right-click in a blank area on the slide and select a layout in the context menu.
Go to Slide > Layout on the Menu bar and select a layout in the drop-down list.
Select a layout in the Layouts panel on the Properties deck on the Sidebar.
3) Click on the text ● Click to add Text and start typing the first list item.
4) Press Enter when finished typing and the first list point is created as a new list point.
Tip
Use the keyboard combination Shift+Enter to start a new line without creating a new list point. This new line has the same indentation as the text in the list point. To switch off bullets altogether, click on Toggle Bulleted List on the Text Formatting toolbar (Figure 15 on page 1).
In AutoLayout text boxes, change the outline level as follows:
1) To demote the outline level of a list point, use one of the following methods:
Press the Tab key.
Click on Demote on the Outline toolbar.
Click on Demote in the Lists panel on the Properties deck on the Sidebar.
Go to Format > Lists on the Menu bar and select Demote in the submenu.
2) To promote the outline level of a list point, use one of the following methods:
Use the keyboard shortcut Shift+Tab.
Click on Promote on the Outline toolbar.
Click on Promote in the Lists panel on the Properties deck on the Sidebar.
Go to Format > Lists on the Menu bar and select Promote in the submenu.
3) To move a list point lower or higher in the list order without changing the outline level, use one of the following methods:
Click on Move Down or Move Up on the Outline toolbar.
Click on Move Down in the Lists panel on the Properties deck on the Sidebar.
Go to Format > Lists on the Menu bar and select Move Down or Move Up in the submenu.
Note
In AutoLayout text boxes, promoting or demoting an item in the list corresponds to applying a different outline style. The second outline level corresponds to Outline 2 style, the third outline level to Outline 3 style, and so on. A change in level and style produces other changes, for example, to font size, bullet type, and so on.
Create a bulleted (unordered) or numbered (ordered) list in a text box as follows:
1) Create a text box on a slide and make sure the cursor is flashing in the text box. See “Text boxes” on page 1 on how to create a text box.
2) Create a list using one of the following methods:
Click on Toggle Unordered List or Toggle Ordered List in the Text Formatting toolbar.
Click on Toggle Unordered List or Toggle Ordered List in the Lists panel on the Properties deck on the Sidebar.
Go to Format > Lists on the Menu bar and select Unordered List or Ordered List in the submenu.
3) Type the text and press Enter to start a new list point or use the keyboard combination Shift+Enter to start a new line without creating a new list point. The new line will have the same indentation as the list point.
4) To increase or decrease the indent level of a list point, or move a list point up or down, see “Changing outline level” on page 1.
The list appearance can be changed for a bullet or numbered type for the entire list or for only a single point.
1) Select a single point in a list, or select the entire list or click on the border of the text box so that the resizing handles are displayed to select the entire list.
2) Change the list type from bullet to number, or number to bullet as described in “Text boxes” above.
3) If required, change the type of bullet or number used for the list:
a) Click on the small triangle ▼ to the right of the Toggle Unordered List or Toggle Ordered List on the Text Formatting toolbar or the Lists panel on the Properties deck on the Sidebar.
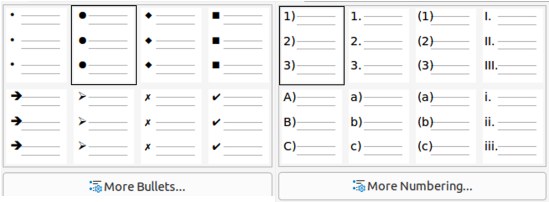
b) Select a bullet or number type from the options available in the drop-down window as shown in Figure 18.
c) If necessary, click on More Bullets or More Numbering in the drop-down window to open the Bullets and Numbering dialog for further options to change the list appearance. See the Impress Guide for more information.
Figure 18: Bullets and Numbering list options
Note
The Bullets and Numbering dialog can also be opened by going to Format > Bullets and Numbering on the Menu bar, or by right-clicking on a list point and selecting Bullets and Numbering in the context menu.
Note
If the list was created in an AutoLayout text box, then an alternative way to change the list appearance is to modify the Outline styles. Changes made to an Outline style apply to all the slides that use that style. For details, see the Impress Guide.
A contents box on a slide can contain images, tables, charts, or media as well as text. The Insert toolbar (Figure 19) provides quick access to relevant tools. This section provides an overview of how to work with these objects. For more information, see the Impress Guide.
1) Open the slide in Normal view on the Workspace where you want to insert an image.
2) Open the Insert Image file browser using one of the following methods:
Go to Insert > Image on the Menu bar.
Click on Insert Image on the Insert toolbar (Figure 19).
Click on Insert Image on the Standard toolbar.
Figure 19: Insert toolbar

3) Navigate to the location of the file and select the image file required.
4) Click Open to place the image in the center of the slide.
5) Reposition and resize the image to the presentation requirements.
When a table is inserted into a slide, the Table toolbar (Figure 20) automatically opens. In Impress, this toolbar offers the same functions as the Table toolbar in Writer, with the exception of the calculation functions Sort and Sum. To use Sum and Sort in a presentation, you have to insert a Calc spreadsheet.
Entering data into table cells is similar to working with text box objects. Click in a cell and begin typing. To move around cells quickly, use the following keyboard options:
Use the arrow keys to move the cursor to another cell if the cell is empty, or to the next character if the cell already contains text.
Press the Tab key to move to the next cell on the right and press Shift+Tab to move to the next cell on the left.
1) Open the slide in Normal view on the Workspace where you want to insert a table.
2) Go to Insert > Table on the Menu bar to open the Insert Table dialog (Figure 21).
3) Select the Number of columns and the Number of rows required for the table.
4) Click OK to place the table in the center of the slide and close the Insert Table dialog.
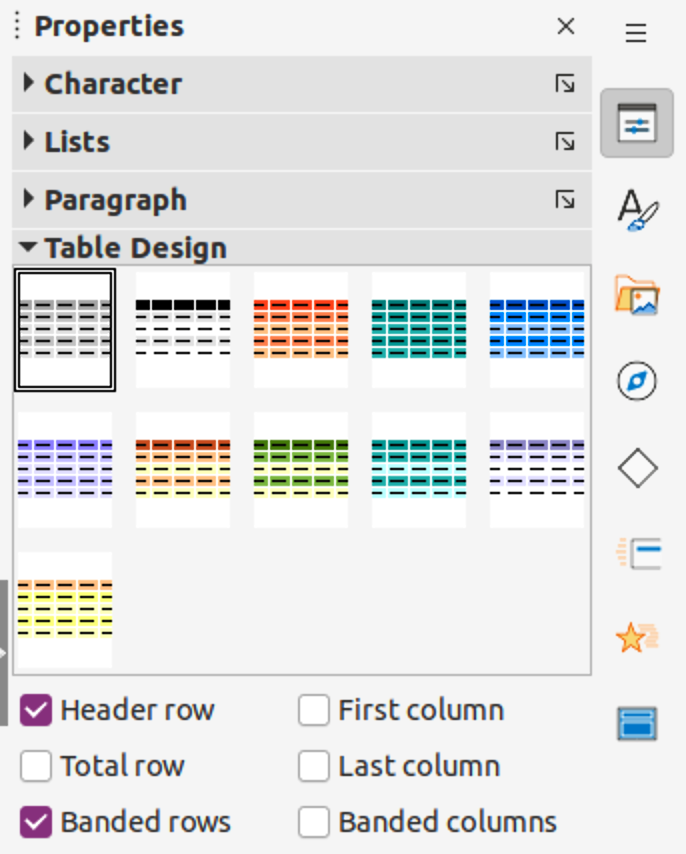
5) The Table Design panel on the Properties deck on the Sidebar opens (Figure 22). Select a table design, the type of rows, and the type of columns required.
6) If necessary, reposition and format the table on the slide to the presentation requirements.
Figure 20: Table toolbar

Figure 21: Insert Table dialog
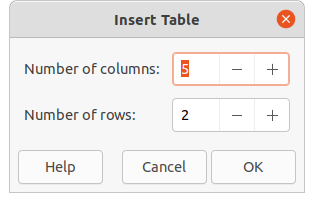
Figure 22: Table Design panel in Properties deck on Sidebar
1) Open the slide in Normal view on the Workspace.
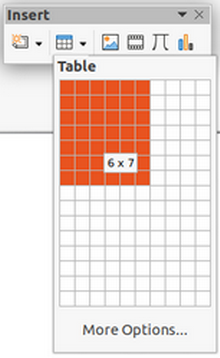
2) Click on Table on the Insert toolbar or the Standard toolbar to open the Insert Table grid (Figure 23).
3) Click and drag the cursor to create the number of columns and rows required.
4) Click the mouse button to place the table in the center of the slide and the Insert Table grid closes.
Figure 23: Insert table grid
5) The Table Design panel on the Properties deck on the Sidebar opens (Figure 22). Select a table design, the type of rows, and the type of columns from the options available.
6) If necessary, reposition and format the table on the slide to the presentation requirements.
Note
Select More Options at the bottom of the Insert Table grid (Figure 23) to open the Insert Table dialog (Figure 21) where you can select the number of rows and columns required.
To insert a chart into a selected slide in Normal view on the Workspace, do one of the following:
Go to Insert > Chart on the Menu bar.
Click on Insert Chart on the Insert toolbar.
Click on Insert Chart on the Standard toolbar.
Figure 24: Formatting toolbar

Figure 25: Chart Type panel in the Properties deck on the Sidebar
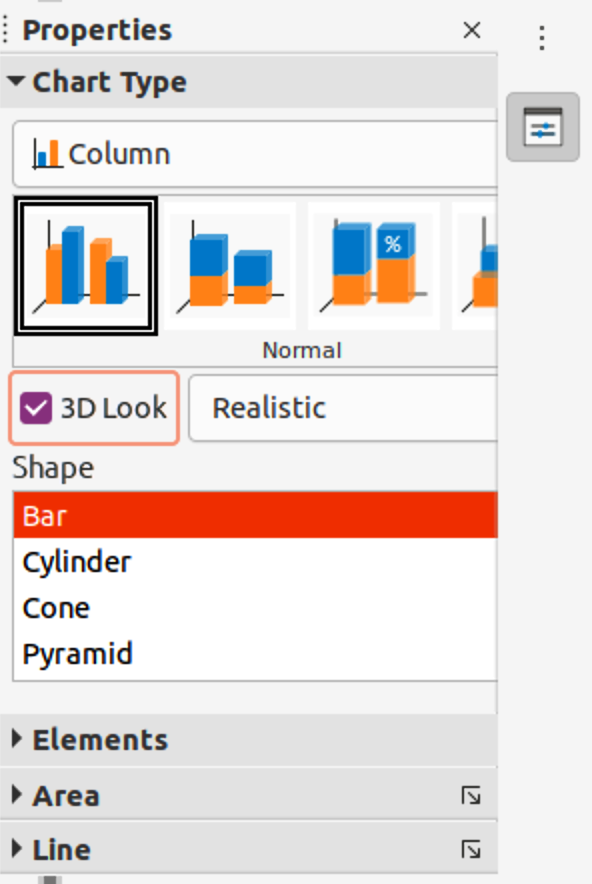
Impress switches to chart view, the Formatting toolbar (Figure 24) automatically opens, and the Chart Type panel on the Properties deck on the Sidebar opens (Figure 25). To change the chart type, insert the required data, and change the formatting, see the Impress Guide and the Calc Guide.
1) Go to Insert > Audio or Video on the Menu bar, or click on Insert Audio or Video on the Insert toolbar (Figure 19 on page 1) and the Insert Audio or Video file browser opens.
2) Navigate to the folder where the file is located and select the audio or video file you want to insert onto a slide. Only the audio and video files that are compatible with Impress will be highlighted in the file browser.
3) Click Open to place the audio or video file in the center of the slide. The Media Playback toolbar opens while the audio or video file is selected.
4) Reposition and/or resize the audio or video file. See the Impress Guide for more information.
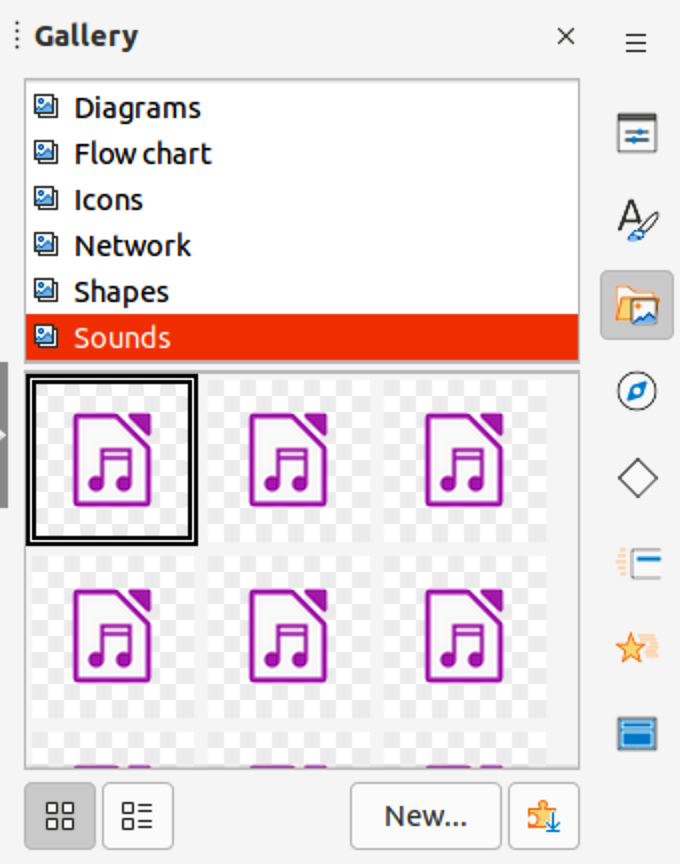
1) If the Gallery deck (Figure 26) is not already open, use one of the following methods:
Go to View > Sidebar on the Menu bar to open the Sidebar, then select Gallery.
Go to View > Gallery on the Menu bar.
2) Browse to a category containing media files, for example Sounds.
3) Click on the audio or video file required and drag it onto the slide. The Media Playback toolbar automatically opens.
4) Reposition and/or resize the audio or video file. See the Impress Guide for more information.
Figure 26: Gallery deck on Sidebar
Graphics, such as shapes, callouts, and arrows, are often useful to complement the text on a slide. These objects are handled much the same way as graphics in Draw. For more information on inserting graphics, see Chapter 7, Getting Started with Draw in this guide, the Impress Guide, or the Draw Guide.
Spreadsheets embedded in Impress include most of the functionality of Calc spreadsheets and are capable of performing complex calculations and data analysis. If you need to analyze the data or apply formulas, these operations are best performed in a Calc spreadsheet and the results displayed in an embedded Calc spreadsheet or in an Impress table. For more information on spreadsheets, see the Impress Guide and the Calc Guide.
Object Linking and Embedding (OLE) is a software technology that allows linking and embedding of spreadsheets, charts, drawings, formulas, and text files into an Impress presentation.
The major benefit of using OLE objects is that it provides a quick and easy method of editing the object using tools from the software used to create the object. These file types can all be created using LibreOffice and OLE objects can be created from new or from an existing file.
When you insert a new OLE object into a presentation, it is only available in that presentation and can only be edited using Impress. For more information on inserting and formatting OLE objects, see the Impress Guide.
A master slide is a slide that is used as the starting point for other slides. It is similar to a page style in LibreOffice Writer as it controls the basic formatting of all slides based on it. A presentation can have more than one master slide.
A master slide has a defined set of characteristics, including the background color, graphic, or gradient. It also can include objects (for example, logos, decorative lines) in the background; headers and footers; placement and size of text frames; and text formatting.
All of the characteristics of master slides are controlled by styles. The styles of any new slide created are inherited from the master slide from which it was created. In other words, the styles of the master slide are available and applied to all slides created from that master slide. Changing a style in a master slide results in changes to all the slides based on that master slide. It is possible to modify each individual slide without affecting the master slide.
Master slides have two types of styles: presentation styles and drawing styles. The presentation styles included with Impress can be modified, but new presentation styles cannot be created or deleted. The drawing styles included with Impress can be modified, but cannot be deleted. However, new drawing styles can be created and these drawing styles can be deleted.
Note
It is highly recommended to use the master slides whenever possible. However, there are occasions where manual changes are needed for a particular slide, for example editing an individual slide to enlarge the chart area when the text and chart layout is used.
Figure 27: Master Slides deck on Sidebar
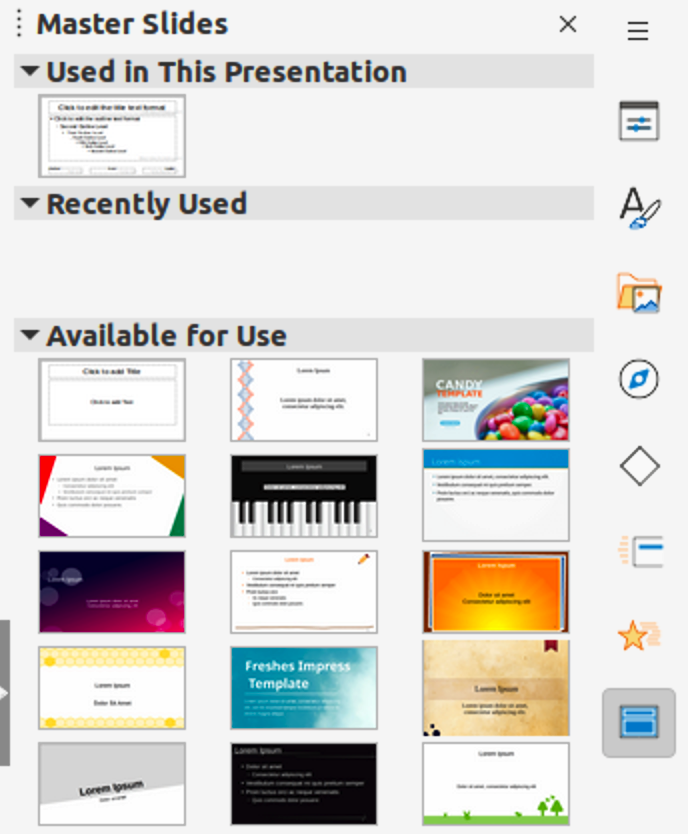
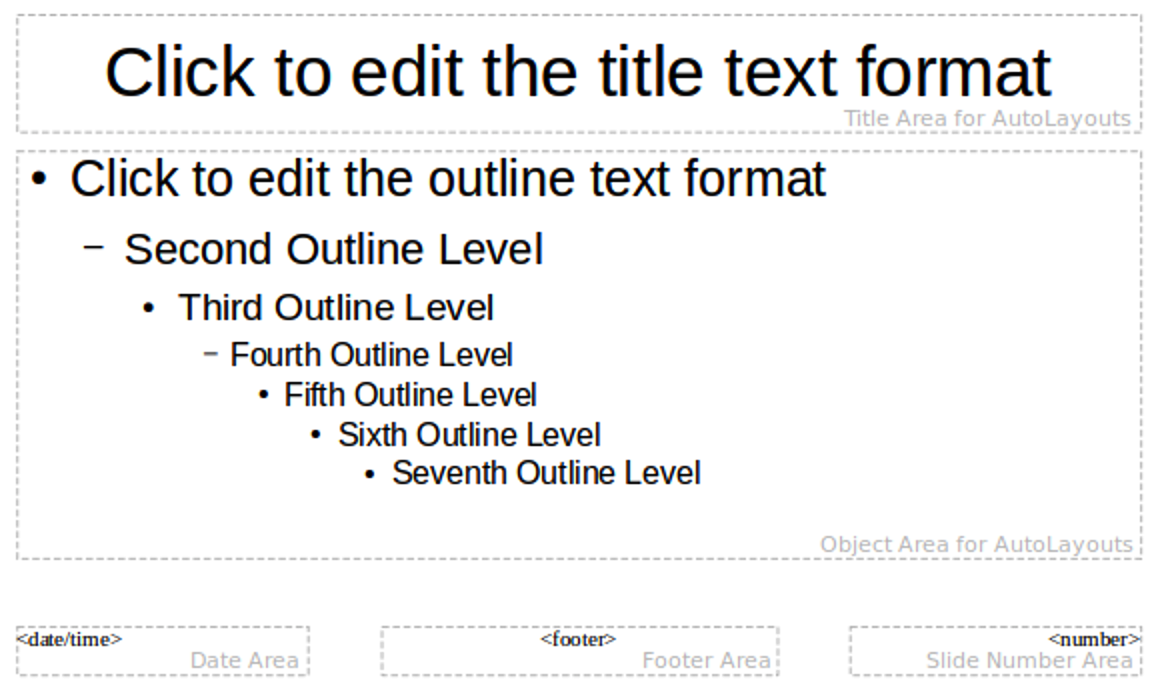
Figure 28: Default master slide
Impress comes with a collection of master slides, which are are shown on the Master Slides deck of the Sidebar (Figure 27).
This deck has three panels: Used in This Presentation, Recently Used, and Available for Use. Click the expand marker on the title bar of a panel to expand it and show thumbnails of the master slides, or click the collapse marker to collapse the panel to hide the thumbnails.
Each of the master slides shown in the Available for Use panel is from a template of the same name. These presentation templates are included when LibreOffice is installed on a computer. If you have created your own templates or added templates from other sources, master slides from those templates also appear in this list.
If a new presentation is created without using one of the templates available, then a default master slide is available. This default master slide is a good starting point for creating master slides. An example of the default master slide is shown in Figure 28.
Figure 29: Master View toolbar

1) Go to View > Master Slide on the Menu bar to open Master view in the Workspace. The Master View toolbar also opens (Figure 29). If the Master View toolbar does not open, go to View > Toolbars on the Menu bar and select Master View.
2) Create a new master slide using one of the following methods. The new master slide appears in the Slides pane:
Click on New Master in the Master View toolbar.
Right-click on a master slide in the Slides pane and select New Master in the context menu.
Go to Slide > New Master on the Menu bar.
3) Rename the new master slide using one of the following methods to open the Rename Slide dialog:
Click on Rename Master on the Master View toolbar.
Right-click on the new master slide in the Slides Pane and select Rename Master in the context menu.
4) Enter a memorable name for the new master slide, then click OK to save the changes and close the dialog.
5) Make sure the new master slide is selected in the Slides pane and add all the text, graphics and master elements that are required. For more information on adding, editing, formatting and managing the different types of objects on a master slide, see the Impress Guide.
6) When you have finished creating a new master slide, use one of the following methods to return to Normal view:
Click Close Master View on the Master View toolbar.
Go to View > Normal on the Menu bar.
7) Save the presentation file before continuing.
To apply a master slide to all slides or selected slides in a presentation:
1) Click on Master Slides on the right of the Sidebar to open the Master Slides deck.
2) Right-click on the required master slide in the Used in This Presentation panel.
3) Select Apply to All Slides or Apply to Selected Slides in the context menu.
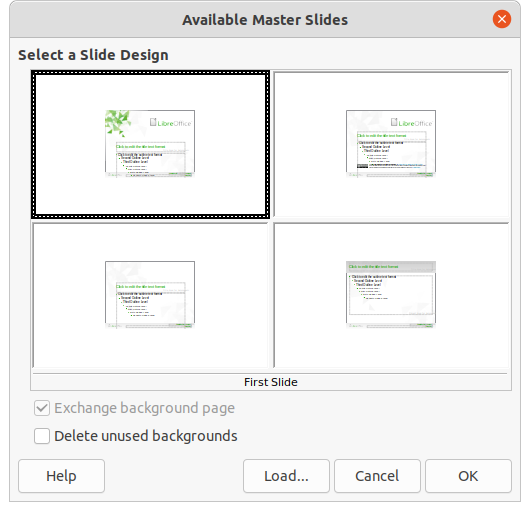
Figure 30: Available Master Slides dialog
In a presentation, it may be necessary to mix multiple master slides that belong to different templates (for more information on templates, see the Impress Guide). For example, you may want a completely different layout for the first slide of the presentation, or want to add a slide from a different presentation to the current presentation.
1) Select the slide or slides on the Slides pane where the master slide is to be changed.
2) Go to Slide > Change Slide Master on the Menu bar to open the Available Master Slides dialog (Figure 30).
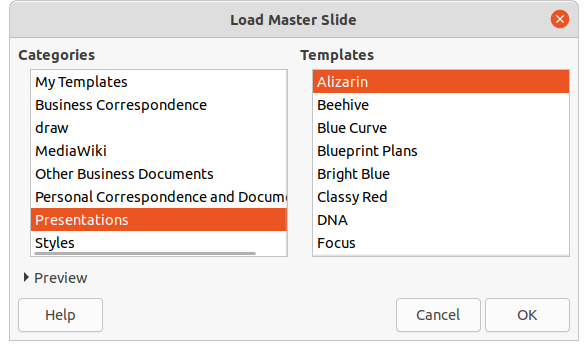
3) To add master slides, click on Load to open the Load Master Slide dialog (Figure 31).
4) In the Load Master Slide dialog, select the template category and the template from which to load the master slide
5) Click OK to close the Load Master Slide dialog and the master slides from the selected template appear in the Available Master Slides dialog.
6) In the Available Master Slides dialog, select the master slide required in the Select a Slide Design box.
7) To apply the selected master slide to all slides in the presentation, select the Exchange background page check box. To apply the slide design to the selected slides only, deselect the Exchange background page check box.
8) Click OK to apply the selection to the slides and close the dialog.
Note
The master slides in the template selected are now shown in the Available for use panel on the Master Slides deck on the Sidebar.
Figure 31: Load Master Slide dialog
The following items can be changed on a master slide. For more information, see the Impress Guide:
Background (color, gradient, hatching, or bitmap).
Background objects (for example, adding a logo or decorative graphics).
Text attributes for the main text area and notes.
Size, placement, and contents of header and footer elements to appear on every slide.
Size and placement of default frames for slide titles and content.
To modify a master slide, follow these steps:
1) Select View > Master Slide from the Menu bar. This also opens the Master View toolbar.
2) Select a master slide for editing in the Slides pane so that it appears in the Workspace.
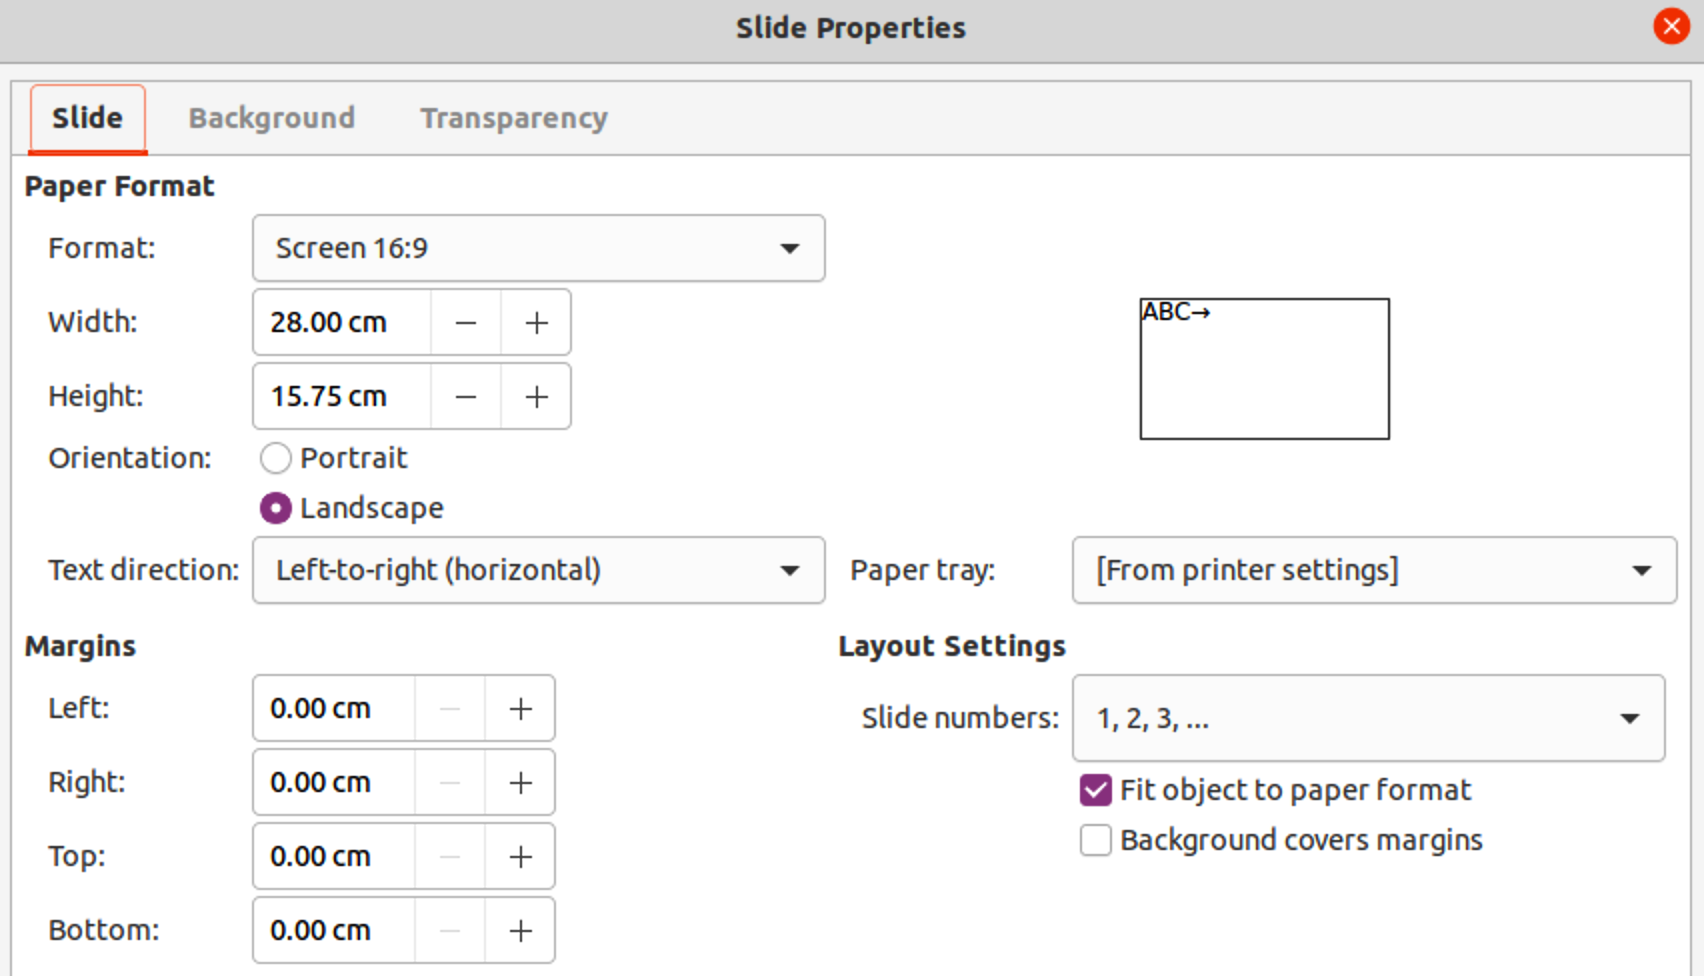
3) Go to Slide > Slide Properties on the Menu bar or right-click in the Workspace and select Slide Properties in the context menu to open the Slide Setup dialog (Figure 32).
4) Use the various options in the Slide, Background, and Transparency pages in the Slide Setup dialog to make changes to the format of the master slide.
5) Click OK to save the changes and close the Slide Setup dialog.
6) Select an object on the master slide, then right-click on the object to open a context menu.
7) Select one of the options in the context menu to edit the object. Selecting an option may open another context menu, a dialog, an application or file browser window to make the necessary changes to the selected object.
Figure 32: Slide Properties dialog - Slide page
8) Click Close Master View on the Master View toolbar or go to View > Normal on the Menu bar to exit from editing master slides.
9) Save the presentation file before continuing.
Note
Any changes made to one slide when in Master Slide mode appears on all slides using this master slide. Always make sure to close Master Slide and return to Normal view before working on any of the presentation slides.
Note
The changes made to an element on a slide in Normal view is not overridden by subsequent changes to the master slide. There are cases, however, where it is desirable to change a manually modified element of a slide to the style defined in the master slide. To change to default formatting, select the element and select Format > Clear Direct Formatting on the Menu bar.
Text, footers, or fields can be added to a master slide so those elements appear on every slide in a presentation. Headers are not normally added to slides.
1) Go to View > Master Slide on the Menu bar to open Master View.
2) Insert a text box on the master slide, see “Text boxes” on page 1 for more information.
3) Type or paste the text into the text box.
4) Click outside the text box when finished adding text.
5) Go to View > Normal on the Menu bar or click Close Master View on the Master View toolbar when finished.
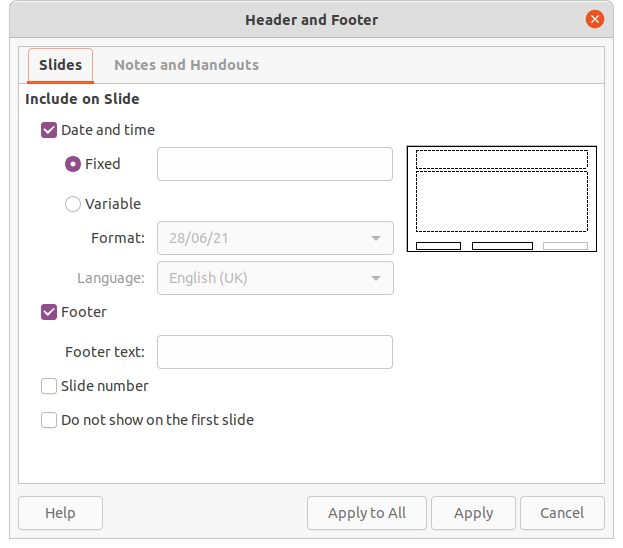
Figure 33: Header and Footer dialog - Slides page
By default, a slide footer consists of three sections, each containing a default field:
Left section – date and time, labelled Date Area. Field name is <date/time>.
Center section – footer text, labelled Footer Area. Field name is <footer>. This section could be the presentation title, file name, or other information.
Right section – slide number, labelled Slide Number Area. Field name is <number>.
The default footer fields are set up as follows using the Header and Footer dialog (Figure 33):
1) Go to View > Master Slide on the Menu bar to open Master View.
2) Go to Insert > Header and Footer on the Menu bar to open the Header and Footer dialog.
3) Click on the Slides tab to open the options available for inserting footers onto a slide.
4) Select Date and Time for the date and time to appear in the left section of the footer.
For a fixed date and time, select Fixed and enter the date required in the Fixed text box.
For a variable date and time, select Variable, then select the format and language from the Format and Language drop-down lists. Using a variable date and time means that each time the presentation is opened, the date and time are updated.
5) To place text in the footer center section, select Footer and then type or paste the text into the Footer text input field.
6) To place the slide number in the right section of the footer, select Slide number.
7) If the footer is not going to appear on the first slide of a presentation, select Do not show on the first slide. The first slide is normally the title slide of a presentation.
8) Click Apply to save the changes and close the Header and Footer dialog.
9) To format the text used for the default footer fields, see the Impress Guide.
10) Click Close Master View on the Master View toolbar or go to View > Normal on the Menu bar when setting up the default footer fields is completed.
Note
The default sections in a footer can be formatted, resized, and repositioned. See “Adding and formatting text” on page 1 for more information.
The default fields in a footer section can be replaced with text or manual fields as follows:
1) Go to View > Master Slide on the Menu bar to open the master slide view.
2) Highlight the default field in the footer section and press the Delete or Backspace key. A flashing text cursor will appear in the footer section and the Text Formatting toolbar automatically opens replacing the Line and Filling toolbar.
3) Type in the required text or insert a manual field into the footer section. For more information, see “Manual fields” on page 1.
4) Format the text or manual field placed in the footer section. See “Adding and formatting text” on page 1 and the Impress Guide or more information.
5) Click outside the footer section to close the Text Formatting toolbar and reopen the Line and Filling toolbar.
6) Click Close Master View on the Master View toolbar or go to View > Normal on the Menu bar when setting up a custom footer section is completed.
Manual fields can be added as text objects on a master slide or replace one of the default footer fields. The fields you can use in a slide are as follows:
Date (fixed)
Date (variable) – updates automatically each time the presentation is opened.
Time (fixed)
Time (variable) – updates automatically each time the presentation is opened and each time a slide is opened more than once during a presentation.
Author – first and last names listed in the LibreOffice user data.
Slide number – the sequence number of the slide, without the word “Slide”.
Slide Title – defaults to Slide 1, Slide 2, and so on if the slides have not been renamed.
Slide Count – the number of slides in the presentation.
File Name
Tip
To change the author information, go to Tools > Options > LibreOffice > User Data on the Menu bar.
Impress supports comments similar to those in Writer and Calc. For more about adding, navigating, and replying to comments, see Chapter 4, Getting Started with Writer.
Before using comments, make sure that your name and initials are entered into Tools > Options > LibreOffice > User Data. The name and initials then appear in the comment marker and in the Author field of the comment. If more than one person edits the document, each person is automatically allocated a different background color.
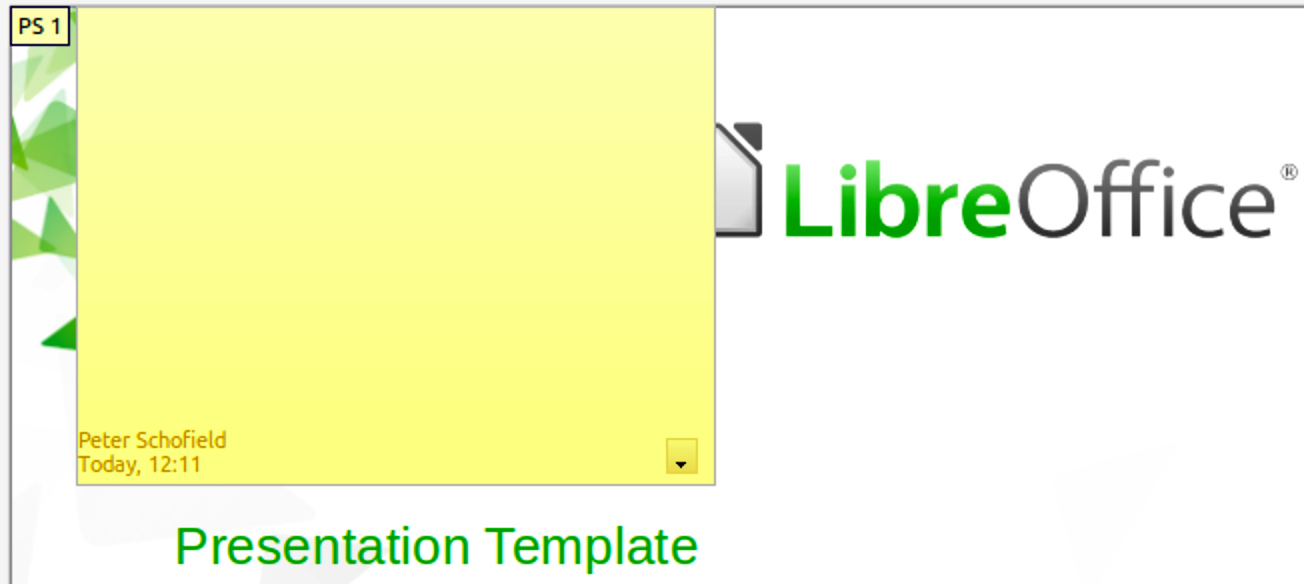
1) In Normal View, go to Insert > Comment on the Menu bar or use the keyboard shortcut Ctrl+Alt+C to open a blank comment (Figure 34).
A small box containing your initials appears in the upper left-hand corner of the slide, with a larger text box beside it. Impress automatically adds your name and the current date at the bottom of the text box.
2) Type or paste your comment into the text box.
3) Move the small comment markers to the required position on the slide. Normally, this is on or near the text or object being referred to in the comment.
4) To show or hide the comment markers, choose View > Comments on the Menu bar.
5) Select Tools > Options > LibreOffice > User Data to configure the name and initials that appear in comments.
Figure 34: Adding a comment
Handouts are used for distributing copies of presentation slides to each member of the audience. Handouts are only available in View > Handout on the Menu bar and are printed using the printing options in Impress.
Note
The printing of handouts depends on the printer, computer operating system, and how a computer is set up. The following is only an example of how to print handouts.
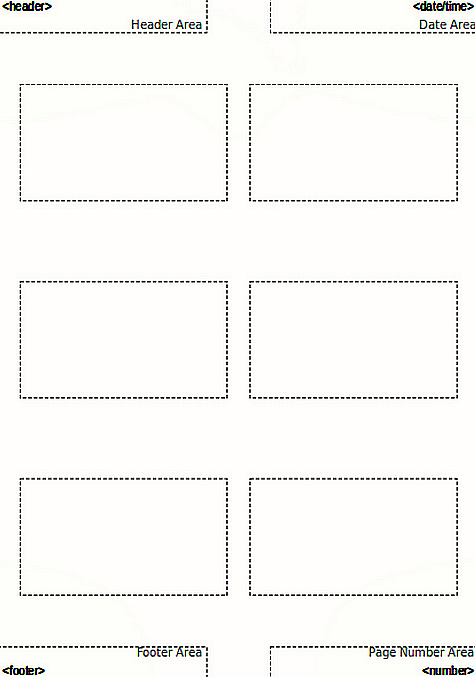
1) Go to View > Master Handout on the Menu bar to open the Master Handout layout in the Workspace. An example Master Handout is shown in Figure 35.
2) Go to Insert > Header and Footer on the Menu bar to open the Header and Footer dialog (Figure 36).
Figure 35: Example of Master Handout layout
3) Click on Notes and Handouts tab (Figure 36).
Figure 36: Header and Footer dialog - Notes and Handouts page
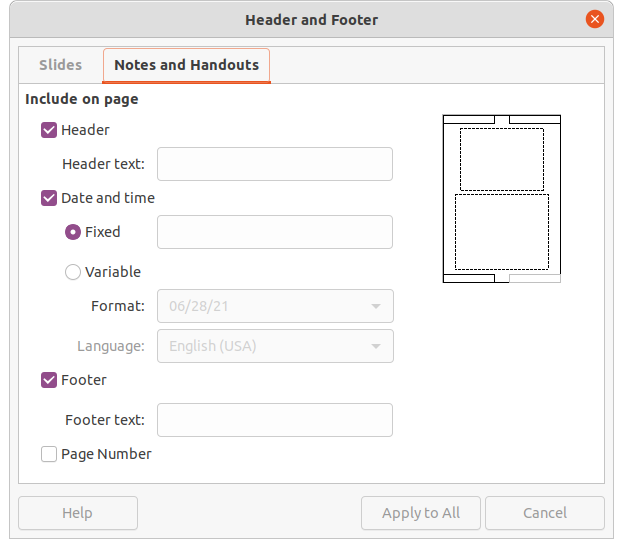
4) Select the required header and footer options as follows:
Select Header and then enter text in the Header text: text box.
Select Date and time and then select either Fixed or Variable for the date and time.
If a fixed date and time was selected, enter the date and/or in the text box.
If a variable date and time was selected, select the Format for the date and time in the drop-down list.
If a variable date and time was selected, select the Language to set the options for the date and time format in the drop-down list.
Select Footer and then enter text in the Footer text: text box.
Select Page Number if you want the handout pages numbered.
5) Click on Apply to All to save the options for the handouts and close the Header and Footer dialog.
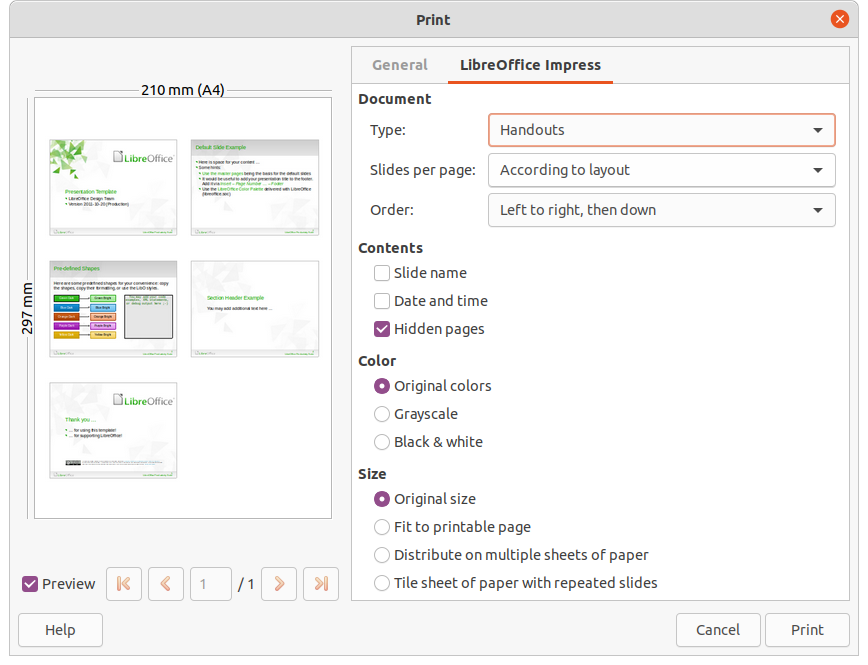
6) Go to File > Print on the Menu bar or use the keyboard shortcut Ctrl+P to open the Print dialog and click on the LibreOffice Impress tab to open the page for printing options of handouts. An example Print dialog is shown in Figure 37.
7) In Document, select the required options in the drop-down lists as follows:
Type: – select Handouts in the drop-down list.
Slides per page: – select how many slides are printed on a sheet of paper.
Order: – select the order in which the slides are printed on a sheet of paper.
8) In Contents, select Slide name, Date and time, and/or Hidden pages if these items are to be printed.
9) In Color, select how the handouts are printed.
10) In Size, select the size for how the handouts are printed.
11) Click on Print to print the handouts and close the Print dialog.
Figure 37: Example Print dialog - LibreOffice Impress page
Impress can create a photo album from a set of photographs and images. The photo album can be a multimedia show with vacation pictures and/or graphics and images as a presentation file.
1) Create a new presentation or open an existing presentation.
2) Select the slide that is going to precede the photo album. In a new presentation, this will be the first slide.
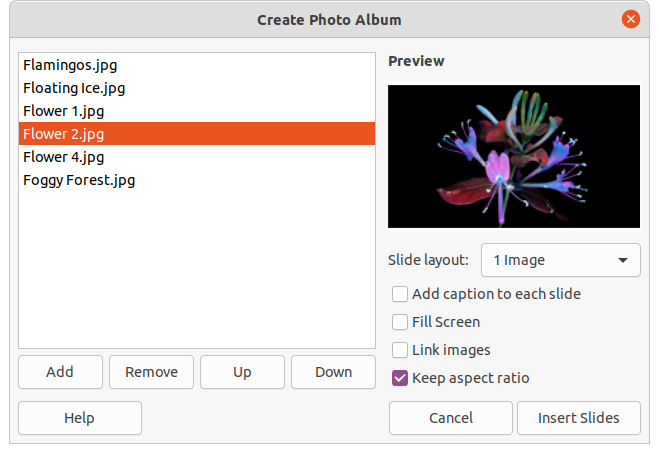
3) Go to Insert > Media > Photo Album on the Menu bar to open the Create Photo Album dialog (Figure 38).
4) Click on Add to open a file browser and navigate to the folder where the images are located.
5) Select the images required and click Open. This closes the file browser and the selected files appear in the Create Photo Album dialog.
6) Select the number of images per slide in the Slide layout: drop-down list.
7) If required, select Add caption to each slide. This inserts a text box on each slide allowing captions to be added to the images.
8) If required and there is only one image per slide, select Fill Screen for each image to fill the entire slide.
9) Create the required sequence of photos or pictures by moving image files up or down in the list of images.
Figure 38: Create Photo Album dialog
10) When the sequence of images is ready, click Insert Slides to create the number of slides required for the photo album. The sequence can be changed later.
11) If required, copy and paste images between slides as with any other elements that can be placed on a slide.
12) If required, set up the photo album to run as a presentation. See “Presentations (slide shows)” below, “Running presentations” on page 1, and the Impress Guide.
Impress allocates reasonable default settings for presentations, while at the same time allowing for customizing many aspects of the presentation experience. This section provides an introduction to presentations. For more information on creating, formatting and running presentations, see the Impress Guide.
Most of the tasks are best done in Slide Sorter view in the Workspace where the majority of the slides in a presentation can be viewed. Go to View > Slide Sorter on the Menu bar or click on the Slide Sorter tab at the top of the Workspace.
There may be more slides than the time available for a presentation, or you may need only a brief overview first and then a more detailed presentation at a later date. Impress provides two tools that help you do this: hiding slides and custom slide shows.
1) Select slides for hiding in the Slide pane or Slide Sorter view in the Workspace.
2) Hide the selected slides using one of the following methods. Hidden slides are greyed out in the Slide pane or Slide Sorter view in the Workspace.
Go to Slide > Hide Slide on the Menu bar.
Right-click on the slide thumbnail and select Hide Slide in the context menu.
Click on Hide Slide in the Slide View toolbar.
3) To show a hidden slide, use one of the following methods.
Go to Slide > Show Slide on the Menu bar.
Right-click on the hidden slide thumbnail and select Show Slide in the context menu.
Click on Show Slide in the Slide View toolbar.
1) Select the slides required for a custom slide show in the Slide pane or Slide Sorter view in the Workspace.
2) Go to Slide Show > Custom Slide Show on the Menu bar to open the Custom Slide Shows dialog (Figure 39).
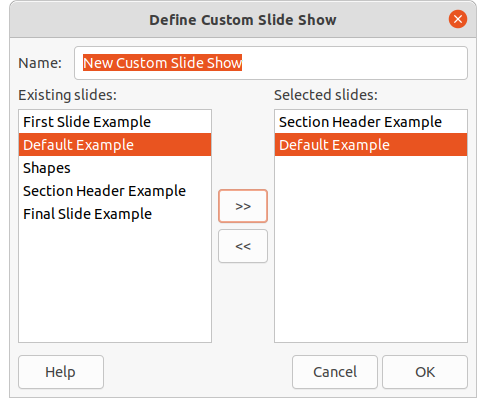
3) Click on New and the Define Custom Slide Show dialog opens (Figure 40).
4) Type a name for the new custom slide show in the Name text box.
5) In the Existing slides list, select the slides to include in the show.
6) Click the >> button to include the slides in the Selected slides list. Several slides can be selected and included at the same time. Hold down the Shift key and click the first and last slide in a group to select that group, or hold down the Ctrl key and click on individual slides to select them.
7) If required, rearrange the slide order in the Selected slides list. Click on a slide name and drag it to a new position in the list, then release the mouse button.
8) Click OK to save the custom slide show and return to the Custom Slide Shows dialog.
9) To activate a custom show, select it in the list in the Custom Slide Shows dialog and then select the Use custom slide show option.
10) Click Start to test the custom slide show or click OK to close the Custom Slide Shows dialog.
Figure 39: Custom Slide Shows dialog
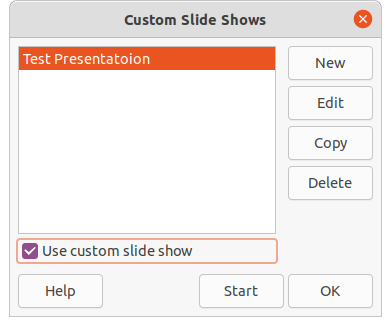
Figure 40: Define Custom Slide Show dialog
Slide transitions are effects and/or sounds that take place between slides when slides change in a presentation and can add a professional look to a presentation, smoothing the change over between slides. For more information on how to setup slide transitions, modify slide transitions, and to advance slides in a presentation, see the Impress Guide.
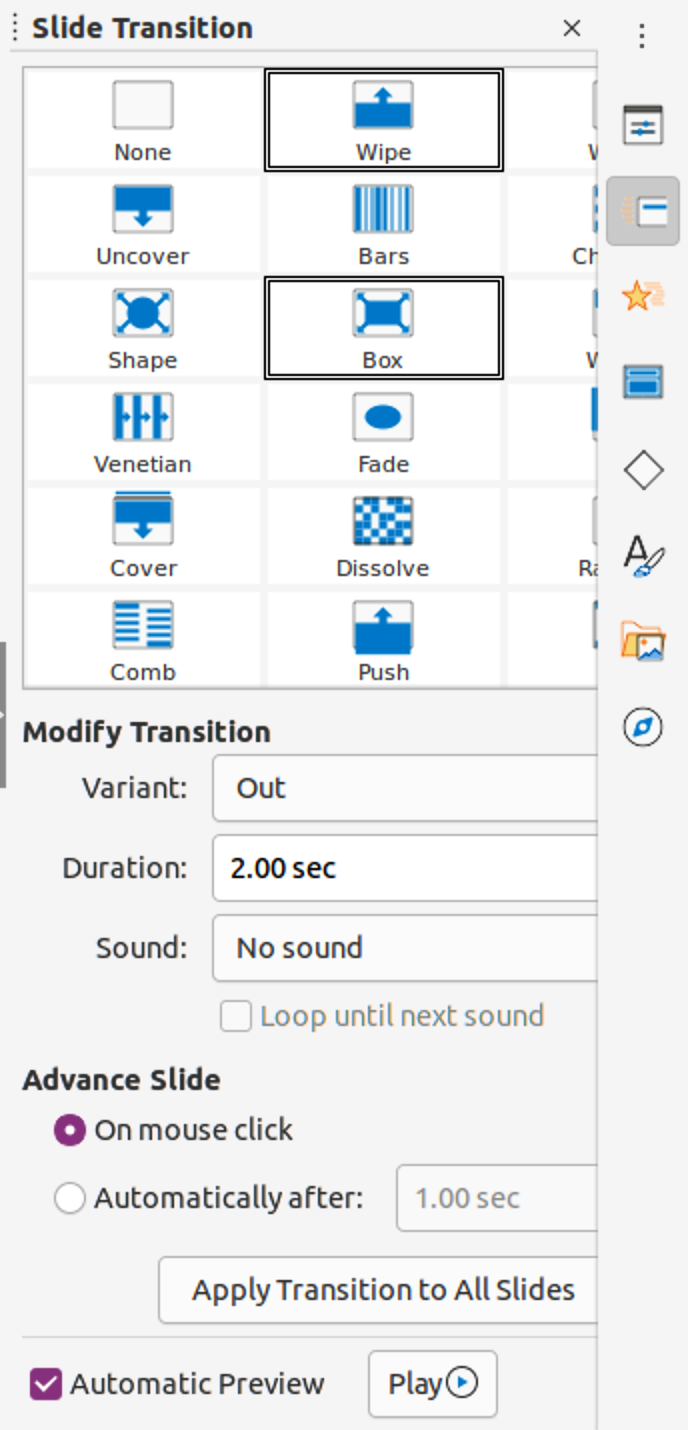
1) Click on Slide Transition in the Sidebar to open the Slide Transition deck (Figure 41).
2) In the Slides pane or Slide Sorter view in the Workspace, select the slides where slide transitions are going to be applied.
3) Click on a transition to apply it to the selected slide.
4) To apply the same transition to all slides in the presentation, click Apply Transition to All Slides at the bottom of the Slides Transition deck.
5) To check how the transition looks, click Play at the bottom of the Slides Transition deck. Alternatively, to automatically preview how the transition looks when it is applied, select Automatic Preview at the bottom of the Slides Transition deck.
6) In the Advance Slide section, select how the slides change in a presentation.
On mouse click – each time the mouse is clicked, the presentation advances to the next slide.
Automatically after – enter a time in box to elapse before the next slide in the presentation advances into view.
Figure 41: Slide Transition deck on the Sidebar
Sound or music can be played during a presentation as a transition effect. When using music in a presentation, make sure you are not infringing any copyright or license for the music.
1) Click on Slide Transition on the Sidebar to open the Slide Transition deck.
2) In the Slides pane or Slide Sorter view in the Workspace, select the slide to add sound or music.
3) In the Modify Transition section, select a sound in the Sound drop-down list.
4) To play music, use the following steps to select a music file:
a) Select Other sound in the Sound drop-down list.
b) In the file browser window that opens, navigate to where the music file is located.
c) Select the music file required and click Play to check if the music is suitable.
d) If the music is suitable, click Open to add the music to the selected slide and close the file browser window.
5) To play a sound or music file continuously in the slide show, select the option Loop until next sound. The sound or music file restarts once it is finished until the next sound or music file that is inserted in the slide show.
Note
Do not select the Apply Transition to All Slides option, otherwise the selected music file restarts at every slide.
Note
The sound or music file is linked to a presentation rather than embedded. If you plan to display the presentation on a different computer, remember to make sure that the music file is available on the computer where the presentation will be played. The link to the sound or music file must be established before starting the presentation.
Slide animations are similar to transitions, but they are applied to individual elements in a single slide, such as title, chart, shape, or individual bullet point. Animations can make a presentation more lively and memorable. However, as with transitions, heavy use of animations can be distracting and even annoying for an audience expecting a professional presentation.
Animations are best applied using Normal view in the Workspace so that you can easily select individual objects on a single slide.
On a slide, an element such as a graphic or an entire text box has selection handles around it when selected. If you select only a portion of the text in a text box, any selection handles may not be visible. For more information on animation effects, see the Impress Guide.
1) Go to View > Normal on the Menu bar to open Normal view in the Workspace.
2) Select an element on a slide for animation.
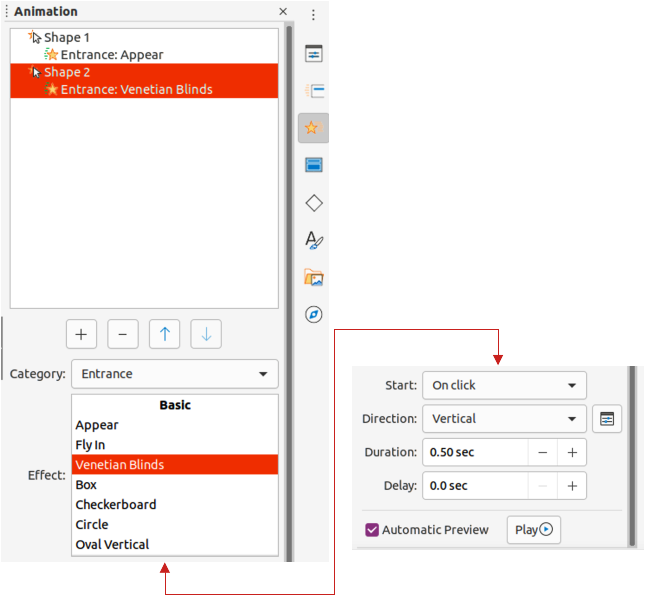
3) On the Sidebar, select Animation to open the Animation deck (Figure 42).
4) Click on Add Effect (+ plus sign) to open the animation options on the Animation deck.
a) Select an animation category in the Category drop-down list.
b) Select an animation effect from the available options in the Effect list.
c) Select how the animation starts in the Start drop-down list.
d) Select the direction of the animation in the Direction drop-down list.
e) Enter a time for the duration of the animation in the Duration box.
f) Enter a time for the delay of when the animation starts in the Delay box.
5) If required, select Automatic Preview so that how the animation looks can be checked when applied to a slide element.
6) Click Play to check how the animation looks when applied to a slide element.
Figure 42: Animation deck on the Sidebar
1) Open the presentation and start the slide show using one of the following methods:
Use the keyboard shortcut F5 to start from the first slide or Shift+F5 to start from the current slide.
Go to Slide Show > Start from First Slide or Start from Current Slide on the Menu bar.
Click on Start from First Slide on the Slide Sorter toolbar.
2) If the slide transition is set to Automatically after x sec, the slide show starts and runs after the set time has elapsed.
3) If the slide transition is set to On mouse click, click the left mouse button, or press the down arrow key, the right arrow key, the page down key, or the spacebar.
4) To navigate backwards through a slide show one slide at a time, press the up arrow key, the left arrow key, or the page up key.
5) During a slide show, more navigation options are available when you right-click on a slide and use the options available in the context menu.
6) When the last slide has displayed, the message Click to exit presentation... is displayed on screen. Press the Esc key or click the left mouse button to exit the slide show.
7) To exit the slide show and return to the Impress workspace at any time, press the Esc key during the slide show.
Note
During the presentation, any animations on a slide are run in the specified order as the slide is displayed.
The Presenter Console provides extra control over slide shows when using dual displays, such as a laptop for yourself and a large display or projector for your audience. The view you see on a computer display includes the current slide that can be seen by the audience, the next slide in the presentation, any slide notes, and a presentation timer.
Note
The Presenter Console only works with operating systems that support two displays. When two displays are being used, one display can be a laptop.
The Presenter Console has to be enabled in Impress before use. Go to Tools > Options > LibreOffice Impress > General (Figure 43) and select Enable Presenter Console in Presentation.
The Presenter Console provides the following views to assist you when making a presentation:
Default view – displays the current slide, including any effects and the next slide in the presentation (Figure 44). Click on the Previous and Next arrows to navigate through the presentation.
Notes view – click on Notes to switch to display any notes that accompany each slide in the presentation (Figure 45). Click on Notes again to return to the default view.
Slides view – click on Slides to switch to display the slide thumbnails that are being used for the presentation (Figure 46). Click on Slides again to return to the default view.
Exchange – click on this icon to switch the Presenter Console between displays.
Figure 43: Options LibreOffice Impress General dialog
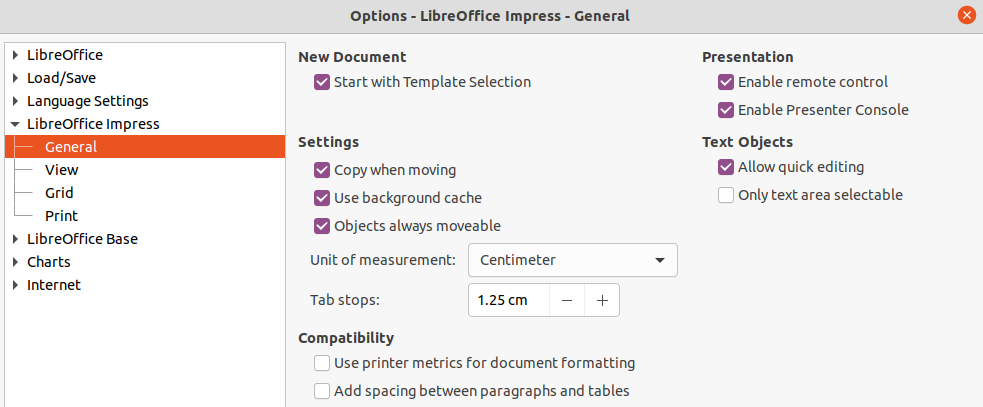
Figure 44: Presenter Console - Default view
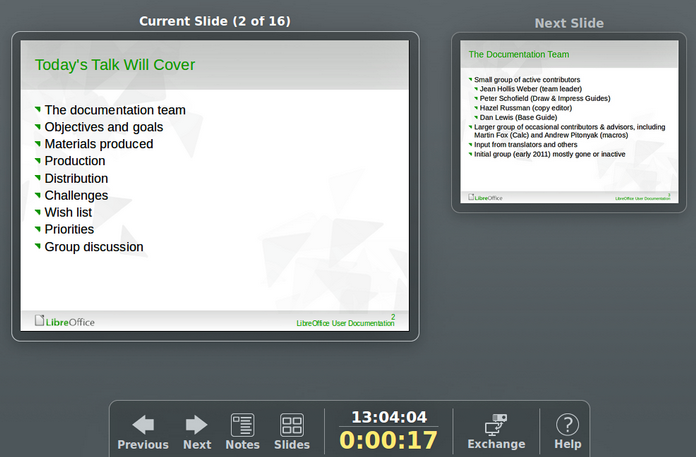
Figure 45: Presenter Console - Notes view
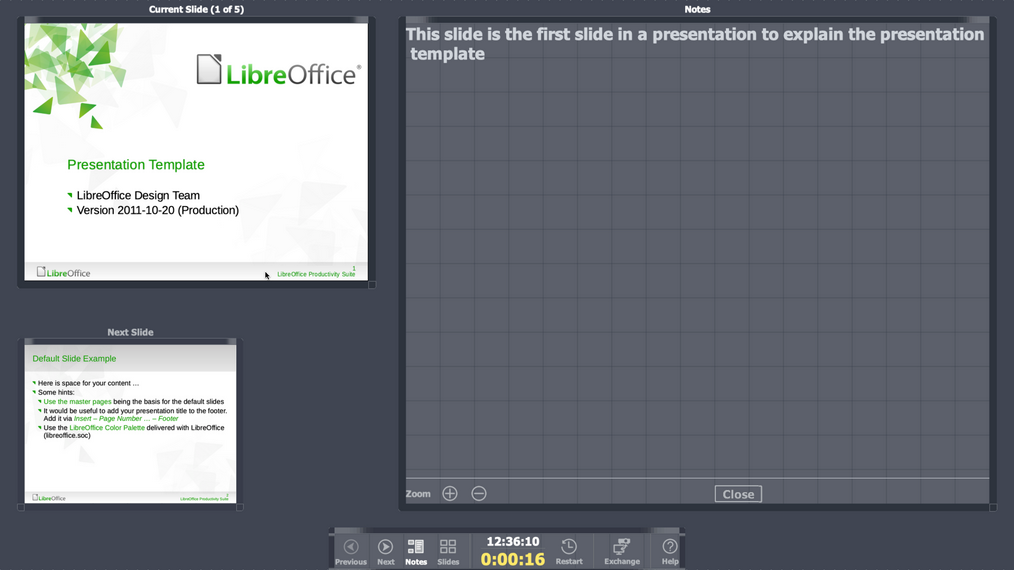
Figure 46: Presenter Console - Slides view
