Getting Started Guide 7.2
Chapter 8
Getting Started with Base
Relational databases in LibreOffice
This document is Copyright © 2021 by the LibreOffice Documentation Team. Contributors are listed below. You may distribute it and/or modify it under the terms of either the GNU General Public License (https://www.gnu.org/licenses/gpl.html), version 3 or later, or the Creative Commons Attribution License (https://creativecommons.org/licenses/by/4.0/), version 4.0 or later.
All trademarks within this guide belong to their legitimate owners.
|
Jean Hollis Weber |
Vasudev Narayaran |
|
|
Rob Westein |
Dave Barton |
Drew Jensen |
|
Dan Lewis |
Jean Hollis Weber |
Hazel Russman |
|
Kees Kriek |
Olivier Hallot |
Iain Roberts |
|
JiHui Choi |
Pulkit Krishna |
Steve Fanning |
|
Magnus Adielsson |
Ron Faile Jr. |
|
Please direct any comments or suggestions about this document to the Documentation Team’s mailing list: documentation@global.libreoffice.org
Note
Everything you send to a mailing list, including your email address and any other personal information that is written in the message, is publicly archived and cannot be deleted.
Published September 2021. Based on LibreOffice 7.2 Community.
Other versions of LibreOffice may differ in appearance and functionality.
Some keystrokes and menu items are different on macOS from those used in Windows and Linux. The table below gives some common substitutions for the instructions in this document. For a detailed list, see the application Help.
|
Windows or Linux |
macOS equivalent |
Effect |
|
Tools > Options |
LibreOffice > Preferences |
Access setup options |
|
Right-click |
Control+click or right-click depending on computer setup |
Open a context menu |
|
Ctrl (Control) |
⌘ (Command) |
Used with other keys |
|
F11 |
⌘+T |
Open the Styles deck in the Sidebar |
A data source, or database, is a collection of pieces of information that can be accessed or managed by LibreOffice. For example, a list of names and addresses is a data source that could be used for producing a mail merge letter. A business stock list could be a data source managed through LibreOffice.
This chapter covers creating a database, showing what is contained in a database, and how the different parts are used by LibreOffice.
Note
LibreOffice uses the terms “Data Source” and “Database” to refer to the same thing, which could be a database such as MySQL or dBase, a spreadsheet or text document holding data, or an address book.
A database consists of a number of fields that contain the individual pieces of data. Each table of the database is a group of fields. When creating a table, you also determine the characteristics of each field within it. Forms are for data entry into the fields of one or more tables which have been associated with the form. They can also be used for viewing fields from one or more tables associated with the form. A query creates a new table from the existing tables based upon how you create the query. A report organizes the information from the fields of a query or table into a document according to your requirements.
Caution
Some of Base will work without a Java Runtime Environment (JRE), but the dialogs and wizards that Base uses require JRE. In order to create reports, JRE is also required.
Please go to Tools > Options > LibreOffice > Advanced to select a JRE from those installed on your computer.
If a JRE is not already installed, you will need to download and install one. For Windows, you need to get Java from www.java.com. For Linux, you can download it from the same website or you can use the JRE available from the repository of your Linux version. macOS users can install a JRE from Apple Inc.
Base creates both flat and relational databases. This makes it fairly easy to create a database in which the fields of the database have relationships with each other.
For example: Consider a database for a library. It will contain a field for the names of the authors and another field for the names of the books. There is an obvious relationship between the authors and the books they have written. The library may contain more than one book by the same author. This is what is known as a one-to-many relationship: one author and more than one book. Most if not all the relationships in such a database are one-to-many relationships.
Consider an employment database for the same library. One of the fields contains the names of the employees while other fields contain the social security numbers and other personal data. The relationship between the names and social security numbers is one-to-one: only one social security number for each name.
If you are acquainted with mathematical sets, a relational database can easily be explained in terms of sets: elements, subsets, unions, and intersections. The fields of a database are the elements. The tables are subsets. Relationships are defined in terms of unions and intersections of the subsets (tables).
Instructions for creating a database for automobile expenses will be used to explain how to do this.
The first step in creating a database is to ask yourself many questions. Write them down, and leave some space between the questions to write the answers later. Using a text document on a computer for these questions and answers makes it easier to move the questions around, add additional questions, or change the answers. You may have to go through this process a few times before everything becomes clear in your mind and on paper.
Here are some of the questions and answers I developed before I created a database for automobile expenses.
What are the fields going to be?
What fields fit the fuel purchases area?
What fields fit the maintenance area?
What fields fit the vacations area?
What fields fit into the food category?
What are the fields that are common to more than one area?
How will I use this information about these three fields?
Tip
While we have listed fields we will create in the tables of the database, there is one more field that may be needed in a table: the field for the primary key, an identifier unique to each record. In some tables, a suitable field for the primary key has already been listed. In other tables such as the payment type, an additional field for the primary key must be created.
Without the primary key field in a table, any data added, deleted, or modified has to be done by using the Execute SQL Statement dialog (Tools > SQL…). This takes much longer than to insert it using the Table Data View dialog. But thereafter, the data is visible in the table and is available to be used in queries, forms, and reports.
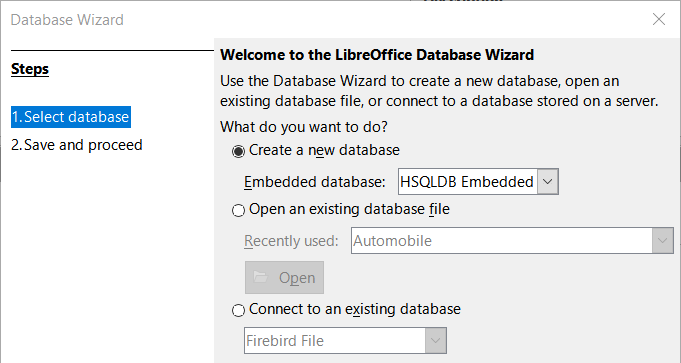
To create a new database, select File > New > Database on the Menu bar, or click the arrow next to the New icon on the Standard toolbar and select Database in the drop-down menu. You can also click the Base Database button in the Create area of the LibreOffice Start Center. If you are already working in Base, you can also press Ctrl+N. All of these methods open the Database Wizard.
On the first page of the Database Wizard (Figure 1), select Create a new database. Be sure that the HSQLDB Embedded entry is selected in the Embedded database drop-down menu; see the Base Guide for information about using alternative embedded database engines. Click Next.
Figure 1: Creating a new database
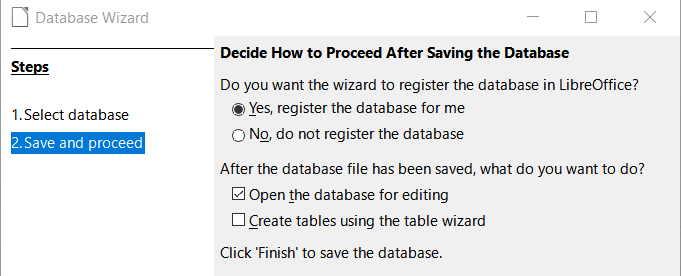
The second page of the Database Wizard (Figure 2) has two questions. For the first question, it is advised that the database should be registered. Make sure the choice for the second question is Open the database for editing. Click Finish. The Database Wizard will prompt you to select a location to name and save the database.
Figure 2: Registering the new database
Note
In Writer and Calc, selecting View > Data Sources, or pressing the Ctrl+Shift+F4 key combination, opens and closes the Data Sources window containing the list of registered databases. If a database is not registered, this window will not contain it and you cannot access it in Writer or Calc if you need to use data from it.
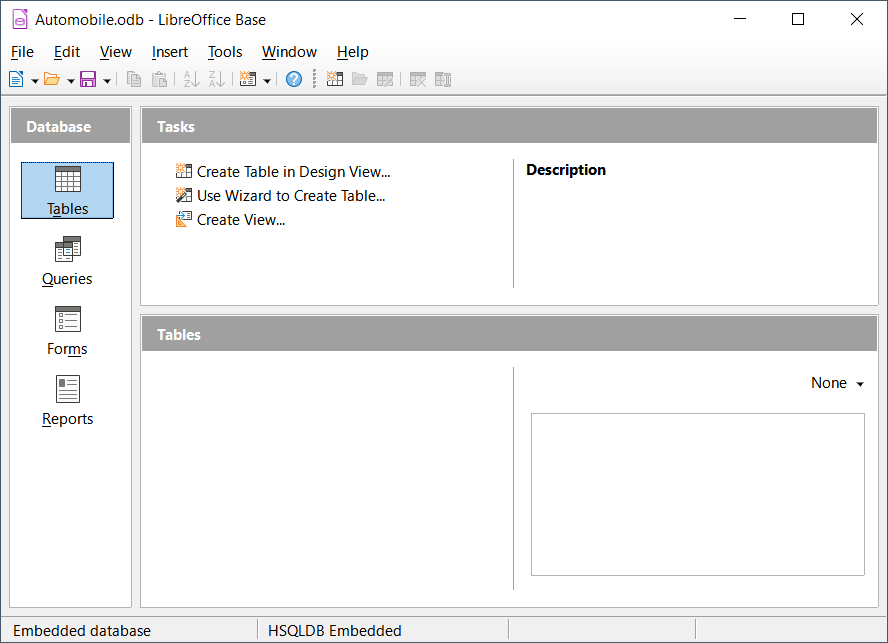
Save the new database with the name Automobile. This opens the Automobile.odb – LibreOffice Base window (Figure 3).
Figure 3: LibreOffice Base window
Tip
Every time the Automobile database is opened, the Automobile.odb – LibreOffice Base window opens. Changes can then be made to the database. The title for this window is always <database name> – LibreOffice Base.
Caution
As you create a database, you should save your work regularly. This means more than saving what you have just created. You must save the whole database as well.
For example, when you create your first table, you must save it before you can close it. This makes it part of the database in memory. But it is only when you save the database file that the table is written to disk.
Note
Database files in Open Document Format are stored with the *.odb extension. This file format is actually a container of all elements of the database, including forms, reports, tables, and the data itself. The same format can also store a connection to an external database server instead of the local data, for example, to access a MySQL or PostgreSQL database server in your network.
In a database, a table stores information in a group of things we call fields. For example, a table might hold an address book, a stock list, a phone book, or a price list. A database must have at least one table and may have several.
Each field of a table contains information of a single type. For example, the Phone field of an address book would only contain phone numbers. Similarly, a price list table could contain two fields: Name and Price. The Name field would contain the names of the items; the Price field would contain the amount of each item.
To work with tables, click the Tables icon in the Database list, select View > Tables, or press Alt+A. The tasks that you can perform on a table are in the Tasks list (see Figure 3).
Figure 4: Creating a table using Wizard
Wizards are designed to do the basic work. Sometimes this is not sufficient for what we want; in those cases we can use a wizard as a starting point and then build upon what it produces.
The Table Wizard in Base contains two categories of suggested tables: business and personal. Each category contains sample tables from which to choose. Each table has a list of available fields. We can delete some of these fields and add other fields.
A field in a table is one bit of information. For example, a price list table might have one field for item name, one for the description, and a third for the price.
Since none of the fields we need for our Automobile database are contained in any of the sample wizard tables, we will create a simple table using the wizard that has nothing to do with our database. This section is merely an exercise in explaining how the wizard works.
The Table Wizard permits the fields of the table to come from more than one suggested table. We will create a table with fields from three different suggested tables in the wizard.
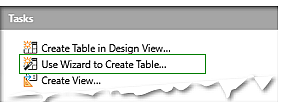
Click Use Wizard to Create Table. This opens the Table Wizard (Figure Figure 5).
Step 1: Select fields
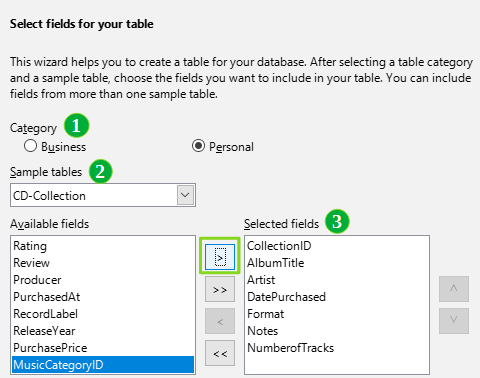
We will use the CD-Collection sample table in the Personal category and Employees in the Business category to select the fields we need.
1) Category: Select Personal. The Sample tables drop-down list changes to a list of personal sample tables.
2) Sample tables: Select CD-Collection. The Available fields area changes to a list of available fields for this table.
3) Selected fields: By selecting each field and using the > button, move the following fields from the Available fields list to the Selected fields list in this order: CollectionID, AlbumTitle, Artist, DatePurchased, Format, Notes, and NumberofTracks.
Figure 5: Selecting fields from Personal category
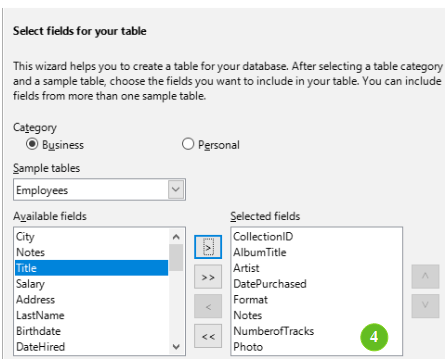
4) To select fields from another sample table, select Business as the Category. Select Employees in the drop-down list of sample tables. Use the > button to move the Photo field from the Available fields list to the Selected fields list. It will be at the bottom of the list, directly below the NumberofTracks field.
5) If you make a mistake in selecting fields, click on the field name in the Selected fields list and use the < button to move it from the Selected fields list back to the Available fields list.
6) If you make a mistake in the order of the selected fields, click the field name that is in the wrong order and use the up and down arrows on the right side of the Selected fields list to move it to the correct position.
7) Click Next.
Tip
You can double-click a field in the Available fields list to transfer it to the Selected fields list. Similarly you can double-click a field in the Selected fields list to transfer it back to the Available fields list.
Figure 6: Selecting fields for the table
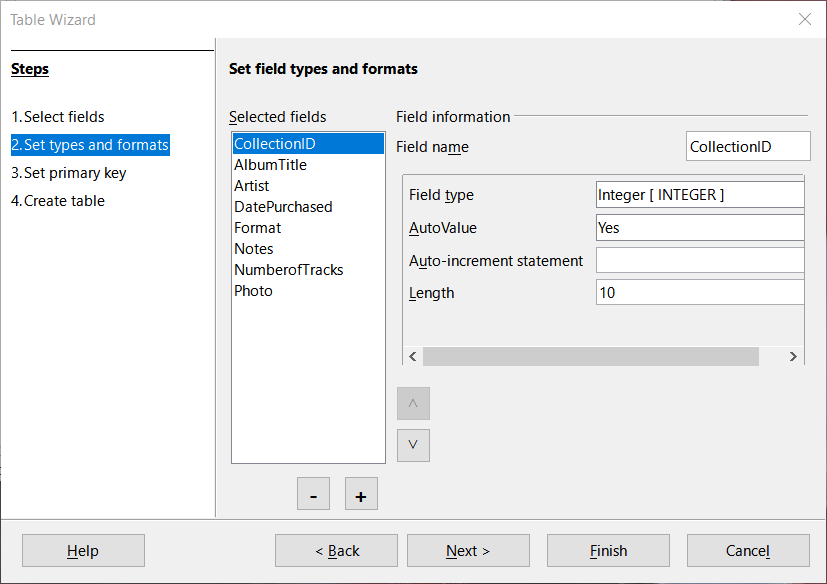
Step 2: Set field types and formats
In this step you give the fields their properties. When you click a field, the information on the right changes. (See Figure 7.) You can then make changes to meet your needs. Click each field, one at a time, and make the changes listed below.
Figure 7: Changing field types
Note
If any of these fields requires a mandatory entry, set Entry required to Yes. A blank field will then not be allowed. In general, only set Entry required to Yes if something must always be put in that field. By default, Entry required is set to No. (The Entry required option is not visible in Figure 7 because AutoValue has been set to Yes.)
CollectionID: Change AutoValue from No to Yes. (example of a mandatory entry)
AlbumTitle:
Entry required: Leave Entry required as No, unless all of your music is in albums.
Length: Unless you have an album title that exceeds 100 characters counting the spaces, do not change the length.
Artist: Use most of the default settings. Since music always has artists, set Entry Required to Yes.
Date Purchased: Field type: default setting. Entry required should be No. (You may not know the date.)
Format: Only change the Entry Required setting: from No to Yes.
Notes: No changes are required.
NumberofTracks: Change the Field type to Small Integer [SMALLINT], which allows for 32768 tracks.
Photo: Use the default settings.
Note
In Base the maximum length of each field must be specified on creation. It is not easy to change this later, so if in doubt specify a greater length. Base uses VARCHAR as the field format for text fields. This format uses only the actual number of characters in a field up to the limit set, so a field containing 20 characters will occupy only 20 characters even if the limit is set at 100. Two album titles containing 25 and 32 characters respectively will use space for 25 and 32 characters and not 100 characters.
Another text format is CHAR, which has a fixed length. If the limit is set to 100 characters, every entry into this field will have a length of 100 regardless of whether the actual length is 1 or 100.
Note
Each field has a Field type, which must be specified. Types include text, integer, date, and decimal. If the field is going to have general information in it (for example, a name or a description), use text. If the field will always contain a number (for example, a price), the type should be decimal or another numerical field. The wizard picks the right field type, so to get an idea of how this works, see what the wizard has chosen for different fields.
Tip
Up and down arrows are available on this page (not shown in Figure 7) and you can use these to reorder the list of fields. Also + and – buttons are available and you can use these to remove fields from the list or to add new fields.
When you have finished, click Next.
1) Create a primary key should be checked.
2) Select option Use an existing field as a primary key.
3) In the Fieldname drop-down list, select CollectionID.
4) Check Auto value if it is not already checked. Click Next.
Note
A primary key uniquely identifies an item (or record) in the table. For example, you might know two people called “Randy Herring” or three people living at the same address and the database needs to distinguish between them.
The simplest method is to assign a unique number to each one: number the first person 1, the second 2, and so on. Each entry has one number and every number is different, so it is easy to say “record ID 172”. This option is chosen here: CollectionID is just a number assigned automatically by Base to each record of this table.
Step 4: Create table
1) If desired, rename the table at this point. If you rename it, make the name meaningful to you. For this example, make no changes.
2) Leave the option Insert data immediately checked.
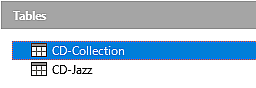
3) Click Finish to complete the Table Wizard. Close the Table Data View window created by the Table Wizard. You are now back to the main window of the database with the listing of the tables, queries, forms, and reports. Notice that a table named CD-Collection is now listed in the Tables portion of the window.
4) Click the Save button on the Standard toolbar at the top of the main window.
If you have a large collection of music, you might want to create a table for each type of music you have. Rather than creating each table from the wizard, you can make copies of the original table, naming each according to the type of music contained in it.
1) Click on the Tables icon in the Database area of the LibreOffice Base window to see the existing tables.
2) Right-click on the CD-Collection table icon. Choose Copy in the context menu.
3) Move the mouse pointer below this table, right-click, and select Paste. The Copy table dialog opens.
4) Change the Table name to CD-Jazz and click Next.
Figure 8: Creating copies of original table
Tip
Using the four action buttons on this page, you can move selected fields, or all fields, in either direction. You can also double-click to move a field from one list to the other.
5) Click the >> button to move all the fields from the left box to the right box and click Next.
6) Since all the fields already have the proper field type, no changes should be needed. However, this is the time and place to make any changes if they are needed. (See Caution below for the reason why.) Click Create. The new table is created.
7) Click the Save button on the Standard toolbar at the top of the LibreOffice Base window.
Caution
Once tables have been created using the wizard, and data has been entered, editing a table should be very limited. You can add or delete fields, but adding a field requires you to enter the data for that one field for every existing record with an entry for that field.
Deleting a field deletes all the data once contained in that field. Changing the field type of a field can lead to data being lost either partially or completely. When creating a new table, it pays to create the fields with the correct names, length, and format before you add any data.
Deleting a table removes all of the data contained in every field of the table. Unless you are sure, do not delete a table.
Design View is a more advanced method for creating a new table, in which you directly enter information about each field in a table. We will use this method for the remaining tables of our Automobile database.
Note
While the field types and formatting are different in Design View, the concepts are the same as in the Table Wizard.
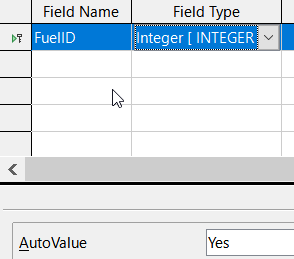
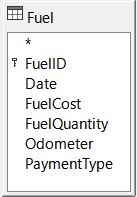
The first table to be created is Fuel. Its fields are FuelID, Date, FuelCost, FuelQuantity, Odometer, and PaymentType.
1) Click Create Table in Design View in the Tasks area of the LibreOffice Base window. Base opens the LibreOffice Base: Table Design dialog.
2) FuelID field: Type FuelID as the first Field Name entry. Press the Tab key to move to the Field Type column. Select Integer [INTEGER] as the field type in the drop-down list. (The default setting is Text [VARCHAR].)
Tip
A shortcut for selecting from the Field Type drop-down list: press the key for the first letter of the choice. You can cycle through the choices for a given letter by repeatedly pressing that key.
a) Change the Field Properties in the bottom section of the dialog.
Change AutoValue from No to Yes.
b) Set FuelID as the primary key.
Click in the Field Name cell directly below FuelID. The dialog automatically sets FuelID as the primary key and places a key icon in front of FuelID (Figure 9).
Figure 9: Defining the primary key field
Tip
Certain of the integer field types (Integer and BigInt for example) have an AutoValue field property. When using one of these field types, your selection of Yes for AutoValue automatically makes the field the primary key.
Primary keys for any other field type must be selected by right-clicking the rectangle before the field and selecting Primary Key in the context menu.
Note
The primary key serves only one purpose: to identify each record uniquely. Any name can be used for this field. We have used FuelID for convenience, so we know to which table it belongs.
3) All other fields (Date, FuelCost, FuelQuantity, Odometer, and PaymentType):
a) Type the next field name in the Field Name column.
b) Select the field type for each field.
For Date use Date[DATE]. (Press the D key to select it.)
FuelCost, FuelQuantity, and Odometer use Number [NUMERIC]. (Press the N key once to select it.)
PaymentType uses Text [VARCHAR], the default setting.
c) FuelCost, FuelQuantity, and Odometer also need changes in the Field Properties section (Figure 10).
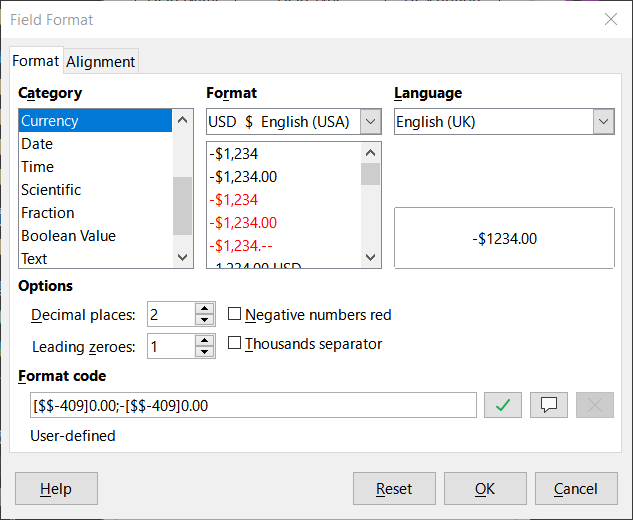
FuelCost: Change the Length to 5 and Decimal places to 2. Click the Format example ellipsis button (...) (Figure 10). This opens the Field Format dialog (Figure 11). Use Currency as the Category and your currency as the Format. My currency has two decimal places. Use what is appropriate for yours.
FuelQuantity: Change Length to 6 and Decimal places to 3. (Many fuel pumps measure fuel to thousandths of a gallon in the USA.)
Odometer: Change the Length to 10 and the Decimal places to 1.
d) Repeat steps a) through c) until you have entered all of the fields.
Figure 10: Changing field properties
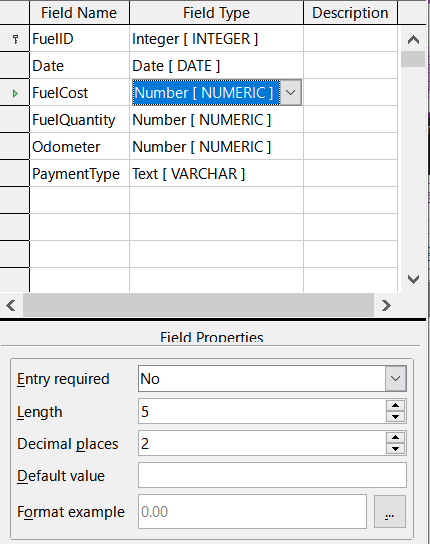
Figure 11: Format example options
4) To save and close the table in the Table Design dialog, select File > Save, or click the Save icon on the Standard toolbar, or press Ctrl+S. Name the table Fuel.
5) Close the Table Design dialog.
6) In the main database window, select File > Save, click the Save icon on the Standard toolbar, or Ctrl+S to save the database.
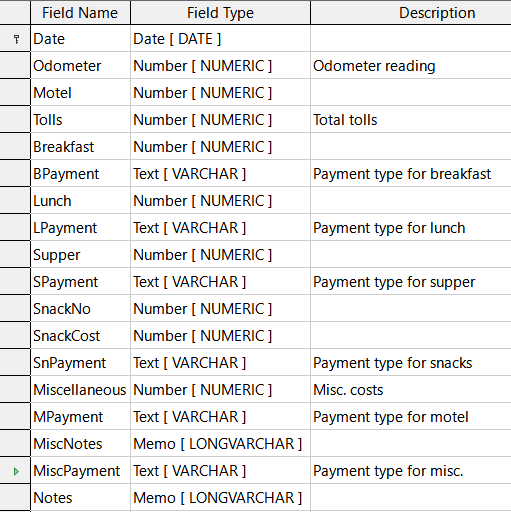
Follow the same steps to create the Vacations table. The fields, field types, and descriptions are listed in Figure 12.
Figure 12: Fields in Vacations table
1) Make the following changes in the Field Properties area of the window.
a) Odometer: As described in step ), bullet ) for the corresponding field of the Fuel table.
b) Motel, Tolls, Breakfast, Lunch, Supper, SnCost, and Miscellaneous: As described in step ), bullet ) for the FuelCost field of the Fuel table.
2) Making Date the primary key in this table has to be done in a different way because this field is typed as Date, not Integer.
a) Right-click to the left of the field name Date.
b) Select Primary Key in the context menu.
Following similar steps to those above, you should use Design View to create a much simpler table entitled Payment Type. This table contains two fields, named Type, with the field type set to Text[VARCHAR] and PaymentID (field type Integer). Set the PaymentID field as the primary key for the table.
Now that the tables have been created, what are the relationships between our tables? This is the time to define them based upon the questions we asked and answered in the beginning.
When on vacation, we want to enter all of our expenses at once each day. Most of these expenses are in the Vacations table, but the fuel we buy is not. So we will link these two tables using the Date fields. Since the Fuel table may have more than one entry per date, this relationship between the Vacations and Fuel tables is one to many (it is designated 1:n.)
The Fuel and Maintenance tables do not really have a relationship even though they share similar fields: Date and Odometer readings. (We are not creating the Maintenance table in these examples.)
Tip
As you create your own databases, you will also need to determine if tables are related and if so how.
1) To begin defining relationships, select Tools > Relationships. The Automobile – LibreOffice Base: Relation Design window opens and the Add Tables dialog pops up. (You can also open it by clicking the Add Tables icon on the Relation Design window if you ever need to do so.)
2) In the Add Tables dialog, use either of these ways to add a table to the Relation Design window:
Double-click the name of the table. In our case, do this for both Vacations and Fuel.
Or, for each table, click the name of the table and then click Add.
3) Click Close to close the Add Tables dialog when you have added the tables you want.
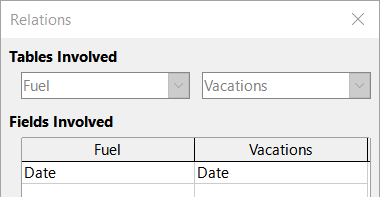
4) Define the relationship between the Vacations and Fuel tables: click the New Relation icon on the Standard toolbar, or select Insert > New Relation. This opens the Relations dialog (Figure 14). Our two tables are listed in the Tables Involved section.
a) In the Fields Involved section, click the drop-down list under the Fuel label.
b) Select Date in the list.
c) Click in the cell to the right of this drop-down list. This opens a drop-down list for the Vacations table.
d) Select Date in the list. It should now look like Figure 14.
e) Modify the Update Options and Delete Options section of the Relations dialog (Figure 15).
Select Update cascade in the Update options area.
Select Delete cascade in the Delete options area.
f) Click OK.
g) In the Relation Design dialog, click the Save icon or select File > Save.
h) Close the Relation Design dialog.
i) Click the Save button on the Standard toolbar at the top of the main database window.
Figure 13: Designation for a 1:n relationship
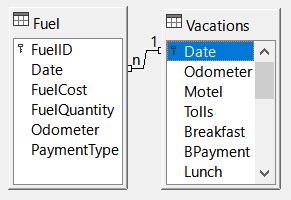
Figure 14: Selected fields in a relationship
Tip
The primary key can contain more than one field. (Its foreign key - a field in a table that stores values of the primary key of records in another table. - will contain the same number of fields.) If this were the case in Figure 14, the other fields of the primary field for the Fuel table would be listed under Date. The corresponding fields of the foreign key would be listed under Vacations. Detailed information about this is in the Base Guide.
Figure 15: Update Options and Delete Options section
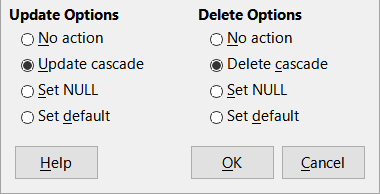
While these options are not strictly necessary, they do help. Having them selected permits you to update a table that has a relationship defined with another table which has been modified. It also permits you to delete a field from the table without causing inconsistencies.
Databases are used to store data. But, how is the data put into the database? Forms are used to do this. In the language of databases, a form is a front end for data entry and editing.
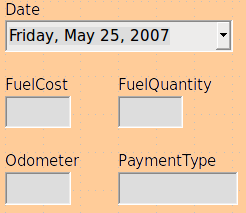
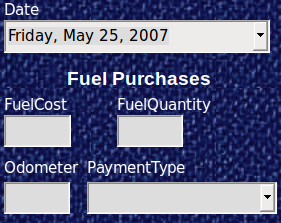
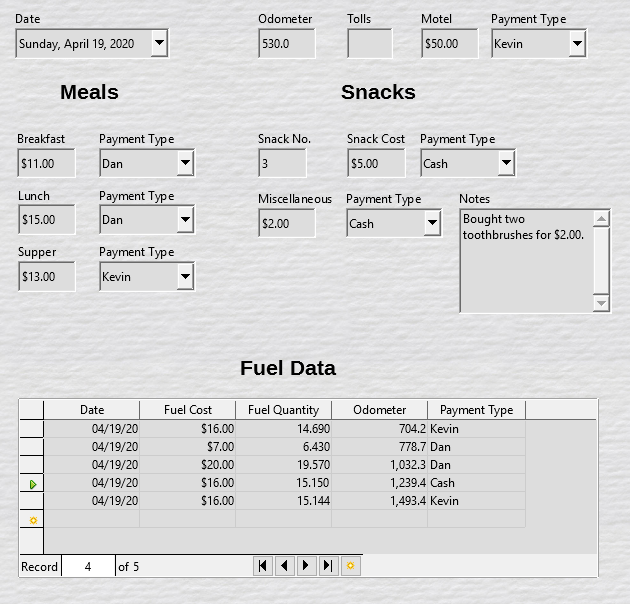
A simple form consists of the fields from a table (Figure 16). More complex forms can contain much more, including additional text, graphics, selection boxes, and many other elements. Figure 17 is made from the same table with a text label (Fuel Purchases), a list box placed in PaymentType, and a graphic background.
Tip
A list box is useful when a field contains a fixed number of options. It saves you from having to type data by hand and having to double-check that the entered data is correct, and ensures that invalid options are not entered.
Figure 16: Fields of a simple form
|
Figure 17: Simple form with additions
|
In our database, payments for food or fuel might be made from one of two credit cards (Dan or Kevin) or in cash, so these would be the available options for all boxes that contain payments.
To create a list box, we first need to create a small, separate table containing the name of the options. This is then linked to the corresponding field in the form. The topic is dealt with in detail in the Base Guide and will not be pursued further here.
We will use the Form Wizard to create a Vacations form, which will contain a form and a subform.
In the main database window (Figure 3), click the Forms icon in the Database area, select View > Forms, or press Alt+M. In the Tasks list, click Use Wizard to Create Form to open the Form Wizard (Figure 18). Base displays the Database Form window and the Form Wizard. Simple forms require only some of these steps, while more complex forms may use all of them.
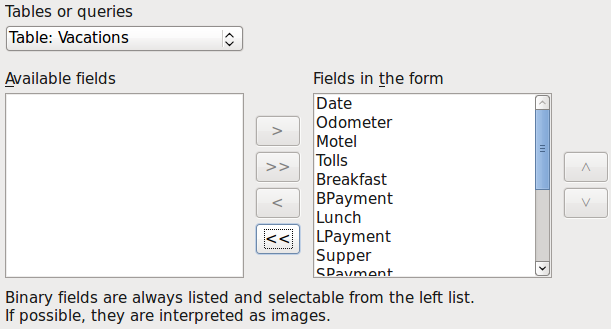
1) On the Form Wizard dialog, under Tables or queries drop-down, select Table: Vacations. Available fields lists the fields for the Vacations table.
2) Click the >> button to move all of these fields to the Fields in the form list. Click Next.
Tip
Using the four action buttons in the center of this page, you can move selected fields, or all fields, in either direction. You can also double-click to move a field from one list to the other. The up and down arrows on the right can be used to re-order entries in the Fields in the form list.
Figure 18: Selecting fields in the Form Wizard
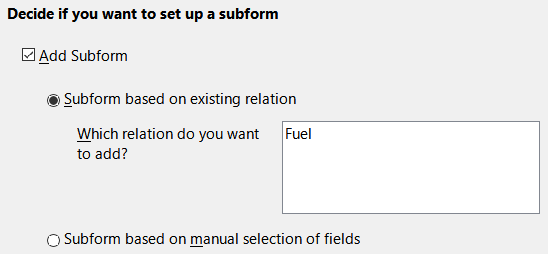
Step 2: Set up a subform
Since we have already created a relationship between the Fuel and Vacations tables, we will use that relationship. If no relationship had been defined, this would need to be done later in the wizard (Step 4: Get joined fields).
1) Click the box labeled Add Subform.
2) Click Subform based upon existing relation.
3) Fuel is listed as a relation we want to add. So click Fuel to highlight it, as in Figure 19. Click Next.
Figure 19: Adding a subform
Step 3: Add subform fields
This step is similar to Step 1: Select fields. The only difference is that not all of the fields will be used in the subform.
1) Fuel is preselected under Tables or queries.
2) Use the >> button to move all the fields to the Fields in the form list.
3) Click the FuelID field to highlight it.
4) Use the < button to move the FuelID back to the Available fields list (Figure 20).
5) Click Next.
Figure 20: Selecting fields of a subform

This step is for tables or queries for which no relationship has been defined. Because this has been defined in the relationship, the wizard skips this step.
Note
It is possible to create a relationship between two tables that is based upon more than one pair of fields. How to do that and why is discussed in the Base Guide.
Caution
When selecting a pair of fields from two tables to use as a relationship, they have to have the same field type. That is why we used the Date field from both tables: both their field types are Date[DATE].
Whether a single pair of fields from two tables are chosen as the relationship, or two or more pairs are chosen, certain requirements must be met for the form to work.
One of the fields from the main form must be the primary key for its table. (Date would have to be used.)
No field from the subform can be the primary key for its table. (FuelID cannot be used.)
Each pair of joined fields must have the same field type.
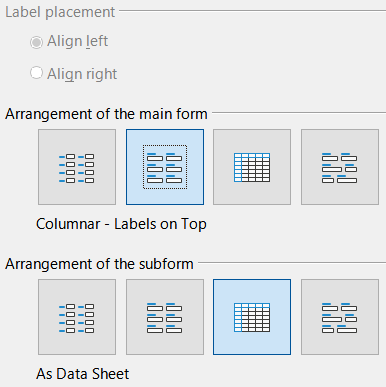
Step 5: Arrange controls
A control in a form consists of two parts: label and field. This step in creating the form determines where a control’s label and field are placed relative to each other. The four choices from left to right are Columnar – Labels Left, Columnar – Labels on Top, As Data Sheet, and In Blocks – Labels Above.
1) Arrangement of the main form: Click the second icon (Columnar – Labels on Top). The labels will be placed above their field.
2) Arrangement of the subform: Click the third icon (As Data Sheet). (The labels are column headings and the field entries are in spreadsheet format.) Click Next.
Figure 21: Arrange controls
Step 6: Set data entry
Unless you have a need for any of these entries to be checked, accept the default settings. Click Next.
Step 7: Apply styles
1) Select the color you want in the Apply styles list. (I chose the Beige option.)
2) Select the Field border you want. (I prefer the 3D look option. You might want to experiment with the different possible settings.)
3) Click Next.
Step 8: Set name
1) Enter the name for the form. In this case, it is Vacations.
2) Click Modify the form.
3) Click Finish. The form opens in edit mode, Base displaying the Fuel – LibreOffce Base: Database Form window.
Figure 22: Basic form created using Wizard
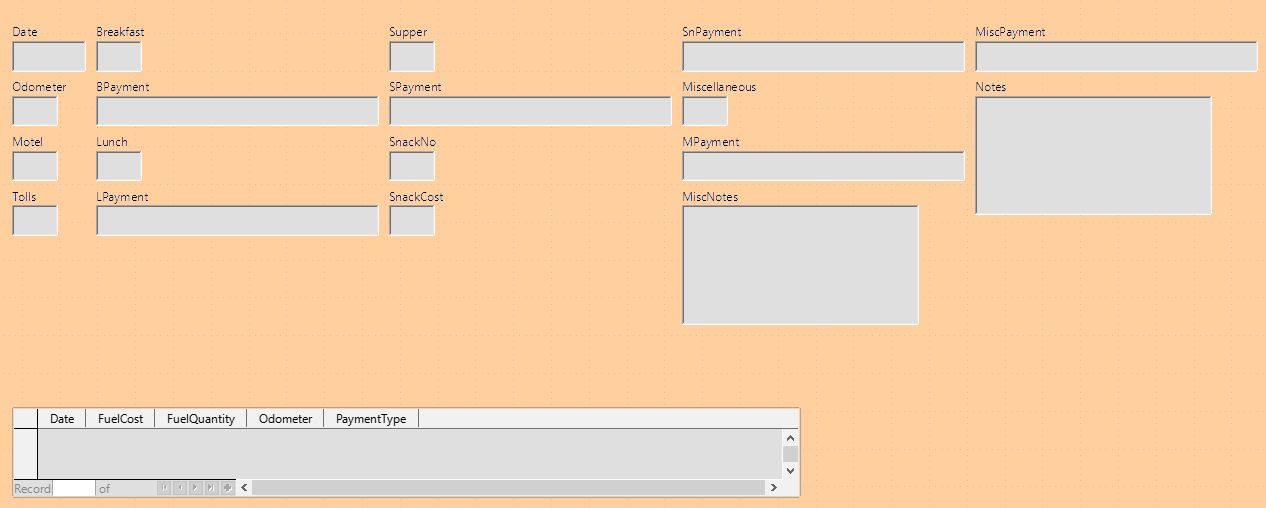
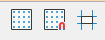
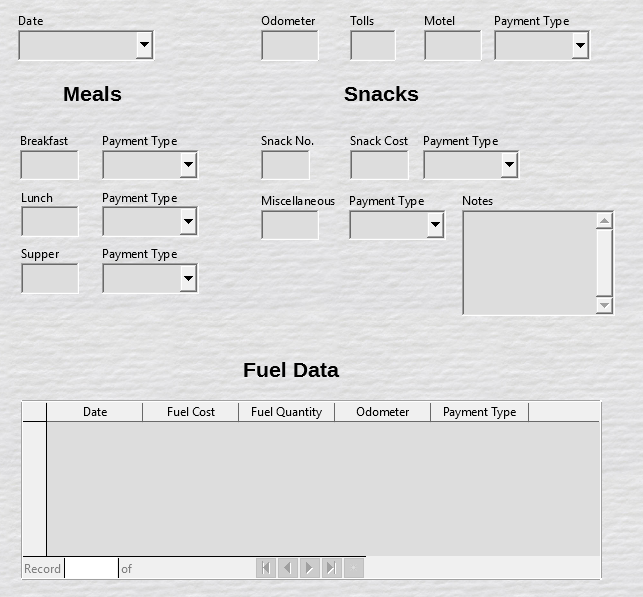
The form does not look organized at all. Every control seems to have a different size. The background is not the best color, nor are all of the labels the way we would want them.
The reason for different sized controls is that they contain different types of field data. There are three different sized controls: text, formatted, and date. Text controls have their width set to display a large number of characters. Formatted controls will usually contain numbers or decimals although they can contain a wide variety of formatting. So, these are likely going to have a limited number of characters, hence a shorter control. Date controls obviously contain dates. Most formats for them are fairly short, which is the reason for their width. However, one of the date formats is day of the week, month day, year (Thursday, October 31, 2020). This needs a larger width than 10/31/2020 or 31/10/2020 for example.
First, all of the payment type controls need to be modified. The fields need to be replaced with a list box, and each needs to be related to an existing field in the table, Payment Type. The rest of the controls require modification based upon the category into which they fall.
Note
The steps that follow assume that the PaymentType table already contains three single-field records. These might be Cash, Dan, and Kevin. If necessary you could use the Form Wizard to create a very simple form to input or edit these values.
We will carry out the following steps:
1) Replace fields with list boxes.
2) Modify text controls (label field first and then the data field).
5) Modify fields in the table.
6) Group the controls (food, fuel subform, and miscellaneous).
8) Add headings (for each group in the form).
9) Change the background to a picture, then modify some of the labels so that they can be read clearly against this background. Change the font color of the headings.
10) Change tab order of fields.
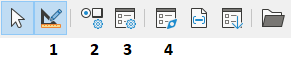
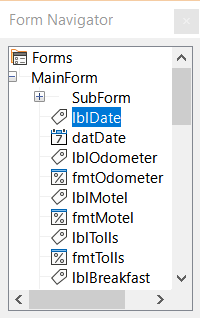
Figure 23 shows a section of the Form Design toolbar, identifying key icons that will be used during the following steps. Figure 24 shows the Form Navigator.
Figure 23: Part of Form Design toolbar
|
1 |
Design Mode |
3 |
Form Properties |
|
2 |
Control Properties |
4 |
Form Navigator |
Figure 24: Form Navigator
Step : Replace fields with list boxes
1) Use the Control Properties and Form Navigator icons on the Form Design toolbar to open the corresponding dialogs. (You may need to select a control for the Control Properties icon to become available)
2) Going down the list of labels and fields in the Form Navigator, click the first text box whose name contains the word “Payment”.
3) If both the label and text box components of the field are highlighted in the Form Navigator, double-click the text box so that only it is highlighted.
Tip
In some cases when the Form Navigator does not have the input focus, selecting a field highlights both components (for example, label and text) of the field. If this arises, then double-clicking the required component will highlight it, and enable you to subsequently move from one component to another with a single click.
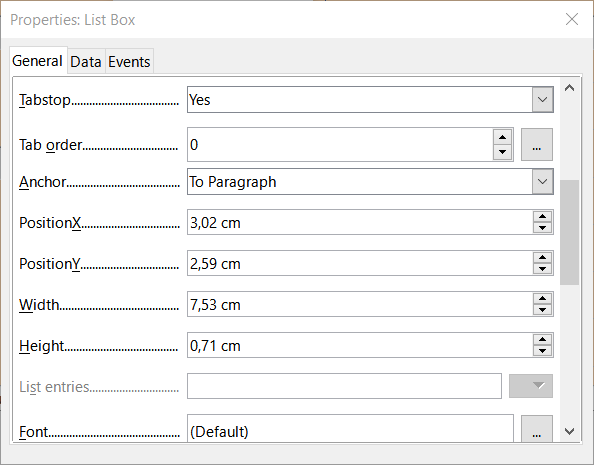
4) Right-click the text box in the Form Navigator and select Replace with > List Box in the context menu.
5) In the Properties dialog, the heading becomes Properties: List Box.
6) The General tab is selected, so scroll down to the Dropdown property. Change No to Yes.
7) Click the Data tab.
8) Go to Type of list contents. Change Valuelist to Sql.
9) The line below this becomes List content. Click the ellipsis (…) to the right of this property.
10) Base opens the SQL Command – LibreOffice Base: Query Design window and the Add Table or Query dialog. The PaymentType table has the entries that are required.
Click it, and then click the Add button.
Close the Add Table or Query dialog.
11) In the SQL Command – LibreOffice Base: Query Design window, double-click Type in the table named PaymentType. This places Type in the Field row of the tabular area.
Figure 25: Selecting PaymentType
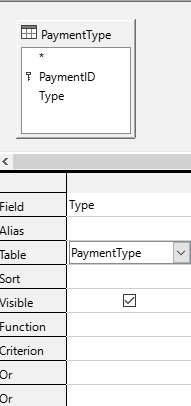
12) Save and close this window. The SQL code appears in the List content property. (SELECT "Type" FROM "PaymentType")
13) Change the Bound field value from 1 to 0.
14) Repeat these steps for each field containing the word “Payment”, six fields in total. (See Note below before doing this.)
There are times, as in this example, when ) through ) produces the same SQL code. When this happens, copy the code. Paste the code into the Type of list contents property before doing ). It is a nice shortcut.
Step : Modifying text controls
These are limited to controls whose fields begin with txt. This is when the labels and fields are modified if necessary to make them more meaningful. In this example, all but one control contains the word “Payment”. The content of these are payment types which determines that name given to them. The other one is named Note.
Next the size of the controls needs to be modified based upon the contents they will contain. Because it is hard to determine beforehand just how large the Note control needs to be, this will be done after all of the other controls are arranged in a more compact order. The rest of the controls with text will have their sizes changed now.
1) Rename the labels.
a) Locate the topmost text control in the Form Navigator.
b) Select the associated the control label (begins with lbl). Make sure that the title of the Properties dialog has become Label Field.
c) Click the General tab if it is not already selected.
d) Click the down-arrow at the right end of the Label property to open the drop-down. Only then rename the label to Payment Type and press Enter.
e) Click on another property to save this change.
f) Adjust the width of the label field if necessary for the new width of the label name.
g) Repeat ) through ) for each label field in the form that contains the word Payment.
Note
This database form contains multiple controls with the same label: Payment Type. When this name has been entered for the first time, it can be copied. In ) for the next label, highlight the current label name, paste the name you want, and click another property.
2) Resize the fields.
a) Make sure that you are in the edit mode, with the Form Navigator and Properties dialogs open.
b) In the Form Navigator dialog, click the field whose size you want to change.
c) Scroll down to the Width property in the Properties dialog.
d) Estimate the width required based on the set of possible values for this field and change the Width property to that value. In the case of our Payment Type fields, the text box should be wide enough for the longest possible payment type value of “Kevin”.
Figure 26: Modifying listbox properties
e) Click either the PositionY or the Height property to save the change. (These are adjacent properties, but clicking on any other property will do the same thing.)
Use these same steps to change the size for each of the remaining text controls, including txtSnackNo and all the payment type fields.
1) With the Properties and Form Navigator dialogs open, select the datDate field in the Form Navigator dialog. The heading of the Properties dialog changes to Properties: Date Field.
2) In the General tab of the Properties dialog, scroll down to the Date format property. In the drop-down list, select the date format you desire.
3) Scroll down to the Dropdown property and select Yes.
4) Is the width of the Date field inappropriate for the selected format? If so:
a) The Date field has a border around it.
b) Move the cursor over the middle green marker on the right side of the Date field. It should become a horizontal double arrow. Drag this to the right to increase the width. Drag it to the left to reduce the width. (It may take several attempts to get this right.)
Step : Modify formatted controls
At each step, instructions have been given for which changes need to be made. With the help of the Form Navigator, make a list of the formatted fields and their labels. The fields are those with the prefix, fmt. (There are eight of them.)
One of these fields, Odometer, contains the odometer readings as integers. The rest are currency fields. Selecting the correct format follows the same steps.
Working with one control at a time perform the following tasks:
1) Check that the label of the control provides the annotation that you require. In the case of lblSnCost, change it to Snack Cost.
2) Click the label of the control to be modified in the Form Navigator. If the border for the label is longer or shorter than the text in the label, adjust its width as described for the Date field above.
3) Click this formatted field in the Form Navigator list.
a) Under the General tab, scroll down to the Formatting property.
b) Click the ellipsis (…) on the right to open the Format Number dialog.
c) For the Odometer field click Number in the Category list, otherwise click Currency.
d) Under Format, select the example to be used.
e) Select the desired number of decimal places (one for Odometer, two otherwise).
f) Select the desired number of leading zeros.
g) Negative numbers red: check if yes, remove the check if no.
h) Thousands separator: check if yes, remove check if no.
i) Click OK.
j) If the width of the field is not correct for the selected format, adjust its width as described for the Date field above.
4) Repeat these steps for each field name in the Form Navigator that begins with fmt.
Step : Modify fields in the table
The labels in these controls form the headings of the columns. The values of the field are in the column. The Form Navigator does not show any information about them. So modifications must be done using the Properties dialog.
The controls in a table control require the same types of modification as have already been discussed. To change things, click the header to be able to access that particular control’s properties.
1) Click the Date label (the column named Date).
a) Scroll to the Date format property. In the drop-down list, select the format you desire, if different from the default setting.
b) Scroll to the Width property. Adjust the width if necessary.
c) Scroll to the Dropdown property. If you want to have a small calendar pop-up window, select Yes.
2) Click the FuelCost label.
a) Open the drop-down list for the Label property. Add a space between Fuel and Cost. Press Enter.
b) Scroll to the Formatting property. Click the ellipsis (…) on the right. Select Currency from the Category column. Uncheck Negative numbers red and Thousands separator. Click OK.
c) Scroll to the Width property. Adjust the width if necessary.
d) Change the Alignment property if you do not want data to be to the left. Select Center to put the data in the middle of the cell.
3) Click the FuelQuantity label.
a) Open the drop-down list for the Label property. Add a space between Fuel and Quantity. Press Enter.
b) Scroll to the Formatting property. Change if needed to show three decimal places.
c) Scroll to the Width property. Adjust the width if necessary.
d) Change the Alignment property if you do not want data to be to the left. Select Center to put the data in the middle of the cell.
4) Click the Odometer label.
a) Scroll to the Formatting property. Change if needed to show one decimal place.
b) Scroll to the Width property. Adjust the width if necessary.
c) Change the Alignment property if you do not want data to be to the left. Select Center to put the data in the middle of the cell.
5) Click the PaymentType label.
a) Right-click this label to open a context menu to add a list box. Select Replace with > List Box in the context menu.
b) Open the drop-down list for the Label property. Add a space between Payment and Type. Press Enter.
c) On the Data tab, change the Type of list contents property to Sql.
d) Paste the SQL code SELECT "Type" FROM "PaymentType" into the List content property. (This is a shortcut method – see the Tip on page 1 and the detailed instructions above it if you want more details).
This is a suggested layout which looks reasonably well organized. Use this one or create one that appeals to you. The controls may be wider or narrower than yours because of the content that will be in them. Note that this layout has left space for the additional labels that will be added later.
1) Three icons need to be activated on the Form Design toolbar: Display Grid, Snap to Grid, and Helplines While Moving. If this toolbar is on the side of the form, click the double arrow (») to open a sub toolbar showing them. If the toolbar is on the top or bottom of the form, they are on the right end of it. If there is a double arrow at the end, click it to reveal them. Make sure they are highlighted as in this figure.
Figure 27: Help for moving controls
Tip
You can also control the Display Grid, Snap to Grid, and Helplines While Moving options using the View > Grid and Helplines menu.
2) Some of the controls need to be moved in pairs so the Form Navigator needs to remain open. Close the Properties dialog now.
Figure 28: Form suggested layout
Note
When moving a control, it is tempting to use the PositionX and PositionY properties to place the control exactly where you want it to be. Do not do this. This will place the control’s label and field on top of each other. These properties can be used to move a label or field to a specific location, but are not designed to move a control. Use the Position and Size icon on the Form Design toolbar to move a control or group of selected controls.
The list in the Form Navigator reveals which controls needed to be grouped based upon their names:
lblMotel / fmtMotel with lblMPayment / txtMPayment;
lblBreakfast / fmtBreakfast with lblBPayment / txtBPayment;
lblLunch / fmtLunch with lblLPayment / txtLPayment;
lblSupper / fmtSupper with lblSPayment / txtSPayment;
lblSnackNo / txtSnackNo with lblSnCost / fmtSnCost and with lblSnPayment / txtSnPayment (group these three controls together);
lblMiscellaneous / fmtMiscellaneous with lblMiscPayment / txtMiscPayment.
That is six groups of controls; each one will be moved separately.
The layout shows, for each of these groups, an order as to where each control of a group goes. For most of them, the first control holds the cost, and the second contains the payment type in a row. The snacks places the number of snacks followed by the cost and then the payment type. The miscellaneous controls contains the payment below the cost.
3) Before moving an entire group to a new location, move the controls within the group to where you want them to be relative to each other, such as the order mentioned in the last paragraph.
a) Click on the first control, placing a border around it.
b) Place the cursor over the label or field where it changes its shape.
c) Drag it to an open area of the form.
d) Using the same method, move the second control to the correct position relative to the first control.
As soon as you begin to move it, the helplines will appear. Use them to line up the edges of the controls before releasing the cursor.
e) If there is a third control, move it to the correct position relative to the second one.
4) Move the controls for the group to where you want them:
a) Click the first component in the Form Navigator list.
b) Use the standard Control+Click and Shift+Click mechanisms until all of the labels and fields in this group are highlighted.
c) Place the cursor over one of the labels or fields changing the arrow.
d) Drag the group to where you want its controls to be.
5) Repeat for the other controls using these same steps. If a group is going to be below another group of controls, use the helplines to line up the left end of the two groups (for example: first control under left control).
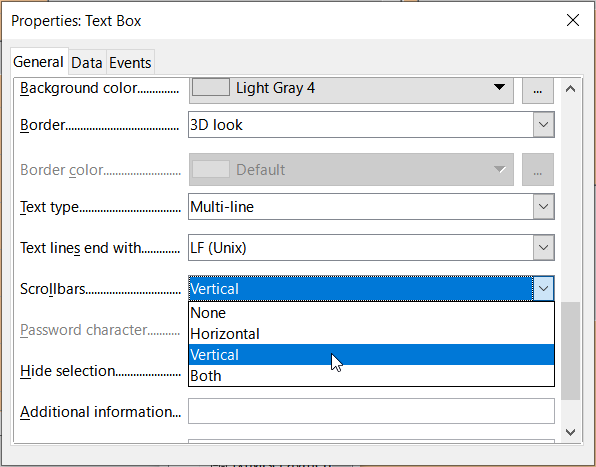
The size of the Note control allows it to be moved into a place on the form that permits the controls of the form to be organized without changing the size of the Note control. This might not always be the case. If the size had needed modification, this is done using the same methods as for other text controls.
The other modification is adding scrollbars. The choices are none, vertical, horizontal, or both.
1) To change the size of this control, follow the same steps for changing the size for any text control.
2) If necessary, move the control to the required position using the same steps described above for grouping the controls (Step ).
3) Click the Control Properties icon on the Form Design toolbar if the Properties dialog is not open.
4) Select the txtNotes control in the Form Navigator dialog.
5) On the Properties dialog, click the General tab if it is not selected.
6) Scroll down to the Text type property.
7) Select the Multi-line option in its drop-down list.
8) Scroll down to the Scrollbars property.
9) In its drop-down list, select the option you need (None, Vertical, Horizontal, or Both).
10) Close the Properties dialog.
Figure 29: Scroll bar selections in the Properties dialog
This task is easier to complete if you have end-of-paragraph markers visible. You should turn them on by selecting View > Formatting Marks, or by clicking the Toggle Formatting Marks icon on the Standard toolbar, or by pressing Ctrl+F10.
1) Make sure that the cursor is in the top left hand corner of the Database Form window. If it is not, click in that corner to move the cursor there.
2) Press the Enter key repeatedly to move the cursor down until it aligns with the gap between the Date field and the Breakfast field.
3) Use the Set Paragraph Style drop-down list on the Formatting toolbar to select the Heading 2 style.
4) Use the space bar to move the input cursor along the empty line to the position where you want the first heading to appear. Type the heading Meals.
5) Use the space bar to move the input cursor along the same line to the position where you want the second heading to appear. Type the heading Snacks.
6) Press the Enter key repeatedly to move the cursor down until it aligns with the gap between the Supper field and the table.
7) If necessary, use the Set Paragraph Style drop-down list on the Formatting toolbar to re-select the Heading 2 style.
8) Use the space bar to move the input cursor along the line to the position where you want the table’s heading to appear. Type the heading Fuel Data.
Tip
If you have experience in using styles, you can open the Styles deck by selecting View > Styles, or by pressing F11. Right-clicking the Heading 2 style and selecting the Modify option in the context menu would allow you to quickly modify the appearance of all three headings. See the Writer Guide for details.
The background for a form can be a color, or a graphic (picture). You can use any of the colors in the color table at Tools > Options > LibreOffice > Application Colors. If you know how to create custom colors, you can use them. You can also use a picture (graphic file) as the background.
To add a color to the form background:
1) Right-click the form and select Page Style in the context menu.
2) Base displays the Page Style dialog (Figure 30). Make sure the Area tab is selected.
Figure 30: Page Style dialog
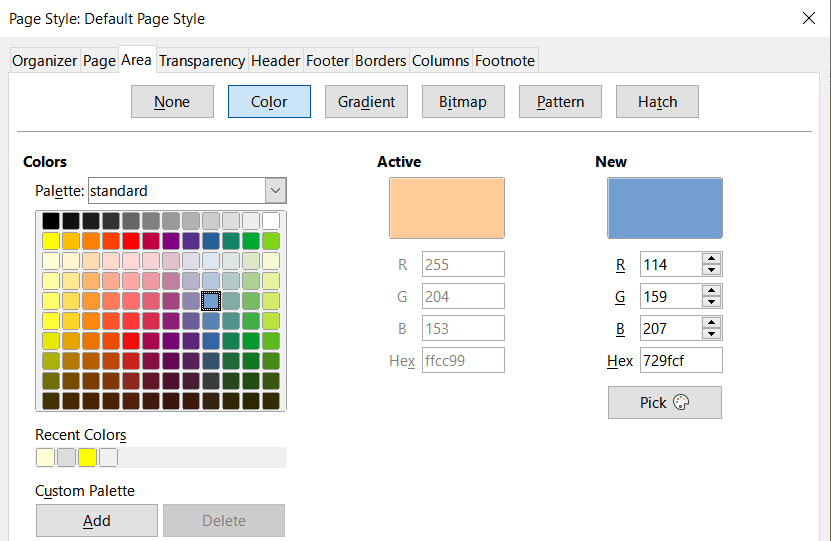
3) Select Color in the row of buttons near the top of the tab.
4) Select a color from the grid. You can change the color palette to access more choices or use the RGB or Hex boxes to specify a color, or click Pick for even more choices.
5) Click Apply to see what your selection will look like in your form.
6) Change if necessary.
7) Click OK to accept your color choice and close the dialog.
To add other form backgrounds:
1) Perform steps ) and ) as for adding color to the background.
2) Select the type of background from the row of buttons: None, Gradient, Bitmap, Pattern, or Hatch.
3) In the selected type, choose one of the selections provided or create your own. For details, see Chapter 4, Changing Object Attributes, in the Draw Guide.
4) Click Apply to see what your selection will look like in your form.
5) Click OK to accept your choice and close the dialog.
If you selected a bitmap in the list, the form might look like Figure 31.
Figure 31: Finished form
The Tab key moves the cursor from field to field. This is much easier to do than to click each field to enter data into it. It also permits us to group our expenses into areas before we begin entering data. For example, all of our meal receipts can be grouped together as can our snacks and also our fuel purchases.
Figure 32: Form Design toolbar with Activation Order icon circled

1) If it is not open already, select View > Toolbar > Form Design to open the Form Design toolbar.
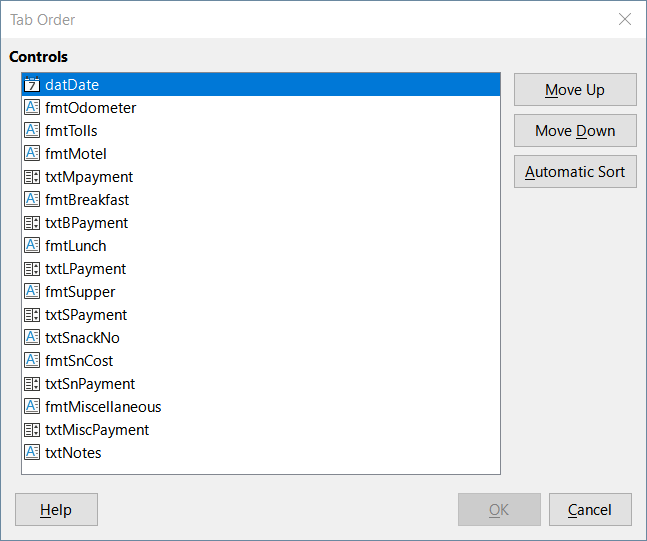
2) Click the Activation Order icon (circled in Figure 32).
3) Rearrange the order of the fields in the Tab Order dialog.
a) If you click the Automatic Sort button, Base will interpret the structure of your form and propose what it considers to be a sensible tab order.
b) You can use the Move Up and Move Down buttons to change the position of a selected control in the list.
c) You can drag a control from one position to another in the Controls list.
d) You may chose to define your own tab order, or you could put the fields in the same order as that shown in Figure 33.
e) Click OK.
4) Save and close the form.
5) Save the database.
Figure 33: Possible tab order for the Vacations form
Records are used to organize the data we enter into a form. They also organize the data we enter into a subform.
Different types of fields allow different methods of data entry. In many cases, more than one method can be used.
The first step to entering data in a form is to open it from the main database window (Figure 3).
1) Click the Forms icon in the Database list, or select View > Database, or press Alt+M.
2) Find the form’s name in the Forms list (Vacations).
3) Double-click the form’s name.
Note
The order in which the following descriptions are presented assume a particular tab order for the form, and this may not match the tab order that you want to define.
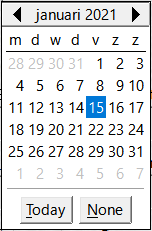
The quickest way to enter a date in the Date field is to click the arrow that opens the drop-down calendar (Figure 34) and click the day that you want. Then press the Tab key to go to the next field.
Figure 34: Calendar drop down
The Odometer, Tolls, and Motel fields are numeric fields. Enter values directly into them, or use the up and down arrows (if you selected to display them during form creation). When the value has been entered, use the Tab key to go to the next field.
Typing the up arrow increases the value, and the down arrow decreases the value by one unit.
The two arrows only change the numerals to the left of the decimal place.
Numerals to the right of the decimal place must be changed by deleting them and typing the desired ones.
The Motel’s Payment Type field is a drop-down list. If, as in my case, all of the elements of the list start with different letters, typing the first letter selects the desired entry.
If two or more elements of the list have the same first letter, repeated typing of the first letter will cycle through these elements.
When the selection is correct, use the Tab key to go to the next field.
The rest of the fields of the main form are either numeric fields or drop-down lists until we reach the Notes field. It is a text field. Type anything you desire in this field just as you would any simple text editor.
Note
The Tab key is used to move between fields. But since text fields do not have tab positions in them, they can not be used to move from one position in the field to another one. All spacing must be done by the space bar. The Enter key is a little more complex. It can be used to move between non-text fields. With a text field, its action depends upon whether the text field has a single line property. With it, pressing Enter will move the cursor to the next field. But when the field has a multi-line property, pressing Enter moved will only move the cursor down one line. With this field, the Tab key has to be used to move the cursor to the next field.
If we did not have a subform for fuel data, pressing the Tab key in the last field would save all of the fields, clear them, and make the form ready to accept data on the second record.
Since we have a subform, using the Tab key places the cursor in the first Date field of the subform with the date automatically entered to match the Date field of the main form.
The Fuel Cost, Fuel Quantity, and Odometer fields are numeric fields. The Payment Type field is a drop-down list. Enter the data just as you did in the main form, and use the Tab key to go to the next field.
When you use the Tab key to leave the Payment Type field, it goes to the Date field of the next line and automatically enters the date. Now you can enter your second set of fuel data for this day.
Figure 35: Sample record of the Vacations form and subform
To move to another record when the form has a subform, click any of the fields of the main form. In this case, click the Date field of the main form. Then use the directional arrows at the bottom; from left to right: First Record, Previous Record, Next Record, and Last Record (all have keyboard shortcuts identified in their extended tips). To the right of these arrows is the New Record icon.
To create a new record while in the last record of the main form, click either the Next Record icon or the New Record icon.
Tip
The number in the Record box is the number of the record whose data is shown in the form.
If you know the number of the record you want, you can enter it into the record box and then type Enter to take you to that record.
Figure 35 is a record with data inserted in its fields.
If you have data in a spreadsheet document that represents the layout of a database table, and you want to copy it into a table of your database, then it is possible to load the sheet contents quickly by dragging and dropping the sheet into a database table:
1) Open the database file in the LibreOffice Base window (Figure 3) and select the Table view.
2) Open the spreadsheet in Calc. Select the sheet you want to insert in the database.
3) Place the two windows side by side on your desktop.
4) Drag the sheet tab in the bottom of the Calc window into the table list of the database file. The mouse pointer shows a square with a + sign. (Sheet tab: This has the name of the sheet on it.)
5) Drop the sheet by releasing the mouse button.
6) The Copy table wizard appears to help you migrate the content to the database table.
7) On the first page of the wizard, select the options of the copy operation and name the database table. Each option is explained in the Help (F1).
8) On the second page of the wizard, select the sheet columns you want to copy into the table.
9) On the third page of the wizard, define the data type of each column of your table.
10) Click Create to populate the new table with the spreadsheet data.
Note
The Copy table operation copies only values and strings from the Calc spreadsheet. It does not copy formulas.
Queries are used to get specific information from a database. Their results are special tables within the database.
To demonstrate the use of queries, we will use two different methods:
Using our CD-Collection table, we will create a list of albums by a particular artist. We will do this using the Query Wizard.
The information we might want from the Fuel table includes what our fuel economy is. We will do this using Design View. (Queries that require calculations are best created with Design View.)
Queries created by the Query Wizard provide a list, or lists, of information based upon what one wants to know. It is possible to obtain a single answer or multiple answers, depending upon the circumstances.
In the main database window (Figure 3), click the Queries icon in the Database section, select View > Queries, or press Alt+Q. In the Tasks section, click Use Wizard to Create Query. The Query Wizard dialog opens (Figure 36). The information we want is which albums are by a certain musical group or individual (the album’s artist). We can include when each album was bought.
Note
When working with a query, more than one table can be used. Since different tables may contain the same field names, the format for naming fields in a query is table name.field name, with a period (.) between the table name and the field name. For example, the Lunch field of the Vacations table used in a query has the name Vacations.Lunch.
Figure 36: First page of the Query Wizard

Step 1: Select the fields
1) Select the Table: CD-Collection option in the Tables drop-down list.
2) Select fields from the CD-Collection table in the Available fields list.
a) Click Artist, and use the > button to move it to the Fields in the Query list.
b) Move the AlbumTitle and DatePurchased fields in the same manner. You can also move a single field from one list to the other by double-clicking.
c) If you make a mistake, you can return an unwanted field from the Fields in the Query list to the Available fields list by selecting it and then typing the < button.
d) In other circumstances, you can use the >> and << buttons to move all fields in one list to the other list.
3) Click Next.
Tip
To change the order of the fields, select the field you want to move and click the up or down arrow to the right of the Fields in the Query list.
Step 2: Select the sorting order
Up to four fields can be used to sort the information of our query. A little simple logic helps at this point. Which field is most important?
In our query, the artist is most important, the album title is less important, and the date purchased is of least importance. Of course, if we were interested in what music we bought on a given day, the date purchased would be the most important.
Figure 37: Sorting order page
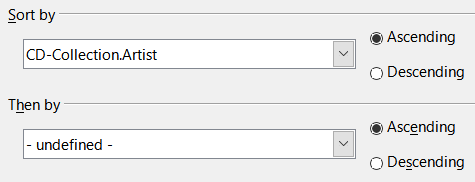
1) Click the first Sort by drop-down list.
a) Select the CD-Collection.Artist option.
b) To list the artists in alphabetical order (a-z), select Ascending on the right.
2) Click the first Then by drop-down list.
Select CD-Collection.AlbumTitle and then select Ascending.
3) Click the second Then by drop-down list.
Select CD-Collection.DatePurchased and then select Ascending.
4) Click Next.
Step 3: Select the search conditions
The search conditions allow us to compare the name we entered with the names of the artist in our database and decide whether to include a particular artist in our query results or not. The following options are available:
is equal to: the same as
is not equal to: not the same as
is smaller than: comes before
is greater than: comes after
is equal or less than: the same as or comes before
is equal or greater than: the same as or comes after
like: similar to in some way
not like: is not similar to
is null:
is not null:
Note
These conditions apply to numbers, letters (using alphabetical order), and dates.
1) Since we are only searching for one thing, we will use the default setting of Match all of the following.
2) We are looking for a particular artist, so select CD-Collection.Artist in the Fields drop-down and is equal to in the Condition drop-down.
3) Type the name of the artist in the Value box.
4) Click Next.
Step 4: Select the type of query
We want simple information, so the default setting: Detailed query is what we want. Click Next.
Note
Since we have a simple query, the Grouping and Grouping conditions are not needed. Steps 5 and 6 of the wizard are skipped in our query.
Step 7: Assign aliases if desired
The fields, AlbumTitle and DatePurchased, have names made up of two words without separation. Instead, aliases can be made containing two words each (Album Title and Date Purchased, respectively).
1) Change the alias for AlbumTitle to Album Title.
2) Change the alias for DatePurchased to Date Purchased.
3) Click Next.
Step 8: Overview
1) Make sure that the query conditions listed in the Overview area are the ones you wanted.
2) If something is wrong, use the Back button to move to the step that contains the error.
3) Then use the Next button to return to this Overview step.
4) Name the query (suggestion: Query_Artists).
5) To the right of this are two choices. Select Display Query.
6) Click Finish.
Base displays the LibreOffice Base: Table Data View query showing any records that match the query. Close the window when you have finished with it.
Creating a query using Design View is not as difficult as it may first seem. It may take multiple steps, but each step is fairly simple.
What fuel economy is our vehicle getting (miles per gallon in the USA)? This question requires us to create two queries, with the first query used as part of the second query.
Step 1: Open the first query in Design View
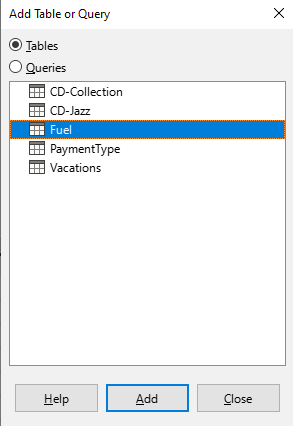
Click Create Query in Design View in the Tasks area of the main window. Base displays the Add Table or query dialog (Figure 38) and the LibreOffice Base: Query Design window.
1) In the Add Table or query dialog, click Fuel to highlight it.
2) Click Add.
3) Click Close.
4) Base closes the Add Table or Query dialog and includes the Fuel table in the upper area of the Query Design window.
Figure 38: Add Table or Query dialog
Tip
Move the cursor over the bottom edge of the Fuel table (Figure 39) and drag the edge to make it longer and easier to see all of the fields in the table.
Figure 39: Fuel table in query
Step 3: Add fields to the table at the bottom
1) Double-click the FuelID field in the Fuel table.
2) Double-click the Odometer field.
3) Double-click the FuelQuantity field.
4) Double-click the FuelCost field.
The query table at the bottom of the Query Design dialog should now have four columns (Figure 40).
Figure 40: Query table

Step 4: Set the criterion for the query
We want the query to include FuelID values that are greater than 0.
1) Type >0 in the Criterion cell under FuelID in the query table.
2) Click the Run Query icon on the Query Design toolbar(circled in red in Figure 41), or click View > Run Query, or press F5.
Figure 41: Run Query icon in Query Design toolbar

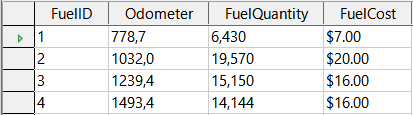
Base presents the results of the query in the area above the query table.
Figure 42 shows the Fuel table with my entries. The query results based upon the Fuel table are shown in Figure 43.
Figure 42: Fuel table
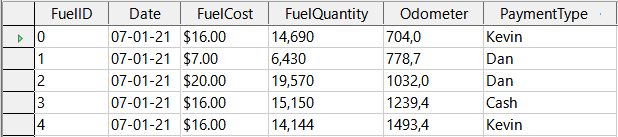
Figure 43: Query of Fuel table
Step 5: Save and close the query
Since this query contains the final odometer reading for our calculations, name it End-Reading when saving it. Then close the query. Now click the Save icon in the main database window.
Step 6: Create the query to calculate the fuel economy
1) Click Create Query in Design View in the Tasks area of the main window to open a new query.
2) Base opens the LibreOffice Base: Query Design window and the Add Table or Query dialog.
3) Add the Fuel table to the query just as you did in Step 2: Add tables to window but do not close the Add Table or Query dialog.
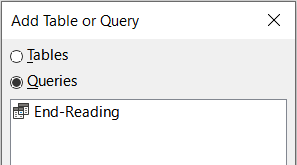
4) Add the End-Reading query to this query.
a) Click Queries to get the list of queries in the database (Figure 44).
b) Click End-Reading.
c) Click Add, and then click Close.
d) Base closes the Add Table or Query dialog and displays the Fuel table and End-Reading query in the upper area of the Query Design window.
Figure 44: Selecting queries to add to another query
Step 7: Add fields to the table at the bottom of the query
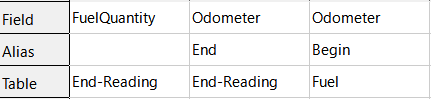
We are going to calculate the fuel economy. To do this we need the fuel quantity and distance traveled. Since the fuel quantity we want to use is the final odometer reading, we will use the End-Reading query to get it. We will also use the Odometer field from both the Fuel table and End-Reading query.
Figure 45: Tables in this query
1) Double-click FuelQuantity in the End-Reading query.
2) Double-click Odometer in the End-Reading query.
3) Double-click Odometer in the Fuel table.
Figure 46: Added fields to the query

Step 8: Enter the FuelID difference field
We want the difference between the FuelID value of the Fuel table and FuelID value of the End-Reading query to equal one (1).
1) Type "End-Reading"."FuelID" - "Fuel"."FuelID" in the field to the right of the Odometer field of the Fuel table (Figure 47).
2) Type = '1' in the Criterion cell of this column.
3) Leave the Visible cell of this column unchecked.
4) Calculate the distance traveled:
Type in the next empty Field cell (Figure 48):
"End-Reading"."Odometer" - "Fuel"."Odometer"
In the Alias row, type Distance.
Type > '0' in the Criterion cell.
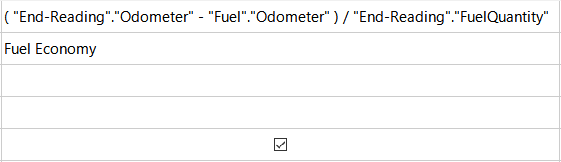
5) Calculate fuel economy: Type
("End-Reading"."Odometer" - "Fuel"."Odometer")/"End-Reading"."FuelQuantity"
in the next column to the right of the word Field (Figure 49).
6) Type Fuel Economy as the alias.
Figure 47: Typing in calculation of fields
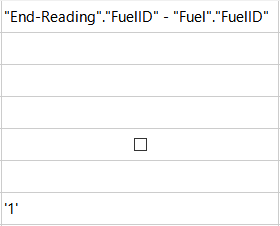
Figure 48: Field for distance traveled calculations
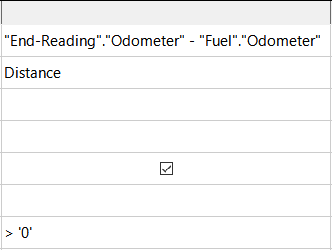
Figure 49: Fuel economy calculation field
Note
When entering fields for these calculations, you must follow this format: table or query name followed by a period followed by the field name. For hyphenated or multiple-word names (table or query), use double quotes around the table or query name. The query will then add the rest of the double quotes as in Figure 49.
Use the arithmetical symbol between the two. More than one calculation can be done by using parentheses to group the arithmetical operations.
Step 9: Run the query and make some modification
After we run the query to make sure it works correctly, we will hide all of the fields that we do not need.
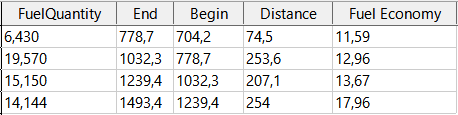
Figure 50: Result of running the fuel economy query
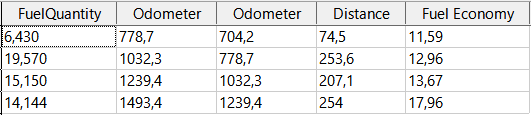
1) Click the Run Query icon on the Query Design toolbar (Figure 41). The results are shown in Figure Figure 50.
2) Add Aliases: Type the aliases as they are listed in Figure 51.
Figure 51: Query table with Odometer aliases added
3) Run the query again. The results are in Figure 52.
Figure 52: Query run with aliases
Step 10: Close, save, and name the query
My suggestion for a name is Fuel Economy.
1) Click the Save icon.
2) Name the query.
3) Close the query.
4) Save the database file.
There are obviously other calculations that can be made in this query such as cost per distance traveled and how much of the cost belongs to each of the payment types.
Note
To fully use queries requires a knowledge of set operations (unions, intersections, and, or, complements, or any combinations of these). Having a copy of the RDBMS manuals, is also extremely useful.
Reports provide information found in the database arranged in a useful way. In this respect, they are similar to queries. They are different in that they are designed to be distributed to people. Queries are only designed to answer a question about the database. Reports are generated from the database’s tables, views, or queries.
All reports are based upon a single table, view, or query, so you need first to decide what fields you want to use in the report. If you want to use fields from different tables, you must first combine these fields in a single query or view. Then you can create a report from this.
For example, a report on vacation expenses includes both fuel costs and meal costs. These values are contained in fields of two different tables: Vacations and Fuel. So this report requires you to create a query or view.
Caution
Dynamic reports update only the data that is changed or added to a table or query. They do not show any modifications made to the table or query itself. For example, after creating the report below, open the Fuel Economy query created in the previous section. For the “End-Reading”.“Odometer” – “Fuel”.“Odometer” column, change the number 1 to the number 3 (see Figure 47). The report will be identical before and after you make the change. But if you add more data to the query and run the report again, it will contain the new data. However, all data will be based upon “End-Reading”.“Odometer” – “Fuel”.“Odometer” having the value 1. No data will be present in the report for which “End-Reading”.“Odometer” – “Fuel”.“Odometer” has the value 3.
We will create a report on vacation expenses. Certain questions need to be asked before creating the report.
What information do we want in the report?
How do we want the information arranged?
What fields are required to provide this information?
Will a query or view have to be created because these fields are in different tables?
Are any calculations required in the data before being added to the report?
The expenses for our vacation are motel, tolls, miscellaneous, breakfast, lunch, supper, snacks, and fuel. One possible report could list the totals of each of these expense groups. Another could list the expense totals for each day of the vacation. A third could list the totals for each expense group for each type of payment. (This would let us know where the money came from to pay the expenses.) Once you create a query to do any one of these, you can create a report based upon the query.
We will create two reports, one listing the expenses each day (other than fuel) and the second listing fuel statistics. The fields we need for the first report from the Vacations table are: Date, Motel, Tolls, Breakfast, Lunch, Supper, Snack Cost, and Miscellaneous. This report only requires the Vacations table. Had the report listed the total expenses for each of these fields, we would have to create a query to provide us with these totals, which is beyond the scope of this chapter.
The second report involves the Fuel table. Since this table includes fuel purchases at times other than during the vacation, we need to create a query that contains only the fuel purchased during vacation periods.
1) When you open the Report Wizard, the Report Builder also opens. As you make your selections in the wizard, these appear in layout in the Report Builder. When you have finished making your selections, you save the report, name it and then close it.
2) When using Design View to create a report, you open the Report Builder to design the layout of it. (There is only one layout available when the wizard is used.)
To create a new report:
1) Click the Reports icon in the Database area of the main Base window (Figure 3), or select View > Reports, or press Alt+R.
2) In the Tasks list, click Use Wizard to Create Report. The Report Wizard dialog and the Report Builder window open.
Step 1: Field selection
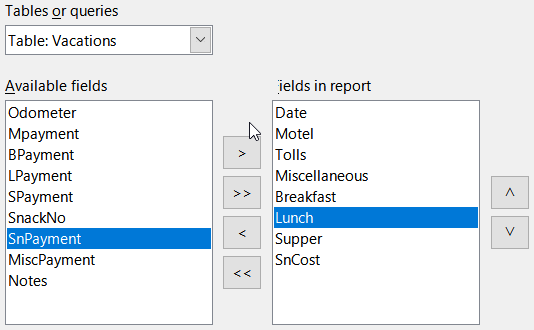
1) Select Table: Vacations in the Tables or queries drop-down list.
2) Use the > to move these fields from the Available fields list to the Fields in report list: Date, Motel, Tolls, Miscellaneous, Breakfast, Lunch, Supper, and SnCost. The other buttons (<, >>, <<, up arrow, and down arrow) and the double-click action perform similar functions to the equivalent interactions on other wizard pages as described earlier in this chapter.
3) Click Next.
Figure 53: Adding fields to a report
Step 2: Labeling fields
Change any field labels you wish. We will shorten Miscellaneous to Misc. and expand SnackCost into two words.
Figure 54: Giving aliases to fields
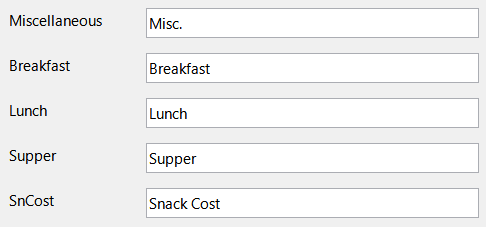
1) Shorten Miscellaneous to Misc.
2) Change SnCost into Snack Cost.
3) Click Next.
Step 3: Grouping
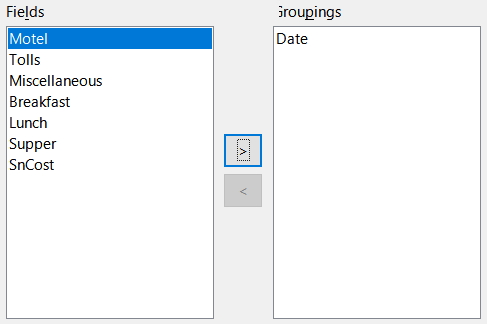
1) Since we are grouping by the date, use the > button to move the Date field from the Fields list to the Groupings list.
2) You can use the < button to return an entry in the Groupings list to the Fields list. You can use the up and down arrows to re-order entries in the Groupings list. You can double-click to move a field from one list to the other.
3) Click Next.
Figure 55: Selecting fields for grouping data
Step 4: Sort options
We do not want to do any additional sorting.
Click Next.
Step 5: Choose layout
1) Select Columnar, three columns in the Layout of data list.
2) Layout of headers and footers have no possible selections.
3) Select Landscape as the Orientation for the page layout.
4) Click Next.
Figure 56: Report Builder template determined by the Report Wizard

Figure 56 shows part of the final template that has been built up in the Report Builder as you reach the end of the wizard.
Step 6: Create report
1) Title the report: Vacation Expenses.
2) Select the Dynamic report option.
3) Select the Create report now option.
4) Click Finish.
5) LibreOffice opens the output report in read-only mode in Writer.
The report (Figure 57) has been created, but it needs some editing. The date could be formatted better, and all the numbers need to be formatted as currency. It could use a heading that includes its name, its author, and the date it was prepared. If the report had more than one page, the page numbers could be put in a footer of each page, perhaps including the total number of pages. But to do these things, you must use Report Builder.
Figure 57: Report without modifications

With Report Builder, you can create complex and stylish database reports. You can define group and page headers, group and page footers, and calculation fields. Report Builder is installed with LibreOffice.
When we used the Report Wizard, we created a template in Report Builder for our report. If we edit our report, we open Report Builder with this template. By modifying the template, we also modify the report. For example, we can change the Date field’s format, and it will change the format of all the dates contained in that field in the above report. Similarly, we can change the field formatting of any of the other fields and change the format everywhere that field appears in the report.
Report Builder can also create reports by itself. To do this, click Create Report in Design View. For instructions on how to use the Report Builder, see Chapter 6, Reports, in the Base Guide.
LibreOffice allows data sources to be accessed and then linked into LibreOffice documents. For example, a mail merge links an external document containing a list of names and addresses into a letter, with one copy of the letter being generated for each entry.
To access a data source that is not a *.odb file:
1) Select File > New > Database, or click the arrow at the right of the New icon on the Standard toolbar and select the Database option in the menu, to open the Database Wizard.
2) Select Connect to an existing database. Select the required database type in the drop-down list. Click Next.
3) The remaining steps in the Database Wizard may vary depending on which database type you have chosen.
4) At some stage the wizard may prompt you to browse to, and select, the database of interest. You will normally select to register the database and open the database for editing.
5) Finally, click Finish to exit the wizard. Name and save the database in the location of your choice.
Accessing a spreadsheet is similar to accessing other databases:
1) Select File > New > Database, or click the arrow at the right of the New icon on the Standard toolbar and select the Database option in the menu, to open the Database Wizard dialog.
2) Select Connect to an existing database. Select Spreadsheet in the drop-down list. Click Next.
3) Click Browse to locate the spreadsheet you want to access. If the spreadsheet is password protected, check the Password required box. Click Next.
4) Make sure that the Yes, register the database for me and Open the database for editing options are selected.
5) Click Finish to exit the wizard. Name and save the database in the location of your choice.
Note
Using this method of accessing a spreadsheet, you cannot change anything in the spreadsheet using Base. You can only view the contents of the spreadsheet, run queries, and create reports based upon the data already entered into the spreadsheet.
All changes in a spreadsheet must be made in the spreadsheet itself, using Calc. After modifying the spreadsheet and saving it, you will see the changes in the database. If you create and save an additional sheet in your spreadsheet, the database will have a new table the next time you access it.
Databases created by LibreOffice are in the *.odb (OpenDocument Database) format. Other programs can also produce databases in this format. Registering a *.odb database is simple:
1) Choose Tools > Options > LibreOffice Base > Databases.
2) Under Registered Databases, click New. LibreOffice displays the Create Database Link dialog.
3) Browse to where the database is located. Make sure the registered name is correct.
4) Click OK.
Note
Sometimes after updating LibreOffice to a newer version, your list of registered database files disappears. When that happens, you can use these steps to re-register your database files with your latest version of LibreOffice.
Having registered the data source, whether a spreadsheet, text document, external database or other accepted data source, you can use it in other LibreOffice components including Writer and Calc.
Open a document in Writer or Calc. To view the data sources available, press Ctrl+Shift+F4 or select View > Data Sources. This brings up a list of registered databases, which will include Bibliography and any other registered database, such as the Automobile database created earlier in this chapter.
To view each database, click the drop-down arrow for the database’s name (Figure 58). This expands to show Queries and Tables. Click the drop-down arrow for Tables to view the individual tables created. Now click on a table to see all the records held in it.
Figure 58: Databases in Data Sources window
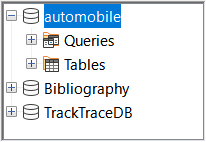
Some data sources (but not spreadsheets) can be edited in the Data Sources window. A record can be edited, added, or deleted.
View a table’s data
If you click on a table, its rows and columns of data appear on the right side of the Data Sources window. Editing this data requires only a click in the cell whose data should be changed, change the data, and click in the row above or below it to save the new data.
Beneath the records are five small buttons. The first four move the cursor to the beginning, to the left, to the right, and to the end respectively. The fifth button, with a small star, inserts a new record.
Figure 59: Data Sources navigation buttons

To delete a record, right-click on the gray box to the left of a row to highlight the entire row, and select Delete Rows in the context window to remove the selected row.
Figure 60: Deleting a row in the Data Sources window
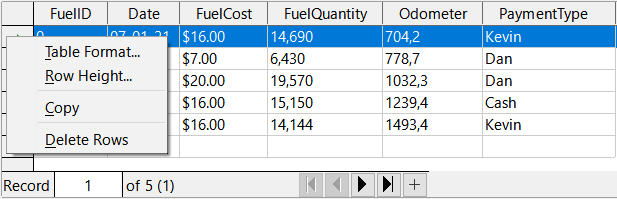
You can launch LibreOffice Base at any time in the Data Sources window. Just right-click on a database or its Tables or Queries components and select Edit Database File in the context menu. Once in Base, you can edit, add, and delete tables, queries, forms, and reports.
Data can be placed into Writer and Calc documents from the tables in the Data Sources window. In Writer, values from individual fields can be inserted. Or a complete table can be created in the Writer document. One common way to use a data source is to perform a mail merge.
Figure 61: Toolbar for the Data Sources window

Tip
Choose Tools > Mail Merge Wizard or click on the Mail Merge icon (circled in Figure 61) in the Data Sources window to start the Mail Merge Wizard, which steps you through creating a mail merge document. See Chapter 14 in the Writer Guide.
To insert a field from a table opened in the Data Sources window into a Writer document, click on the field name (the gray square at the top of the field list) and, with the left mouse button held down, drag the field onto the document. In a Writer document, it will appear as <FIELD> (where FIELD is the name of the field you dragged).
For example, to enter the cost of meals and who paid for them on a certain date of a vacation:
1) Open the list of data sources (Ctrl+Shift+F4) and select the Vacations table in the Automobile database.
2) Use this sentence: “On (date), our breakfast cost (amount) paid by (name), our lunch cost (amount) paid by (name), and our supper cost (amount) paid by (name).” But only type
“On, our breakfast cost paid by, our lunch cost paid by, and our supper cost paid by.”
3) To replace (date), click the field name Date in the Data Sources window and drag it to the right of the word On. Insert an extra space if necessary. The result: On <Date>. If you have field shadings turned on (View > Field Shadings), <Date> has a gray background. Otherwise it does not.
4) To replace first (amount), click the Breakfast field name and drag it to the right of our breakfast cost. Make sure you have the proper spacing between the field names and the words before and after them. Result: breakfast cost <Breakfast>.
5) To replace the first (name), click the BPayment field name and drag it to the right of paid by. Result: paid by <BPayment>.
6) In the same way, fill in the rest of the fields in the sentence.
Use <Lunch> and <LPayment> for the second set of (amount) and (name) in the sentence.
Use <Supper> and <SPayment> for the third set of (amount) and (name) in the sentence.
7) Final result: On <Date>, our breakfast cost <Breakfast> paid by <BPayment>, our lunch cost <Lunch> paid by <LPayment>, and our supper cost <Supper> paid by <SPayment>.
8) Add data to the fields of the sentence:
a) Click the gray box to the left of the row of data you want to add. That row should be highlighted like the second row of Figure 62.
b) Click the Data to Fields icon in the Table Data toolbar (circled in Figure 62). This should fill the fields with the data from the row you chose.
c) Click another row and then click this icon again. The data in the sentence changes to reflect this selected row of data.
d) Save the document if you want to use it as an example later.
Figure 62: Selected row in Data Sources window

Adding data in table format is a little easier and takes perhaps fewer steps. Some of the steps will be quite similar.
1) Navigate to the place you want to place the table and click the location.
2) Ctrl+Click the gray box to the left of each row of the data source that you want to be a row in your table if the rows are not consecutive. To select consecutive rows, click the gray box to the left of the top desired row and Shift+click the bottom desired row.
3) Click the Data to Text icon to open the Insert Database Columns dialog (Figure 63). (The Data to Text icon is to the left of the Data to Fields icon in Figure 62.)
Figure 63: Insert Database Columns dialog

4) Move the fields you want in your table from the Database columns list to the Table column(s) list.
To place the fields in the order you select, click the field and use the single right arrow to move the fields in the order you desire. You can also limit the fields you use to less than all of the fields available.
To use all of the fields, use the double arrow pointing to the right to move all of them at one time (this icon may have a different appearance in some environments). The order of the fields in the table you create will be the same as in the data source table.
To remove a single field from the Table column(s) list, click the field and use the single arrow pointing to the left.
You can double-click a field in one list to move it to the other list.
5) To start over, click the double arrow pointing to the left (this icon may have a different appearance in some environments).
6) Select the settings for your table. Use the default settings as in Figure 63.
7) Click OK. Save the document.
There are two ways to transfer data into a Calc spreadsheet. One enters the data into the spreadsheet cells. The other creates complete new records in the spreadsheet. While you can directly access the data inserted into the spreadsheet cells, new records created in the spreadsheet are read-only.
Entering data directly to the spreadsheet cells uses the Data to Text icon as when making a table in a Writer document. But there are certain differences.
The steps are straightforward.
1) Click the cell of the spreadsheet which you want to be the top left cell of your data, including the column names.
2) Use Ctrl+Shift+F4 to open the Data Sources window and select the table whose data you want to use.
3) Select the rows of data you want to add to the spreadsheet:
Click the gray box to the left of the row (the row header) you want to select if only selecting one row. That row is highlighted.
To select multiple rows, hold down the Ctrl key while clicking the gray box of the rows you need. Those rows are highlighted.
To select all the rows, click the gray box in the upper left corner. All rows are highlighted.
4) Click the Data to Text icon to insert the data into the spreadsheet cells.
5) Save the spreadsheet.
Adding records to a spreadsheet is fairly easy. You need to have the Data Sources window open, your spreadsheet open, and the table you want to use selected.
1) Drag and drop the gray box containing the field name for the table’s ID field (the column header) to where you want the record to appear in the spreadsheet.
2) Repeat until you have copied all of the fields you need to where you want them in the spreadsheet.
3) Select File > Save, or click the Save icon on the Standard toolbar, to name and save the spreadsheet. Close the file.
Next time you open the spreadsheet, the fields will be populated with data from the first record of the table, and the Form Navigation toolbar will appear at the bottom of the spreadsheet.
Click the arrows on the Form Navigation toolbar to view the different records of the table. (The arrows are circled in red in Figure 64.) The number in the box changes when you change the record number by clicking an arrow. The data in the fields changes to reflect the data for that particular record number.
Figure 64: Navigation arrows of a form