
Getting Started Guide 7.2
Chapter 9
Getting Started with Math
LibreOffice’s Formula (Equation) Editor
This document is Copyright © 2021 by the LibreOffice Documentation Team. Contributors are listed below. You may distribute it and/or modify it under the terms of either the GNU General Public License (https://www.gnu.org/licenses/gpl.html), version 3 or later, or the Creative Commons Attribution License (https//creativecommons.org/licenses/by/4.0/), version 4.0 or later.
All trademarks within this guide belong to their legitimate owners.
|
Jean Hollis Weber |
Mitchell Camfield |
|
|
Peter Schofield |
Kees Kriek |
Laurent Balland-Poirier |
|
Rafael Lima |
Winston Min Tjong |
Hazel Russman |
|
Jean Hollis Weber |
John A Smith |
Martin Saffron |
|
Regina Henschel |
Christian Kühl |
Florian Reisinger |
|
Gisbert Friege (Dmaths) |
Jochen Schiffers |
Frédéric Parrenin |
|
Bernard Siaud |
Steve Fanning |
Olivier Hallot |
|
Roman Kuznetsov |
Dave Barton |
|
Please direct any comments or suggestions about this document to the Documentation Team’s mailing list: documentation@global.libreoffice.org
Note
Everything you send to a mailing list, including your email address and any other personal information that is written in the message, is publicly archived and cannot be deleted.
Published September 2021. Based on LibreOffice 7.2 Community.
Other versions of LibreOffice may differ in appearance and functionality.
Some keystrokes and menu items are different on macOS from those used in Windows and Linux. The table below gives some common substitutions for the instructions in this document. For a detailed list, see the application Help.
|
Windows or Linux |
macOS equivalent |
Effect |
|
Tools > Options |
LibreOffice > Preferences |
Access setup options |
|
Right-click |
Control+click or right-click depending on computer setup |
Open a context menu |
|
Ctrl (Control) |
⌘ (Command) |
Used with other keys |
|
F11 |
⌘+T |
Open the Styles deck in the Sidebar |
Math is a formula editor module included with LibreOffice that allows you to create or edit formulas (equations) in a symbolic form, within LibreOffice documents or as stand-alone objects. Example formulas are shown below:
or
The Formula Editor in Math uses a markup language to represent formulas. This markup language is designed to be easily read wherever possible. For example, a over b using markup language produces the fraction when used in a formula.
Using the Formula Editor, you can create a formula as a separate file for a formula library or insert formulas directly into a document using LibreOffice Writer, Calc, Impress, or Draw.
To create a formula as a separate document or file, use one of the following methods to open an empty formula document in LibreOffice Math (Figure 1):
On the Menu bar, go to File > New > Formula.
On the Standard toolbar, click the triangle to the right of the New icon and select Formula.
In the Start Center, click Math Formula.
From within LibreOffice Math, use the keyboard shortcut Ctrl+N.
You can also launch Math from the command line using libreoffice --math
Figure 1: An empty formula document in Math
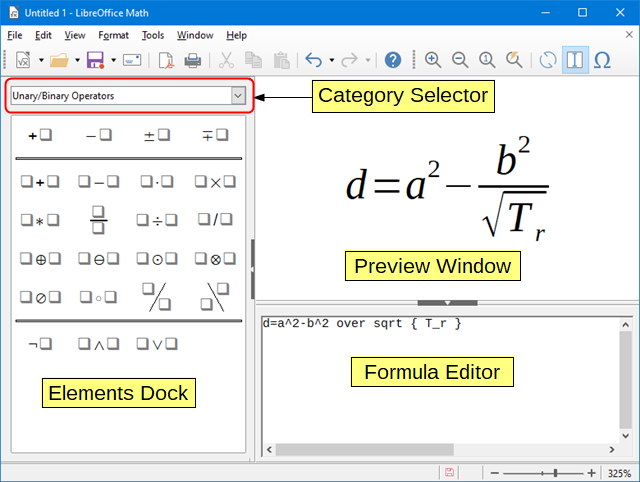
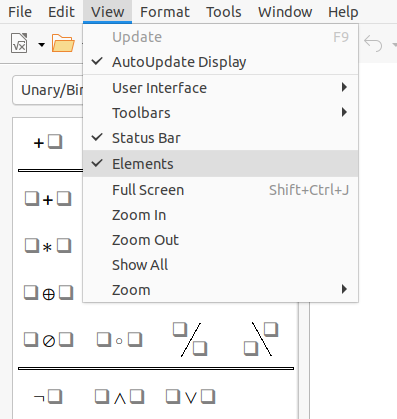
As you enter the markup language in the Formula Editor, the formula will appear in the Preview window during and after input of the markup language. The Elements Dock to the left of the Preview window may also appear, if these have been selected in View on the Menu bar. Figure 2 illustrates how to enable the Elements dock in Math. For more information on creating formulas, see “Creating formulas” on page 1.
Figure 2: Enabling the Elements Dock
To insert a formula into a LibreOffice document, open the document in Writer, Calc, Draw, or Impress. The LibreOffice module you are using affects how you position the cursor to insert the formula.
In Writer, click in the paragraph where you want to insert the formula.
In Calc, click in the spreadsheet cell where you want to insert the formula.
In Draw and Impress, the formula is inserted into the center of the drawing or slide.
Then, go to Insert > Object > Formula Object on the Menu bar to open the Formula Editor. Alternatively, go to Insert > Object > OLE Object on the Menu bar to open the Insert OLE Object dialog, then select Create new option, choose the Object Type “LibreOffice Formula” and then click OK to open the Formula Editor. The Elements Dock to the left of the Preview window and/or the Elements dialog as a floating dialog may also appear, if these have been selected in View on the Menu bar.
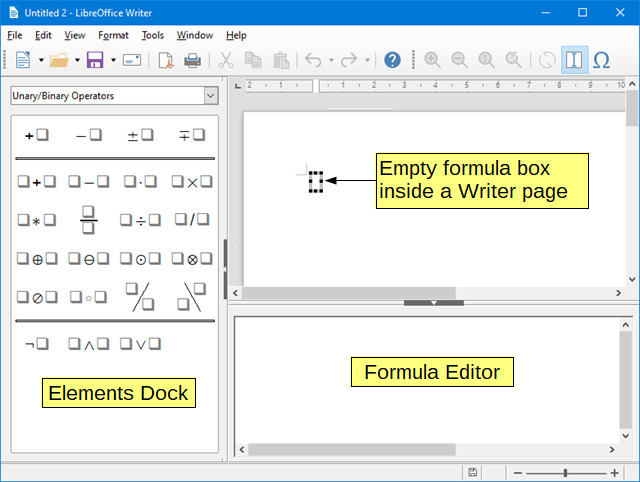
Figure 3 shows an example Writer document with the formula box selected ready for a formula to be entered.
When you have completed entering the markup language for your formula, close the Formula Editor by pressing the Esc key or by clicking an area outside the formula in your document. Double-clicking on the formula object in the document will open the Formula Editor again so that you can edit the formula.
Formulas are inserted as OLE objects into documents. You can change how the object is placed within the document, as with any OLE object. For more information on OLE objects, see “Formulas in Writer” on page 1, “Formulas in Calc, Draw, and Impress” on page 1, and the user guides for Writer, Calc, Draw, and Impress.
Figure 3: Empty formula in a Writer document
If you frequently insert formulas into documents, it is recommended to add the Formula button to the Standard toolbar or create a keyboard shortcut. See “Customization” on page 1 for more information.
You can insert a formula using one of the following methods:
In the Elements dock, select a category in the drop-down list, then select a symbol.
Right-click in the Formula Editor and select a category, then select a symbol in the context menu.
Enter markup language directly in the Formula Editor.
Note
Using the Elements dock or the context menus to insert a formula provides a convenient way to learn the markup language used by Math.
Tip
When using the Elements dock, it is recommended to have Extended tips selected in the LibreOffice Options. This will help you identify the categories and symbols you want to use in the formula. Go to Tools > Options > LibreOffice > General and select Extended tips in the Help section.
The Elements dock can be used when entering formula data.
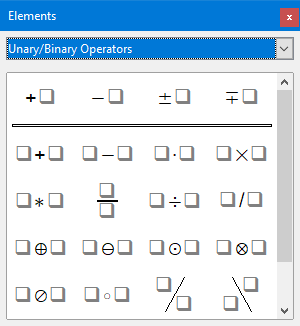
1) Go to View > Elements on the Menu bar to open the Elements dock (Figure 4).
2) Select the category you want to use in your formula in the drop-down list at the top of the Elements Dock.
3) Select the symbol you want to use in the formula in the Elements Dock. The symbols that are available change according to the selected category.
4) After choosing one of the symbols in the Elements Dock, the Formula Editor will be updated with the Markup notation of the selected symbol.
Figure 4: Elements dock
Note
The Elements dock can either be a floating dialog, as shown in Figure 4, or positioned to the left of the Formula Editor, as shown in Figure 1 and Figure 3.
Tip
The Elements Dock also provides an Examples category which provides example formulas to use as a starting point for your formula or equation.
The Formula Editor also provides a context menu to access categories and symbols when creating a formula. Right-click in the Formula Editor to open the context menu. Select a category and then select the markup example that you want to use in the sub-context menu. An example is shown in Figure 5.
Note
The Elements Dock and the context menu contain only the most common commands that are used in formulas. To insert other symbols and commands not listed in the Elements Dock and context menu, you have to enter them manually using the markup language. For a complete list of commands and symbols available in Math, see Appendix A, Commands Reference, in the Math Guide.
Figure 5: Context menu in Formula Editor

Markup language is entered directly into the Formula Editor. For example, typing the markup language 5 times 4 into the Formula Editor creates the simple formula . If you are experienced in using markup language, it can be the quickest way to enter a formula. Table 1 shows some examples of using markup language to enter commands. For a full list of commands that can be used in the Formula Editor, see Appendix A, Commands Reference, in the Math Guide.
Table 1: Example commands using markup language
|
Display |
Command |
Display |
Command |
|
|
a = b |
|
sqrt {a} |
|
|
a^2 |
|
a_n |
|
|
int f(x) dx |
|
sum a_n |
|
|
a <= b |
|
infinity |
|
|
a times b |
|
x cdot y |
Greek characters are commonly used in formulas, but they cannot be entered into a formula using the Elements dock or the context menu. Use the English names of Greek characters in markup language when entering Greek characters into a formula. See Appendix A, Commands Reference, in the Math Guide for a list of characters that can be entered using markup language.
For a lowercase Greek character, type a percentage % sign, then type the character name in lowercase using the English name. For example, typing %lambda creates the Greek character .
For an UPPERCASE Greek character, type a percentage % sign, then type the character name in UPPERCASE using the English name. For example, typing %LAMBDA creates the Greek character .
For an italic Greek character, type a percentage % sign followed by the i character, then the English name of the Greek character in lower or UPPER case. For example, typing %iTHETA creates the italic Greek character .
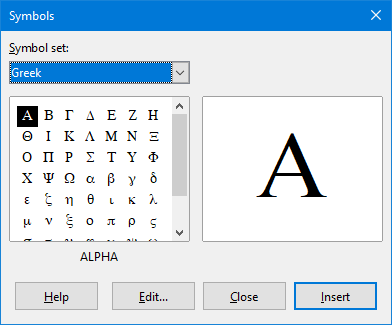
Greek characters can also be entered into a formula using the Symbols dialog.
1) Make sure your cursor is in the correct position in the Formula Editor.
2) Go to Tools > Symbols on the Menu bar, or click the Symbols icon in the Tools toolbar, to open the Symbols dialog (Figure 6).
3) Select Greek in the Symbol set drop-down list. For italic characters, select iGreek in the drop-down list.
4) Double-click the Greek character you want to insert or select it and click Insert. When selected, the name of the character is shown below the symbol list.
5) Click Close when you have finished entering Greek characters into your formula.
Figure 6: Symbols dialog
The simple formula can be created using LibreOffice Math as follows:
1) Make sure your cursor is flashing in the Formula Editor, then select the category Unary/Binary Operators and symbol Multiplication using one of the following methods:
Right-click in the Formula Editor and select Unary/Binary Operators > a times b in the context menu.
In the Elements Dock, select Unary/Binary Operators in the drop-down list and then select the Multiplication icon  .
.
Using markup language, enter 5 times 4 in the Formula Editor.
2) Select the first placeholder <?> before the word times in the Formula Editor and replace it with the character 5. The formula in the document updates automatically.
The first two methods place the formula text <?> times <?> in the Formula Editor and the symbol appears in the document. For the third method, using markup language in the Formula Editor places the formula directly into the document and there is no need to carry out the following steps.
3) Select the second placeholder <?> after the word times in the Formula Editor and replace it with the character 4. The formula in the document updates automatically.
Tip
To move forward from one placeholder to the next placeholder in a formula, press the F4 key. To move backward from one placeholder to the previous placeholder in a formula, use the key combination Shift+F4.
Note
If necessary, you can prevent a formula in a document from updating automatically. Go to View on the Menu bar and deselect AutoUpdate display. To then manually update a formula, press the F9 key or select View > Update on the Menu bar.
You want to enter the formula where the value of pi is rounded to 5 decimal places. You know the name of the Greek character (pi), but do not know the markup associated with the Is Similar Or Equal symbol .
1) Make sure your cursor is flashing in the Formula Editor.
2) Enter %pi in the Formula Editor to enter the Greek character for pi (π).
3) Select the category Relations and symbol Is Similar Or Equal using one of the following methods:
Right-click in the Formula Editor and select Relations > a simeq b in the context menu.
In the Elements dock, select Relations in the drop-down list and then select the Is Similar Or Equal icon  .
.
4) Delete the first placeholder <?> before the word simeq in the Formula Editor.
5) Select the second placeholder <?> after the word simeq in the Formula Editor and replace it with the characters 3.14159. The formula now appears in the document.
How you edit a formula and switch into formula editing mode depends on whether the formula is in Math or another LibreOffice component.
1) In Math, double-click on a formula element in the formula that appears in the Preview window to select the formula element in the Formula Editor, or directly select a formula element in the Formula Editor.
2) In Writer, Calc, Impress, or Draw, double-click on the formula, or right-click on the formula and select Edit in the context menu, to open the Formula Editor and enter editing mode. The cursor is positioned at the start of the formula in the Formula Editor.
Note
If you cannot select a formula element using the cursor, click on the Formula Cursor icon in the Tools toolbar to activate the formula cursor.
3) Select the formula element you want to change using one of the following methods:
Click on the formula element in the Preview window, positioning the cursor at the beginning of the formula element in the Formula Editor, then select the formula element in the Formula Editor.
Double-click on the formula element in the Preview window to select the formula element in the Formula Editor.
Position the cursor in the Formula Editor at the formula element you want to edit, then select that formula element.
Double-click directly on the formula element in the Formula Editor to select it.
4) Make your changes to the formula element you have selected.
5) Go to View > Update on the Menu bar, or press the F9 key, or click on the Update icon on the Tools toolbar to update the formula in the Preview window or your document.
6) In Math, save your changes to the formula after editing.
7) In Writer, Calc, Impress, or Draw, click anywhere in the document away from the formula to leave editing mode, then save the document to save your changes to the formula.
This section provides some advice on how to lay out complex formulas in Math or in your LibreOffice document.
LibreOffice Math knows nothing about order of operations within a formula. You need to use braces (curly brackets) to define the order of operations. The following examples show how braces can be used in a formula.
If you want to use a matrix in a formula, you have to use the matrix command. Below is a simple example of a 2 x 2 matrix.
|
matrix { a # b ## c # d } |
|
In matrices, rows are separated by two hashes (##) and entries within each row are separated by one hash (#).
Normally, when you use brackets within a matrix, the brackets do not scale as the matrix increases in size. The example below shows a formula where the parentheses do not scale to the size of the resulting matrix.
|
( matrix { a # b ## c # d } ) |
|
To overcome this problem, Math provides scalable brackets that grow in size to match the size of the matrix. Use the commands left( and right) to create scalable brackets around a matrix. The following example shows how to create a matrix with scalable parentheses.
|
left( matrix { a # b ## c # d } right) |
|
Scalable brackets can also be used with any element of a formula, such as fraction, square root, and so on.
If you want to create a matrix where some values are empty, you can use the grave accent (`) so that Math will put a small space in that position, as shown in the example below.
|
left( matrix { 1 # 2 # 3 ## 4 # ` # 6 } right) |
|
Tip
Use the commands left[ and right] to obtain square brackets. A list of all brackets available within Math can be found in Appendix A, Commands Reference, of the Math Guide.
Tip
If you want all brackets to be scalable, go to Format > Spacing on the Menu bar to open the Spacing dialog. Click on Category, select Brackets in the drop-down list, and then select the option Scale all brackets.
When using brackets in a formula, Math expects that for every opening bracket there will be a closing one. If you forget to add a closing bracket, Math places an inverted question mark next to where the closing bracket should have been placed. For example, lbrace a; b will result in because the right bracket rbrace is missing.
This inverted question mark disappears when all the brackets are paired. The previous example could be fixed to lbrace a; b rbrace, resulting in . However, there are cases where an unpaired bracket is necessary and for that you have the following options.
A backslash \ is placed before a non scalable bracket to indicate that the subsequent character should not be regarded as a bracket, but rather as a literal character.
For example, the unpaired brackets in the formula [ a; b [ would result in an inverted question mark because Math expects that [ will be closed by ]. To fix the error, you can use the backslash and insert \ [ a; b \ [ into the Formula Editor to obtain as the result.
To create unpaired scalable brackets or braces in a formula, the markup commands left, right, and none can be used.
|
abs x = left lbrace stack {x "for" x >= 0 # -x "for" x < 0} right none |
|
In the basic installation of Math, Math outputs functions in normal characters and variables in italic characters. However, if Math fails to recognize a function, you can tell Math that you have just entered a function. Entering the markup command func before a function forces Math to recognize any following text as a function and uses normal characters.
For a full list of functions within Math, see Appendix A, Commands Reference, in the Math Guide.
Some Math functions have to be followed by a number or a variable. If these are missing, Math places an inverted question mark where the missing number or variable should be. To remove the inverted question mark and correct the formula, you have to enter a number, a variable, or a pair of empty brackets as a placeholder.
Tip
You can navigate through errors in a formula using the F3 key to move to the next error or the key combination Shift+F3 to move to the previous error.
Suppose you want to create a formula that requires more than one line, for example . Your first reaction would be to press the Enter key. However, if you do that, the markup language in the Formula Editor goes to a new line, but the resulting formula does not have two lines. To add a new line to the formula you need to use the markup command newline.
|
Markup Language |
Resulting Formula |
|
x = 3 |
|
|
x = 3 newline y = 1 |
|
Spacing between the elements in a formula is not set by using space characters in the markup language. If you want to add spaces into your formula, use one of the following options:
Grave ` to add a small space.
Tilde ~ for a large space.
Add space characters between quotes “ ”. These spaces will be considered as text.
Any spaces at the end of a line in the markup language are ignored by default. For more information, see “Customization” on page 1.
The sum and int commands, used for summations and integrals respectively, can take the parameters from and to if you want to set the lower and upper limits. The parameters from and to can be used singly or together as shown by the following examples. For more information on the sum and integral commands, see Appendix A, Commands Reference, in the Math Guide.
|
Markup Language |
Resulting Formula |
|
sum from k = 1 to n a_k |
|
|
sum to infinity 2^{-n} |
|
|
sum from{ i=1 } to{ n } sum from{ j=1; i <> j } to{ m } x_ij |
|
|
int from 0 to x f(t) dt |
|
|
int_0^x f(t) dt |
|
|
int from Re f |
|
When writing derivatives, you have to tell Math that it is a fraction by using the over command. The over command is combined with the character d for a total derivative or the partial command for a partial derivative to achieve the effect of a derivative. Braces {} are used in each side of the elements to surround them and make the derivative, as shown by the following examples.
|
Markup Language |
Resulting Formula |
|
{df} over {dx} |
|
|
{partial f} over {partial y} |
|
|
{partial^2 f} over {partial t^2} |
|
Note
To write function names with primes, as is normal in school notation, you must first add the symbols to the catalog. See “Customization” on page 1 for more information.
Characters that are used as controls in markup language cannot be entered directly as normal characters. These characters are: %, {, }, &, |, _, ^ and ". For example, you cannot write 2% = 0.02 in markup language and expect the same characters to appear in your formula. To overcome this limitation in markup language, use one of the following methods:
Use double quotes to mark that character as text, for example 2"%"= 0.02 will appear in your formula as . However, this method cannot be used for the double-quote character itself, see “Text in formulas” below.
Add the character to the Math Catalog, for example the double quote character.
Use commands, for example lbrace and rbrace give you literal braces .
Note
The Special Characters dialog used by other LibreOffice modules is not available in Math. If you are going to regularly require special characters in Math, then it is recommended to add the characters to the Math Catalog; see “Customization” on page 1 for more information.
To include text in a formula, you have to enclose any text in double-quotes, for example x " for " x >= 0 in markup language will create the formula . All characters, except double quotes, can be used in text.
However, if you require double quotes in formula text, then you have to create the text with double quotes in LibreOffice Writer, then copy and paste the text into the Formula Editor, as shown in Figure 7.
Figure 7: Example of double quotes in formula text

The font used for text in a formula will be the default font that has been set in the Fonts dialog. For more information on how to change fonts used for in formulas, see “Changing formula appearance” on page 1.
By default, text alignment is left-justified in formulas. For more information on how to change text alignment, see “Adjusting formula alignment” on page 1.
Formatting commands are not interpreted within text used in formulas. If you want to use formatting commands within formula text, then you must break up the text using double quotes in the Formula Editor.
LibreOffice Math does not have a command for aligning formulas on a particular character. However, you can use a matrix to align formulas on a character and this character is normally the equals sign (=). In addition, you can use the markup commands alignr, alignl and alignc to set the alignment of each value inside the matrix to the right, left or center, respectively.
Example
|
matrix{ alignr x+y # {}={} # alignl 2 ## alignr x # {}={} # alignl 2-y } |
|
Note
The empty braces each side of the equals sign are necessary because the equals sign is a binary operator and requires an expression on each side. You can use spaces, or ` or ~ characters each side of the equals sign, but braces are recommended as they are easier to see within the markup language.
You can reduce the spacing on each side of the equals sign if you change the inter-column spacing of the matrix. See “Adjusting formula spacing” on page 1 for more information.
This section describes how to change the font or font size in a selected formula and how to change the default font or font size.
If you have already inserted formulas into your document and you change the default font or font size, only formulas inserted after the change in default font or font size will use the new default settings. You have to individually change the font or font size of formulas already inserted if you want these formulas to use the same font or font size as the default settings.
The extension “Formatting of all Math formulas” allows you to change font name and font size for all or only for selected formulas in a document. You can download it and read the installation and usage instructions here: https://extensions.libreoffice.org/en/extensions/show/formatting-of-all-math-formulas
To change the font size used for a formula already inserted in Math or another LibreOffice component:
1) Click in the markup language in the Formula Editor.
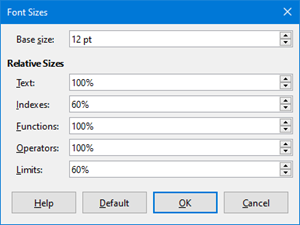
2) Go to Format > Font size on the Menu bar to open the Font Sizes dialog (Figure 8).
3) Select a different font size using the Base size spinner or type a new font size in the Base Size box.
4) Click OK to save your changes and close the dialog. An example result when you change font size is shown below.
Example
Figure 8: Font Sizes dialog
To change the default font size used for all formulas in Math or another LibreOffice component:
1) Before inserting any formulas in your document, go to Format > Font size on the Menu bar to open the Font Sizes dialog (Figure 8).
2) Select a different font size using the Base size spinner or type a new font size in the Base size box.
3) Click Default and confirm your changes to the base size font. Any formulas created from this point on will use the new base size font for formulas.
4) Click OK to save your changes and close the Font Sizes dialog.
The Font Sizes dialog (Figure 8) specifies the font sizes for a formula. Select a base size and all elements of the formula will be scaled in relation to this base.
Base size – all elements of a formula are proportionally scaled to the base size. To change the base size, select or type in the desired point (pt) size. You can also use other units of measure or other metrics, which are then automatically converted to points. For example, if you enter 1in or 1”, Math converts the value to 72 pt.
Relative Sizes – in this section, you can determine the relative sizes for each type of element with reference to the base size.
Default – click this button to save any changes as a default for all new formulas. A confirmation message appears.
To change the fonts used for the current formula in Math or another LibreOffice component:
1) Click in the markup language in the Formula Editor.
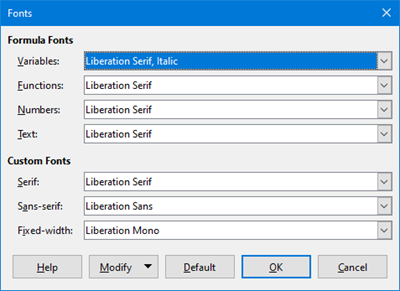
2) Go to Format > Fonts on the Menu bar to open the Fonts dialog (Figure 9).
Figure 9: Fonts dialog
3) Select a new font for each of the various options in the drop-down lists.
4) If the font you want to use does not appear in the drop-down list, click Modify and select the option in the context menu to open a fonts dialog. Select the font you want to use and click OK to add it to the drop-down list for that option.
5) Click OK to save your changes and close the Fonts dialog.
To change the default fonts used for all formulas in Math or another LibreOffice component:
1) Before inserting any formulas in your document, go to Format > Fonts on the Menu bar to open the Fonts dialog (Figure 9).
2) Select a new font for each of the various options in the drop-down lists.
3) If the font you want to use does not appear in the drop-down list, click Modify and select the option in the context menu to open a fonts dialog. Select the font you want to use and click OK to add it to the drop-down list for that option.
4) Click Default and confirm your changes to the fonts. Any formulas created from this point on will use the new font for formulas.
5) Click OK to save your changes and close the Fonts dialog.
Defines the fonts that can be applied to formula elements.
Formula Fonts – defines the fonts used for the variables, functions, numbers and inserted text that form the elements of a formula.
Custom Fonts – in this section of the Fonts dialog (Figure 9), fonts are defined which format other text components in a formula. The three basic fonts Serif, Sans, and Fixed are available. Other fonts can be added to each standard installed basic font using the Modify button. Every font installed on a computer system is available for use.
Modify – click one of the options in the drop-down menu to access the Fonts dialog, where the font and attributes can be defined for the respective formula and for custom fonts.
Default – click this button to save any changes as a default for all new formulas. A confirmation message appears.
Note
When a new font is selected for a formula, the old font remains in the list alongside the new one and can be selected again.
Note
Variables should be written in italics, so make sure that the Italic option is selected for the font you want to use. For all other elements, use the basic form of a font. The style can be easily altered in the formula itself by using the commands italic or bold to set these characteristics and nitalic or nbold to unset them.
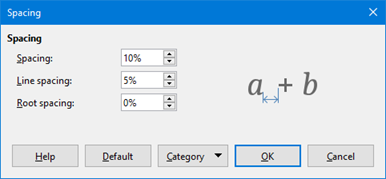
Use the Spacing dialog (Figure 10) to determine the spacing between formula elements. The spacing is specified as a percentage in relation to the defined base size for font sizes.
Figure 10: Spacing dialog
To change the spacing used for the current formula in Math or another LibreOffice component:
1) Click in the markup language in the Formula Editor.
2) Go to Format > Spacing on the Menu bar to open the Spacing dialog (Figure 10).
3) Click Category and select one of the options in the drop-down list. The options in the Spacing dialog change according to the category selected.
4) Enter new values for the spacing category and click OK.
5) Check the result in your formula. If not to your satisfaction, repeat the above steps.
To change the default spacing used for all formulas in Math or another LibreOffice component:
1) Before inserting any formulas in your document, go to Format > Spacing on the Menu bar to open the Spacing dialog (Figure 10).
2) Click Category and select one of the options in the drop-down list. The options in the Spacing dialog change according to the category selected.
3) Enter new values for the spacing category.
4) Click Default and confirm your changes to the formula spacing. Any formulas created from this point on will use the new spacing for formulas.
5) Click OK to save your changes and close the Spacing dialog.
Note
If you have already inserted formulas into your document and you change the spacing, only formulas inserted after the change in spacing will use the new default settings. You have to individually change the spacing of formulas already inserted if you want these formulas to use the same spacing as the default settings.
Use Category in the Spacing dialog (Figure 10) to determine the formula element for which you would like to specify the spacing. The appearance of the dialog depends on the selected category. A preview window shows you which spacing is modified through the respective boxes.
Category – pressing this button allows you to select the category for which you would like to change the spacing.
Spacing – defines the spacing between variables and operators, between lines, and between root signs and radicals.
Indexes – defines the spacing for superscript and subscript indexes.
Fractions – defines the spacing between the fraction bar and the numerator or denominator.
Fraction Bars – defines the excess length and line weight of the fraction bar.
Limits – defines the spacing between the sum symbol and the limit conditions.
Brackets – defines the spacing between brackets and the content.
Excess size (left/right) – determines the vertical distance between the upper edge of the contents and the upper end of the brackets.
Spacing – determines the horizontal distance between the contents and the upper end of the brackets.
Scale all brackets – scales all types of brackets. If you then enter (a over b) in the Formula Editor, the brackets will surround the whole height of the argument. You normally achieve this effect by entering left (a over b right).
Excess size – adjusts the percentage excess size. At 0% the brackets are set so that they surround the argument at the same height. The higher the entered value is, the larger the vertical gap between the contents of the brackets and the external border of the brackets. The field can only be used in combination with Scale all brackets.
Matrices – defines the relative spacing for the elements in a matrix.
Line spacing – determines the spacing between matrix elements in a row.
Column spacing – determines the spacing between matrix elements in a column.
Symbols – defines the spacing of symbols in relation to variables
Primary height – defines the height of the symbols in relation to the baseline.
Minimum spacing – determines the minimum distance between a symbol and variable.
Operators – defines the spacing between operators and variables or numbers.
Excess size – determines the height from the variable to the operator upper edge.
Spacing – determines the horizontal distance between operators and variables.
Borders – adds a border to a formula. This option is particularly useful if you want to integrate the formula into a text file in Writer. When making settings, make sure that you do not use 0 as a size as this creates viewing problems for text that surrounds the insertion point.
Preview Field – displays a preview of the current selection.
Default – saves any changes as default settings for all new formulas. A confirmation dialog will appear before saving these changes.
The alignment settings determine how formula elements located above one another are aligned horizontally relative to each other.
Note
It is not possible to align formulas on a particular character and formula alignment does not apply to text elements. Text elements are always aligned left.
Note
Independent of using formula alignment given below, it is possible to align formulas using the commands alignl, alignc and alignr. These commands also work for text elements.
To change the alignment used for the current formula in Math or another LibreOffice component:
1) Click in the markup language in the Formula Editor.
2) Go to Format > Alignment on the Menu bar to open the Alignment dialog (Figure 11).
3) Select either Left, Centered, or Right for horizontal alignment.
4) Click OK and check the result in your formula. If not to your satisfaction, repeat the above steps.
Figure 11: Alignment dialog

Note
Regardless of the alignment option selected in the Alignment dialog, it is possible to align sections of a formula using the commands alignl, alignc and alignr. For example, they can be useful to align formulas in matrices. These commands also work for text elements.
To change the default alignment used for all formulas in Math or another LibreOffice component:
1) Before inserting any formulas in your document, go to Format > Alignment on the Menu bar to open the Alignment dialog (Figure 11).
2) Select either Left, Centered, or Right for horizontal alignment.
3) Click Default and confirm your changes to the formula alignment. Any formulas created from this point on will use the new alignment for formulas.
4) Click OK and check the result in your formula. If not to your satisfaction, repeat the above steps.
Note
If you have already inserted formulas into a document and you change the formula alignment, only formulas inserted after the change in alignment will use the new default settings. You have to individually change the alignment of formulas already inserted if you want these formulas to use the same alignment as the default settings.
Formula color for the characters used in a formula is changed by using the command color in the markup language. This command only works on the formula element immediately after the color name. For example, entering the markup language color red 5 times 4 gives the result . Note that only the number 5 was colored red.
To change the color of the whole formula, you have to enclose the whole formula within brackets. For example, entering the markup language color red {5 times 4} gives the result .
Math now has full support for named HTML colors. Some of them have been added to the Attributes section of the Elements dock (Figure 4 on page Figure 4). For information on the colors available in Math, see Appendix A, Commands Reference, in the Math Guide.
Alternatively, it is possible to use custom colors defined using RGB (Red, Green and Blue) values ranging from 0 to 255. This is done by using the color rgb R G B markup command, where R, G and B correspond to the Red, Green and Blue values of the desired color.
Example
It is not possible to select a background color for formulas in LibreOffice Math. The background color for a formula is by default the same color as the document or frame that the formula has been inserted into. In LibreOffice documents, you can use object properties to change the background color for a formula. For more information, see “Background and borders” on page 1.
If you regularly insert the same formulas into your documents, you can create a formula library using formulas that you have created using the Formula Editor. Individual formulas can be saved as separate files using the ODF format for formulas with the file suffix of .odf, or in MathML format with the file suffix of .mml.
You can use either LibreOffice Math, Writer, Calc, Draw, or Impress to create formulas and build up your formula library.
1) Create a folder on your computer to contain your formulas and give the folder a memorable name, for example Formula Library.
2) In LibreOffice, go to File > New > Formula on the Menu bar, or click on Math Formula in the opening splash screen to open Math and create your formula using the Formula Editor. See “Formulas as separate documents or files” on page 1 for more information.
3) Go to File > Save As on the Menu bar or use the keyboard shortcut Ctrl+Shift+S to open a Save As dialog.
4) Navigate to the folder you have created for your formula library.
5) Type a memorable name for the formula in the File name box.
6) Select in the File type drop-down list either ODF Formula (.odf) or MathML 2.0 (.mml) as the file type for the formula.
7) Click Save to save the formula and close the Save As dialog.
1) Create a folder on your computer to contain your formulas and give the folder a memorable name, for example Formula Library.
2) Open a document using Writer, Calc, Draw, or Impress.
3) Go to Insert > Object > Formula Object on the Menu bar to open the Formula Editor and create your formula. See “Formulas in LibreOffice documents” on page 1 for more information.
4) Right-click on the formula object and select Save Copy as in the context menu to open a Save As dialog.
5) Navigate to the folder you have created for your formula library.
6) Type a memorable name for the formula in the File name box.
7) Select in the File type drop-down list either ODF Formula (.odf) or MathML 2.0 (.mml) as the file type for the formula.
8) Click Save to save the formula and close the Save As dialog.
You cannot insert a formula from your library into a document by dragging and dropping using the mouse, nor by using Insert > File on the Menu bar. You must insert the formula as an OLE object.
1) Open the document in Writer, Calc, Draw, or Impress.
2) Go to Insert > Object > OLE Object on the Menu bar to open the Insert OLE Object dialog.
3) Select the option Create from file.
4) Click Search to open a file browser dialog.
5) Navigate to the folder you have created for your formula library.
6) Select the formula you want to insert and click Open, or double-click on the formula.
7) Click OK to insert the formula as an OLE object in the document and close the dialog.
When a formula is inserted into a document, LibreOffice Writer inserts the formula into a frame and treats the formula as an OLE object. Double-clicking on an inserted formula will open the Formula Editor in LibreOffice Math allowing you to edit the formula.
This section explains what options you can change for each individual formula within a Writer document. Please refer to the chapters on styles in the Writer Guide for information on how to change the default settings for frame styles for OLE objects.
Automatic numbering of formulas for cross reference purposes can only be carried out in LibreOffice Writer. The easiest way to add numbered formulas in sequence is to use the AutoText entry fn (for 'formula numbered') using the following steps:
1) Start a new line in your document.
2) Type fn and then press the F3 key. A two column table with no borders is inserted into your document with the left column containing a sample formula and the right column containing a reference number, as shown below.
|
|
(1) |
3) Delete the sample formula and insert your formula as an object in the left column.
4) Alternatively, you can first insert your formula into the document, then carry out Steps 1 and 2 above replacing the sample formula with your formula.
1) Click in your document where you want the cross reference to appear.
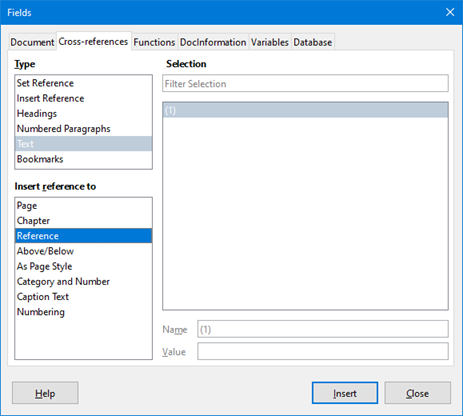
2) Go to Insert > Cross-reference on the Menu bar to open the Fields dialog (Figure 12).
3) Click on the Cross-references tab, then select Text in the Type section.
4) In the Selection section, select the formula number you want to refer to.
5) In the Insert reference to section, select Reference and click Insert.
6) When you have finished creating cross references, click Close to close the Fields dialog.
Figure 12: Fields dialog – Cross-references tab
Tip
To insert the cross reference number without parentheses, select Numbering instead of Reference in the Insert reference to section.
Note
If you want to use square parentheses instead of round ones, or if you want the cross reference number to be separated from the formula by tabs instead of using a table, then refer to the chapter on automatic text in the Writer Guide.
A formula is treated as an object within Writer and its default anchoring is To character within a paragraph when it is inserted into a document. To change the anchoring of a formula object:
1) Right-click on the selected formula object and select Anchor in the context menu.
2) Select a new anchoring option in the context sub-menu. The anchoring positions available are To Page, To Paragraph, To Character, or As Character.
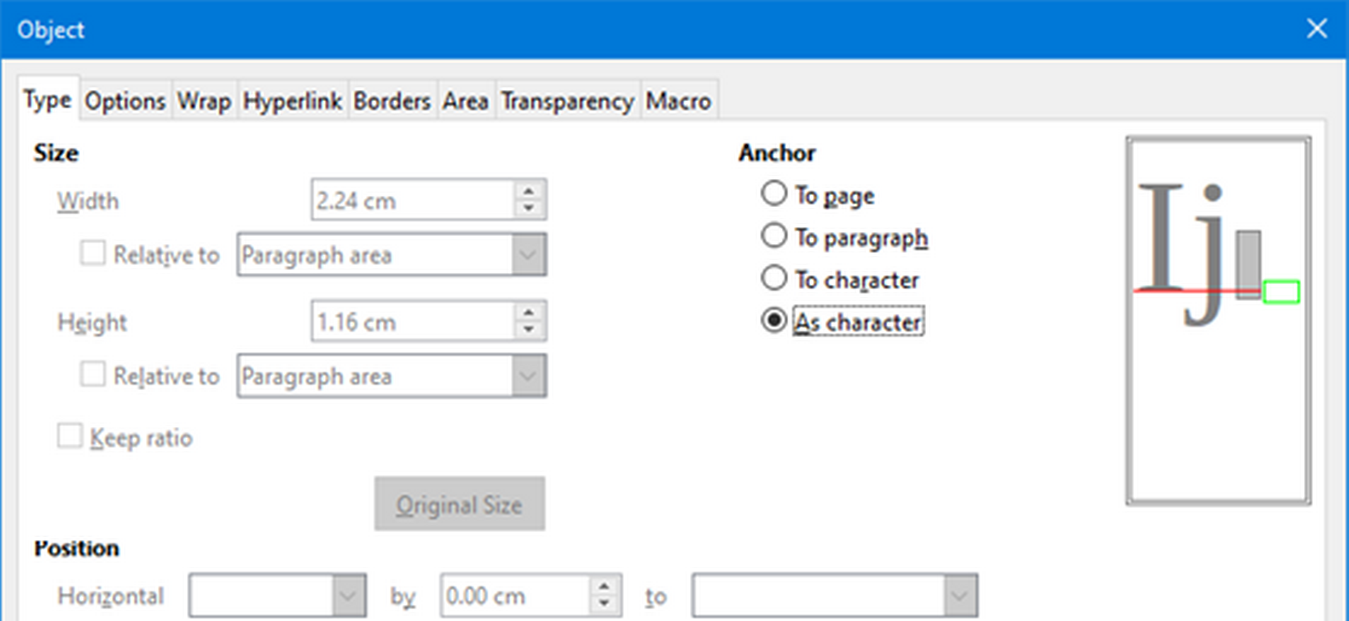
3) Alternatively, right-click on the selected formula object and select Properties in the context menu, or go to Format > Frame and Object > Properties on the Menu bar to open the Object dialog (Figure 13).
4) Make sure the Type tab is selected and select a new anchoring position from the Anchor section in the upper right of the tab.
5) Click OK to save your changes and close the Object dialog.
Figure 13: Object dialog – Type tab with Anchor options
Note
The anchoring options are not available in the Object dialog when you are making changes to the options available for frame styles. For more information on how to modify frame styles, please refer to the chapters on styles in the Writer Guide.
The normal default setting for vertical alignment for formula objects is to use the text base line as a reference. This default setting can be changed by modifying the Formula frame style; see the chapters on styles in the Writer Guide for more information.
To change the vertical alignment position of an individual formula object (assuming that the As character anchoring option is selected):
1) Right-click on the selected formula object and select Properties in the context menu, or go to Format > Frame and Object > Properties to open the Object dialog (Figure 13).
2) Make sure the Type tab is selected and select a new alignment position in the drop-down list in the Position section. The vertical alignment options available are Top, Bottom, Center, or From bottom.
3) If necessary, type in the text box a plus or minus value for vertical alignment. This option is only available if From bottom vertical alignment has been selected.
4) Select the type of text alignment in the drop-down list in the Position section. The text alignment options available are Base line, Character, and Row.
5) Click OK to save your changes and close the Object dialog.
Note
If the Position section in the Object dialog is grayed out and not available, then go to Tools > Options > LibreOffice Writer > Formatting Aids and uncheck the option Math baseline alignment. This setting is stored with the document and applies to all formulas within it. Any new documents created will also use this setting for Math baseline alignment.
A formula object, when inserted into a Writer document, has spacing each side of the formula object. The default value used for spacing is set within the frame style for formula objects and can be changed by modifying the Formula frame style, see the chapters on styles in the Writer Guide for more information.
You can individually adjust the spacing for each formula object within your document as follows:
1) Create your formula in your Writer document.
2) Right-click on your selected formula object and select Properties in the context menu, or go to Format > Frame and Object > Properties to open the Object dialog.
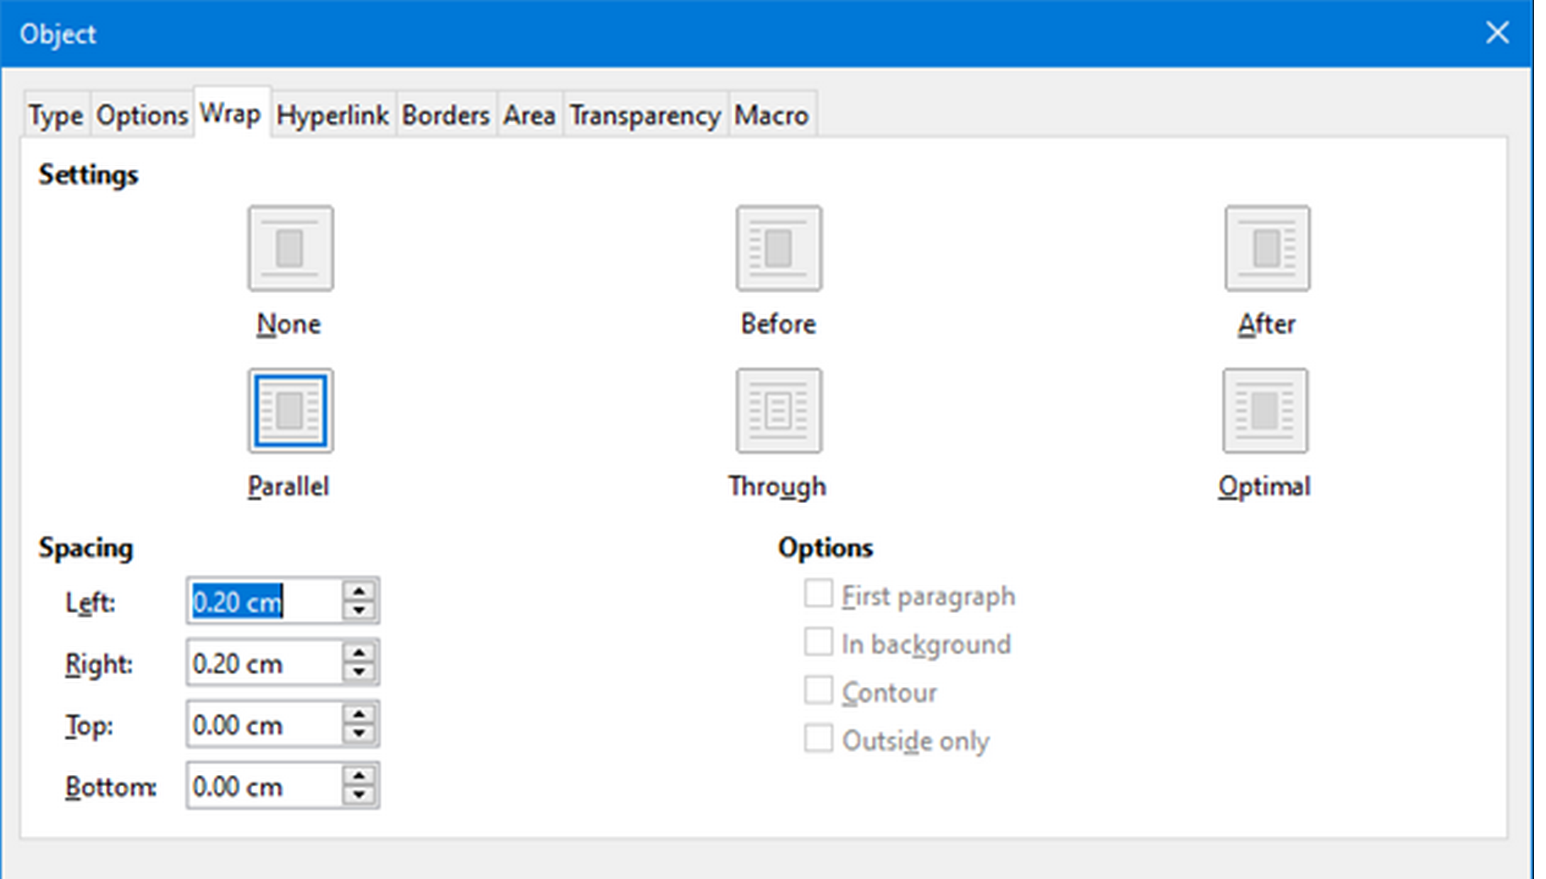
3) Click on the Wrap tab to open the Wrap page in the Object dialog (Figure 14).
4) In the Spacing section, enter the spacing value for Left, Right, Top and Bottom spacing.
5) Click OK to save your changes and close the Object dialog.
Figure 14: Object dialog – Wrap tab
In large formulas placed within a line of text, the formula elements can often be higher than the text height. Therefore, to make large formulas easier to read, it is recommended to always insert large formulas into a separate paragraph of their own so that it is separated from text.
However, if it is necessary to place a large formula within a line of text, double-click on the formula to open the Formula Editor and then go to Format > Text Mode on the Menu bar. The Formula Editor will try to shrink the formula to fit the text height. The numerators and denominators of fractions are shrunk, and the limits of integrals and sums are placed beside the integral/sum sign, as shown in the following example.
Example
The default setting for background (area fill) and borders for formula objects is set by the formula frame style. To change this default setting for formula frame style, refer to the chapters on styles in the Writer Guide. However, for individual formulas in your document, you can change the background and borders.
Note
The size of the frame that a formula is placed in when inserted into a document cannot be changed. The frame size for a formula object depends on the setting of the formula font size, see “Formula font size” on page 1 for more information.
1) In your document, select the formula where you want to change the background.
2) Right-click on the formula and select Properties in the context menu, or go to Format > Frame and Object > Properties to open the Object dialog.
3) Click on the Area tab and use the buttons to select the type of fill you want to use for your formula (Figure 15).
4) Select the options you want to use for your formula background. The options change depending on the type of fill selected.
5) Click OK to save your changes and close the Object dialog.
Figure 15: Object dialog – Area tab

Borders
1) In your document, select the formula where you want to change the borders.
2) Right-click on the formula and select Properties in the context menu, or go to Format > Frame and Object > Properties to open the Object dialog.
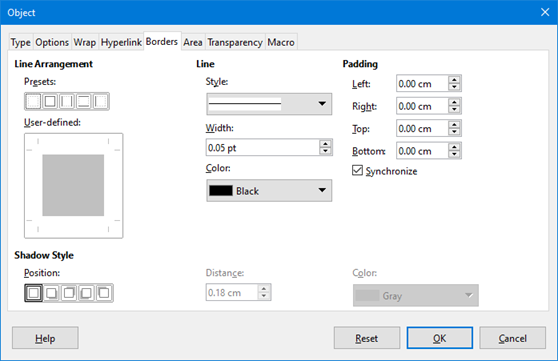
3) Click on the Borders tab and select the options you want to use for your formula borders (Figure 16).
4) Click OK to save your changes and close the Object dialog.
Figure 16: Object dialog – Borders tab
If you know the markup language for your formula, you can quickly insert it into your Writer document without opening the Formula Editor as follows:
1) Enter the formula markup language into your document at the position where you want the formula to be placed.
2) Select the markup language.
3) Go to Insert > Object on the Menu bar and select Formula Object to create a formula from the selected markup language.
4) Alternatively you can use the key combination Ctrl + Insert to open the Insert OLE Object dialog and then select Formula.
In Calc, Draw, and Impress, formulas are inserted as OLE objects without any background (area fill) or borders. Each formula object is inserted into a spreadsheet, drawing, or slide as follows:
In Calc, formulas are inserted into a selected cell in a spreadsheet with no style assigned to the formula object.
In Draw and Impress, formulas are inserted into a central position on your drawing or slide and, by default, are assigned the drawing object style Object with no fill and no line. For more information on how to modify or assign drawing object styles, see the Draw Guide or the Impress Guide.
A formula object can be anchored into a spreadsheet as To Page (default setting), or as To Cell. To change the anchoring type of formulas in a Calc spreadsheet:
1) Select the formula object in the spreadsheet.
2) Right-click on the formula and select Anchor > To Page or To Cell in the context menu
3) Alternatively, go to Format > Anchor on the Menu bar and select To Page or To Cell.
Tip
If you insert a formula into a Calc spreadsheet and it appears out of scale, you can fix it by right-clicking the formula object and then selecting the Original Size option in the context menu.
When a formula is inserted into a drawing or slide, it is inserted as a floating OLE object and is not anchored to any particular position in a drawing or slide.
Formula objects in Calc, Draw, and Impress can be modified just like any other object that has been placed in your spreadsheet, drawing, or presentation, with the exception of formula object size and changing the format of any text within a formula. For more information on how to change object properties, see the Calc Guide, Draw Guide and Impress Guide.
The following points will help you select which dialog to use if you want to change the properties of formula objects.
For formula backgrounds, use the various options in the tabs of the Area dialog.
For formula borders, use the various options in the Line dialog. Note that formula borders are separate from cell borders in a Calc spreadsheet.
To accurately re-position a formula object, use the various options in tabs of the Position and Size dialog.
In Draw and Impress, you can arrange, align, group, flip, convert, break, combine, and edit points of formula objects.
You cannot change the text attributes of a formula object. The text used in a formula is set when you create the formula in the Formula Editor.
Formula object size is set by the formula font size when the formula is created in the Formula Editor. The formula object size is protected in the Position and Size dialog, but this can be deselected if you wish. However, this is not recommended as resizing a formula object using the Position and Size dialog could lead to distortion of a formula making it difficult to read.
A chart in a Calc spreadsheet is itself an OLE object, therefore, you cannot use the Formula Editor to create and insert a formula directly into a chart. However, you can create both the Chart and Math objects separately and later copy and paste the Math formula into the Chart object:
1) Create the chart using LibreOffice Calc. For a complete reference on how to create charts, see Chapter 3 in the Calc Guide.
2) Click at any cell in your spreadsheet so that the Chart is no longer selected.
3) Insert a Math Formula object by clicking Insert > Object > Formula.
4) Type the desired formula into the Formula Editor.
5) After editing the formula, select the Math Formula object and press Ctrl+C to copy the Formula object to the clipboard.
6) Double-click the chart object to start editing the chart and press Ctrl+V to paste the Formula object into the chart.
7) Now you can position the object anywhere you want inside the chart.
If you want to change the formula at a later date, then you must repeat the whole process of creating, copying, and pasting the Formula object into the chart.
This section explains how you can customize Math to suit the way you create formulas for use in LibreOffice documents. Also, refer to Chapter 14, Customizing LibreOffice, for more general information on how to customize LibreOffice.
The Formula Editor and Elements dock can cover a large part of your document. To help create more space and/or allow you to move either the Formula Editor or Elements dock out of the way, you can turn both of them into floating dialogs.
1) Position the cursor on the frame.
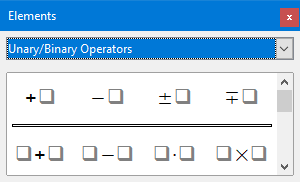
2) Hold down the Ctrl key and double-click. This turns the Formula Editor into the Commands dialog (Figure 17) and the Elements dock into the Elements dialog (Figure 18).
Figure 17: Commands dialog
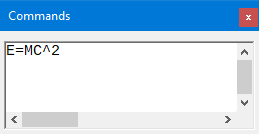
Figure 18: Elements dialog
To return the Commands dialog and Elements dialog back to their default positions:
1) Position the cursor on the frame of the dialog, NOT the title bar at the top of the dialog.
2) Hold down the Ctrl key and double-click.
You can add keyboard shortcuts to LibreOffice to make creating documents much easier and to match your workflow. See Chapter 14, Customizing LibreOffice, for instructions.
If you regularly use a symbol that is not available in Math, you can add it to the Symbols dialog (Figure 19) by opening the Edit Symbols dialog (Figure 20).
Using the Edit Symbols dialog you can add symbols to a symbol set, edit symbol sets, or modify symbol notations. You can also define new symbol sets, assign names to symbols, or modify existing symbol sets.
1) Go to Tools > Symbols on the Menu bar or click on the Symbols icon on the Tools toolbar to open the Symbols dialog.
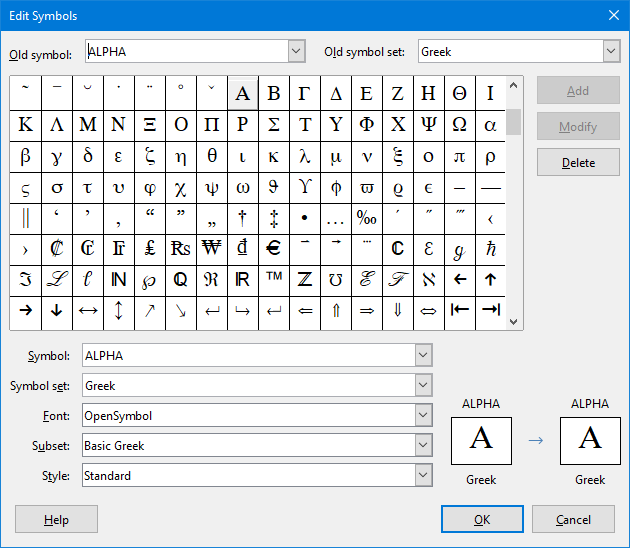
2) Click the Edit button to open the Edit Symbols dialog.
3) Select a font in the Font drop-down list.
4) Select a symbol character that you want to add in the preview box. You may have to scroll down in the preview box to locate the symbol you want to use. The small right preview box displays the new symbol.
5) In the Symbol box, type a memorable name for the symbol you are adding.
6) In the Symbol set box, select a symbol set in the drop-down list to add your new symbol to, or type a new name to create a new symbol set for your new symbol.
7) If required, select a font style in the Style drop-down list – Standard, Italic, Bold, or Bold, Italic.
8) Click Add, then click OK to close the Edit Symbols dialog. The new symbol and, if created, new symbol set are now available for use.
Figure 19: Symbols dialog
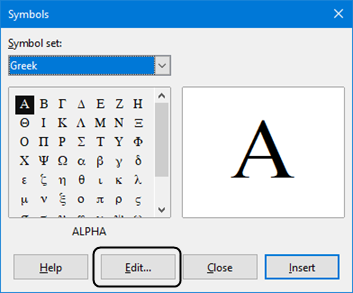
Figure 20: The Edit Symbols dialog
Note
When a new symbol is added to the catalog, you can type a percentage sign (%) followed by the new name into the markup language in the Formula Editor and your new symbol will appear in your formula. Remember that symbol names are case sensitive, for example, %prime is a different symbol to %Prime.
Note
There are numerous free fonts available that contain several symbols if you cannot find a symbol to use in the fonts already installed on your computer. For example, the STIX font was developed specially for writing mathematical and technical texts. Also, the DejaVu and Lucida fonts have a wide range of symbols that you can use.
Note
When LibreOffice is installed on a computer, only those user-defined symbols that actually occur in the document are stored with it. Sometimes it is useful to embed all the user-defined symbols, so that when the document is transferred to another computer it can be edited by another person. Go to Tools > Options > LibreOffice Math > Settings, uncheck the option Embed only used symbols (smaller file size).This setting is only available when you are working with LibreOffice Math.
You can change the name of a symbol as follows:
1) Select the symbol name you want to change in the Old symbol drop-down list. The symbol appears in the left preview pane at the bottom of the Edit Symbols dialog (Figure Figure 20).
2) Type a new name for the symbol in the Symbol text box, or select a new name in the Symbol drop-down list. The new symbol name appears above the right preview pane at the bottom of the Edit Symbols dialog.
3) Click Modify and the symbol name is changed.
4) Click OK to close the Edit Symbols dialog.
You can move a symbol from one symbol set to another as follows:
1) In the Old symbol set drop-down list, select the symbol set where the symbol you want to move is located.
2) Select the symbol name you want move in the Old symbol drop-down list. The symbol appears in the left preview pane at the bottom of the Edit Symbols dialog (Figure 20).
3) In the Symbol set drop-down list, select the symbol set that you want to move the symbol to. The new symbol set name appears below the right preview pane at the bottom of the Edit Symbols dialog.
4) Click Modify and the symbol is moved to the new symbol set
5) Click OK to close the Edit Symbols dialog.
You can delete a symbol from a symbol set as follows:
1) In the Old symbol set drop-down list, select the symbol set from which you want to delete the symbol.
2) Select the symbol name you want delete in the Old symbol drop-down list. The symbol appears in the left preview pane at the bottom of the Edit Symbols dialog (Figure 20).
3) Click Delete and the symbol is deleted from the symbol set without any confirmation.
4) Click OK to close the Edit Symbols dialog.
Note
The only way you can delete a symbol set is by deleting all of the symbols in that set. When you delete the last symbol from a set, the set is also deleted.
For details of the fields in the Edit Symbols dialog (Figure 20), please refer to the Math Guide.
The grave accent (`) inserts an additional small space and the tilde (~) inserts an additional large space into formulas. However, in the basic installation of LibreOffice, these symbols are ignored when they occur at the end of a formula. If you are working with running text in a formula, it may be necessary to include spacing at the end of formulas as well. This customization is only required when you are working with a Math document and is not required when you are inserting a formula into another LibreOffice component.
To add spacing at the end of formula in Math, go to Tools > Options > LibreOffice Math > Settings on the Menu bar and uncheck Ignore ~ and ` at the end of the line in the Miscellaneous Options section.
If you create formulas frequently in your documents, you can customize LibreOffice by adding extensions that are designed to help you create formulas. Extensions are easily installed using the Extension Manager. For more information on how to install extensions, see Chapter 14, Customizing LibreOffice.
A commonly used extension is Formatting of All Math Formulas. It allows you to format all Math formulas in your Writer, Calc, Draw or Impress document. With it you can change the font names and font sizes of all formulas in your document. For more information on this extension, go to https://extensions.libreoffice.org/en/extensions/show/formatting-of-all-math-formulas.
In addition to exporting documents as PDFs, LibreOffice offers the possibility of saving formulas in the MathML format. This allows you or another person to insert formulas into documents that were created in other software, for example, Microsoft Office or an internet browser.
Note
Some internet browsers do not fully support the MathML format and your formula may not display correctly.
If you are working on a Math document, go to File > Save as on the Menu bar or use the keyboard combination Ctrl+Shift+S to open the Save as dialog. Select MathML in the list of available file formats in File type: to save your formula as MathML.
If you are working in another LibreOffice module, right-click on the formula object and select Save Copy as in the context menu to open the Save as dialog. Select MathML in the list of available file formats in File type: to save your formula object as MathML.
In Math you can also import MathML formulas. Use Tools > Import MathML from Clipboard on the Menu bar.
To control how formulas in Microsoft format are imported and exported using LibreOffice, go to Tools > Options > Load/Save > Microsoft Office on the Menu bar and select or deselect the options for MathType to LibreOffice Math or reverse.
[L]: Load and convert the object
[S]: Convert and save the object
Select this option if Microsoft OLE objects are to be converted into the specified LibreOffice OLE object when a Microsoft document is opened in LibreOffice. For formulas, any embedded MathType objects must not exceed the MathType 3.1 specifications to be successfully loaded and converted. Information on MathType format can be found at http://www.dessci.com/en.
If a document containing OMML formulas has been saved in .docx format and then converted to the older .doc format, then any OMML objects are converted into graphics, which will be displayed in LibreOffice as graphics.
Select this option if LibreOffice OLE objects are to be converted and saved in Microsoft file format. LibreOffice converts any formulas into a format that can be read and modified by Microsoft Equation Editor and MathType.
When this option is not selected, the formula is treated as an OLE object on conversion into a .doc format and remains linked to LibreOffice. A double-click on the object in Microsoft Office will attempt to launch LibreOffice.