

Getting Started Guide 7.2
Chapter 12
Creating HTML Files
Saving documents as HTML files
This document is Copyright © 2021 by the LibreOffice Documentation Team. Contributors are listed below. You may distribute it and/or modify it under the terms of either the GNU General Public License (https://www.gnu.org/licenses/gpl.html), version 3 or later, or the Creative Commons Attribution License (https://creativecommons.org/licenses/by/4.0/), version 4.0 or later.
All trademarks within this guide belong to their legitimate owners.
|
Jean Hollis Weber |
Vasudev Narayanan |
Kees Kriek |
|
Jean Hollis Weber |
Felipe Viggiano |
Kees Kriek |
|
Olivier Hallot |
Dave Barton |
Dan Lewis |
|
Peter Schofield |
Steve Fanning |
Ron Faile Jr. |
Please direct any comments or suggestions about this document to the Documentation Team’s mailing list: documentation@global.libreoffice.org
Note
Everything you send to a mailing list, including your email address and any other personal information that is written in the message, is publicly archived and cannot be deleted.
Published September 2021. Based on LibreOffice 7.2 Community.
Other versions of LibreOffice may differ in appearance and functionality.
Some keystrokes and menu items are different on macOS from those used in Windows and Linux. The table below gives some common substitutions for the instructions in this document. For a detailed list, see the application Help.
|
Windows or Linux |
macOS equivalent |
Effect |
|
Tools > Options |
LibreOffice > Preferences |
Access setup options |
|
Right-click |
Control+click or right-click depending on computer setup |
Open a context menu |
|
Ctrl (Control) |
⌘ (Command) |
Used with other keys |
|
F11 |
⌘+T |
Open the Styles deck in the Sidebar |
HTML (Hypertext Markup Language) capabilities in LibreOffice make it possible to save and export documents in HTML format.
This chapter describes how to do the following in Writer, Calc, Impress, and Draw:
Create hyperlinks within a document and to other documents such as web pages, PDFs, and other files.
Save and export documents as HTML files.
Create, edit, and save HTML documents using Writer/Web.
When creating a document that you plan to deliver as an HTML file, you need to consider the following:
In an HTML document, hyperlinks are active (clickable), but other cross-references inserted by LibreOffice are not active links.
An object such as an image is saved as a separate file. However, if that object has been placed in a frame (for example, with an associated caption), it is not saved and does not appear in the HTML document; instead, the name of the frame appears.
Hyperlinks stored within a file can be either relative or absolute.
A relative hyperlink says, Here is how to get there starting from where you are now (meaning from the folder in which your current document is saved), while an absolute hyperlink says, Here is how to get there no matter where you start from.
An absolute link will stop working if the target is moved. A relative link will stop working if the start and target locations change relative to each other. For instance, if you have two spreadsheets in the same folder linked to each other and you move the entire folder to a new location, an absolute hyperlink will break but a relative one will not.
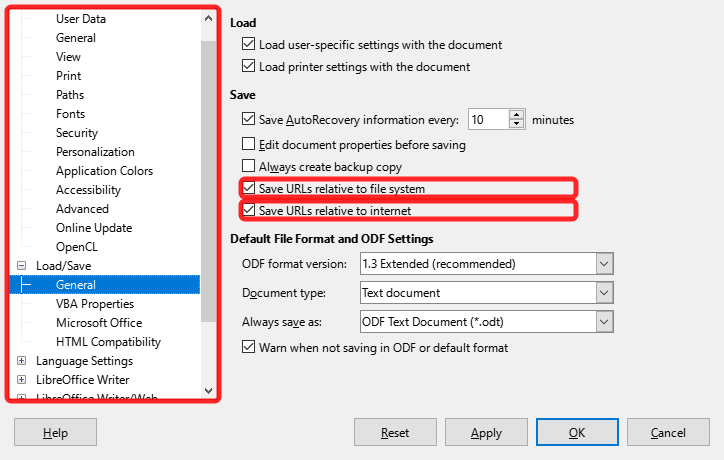
To change the way that LibreOffice stores the hyperlinks in your file, select Tools > Options > Load/Save > General on the Menu bar and choose if you want URLs (Universal Resource Locators) saved relatively when referencing the file system, or the Internet, or both (Figure 1).
LibreOffice will always display an absolute hyperlink. It does this even when you have saved a relative hyperlink. This ‘absolute’ target address will be updated if you move the file.
Note
HTML files containing links relative to the file system that will be uploaded to a web server require the files be in a folder structure matching that of the web server. Otherwise, the links will point to the wrong folder.
Tip
When you rest the mouse pointer on a hyperlink, a help tip displays the absolute reference, because LibreOffice uses absolute path names internally. The complete path and address can only be seen when you view the result of the HTML export (for example, saving a spreadsheet as an HTML file), by loading the HTML file as text, or by opening it with a text editor.
Figure 1: Options for storing hyperlinks
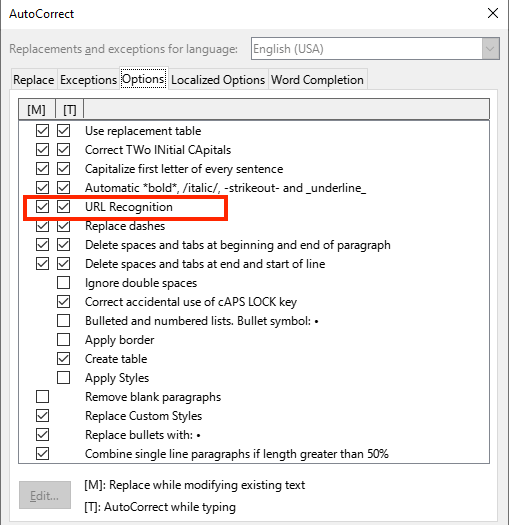
When you type text (such as a website address or URL) that can be used as a hyperlink, and then press the Spacebar or the Enter key, LibreOffice automatically creates the hyperlink and applies formatting to the text (usually a color and underlining). If this does not happen, you can enable this feature by going to the AutoCorrect dialog (Tools > AutoCorrect > AutoCorrect Options in Writer or Tools > AutoCorrect Options in Calc, Draw, and Impress) and selecting URL Recognition on the Options tab (Figure 2). If you do not want automatic hyperlink creation, you can turn it off by deselecting the URL Recognition option.
Figure 2: Autocorrect options - URL Recognition
If you do not want LibreOffice to convert a specific URL to a hyperlink, you can go to Edit > Undo on the Menu bar, or press Ctrl+Z immediately after the formatting has been applied, or place the cursor in the hyperlink, right-click, and select Remove Hyperlink in the context menu.
Tip
To change the color of hyperlinks, go to Tools > Options > LibreOffice > Application Colors, scroll to Unvisited links and/or Visited links, pick the new colors, and click OK. Caution: This will change the color for all hyperlinks in all components of LibreOffice; this may not be what you want.
In Writer and Calc (but not Draw or Impress), you can also change the Internet link character style or define and apply new styles to selected links.
You can use the Navigator in Writer or Calc to insert a hyperlink to another part of the same document or to another document.
1) Open the documents containing the items you want to cross-reference.
2) Click the Navigator icon on the Sidebar, select View > Navigator on the Menu bar, or press F5.
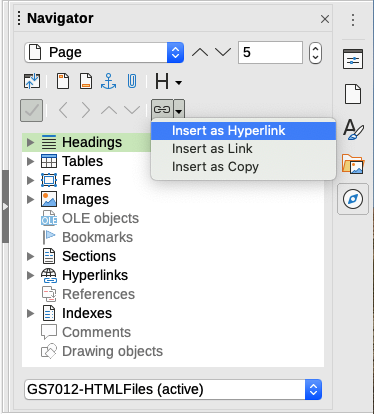
3) Click the triangle to the right of the Drag Mode icon and select Insert as Hyperlink (Figure 3). The Drag Mode icon changes shape depending on the type of insert that was previously selected. The default icon for Drag Mode is to show the Hyperlink icon.
Figure 3: Inserting a hyperlink using the Navigator
4) Select the document in the drop-down list at the bottom of the Navigator that contains the item that you want to link to.
5) In the Navigator list, select the item that you want to insert as a hyperlink.
6) Drag the item to where you want to insert the hyperlink in the document. The name of the item is inserted in the document as an active hyperlink.
When using the Navigator to insert a hyperlink to an object such as a graphic, it is recommended to have the hyperlink show a useful name, for example 2009 Sales Graph. You need to give such objects useful names instead of leaving them as the default names, for example Image6, or you will have to edit the name of the resulting link using the Hyperlink dialog, as described below.
You can also use the Navigator to insert a hyperlink from one document (the source) to a specific place in another document (the target). Open the Navigator in the target document and drag the item to the position in the source document where you want the hyperlink to appear.
You can use the Hyperlink dialog to insert a hyperlink and modify all hyperlinks.
1) Highlight the existing text you want to use as a link.
2) Click the Insert Hyperlink icon on the Standard toolbar or go to Insert > Hyperlink on the Menu bar, or press Ctrl+K to open the Hyperlink dialog (Figure 4).
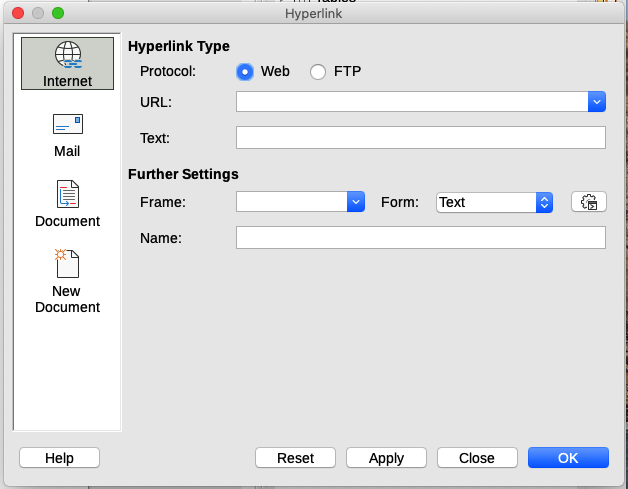
Figure 4: Hyperlink dialog showing details for Internet links
3) On the left side, select one of the four categories of hyperlink:
Internet: the hyperlink points to a web address, normally starting with https://, or an FTP (File Transfer Protocol) address, normally starting with ftp://.
Mail: the hyperlink opens an email message that is pre-addressed to a particular recipient.
Document: the hyperlink points to another document or to another place in the current document.
New document: the hyperlink creates a new document.
4) The Hyperlink dialog changes depending on the type of hyperlink selected. Enter all necessary details to create the hyperlink, as described below.
5) Click Apply or OK to create the hyperlink. Clicking Apply leaves the dialog open, allowing you to keep editing the recently created hyperlink or create another hyperlink.
6) Click Close to close the Hyperlink dialog.
The dialog changes according to the choice made for the hyperlink category in the left panel. A full description of all the choices and their interactions is beyond the scope of this chapter. Here is a summary of the most common choices.
For an Internet hyperlink (Figure 4), choose the type of hyperlink (Web or FTP), and enter the required web address (URL). For an FTP address (Figure 5), you can also define the login name and password if needed. Text is the words that become a hyperlink in the document.
For a Mail hyperlink (Figure 6), specify the address of the receiver and the subject.
For a Document hyperlink (Figure 7), specify the document path (click the Open File icon to open a file browser) or leave this blank to link to a target in the same document. Optionally specify the target in the document (for example a specific slide). Click the Target in Document icon to open the Target in Document dialog where you can select the type of target; or, if you know the name of the target, you can type it into the box.
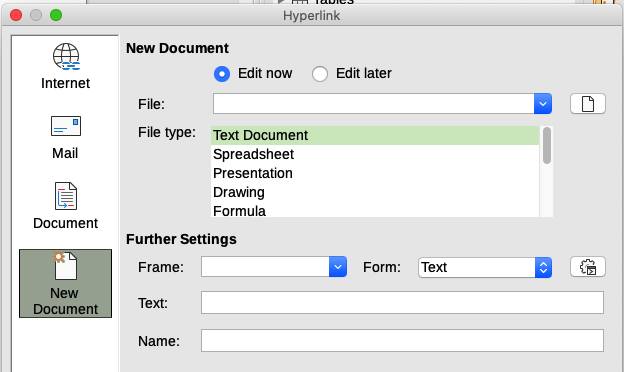
For a New Document hyperlink (Figure 8), specify whether to edit the newly created document immediately (Edit now) or just create it (Edit later). Enter the file name and select the type of document to create (text, spreadsheet, and so on). Click the Select Path icon to open a file browser and choose where to store the file.
Figure 5: Hyperlink dialog showing details for an Internet FTP link
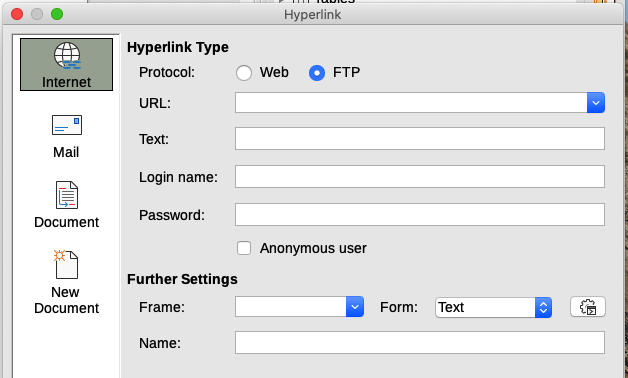
Figure 6: Hyperlink dialog showing details for a Mail link
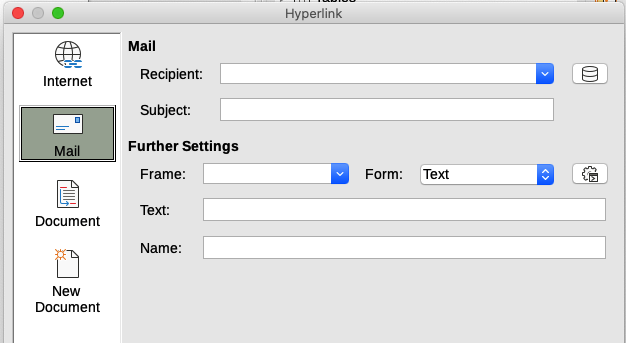
Figure 7: Hyperlink dialog showing details for a Document link
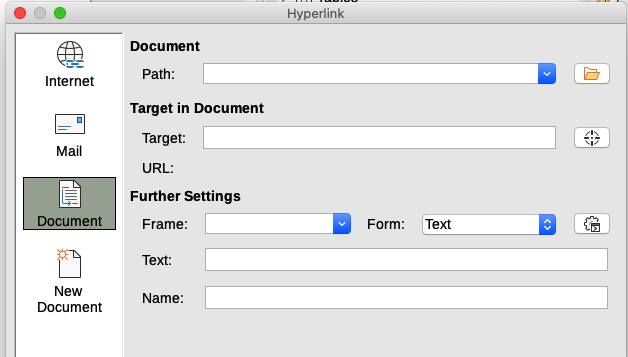
Figure 8: Hyperlink dialog showing details for a New Document link
The Further Settings section in the bottom part of the dialog is common to all the hyperlink categories, although some choices are more relevant to some types of links.
Frame determines how the hyperlink will open in a Web browser.
Form specifies if the link is to be presented as text or as a button.
Text specifies the text that will be visible to the user. If you do not enter anything here, LibreOffice uses the full URL or path as the link text. Note that if the link is relative and you move the file, this text will not change, though the target will. [This setting is in the upper part of the dialog for Internet links (Figure 4).]
Name is applicable to HTML documents. It specifies text that will be added as a NAME attribute in the HTML code behind the hyperlink.
Events icon (next to the text box of Form) opens the Assign Macro dialog. Select a macro to run when the link is clicked. See Chapter 13, Getting Started with Macros, for more information.
To edit an existing link:
1) Click anywhere in the hyperlink text.
2) Click the Insert Hyperlink icon on the Standard toolbar, or go to Edit > Hyperlink on the Menu bar, or press Ctrl+K, or right-click and select Edit Hyperlink in the context menu.
3) In the Hyperlink dialog, make your changes and click Apply to save the changes. The Hyperlink dialog remains open, allowing you to continue editing hyperlinks. Click Apply after editing each hyperlink.
4) When you are finished editing hyperlinks, click Close.
The standard (default) behavior for activating hyperlinks within LibreOffice is to use Ctrl+click. This behavior can be changed in Tools > Options > LibreOffice > Security > Options by deselecting the option Ctrl-click required to open hyperlinks. If clicking in your links activates them, check that page to see if the option has been deselected.
You can remove the link from hyperlink text and leave just the text by right-clicking on the link and selecting Remove Hyperlink in the context menu. You may then need to re-apply some formatting to match the text with the rest of your document.
To remove the link text or button from the document, select it and press the Delete key.
The easiest way to create HTML documents in LibreOffice is to start with an existing document. In Writer, you can get a good idea of how it will appear as a web page by using View > Web. However, Web view does not show you which features will or will not be saved correctly in HTML format. Refer to “Relative and absolute hyperlinks” on page 1 for what to consider before creating a web page from a document.
To save a Writer document as HTML, go to File > Save As on the Menu bar and select HTML Document (Writer) as the file type in the Save As dialog. You may be prompted to confirm that you wish to continue using the HTML format.
Saving a document as HTML produces a set of files. LibreOffice generates the image files and the HTML file necessary to create an HTML page in a browser. The number of files generated by the format conversion depends on the number of images and objects in the original text document.
Tip
Use an empty folder to save your document as HTML file and images.
The file names are created following a simple rule summarized in Table 1.
Table 1: File types created when saving as HTML format
|
File |
Contents |
|
Myfile.html |
The text contents, page layout, text attributes, meta tags, and styles. |
|
Myfile_html_[random number].gif |
GIF images of visible contents of OLE objects. |
|
Myfile_html_[random number].png, jpg, or bmp |
Images inserted in the text document as PNG, BMP, or JPEG keep their original format. |
Note
The HTML transformation of the text document is limited by the HTML 4.0 Transitional specification. Text documents in office suites have a richer set of resources that will not appear in HTML, for example page formatting. Do not expect the same layout fidelity when saving a file in HTML format.
Saving as HTML may require more work directly on the HTML code to adjust the layout of the web page. See “Creating, editing, and saving HTML files using Writer/Web” on page 1.
Another way to create a HTML file is to use File > Export and specify XHTML (Extensible Hypertext Markup Language) as the file type. LibreOffice will generate one XHTML 1.1 file per text document. The image files are embedded in the XHTML file. XHTML files created by exporting a text document in LibreOffice have significantly better layout rendering but fail to render objects other than images.
Notes
Writer does not replace multiple spaces in the original document with the HTML code for non-breaking spaces. If you want to have extra spaces in your HTML file or web page, you need to insert non-breaking spaces in LibreOffice. To do this, press Ctrl+Spacebar or Ctrl+Shift+Spacebar (depending on the operating system), instead of just Spacebar.
The Tab character is not rendered on exporting to XHTML. Instead, use borderless tables to position contents instead of the Tab character in a line. This also affects bullet and number lists that insert by default a Tab character between the bullet or number and the text. Use a list style where the Tab character is replaced by a space.
Objects different from usual image formats are not rendered in LibreOffice XHTML output. These include drawings, spreadsheets, charts, and OLE object in general. To render an OLE object in XHTML, first transform its visible contents into an image and then replace the object in your document with the image.
The use of styles in the text document is strongly recommended for getting the best results when exporting to HTML or XHTML.
Writer can save a large document as a series of web pages (HTML files) with a table of contents page.
1) Decide which headings in the document should start on a new page and make sure all those headings have the same paragraph style (for example, Heading 1).
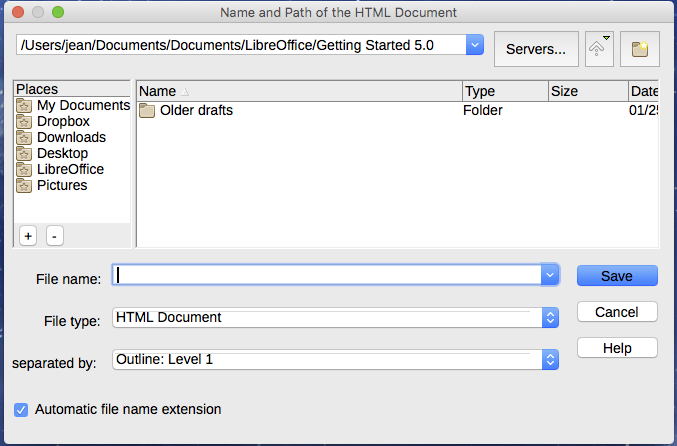
2) Go to File > Send > Create HTML Document on the Menu bar to open the Name and Path of the HTML Document dialog (Figure 9).
3) Type the file name to save the pages under.
4) Specify which style indicates a new page by using the separated by drop-down list at the bottom of the dialog (for example, Outline: Level 1).
5) Click Save to create the multi-page HTML document. The resulting HTML files conform to the HTML 4.0 Transitional standard.
Figure 9: Creating a series of web pages from one document
Calc can save files as HTML documents. Go to File > Save As on the Menu bar and select HTML Document (Calc) as the file type in the Save As dialog.
If the file contains more than one sheet, the additional sheets will follow one another in the HTML file. Links to each sheet will be placed at the top of the document.
Calc also allows the insertion of links directly into the spreadsheet using the Hyperlink dialog. See “Creating hyperlinks” on page 1 for more information on hyperlinks.
Impress presentations cannot be saved in HTML format, but have to be exported as HTML documents. The HTML files created will then use the default settings that you have not changed.
Notes
Saving in HTML format does not retain animation and slide transitions.
You can click Create on the HTML Export dialog at any step in the following procedure.
1) Go to File > Export on the Menu bar and specify the file name and location of where to save the web page version of your presentation.
2) Select HTML Document (Impress) as the file type and click Export to open the HTML Export dialog / wizard (Figure 10).
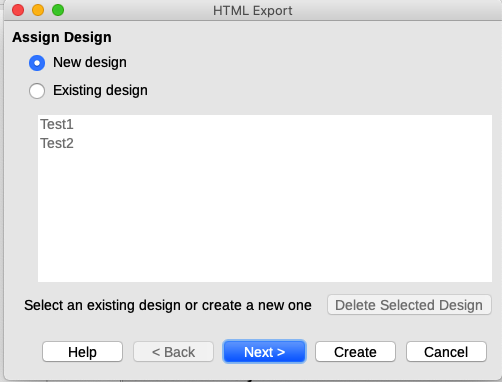
3) On the Assign Design page, you can choose to create a new design and select or delete an existing design. Select New design or Existing design and click Next >. If you have not previously saved a web page design, the Existing design choice is not available.
New design – creates a new design in the next pages of the wizard.
Existing design – loads an existing design from the design list to use as a starting point for the steps that follow. The list box displays all existing designs.
Delete Selected Design deletes the design from the list. If you delete a design, you will only delete the design information. An export file will not be deleted by this action.
Figure 10: HTML Export dialog – Assign Design page
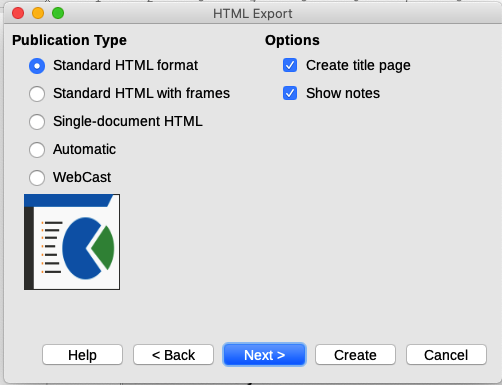
4) Specify the publication type for the web pages (Figure 11), then click Next >. The publication type defines the basic settings for the intended export. The choices are:
Standard HTML format – creates standard HTML pages from export pages.
Standard HTML with frames – creates standard HTML pages with frames. The exported page will be placed in the main frame and the frame to the left will display a table of contents in the form of hyperlinks.
Single-document HTML – creates a single file containing the text of the presentation, but not the layout or images.
Automatic – creates a default HTML presentation as a kiosk export in which the slides are automatically advanced after a specified amount of time.
WebCast – in a WebCast export, automatic scripts will be generated with Perl or ASP support. This enables the speaker (for example, a speaker in a telephone conference using a slide show on the Internet) to change the slides in the web browsers used by the audience.
Options are also provided to create a title page and to display your notes. For more information about the options on this page of the HTML Export dialog, click Help.
Figure 11: HTML Export dialog – publication type and options page
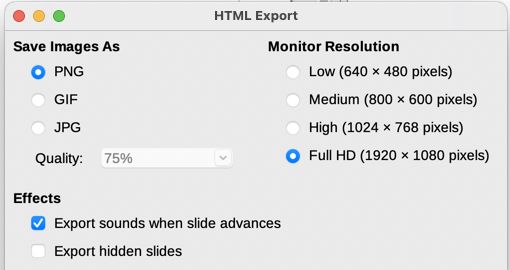
5) Specify the options for saving images, monitor resolution, and effects used for the web pages (Figure 12), then click Next >. The options on this page are as follows:
Save Images As – determines the image format. You can also define the compression value for the export.
Monitor Resolution – defines the resolution for the target screen. Depending on the selected resolution, the image will be displayed in a reduced size. You can specify a reduction of up to 80% from the original size. When selecting a resolution, consider what the majority of your viewers might be using. If you specify a high resolution, then a viewer with a medium-resolution monitor will have to scroll sideways to see the entire slide, which is probably not desirable.
Effects – specifies whether sound files defined as an effect for slide transitions are exported and whether any hidden slides are exported.
For more information on the options available for this page of the HTML Export dialog, click Help to open the help pages.
Figure 12: HTML Export dialog – image format, monitor resolution, and effects page
6) Specify the Information for the title page to be used with the web version of your presentation (Figure 13). The title page normally contains the author’s name, an email address, a home page address, and any additional information you want to include. This page is only available if you have selected to create a title page (option only applicable to the Standard HTML format and Standard HTML with frames publication types).
Figure 13: HTML Export dialog – title page information page
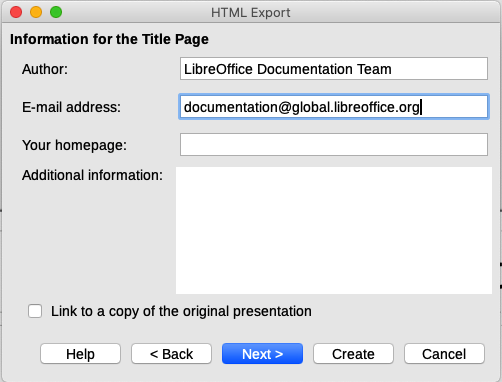
7) Select Link to a copy of the original presentation if you want to create a hyperlink to download a copy of the presentation file, and then click Next >.
8) Select the button style to be used for the web pages from the designs available (Figure 14) and then click Next >.
If you do not select a button style, LibreOffice will create a text navigator.
This page is not available if you have selected either Automatic or WebCast publication type.
Figure 14: HTML Export dialog – button style page
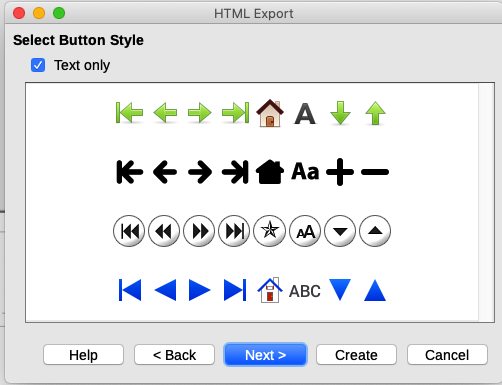
9) Select the color scheme to be used for the web pages (Figure 15), including colors for text, links, and background. This page is not available if you have selected either Automatic or WebCast publication type.
Figure 15: HTML Export dialog – color scheme page
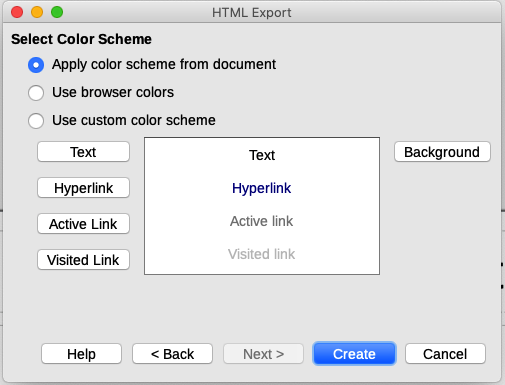
10) Click Create.
11) If you have created a new design for your web pages, a small Name HTML design dialog opens. Type a name for the design and click OK.
Note
Depending on the size of your presentation and the number of graphics it contains, the HTML export function creates several HTML, JPG, and GIF files. It is recommended to create a folder to hold all the files created for the web version of your presentation. If you simply save to your desktop and not in a specific folder, these separate HTML and graphics files will be placed all over your desktop.
Draw documents cannot be saved in HTML format, but have to be exported as HTML documents. Exporting drawings from Draw is similar to exporting a presentation from Impress. Go to File > Export and select HTML Document (Draw) as the file type, then follow the procedure above for exporting Impress presentations.
LibreOffice Writer can create, edit, and save files in HTML format using a configuration called Writer/Web.
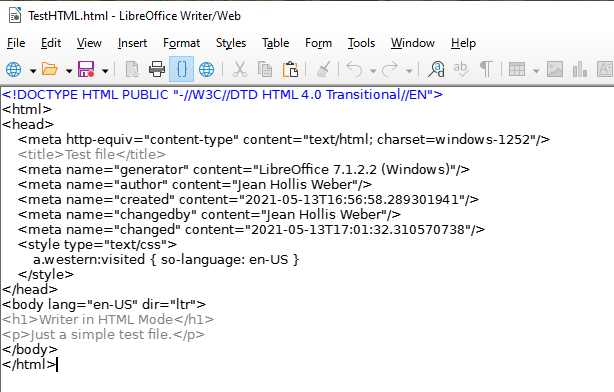
In addition to the Normal and Web display modes for editing (Figure 16), Writer/Web has a third editing mode called HTML Source mode (Figure 17). You can select this view when creating a new HTML document or after opening an existing one. With the HTML Source mode, you can directly edit HTML tags such as <p>, <ul>, <table>, and so on to compose web page elements. In that mode you must be familiar with the HTML markup language.
You normally add content to an HTML document using the Web display mode, because it will render the contents as if displayed in a browser. Use the HTML Source editing mode to tweak the formatting.
Note
Because HTML markup language has fewer formatting possibilities than a text document in OpenDocument Format, Writer/Web cannot provide all formatting features for HTML documents and some formatting dialogs have fewer options available. For example, a HTML paragraph has no tab settings.
Figure 16: Web display mode for Writer/Web
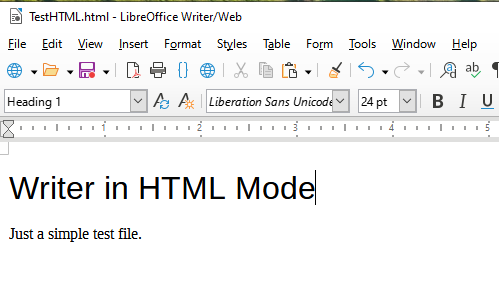
Figure 17: HTML Source display mode
To create a HTML document, choose File > New > HTML Document. Writer/Web opens a blank document in Web display mode. You can now add content to the document by typing or pasting text, images, tables, and other objects. Use all the Writer/Web formatting resources including styles to format the content. When you have finished, save the document with the HTML file type.
If you need to add HTML content directly into the document, enter HTML Source editing mode by clicking the HTML Source icon on the Standard toolbar, or choosing View > HTML Source on the Menu bar. If you haven’t saved a new document, Writer/Web will ask you to do so before it switches to HTML Source editing mode. In that mode, Writer/Web turns into a notepad-like text editor (Figure 17).
Note
The HTML markup content generated by Writer/Web is limited to the production of a displayable document in a web browser. It does not consider other components of a website such as external cascading style sheets (CSS), external JavaScript, or other script languages. Use the HTML Source mode to manually insert links to these external components into the page.
It is important to check your web pages (HTML documents) in a web browser such as Mozilla Firefox, Google Chrome, Microsoft Edge, or Safari. Not all browsers render HTML files the same way, so if possible, check the contents in several browsers.
To make LibreOffice open your default web browser and display the contents of an HTML document, go to File > Preview in Web Browser on the Menu bar, or click the Preview in Web Browser icon on the Standard toolbar. You can also open any web browser and then open the HTML file in it.