
Getting Started Guide 7.3
Chapter 1
Introducing LibreOffice
This document is Copyright © 2022 by the LibreOffice Documentation Team. Contributors are listed below. You may distribute it and/or modify it under the terms of either the GNU General Public License (https://www.gnu.org/licenses/gpl.html), version 3 or later, or the Creative Commons Attribution License (https://creativecommons.org/licenses/by/4.0/), version 4.0 or later.
All trademarks within this guide belong to their legitimate owners.
|
Jean Hollis Weber |
Kees Kriek |
|
|
Jean Hollis Weber |
Steve Fanning |
Kees Kriek |
|
Paul Figueiredo |
Jorge Rodriguez |
Amanda Labby |
|
Olivier Hallot |
Dave Barton |
Peter Schofield |
|
Hazel Russman |
Martin Saffron |
Ron Faile Jr. |
|
Jeremy Cartwright |
John A Smith |
|
Please direct any comments or suggestions about this document to the Documentation Team’s mailing list: documentation@global.libreoffice.org
Note
Everything you send to a mailing list, including your email address and any other personal information that is written in the message, is publicly archived and cannot be deleted.
Published February 2022. Based on LibreOffice 7.3 Community.
Other versions of LibreOffice may differ in appearance and functionality.
Some keystrokes and menu items are different on macOS from those used in Windows and Linux. The table below gives some common substitutions for the instructions in this document. For a detailed list, see the application Help.
|
Windows or Linux |
macOS equivalent |
Effect |
|
Tools > Options |
LibreOffice > Preferences |
Access setup options |
|
Right-click |
Control+click or right-click depending on computer setup |
Open a context menu |
|
Ctrl (Control) |
⌘ (Command) |
Used with other keys |
|
Alt |
⌥ (Option) or Alt, depending on keyboard |
Used with other keys |
|
F11 |
⌘+T |
Open Styles deck in Sidebar |
LibreOffice is a freely available, fully-featured, open source office productivity suite that is compatible with other major office suites and is available on a variety of platforms. Its native file format is Open Document Format (ODF), and it can also open and save documents in many other formats, including those used by several versions of Microsoft Office. For more information, see Appendix B, Open Source, Open Standards, OpenDocument.
LibreOffice includes the following components.
Writer is a feature-rich tool for creating letters, books, reports, newsletters, brochures, and other documents. You can insert graphics and objects from other components into Writer documents. Writer can export files to HTML, XHTML, XML, Portable Document Format (PDF), and EPUB; and it can save files in many formats, including several versions of Microsoft Word files. It also connects to your email client.
Calc has all of the advanced analysis, charting, and decision making features expected from a high-end spreadsheet. It includes over 500 functions for financial, statistical, and mathematical operations, among others. The Scenario Manager provides “what if” analysis. Calc generates 2D and 3D charts, which can be integrated into other LibreOffice documents. You can also open and work with Microsoft Excel workbooks and save them in Excel format. Calc can also export spreadsheets in several formats, including for example Comma Separated Value (CSV), Adobe PDF and HTML formats.
Impress provides all the common multimedia presentation tools, such as special effects, animation, and drawing tools. It is integrated with the advanced graphics capabilities of LibreOffice Draw and Math components. Slideshows can be further enhanced using Fontwork special effects text, as well as sound and video clips. Impress can open, edit, and save Microsoft PowerPoint presentations and can also save your work in numerous graphics formats.
Draw is a vector drawing tool that can produce everything from simple diagrams or flowcharts to 3D artwork. Its Smart Connectors feature allows you to define your own connection points. You can use Draw to create drawings for use in any of the LibreOffice components, and you can create your own clip art and then add it to the Gallery. Draw can import graphics from many common formats and save them in many formats, including PNG, GIF, JPEG, BMP, TIFF, SVG, HTML and PDF.
Base provides tools for day-to-day database work within a simple interface. It can create and edit forms, reports, queries, tables, views, and relations, so that managing a relational database is much the same as in other popular database applications. Base provides many new features, such as the ability to analyze and edit relationships from a diagram view. Base incorporates two relational database engines, HSQLDB and Firebird. It can also use PostgreSQL, dBASE, Microsoft Access, MySQL, Oracle, or any ODBC compliant or JDBC compliant database. Base also provides support for a subset of ANSI-92 SQL.
Math is a formula or equation editor. You can use it to create complex equations that include symbols or characters not available in standard font sets. While it is most commonly used to create formulas in other documents, such as Writer and Impress files, Math can also work as a standalone tool. You can save formulas in the standard Mathematical Markup Language (MathML) format for inclusion in web pages and other documents not created by LibreOffice.
Here are some of the advantages of LibreOffice over other office suites:
No licensing fees. LibreOffice is free for anyone to use and distribute at no cost. Many features that are available as extra cost add-ins in other office suites (like PDF export) are free with LibreOffice. There are no hidden charges now or in the future.
Open source. You can distribute, copy, and modify the software as much as you wish, in accordance with the LibreOffice Open Source licenses.
Cross-platform. LibreOffice runs on several hardware architectures and under multiple operating systems, such as Microsoft Windows, macOS, and Linux.
Extensive language support. The LibreOffice user interface, including spelling, hyphenation, and thesaurus dictionaries, is available in over 100 languages and dialects. LibreOffice also provides support for both Complex Text Layout (CTL) and Right to Left (RTL) layout languages (such as Urdu, Hebrew, and Arabic).
Consistent user interface. All the components have a similar “look and feel”, making them easy to use and master.
Integration. The components of LibreOffice are well integrated with one another.
All the components share a common spelling checker and other tools, which are used consistently across the suite. For example, the drawing tools available in Writer are also found in Calc, with similar but enhanced versions in Impress and Draw.
You do not need to know which application was used to create a particular file. For example, you can open a Draw file from Writer; it will open automatically in Draw.
Granularity. Usually, if you change an option, it affects all components. However, LibreOffice options can be set at a component level or even at document level.
File compatibility. In addition to its native OpenDocument formats, LibreOffice includes support for opening and saving files in many common formats including Microsoft Office, HTML, XML, WordPerfect, Lotus 1-2-3, and PDF. See Appendix B for a list.
No vendor lock-in. LibreOffice uses OpenDocument, an XML (eXtensible Markup Language) file format developed as an industry standard by OASIS (Organization for the Advancement of Structured Information Standards). These files can easily be unzipped and read by any text editor, and their framework is open and published.
You have a voice. Enhancements, software fixes, and release dates are community-driven. You can join the community and affect the course of the product you use.
You can read more about LibreOffice and The Document Foundation on their websites at https://www.libreoffice.org/ and https://www.documentfoundation.org/.
LibreOffice 7.3 requires one of the following operating systems:
Microsoft Windows: Windows 7 SP1, Windows 8, Windows Server 2012, or Windows 10. Administrator rights are needed for the installation process.
GNU/Linux: Kernel version 3.10 or higher and glibc2 v2.17 or higher.
macOS 10.12 (Sierra) or higher.
For a detailed list of hardware and software requirements, see the LibreOffice website,
https://www.libreoffice.org/get-help/system-requirements/.
Note regarding Java
Some LibreOffice features (wizards and the HSQLDB database engine) require that the Java Runtime Environment (JRE) or, for macOS, the Java Development Kit (JDK) is installed on your computer. If you do not want to use Java, you can still use nearly all of the LibreOffice features.
Java is available at no cost. More information and download links to the appropriate edition for your operating system can be found at: https://java.com/en/download/manual.jsp.
For macOS, you need to install Oracle’s Java Development Kit (JDK), not just the Java Runtime Environment (JRE). Download links can be found at: https://www.oracle.com/java/technologies/downloads/.
If you want to use LibreOffice features that require Java, it is important that the correct 32-bit or 64-bit edition matches the installed version of LibreOffice. See the Advanced Options in Chapter 2, Setting up LibreOffice.
Versions of LibreOffice Community for Windows, Linux, and macOS can be downloaded free from https://www.libreoffice.org/download. You can also download the software by using a Peer-to-Peer client, such as BitTorrent, at the same address.
Linux users will also find LibreOffice included in many of the latest Linux distributions; Ubuntu is just one example. Portable and other versions of LibreOffice are listed on the download page.
Linux, Enterprise, Online, and other versions may differ in appearance and functionality from the descriptions in this book.
Information on installing LibreOffice on the various supported operating systems is given here: https://www.libreoffice.org/get-help/install-howto/. After installation, you can change the default settings (options) in LibreOffice to suit your preferences; see Chapter 2, Setting up LibreOffice.
You can add functionality to LibreOffice with extensions and add-ons. Several extensions are installed with the program and you can get others from the official extensions repository, https://extensions.libreoffice.org/ and from other sources. See Chapter 14, Customizing LibreOffice, for more information on installing extensions and add-ons.
In general, you start LibreOffice the same way you start any other program on your computer.
On Windows and Linux, entries for LibreOffice and each of its components appear in the system menu of your computer. On macOS, only an entry for LibreOffice is added to the Applications menu. You can make a desktop icon for LibreOffice or a component in the same way you can make a desktop icon for any other program; see your operating system’s help for how to do this.
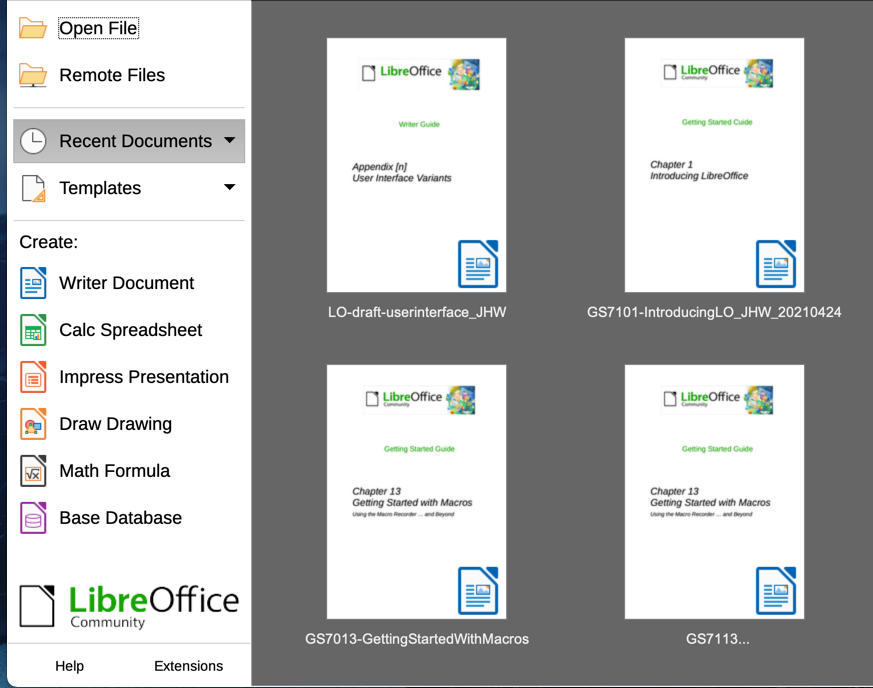
Clicking on the LibreOffice menu entry, desktop icon, or tile opens the LibreOffice Start Center (Figure 1) from where you can select the individual components of LibreOffice. You can also open an existing file, use a template, or access Help and extensions. The thumbnails in the Start Center include an icon showing the type of file (text, spreadsheet, drawing, presentation).
Figure 1: LibreOffice Start Center
You can also start LibreOffice by double-clicking the filename of an ODF document on the desktop, or in a file manager such as Windows Explorer or macOS Finder. The appropriate component of LibreOffice will start and the document will be loaded.
You can open files stored in remote servers running Content Management Interoperability Services (CMIS). CMIS, like OpenDocument Format, is an OASIS standard. When using CMIS servers, the service will ask you for the necessary credentials for file access. See “Opening and saving files on remote servers” on page 1.
For more information on opening files, see “Opening existing documents” on page 1.
The main window is similar for each component of LibreOffice, although some details vary. See the relevant chapters in this guide about Writer, Calc, Draw, Impress, Base, and Math for descriptions of those details.
Common features include the Title bar, Menu bar, Standard toolbar, and Formatting toolbar (Writer and Calc only) at the top of the window and the Status bar at the bottom.
Note
By default, LibreOffice’s commands are grouped in menus and toolbars, as described in this section. You can choose other user interface variants, displaying contextual groups of commands and contents (View > User Interface) For more information, see Chapter 14, Customizing LibreOffice.
The Title bar is located at the top of the LibreOffice window. It shows the file name of the current document. When the document is not yet named, the document name will appear as Untitled X, where X is a number. Untitled documents are numbered in the order in which they are created.
The Menu bar is located just below the Title bar in Windows and Linux and at the top of the screen in macOS. When you select one of the menus, a submenu drops down to show further options, including:
Commands that directly cause an action, such as Close or Save in the File menu.
Commands that open dialogs. These are indicated by three dots following a command, such as Find and Replace... in the Edit menu.
Commands that open further submenus. These are indicated by a right-pointing arrow following a command, such as Toolbars and Zoom, in the View menu. Moving the cursor onto one of these items causes its submenu to open.
As an example, the default Menu bar for Writer contains the following:
File – commands that apply to the entire document such as Open, Save, and Print.
Edit – commands for editing the document such as Undo, Find and Replace, Cut, Copy, Paste, and Track Changes.
View – commands for controlling the display of the document such as User Interface, Toolbars, Text Boundaries, Rulers, and Zoom.
Insert – commands for inserting elements into your document such as Image, Comment, Header and Footer, and Table of Contents and Index.
Format – commands for formatting the layout of your document.
Styles – commands for quickly applying common styles; for editing, loading, and creating styles; and for managing styles.
Table – commands to insert and edit a table in a text document.
Form – commands to create fill-in forms.
Tools – functions such as Spelling, AutoCorrect, Customize, and Options.
Window – commands for the display window.
Help – links to the LibreOffice Help, What’s This?, and information about the program.
LibreOffice has two types of toolbars: docked (fixed in place) and floating. Docked toolbars can be moved to different locations or made to float, and floating toolbars can be docked.
In a default LibreOffice installation, the top docked toolbar, just under the Menu bar, is called the Standard toolbar. It is consistent across the LibreOffice applications.
The second toolbar at the top for Writer and Calc, in a default LibreOffice installation, is the Formatting toolbar. It is context-sensitive; that is, it shows the tools relevant to the current position of the cursor or the object selected. For example, when the cursor is on a graphic, the Formatting toolbar provides tools for formatting graphics; when the cursor is in text, the tools are for formatting text.
In some cases it is convenient to reduce the number of toolbars displayed and get more space for the document. LibreOffice provides a single-toolbar alternative to the default double-toolbar setup. It contains the most-used commands. To activate it, enable View > User Interface > Single Toolbar.
To display or hide toolbars in a standard setup, go to View > Toolbars on the Menu bar, then click on the name of a toolbar in the submenu. An active toolbar shows a checkmark beside its name. Toolbars created from tool palettes are not listed in the View menu.
To close a toolbar, go to View > Toolbars on the Menu bar and deselect the toolbar, or right-click in an empty space between the icons on a toolbar and select Close Toolbar in the context menu.
Toolbar icons with a small triangle to the right will display sub-menus, tool palettes, and alternative methods of selecting items, depending on the icon.
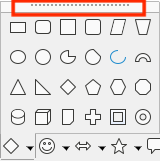
A tool palette is a pop-up collection of tools attached to a single tool in a toolbar. Tool palettes can be made into floating toolbars. Figure 2 shows an example of a tool palette from the Drawing toolbar made into a floating toolbar. Once removed from the parent toolbar, the palette displays a Title bar. Floating tool palettes can be left floating or docked along an edge of the screen or in one of the existing toolbar areas. See “Moving toolbars” and “Floating toolbars” below for more information.
Figure 2: Example of tearing off a tool palette: click on the dots and drag to form a floating toolbar

Tip
If you cannot see the dots at the top of the tool palette, you need to unlock the toolbar before you can float the palette. See “Locking and unlocking toolbars” below.
You can lock all toolbars, or individual toolbars, into place so they cannot be moved. When all toolbars are locked, you cannot unlock individual ones.
To lock all toolbars in place, go to View > Toolbars on the Menu bar and select Lock Toolbars at the bottom of the submenu. You will need to restart LibreOffice for this change to take effect. To unlock all toolbars, click on Lock Toolbars again.
To lock an individual toolbar into place, be sure Lock Toolbars is not selected on View > Toolbars, then right-click on the toolbar and select Lock Toolbar Position on the context menu.
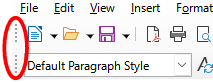
Docked toolbars are not locked in place. They are indicated by dotted handles on the left end (Figure 3). Docked toolbars can be undocked and moved to a new docked position or left as a floating toolbar.
1) Move the mouse cursor over the toolbar handle, which is the small vertical bar of dots to the left of a docked toolbar, highlighted in Figure 3.
2) Hold down the left mouse button and drag the toolbar to the new location.
3) Release the mouse button.
To move a floating toolbar, click on its title bar and drag it to a new floating location or dock the toolbar at the top or bottom of the main window.
Figure 3: Toolbar handles
LibreOffice includes several additional toolbars, whose default settings have them appear as floating toolbars in response to the current position of the cursor or selection. You can dock these toolbars to the top or bottom of the main window, or reposition them on your computer display (see “Moving toolbars” above).
Some of these additional toolbars are context sensitive and will automatically appear depending on the position of the cursor. For example, when the cursor is in a table, a Table toolbar appears, and when the cursor is in a numbered or bullet list, the Bullets and Numbering toolbar appears.
You can customize toolbars in several ways, including choosing which icons are visible and locking the position of a docked toolbar. You can also add icons and create new toolbars, as described in Chapter 14, Customizing LibreOffice. To access the customization options for a toolbar, right-click in an empty space between the icons on a toolbar to open a context menu.
To show or hide icons defined for the selected toolbar, point to Visible Buttons (in the context menu). Visible icons on a toolbar are indicated by an outline around the icon (Figure 4) or by a check mark beside the icon, depending on your operating system. Select or deselect icons to hide or show them on the toolbar.
Click Customize Toolbar to open the Customize dialog; See Chapter 14, Customizing LibreOffice, for more information.
Click Dock Toolbar to dock the selected floating toolbar. You can reposition the toolbar to a different docked position.
Click Dock All Toolbars to dock all floating toolbars. You can reposition the toolbars to different docked positions.
Click Lock Toolbar Position to lock a docked toolbar into its docked position.
Click Close Toolbar to close the selected toolbar.
Figure 4: Toolbar context menu and selection of visible toolbar icons:
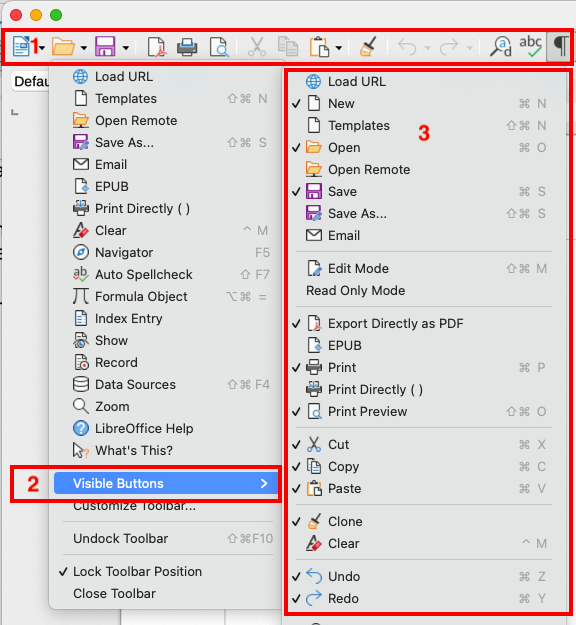
1) Right-click anywhere on the toolbar; 2) Point to Visible Buttons;
3) Visible icons are marked.
Context menus provide quick access to many menu functions. They are opened by right-clicking on a paragraph, graphic, or other object. When a context menu opens, the functions or options available will depend on the object that has been selected. A context menu can be the easiest way to reach a function, especially if you are not sure where the function is located in the menus or toolbars. Context menus may display an applicable keyboard shortcut if one has been set; you can toggle this visibility off or on in Tools > Options > LibreOffice > View > Visibility.
The Status bar is located at the bottom of the workspace. It provides information about the document and convenient ways to change some features quickly. It is similar in Writer, Calc, Impress, and Draw, but each LibreOffice component includes some component-specific items. An example of the Writer Status bar is shown in Figures Figure 5 and Figure 6.
Figure 5: Writer Status bar, left end

Figure 6: Writer Status bar, right end

Document changes status
Page, sheet, or slide number and page count
Word & character count
Page style or slide design
Language
Insert mode
Selection mode
Digital signature
Object information
View layout
Zoom slider
Zoom percentage
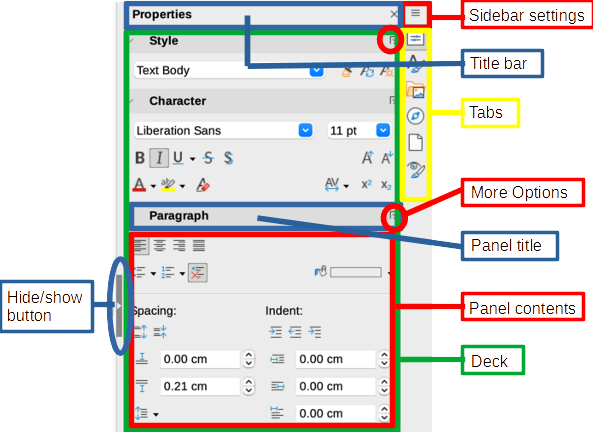
The Sidebar (Figure 7) is normally open by default on the right side of the workspace in Writer, Calc, Impress, and Draw. Select View > Sidebar on the Menu bar to display or hide it. It contains one or more decks, based on the current document context. Decks are organized into panels. A tab bar on the right side of the sidebar allows you to switch between different decks.
All four components contain the Properties, Styles, Gallery, and Navigator decks. Some components have additional decks, such as Page and Style Inspector for Writer; Master Slides, Animation, Shapes, and Slide Transition for Impress; Shapes for Draw; and Functions for Calc.
Toolbars and Sidebar panels share many functions. For example, the buttons for making text bold or italic exist in both the Formatting toolbar and the Properties panel. Some panels contain a More Options button, which opens a dialog with additional editing controls.
For more detail, see the Sidebar explanation in the relevant LibreOffice component’s user guide.
To hide the Sidebar, click on the gray Hide button on the left. Click on the same button to show the Sidebar again.
To undock the Sidebar and make it floating, and to dock a floating Sidebar, use the choices on the Sidebar Settings drop-down list at the top of the tab bar.
Figure 7: Properties panel of the Sidebar in Writer
You can start a new, blank document in LibreOffice in several ways.
When LibreOffice is running but no document is open, the Start Center (Figure 1 on page Figure 1) is shown. Click one of the icons to open a new document of that type, or click the Templates icon to start a new document using a template.
Use File > New on the Menu bar and select the type of document in the sub menu.
Use the keyboard shortcut Ctrl+N to create a new document. The type of document created depends on which LibreOffice component is open and active. For example, if Calc is open and active, a new spreadsheet is created.
Use File > Wizards on the Menu bar and select the type of document in the context menu.
If a document is already open in LibreOffice, click the New icon on the Standard toolbar and a new document of the type shown on the icon is created in a new window. The New icon changes depending on which component of LibreOffice was last created.
If a document is already open in LibreOffice, click on the small triangle to the right of the New icon on the Standard toolbar and select the type of document in the context menu.
Note
If all documents are closed without exiting from LibreOffice, then the Start Center will be displayed.
You can open an existing document in several ways.
When no document is open:
Click Open File or Remote Files in the Start Center.
Go to File > Open or File > Open Remote on the Menu bar.
Use the keyboard shortcut Ctrl+O.
Click on a thumbnail in the list of recently opened documents displayed in the Start Center. You can scroll up or down in the Start Center to locate a recently opened document.
Note
Renamed or relocated documents can still be listed in the Start Center. Selecting one gives an error message that the file does not exist. To remove the thumbnail from the Start Center, hover the mouse pointer over the thumbnail until an X appears in the upper right corner, and then click on the X.
If a document is already open:
Click the Open icon on the Standard toolbar.
Click the small triangle to the right of the Open icon and select from a list of recently opened documents, or select Open Remote File.
Use File > Recent Documents to make a selection from the submenu.
When using the Open dialog, navigate to the folder you want, select the file, and then click Open. If a document is already open in LibreOffice, the second document opens in a new window.
In the Open dialog, you can reduce the list of files by selecting the type of file you are looking for. For example, if you choose Text documents as the file type, you will only see documents Writer can open (including .odt, .doc, .txt); if you choose Spreadsheets, you will see .ods, .xls, and other files that Calc opens.
You can also open an existing document that is in a format that LibreOffice recognizes by double-clicking on the file icon on the desktop or in a file manager such as Windows Explorer or macOS Finder. LibreOffice may need to be associated with file types that are not ODF files for the appropriate LibreOffice component to open.
For example, on a Windows computer, if you do not have Microsoft Office installed or if Microsoft Office is installed but you have associated Microsoft Office file types with LibreOffice, then when you double-click on the following files, they open in LibreOffice:
A Word file (*.doc or *.docx) opens in Writer.
An Excel file (*.xls or *.xlsx) opens in Calc.
A PowerPoint file (*.ppt or *.pptx) opens in Impress.
If you did not associate the file types with LibreOffice, and Microsoft Office is installed on your computer, then when you double-click on a Microsoft Office file, it opens using the appropriate Microsoft Office component.
On macOS, if Microsoft Office is not installed and you have not associated those file types with LibreOffice, the files may open in Apple’s Pages, Numbers, or Keynote applications.
See the LibreOffice Help for more about file associations.
You can save documents as follows:
Save – use if you are keeping the document, its current filename and location.
Save As – use to create a new document, or change the filename and/or file format, or save the file in a different location on your computer.
Save Remote – use if your document is already stored in a remote server or will be stored in a remote server.
Save a Copy – use to save a copy of your current document and keep it open for more editing.
Save All – use to save all the files open in your current session.
To save a document if you are keeping the document’s current filename and location, do one of the following:
Use the menu option File > Save.
Use the keyboard shortcut Ctrl+S.
Click the Save icon on the Standard toolbar.
Use the menu option File > Save All.
Use the menu option File > Save Remote.
Use the menu option File > Save a Copy (similar to the Save As command).
Using the Save command will immediately overwrite the last saved version of the file.
If you want to create a new document file, change the filename and/or file format, or save the file in a different location on your computer:
Use the keyboard shortcut Ctrl+Shift+S.
Use the menu option File > Save As.
Click the arrow to the right of the Save icon and select Save As from the context menu.
When the Save As dialog or Save dialog opens, enter the file name, change the file type (if applicable; for example, to a Microsoft Office format), navigate to a new location (if applicable), and click Save.
LibreOffice provides two types of document protection: password protection and OpenPGP encryption. Files encrypted with the Save password cannot be decrypted without the password, which must be sent to each user who needs to decrypt the document. With OpenPGP encryption, the document is encrypted using an algorithm, which requires a key. Each key is used only once and is sent to the recipient along with the document.
LibreOffice provides two levels of password protection: read-protect (file cannot be viewed without a password) and write-protect (file can be viewed in read-only mode but cannot be changed without a password). Thus you can make the content available for reading by one group of people and for reading and editing by a different group. This behavior is compatible with Microsoft Word file protection. The two levels can also be combined.
Figure 8: Save with password and Encrypt with GPG key options
To protect a document with passwords:
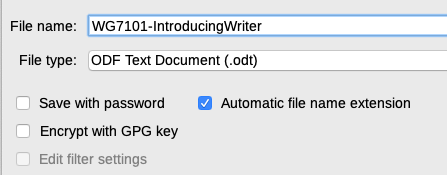
1) Using the Save As command, select the Save with password option in the lower left of the Save As dialog or Save dialog (Figure 8).
2) Click Save and the Set Password dialog opens (Figure 9).
3) In the File Encryption Password section, enter a password to open the document and then enter the same password as confirmation.
4) To restrict who can edit the document, click Options.
5) In the File Sharing Password section, select Open file read-only, enter a password to allow editing, and then enter the same password as confirmation.
6) Click OK and the dialog closes. If the passwords match, the document is saved password-protected. If either pair of passwords do not match, you receive an error message.
Caution
LibreOffice uses a very strong encryption mechanism that makes it almost impossible to recover the contents of a document if you lose or forget the password.
Figure 9: Set Password dialog

When a document is password-protected, you can change the password while the document is open. Go to File > Properties > General on the Menu bar and click the Change Password button. This opens the Set Password dialog where you can enter a new password.
LibreOffice uses the OpenPGP software installed on your computer. If no OpenPGP software is available, you must download and install one suitable for your operating system before you can use this option.
You must define a personal pair of cryptography keys with the OpenPGP application. Refer to the OpenPGP software installed on how to create a pair of keys. For more information on using this form of encryption, see the supplied Help.
OpenPGP encryption requires the use of the public key of the recipient; this key must be available in the OpenPGP key chain stored in your computer.
To encrypt a document:
1) Choose File > Save As,
2) In the Save As dialog, enter a name for the file.
3) Select the Encrypt with GPG key option (see Figure 8).
4) Click Save. The OpenPGP public key selection dialog opens.
5) Choose the public key of the recipient. You can select multiple keys.
6) Click OK to close the dialog and save the file encrypted with the selected public keys.
LibreOffice can save files automatically as part of the AutoRecovery feature. Automatic saving, like manual saving, overwrites the last saved state of the file.
To set up automatic file saving:
1) Go to Tools > Options > Load/Save > General on the Menu bar.
2) Select Save AutoRecovery information every and set the time interval.
3) Click OK.
LibreOffice can open and save files stored on remote servers. Keeping files on remote servers allows you to work with the documents using different computers. For example, you can work on a document in the office during the day and edit it at home for last-minute changes. Storing files on a remote server also backs up documents from computer loss or hard disk failure. Some servers are also able to check-in and check-out files, thus controlling their usage and access.
LibreOffice supports many document servers that use well known network protocols such as FTP, WebDav, Windows share, and SSH. It also supports popular services like Google Drive and Microsoft OneNote, as well as commercial and open source servers that implement the OASIS CMIS standard.
To enable a remote server connection, use one of these methods:
Click on the Remote Files button in the Start Center.
Select File > Open Remote in any open document.
Select File > Save Remote in any open document.
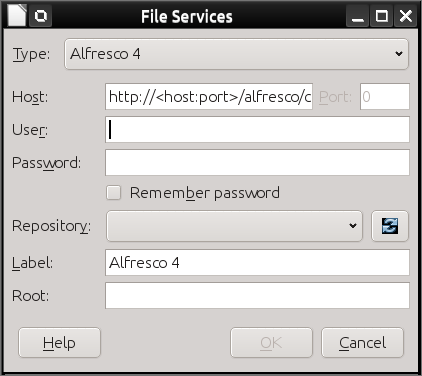
On the Remote Files dialog (Figure 10), click Manage Services / Add Service button in the upper right to open the File Services dialog (Figure 11). Depending on the type of file service you choose in the Type listbox, different parameters are necessary to fully qualify the connection to the remote server.
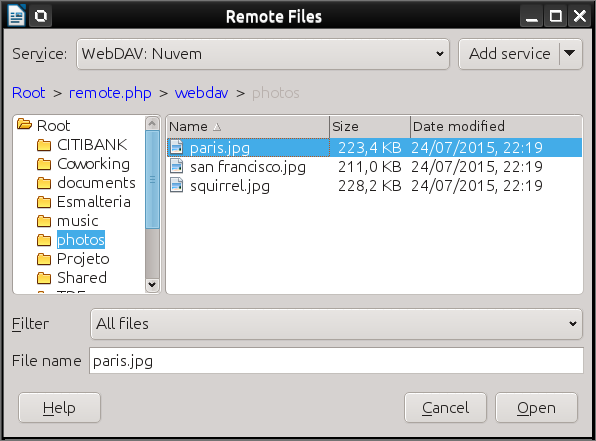
Figure 10: Remote Files dialog when connected to a server
Once the connection is defined, click OK to connect. The dialog will dim until the connection is established with the server. A dialog asking for the user name and the password may pop up to let you log in the server. Proceed entering your credentials.
The Remote Files dialog (Figure 10) which then appears has many parts. The upper list box contains the list of remote servers you have previously defined. The line below the list box shows the path to access the folder. On the left is the folder structure of the user space in the server. The main pane displays the files in the remote folder. Click the Open or Save button to proceed.
Figure 11: Remote server configuration
The Navigator lists objects contained in a document, collected into categories. For example, in Writer it shows Headings, Tables, Frames, Comments, Images, Bookmarks, and other items, as shown in Figure Figure 12. In Calc it shows Sheets, Range names, Database ranges, Images, Drawing objects, and other items. In Impress and Draw it shows Slides, Pages, and other items.
In a default installation of LibreOffice, the Navigator is a Sidebar deck. If necessary, press the F5 key, or go to View > Navigator on the Menu bar, or click the Navigator icon on the Sidebar, to open it.
Figure 12: Navigator in Writer
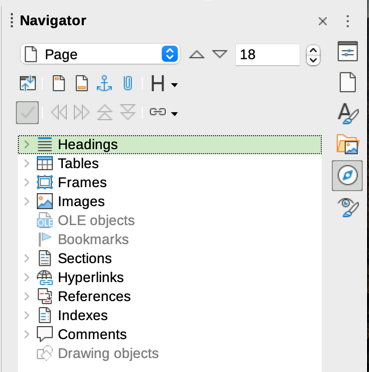
Click the marker (+ or triangle) by any of the categories to display the list of objects in that category.
The Navigator provides several convenient ways to move around a document and find items in it:
When a category is showing the list of objects in it, double-click on an object to jump directly to that object’s location in the document.
Objects are much easier to find if you have given them recognizable names when creating them, instead of keeping the default names such as Sheet1, Table1, or Table2. The default names may not correspond to the actual position of the object in the document.
Navigator also provides the facility to move, promote, demote items within a document.
Each Navigator in the individual LibreOffice components has a different range of functions. These functions are further explained in the user guide for each LibreOffice component.
You can open, view, and edit several views of the same document in LibreOffice at the same time. These views are displayed in windows that can display different pages or use different zoom levels or other settings. A change to the document in one window is immediately reflected in the other windows. In Writer, for example, you might find this useful for copying or moving information from one page to another.
To open a new window showing the document, go to Window > New Window on the Menu bar. In each window opened, the filename in the title bar is automatically numbered as shown by the example in Figure 13. If other LibreOffice documents are open at the same time, the list of windows also includes them. The active window has a marker by its filename in the list. You can switch between windows by clicking on a name in the list, or by clicking on the window itself if it is visible on the display.
To close a window, go to Window > Close Window on the Menu bar, or use the keyboard shortcut Ctrl+W, or click the Close icon on the Menu bar or Title bar of the window.
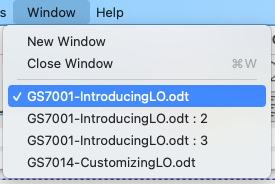
Figure 13: List of open windows
To undo the most recent unsaved change in a document, use the keyboard shortcut Ctrl+Z, or click the Undo icon on the Standard toolbar, or go to Edit > Undo on the Menu bar. Click the small triangle to the right of the Undo icon to get a list of all the changes that can be undone. You can select multiple changes and undo them at the same time.
After changes have been undone, you can redo changes. To redo a change use the keyboard shortcut Ctrl+Y, or click the Redo icon, or go to Edit > Redo on the Menu bar. As with Undo, click on the triangle to the right of the Redo icon to get a list of the changes that can be reapplied.
To repeat the last command applied to your document, use the shortcut Ctrl+Shift+Y or go to Edit > Repeat on the Menu bar. This can save several repetitive menu navigation clicks or keyboard shortcuts, especially when the command is taken from a secondary menu.
Reloading is useful in two situations.
You may want to discard all the changes made in an editing session after the last document save.
You may have made some formatting changes that do not show until the document has been closed and reopened; reloading has the same result.
To reload a document, go to File > Reload on the Menu bar. If you have made changes to a file since the last save, a confirmation dialog will warn you that reloading will discard your last changes. Choose whether to save or discard the changes.
On reloading the document, the File dialog does not open, because the file is already selected.
To open the Properties dialog for a document, go to File > Properties on the Menu bar. The Properties dialog provides information about the document and allows you to set some of its properties. The dialog and its tabs are described below.
Contains basic information about the current file: file name and type; storage location; file size; date, time, and author of file creation and last modification; template used to create the file; date, time, and author of digital signature; date, time, and user name when the file was last printed; total editing time; and revision number.
Controls available:
Change Password – opens a dialog to change the password. It is only active if a password has been set for the file.
Digital Signatures – opens the Digital Signatures dialog where you can manage digital signatures for the current document.
Apply user data – saves the full name of the user with the file. You can edit the name by going to Tools > Options > LibreOffice > User Data on the Menu bar.
Save preview image with this document – saves a thumbnail.png inside the document. These images may be used by a file manager under certain conditions.
Reset Properties – resets the editing time to zero, the creation date to the current date and time, and the version number to 1. The modification and printing dates are also deleted.
Contains optional editable descriptive information about the document, which may be exported as metadata to other file formats.
Title – enter a title for the document.
Subject – enter a subject for the document. You can use a subject to group documents with similar contents.
Keywords – enter the words that you want to use to index the content of the document. Keywords must be separated by commas. A keyword can contain white space characters or semicolons.
Comments – enter comments to help identify the document.
Use this page to assign custom information fields to the document. In a new document, this page may be blank. If the new document is based on a template, this page may contain fields. You can change the name, type, and contents of each row. The information in the fields will be exported as metadata to other file formats.
Click Add Property to add a new custom property. Click Reset to delete all custom properties.
Used for documents stored on remote servers; not shown otherwise. See the Help for more information.
Enables two password-protected security options.
Open file read-only – select to allow this document to be opened only in read-only mode. This file sharing option protects the document against accidental changes. It is still possible to edit a copy of the document and save that copy with the same name as the original.
Record changes – select to require that all changes be recorded. To protect the recording state with a password, click Protect and enter a password. This is similar to Edit > Track Changes > Record on the Menu bar. However, while other users of this document can apply their changes, they cannot disable change recording without knowing the password.
Protect or Unprotect button protects the change recording state with a password. If change recording is protected for the current document, the button is named Unprotect. Click Unprotect and type the correct password to disable the protection.
When Embed fonts in the document is selected, any fonts used in the document will be embedded into the document when it is saved. This may be useful if you are creating a PDF and want to control how it will look on other computer systems.
Only embed fonts that are used in documents – If fonts have been defined for the document (for example, in the template), but have not been used, select this option to not embed them.
Font scripts to embed – You can choose which types of fonts are embedded: Latin, Asian, Complex.
Displays statistics for the current file, such as the number of pages, words, and characters.
Document classification and security are important for businesses and governments. Where sensitive information is exchanged between users and organizations, the parties agree how such information will be identified and handled. LibreOffice provides standardized means for sensitive information to be identified and protected, using a set of standard fields that can be used to hold sensitive information.
LibreOffice implemented the open standards produced by TSCP (Transglobal Secure Collaboration Participation, Inc.). It contains three BAF (Business Authentication Framework) categories: Intellectual Property, National Security and Export Control. Each category has four BAILS (Business Authorization Identification and Labeling Scheme) levels: Non-Business, General Business, Confidential, and Internal Only.
To enable document classification, open the TSCP bar (View > Toolbars > TSCP Classification). This toolbar contains list boxes to help in selecting the security of the document. LibreOffice then adds custom fields in the document properties (File > Properties, Custom Properties tab) to store the classification policy as document metadata.
To prevent a breach in security policy, contents with a higher classification level cannot be pasted into documents with a lower classification level.
If only one document is open and you want to close that document, go to File > Close on the Menu bar or click on the X on the right or left end of the Menu bar. On Windows and Linux, the document closes and the LibreOffice Start Center opens. On macOS, the document closes and only the Menu bar remains at the top of the screen.
If more than one document is open and you want to close one of them, go to File > Close on the Menu bar or click on the X on the right or left end of the title bar of that document’s window.
If the document has not been saved since the last change, a message box is displayed. Choose whether to save or discard your changes.
To close LibreOffice completely, go to File > Exit LibreOffice on the Menu bar in Windows and Linux. In macOS, go to LibreOffice > Quit LibreOffice on the Menu bar.
In Windows and Linux, when you close the last document using the X on the title bar of the window, then LibreOffice will close completely. In macOS, you need to use LibreOffice > Quit LibreOffice.
You can also use a keyboard shortcut:
In Windows and Linux – Ctrl+Q
In macOS – ⌘+Q
If any documents have not been saved since the last change, a message box is displayed. Choose whether to save or discard your changes.
You can use Safe Mode (Figure 14) to help restore an instance of LibreOffice that has become corrupted and stopped working, fails to launch, or crashes in some situations.
To access Safe Mode, do one of the following:
Choose Help > Restart in Safe Mode on the Menu bar.
Start LibreOffice from the command line with the --safe-mode option.
In Windows only, choose LibreOffice (Safe Mode) from the Start Menu.
Figure 14: LibreOffice Safe Mode
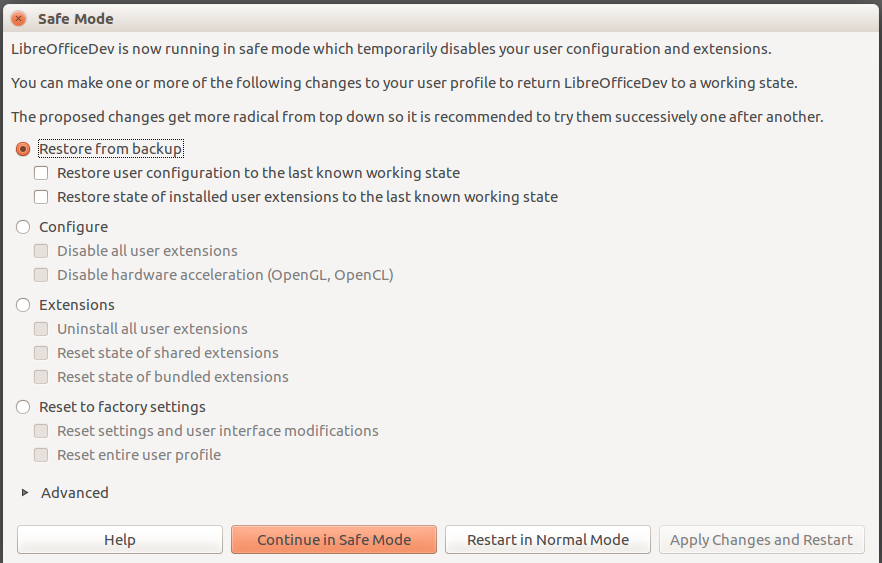
The following Safe Mode options get more extreme from the top down, so it is recommended that you try them successively.
Restore from backup – LibreOffice keeps backups of previous configurations and activated extensions. Use this option to restore the user configuration, installed extensions, or both, to a previous known working state if you suspect that your problems were caused by recent changes to either.
Configure – Use this option to disable all user extensions, hardware acceleration, or both. This is a good choice if you are experiencing crashes on startup or visual glitches that are often related to hardware acceleration.
Extensions – If you suspect that a corrupted extension is blocking or causing LibreOffice to crash, you can use this option to uninstall all user extensions and reset the state of any shared or bundled extensions. In the case of shared or bundled extensions, the option will only work if you have the proper system access rights. It should be exercised with caution.
Reset to factory settings – If all of the above fails, you can reset your settings and your user interface modifications, or your entire profile, back to factory defaults.
Reset settings and user interface modifications – this will reset your User Interface and configuration changes, but keep things like your personal dictionary, templates, etc.
Reset entire user profile – this will erase all customized options and return your user profile to the factory default state.
Continue in Safe Mode – Continuing in Safe Mode will allow you to work in LibreOffice, using a temporary profile that was created on startup. Any extensions or configuration options you had set up previously will have to be reconfigured in order to be used, bearing in mind that any changes made to the temporary user profile will be lost after any restart.
Restart in Normal Mode – If you arrived in Safe Mode accidentally, this option will discard any changes, terminate Safe Mode, and restart LibreOffice normally.
Apply Changes and Restart – Choose this option to apply any of the above changes and restart LibreOffice.
Note
If you are unable to solve your problem using Safe Mode, the Advanced tab provides instructions on receiving further aid.
In the Advanced tab you can also create a .zip file of your corrupted user profile which can then be uploaded to the bug tracking system where it can be further investigated by the developers.
However, be aware that your uploaded user profile may contain sensitive information such as installed extensions, personal dictionaries, and settings.