
Getting Started Guide 7.4
Chapter 11,
Getting Started with Macros
Using the Macro Recorder … and Beyond
This document is Copyright © 2022 by the LibreOffice Documentation Team. Contributors are listed below. You may distribute it and/or modify it under the terms of either the GNU General Public License (https://www.gnu.org/licenses/gpl.html), version 3 or later, or the Creative Commons Attribution License (https://creativecommons.org/licenses/by/4.0/), version 4.0 or later.
All trademarks within this guide belong to their legitimate owners.
|
Skip Masonsmith |
Flywire |
Kees Kriek |
|
|
Jean Hollis Weber |
Felipe Viggiano |
Kees Kriek |
Olivier Hallot |
|
Rafael Lima |
Peter Schofield |
Andrew Pitonyak |
Hazel Russman |
|
Steve Fanning |
Martin Fox |
Andrew Jensen |
Ron Faile Jr. |
|
Valerii Goncharuk |
|
|
|
Please direct any comments or suggestions about this document to the Documentation Team’s forum at https://community.documentfoundation.org/c/documentation/loguides/ (registration is required) or send an email to: loguides@community.documentfoundation.org.
Note
Everything you send to a mailing list, including your email address and any other personal information that is written in the message, is publicly archived and cannot be deleted.
Published January 2022. Based on LibreOffice 7.4 Community.
Other versions of LibreOffice may differ in appearance and functionality.
Some keystrokes and menu items are different on macOS from those used in Windows and Linux. The table below gives some common substitutions for the instructions in this document. For a detailed list, see the application Help.
|
Windows or Linux |
macOS equivalent |
Effect |
|
Tools > Options |
LibreOffice > Preferences |
Access setup options |
|
Right-click |
Control+click or right-click depending on computer setup |
Open a context menu |
|
Ctrl (Control) |
⌘ (Command) |
Used with other keys |
|
Alt |
⌥ (Option) or Alt, depending on keyboard |
Used with other keys |
|
F11 |
⌘+T |
Open Styles deck in Sidebar |
A macro is a set of commands or keystrokes that are stored for later use. An example of a simple macro is one that enters your address into an open document. You can use macros to automate both simple and complex tasks. Macros are very useful when you have to repeat the same task in the same way.
The simplest way to create a macro is to record a series of actions through LibreOffice’s user interface. LibreOffice saves recorded macros using the open source LibreOffice Basic scripting language, which is an implementation of the well-known BASIC programming language. Such macros can be edited and enhanced after recording using the built-in LibreOffice Basic Integrated Development Environment (IDE).
The most powerful macros in LibreOffice are created by writing code using one of the four supported scripting languages (LibreOffice Basic, Python, JavaScript, and BeanShell). This chapter provides an overview of LibreOffice’s macro facilities, mostly focused on its default macro scripting language, LibreOffice Basic. Some introductory examples are included for the BeanShell, JavaScript, and Python scripting languages. However, an in-depth discussion of how to use these languages for scripting is beyond the scope of this chapter.
The first step in learning macro programming is to find and use existing macros. This section assumes that you have a macro that you want to use, which you may have found in a book or on the internet. For this example, the macro in Listing 1 is used. You should create a library and module to contain your macro; see “Macro organization” below for more information.
Listing 1: Simple macro that says hello
Sub HelloMacro
Print "Hello"
End Sub
Use the following steps to create a library that will contain your macro:
1) Open any LibreOffice application.
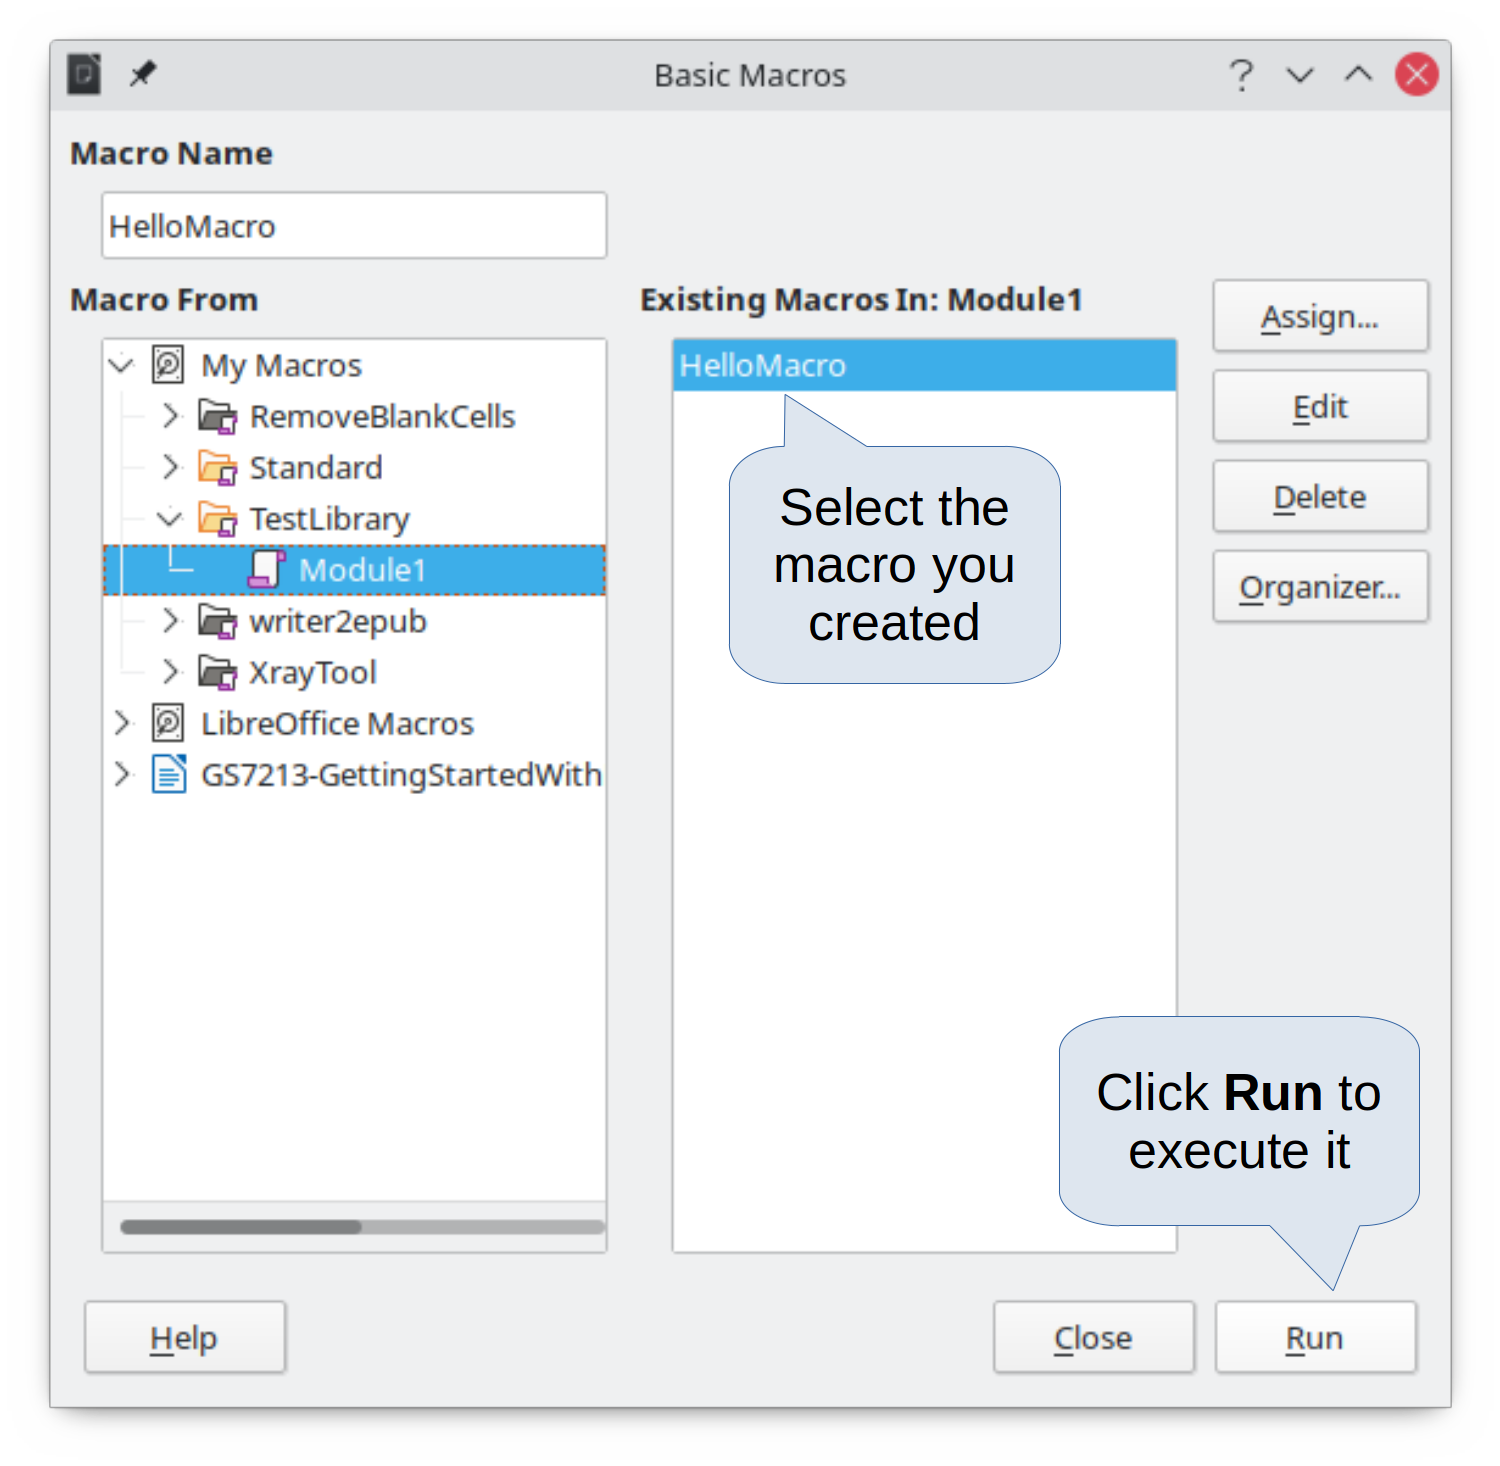
2) Go to Tools > Macros > Organize Macros > Basic to open the Basic Macros dialog (Figure 1).
3) Click Organizer to open the Basic Macro Organizer dialog (Figure 2) and select the Libraries tab.
4) Set the Location drop-down to My Macros & Dialogs, which is the default location.
5) Click New to open the New Library dialog (not shown here).
6) Enter a library name, for example TestLibrary, and click OK.
7) On the Basic Macro Organizer dialog, select the Modules tab (Figure 3).
8) In the Module list, expand My Macros and select your library (in the example, TestLibrary). A module named Module1 already exists and can contain your macro. If you wish, you can click New to create another module in the library.
9) Select Module1, or the new module that you created, and click Edit to open the Integrated Development Environment (IDE) (Figure 4). The IDE is a text editor and associated facilities that are built into LibreOffice and allow you to create, edit, run, and debug macros.
Figure 1: Basic Macros dialog
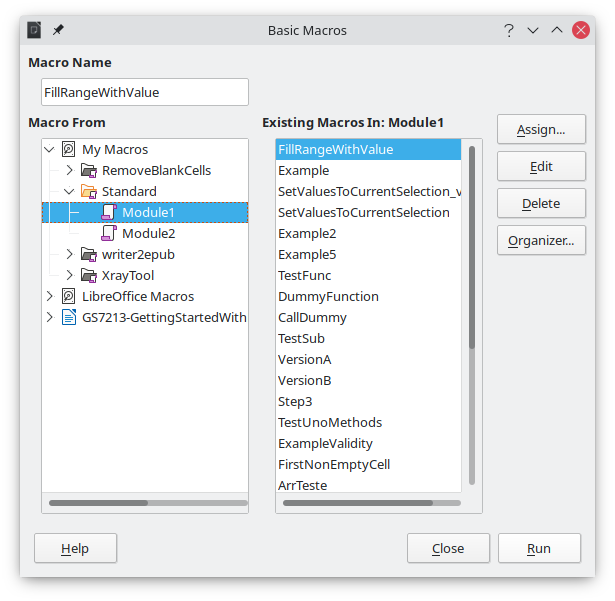
Figure 2: LibreOffice Basic Macro Organizer dialog, Libraries tab
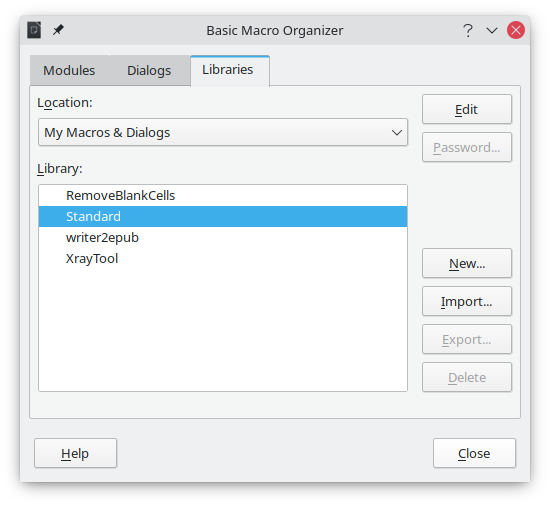
Figure 3: Basic Macro Organizer dialog, Modules tab
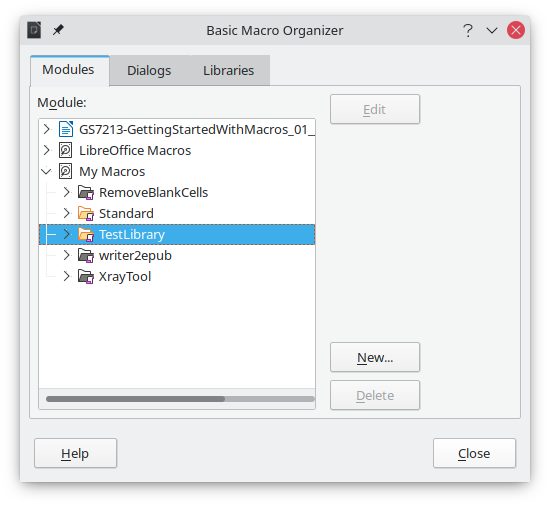
Figure 4: LibreOffice Basic IDE (Integrated Development Environment) window
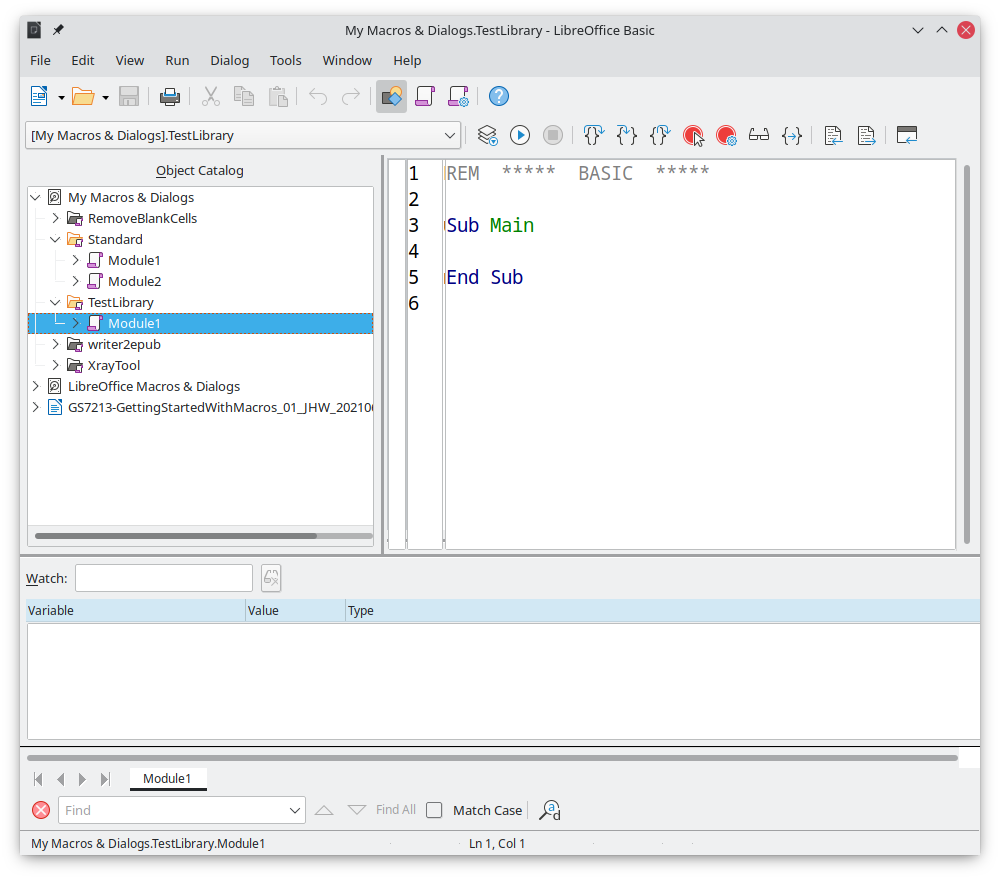
10) When a new module is created, it contains a comment and an empty macro named Main, which currently does nothing.
11) Add the new macro either before Sub Main or after End Sub. Listing 2 shows the new macro added before Sub Main.
Listing 2: Module1 after adding the new macro
REM ***** BASIC *****
Sub HelloMacro
Print "Hello"
End Sub
Sub Main
End Sub
Tip
If you prefer, you can remove the Sub Main … End Sub code from the Module and leave only the HelloMacro subroutine.
12) (Optional) To check if the macro is written as expected by the programming language, click the Compile icon on the Macro toolbar.
13) Double-click the HelloMacro subroutine in the Object Catalog window under TestLibrary > Module 1 and click the Run icon on the Macro toolbar, or press the F5 key, to run the HelloMacro subroutine in the module. A small dialog will open with the word “Hello” displayed (see below).
14) Click OK to close this small dialog.

15) If no subroutine or function is selected, a dialog like the one in Figure 5 will open. Then select the macro and click Run to execute it.
16) To select and run any macro in the module, click the Select Macro icon on the Standard toolbar or go to Tools > Macros > Organize Macros > Basic.
17) Select a macro and then click Run.
Figure 5: Dialog to select and run a macro
When you record a macro in LibreOffice, you are actually recording the steps to perform a certain task using programming language. For example, consider that you have to repeatedly enter the same information into a document. You can copy this information after it has been entered into the document for the first time, then paste the information into the document each time you want to use it. However, if something else is copied to the clipboard, the contents of the clipboard are changed. This means that you have to re-copy this piece of information again to later paste it into the document. To overcome this problem, you can create a macro that enters this piece of information without having to copy it every time you need it.
Note
For some cases when you want to repeatedly enter information into a document, it may be more convenient to create an AutoText. See Chapter 2, Working with Text: Basics, in the Writer Guide for more information.
Make sure macro recording is enabled by going to Tools > Options > LibreOffice > Advanced and selecting the option Enable macro recording under Optional Features. By default, this feature is turned off in LibreOffice.
1) Go to Tools > Macros > Record Macro to start recording a macro. A small dialog with a Stop Recording button is displayed indicating that LibreOffice is recording a macro.
2) Type the desired text you want to be entered when this macro is run. As an example, type your name.
3) Click Stop Recording on the small dialog. This will cause Basic Macros dialog to open (similar to Figure 1 above, but with different action buttons).
4) Open the library container My Macros.
5) Find the library named Standard in My Macros. Note that every library container has a library named Standard.
6) Select the Standard library and then choose an existing module in which to save the macro. Alternatively you can click New Module to create a new module to contain the newly recorded macro.
7) In the Macro Name text box at the top left section of the dialog, type a name for the macro you have just recorded, for example EnterMyName.
8) Click Save to save the macro and close the Basic Macros dialog.
If you followed all of the above steps, a macro named EnterMyName will have been created inside the selected module.
Note
Whenever you create a new module in LibreOffice, a subroutine named Main is automatically added to the module.
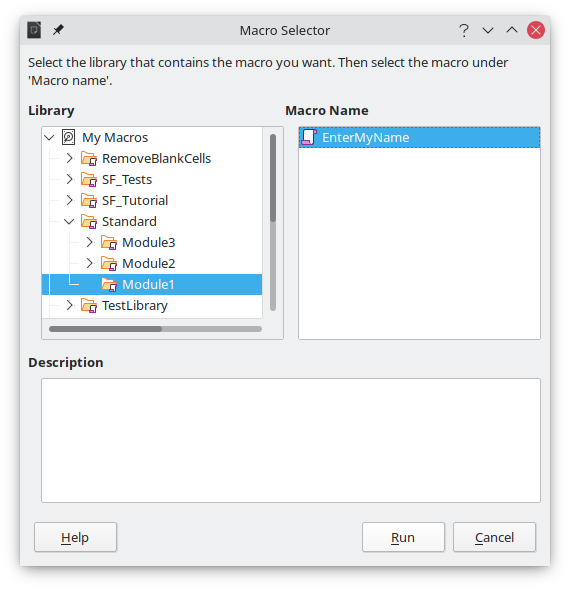
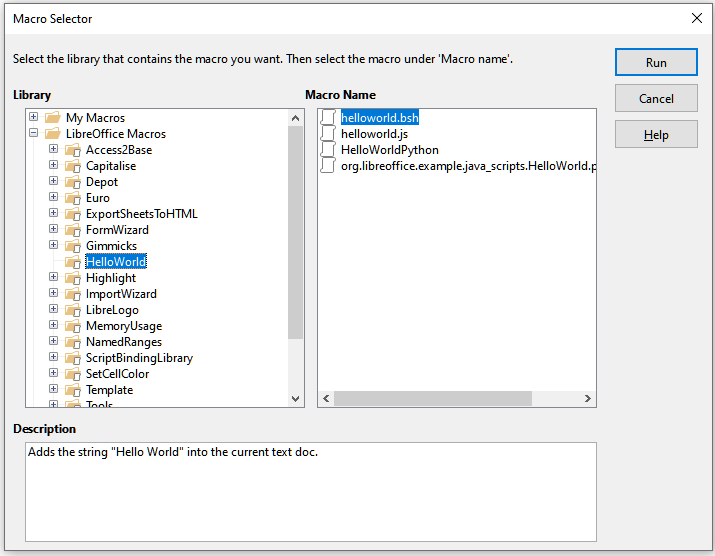
1) Go to Tools > Macros > Run Macro to open the Macro Selector dialog (Figure 6).
2) For example, select your newly created macro EnterMyName and click Run.
3) Alternatively, go to Tools > Macros > Organize Macros > Basic to open the Basic Macros dialog (Figure 1), select your macro and click Run.
Figure 6: Use the Macro Selector dialog to select and run an existing macro
To view and/or edit the macro that you created:
1) Go to Tools > Macros > Organize Macros > Basic to open the Basic Macros dialog.
2) Select your new macro EnterMyName and click Edit. The Basic IDE will open and the macro EnterMyName will be shown as in Listing 3.
This first macro is not complicated. A little explanation will significantly help you in understanding macros. The discussion starts with first line of the macro and describes features through the whole listing.
Listing 3: Code recorded for the EnterMyname macro
sub EnterMyName
rem -------------------------------------------------------------
rem define variables
dim document as object
dim dispatcher as object
rem -------------------------------------------------------------
rem get access to the document
document = ThisComponent.CurrentController.Frame
dispatcher = createUnoService("com.sun.star.frame.DispatchHelper")
rem -------------------------------------------------------------
dim args1(0) as new com.sun.star.beans.PropertyValue
args1(0).Name = "Text"
args1(0).Value = "Your name"
dispatcher.executeDispatch(document, ".uno:InsertText", "", 0, args1())
end sub
All comments in Basic macro coding begin with REM, which stands for remark. All text after REM on the same line is ignored by the Basic interpreter when the macro is run.
Tip
As a shortcut, you can use the single quote character (') to start a comment.
LibreOffice Basic is not case-sensitive for keywords, so REM, Rem, and rem can all start a comment. If you use symbolic constants defined by the Application Programming Interface (API), it is safer to assume that the names are case-sensitive. Symbolic constants are an advanced topic not covered by this user guide and are not required when using the macro recorder in LibreOffice.
Individual macros are stored in subroutines and these subroutines begin with the keyword SUB. The end of a subroutine is indicated by the words END SUB. The code starts by defining the subroutine named Main, which is empty and does nothing. Note that the code in Listing 3 for the EnterMyName macro starts with the keyword SUB and ends with END SUB.
There are advanced topics that are beyond the scope of this user guide, but knowing about them might be of interest:
You can write subroutines that accept input values to be used inside the macro. These values are called arguments. This can only be done when you create subroutines from scratch. Recorded macros in LibreOffice do not accept arguments.
Another kind of subroutine is called a function, which is a subroutine that can return a value as a result of its work. Functions are defined by the keyword FUNCTION at the beginning. Recorded macros in LibreOffice create subroutines only.
You can write information on a piece of paper so that you can look at it later. A variable, like a piece of paper, contains information that can be changed and read. The DIM keyword originally stood for Dimension and was used to define the dimensions of an array. The DIM statement used in the EnterMyName macro is similar to setting aside a piece of paper to be used to store a message or note.
In the EnterMyName macro, the variables document and dispatcher are defined as the type object. Other common variable types include string, integer, and date. A third variable, named args1, is an array of property values. A variable of type array allows a single variable to contain multiple values, similar to storing multiple pages in a single book. Values in an array are usually numbered starting from zero. The number in the parentheses indicates the highest usable number to access a storage location. In this example, there is only one value, and it is numbered zero.
The following is an explanation of the code used in the EnterMyName macro. You may not understand all the details, but the explanation of each line of code may give you some idea of how a macro works.
sub EnterMyName
dim document as object
Note
Sometimes the word service is used. A service is supplied by a type of object which are distinguished in order to point out how they are used.
document = ThisComponent.CurrentController.Frame
dispatcher = createUnoService("com.sun.star.frame.DispatchHelper")
dim args1(0) as new com.sun.star.beans.PropertyValue
args1(0).Name = "Text"
args1(0).Value = "Your name"
dispatcher.executeDispatch(document, ".uno:InsertText", "", 0, args1())
end sub
When creating a macro, it is important to ask two questions before recording:
1) Can the task be written as a simple set of commands?
2) Can the steps be arranged so that the last command leaves the cursor ready for the next command or entering text or data into the document?
A common task is to copy rows and columns of data from a website and format them as a table in a text document as follows:
1) Copy the data from the website to the clipboard.
2) To avoid strange formatting and fonts, paste the text into a Writer document as unformatted text.
3) Reformat the text with tabs between columns so that it can be converted into a table using Table > Convert > Text to Table.
With the two questions above in mind, inspect the text to see if a macro can be recorded to format the text. As an example of copied data, consider the text copied from the API website describing the FontWeight constants (Figure 7). The first column in this example indicates a constant name and each name is followed by a space and a tab, and each line has two trailing spaces.
|
DONTKNOW |
The font weight is not specified/known. |
|
THIN |
specifies a 50% font weight. |
|
ULTRALIGHT |
specifies a 60% font weight. |
|
LIGHT |
specifies a 75% font weight. |
|
SEMILIGHT |
specifies a 90% font weight. |
|
NORMAL |
specifies a normal font weight. |
|
SEMIBOLD |
specifies a 110% font weight. |
|
BOLD |
specifies a 150% font weight. |
|
ULTRABOLD |
specifies a 175% font weight. |
|
BLACK |
specifies a 200% font weight. |
Figure 7: Example of copied data
Suppose you want the first column in the table to contain the numeric value of the font weight, the second column the constant name, and the third column the text description. This task can be accomplished easily for every row except for DONTKNOW and NORMAL, which do not contain a numeric value.
Below are the steps to record this macro using keystrokes and assuming that the cursor is at the beginning of the line with the text “THIN”.
1) Make sure macro recording is enabled by going to Tools > Options > LibreOffice > Advanced and selecting the option Enable macro recording. By default, this feature is turned off when LibreOffice is installed on your computer.
2) Go to Tools > Macros > Record Macro to start recording.
3) Press Ctrl+Right Arrow to move the cursor to the start of the word “specifies”.
4) Press Backspace twice to remove the tab and the space.
5) Press Tab to add the tab without the space after the constant name.
6) Press Delete to delete the lower case “s” and then press Shift+S to add an upper case “S”.
7) Press Ctrl+Right Arrow twice to move the cursor to the start of the number.
8) Press Ctrl+Shift+Right Arrow to select and move the cursor before the % sign.
9) Press Ctrl+C to copy the selected text to the clipboard.
10) Press End to move the cursor to the end of the line.
11) Press Backspace twice to remove the two trailing spaces.
12) Press Home to move the cursor to the start of the line.
13) Press Ctrl+V to paste the selected number to the start of the line.
14) Pasting the value also pasted an extra space, so press Backspace to remove the extra space.
15) Press Tab to insert a tab between the number and the name.
16) Press Home to move to the start of the line.
17) Press Down Arrow to move to the next line.
18) Stop recording the macro and save the macro, see “Recording a macro” above.
It takes much longer to read and write the steps above than to actually record the macro. Work slowly and think about the steps as you do them. With practice you will learn how to organize the steps to create macros that can be used to automate repetitive tasks.
The generated macro code in Listing 4 has been modified to contain the step numbers in the comments to match the steps discussed above.
Listing 4: Copying numeric value to start of the column
sub CopyNumToCol1
rem -------------------------------------------------------------
rem define variables
dim document as object
dim dispatcher as object
rem -------------------------------------------------------------
rem get access to the document
document = ThisComponent.CurrentController.Frame
dispatcher = createUnoService("com.sun.star.frame.DispatchHelper")
rem (3) Press Ctrl+Right Arrow to move the cursor to the start of “specifies”.
dispatcher.executeDispatch(document, ".uno:GoToNextWord", "", 0, Array())
rem (4) Press Backspace twice to remove the tab and the space.
dispatcher.executeDispatch(document, ".uno:SwBackspace", "", 0, Array())
rem -------------------------------------------------------------
dispatcher.executeDispatch(document, ".uno:SwBackspace", "", 0, Array())
rem (5) Press Tab to add the tab without the space after the constant name.
dim args4(0) as new com.sun.star.beans.PropertyValue
args4(0).Name = "Text"
args4(0).Value = CHR$(9)
dispatcher.executeDispatch(document, ".uno:InsertText", "", 0, args4())
rem (6) Press Delete to delete the lower case s ....
dispatcher.executeDispatch(document, ".uno:Delete", "", 0, Array())
rem (6) ... and then press Shift+S to add an upper case S.
dim args6(0) as new com.sun.star.beans.PropertyValue
args6(0).Name = "Text"
args6(0).Value = "S"
dispatcher.executeDispatch(document, ".uno:InsertText", "", 0, args6())
rem (7) Press Ctrl+Right Arrow twice to move the cursor to the number.
dispatcher.executeDispatch(document, ".uno:GoToNextWord", "", 0, Array())
rem -------------------------------------------------------------
dispatcher.executeDispatch(document, ".uno:GoToNextWord", "", 0, Array())
rem (8) Press Ctrl+Shift+Right Arrow to select the number.
dispatcher.executeDispatch(document, ".uno:WordRightSel", "", 0, Array())
rem (9) Press Ctrl+C to copy the selected text to the clipboard.
dispatcher.executeDispatch(document, ".uno:Copy", "", 0, Array())
rem (10) Press End to move the cursor to the end of the line.
dispatcher.executeDispatch(document, ".uno:GoToEndOfLine", "", 0, Array())
rem (11) Press Backspace twice to remove the two trailing spaces.
dispatcher.executeDispatch(document, ".uno:SwBackspace", "", 0, Array())
rem -------------------------------------------------------------
dispatcher.executeDispatch(document, ".uno:SwBackspace", "", 0, Array())
rem (12) Press Home to move the cursor to the start of the line.
dispatcher.executeDispatch(document, ".uno:GoToStartOfLine", "", 0, Array())
rem (13) Press Ctrl+V to paste the selected number to the start of the line.
dispatcher.executeDispatch(document, ".uno:Paste", "", 0, Array())
rem (14) Press Backspace to remove the extra space.
dispatcher.executeDispatch(document, ".uno:SwBackspace", "", 0, Array())
rem (15) Press Tab to insert a tab between the number and the name.
dim args17(0) as new com.sun.star.beans.PropertyValue
args17(0).Name = "Text"
args17(0).Value = CHR$(9)
dispatcher.executeDispatch(document, ".uno:InsertText", "", 0, args17())
rem (16) Press Home to move to the start of the line.
dispatcher.executeDispatch(document, ".uno:GoToStartOfLine", "", 0, Array())
rem (17) Press Down Arrow to move to the next line.
dim args19(1) as new com.sun.star.beans.PropertyValue
args19(0).Name = "Count"
args19(0).Value = 1
args19(1).Name = "Select"
args19(1).Value = false
dispatcher.executeDispatch(document, ".uno:GoDown", "", 0, args19())
end sub
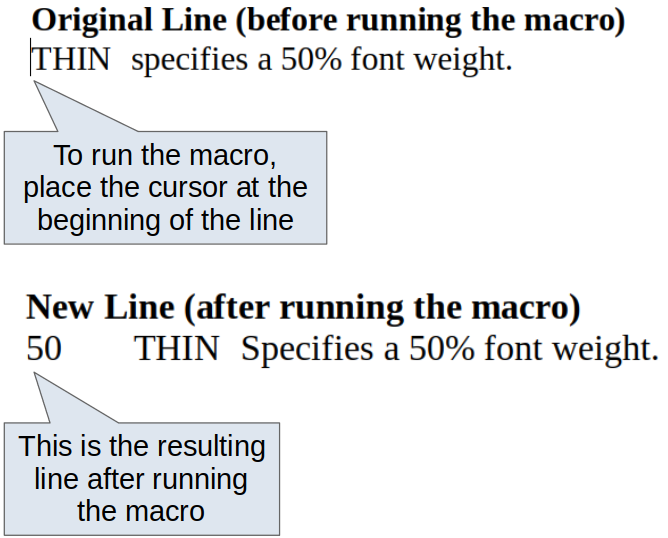
To run this macro, first place the cursor at the beginning of the line to which you want to apply the recorded steps. Then go to Tools > Macros > Run Macro, select the CopyNumToCol1 macro and click Run. Figure 8 shows the original line and the resulting line after applying the macro.
Figure 8: Result of applying the recorded macro
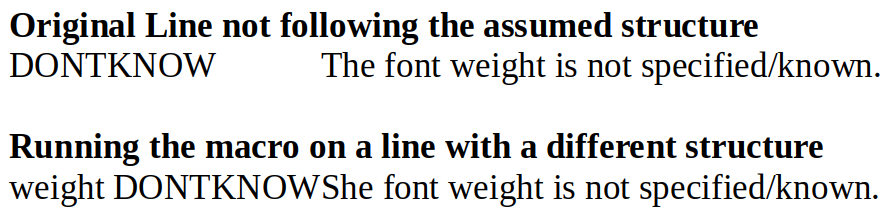
Keep in mind that the steps described above will only work properly if the line follows the format we assumed while creating the macro. If you run this macro on the “DONTKNOW” and “NORMAL” lines the results will not be as expected because these two lines have different formats. Figure 9 shows the original line starting with “DONTKNOW”.
Figure 9: Result of using the macro in a line with a different structure
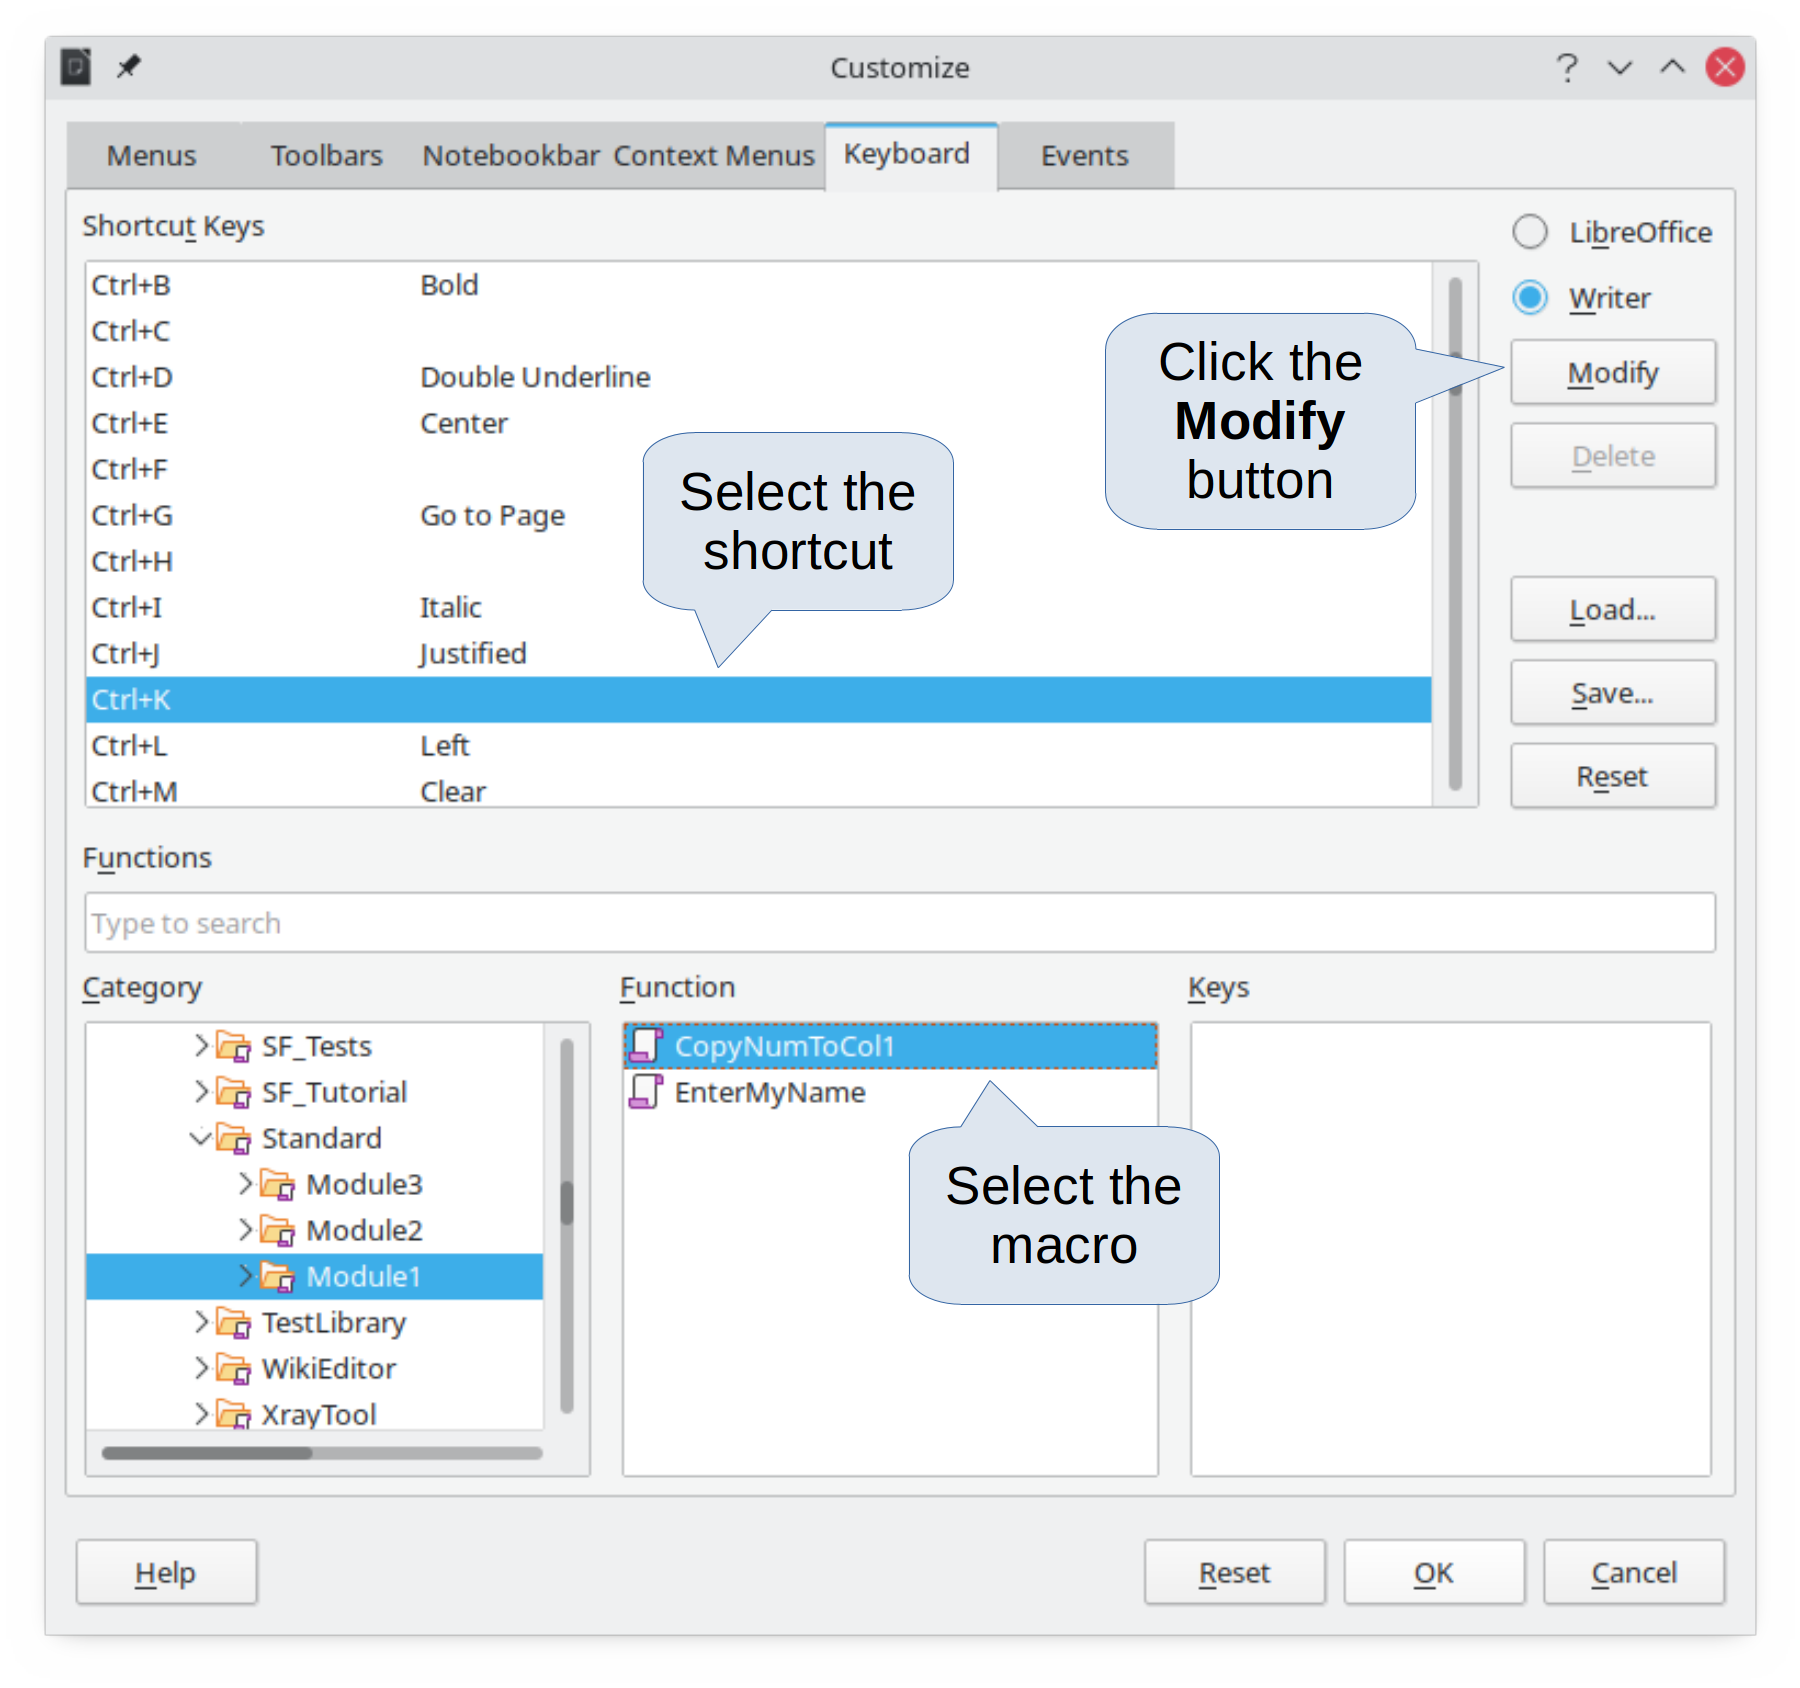
It is not convenient to repeatedly run macros using Tools > Macros > Run Macro. If you frequently need to use a certain macro, you can assign a keyboard shortcut to quickly run it. Next are the steps to assign the shortcut Ctrl+K to the CopyNumToCol1 macro.
1) Go to Tools > Customize. This will open the Customize dialog.
2) Select the Keyboard tab. In the Shortcut Keys section, select the Ctrl+K shortcut.
3) In the Category section, select LibreOffice macros. Navigate this section and select the CopyNumToCol1 macro.
4) Now click the Modify button to assign the Ctrl+K shortcut to the CopyNumToCol1 macro.
5) Click OK to close the Customize dialog.
Now you can run the CopyNumToCol1 macro using the Ctrl+K shortcut. This is very fast and easy to configure after you get used to the macro workflow. Figure 10 illustrates the steps involved.
Figure 10: Assigning a shortcut to a macro
The Macro Recorder has some limitations, which means that some actions may not be recorded. A deeper knowledge of LibreOffice internal workings helps to understand how and why the macro recorder will work. The main cause of these limitations is the dispatch framework and its relationship to the macro recorder.
The purpose of the dispatch framework is to provide uniform access to components (documents) for commands that usually correspond to menu items. Using File > Save, the shortcut keys Ctrl+S, or clicking the Save icon on the Standard toolbar are all commands that are translated into the same “dispatch command”.
The dispatch framework can also be used to send “commands” back to the user interface (UI). For example, after saving a new document, the list of recent files is updated.
A dispatch command is text, for example .uno:InsertObject or .uno:GoToStartOfLine. The command is sent to the document frame and this passes on the command until an object is found that can handle the command.
The macro recorder records the generated dispatches. The recorder is a relatively simple tool to use and the same commands that are issued are recorded for later use. The problem is that not all dispatched commands are complete. For example, inserting an object generates the following code:
dispatcher.executeDispatch(document, ".uno:InsertObject", "", 0, Array())
It is not possible to specify what kind of object to create or insert. If an object is inserted from a file, you cannot specify which file to insert.
If while recording a macro you use Tools > Options to open and modify configuration items, the generated macro does not record any configuration changes. In fact, the generated code is commented so it will not even be run.
rem dispatcher.executeDispatch(document, ".uno:OptionsTreeDialog", "", 0, Array())
If a dialog is opened, a command to open the dialog is likely to be generated. Any work done inside the dialog is not usually recorded. Examples of this include macro organization dialogs, inserting special characters, and similar types of dialogs. Other possible problems using the macro recorder include things such as inserting a formula, setting user data, setting filters in Calc, actions in database forms, and exporting a document to an encrypted PDF file. You never know for certain what will work unless you try it. For example, the actions from the search dialog are properly captured.
When the macro recorder is not able to solve a specific problem, the usual solution is to write code using the LibreOffice objects. Unfortunately, there is a steep learning curve for these LibreOffice objects. It is usually best to start with simple examples and then increase the scope of macros as you learn more. Learning to read generated macros is a good place to start.
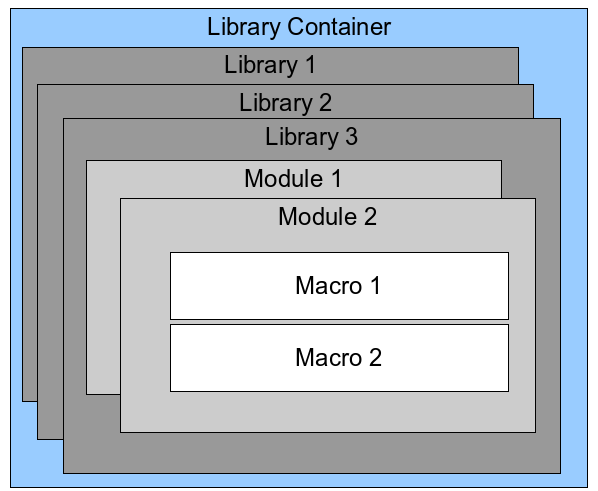
In LibreOffice, macros are grouped in modules, modules are grouped in libraries, and libraries are grouped in library containers. A library is usually used as a major grouping for either an entire category of macros, or for an entire application. Modules usually split functionality, such as user interaction and calculations. Individual macros are subroutines and functions. Figure 11 shows an example of the hierarchical structure of macro libraries in LibreOffice.
Figure 11: Macro Library hierarchy
Go to Tools > Macros > Organize Macros > Basic to open the Basic Macros dialog (Figure 1 above). All available library containers are shown in the Macro From list. Every document is a library container, capable of containing multiple libraries. The application itself acts as two library containers, one container for macros distributed with LibreOffice called LibreOffice Macros, and one container for personal macros called My Macros.
The LibreOffice Macros are stored with the application runtime code, which may not be editable to you unless you are an administrator. This helps protect these macros because they should not be changed and you should not store your own macros in the LibreOffice Macros container.
Unless your macros are applicable to a single document, and only to a single document, your macros will probably be stored in the My Macros container. The My Macros container is stored in your user area or home directory.
If a macro is contained in a document, then a recorded macro will attempt to work on that document, because it primarily uses ThisComponent for its actions.
Every library container contains a library named Standard. It is better to create your own libraries with meaningful names than to use the Standard library. Not only are meaningful names easier to manage, but they can also be imported into other library containers whereas the Standard library cannot.
Caution
LibreOffice allows you to import libraries into a library container, but it will not allow you to overwrite the library named Standard. Therefore, if you store your macros in the Standard library, you cannot import them into another library container.
Just as it makes good sense to give your libraries meaningful names, it is prudent to use meaningful names for your modules. By default, LibreOffice uses names such as Module1, Module2, and so on.
As you create your macros, you must decide where to store them. Storing a macro in a document is useful if the document will be shared and you want the macro to be included with the document. Macros stored in the application library container named My Macros, however, are globally available to all documents.
Macros are not available until the library that contains them is loaded. However, in contrast to other libraries, the Standard and Template libraries are automatically loaded. A loaded library is displayed differently from a library that is not loaded. To load the library and the modules it contains, double-click on the library.
LibreOffice stores user-specific data in a folder inside the user’s home directory. The location is operating system specific. Go to Tools > Options > LibreOffice > Paths to view where other configuration data are stored. User macros written in Basic are stored in LibreOffice\4\user\basic. Each library is stored in its own directory inside the basic directory.
For casual use, it is not necessary to understand where macros are stored. If you know where they are stored, however, you can create a backup, share your macros, or inspect them if there is an error.
The LibreOffice Basic Macro Organizer dialog allows you to export macro libraries so that they can be reused and shared with other people. To export a macro library:
1) Go to Tools > Macros > Organize Macros > Basic and the click the Organizer button.
2) Click the Libraries tab and choose which library you want to export.
3) Click Export and then select Export as BASIC Library (note that you cannot export the Standard library).
4) Choose where you want to save the library and click Save.
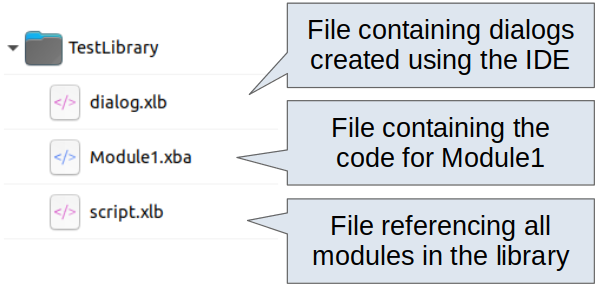
When a library is exported, LibreOffice creates a folder containing all files related to the library. Figure 12 shows an example of how a library named TestLibrary with a single module called Module1 would be exported.
Figure 12: Folder containing the exported library
The LibreOffice Basic Macro Organizer dialog allows you to import macro libraries into your document as well as creating, deleting, and renaming libraries, modules, and dialogs.
1) On the Libraries tab, select the library container to use and then click Import to import macro libraries.
2) Navigate to the directory containing the library to import (Figure 13). There are usually two files from which to choose, dialog.xlb and script.xlb. It does not matter which of these two files you select; both will be imported. Macros can be stored in libraries inside LibreOffice documents. Select a document rather than a directory on disk to import libraries contained in a document.
Figure 13: Navigating to a macro library

3) Select a file and click Open to continue and open the Import Libraries dialog (Figure 14).
Figure 14: Choose library import options
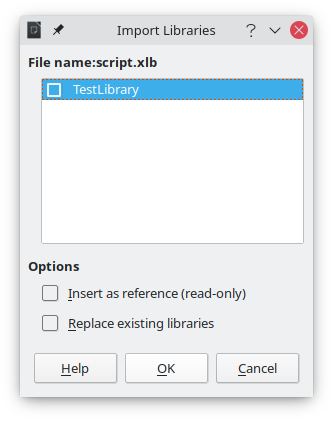
4) Select the following options for importing libraries:
If no options are selected, the library is copied to your user macro directory. However, if the library you are importing has the same name and you are importing into the same location, it will not be copied.
Select Insert as reference (read-only) if you want to use the library as reference, but not import it into the document. When a library is used as a reference, it remains in its current location and is fully functional, but cannot be modified in the Basic IDE.
Select Replace existing libraries if the library you want to import has the same name and you want to replace the existing library.
5) Click OK to import the macro library you selected.
Note
You cannot export/import the library named Standard.
Tip
On Linux, LibreOffice-specific files are stored in the user’s home directory inside the .config folder. Directories and files with names beginning with a dot may be hidden and not shown in a normal file selection dialog. When using LibreOffice dialogs, rather than the operating system’s specific dialogs, type the name of the desired directory in the Name field.
You can find macros created by the community to download from the internet. Some macros are contained in documents, some as regular files that you need to import, and some are published as text and need to be copied and pasted into the Basic IDE. See “Adding a macro” above on how to add macros to your macro library and “Viewing and editing macros” above on how to edit macros using the Basic IDE.
Some macros are available as free downloads on the Internet (see Table 1).
Table 1. Places to find macro examples
|
Location |
Description |
|
Reference materials regarding macros. |
|
|
Reference materials regarding database macros. |
|
|
Lots of links to macros. |
|
|
Forums, with many examples and help. |
Although you can use Tools > Macros > Run to run all macros, this is not efficient for frequently used macros. LibreOffice offers many ways for you to quickly run your macros.
In addition to assigning a shortcut to macros, as seen in “Running a macro” above, you can also link macros to a toolbar icon, menu item, event, or a button embedded in a document. When choosing a method, it is also good to ask questions such as:
Should the macro be available for only one document or globally for all documents?
Is the macro for a specific document type, such as a Calc document?
How frequently will the macro be used?
The answers will determine where to store the macro and how to make it available. For example, you will probably not add a rarely used macro to a toolbar. To help determine your choices, see Table 2.
Table 2. Where to store a macro
|
Where to place the macro |
For all LibreOffice applications |
For a specific LO application |
For a single document |
|
Toolbar |
No |
Yes |
Yes |
|
Menu |
No |
Yes |
Yes |
|
Shortcut |
Yes |
Yes |
No |
|
Event |
Yes |
No |
Yes |
To add a menu item, keyboard shortcut, or toolbar icon that calls a macro, use the Customize dialog, which contains pages to configure menus, keyboard shortcuts, toolbars, and events. To open this dialog, go to Tools > Customize. Use of the Menus, Toolbars, Context Menus, and Keyboard tabs are covered in Chapter 13, Customizing LibreOffice.
Whenever something happens in LibreOffice, it is called an event. For example, opening a document, changing status of modified, or moving the mouse cursor are all events. LibreOffice allows events to trigger the execution of a macro; the macro is then called an event handler. Full coverage of event handlers is well beyond the scope of this chapter, but a little knowledge can accomplish much.
Caution
Be careful when you configure an event handler. For example, assume that you write an event handler that is called every time that a document is modified, but you make a mistake so the event is not properly handled. One possible result is that your event handler will force you to kill LibreOffice.
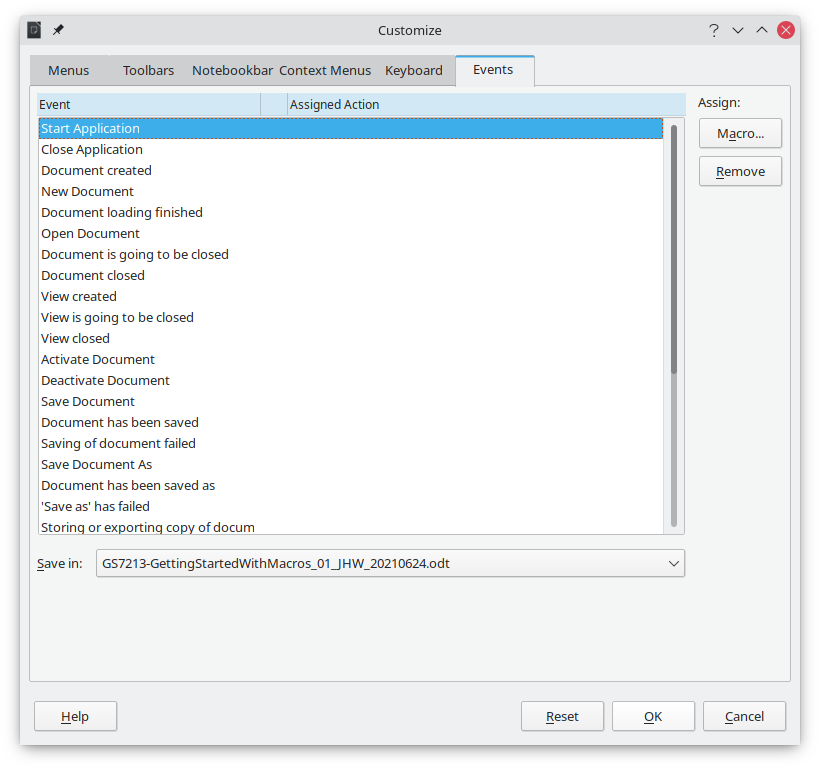
1) Go to Tools > Customize to open the Customize dialog and select the Events tab (Figure 15). The events in the Customize dialog are related to the entire application and specific documents.
2) In the Save In drop-down, select LibreOffice, or a specific document from the menu to save your event.
3) A common use is to assign the Open Document event to call a specific macro. The macro then performs certain setup tasks for the document. Select the desired event and click Macro to open the Macro Selector dialog (similar to Figure 6 above but with different action buttons).
4) Select the desired macro and click OK to assign the macro to the event. The Events tab will show that the event has been assigned to a macro.
Many objects in a document can be set to call macros when events occur. The most common use is to add a control, such as a button, into a document. Even double-clicking on a graphic opens a dialog with a Macros tab that allows you to assign a macro to an event.
Figure 15: Events tab in Customize dialog
An extension is a package that can be installed into LibreOffice to add new functionality. Extensions can be written in almost any programming language and may be simple or sophisticated. Extensions can be grouped into types, for example:
Calc add-ins, which provide new functionality for Calc, including new functions that act like normal built-in functions.
New components and functionality, which normally include some level of User Interface (UI) integration such as new menus or toolbars.
Chart add-ins with new chart types.
Linguistic components such as spelling checkers.
Document templates and images.
Although individual extensions can be found in several places, there is currently an extension repository at: https://extensions.libreoffice.org/ and some documentation at https://libreplanet.org/wiki/Group:OpenOfficeExtensions/List.
For more about obtaining and installing extensions, see Chapter 13, Customizing LibreOffice.
The examples covered so far in this chapter were created using the macro recorder and the dispatcher. You can also write macros that directly access the objects that comprise LibreOffice if you are confident in writing computer code. In other words, you can create a macro that directly manipulates a document using more advanced programming logic.
Directly manipulating LibreOffice internal objects is an advanced topic that is beyond the scope of this chapter. A simple example, however, demonstrates how this works.
The sample code in Listing 5 is a simple example of a macro created without the recorder that adds the string “Hello” at the end of a Writer document.
To add this macro to a library, follow the steps below:
1) Go to Tools > Macros > Organize Macros > Basic.
2) In My Macros, navigate to the library where you want the macro to be created. In this example, consider the library TestLibrary.
3) Select one of the modules already available in the library, for example Module1. If you want to create a new module, click Organizer and then add the new module.
4) With the module selected, click Edit. This will open the Basic IDE window and show the code for the macros implemented in the selected module.
5) Enter the code in Listing 5 into the module.
Listing 5: Append the text “Hello” at the end of to the current document
Sub AppendHello
Dim oDoc
Dim sTextService$
Dim oCurs
REM ThisComponent refers to the currently active document.
oDoc = ThisComponent
REM Verify that this is a text document.
sTextService = "com.sun.star.text.TextDocument"
If NOT oDoc.supportsService(sTextService) Then
MsgBox "This macro only works with a text document"
Exit Sub
End If
REM Get the view cursor from the current controller.
oCurs = oDoc.currentController.getViewCursor()
REM Move the cursor to the end of the document.
oCurs.gotoEnd(False)
REM Insert text "Hello" at the end of the document.
oCurs.Text.insertString(oCurs, "Hello", False)
End Sub
One powerful way to extend the functionalities of LibreOffice Calc is to write macros that automate repetitive tasks. You can use the Basic language to write macros that can do tasks ranging from simple cell handling and formatting to advanced data manipulation.
As a simple example, consider you want to analyze a range of cells to determine if all values are between 0 and 100. Additionally, values ranging from 50 to 100 should be marked in light green whereas cells with values that are greater than or equal to 0 and less then 50 should be marked in light red. If any values outside the allowed range of 0 to 100 are found, a warning message should be displayed and cells should be marked in light gray. Listing 6 shows the Basic code for such a macro.
Listing 6: Calc macro to format ranges based on values
Sub FormatRangeBasedOnValue
'Gets the current selection
Dim oRange as Object, oCell as Object
Set oRange = Thiscomponent.getCurrentSelection()
'Checks if the selected range is a single range
If Not oRange.supportsService("com.sun.star.sheet.SheetCellRange") Then
MsgBox "This macro applies only to single ranges."
Exit Sub
End If
' Number of columns and rows in selection
Dim nCols as Long : nCols = oRange.Columns.getCount()
Dim nRows as Long : nRows = oRange.Rows.getCount()
Dim col as Long, row as Long
Dim cellValue as Long
Dim isError as Boolean : isError = False
' Iterate over all cells in the range
For col = 0 To nCols - 1
For row = 0 to nRows - 1
Set oCell = oRange.getCellByPosition(col, row)
cellValue = oCell.getValue()
If cellValue >= 50 and cellValue <= 100 Then
' Sets background to light green
oCell.CellBackcolor = RGB(144, 238, 144)
ElseIf cellValue >= 0 and cellValue < 50 Then
' Sets background to light red
oCell.CellBackcolor = RGB(255, 127, 127)
Else
' Sets background to light gray
oCell.CellBackcolor = RGB(220, 220, 220)
isError = True
End If
Next row
Next col
' Displays a message indicating that there were errors
If isError Then
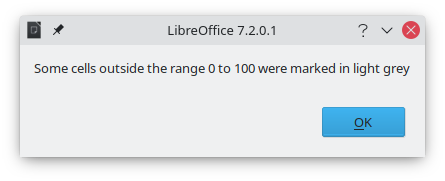
MsgBox "Some cells outside the range 0 to 100 were marked in light grey"
End If
End Sub
To add this macro to a library, follow the steps described in “An example of a macro for Writer” above. To run this macro, first create a new Calc sheet and add some numeric values in a range of cells. Then, select the cells and use one of the methods described in “How to run a macro” above to execute it.
Figure 16 shows an example of the macro being run on a set of cells. Because some of the cells have values that are not between 0 and 100, the message box in Figure 17 will also be displayed.
Figure 16: Cell values after being formatted by the macro
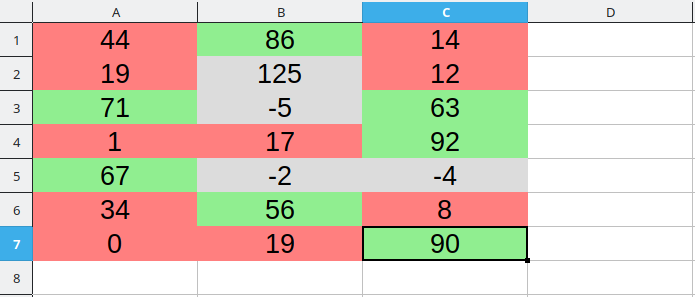
Figure 17: Message box presented if some values are not between 0 and 100
Macro programmers frequently need to perform tasks such as creating and opening files, accessing form controls, reading data from databases embedded in Base documents, and so forth. The objective of the ScriptForge library is to make it easier to execute such commands without having to learn the required LibreOffice APIs (Application Programming Interfaces) and commands, which may be difficult for casual programmers.
The ScriptForge library is organized into a set of services, each of which provides methods and properties related to a specific topic. For example, the Dialog service provides access to dialogs available in script modules and the Database service allows to execute SQL commands in Base documents. The example in Listing 7 shows a macro written in Basic using the ScriptForge library that opens a Calc document, creates a new sheet named NewSheet, and inserts the string “Hello” into cell A1. The macro also saves and closes the document.
Listing 7: Macro using the ScriptForge library
Sub CreateSheetExample
' Loads the ScriptForge library
GlobalScope.BasicLibraries.LoadLibrary("ScriptForge")
' Instantiates the UI service
Dim ui as Object, myDoc as Object
ui = CreateScriptService("UI")
' Opens the file "myfile.ods"
Set myDoc = ui.OpenDocument("/home/user/Documents/myfile.ods")
' Inserts a new sheet named "NewSheet"
myDoc.InsertSheet("NewSheet")
' Inserts the string "Hello" into cell "A1" of the new sheet
myDoc.SetValue("NewSheet.A1", "Hello")
' Shows the sheet "NewSheet"
myDoc.Activate("NewSheet")
' Saves the document
myDoc.Save()
' Closes the document
myDoc.CloseDocument()
End Sub
As seen in the example, the ScriptForge library provides straightforward commands to execute commands, which seeks to simplify the creation of macros.
Tip
To learn more about the ScriptForge library, visit LibreOffice’s online Help at https://help.libreoffice.org/7.4/en-US/text/sbasic/shared/03/lib_ScriptForge.html?DbPAR=BASIC. Each of the 26 supported services have been extensively documented and examples are provided for both Basic and Python programming languages.
LibreOffice has an extensive API that can be used by macro programmers to automate almost any aspect of its applications. However, one of the main challenges for programmers is to discover object types as well as their supported services, methods, and properties.
The UNO Object Inspector can help macro developers inspect objects and discover how they can be accessed and used in macros. This feature is available in Writer, Calc, Impress, and Draw. To enable it, go to Tools > Development Tools. The Object Inspector will be opened at the bottom of the user interface, as shown in Figure 18.
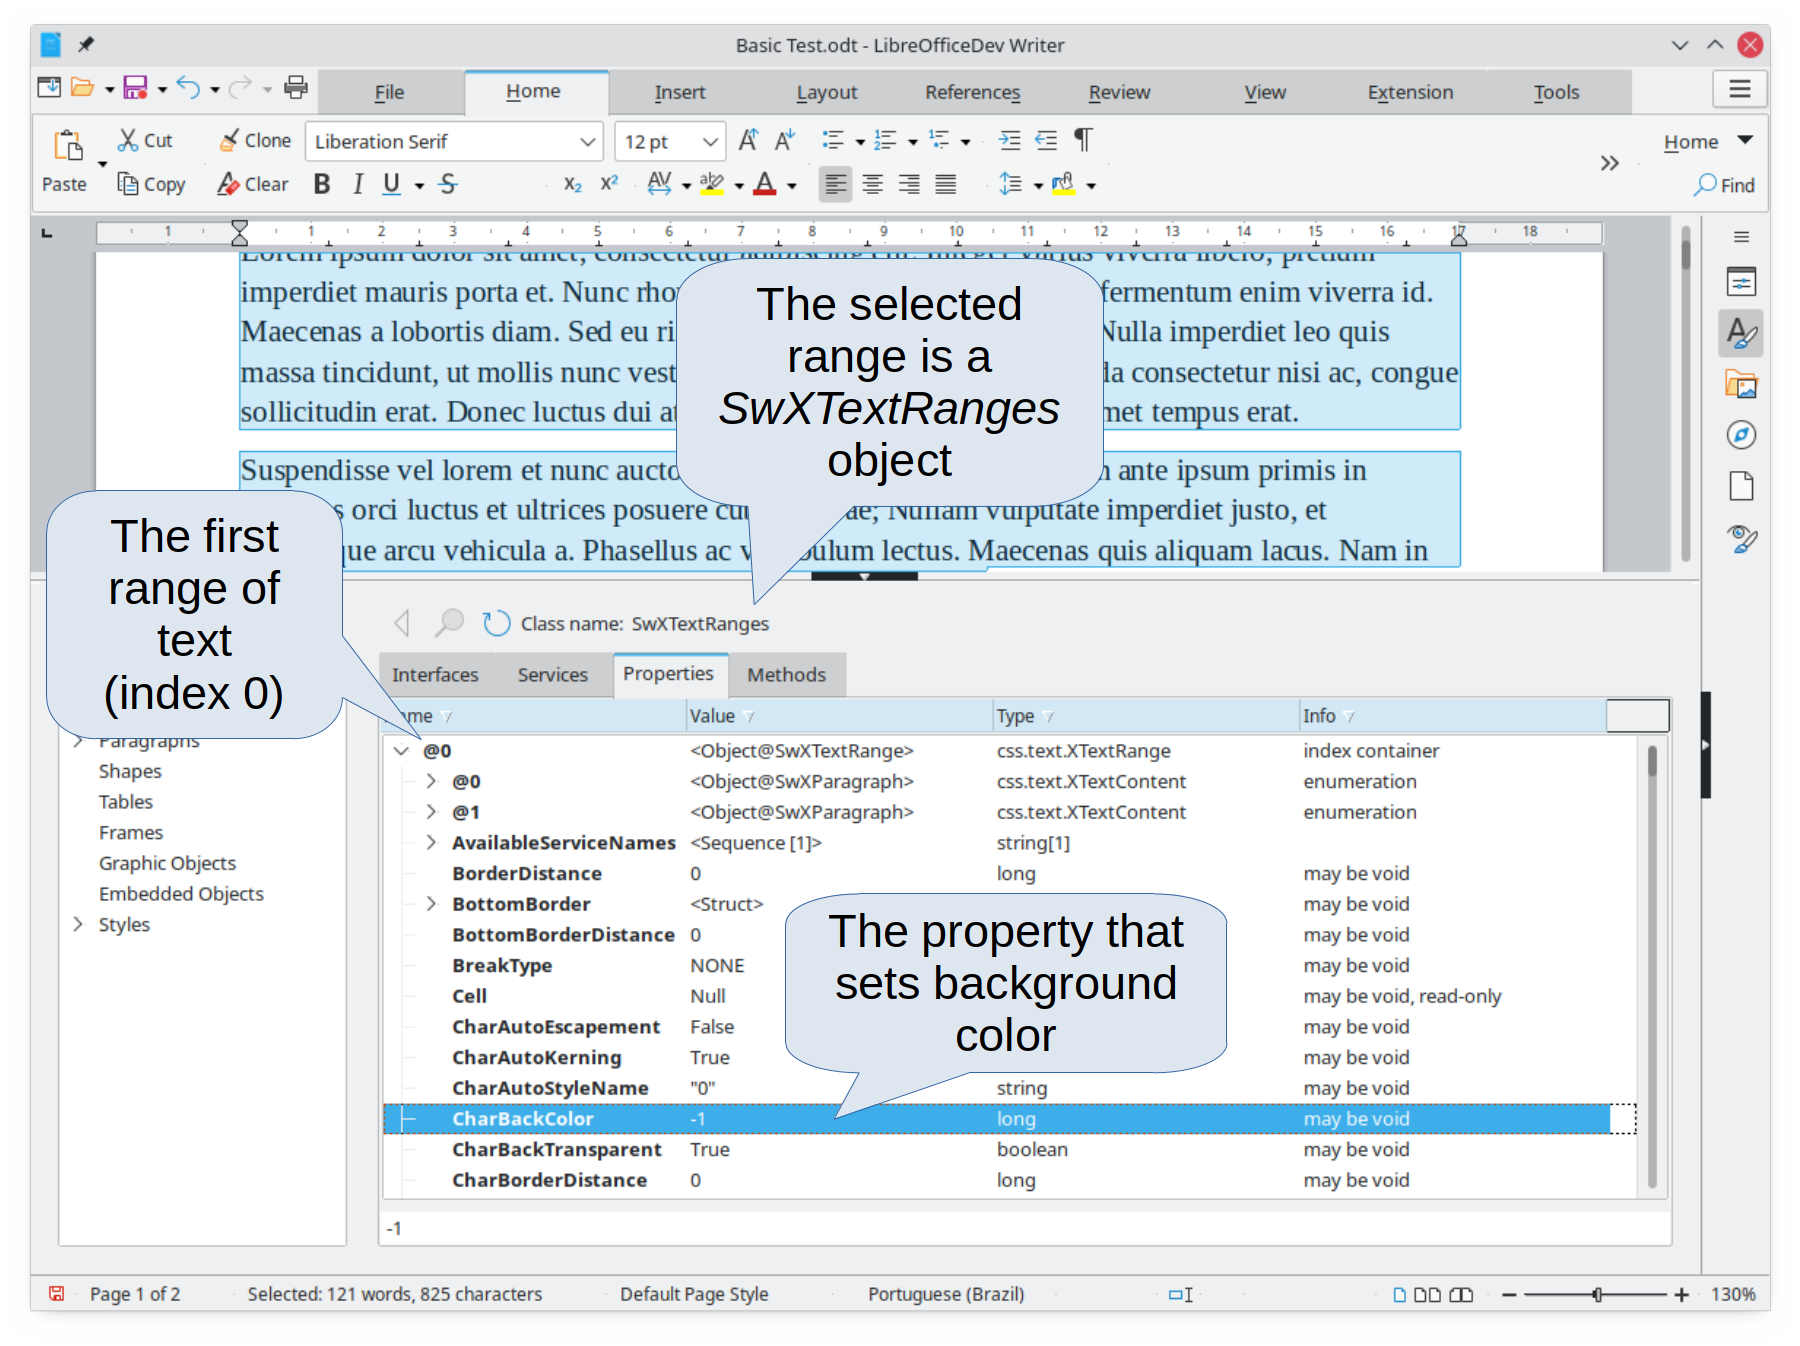
Figure 18: UNO Object Inspector opened in a Writer document
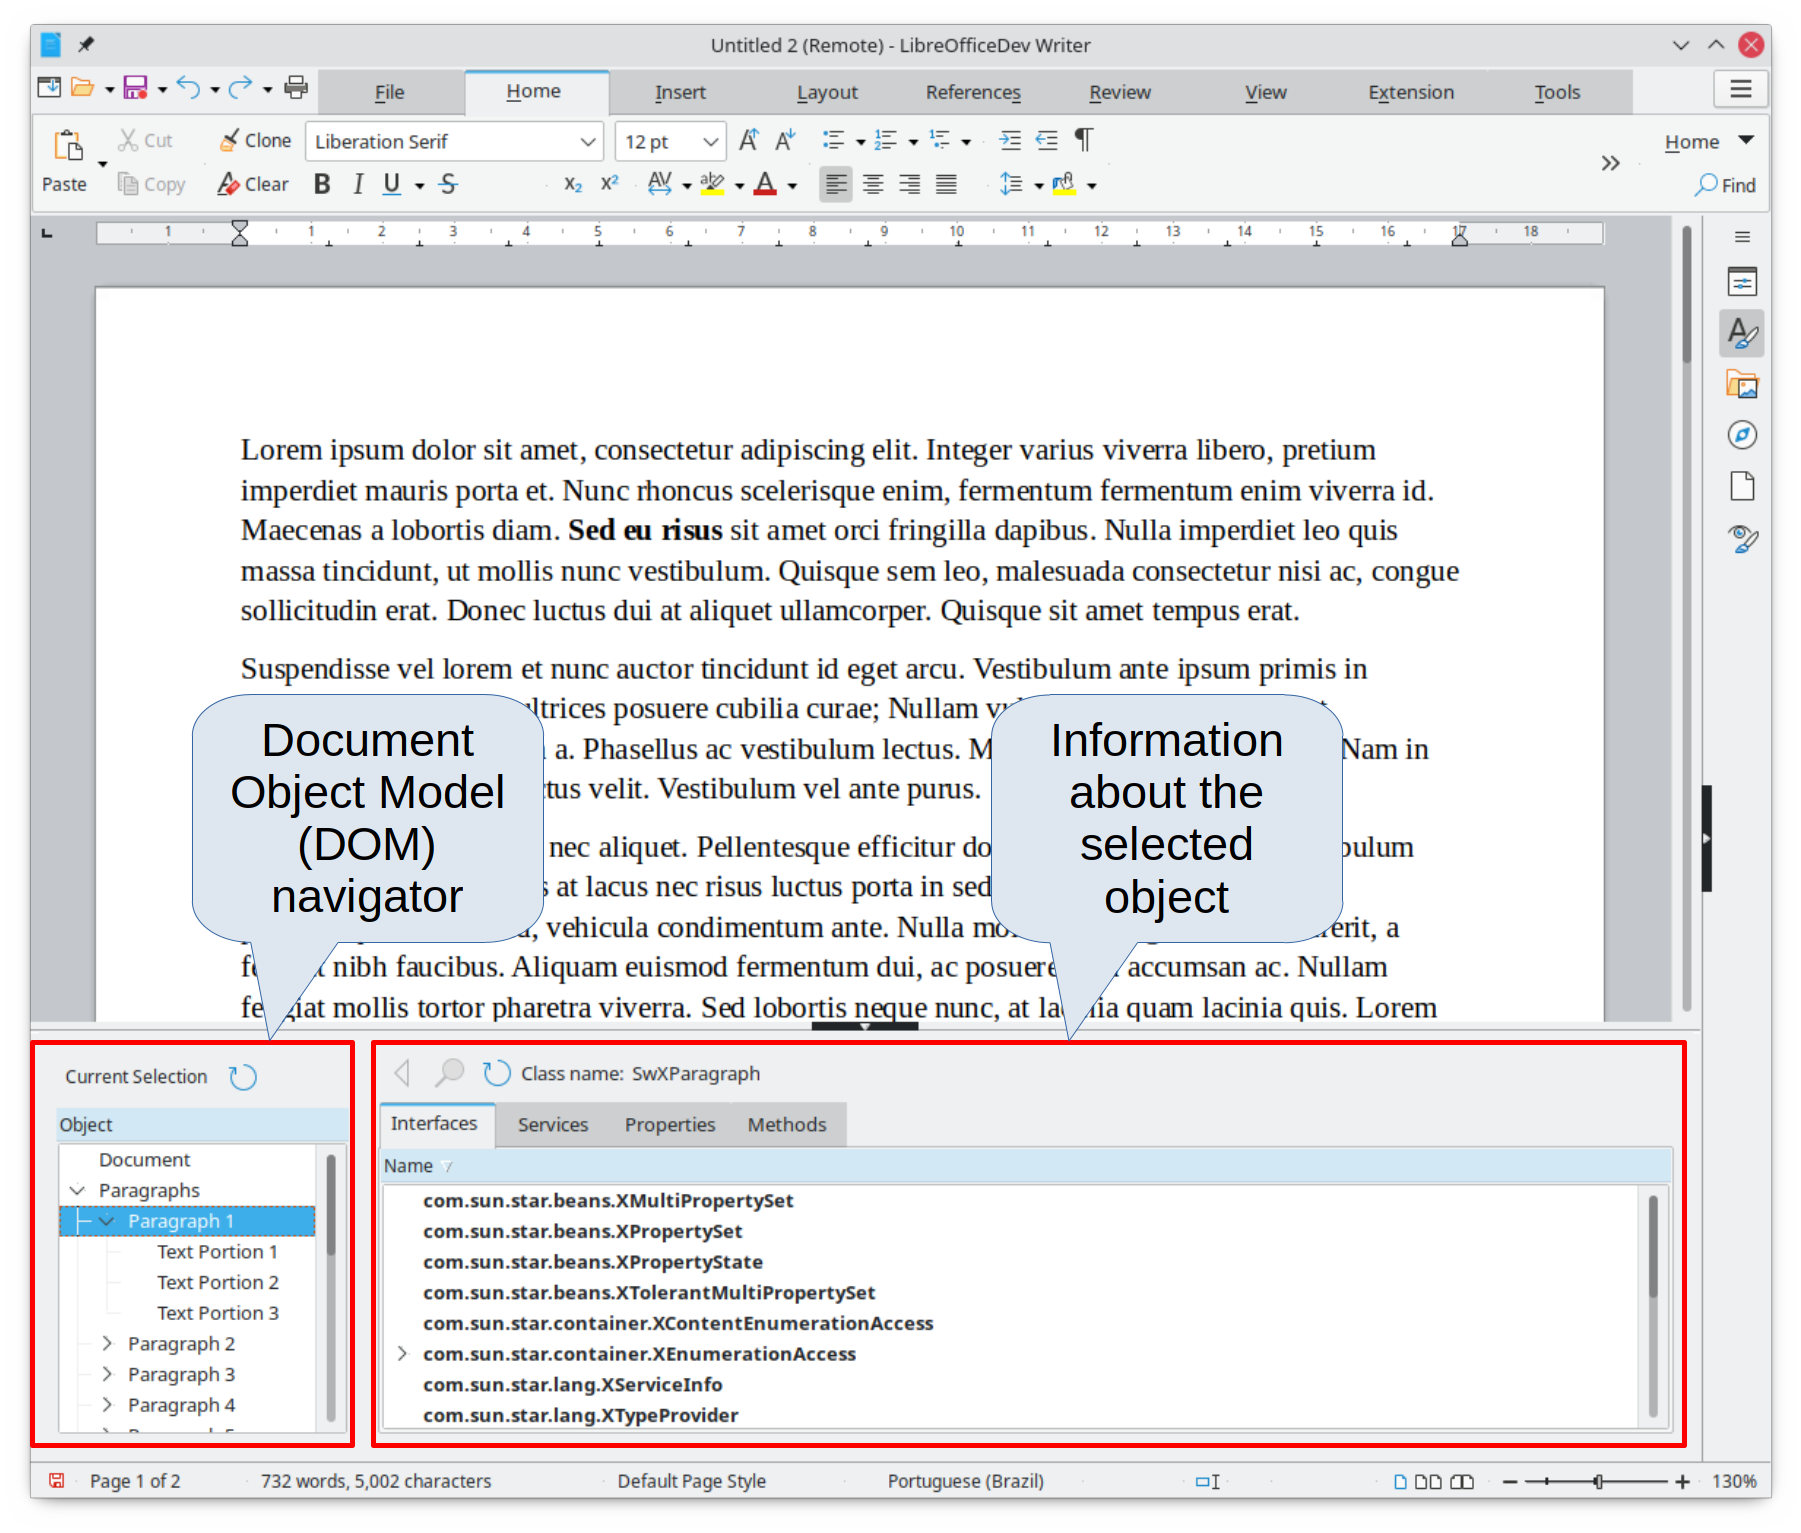
The left portion of the Object Inspector consists of the Document Object Model (DOM) navigator, which allows the user to navigate through all the objects in the document. When an object is selected, information about the object are shown in the right portion of the Object Inspector window:
The names of all implemented interfaces.
The names of all services supported by the object.
The names and types of all properties available in the object.
The names, arguments and return types of all methods that can be called by the object.
Instead of inspecting objects using the DOM navigator, it is possible to directly inspect the currently selected object in the document by toggling the Current Selection button.
For example, suppose you want to change the background color of the text selected in a Writer document. You can select a portion of text, open the Object Inspector and toggle the Current Selection button. Now, inspect the object properties in search of a property that matches the desired effect. Figure 19 shows the CharBackColor property selected, which is the property used to set text background color.
Figure 19: Using the Object Inspector to find a property
Now it is possible to write a macro using this property to change the background color of the selected text. Listing 8 shows the code for this macro.
Listing 8: Macro that changes the background color of a text range
Sub ChangeTextBGColor
Dim oSel as Object
Set oSel = ThisComponent.getCurrentSelection()
oSel(0).CharBackColor = RGB(255, 127, 127)
End Sub
Note that in Writer it is possible to have multiple ranges selected at once, hence oSel(0) accesses the first range of text.
Many programmers may not be familiar with LibreOffice Basic, so LibreOffice supports macros written in three other languages that may be more familiar: Python, BeanShell, and JavaScript.
Macros are organized in the same way for all four scripting languages. The LibreOffice Macros container holds all the macros that are supplied in the LibreOffice installation. The My Macros library container holds your macros that are available to any of your LibreOffice documents. Each document can also contain your macros that are not available to any other document.
When you use the recording facility, the macros are created in LibreOffice Basic. To use the other available scripting languages, you must write the code yourself.
When you select to run a macro using Tools > Macros > Run Macro, LibreOffice displays the Macro Selector dialog. This dialog enables selection and running of any available macro, coded in any of the available languages (Figure 20).
When you edit a macro using Tools > Macros > Edit Macros, LibreOffice displays the LibreOffice Basic IDE. This dialog enables selection and editing of any available LibreOffice Basic macro, but not macros in other languages.
Figure 20: Macro Selector dialog
The component model used in LibreOffice is known as Universal Network Objects or UNO. LibreOffice macros in any scripting language use a UNO runtime application programming interface (API). The XSCRIPTCONTEXT interface is provided to macro scripts in all four languages, which provides some means of access to the various interfaces which they might need to perform an action on a document.
Tip
If you want to learn more about the LibreOffice API as well as UNO objects, refer to the official API documentation at https://api.libreoffice.org/
Python is a high-level, general-purpose programming language that was first released in 1991.
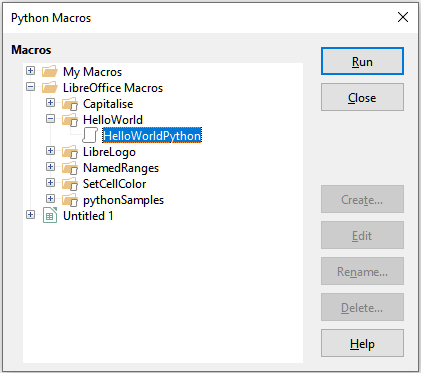
When you select Tools > Macros > Organize Macros > Python, LibreOffice displays the Python Macros dialog (Figure 21).
Figure 21: Python Macros dialog
Facilities to edit and debug Python scripts are not currently integrated into the standard LibreOffice user interface. However, you can use any Python editor to create scripts and then copy these files into the Scripts folder in your home directory. For more information, refer to “Where are macros stored?” above.
Listing 9 presents an example of a Python macro that writes the text “Hello World from Python” into cell A1 of the first sheet in a Calc spreadsheet.
Listing 9: Sample Python macro
import uno
def HelloWorld():
doc = XSCRIPTCONTEXT.getDocument()
cell = doc.Sheets[0]['A1']
cell.setString('Hello World from Python')
return
Tip
The Alternative Python Script Organizer (APSO) extension makes it easier to edit and organize Python scripts, in particular when embedded in a document. Using APSO you can configure your preferred source code editor, start the integrated Python shell and debug Python scripts. Visit https://gitlab.com/jmzambon/apso to download APSO and learn more about how to use it.
Tip
To learn more about Python scripting in LibreOffice, you can refer to the Wiki “Macros/Python Basics”, where you will find in-depth explanations and examples on how to get started with Python scripting. To learn more, visit https://wiki.documentfoundation.org/Macros/Python_Basics.
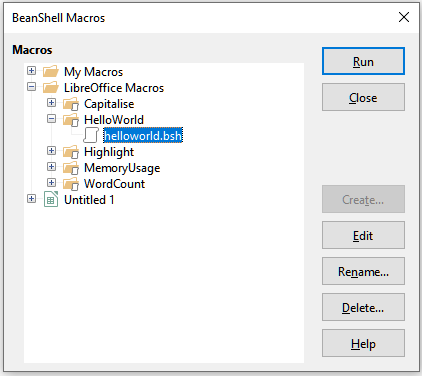
BeanShell is a Java-like scripting language that was first released in 1999.
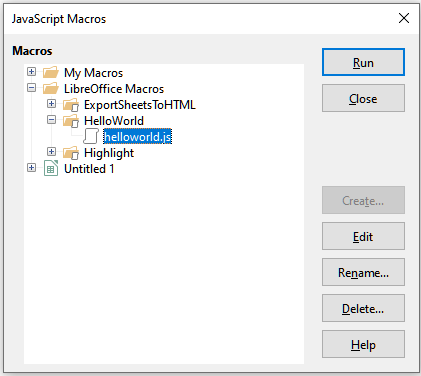
When you select Tools > Macros > Organize Macros > BeanShell, LibreOffice displays the BeanShell Macros dialog (Figure 22).
Figure 22: BeanShell Macros dialog
Click the Edit button on the BeanShell Macros dialog to access the BeanShell Debug Window (Figure 23).
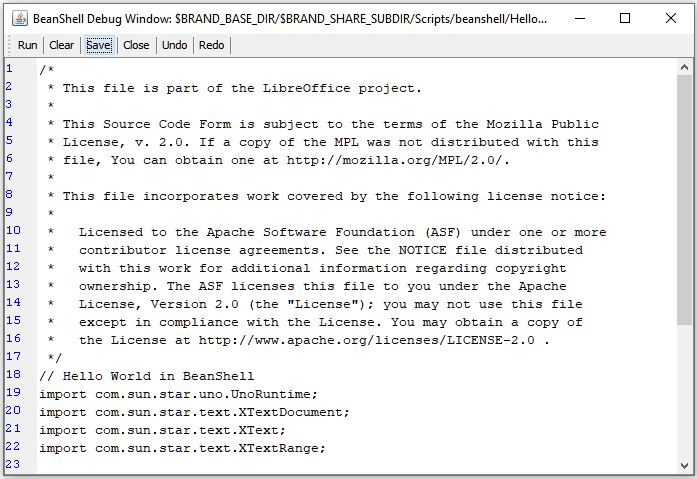
Figure 23: BeanShell Debug Window
Listing 10 is an example of a BeanShell macro that inserts the text “Hello World from BeanShell” in cell A1 of the active Calc spreadsheet.
Listing 10: Sample BeanShell macro
import com.sun.star.uno.UnoRuntime;
import com.sun.star.sheet.XspreadsheetView;
import com.sun.star.text.XText;
model = XSCRIPTCONTEXT.getDocument();
controller = model.getCurrentController();
view = UnoRuntime.queryInterface(XSpreadsheetView.class, controller);
sheet = view.getActiveSheet();
cell = sheet.getCellByPosition(0, 0);
cellText = UnoRuntime.queryInterface(XText.class, cell);
textCursor = cellText.createTextCursor();
cellText.insertString(textCursor, "Hello World from BeanShell", true);
return 0;
JavaScript is a high-level scripting language that was first released in 1995.
When you select Tools > Macros > Organize Macros > JavaScript, LibreOffice displays the JavaScript Macros dialog (Figure 24).
Figure 24: JavaScript Macros dialog
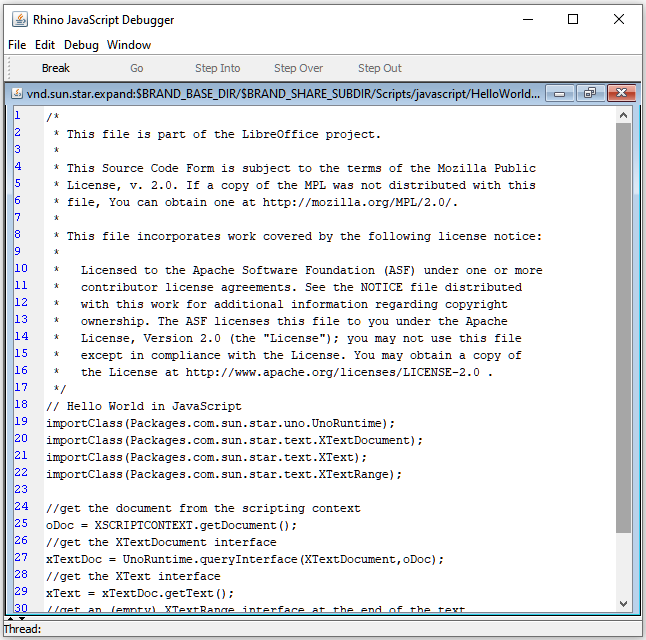
Click the Edit button on the JavaScript Macros dialog to access the Rhino JavaScript Debugger (Figure 25). Detailed instructions for using this tool can be found on Mozilla’s website at https://developer.mozilla.org/en-US/docs/Mozilla/Projects/Rhino/Debugger.
Listing 11 is an example of a JavaScript macro that inserts the text “Hello World from JavaScript” in cell A1 of the first sheet in a Calc spreadsheet.
Listing 11: Sample JavaScript macro
importClass(Packages.com.sun.star.uno.UnoRuntime);
importClass(Packages.com.sun.star.sheet.XspreadsheetDocument);
importClass(Packages.com.sun.star.container.XindexAccess);
importClass(Packages.com.sun.star.table.XcellRange);
importClass(Packages.com.sun.star.table.Xcell);
documentRef = XSCRIPTCONTEXT.getDocument();
spreadsheetInterface = UnoRuntime.queryInterface(XSpreadsheetDocument, documentRef);
allSheets = UnoRuntime.queryInterface(XIndexAccess, spreadsheetInterface.getSheets());
theSheet = allSheets.getByIndex(0);
Cells = UnoRuntime.queryInterface(XCellRange,theSheet);
cellA1 = Cells.getCellByPosition(0,0);
theCell = UnoRuntime.queryInterface(XCell,cellA1);
theCell.setFormula("Hello World from JavaScript");
Figure 25: Rhino JavaScript Debugger
Numerous resources are available that provide help with writing macros. Use Help > LibreOffice Help, or press the F1 key, to open the LibreOffice help pages. The upper left corner of the LibreOffice help system contains a drop-down list that determines which help set is displayed. To view the help for Basic, choose Basic from this list.
Many excellent macros are included with LibreOffice. Use Tools > Macros > Organize Macros > Basic to open the LibreOffice Basic Macros dialog. Expand the Tools library in the LibreOffice library container. Inspect the Debug module; some good examples include WritedbgInfo (document) and printdbgInfo (sheet).
The following links and references contain information regarding macro programming:
https://wiki.documentfoundation.org/Macros
https://ask.libreoffice.org/ (a Q&A site where volunteers answer questions related to LibreOffice)
https://wiki.documentfoundation.org/Documentation/Other_Documentation_and_Resources (look in Programmers section for BASIC Programmers’ Guide and Developers’ Guide; the latter contains a detailed explanation)
http://forum.openoffice.org/en/forum/ (Apache OpenOffice community forum; volunteers answer questions about LibreOffice as well)
Andrew Pitonyak published a free online book OpenOffice.org Macros Explained, which is a great reference for learning the Basic language used in both LibreOffice and OpenOffice. You can download the PDF version at https://www.pitonyak.org/OOME_3_0.pdf.
Dr. Mark Alexander Bain published the book Learn OpenOffice.org Spreadsheet Macro Programming. See https://www.packtpub.com/openoffice-ooobasic-calc-automation/book.
Roberto Benitez's Database Programming with OpenOffice.org Base & Basic is also a great source to learn more about macro programming.