

Getting Started Guide 7.4
Chapter 12,
Configuring LibreOffice
Choosing options to suit the way you work
This document is Copyright © 2022 by the LibreOffice Documentation Team. Contributors are listed below. You may distribute it and/or modify it under the terms of either the GNU General Public License (http://www.gnu.org/licenses/gpl.html), version 3 or later, or the Creative Commons Attribution License (http://creativecommons.org/licenses/by/4.0/), version 4.0 or later.
All trademarks within this guide belong to their legitimate owners.
|
Skip Masonsmith |
Kees Kriek |
|
|
Jean Hollis Weber |
Steve Fanning |
Kees Kriek |
John A Smith |
|
Paul Figueiredo |
Dave Barton |
Amanda Labby |
Ron Faile Jr. |
|
Jorge Rodriguez |
Olivier Hallot |
Hazel Russman |
Martin Saffron |
|
Steve Schwettman |
Colleen Hayes |
|
|
Please direct any comments or suggestions about this document to the Documentation Team’s forum at https://community.documentfoundation.org/c/documentation/loguides/ (registration is required) or send an email to: loguides@community.documentfoundation.org.
Note
Everything you send to a mailing list, including your email address and any other personal information that is written in the message, is publicly archived and cannot be deleted.
Published January 2022. Based on LibreOffice 7.4 Community.
Other versions of LibreOffice may differ in appearance and functionality.
Some keystrokes and menu items are different on macOS from those used in Windows and Linux. The table below gives some common substitutions for the instructions in this document. For a detailed list, see the application Help.
|
Windows or Linux |
macOS equivalent |
Effect |
|
Tools > Options |
LibreOffice > Preferences |
Access setup options |
|
Right-click |
Control+click or right-click depending on computer setup |
Open a context menu |
|
Ctrl (Control) |
⌘ (Command) |
Used with other keys |
|
Alt |
⌥ (Option) or Alt, depending on keyboard |
Used with other keys |
|
F11 |
⌘+T |
Open Styles deck in Sidebar |
This chapter briefly describes some of the setup options found under Tools > Options on the Menu bar (LibreOffice > Preferences on macOS). Additional options, and more details about the ones given here, are covered in the Help.
Tip
Many options are intended for power users and programmers. If you do not understand what an option does, it is usually best to leave it on the default setting unless instructions in this book recommend changing the setting.
This section covers some of the settings that apply to all the components of LibreOffice. For information on settings not discussed here, see the Help.
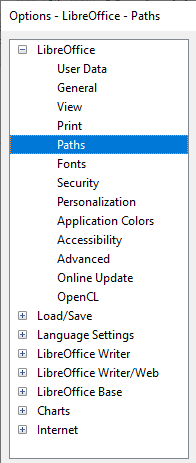
Click Tools > Options. The list in the left-hand box of the Options – LibreOffice dialog varies depending on which component of LibreOffice is open. The illustrations in this chapter show the list as it appears when a Writer document is open. If you are using a version of LibreOffice other than US English, some field labels may be different from those shown in the illustrations.
Click the expansion symbol (+ or triangle) next to LibreOffice. Select an item in the drop-down list to display the relevant page on the right-hand side of the dialog.
Figure 1: LibreOffice options
Note
The Reset button, located in the lower right of the Options dialog, resets the values on that page to the values that were in place when you opened the dialog. It may be called Revert on some installations.
Because LibreOffice can use the name or initials stored in the LibreOffice – User Data page for several things, including document properties (“created by” and “last edited by” information), the name of the author of comments and changes, and the sender address in mailing lists, you will want to ensure that the correct information appears here.
Fill in the form, or amend or delete any existing information. If you do not want user data to be part of the document’s properties, deselect Use data for document properties.
Figure 2: User Data page
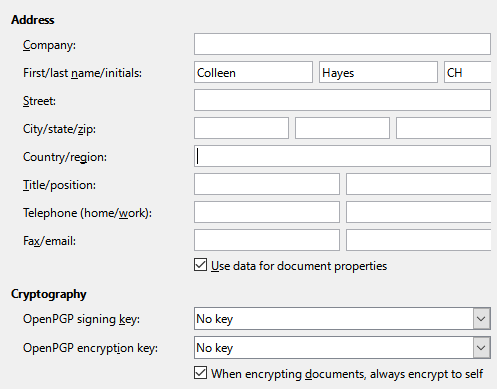
In the Cryptography section, you can set the preferred public key for OpenPGP encryption and digital signature. These preferred keys will be pre-selected in the key selection dialog when you sign or encrypt a document (see Chapter 10, Working with File Formats, Security, and Exporting).
The options on the LibreOffice – General page (Figure 3) are described below.
Extended tips
Show “No offline help installed” popup
Show “Tip of the Day” dialog on start-up
Open/Save Dialogs – Use LibreOffice dialogs
Figure 3: Setting general options for LibreOffice
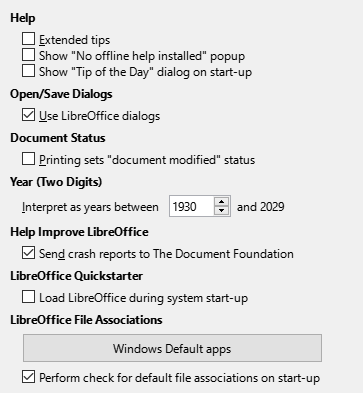
Document Status – Printing sets “document modified” status
Help Improve LibreOffice
Collect usage data and send it to The Document Foundation
Send crash reports to The Document Foundation
LibreOffice Quickstarter – Load LibreOffice during system start-up
LibreOffice File Associations – Windows Default apps button
Perform check for default file associations on start-up
The options on the LibreOffice – View page affect how the document window looks and behaves. Some of these options are described below Figure 4. Set them to suit your personal preferences. Some of the available options vary with your computer’s operating system; the figure shows the options on Windows 10.
Figure 4: Choosing View options for LibreOffice applications
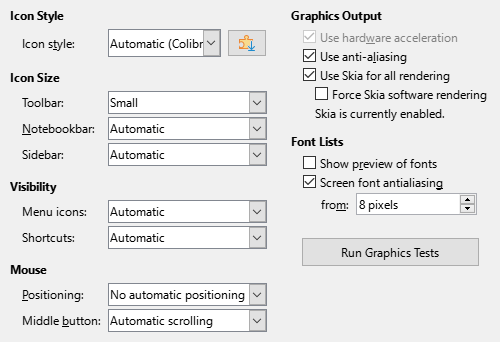
Icon style
Icon size – Toolbar, Notebookbar, Sidebar
Visibility – Menu icons, Shortcuts
Mouse – Middle button
Automatic scrolling – dragging while pressing the middle mouse button shifts the view.
Paste clipboard – pressing the middle mouse button inserts the contents of the Selection clipboard at the cursor position.
|
Function |
Clipboard |
Selection clipboard |
|
Copy content |
Edit > Copy Ctrl+C |
Select text, table, or object. |
|
Paste content |
Edit > Paste Ctrl+V pastes at the cursor position. |
Clicking the middle mouse button pastes at the mouse pointer position. |
|
Pasting into another document |
No effect on the clipboard contents. |
The last marked selection is the content of the Selection clipboard. |
Graphics Output
Use hardware acceleration
Use anti-aliasing
Tip
Press Shift+Ctrl+R to restore or refresh the view of the current document after changing the anti-aliasing settings, to see the effect.
Use Skia for all rendering
Force Skia software rendering
Font Lists
|
|
|
|
Figure 5: Font list (Left) with preview; (Right) without preview |
|
Run Graphics Tests button
On the LibreOffice – Print page (Figure 6), you can set the print options to suit your default printer and your most common printing method. Most of these options should be self-explanatory.
Figure 6: Choosing general printing options for all components
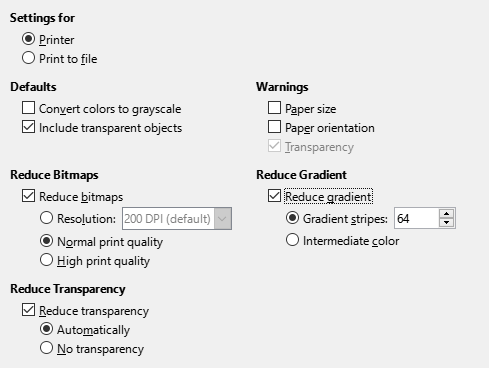
In the Warnings section, you can choose whether to be warned if the paper size or orientation specified in your document does not match the paper size or orientation available for your printer. Having these warnings turned on can be quite helpful, particularly if you work with documents produced by people in other countries where the standard paper size is different from yours.
Tip
If your printouts are incorrectly placed on the page or chopped off at the top, bottom, or sides, or the printer is refusing to print, a likely cause is page size incompatibility.
Note
Linux installations have an extra option (not shown in Figure 6): PDF as Standard Print Job Format. Select this option to change the internal print job format from a Postscript document description to a PDF description. This format has a number of advantages over Postscript. For more information, see https://www.linuxfoundation.org/collaborate/workgroups/openprinting/pdf_as_standard_print_job_format
Deselecting this option reverts to a Postscript document workflow.
On the LibreOffice – Paths page, you can change the location of files associated with, or used by, LibreOffice to suit your working situation. For example, you might want to store documents by default somewhere other than My Documents.
To make changes, select an item in the list shown in Figure 1 and click Edit. On the Select Path dialog (not shown; may also be titled Edit Paths), add or delete folders as required, and then click OK to return to the Options dialog.
Figure 7: Viewing the paths of files used by LibreOffice
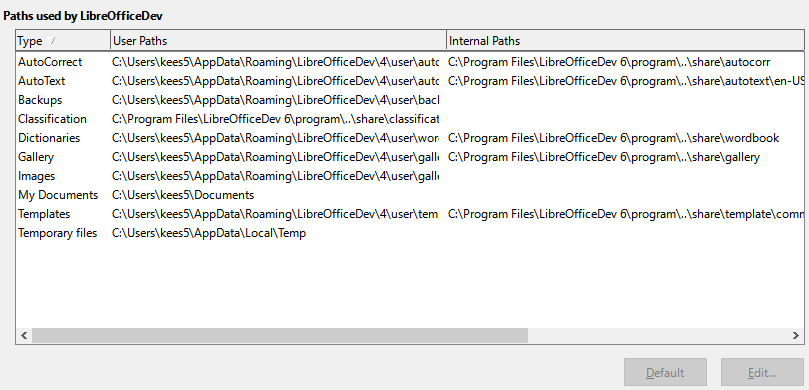
Some items can have at least two paths listed: the User Path is to a user-specific folder (normally on the user’s personal computer) and the Internal Path is to a shared folder where LibreOffice is installed (which might be on a network).
Tip
You can use the entries on the LibreOffice – Paths page to compile a list of files, such as those containing AutoText, that you need to back up or copy to another computer.
You can define replacements for any fonts that might appear in your documents. If you receive from someone else a document containing fonts that you do not have on your system, LibreOffice will substitute fonts for those it does not find. You might prefer to specify a different font from the one that the program chooses.
Note
These choices do not affect the default font for your documents. To do that, you need to change the default template for documents, as described in Chapter 4, Working with Styles, Templates and Hyperlinks. In Writer, some basic fonts can be changed using the Basic Fonts options pages; see the Writer Guide or Help for more information.
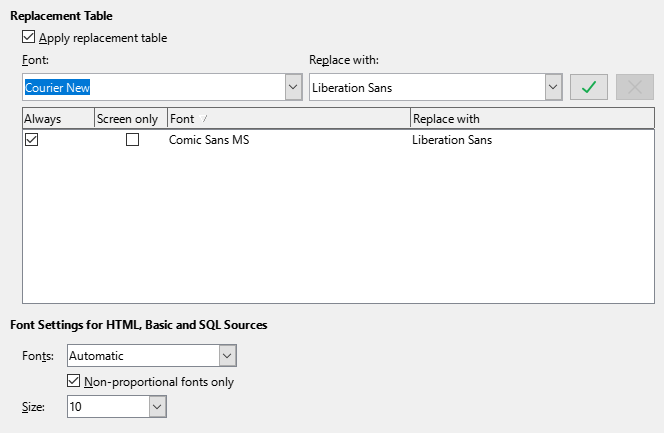
On the LibreOffice – Fonts page (Figure 8):
1) Select the Apply replacement table option.
2) Select or type the name of the font to be replaced in the Font box. (If you do not have this font on your system, it will not appear in the drop-down list in this box, so you need to type it in.)
3) In the Replace with box, select a suitable font from the drop-down list of fonts installed on your computer.
4) Click on the tick (check) icon to the right of the Replace with box. A row of information now appears in the larger box below the input boxes. Select Always to replace the font, even if the original font is installed on your system. Select Screen only to replace the screen font only and never replace the font for printing. The results of combining these selections are given in Table 1.
5) In the bottom section of the page, you can change the typeface and size of the font used to display source code such as HTML and Basic (in macros).
Table 1. Font substitution replacement actions
|
Always checkbox |
Screen only checkbox |
Replacement action |
|
checked |
blank |
Font replaced on screen and when printing, whether the font is installed or not. |
|
checked |
checked |
Font replaced only on screen, whether the font is installed or not. |
|
blank |
checked |
Font replaced only on screen, but only if font is not available. |
|
blank |
blank |
Font replaced on screen and when printing, but only if font is not available. |
Figure 8: Defining a font to be substituted for another font
Use the LibreOffice – Security page (Figure 9) to choose security options for saving documents and for opening documents that contain macros.
Security Options and Warnings
Figure 9: Choosing security options for opening and saving documents
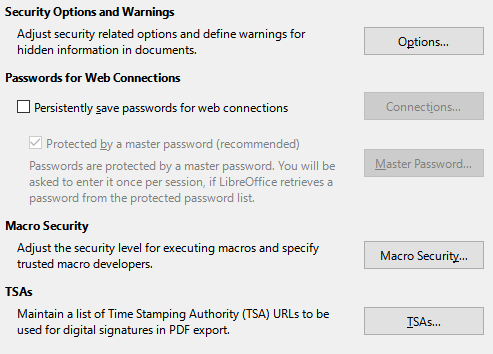
Passwords for Web Connections
Macro Security
Certificate Path (Not available on Windows)
TSAs –Time Stamping Authorities
Most of the options on the Security Options and Warnings dialog (Figure 10) should be self-explanatory.
Figure 10: Security Options and Warnings dialog
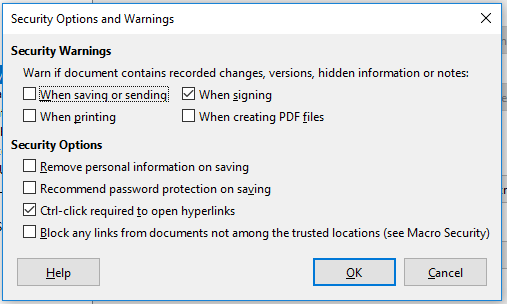
Remove personal information on saving
Ctrl+click required to open hyperlinks
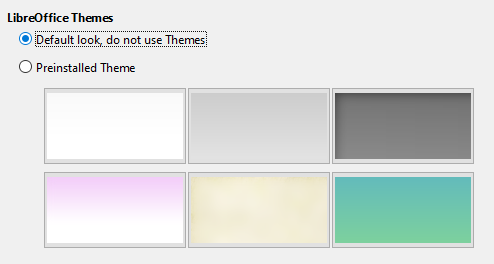
You can customize the overall appearance of LibreOffice with themes.
On the LibreOffice – Personalization page, select Preinstalled Theme and then click on a theme thumbnail and click Apply. After a brief pause the appearance of LibreOffice will refresh and reflect the selected theme.
Figure 11: Selecting a preinstalled theme
Writing, editing, and page layout are often easier when you can see the page margins (text boundaries), the boundaries of tables and sections (in Writer documents), page breaks in Calc, grid lines in Draw or Writer, and other features. In addition, you might prefer to use colors that are different from LibreOffice’s defaults for such items as comment indicators or field shadings.
On the LibreOffice – Application Colors page (Figure 12), you can specify which items are visible and the colors used to display various items.
Figure 12: Showing or hiding text, object, and table boundaries
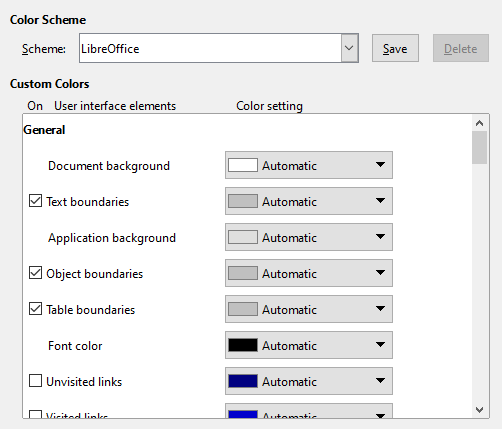
To show or hide items such as text boundaries, select or deselect the checkboxes next to the names of the items.
To change the default colors for items, click the down-arrow in the Color setting column by the name of the item and select a color from the list box. Note that you can change the list of available colors by selecting other available palettes from the drop-down list.
To save your color changes as a color scheme, click Save, type a name in the Name of color scheme box in the popup dialog (not shown), and then click OK.
Note
To change the color settings used in Track Changes mode, go to Tools > Options > LibreOffice Writer > Changes.
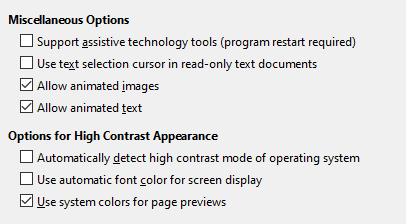
Accessibility options include whether to allow animated graphics or text, some options for high contrast display, and a way to change the font for the LibreOffice user interface.
Accessibility support relies on the Java Runtime Environment for communication with assistive technology tools. The Support assistive technology tools option is not shown on all LibreOffice installations. See Assistive Tools in LibreOffice in the Help for other requirements and information.
Select or deselect the options on the LibreOffice – Accessibility page (Figure 13) as required.
Figure 13: Choosing accessibility options
LibreOffice needs Java to run several wizards, the Mediawiki Publisher (if available; see “Choosing Internet options” on page 1), and some functions in the Base component.
Note
Users of Windows should find a suitable Java Runtime Environment (JRE) already installed on their machines. Linux users may need to get one from their distribution’s software repository if it is not already installed. Users of macOS need to install Oracle’s Java Development Kit (JDK), not just the JRE. To get the required JDK, select the macOS option at https://www.oracle.com/java/technologies/downloads/
Java Options
Figure 14: Choosing a Java runtime environment
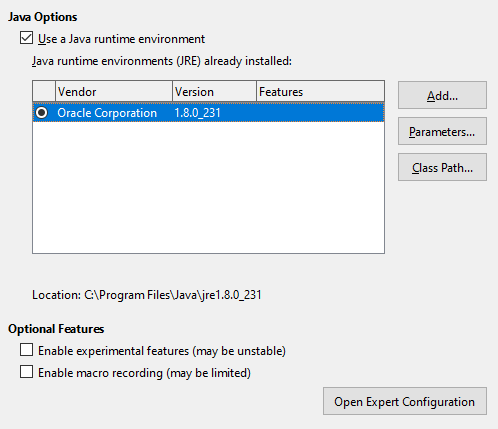
Optional Features
Enable experimental features (may be unstable)
Enable macro recording (may be limited)
Open Expert Configuration
Caution
The Expert Configuration dialog lets you access, edit, and save configuration preferences that can turn the user profile of LibreOffice unstable, inconsistent, or even unusable. If you do not know what an option does, you can best leave it as the default.
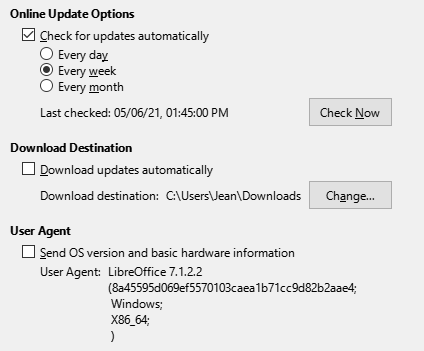
On the LibreOffice – Online Update page (Figure 15), you can choose whether and how often to have the program check the LibreOffice website for program updates. If the Check for updates automatically option is selected, an icon appears at the right-hand end of the Menu bar when an update is available. Click this icon to open a dialog where you can download the update.
If the Download updates automatically option is selected, the download starts when you click the icon. To change the download destination, click the Change button and select the required folder in the file browser window.
If the Send OS version and basic hardware information option is selected, information about the computer architecture and operating system will be sent to the server for statistics collection.
Figure 15: Online update options
OpenCL (Open Computing Language) is a software architecture used to write programs that run in different processors of the computer, such as the CPU and GPU (graphics processing unit) of the video card. With OpenCL enabled, LibreOffice can benefit from the very fast numerical calculations performed in the GPU, which is especially useful in very large spreadsheets with extensive calculations. The computer’s video card driver must have support for OpenCL to use this feature.
You can set the options for loading and saving documents to suit the way you work.
If the Options dialog is not already open, click Tools > Options. Click the expansion symbol (+ or triangle) to the left of Load/Save.
Most of the choices on the Load/Save – General page (Figure 16) are familiar to users of other office suites. Some items of interest are described below.
Figure 16: Choosing Load and Save options
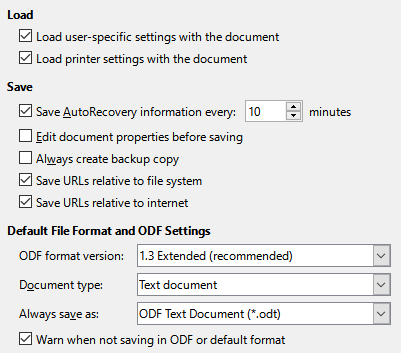
Load user-specific settings with the document
Settings in File > Print > Options.
Spacing options for paragraphs before text tables.
Information about automatic updating for links, field functions, and charts.
Information about working with Asian character formats.
Data source linked to the document and its view.
Load printer settings with the document
Save AutoRecovery information every __ minutes
Edit document properties before saving
Always create backup copy
Save URLs relative to file system / internet
|
Examples |
File system |
Internet |
|
relative |
../images/img.jpg |
../images/img.jpg |
|
absolute |
file:///c|/work/images/img.jpg |
http://myserver.com/work/images/img.jpg |
Default File Format and ODF Settings
On the Load/Save – VBA Properties page, you can choose whether to keep any macros in Microsoft Office documents that are opened in LibreOffice.
If you choose Load Basic code, you can edit the macros in LibreOffice. The changed code is saved in an ODF document but is not retained if you save into a Microsoft Office format.
If you choose Save original Basic code, the macros will not work in LibreOffice but are retained unchanged if you save the file into Microsoft Office format.
If you are importing a Microsoft Word or Excel file containing VBA code, you can select the option Executable code. Whereas normally the code is preserved but rendered inactive (if you inspect it with the Basic IDE you will notice that it is all commented), with this option the code is ready to be executed.
Figure 17: Choosing Load/Save VBA Properties
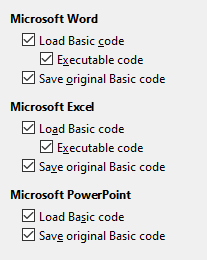
Save original Basic code takes precedence over Load Basic code. If both options are selected and you edit the disabled code in LibreOffice, the original Microsoft Basic code will be saved when saving in a Microsoft Office format.
To remove any possible macro viruses from the Microsoft Office document, deselect Save original Basic code. The document will be saved without the Microsoft Basic code.
On the Load/Save – Microsoft Office page (Figure 18), you can choose what to do when importing and exporting Microsoft Office OLE objects (linked or embedded objects or documents such as spreadsheets or equations).
The Embedded Objects section specifies how to import and export Microsoft Office OLE objects. These settings are valid when no Microsoft OLE server exists (for example, in UNIX) or when there is no LibreOffice OLE server ready for editing the OLE objects. If an OLE server is active for the embedded object, then the OLE server will be used to handle the object.
Select the [L] options to convert Microsoft OLE objects into the corresponding LibreOffice OLE objects when a Microsoft document is loaded into LibreOffice (mnemonic: “L” for “load”).
Select the [S] options to convert LibreOffice OLE objects into the corresponding Microsoft OLE objects when a document is saved in a Microsoft format (mnemonic: “S” for “save”). Linux installations may include selectable [S] options not shown in the illustration for the last three items.
Figure 18: Choosing Load/Save Microsoft Office options
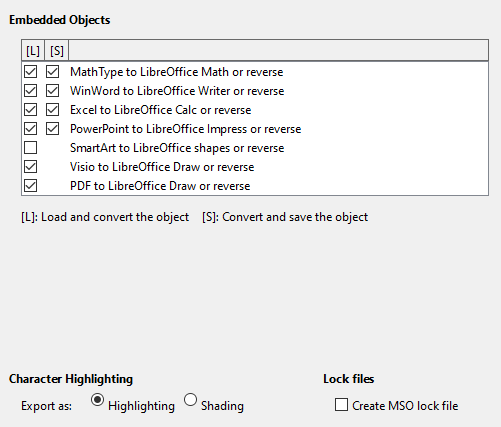
Character Highlighting – Export as
Lock files – Create MSO lock file
Choices made on the Load/Save – HTML Compatibility page (Figure 19) affect HTML pages imported into LibreOffice and those exported from LibreOffice. See HTML documents; importing/exporting in the Help for more information.
Figure 19: Choosing HTML compatibility options
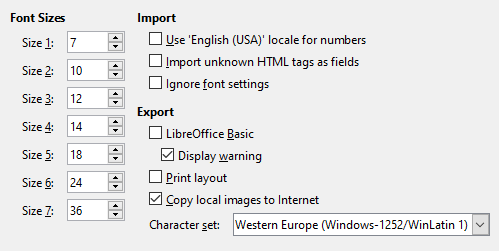
Font Sizes
Import
Use 'English (USA)' locale for numbers
Import unknown HTML tags as fields
Ignore font settings
Export
LibreOffice Basic
Display warning
Print layout
Copy local images to Internet
Character set
To customize the language settings in LibreOffice, you can do any of the following:
Install the required dictionaries
Change some locale and language settings
Choose spelling options
LibreOffice automatically installs many language modules with the program. A language module can contain up to three submodules: spelling dictionary, hyphenation dictionary, and thesaurus. These are usually referred to as “dictionaries” in LibreOffice. To add other language modules, be sure you are connected to the Internet, and then choose Tools > Language Settings > Writing Aids and click the Get more dictionaries online link (Figure 22). LibreOffice will open a window containing links to additional dictionaries. Select and install the ones you want.
You can change some details of the locale and language settings that LibreOffice uses for all documents, or for specific documents.
In the Options dialog, click the expansion symbol (+ or triangle) by Language Settings (Figure 20). The exact list shown depends on the language support settings (Figure 21).
|
|
Figure 20: LibreOffice language options, without and with Asian and CTL options enabled
On the right-hand side of the Language Settings – Languages page (Figure 21), change the User interface, Locale setting, Default currency, and Default Languages for Documents as required. In the example, English (USA) has been chosen for all the appropriate settings.
Language Of
User interface
Formats
Locale setting
Default currency
Decimal separator key
Figure 21: Choosing language options
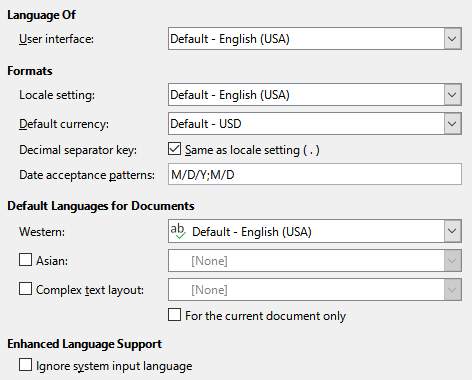
Date acceptance patterns
Caution
Data entered into a Calc spreadsheet or a Writer table must be entered in a format defined by locale in order to be recognized as dates.
Default Languages for Documents
Note
An ABC icon in front of a language indicates that a spelling dictionary, thesaurus, and hyphenation dictionary are activated for this language.
Enhanced Language Support
Ignore system input language
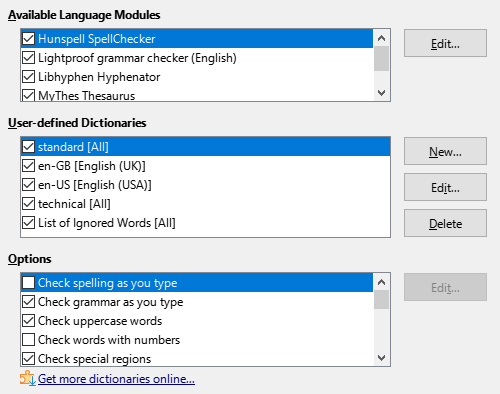
To choose the options for checking spelling, click Language Settings > Writing Aids.
For details on using the Available Language Modules and User-defined Dictionaries sections, please see the Help.
In the Options section of the page (Figure 22), choose the settings that are useful for you.
Figure 22: Choosing languages, dictionaries, and options for checking spelling
Some considerations:
If you want spelling checked while you type, you must have Check spelling as you type enabled.
If you want grammar to be checked as you type, you must have both Check grammar as you type and Check spelling as you type enabled.
If you use a custom dictionary that includes words in all uppercase and words with numbers (for example, AS/400), select Check uppercase words and Check words with numbers.
Check special regions means that text in headers, footers, frames, and tables are also checked when checking spelling.
Here you can also select which user-defined (custom) dictionaries are active by default, and add or remove user-installed dictionaries, by clicking the New or Delete buttons. Dictionaries installed by the system cannot be deleted.
If you have an API key for LanguageTool, you can use LanguageTool to check the spelling and grammar in your document.
Activate this option by checking the Enable LanguageTool checkbox in Language Settings – LanguageTool Settings, then supply the requested Base URL, Username and API Key fields.
Information about LanguageTool can be found at https://languagetool.org/.
On the Language Settings – English Sentence Checking page (Figure 23), you can choose which items are checked for, reported to you, or converted automatically.
After selecting the additional grammar checks, you must restart LibreOffice, or reload the document, for them to take effect.
Figure 23: Choosing options for checking sentences in English
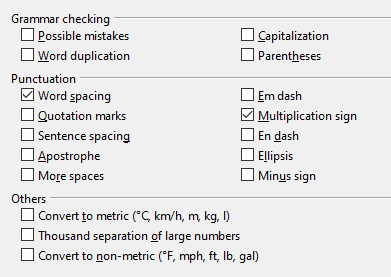
Possible mistakes
Capitalization
Word duplication
Parentheses
Word spacing
Quotation marks
Sentence spacing
Apostrophe
More spaces
Em dash; En dash
Multiplication sign
Ellipsis
Minus sign
Convert to metric; Convert to non-metric
Thousands separation of large numbers
LibreOffice can check sentences in many languages. These checkers are enabled by default if the language is the computer’s default language, and others can be added using the Extension Manager. The set of rules available for these sentence checkers depends on the language.
The Internet options available found in the Internet settings depend on your operating system.
Use the Proxy page (if available) to save proxy settings for use with LibreOffice.
If you are using Linux or macOS, an additional page of Email options is available, where you can specify the program to use when you send the current document as email. Under Windows, your default email program is always used.
To suppress (exclude) hidden elements such as tracked changes, hidden sections, hidden tabs in a spreadsheet, or hidden layers in a drawing, select the Suppress hidden elements of documents option.
Figure 24: Internet options, showing Email page available to Linux and macOS users

A MediaWiki publisher is included on Windows and Linux. To enable it, select MediaWiki in the Internet options, then click the Add button to open a dialog where you can specify the address (URL) and login information for a wiki. You can add several wikis to the list. A JRE (Java Runtime Environment) is needed for this feature to work.
LibreOffice’s AutoCorrect functions automatically detect and replace common symbols, spelling mistakes, and grammar mistakes. Sometimes, AutoCorrect changes something that should have been kept. If unexplained changes appear in your document, the AutoCorrect settings are often the cause.
Click Tools > AutoCorrect > AutoCorrect Options to customize AutoCorrect. You must have a document open for this menu item to appear. Use the tabs to add, edit, and delete AutoCorrect options. In Writer, this dialog has five tabs. In other components of LibreOffice, the dialog has only four tabs. Find more details in the relevant component guides.