
Getting Started Guide 7.5
Chapter 12,
Configuring LibreOffice
Choosing options to suit the way of working
This document is Copyright © 2023 by the LibreOffice Documentation Team. Contributors are listed below. This document maybe distributed and/or modified under the terms of either the GNU General Public License (https://www.gnu.org/licenses/gpl.html), version 3 or later, or the Creative Commons Attribution License (https://creativecommons.org/licenses/by/4.0/), version 4.0 or later. All trademarks within this guide belong to their legitimate owners.
Contributors for this edition:
Peter Schofield
Jean Hollis Weber
Contributors for previous editions:
Amanda Labby
Colleen Hayes
Dave Barton
Hazel Russman
Jean Hollis Weber
John A Smith
Jorge Rodriguez
Kees Kriek
Martin Saffron
Olivier Hallot
Paul Figueiredo
Ron Faile Jr.
Skip Masonsmith
Steve Fanning
Steve Schwettman
Please direct any comments or suggestions about this document to the Documentation Team forum at https://community.documentfoundation.org/c/documentation/loguides/ (registration is required) or send an email to: loguides@community.documentfoundation.org.
Note
Everything sent to a forum, including email addresses and any other personal information that is written in the message, is publicly archived and cannot be deleted. Emails sent to the forum are moderated.
Published July 2023 Based on LibreOffice 7.5 Community.
Other versions of LibreOffice may differ in appearance and functionality.
Some keystrokes and menu items are different on macOS from those used in Windows and Linux. The table below gives some common substitutions used in this document. For a detailed list, see LibreOffice Help.
|
Windows or Linux |
macOS equivalent |
Effect |
|
Tools > Options |
LibreOffice > Preferences |
Access setup options |
|
Right-click |
Control+click, Ctrl+click, or right-click depending on computer setup |
Open a context menu |
|
Ctrl or Control |
⌘ and/or Cmd or Command, depending on keyboard |
|
|
Alt |
⌥ and/or Alt or Option depending on keyboard |
Used with other keys |
|
F11 |
⌘+T |
Open the Styles deck in the Sidebar |
This chapter describes some of the setup options found in Tools > Options (macOS LibreOffice > Preferences) on the Menu bar. Additional options, and more details about the options in this user guide, are covered in LibreOffice Help.
Tip
Many options are intended for power users and programmers. If understanding is difficult on what an option does, it is usually best to leave the option on its default setting unless instructions in this user guide recommend changing the setting.
This section covers some of the options and settings that apply to all the components of LibreOffice. For information on options or settings that are not discussed in this section, see the LibreOffice Help.
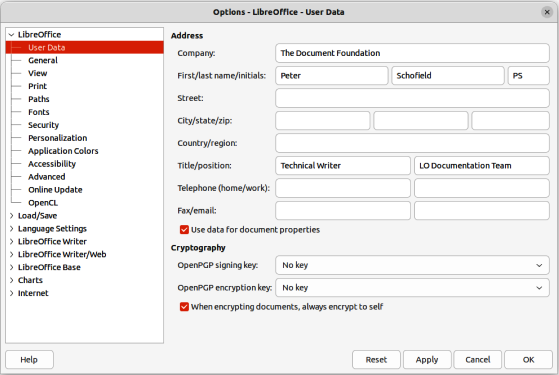
To open the Options LibreOffice dialog for LibreOffice (Figure 1), go to Tools > Options (macOS LibreOffice > Preferences) on the Menu bar. The list in the left-hand box of the Options LibreOffice dialog varies depending on which LibreOffice module is open. The figures in this chapter show this list in the left-hand box as it appears when a Writer document is open. Click the chevron > next to LibreOffice to select a category from the drop-down list and display the relevant page on the right-hand side of the dialog.
Figure 1: Options LibreOffice dialog — User Data page
Notes
If a version of LibreOffice being used is not US English, some field labels may be different from those shown in the following figures.
The Reset button, located at the lower right of the Options dialog, resets the values on that page to the values that were in place when the dialog opened.
On the User Data page of the Options LibreOffice dialog (Figure 1), the details of a LibreOffice user can be entered and stored. These user details are used for several things within LibreOffice; for example created by or last edited by for document properties, author of comments or changes, sender address in mailing lists, and so on.
It is necessary to make sure that the correct user information appears here. Fill in the necessary information if these details are blank, or amend and/or delete any existing information not required.
If user data is not going to be used for document’s properties, deselect the option Apply user data in Properties dialog for the LibreOffice file that is open. Go to File > Properties on the Menu bar to open the Properties dialog for a file.
In Cryptography on the User Data page, set the preferred public keys for OpenPGP encryption and digital signature. These keys are pre-selected in the text boxes for OpenPGP signing key and OpenPGP encryption key when a document is digitally signed or encrypted (for more information, see Chapter 10, Working with File Formats, Security, and Exporting).
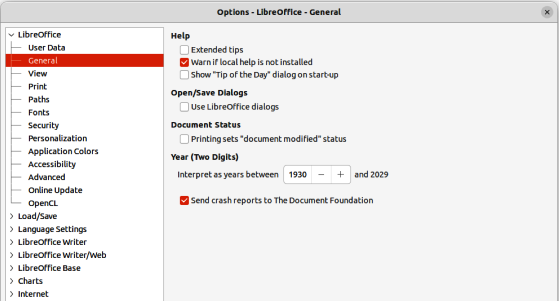
The options available on the Options LibreOffice dialog — General page (Figure 2) are described as follows.
Help
Extended tips
When Extended tips is active, a brief description of the function of an icon, menu command, or a field on a dialog appears when the cursor is held over the item.
Warn if local help is not installed
Deselect this option to disable a warning when selecting Help, if offline help is not installed.
Show “Tip of the Day” dialog on start-up
Deselect to disable the Tip of the Day dialog.
Open/Save Dialogs
Use LibreOffice dialogs
Select this option to use the Open and Save dialogs supplied with LibreOffice. Deselect to use the standard Open and Save dialogs of the computer operating system. This guide uses the LibreOffice Open and Save dialogs in illustrations.
Document Status
Printing sets “document modified” status
If this option is selected, the next time the document is closed after printing, the print date is recorded in the document properties as a change. There will be prompt to save the document again, even if any other changes have not been made.
Figure 2: Options LibreOffice dialog — General page
Year (Two Digits)
Help Improve LibreOffice
Send crash reports to The Document Foundation
Linux only — send usage data to help The Document Foundation improve usability of the software. The usage data is sent anonymously and carries no document contents, only the commands used.
Send crash reports to The Document Foundation
Windows only — if selected, the Error Report Tool starts automatically when a program crash occurs. The tool gathers all necessary information that can help the program developers to improve the code. Include any additional information that may help the developers to localize the error. For more information, see the Help.
LibreOffice Quickstarter
Load LibreOffice during system start-up
Windows only — when selected, the necessary library files are loaded when the computer is started, resulting in a shorter startup time for LibreOffice components. The old menu in the system tray is no longer used.
LibreOffice File Associations
Windows Default apps button
Windows only — opens Default apps dialog in Windows.
Perform check for default file associations on start-up
Windows only — when selected, LibreOffice checks file associations on startup and displays a message if any relevant formats are not registered to be opened by default in LibreOffice.
Figure 3: Options LibreOffice dialog — View page
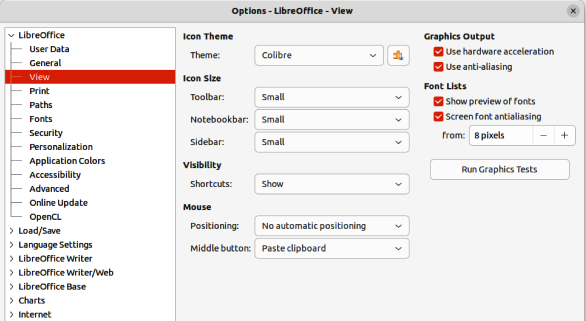
The options available in the View page of the Options LibreOffice dialog (Figure 3) affect how the document window looks and behaves. Set these options to suit user personal preferences. Some options vary with the computer operating system.
Icon style
Icon size
Toolbar, Notebookbar, Sidebar
Choose the display size of toolbar icons: Automatic, Small, Large, Extra Large (toolbars only). The Automatic icon size option uses the setting for the computer operating system. The Toolbar, Notebookbar and Sidebar can have different settings.
Visibility
Menu icons, Shortcuts
Select the visibility mode (Automatic, Hide, Show) to hide or show icons as well as text on the Menu bar and in shortcut items.
Mouse
Positioning
Specifies if and how the cursor is positioned in newly opened dialogs (Default button, Dialog center, No automatic positioning).
Middle button
Defines the function of the middle mouse button (if available)
No function
Automatic scrolling — dragging while pressing the middle mouse button shifts the view.
Paste clipboard — pressing the middle mouse button inserts the contents of the Selection clipboard at the cursor position.
The Selection clipboard is independent of the normal clipboard used by Edit > Copy/Cut/Paste. The Clipboard and Selection clipboard can contain different contents at the same time as shown in Table 1.
Table 1: Clipboard and Selection clipboard functions
|
Function |
Clipboard |
Selection clipboard |
|
Copy content |
Edit > Copy or Ctrl+C (macOS ⌘+C) |
Select text, table, or object. |
|
Paste content |
Edit > Paste or Ctrl+V (macOS ⌘+C) pastes at the cursor position. |
Clicking the middle mouse button pastes at the cursor position. |
|
Pasting into another document |
No effect on the clipboard contents. |
The last marked selection is the content of the Selection clipboard. |
Graphics Output
Use hardware acceleration
Directly accesses hardware features of the graphical display adapter to improve the screen display.
Use anti-aliasing
Enables and disables anti-aliasing, which makes the display of most graphical objects look smoother and with fewer artifacts.
Tip
Use Ctrl+Shift+R (macOS ⌘+Shift+R) to restore or refresh the view of the current document after changing the anti-aliasing settings to see the effect.
Use Skia for all rendering
Windows and macOS only — enables and disables the use of the 3D graphics language Skia.
Force Skia software rendering
Windows and macOS only — forces the use of Skia even if the graphics device is blacklisted. A device is blacklisted when it is buggy or may render graphics with poor quality.
Font Lists
Show preview of fonts
When selected — displays the font names shown with an example of the font. When deselected, the font list shows only the font names. The fonts listed are those that are installed on the computer system. Some fonts show an additional preview of some sample text.
Screen font anti-aliasing
Select this option to smooth the screen appearance of text. Enter the smallest font size to apply anti-aliasing.
Run Graphics Tests button
Figure 4: Options LibreOffice dialog — Print page
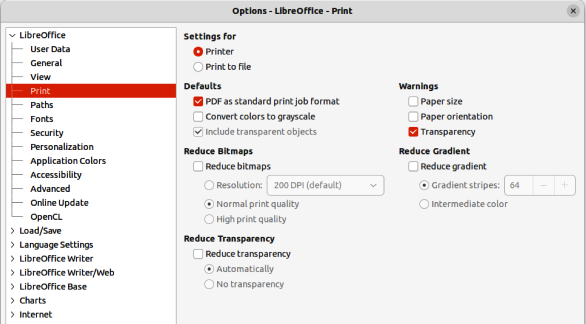
After installing a printer on a computer, the general printing options for LibreOffice can be selected to suit the most common printing method that is going to be used in the Print page of the Options LibreOffice dialog (Figure 4).
Settings for
Defaults
PDF as standard print job format
Linux and macOS only — select this option to change the internal print job format from Postscript format to a PDF format. Using PDF format has a number of advantages over Postscript. For more information, see the following link: https://www.linuxfoundation.org/collaborate/workgroups/openprinting/pdf_as_standard_print_job_format.
Convert colors to grayscale
Specifies that all colors in a document are printed only as greyscale.
Include transparent objects
If selected, the reduction in print quality for bitmaps also applies to the transparent areas of objects.
Reduce bitmaps
Resolution
Specifies the maximum print quality in DPI. The resolution can only be reduced and not increased.
High print quality
High print quality corresponds to a resolution of 300dpi.
Normal print quality
Normal print quality corresponds to a resolution of 200dpi.
Note
Reducing the amount of data sent to the printer increases the print speed because the print files are smaller. This makes it easier for printers with a smaller memory when printing large files. However, reducing print data can result in slightly lower print quality.
Reduce transparency
Automatically
Specifies that the transparency is only printed if the transparent area covers less than a quarter of the entire page.
No transparency
When selected, a transparency does not print.
Note
Transparencies cannot be sent directly to a printer. Transparencies must be visible to be calculated as bitmaps and sent to the printer. Depending on bitmap size and the print resolution, a large amount of data may result.
Warnings
Paper size
Select this option if a certain paper size is required for printing the current document. If the paper size used in the document is not provided by the current printer, an error message opens.
Paper orientation
Select this option if a certain paper orientation is required for printing the current document. If the format used by the current document is not available from the printer, an error message opens.
Transparency
Select this option if a warning is required if transparent objects are contained in the document. When printing a document with transparencies, a dialog opens to enable selection if the transparency is to be printed.
Reduce gradient
If selected, gradients are printed with reduced quality.
Gradient stripes
Specifies the maximum number of gradient stripes for printing.
Intermediate color
Specifies that gradients are only printed in a single intermediate color.
On Paths page in the Options LibreOffice dialog (Figure 5), the location of files associated with, or used by, LibreOffice can be changed to suit the working situation. For example, there may be a requirement to store documents by default somewhere other than in My Documents.
Figure 5: Options LibreOffice dialog — Paths page
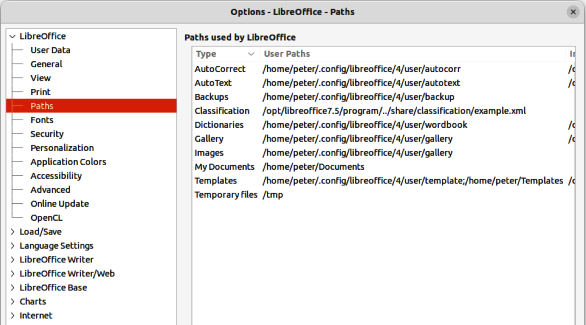
To make changes, select an item in Paths used by LibreOffice and click on Edit. This opens the Select Path dialog, or Edit Paths dialog, allowing folders to added, edited, or deleted as required. Click OK to return to the Options dialog. Some items may have two paths listed as follows:
User Paths is a user-specific folder and is normally located on a single computer.
Internal Paths is a shared folder where LibreOffice is installed which is normally on a network.
Tip
Use the entries on the Paths page of the Options LibreOffice dialog to compile a list of files, such as those containing AutoText, that are required to create a back up or copy to another computer.
The Fonts page on the Options LibreOffice dialog (Figure 6) allows the definition of any replacements for any fonts that might appear in documents. If a document is received from another source it may contain fonts that that are not installed on the computer system being used. LibreOffice can substitute any fonts it cannot locate using the fonts listed on the Fonts page when required. However, this font replacement does not change the font specified in the document.
Replacement table
Apply replacement table
Enables the font replacement settings that have been defined.
Figure 6: Options LibreOffice dialog — Fonts page
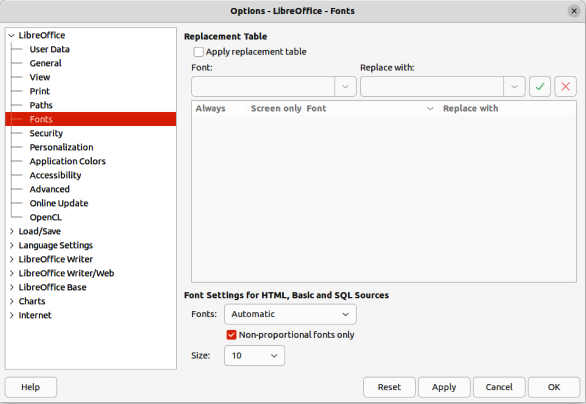
Table 2: Font replacement options
|
Always check box |
Screen only check box |
Replacement action |
|
Checked |
Blank |
Font replacement on screen and when printing, whether the font is installed or not. |
|
Checked |
Checked |
Font replacement only on screen, whether the font is installed or not. |
|
Blank |
Checked |
Font replacement only on screen, but only if font is not available. |
|
Blank |
Blank |
Font replacement on screen and when printing, but only if font is not available. |
Font
Replace with
Enter or select the name of the replacement font.
Apply
Clicking on the icon applies the selected font replacement.
Delete
Clicking on the icon deletes the selected font replacement.
Font settings for HTML, Basic and SQL Sources
Fonts
Select the font for the display of HTML and Basic source code. Select Automatic to detect a suitable font automatically.
Non-proportional fonts only
Mark this check box to display only non-proportional fonts in the Fonts list box.
Size
Select a font size for the display of HTML, Basic and SQL Source code.
On the Security page of the Options LibreOffice dialog (Figure 7), the security options for saving documents and for opening documents that contain macros can be selected.
Security Options and Warnings
Security Warnings
Warns if a restricted document contains any recorded changes, versions, hidden information, or notes when saving, sending, signing, printing, or creating PDF files.
Security Options
Provides options for removing personal information, password protection, how hyperlinks are opened, and to block any links from documents that are not trusted.
Passwords for Web Connections
Persistently save web passwords for web connections
Protected by a master password
Macro Security
Figure 7: Options LibreOffice dialog — Security page
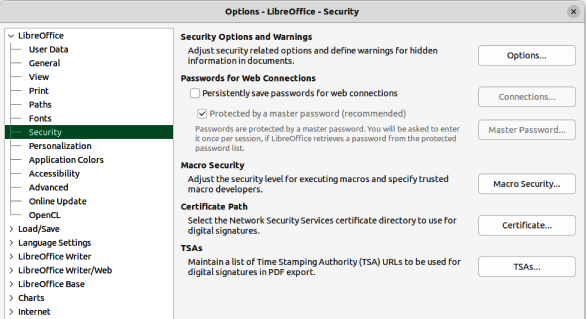
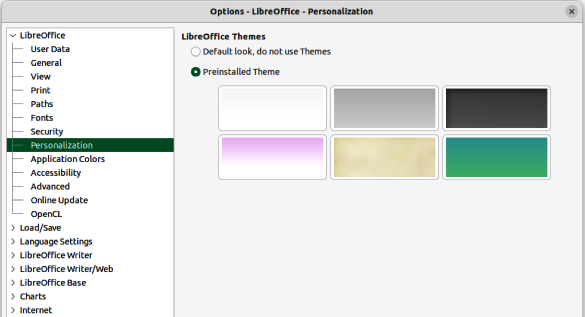
Figure 8: Options LibreOffice dialog — Personalization page
Certificate Path
TSAs
On the Personalization page of the Options LibreOffice dialog (Figure 8), the overall appearance of LibreOffice can be changed using themes.
Select Default look, do not use Themes and LibreOffice uses the default in all modules.
Select Preinstalled Theme, then click on a theme thumbnail and click Apply. After a brief pause the appearance of LibreOffice refreshes and reflects the selected theme.
On the Application Colors page of the Options LibreOffice dialog (Figure 9), the overall appearance of LibreOffice can be changed by setting the colors used for the LibreOffice user interface. Current settings of a color scheme being used can be saved and reloaded reloaded at a later time.
Changing colors can make using LibreOffice easier, for example when writing, editing, creating page layouts and page margins, inserting page breaks or graphics, and so on. Also, users may prefer different colors from those used as LibreOffice defaults.
Figure 9: Options LibreOffice dialog — Application Colors page

Colour Scheme
Scheme
Selects the color scheme for use.
Save
Saves the current settings as a color scheme that can be reloaded later. The name of the color scheme is added to the drop-down list in the Scheme box.
Delete
Deletes the color scheme displayed in the Scheme box. The Default scheme cannot be deleted.
Custom Colors
Notes
Some user interface elements cannot be hidden.
To enhance cursor visibility, set the Application background to between 40% and 60% grey. If the Application background is set to Automatic, 40% grey is used.
Figure 10: Options LibreOffice dialog — Accessibility page
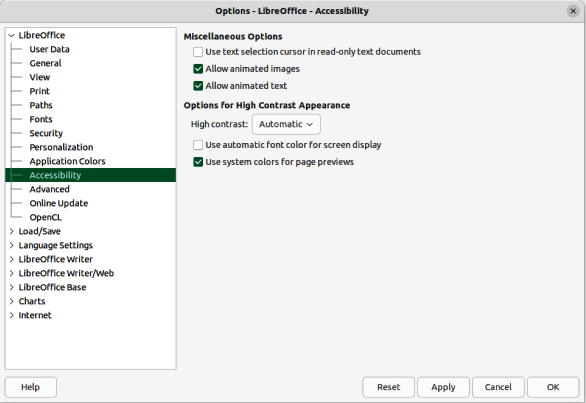
On the Accessibility page of the Options LibreOffice dialog (Figure 10), select accessibility options including, for example, whether to allow animated graphics or text, some options for high contrast display, and a way to change the font for the LibreOffice user interface.
Miscellaneous options
Support assistive technology tools (program restart required)
Windows only — allows use of assistive tools, such as external screen readers, Braille devices, or speech recognition input devices. The Java Runtime Environment (JRE) must be installed on a computer before enabling assistive support.
Use text selection cursor in read-only text document
Displays cursor in read-only documents.
Allow animated images
Previews animated graphics, such as GIF images, in LibreOffice.
Allow animated text
Previews animated text, such as blinking and scrolling, in LibreOffice.
Options for High Contrast Appearance
High contrast
With Automatic and high contrast mode selected, it switches LibreOffice into high contrast mode when the system background color is very dark.
Use automatic font color for screen display
Displays fonts in LibreOffice using the system color settings. This option only affects the screen display.
Use system colors for page previews
Applies the high contrast settings of the operating system to page previews.
On the Advanced page of the Options LibreOffice dialog (Figure 11), the support options are specified for Java applications in LibreOffice, including which Java Runtime Environment (JRE) to use. It also specifies whether to use experimental (unstable) features such as macro recording.
Notes
Users of Windows have a suitable Java Runtime Environment (JRE) already installed on their machines. Linux users may need to get a JRE from the distribution software repository if it is not already installed. Users of macOS need to install Oracle Java Development Kit (JDK), not just JRE. To get the required JDK, select the macOS option at https://www.oracle.com/java/technologies/downloads/.
Some options cannot be reset once edited. Either undo the changes manually, or click Cancel and reopen the Options LibreOffice dialog.
Make sure to install a JRE that is compatible with the LibreOffice architecture being used. That is 64-bit JRE for 64-bit LibreOffice and 32-bit JRE for 32-bit LibreOffice.
Figure 11: Options LibreOffice dialog — Advanced page
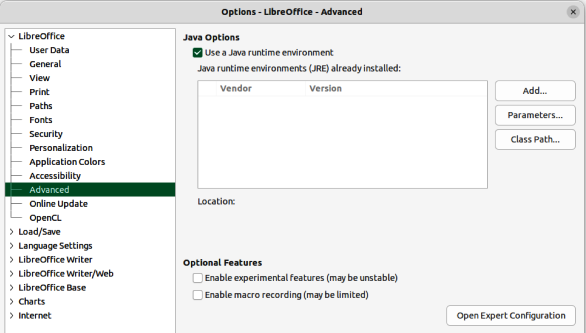
Java Options
Use a Java runtime environment
Allows running of Java applications in LibreOffice. When a Java application attempts to access a hard drive, a prompt opens.
Java runtime environments (JRE) already installed
Select the JRE that required. On some systems, wait at least a minute until the list is populated. On some systems, LibreOffice has to be restarted to use any changed settings. The path to the JRE is displayed beneath the list box.
The default JRE of the operating system can be overridden with one of the following alternatives:
By setting the environment variable JAVA_HOME.
By adding a JRE to the $PATH variable.
By providing the configuration file for the computer operating system in the folder <instdir>/presets/config.
Add
Add a path to the root folder of a JRE on a computer. The path is set in the Select Path dialog that opens.
Parameters
Opens the Java Start Parameters dialog.
Class Path
Opens the Class Path dialog.
Optional Features
Enable experimental features (may be unstable)
Select this option to enable features that are not yet complete, or contain known bugs. The list of these features is different version by version.
Enable macro recording (may be limited)
This option enables macro recording, with some limitations. Opening a window, switching between windows, and recording in a different window from where the recording began, are not supported. Only actions relating to document contents are recordable, so changes in options or customizing menus are not supported. For more about macro recording, see Chapter 11, Getting Started with Macros.
Open Expert Configuration
Most users will have no need to use this. Select this option to open a new dialog in which the LibreOffice installation can be fine tuned. The dialog offers detailed configuration options for many aspects of the LibreOffice appearance and performance. Double-click on a listed preference to enter a value to configure the preference.
Note
The Expert Configuration dialog lets a user access, edit, and save configuration preferences that can make the user profile of LibreOffice unstable, inconsistent, or even unusable. If there is no knowledge what an option does, it is best to leave the option at its default setting.
Figure 12: Options LibreOffice dialog — Online Update page
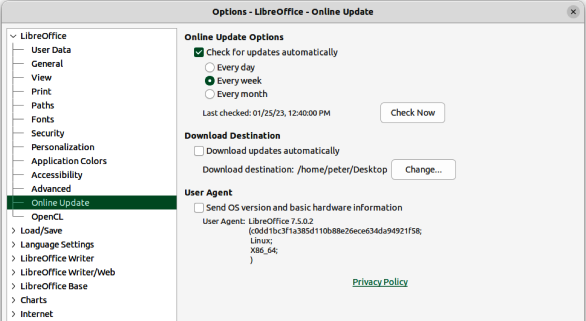
On the Online Update page of the Options LibreOffice dialog (Figure 12), options are specified for the automatic notification and downloading of online updates to LibreOffice.
Online Update Options
Check for updates automatically
Mark to check for online updates periodically, then select the time interval how often LibreOffice checks for online updates. LibreOffice will check Every day, Every week, or Every month, as soon as a working Internet connection is detected. Also, click on Check Now to immediately check for an update.
Connecting to the Internet by a proxy server, set the proxy in Tools > Options > Internet > Proxy (macOS LibreOffice > Preferences > Internet > Proxy).
Download Destination
Download updates automatically
Enable the automatic download of updates to the specified folder.
Change
Click to select the destination folder for downloaded files.
User Agent
OpenCL™ is an open, royalty-free standard for cross-platform, parallel programming of modern processors found in personal computers, servers and hand-held/embedded devices. OpenCL (Open Computing Language) greatly improves speed and responsiveness for a wide spectrum of applications in numerous market categories from gaming and entertainment to scientific and medical software. For more information on OpenCL, visit https://www.khronos.org/opencl/.
With OpenCL enabled, LibreOffice can benefit from the very fast numerical calculations performed in the GPU, which is especially useful in very large spreadsheets with extensive calculations. The computer video card driver must have support for OpenCL to use this feature.
Options for loading and saving documents can be selected in the Options Load/Save dialog to suit working requirements on a computer system. If the Options Load/Save dialog is not already open, go to Tools > Options > Load/Save (macOS LibreOffice > Preferences > Load/Save) on the Menu bar.
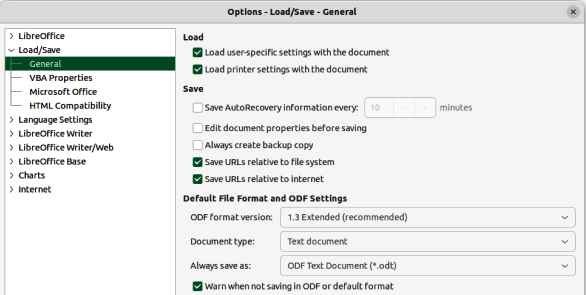
On the General page of the Options Load/Save dialog (Figure 13), the default settings for saving documents and default file formats can be selected.
Load
Load user-specific settings with the document
A LibreOffice document contains settings that are read from a computer system. When saving a document, these settings are saved with it. Select this option so that when a document loads, it ignores the stored settings in favor of the settings on the computer. If this option is not selected, the following user-specific settings still apply:
Settings in File > Print > Options.
Spacing options for paragraphs before text tables.
Information about automatic updating for links, field functions, and charts.
Information about working with Asian character formats.
The data source linked to the document and its view are always loaded with the document, whether or not this option is selected.
Load printer settings with the document
If enabled, the printer settings are loaded with the document. This can cause a document to be printed on a distant printer (perhaps in an office setting). To prevent this happening, manually change the printer in the Print dialog. If disabled, the default printer will be used to print the document. The current printer settings are stored with the document whether or not this option is selected.
Save
Save AutoRecovery information every __ minutes
Select AutoRecovery and the time period for how often the information used by the AutoRecovery process is saved. AutoRecovery saves information required to restore all open documents if LibreOffice crashes. Setting this option makes recovering a document after a system crash easier.
Edit document properties before saving
Specifies that the Properties dialog opens when a file is saved for the first time and every time that Save As is selected.
Always create backup copy
Saves the previous version of a document as a backup copy whenever a document is saved. Every time LibreOffice creates a backup copy, the previous backup copy is replaced. A backup copy uses the extension BAK.
To change the location of the backup copy, go to Tools > Options > LibreOffice > Paths (macOS LibreOffice > Preferences > LibreOffice > Paths) and then enter a new path for the backup file.
Figure 13: Options Load/Save dialog — General page
Save URLs relative to file system/Save URLs relative to the Internet
Selecting these options specifies the default for relative addressing of URLs in the file system and on the Internet. Relative addressing is only possible if the source document and the referenced document are both on the same drive.
A relative address always starts from the directory in which the current document is located. In contrast, absolute addressing always starts from a root directory. The following table demonstrates the difference in syntax between relative and absolute referencing:
Table 3: Examples of saving URLs
|
Examples |
File system |
Internet |
|
relative |
../images/img.jpg |
../images/img.jpg |
|
absolute |
http://myserver.com/work/images/img.jpg |
Default File Format and ODF Settings
ODF format version
LibreOffice 7.0 and above support the OpenDocument format (ODF) version 1.3 Extended. This format allows for improved functionality, but there may be backwards compatibility issues. The previous versions of LibreOffice support the file format ODF 1.2. However, previous file formats cannot store all new features of the newer version of LibreOffice. This version of LibreOffice can open and save documents in previous versions of ODF formats.
Document type
Specifies the document type to define the default file format.
Always save as
Specifies that documents of the type selected on the left are always saved as the file type selected from the drop-down list. Another file type for the current document can be selected in the Save as dialog.
Warn when not saving in ODF or default format
When selected, a warning message is displayed when saving a document in a format that is not the selected default format, or ODF format.
Figure 14: Options Load/Save dialog — VBA Properties page

On the VBA Properties page of the Options Load/Save dialog (Figure 14), the general properties for loading and saving Microsoft Office documents with VBA (Visual Basic for Applications) code are specified.
Microsoft Word
Load Basic code
Loads and saves the Basic code from a Microsoft document as a special LibreOffice Basic module with the document. When saving the document in OpenDocument format, the Basic code is saved as well. When saving in another format, the Basic code from the LibreOffice Basic IDE is not saved.
Executable code
If selected, the Visual Basic for Applications (VBA) code is loaded ready to be executed. If not selected, the VBA code is commented out so it can be inspected, but not run.
Note
After loading the VBA code, LibreOffice inserts the statement Option VBASupport 1 in every Basic module to enable a limited support for VBA statements, functions and objects.
Save original Basic code
Specifies that the original Microsoft Basic code contained in the document is held in a special internal memory for as long as the document remains loaded in LibreOffice. When saving the document in Microsoft format, the Microsoft Basic code is saved again with the code in an unchanged form.
When saving in a format other than Microsoft Format, the Microsoft Basic Code is not saved. For example, if the document contains Microsoft Basic code and the document is saved in OpenDocument format, a warning is displayed stating that Microsoft Basic code will not be saved.
The Save original Basic code selection takes precedence over the Load Basic code selection. If both options are marked and the disabled Basic code is edited in the LibreOffice Basic IDE, the original Microsoft Basic code is saved when saving in Microsoft format.
To remove any possible Microsoft Basic macro viruses from a Microsoft document, deselect Save original Basic code and save the document in Microsoft format. The document is saved without the Microsoft Basic code.
Microsoft Excel
Microsoft PowerPoint
On the Microsoft Office page of the Options Load/Save dialog (Figure 15), the settings for importing and exporting Microsoft Office and other documents are specified.
Embedded Objects
Figure 15: Options Load/Save dialog — Microsoft Office page
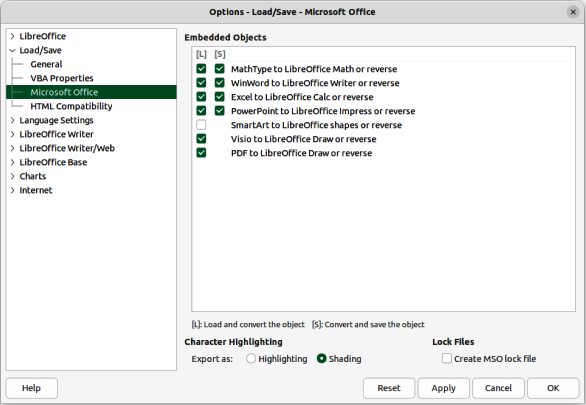
[L] and [S] Columns
Character Highlighting
Highlighting
Exports the closest match between a LibreOffice highlighting color and one of the 16 Microsoft highlighting colors. This character attribute makes it easy for Microsoft Office users to edit with the highlighting tool in Microsoft Office applications.
Shading
Exports all RGB colors to the other Microsoft Office character attribute. This preserves color fidelity between LibreOffice and Microsoft Office documents, but Microsoft Office users must edit this character attribute with a tool that is not commonly used or easy to find in Microsoft Office applications. This is the default setting since LibreOffice 7.0.
Tip
The compatibility filter in the Character Highlighting Color dialog provides the Microsoft Office highlighting colors. Use those colors and choose Highlighting if both color fidelity and ease of editing is required for Microsoft Office users.
Lock files
On the HTML compatibility page of the Options Load/Save dialog (Figure 16), define the settings for HTML pages.
Font sizes
Import
Figure 16: Options Load/Save dialog — HTML Compatibility page
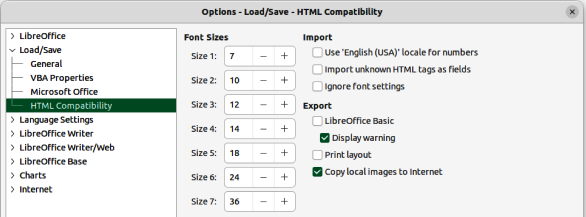
Use 'English (USA)' locale for numbers
When importing numbers from an HTML page, the decimal separator and the thousands separator characters differ according to the locale of the HTML page. The clipboard, however, contains no information about the locale. For example, the characters "1.000" copied from a German Web page probably mean “one thousand” because the dot-on-the-line is the thousands separator in a German locale. If copied from an English Web page, the same characters stand for the number 1 as in “one dot zero zero zero”.
If not selected, numbers are interpreted according to the setting in Tools > Options > Language Settings (macOS LibreOffice > Preferences > Language Settings). If marked, numbers are interpreted using the English (USA) locale.
Import unknown HTML tags as fields
Select this option if tags that are not recognized by LibreOffice are to be imported as fields. For an opening tag, an HTML_ON field is created with the value of the tag name. For a closing tag, an HTML_OFF is created. These fields are converted to tags in the HTML export.
Ignore font settings
Select this option to ignore all font settings when importing. The fonts that were defined in the HTML Page Style are the fonts used.
Export
LibreOffice Basic
Select this option to include the LibreOffice Basic instructions when exporting to HTML format.
This option must be selected before creating the LibreOffice Basic Script, otherwise it will not be inserted. LibreOffice Basic scripts must be located in the header of the HTML document. Once the macro is created in LibreOffice Basic IDE, it appears in the source text of the HTML document in the header.
Display warning
If selected, when exporting to HTML a warning is displayed stating that LibreOffice Basic macros will be lost.
Print layout
If selected, the print layout of the current document (for example, table of contents with justified page numbers and dot leaders) is exported as well. It can be read by LibreOffice, Mozilla Firefox, and MS Internet Explorer.
Note
The HTML filter supports CSS2 (Cascading Style Sheets Level 2) for printing documents. These capabilities are only effective if print layout export is activated.
Copy local images to Internet
Select this option to automatically upload the embedded images to the Internet server when uploading using FTP. Use the Save As dialog to save the document and enter a complete FTP URL as the file name in the Internet.
Note
Some options cannot be reset once edited. Either undo the changes manually, or click Cancel and reopen the Options dialog.
Go to Tools > Options > Language Settings (macOS LibreOffice > Preferences > Language Settings) on the Menu bar to open dialogs where the properties for languages, writing aids, language tools can be defined.
Note
Searching in Japanese and Asian Layout pages are only visible if the Asian language support option in the Languages page is activated. Complex Text Layout page is only visible if the CTL support is activated.
On the Languages page of the Options Language Settings dialog (Figure 17), define the default languages and locale settings for documents.
Language of
User interface
Select the language used for the user interface, for example menus, dialogs, and help files. There must be at least one additional language pack installed, or a multi‑language version of LibreOffice installed.
The Default entry selects the language of the user interface used by the computer operating system. If this language is not available in the LibreOffice installation, the language of the LibreOffice installation is the default language.
Formats
Locale setting
Specifies the locale setting of the country setting. This influences settings for numbering, currency and units of measure.
The Default entry selects the locale used by the operating system. A change in this field is immediately applicable.
Default currency
Specifies the default currency used by the currency format and the currency fields. If the locale setting is changed, the default currency changes automatically.
The Default entry applies to the currency format that is assigned by the selected locale setting. A change in Default currency will change all open documents. Also, dialogs and icons that use the currency format also changes.
Figure 17: Options Language Settings dialog — Languages page
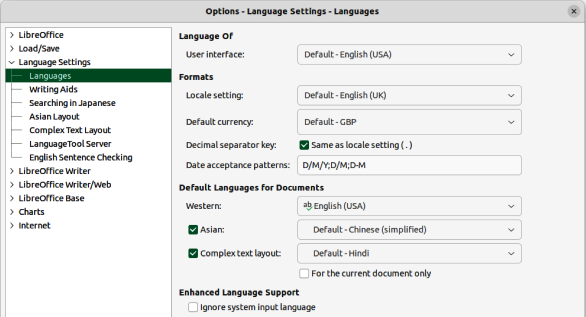
Decimal separator key
If Same as locale setting is selected, the decimal separator key that is set in the computer system is used when the respective key on the number pad is pressed. If Same as locale setting is not selected, the character used by the keyboard driver software is inserted.
Date acceptance patterns
Specifies the date acceptance patterns used by the current locale. Calc spreadsheet and Writer table cell input have to match locale dependent date acceptance patterns before being recognized as a valid date.
Type numbers and characters that correspond to the defined date acceptance patterns into a table cell, and then move the cursor outside of the cell. LibreOffice automatically recognizes the data entry and converts the input to the correct date format.
The initial patterns in Date acceptance patterns are determined by the locale setting, but these default patterns can be modified and more patterns added. Use a semi‑colon (;) to separate each pattern.
Note
The spell check for the selected language only functions when the corresponding language module is installed. A language entry has a check mark in front of it if spell checking is activated for the selected language.
Default Languages for Documents
Western
Specifies the language used for the spelling check function in western alphabets.
Asian
When selected, activates Asian languages support. The corresponding Asian language settings in LibreOffice can now be defined. For example, when writing Chinese, Japanese or Korean characters, selecting Asian activates the support for these languages in the user interface.
Complex text layout
Specifies the language for the complex text layout spelling check.
For the current document only
When selected, specifies that the settings for default languages are valid only for the current document.
Enhanced language support
Ignore system input language
Indicates whether changes to the system input language, or keyboard, are ignored. If ignored, when new text is typed that text follows the document language or current paragraph, not the current system language.
Note
Some options cannot be reset once edited. Either undo the changes manually, or click Cancel and reopen the Options dialog.
On the Writing Aids page of the Options Language Settings dialog (Figure 18) the properties of spelling, thesaurus and hyphenation can be specified.
Available Language Modules
Note
The configuration allows two folders: one folder where a user has write permissions, and one folder without write permissions. A user can only edit and delete the user dictionaries that are located in the writeable path. Other dictionaries can be read only.
Edit
To edit a language module, click on Edit to open the Edit Modules dialog. Select, or deselect, each sub-module as required.
User-defined dictionaries
New
Opens the New Dictionary dialog where the details of a new user-defined dictionary are added and the language specified. Click on Help for more information on the options available for the New Dictionary dialog.
Edit
Opens the Edit Custom Dictionary dialog allowing adding new entries and editing existing entries in a custom dictionary. When a custom dictionary is edited, a check is made on the status of the file. If the file is write-protected, it cannot be changed. New and Delete are deactivated. Click on Help for more information on the options available for the Edit Custom Dictionary dialog.
Figure 18: Options Language Settings dialog — Writing Aids page
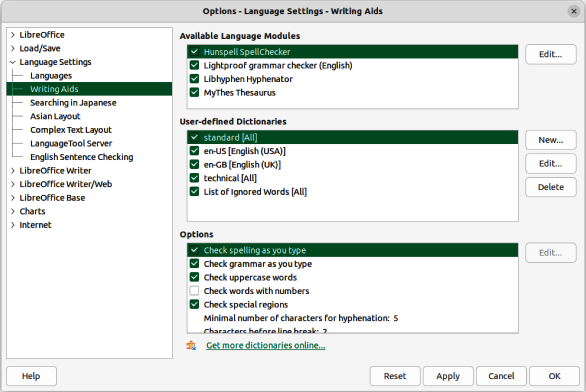
Options
Check spelling as you type
Automatically checks spelling as text is typed and underlines errors.
Typing errors are highlighted in the document with a red underline. If the cursor is placed over a highlighted word, a context menu opens with a list of suggested corrections. Select a suggested correction to replace the suspect word with the suggestion. If the same mistake is made again while editing the document, the mistake is marked as an error again.
To place a word into the AutoCorrect replacement table, right-click on the word and select AutoCorrect Options from the context menu to open the AutoCorrect dialog. Select from the available options and the word is placed in the AutoCorrect replacement table.
Check grammar as you type
Any errors of grammar as text is typed into a document are highlighted.
Check upper-case words
Specifies that capitalization is checked during a spell check.
Check words with numbers
Specifies that words that contain numbers as well as letters are to be checked.
Check special regions
Specifies that special regions, such as drawing text, text in headers and footers, document tables, and text frames, are checked during a spell check.
Minimal number of characters for hyphenation
Specifies the minimum number of characters required for automatic hyphenation to be applied.
Characters before line break
Sets the minimum number of characters of the word to be hyphenated that must remain at the end of the line.
Characters after line break
Specifies the minimum number of characters of a hyphenated word required at the beginning of the next line.
Hyphenate without inquiry
Specifies that there are no prompts for manual hyphenation. If not selected, when a word is not recognized a dialog with options for entering hyphens.
Hyphenate special regions
Specifies that hyphenation is carried out in footnotes, headers and footers.
Edit
To change a value in an option, select the entry. If applicable, click on Edit to open a dialog allowing a new value to be entered.
Note
Some options cannot be reset once edited. Either undo the changes manually, or click Cancel and reopen the Options dialog.
LibreOffice automatically installs several language modules when it is installed on a computer. Each language module can contain up to three submodules: spelling dictionary, hyphenation dictionary, and thesaurus. These language modules are usually referred to as dictionaries in LibreOffice.
Additional dictionaries can be installed as extensions. An example of adding another language dictionary is as follows:
1) Go to Tools > Language > More Dictionaries Online on the Menu bar to open the Extension Dictionaries dialog.
2) Select the required dictionary from the list of available dictionaries.
3) If necessary, click on the website link to find out more information on the selected dictionary.
4) Click on Install below the required dictionary and the dictionary is installed into LibreOffice.
5) Click on Close to close the Extensions Dictionary dialog.
6) Make sure all documents are saved and closed, then restart LibreOffice for the new dictionary to register in LibreOffice.
Defines the search options for Japanese. These commands can only be accessed after support for Asian languages is enabled. Go to Tools > Options > Language Settings > Languages (macOS LibreOffice > Preferences > Language Settings > Languages) on the Menu bar to enable these options.
On the Searching in Japanese page of the Options Language Settings dialog (Figure 19) the search properties for Japanese can be specified.
Figure 19: Options Language Settings dialog — Searching in Japanese page

Treat as equal
Ignore
Defines the typographic default settings for Asian text after support for Asian languages has been enabled. To enable these options, go to Tools > Options > Language Settings > Languages (macOS LibreOffice > Preferences > Language Settings > Languages) on the Menu bar.
On the Asian Layout page of the Options Language Settings dialog (Figure 20), the properties for Asian Layout can be specified.
Kerning
Western text only
Specifies that kerning is only applied to Western text.
Western text and Asian punctuation
Character spacing
No compression
Specifies that no compression occurs.
Compress only punctuation
Specifies that only the punctuation is compressed.
Compress punctuation and Japanese Kana
Specifies that punctuation and Japanese Kana are compressed.
First and last characters
Language
Specifies the language where first and last characters are defined.
Figure 20: Options Language Settings dialog — Asian Layout dialog
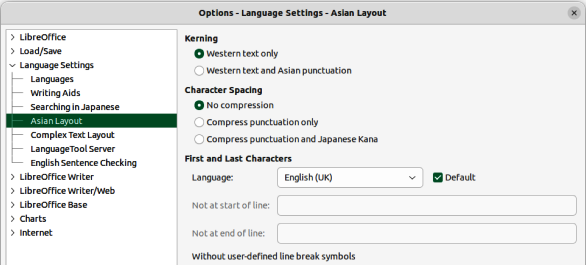
Default
When Default is selected, the following two text boxes are filled with the default characters for the selected language:
Not at start of line
Specifies the characters that will not appear alone at the beginning of a line. If a character typed here is positioned at the beginning of a line after a line break, it is automatically moved to the end of the previous line. For example, an exclamation point at the end of a sentence never appears at the start of a line if it is listed in the Not at start of line list.
Not at end of line
Specifies the characters that will not appear alone at the end of a line. If a character typed here is positioned at the end of a line due to a line break, it is automatically moved to the beginning of the next line. For example, a currency symbol that appears in front of an amount never appears at the end of a line if it is listed in the Not at end of line list.
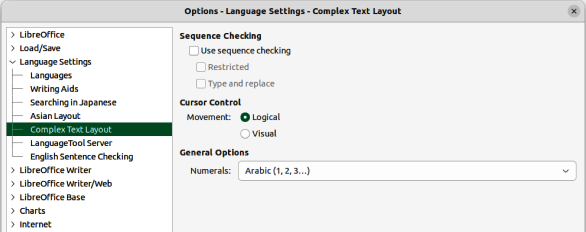
Defines the options for documents that use Complex Text Layouts (CTL). To enable these options, go to Tools > Options > Language Settings > Languages (macOS LibreOffice > Preferences > Language Settings > Languages) on the Menu bar. On the Complex Text Layout page of the Options Language Settings dialog (Figure 21), the options for Complex Text Layout can be specified.
Currently, LibreOffice supports Hindi, Thai, Hebrew, and Arabic as CTL languages.
If the text flow from right to left is selected, embedded Western text still runs from left to right. The cursor responds to the arrow keys. The right arrow key moves the cursor toward the text end and the left arrow key moves the cursor toward the text start.
Change the text writing direction directly be using one of the following keyboard combinations. These keyboard combinations only work when CTL support is enabled.
Switch to right-to-left text entry — Ctrl+Shift+D or Ctrl+Right Shift Key (macOS ⌘+Shift+D or ⌘+Right Shift Key).
Switch to left-to-right text entry — Ctrl+Shift+A or Ctrl+Left Shift Key (macOS ⌘+Shift+A or ⌘+Left Shift Key).
Figure 21: Options Language Settings dialog — Complex Text Layout page
In multicolumn pages, sections, or frames that are formatted with text flow from right to left, the first column is the right column and the last column is the left column.
Sequence Checking
Use sequence checking
Enables sequence input checking for languages.
Restricted
Prevents the use and the printing of illegal character combinations.
Type and replace
When selected, allows typing and replacement of characters.
Cursor control
Logical
Using the Right Arrow key moves the text cursor towards the end of the current text. Using the Left Arrow key moves the text cursor towards the beginning of the current text.
Visual
Using the Right Arrow key moves the text cursor in the right-hand direction. Using the Left Arrow key moves the text cursor in the left-hand direction.
General Options
Numerals
Selects the type of numerals used within text, text in objects, fields, and controls, in all LibreOffice modules. Only cell contents of LibreOffice Calc are not affected.
Arabic — all numbers are shown using Arabic numerals. This is the default.
Hindi — all numbers are shown using Hindi numerals.
System — all numbers are shown using Arabic, or Hindi, numerals according to the locale settings defined by the computer system locality.
Figure 22: Options Language Settings dialog — Language Tool Server page

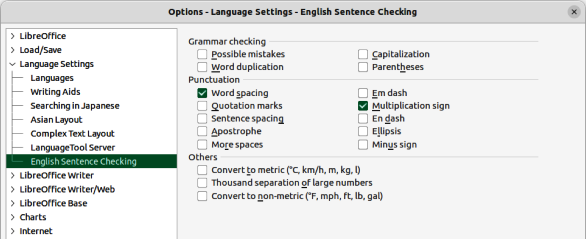
Figure 23: Options Language Settings dialog — English Sentence Checking page
On the Language Tool Server page of the Options Language Settings dialog (Figure 22), select the Enable Language Tool to use a language tool assistant available for LibreOffice. If necessary, click on the link https://languagetool.org/legal/privacy to access the privacy policy for using the language tool assistant.
On the English Sentence Checking page of the Options Language Settings dialog (Figure 23), the options for checking the language used in a document can be selected.
In the Default Colors page of the Options Charts dialog (Figure 24) the default colors are specified for LibreOffice charts. Any colors changed only apply to newly created charts.
Chart Colors
Color Table
Figure 24: Options Charts dialog — Default Colors page
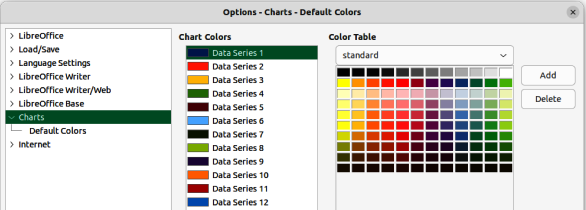
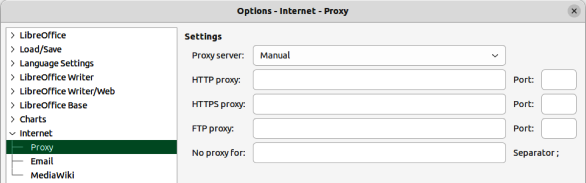
Figure 25: Options Internet dialog — Proxy page
Add
Delete
In the Options Internet dialog (Figure 25) the following Internet settings are located on separate dialog pages, depending on the computer operating system.
Proxy page — enter the proxy settings for use with LibreOffice.
Email page — enter the email program to be used when sending documents as email attachments — Linux and macOS only. On a Windows operating system, the default email program is used.
MediaWiki page — A MediaWiki publisher is included with Windows and Linux. A Java Runtime Environment (JRE) is required for this feature to work.
The AutoCorrect functions in LibreOffice automatically detect and replace common symbols, spelling mistakes, and grammar mistakes. Occasionally, AutoCorrect changes something that should have been kept. If unexplained changes appear in a document, the AutoCorrect settings are often the cause. For more information on AutoCorrect, refer to the relevant user guides for each module.
Figure 26: AutoCorrect dialog
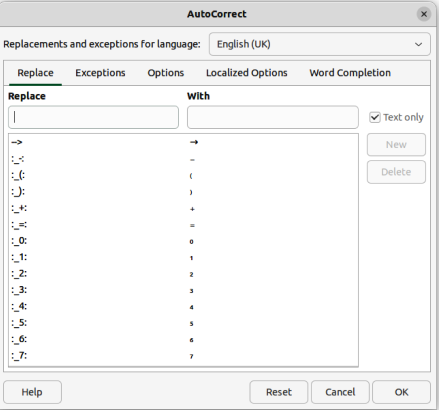
1) Go to Tools > AutoCorrect > AutoCorrect Options on the Menu bar to open AutoCorrect dialog (Figure 26). A document must be open for this menu item to appear.
2) Select each tab in the dialog to add, edit, and delete AutoCorrect options. In Writer, the dialog has five tabs. In the other LibreOffice modules, the dialog only has four tabs.
3) Click OK to save the changes and close the dialog.