
Getting Started Guide 7.5
Chapter 13,
Customizing LibreOffice
This document is Copyright © 2023 by the LibreOffice Documentation Team. Contributors are listed below. This document maybe distributed and/or modified under the terms of either the GNU General Public License (https://www.gnu.org/licenses/gpl.html), version 3 or later, or the Creative Commons Attribution License (https://creativecommons.org/licenses/by/4.0/), version 4.0 or later. All trademarks within this guide belong to their legitimate owners.
Contributors for this edition:
Peter Schofield
Jean Hollis Weber
Contributors for previous editions:
Jean Hollis Weber
John A Smith
Jorge Rodríguez
Kees Kriek
Olivier Hallot
Rafael Lima
Ron Faile Jr.
Skip Masonsmith
Steve Fanning
Please direct any comments or suggestions about this document to the Documentation Team forum at https://community.documentfoundation.org/c/documentation/loguides/ (registration is required), or send an email to loguides@community.documentfoundation.org.
Note
Everything sent to a forum, including email addresses and any other personal information that is written in the message, is publicly archived and cannot be deleted. Emails sent to the forum are moderated.
Published July 2023. Based on LibreOffice 7.5 Community.
Other versions of LibreOffice may differ in appearance and functionality.
Some keystrokes and menu items are different on macOS from those used in Windows and Linux. The table below gives some common substitutions used in this document. For a detailed list, see LibreOffice Help.
|
Windows or Linux |
macOS equivalent |
Effect |
|
Tools > Options |
LibreOffice > Preferences |
Access setup options |
|
Right-click |
Control+click, Ctrl+click, or right-click depending on computer setup |
Open a context menu |
|
Ctrl or Control |
⌘ and/or Cmd or Command, depending on keyboard |
|
|
Alt |
⌥ and/or Alt or Option depending on keyboard |
Used with other keys |
|
F11 |
⌘+T |
Open the Styles deck in the Sidebar |
This chapter describes some common customization that can be carried out, as follows:
Menus, toolbars, keyboard shortcuts, and the tabbed interface in LibreOffice can be customized.
New menus and toolbars, assign macros to events can be added.
Different user interface variants can be selected and used.
Customizations can also be carried out by adding extensions that can be installed from the LibreOffice website or from other providers. For more information, see “Adding extensions” on page 1.
Note
Customized menus and toolbars can be saved in a template. The customized menus and toolbars are created in a document and the document is then saved as a template. For more information, see Chapter 4, Working with Styles, Templates, and Hyperlinks.
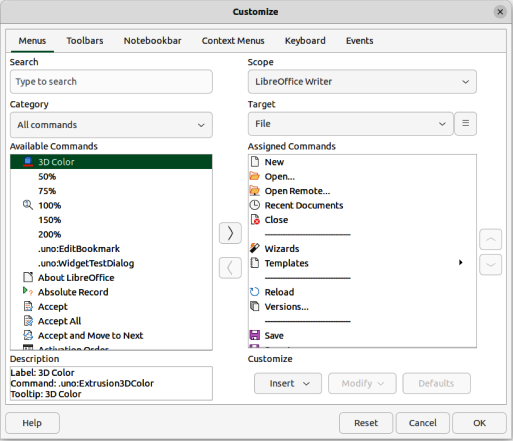
Menus and commands on the Menu bar or context menus can be added, rearranged, removed, or other changes made. To customize menus, go to Tools > Customize on the Menu bar and select the Menus page (Figure 1), or the Context Menus page, from the context menu. The Context Menus page is similar to the Menus page.
The following is an example of customizing a menu in LibreOffice Writer. The menus in the other LibreOffice modules are also customized using similar procedures.
1) Go to Tools > Customize on the Menu bar to open the Customize dialog.
2) Click on Menus to open the Menus page (Figure 1). In the Scope drop-down list, LibreOffice Writer appears as the selected module.
3) In Target, select the menu for customization from the drop-down list. This drop‑down list also includes the submenus available in the selected menu.
4) In Assigned Commands, check that the required command is not already listed for the selected menu. This may require scrolling through the list of commands.
5) If necessary, enter a command name in the Search text box to locate the command in the Available Commands list.
6) If necessary, select a command category from the Category drop‑down list. By default, All commands is displayed as the category.
7) Select the required command in the Available Commands list. This may require scrolling through the list of commands.
8) Click on the right arrow to add the required command to the Assigned Commands list.
9) If necessary, click on the up arrow, or down arrow, to move the command into its correct position in the Assigned Commands list.
Figure 1: Customize dialog — Menus page
10) If necessary, insert a menu separator above the newly inserted command as follows:
a) Select the newly inserted command in the Available Commands list.
b) Click on Insert and select Insert Separator from the drop‑down list.
11) If necessary, insert a submenu as follows:
a) Select the newly inserted command in the Available Commands list.
b) Click on Insert and select Insert Submenu from the drop‑down list.
c) Enter a name for the submenu in the Add Submenu dialog that opens.
d) Click OK to create the submenu and close the dialog.
12) If necessary, rename the newly inserted command as follows:
a) Select the newly inserted command in the Available Commands list.
b) Click on Modify and select Rename from the drop‑down list.
c) Enter a new name for the command in the Rename Menu dialog that opens.
d) Click OK to rename the command and close the dialog.
13) Click OK to save the changes to the menu and close the Customize dialog.
1) Go to Tools > Customize on the Menu bar to open the Customize dialog.
2) Click on Menus to open the Menus page. In the Scope drop-down list, LibreOffice Writer appears as the selected module.
3) Select the command for removal in the Assigned Commands list.
4) Click on the left arrow to move the selected command to the Available Commands list.
5) Click OK to save the changes to the menu and close the Customize dialog.
The following is an example of creating a new menu in LibreOffice Writer. The menus in the other LibreOffice modules are also created using a similar procedure.
Figure 2: Adding new menu
1) Go to Tools > Customize on the Menu bar to open the Customize dialog.
2) Click on Menus to open the Menus page.
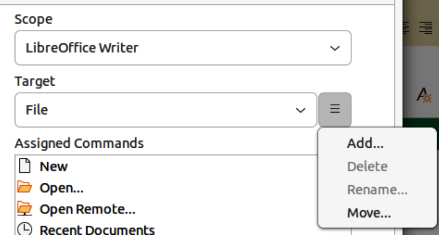
3) Click on the three bars Ξ next to the Target drop‑down list to open a context menu (Figure 2).
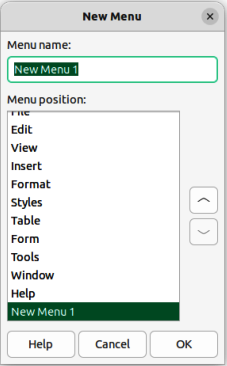
4) Select Add from the context menu to open the New Menu dialog (Figure 3).
5) Enter a name for the new menu in the Menu name text box. The name of the new menu appears at the bottom of the menu list in Menu position.
6) Select the new menu and use the up and down arrows to reposition the new menu in the Menu position list.
7) Click OK to close the New Menu dialog and the new menu name appears in Target with the Assigned Commands box empty.
8) Add commands to the new menu. See “Adding commands” on page 1 on how to add menu commands.
Figure 3: New Menu dialog
9) Click OK to close the Customize dialog.
In Windows only, a character can be assigned as a keyboard shortcut for menu commands. The character is underlined in the name of the menu command. For example, the character O is used to open the Format menu on the Menu bar when the key combination Alt+O is used.
Adding a character as a keyboard shortcut to a menu command is as follows:
1) Go to Tools > Customize on the Menu bar to open the Customize dialog.
2) Click on Menus to open the Menus page.
3) Select the menu from the Target drop‑down list.
4) Select the menu command from the Assigned Commands list.
5) Click on the three bars Ξ ("hamburger menu") next to the Target drop‑down list to open a context menu.
6) Click on Rename from the context menu to open the Rename dialog.
7) Add a tilde (~) before the character to be used as the keyboard shortcut.
8) Click OK to save the change and close the Rename dialog.
9) Click OK to close the Customize dialog. The character appears with an underline in the menu item name.
Note
When assigning a character as a keyboard shortcut, make sure the character used is NOT already assigned to another menu command.
Toolbars can be customized in several ways, such as locking the position of a docked toolbar, and adding or deleting tools available on a toolbar. Also new toolbars can be created if required. This section describes how to create new toolbars and add or delete icons on existing toolbars.
Figure 4: Customize dialog — Toolbars page
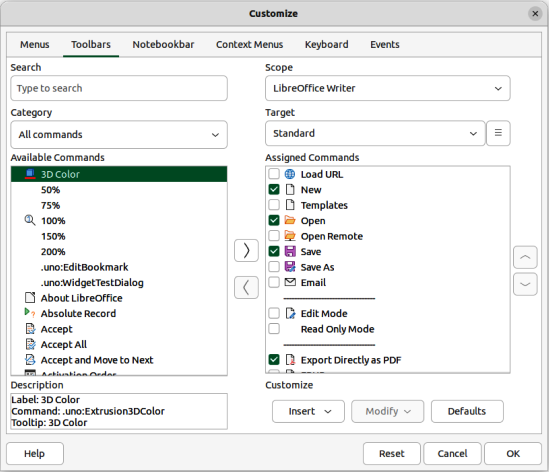
The Toolbars page on the Customize dialog (Figure 4) is used to customize a toolbar, or create a new toolbar, it is opened using one of following methods:
Right-click in an empty space on a toolbar and select Customize Toolbar from the context menu.
Go to View > Toolbars > Customize on the Menu bar.
Go to Tools > Customize on the Menu bar and click on the Toolbars tab when the dialog opens.
Note
When customizing or creating toolbars in LibreOffice, make sure that there is a LibreOffice module open, for example Writer, and at least one document open. If there is no LibreOffice module, or document, open, then toolbar customization or creation cannot be carried out.
1) Open the Customize dialog and click on Toolbars to open the Toolbars page.
2) In the Scope drop‑down list, select the LibreOffice module displayed, or one of the listed documents.
Note
If a listed document is selected in the Scope drop‑down list, then any customization to a toolbar is only available for that selected document.
3) In the Target drop‑down list, select the toolbar for customization. The tools on the selected toolbar are displayed in the Assigned Commands list.
4) Select a tool in the Available Commands list. By default, all available tools are displayed in the Available Commands list.
5) Alternatively, and to reduce the number of tools listed in Available Commands, use one of the following methods:
Enter a search term in the Search box
Select a category in the Category drop‑down list.
6) Select the required tool and click on the right arrow to add the selected tool at the bottom of the Assigned Commands list for the toolbar.
7) Use the up and down arrows in Assigned Commands to position the tool in its required position on the selected toolbar.
8) If necessary, insert a separator bar above the newly inserted tool as follows:
a) Select the newly inserted tool in the Available Commands list.
b) Click on Insert and select Insert Separator from the drop‑down list.
9) If necessary, to remove a separator bar, right‑click on the separator bar and select Remove from the drop‑down list.
10) If necessary, rename the newly inserted tool as follows:
a) Select the newly inserted tool in the Available Commands list.
b) Click on Modify and select Rename from the drop‑down list.
c) Enter a new name for the tool in the Rename Menu dialog that opens.
d) Click OK to rename the tool and close the dialog.
11) Click OK to save the changes to the toolbar and close the Customize dialog.
1) Open the Customize dialog and click on Toolbars to open the Toolbars page.
2) In the Scope drop-down list, the LibreOffice module that is open appears as the selected module.
3) In the Target drop‑down list, select the toolbar that has the tool that is going to be removed.
4) Select the tool for removal in the Assigned Commands list.
5) Click on the left arrow to move the selected tool into the Available Commands list and remove the tool from the selected toolbar.
6) Click OK to save the changes to the toolbar and close the Customize dialog.
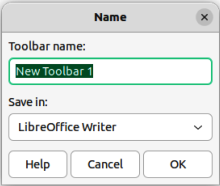
Figure 5: Name dialog
1) Open the Customize dialog and click on Toolbars to open the Toolbars page.
2) In the Scope drop‑down list, select the LibreOffice module displayed, or one of the listed documents.
3) Click on the three bars Ξ next to the Target drop‑down list to open a context menu (Figure 2 above).
4) Select Add from the drop‑down list to open the Name dialog (Figure 5).
5) Type a name for the new toolbar in the Toolbar name box.
6) In the Save in box select where to save the new toolbar. This can be a LibreOffice module, or one of the listed documents.
7) Click OK to save the new toolbar and close the Name dialog.
8) Add the required tools to the new toolbar. Refer to “Toolbar customization” on page 1 for information on how to add tools.
9) Click OK to save the new toolbar and close the Customize dialog.
Tools on a toolbar are indicated by icons and can be changed as follows:
1) Open the Customize dialog and click on Toolbars to open the Toolbars page.
2) In the Target drop‑down list, select the toolbar where icons are going to be customized.
3) In Assigned Commands, select the tool where the icon is going to be changed.
4) Click on Modify, or right-click on the selected tool, and select Change Icon from the context menu to open the Change Icon dialog (Figure 6).
5) Select an icon from the available icons shown in the Icons preview box.
6) Click OK to change the icon for the selected tool and close the Change Icon dialog. There is no confirmation message when changing icons.
7) Click OK to save the changes to the toolbar and close the Customize dialog.
Note
Icons can be created using a graphics program and imported into LibreOffice. The recommended icon size is 16X16 pixels for best quality. Different sized icons are scaled automatically.
Figure 6: Change Icon dialog

A great deal of LibreOffice functionality can be done without using a mouse or other pointing device, but by using keyboard shortcuts. For example, the keyboard shortcut Ctrl+O (macOS ⌘+O) is displayed next to the Open command in the File menu on the Menu bar. To use this keyboard shortcut, press and hold down the Ctrl (macOS ⌘) key and then press the O key to open the Open dialog. Release both keys after the Open dialog opens and displays. For more information on keyboard shortcuts, see Appendix A, Keyboard Shortcuts.
In addition to using the keyboard shortcuts available in LibreOffice, custom keyboard shortcuts can be created. These custom keyboard shortcuts can be allocated to LibreOffice functions or macros, and saved for use with the LibreOffice suite of applications.
Note
Some of the keyboard shortcuts available may be assigned as functions or commands for use by the computer system. These keyboard shortcuts assigned to the computer system should not used as a custom keyboard shortcut within LibreOffice. It is possible to change keyboard shortcuts already assigned to the computer system, but is definitely NOT recommended. Changing the keyboard shortcuts used by the computer system may create problems in the operation of a computer system.
1) Open the Customize dialog using one of following methods:
Right-click in an empty space on a toolbar and select Customize Toolbar from the context menu.
Go to View > Toolbars > Customize on the Menu bar.
Go to Tools > Customize on the Menu bar and click on the Toolbars tab when the dialog opens.
2) Click on Keyboard to open the Keyboard page (Figure 7).
Figure 7: Customize dialog — Keyboard page
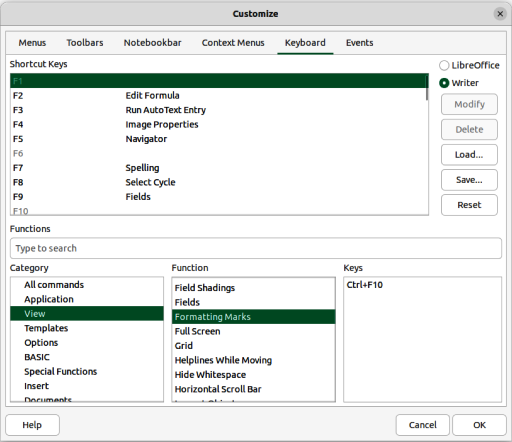
3) Assign a new keyboard shortcut to a command as follows:
Keyboard shortcut available in all LibreOffice modules, select LibreOffice at the upper right of the dialog.
Keyboard shortcut available in a selected LibreOffice module, select the LibreOffice module at the upper right of the dialog. Figure 7 shows that Writer has been selected.
4) Select the required category for the keyboard shortcut from the Category list.
5) Select the required function for the keyboard shortcut from the Function list.
6) Select the required shortcut key in the Shortcut Keys list and click on Modify. The selected shortcut key in Shortcut Keys is assigned to the selected Category and Function, and appears in Keys.
7) Click OK to save the new keyboard shortcut and close the Customize dialog.
Note
Any keyboard shortcut that is already assigned to a function appears in the Keys list. This is shown by the example of Ctrl+F10 (macOS ⌘+F10) in Figure 7 for the View category and Formatting Marks function. It is not recommended to change a keyboard shortcut that has already been assigned.
Any Shortcut Keys that are grayed-out in the list on the Customize dialog cannot be used or reassigned, for example F1, F6, and F10.
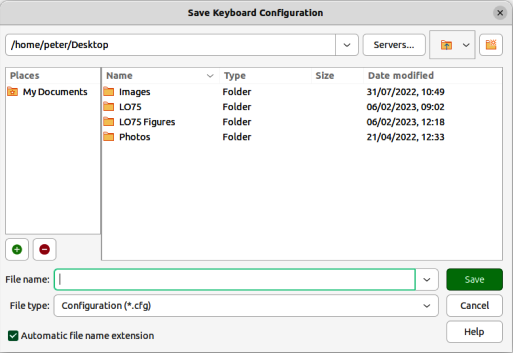
Figure 8: Example of Save Keyboard Configuration file browser
Changes to the assignments of keyboard shortcuts can be saved as a keyboard configuration file. This allows the creation and application of different keyboard configurations as and when necessary. Also, a keyboard configuration file can be distributed among several users.
1) After making adjustment and changes to keyboard shortcut assignments, click on Save at the right side of the Customize dialog to open the file browser for Save Keyboard Configuration (example shown in Figure 8).
2) Navigate to the folder to be used for keyboard configuration files.
3) In the Save Keyboard Configuration file browser, enter a file name in the File name text box, or select a keyboard configuration file in the file list. The file name extension used for a keyboard configuration file is CFG, as shown by the example in the File type text box.
4) Click on Save to save the keyboard configuration file and close the Save Keyboard Configuration file browser.
5) Click OK to save the changes and close the Customize dialog.
To load a saved keyboard configuration file and replace the existing keyboard configuration:
1) Click on Load at the right side of the Customize dialog to open the Load Keyboard Configuration file browser. This is similar to the Save Keyboard Configuration file browser.
2) Navigate to the folder to be where keyboard configuration files are located.
3) Click on Open to load the selected keyboard configuration into LibreOffice and close the Load Keyboard Configuration file browser.
4) Click OK to save the changes and close the Customize dialog.
5) Restart LibreOffice to make sure the new keyboard configuration is active.
Resetting all of keyboard shortcuts to their default values in LibreOffice is as follows:
1) Open the Customize dialog using one of following methods:
Right-click in an empty space on a toolbar and select Customize Toolbar from the context menu.
Go to View > Toolbars > Customize on the Menu bar.
Go to Tools > Customize on the Menu bar and click on the Toolbars tab when the dialog opens.
2) Click on Keyboard to open the Keyboard page
3) Click on Reset at the right side of the Customize dialog. There is no confirmation dialog displayed when resetting keyboard configuration to its default setting.
4) Click OK to save the changes and close the Customize dialog.
5) Restart LibreOffice to make sure the default keyboard configuration is active.
Macros can be assigned to events in LibreOffice. The assigned macro automatically runs each time the associated event occurs. For example, an event could be when a document is opened, a key is pressed, or the cursor is moved. To associate a macro with an event, the Events page in the Customize dialog is used. For more information on assigning events to macros, see Chapter 11, Getting Started with Macros.
An extension is a program that can be installed into LibreOffice to increase the functionality of LibreOffice. For example, templates, dictionaries, clip-art galleries, macros, and dialog libraries can be added to LibreOffice as extensions.
Several extensions are installed when LibreOffice is installed onto a computer. More extensions can be downloaded free of charge from the official extension repository located at https://extensions.libreoffice.org/.
Extensions can also be downloaded from other sources. Some of these extensions are free of charge; other extensions are available for a fee. Check the descriptions to see what licenses and fees apply to extensions from other sources.
Installing an extension that is listed in the official extension repository is as follows:
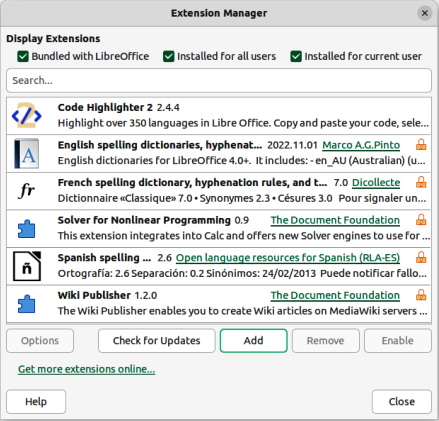
1) Go to Tools > Extension Manager on the Menu bar to open the Extension Manager dialog (Figure 9).
2) Click on Get more extensions online link. The official extension repository for LibreOffice opens in a web browser.
3) Enter a search term in What are you looking for? text box in the web browser and click on Search.
4) If necessary, select a tag filter before searching to reduce the number of extensions in the search result.
Figure 9: Extension Manager dialog
5) Locate the extension required and click on it to open the web page for the selected extension.
6) Check the extension description and its compatibility for the LibreOffice version and computer operating system being used.
7) For the correct extension version, click on Download and the extension is downloaded into the Downloads folder on the computer.
8) In the Extension Manager dialog, click on Add to open the Add Extension(s) browser window.
9) Navigate to the folder where the extension is located.
10) Select the extension and click on Open.
11) If necessary, agree to accepting the license agreement and the extension is installed and listed in the Extension Manager dialog.
12) If necessary, restart LibreOffice for the extension to become effective.
Note
To install an extension that is not listed in the official extension repository, download the extension from its source, then continue from Step 7 above to install the extension.
It is necessary to check for updates to extensions on a regular basis. Checking for extension updates is as follows:
1) Go to Tools > Extension Manager on the Menu bar to open the Extension Manager dialog.
2) Click on Check for Updates to open the Extension Update dialog.
3) Select any extension that is listed in Available extension updates and click on Install to update the extension.
4) Close the Extension Update and Extension Manager dialogs.
5) If necessary, restart LibreOffice for the extension update to become effective.
To remove and completely uninstall an extension no longer required is as follows:
1) Go to Tools > Extension Manager on the Menu bar to open the Extension Manager dialog.
2) Select the extension for removal in the Extension Manager dialog.
3) Click on Remove and confirm the removal of the extension.
4) Close the Extension Manager dialog.
To disable an extension without removing the extension from LibreOffice is as follows:
1) Go to Tools > Extension Manager on the Menu bar to open the Extension Manager dialog.
2) Select the extension being disabled in the Extension Manager dialog.
3) Click on Disable. The Disable button changes to Enable.
4) When necessary, click on Enable and the extension can be used again in LibreOffice.
5) Close the Extension Manager dialog.
Note
If Remove and Disable are grayed out in the Extension Manager dialog, the extension cannot be removed or disabled. For example, when an extension is part of the LibreOffice installation, it must not be removed or disabled.
Custom colors can be created and added to LibreOffice custom palette. For example, custom colors may be required to exactly match a corporate color scheme when creating documents. Custom colors are created by changing the values in one of the following color notations.
RGB notation of Red (R), Green (G), and Blue (B)
Hex # number
Hue (H), Saturation (S), and Brightness (B)
CMYK percentages of Cyan (C), Magenta (M), Yellow (Y), and Black (K).
The following procedures for creating custom colors are examples of creating a color area fill for an object. Custom colors created for area fills are saved into the Custom palette, which makes custom colors available for use with lines, arrows, or text. The dialogs can be used to create custom colors are as follows:
Pick A Color dialog.
Color page in the Area dialog.
Line page in the Line dialog.
Font Color on the Font Effects page in the Character, or Character Style dialog.
Font Color on the Font Effects page in the Paragraph Style dialog.
Fill Color in Area panel in Properties deck on the Sidebar.
Line Color in Line panel in Properties deck on the Sidebar.
Font Color in Character panel in Properties deck on the Sidebar.
1) Insert a filled object into a document, for example a square, and make sure it is selected.
2) Right-click on the selected object and select Area from the context menu to open the Area dialog (Figure 10).
3) Click on Color to open the options available for a color fill.
4) Specify the values in New for the Red (R), Green (G), and Blue (B) on a 0 to 255 scale, or enter the Hex # number for the custom color, if known.
5) Click on Add in Custom Palette and enter a name for the color in the Name dialog that opens.
6) Click OK to close the Name dialog and the color is added to the Custom palette.
7) Click OK to close the Area dialog and save the changes. The new custom color appears as a fill in the selected object and is available for use in other documents.
Figure 10: Area dialog — Color page
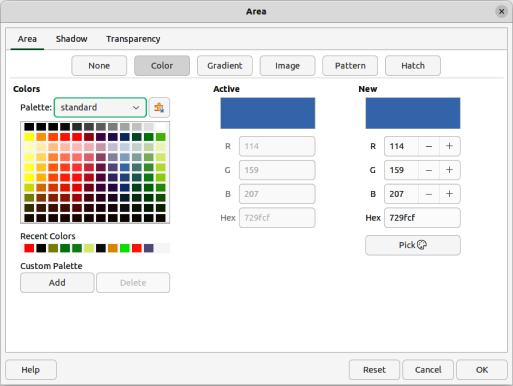
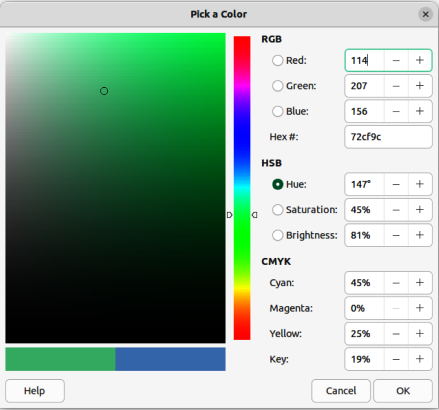
Figure 11: Pick A Color dialog
Note
The color notations are linked and changing the value in one notification set automatically changes the values in the other notification sets.
1) Insert a filled object into a document, for example a square, and make sure it is selected.
2) Open the Pick a Color dialog (Figure 11) using one of the following methods:
Click on Pick on the Color page of the Area dialog.
Click on the triangle ▼ next to Fill Color on the Line and Filling toolbar and select Custom Color from the context menu.
Click on the triangle ▼ next to Fill Color in the Area panel of the Properties deck on the Sidebar and select Custom Color from the context menu.
3) Create a custom color using one of the following methods. A preview of the color being created is shown on the left side of the original color box below the color selection box.
Select a color range from the colored bar, then, using the cursor, move the target in the colored box until the cursor is on the color required.
Enter values for Red (R), Green (G), and Blue (B) in the RGB text boxes.
Enter values for Cyan (C), Magenta (M), Yellow (Y), and Key (K) (black) in the CMYK text boxes.
Enter values for Hue (H), Saturation (S), and Brightness (B) in the HSB text boxes. HSB values do not change the color, but how a color looks.
If known, enter the Hex # number in the text box. Hex numbers are normally used when a specific color has been created for a company logo or company name.
4) Click OK to close the Pick a Color dialog and save the color. The color appears as a fill in the selected object.
5) Open the Color page of the Area dialog.
6) Click on Add in Custom Palette and enter a name for the color in the Name dialog that opens.
7) Click OK to close the Name dialog and the color is added to the Custom palette.
8) Click OK to close the Area dialog. The new color is now available for use in other documents.
LibreOffice supports PostScript (.pfb), TrueType (.ttf), and OpenType (.otf) font file formats. Other font formats are available and may be supported by the computer operating system. However, these font formats may be limited in character selection and quality.
Administration privileges are required to install additional fonts. After installation onto a computer operating system, any additional fonts are available for use by all modules in LibreOffice.
In addition to proprietary fonts from sources like Adobe, hundreds of free license fonts are available. Most free license fonts are available at no cost and can be used, shared, and edited. Many of these fonts are clones, or close variations of classic fonts, but several fonts are original fonts.
Many Linux distributions include some free license fonts in their package repositories. There are several places where free license fonts are available, for example, The League of Movable Type (https://www.theleagueofmoveabletype.com), Open Font Library (https://fontlibrary.org).
By default, commands and functions in LibreOffice are grouped in cascading menus with tools available on toolbars, called the Standard Toolbar user interface. Other user interface variants, are available, displaying contextual groups of commands and contents. With each LibreOffice module having different requirements, refer to the specific user guide for each LibreOffice module for a full description of user interface variants and how to use the user interface.
Figure 12: Select Your Preferred User Interface dialog
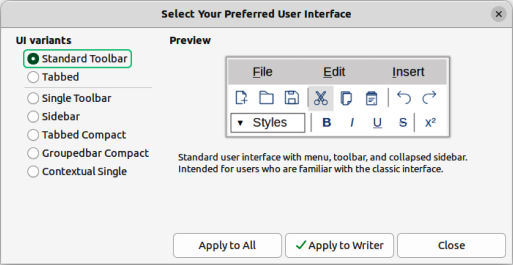
Select a preferred user interface variant as follows:
1) Open a LibreOffice module to change the user interface.
2) Go to View > User Interface on the Menu bar to open the Select Your Preferred User Interface dialog (Figure 12).
3) Select the preferred user interface from the options available in UI variants. A preview of the selected user interface is displayed in the dialog.
4) To use the selected user interface for all LibreOffice modules, click on Apply to All.
5) To only use the selected user interface for the LibreOffice module that is open, click on Apply to {Module}, for example Apply to Writer.
6) Click on Close to close the dialog.