
Getting Started Guide 7.5
Appendix A,
Keyboard Shortcuts
This document is Copyright © 2023 by the LibreOffice Documentation Team. Contributors are listed below. This document maybe distributed and/or modified under the terms of either the GNU General Public License (https://www.gnu.org/licenses/gpl.html), version 3 or later, or the Creative Commons Attribution License (https://creativecommons.org/licenses/by/4.0/), version 4.0 or later. All trademarks within this guide belong to their legitimate owners.
Contributors for this edition:
Peter Schofield
Contributors for previous editions:
Jean Hollis Weber
John A Smith
Kees Kriek
Olivier Hallot
Peter Schofield
Rafael Lima
Ron Faile Jr.
Skip Masonsmith
Steve Fanning
Please direct any comments or suggestions about this document to the Documentation Team forum at https://community.documentfoundation.org/c/documentation/loguides/ (registration is required) or send an email to: loguides@community.documentfoundation.org
Note
Everything you send to a mailing list or forum, including your email address and any other personal information that is written in the message, is publicly archived and cannot be deleted.
Published July 2023. Based on LibreOffice 7.5 Community.
Other versions of LibreOffice may differ in appearance and functionality.
LibreOffice can be used without requiring a pointing device, such as a mouse or trackball, by using the keyboard shortcuts that are available in Draw. Tasks as varied and complex as docking and un-docking toolbars and windows, or changing the size or position of objects can all be accomplished with using keyboard shortcuts. Although LibreOffice has an extensive set of keyboard shortcuts, each LibreOffice module has keyboard shortcuts that are specific to that module.
This appendix lists some of the more common keyboard shortcuts that apply to multiple components of LibreOffice. For shortcuts specific to Writer, Calc, Impress, Draw, Math, or Base, refer to the relevant user guide for each module, or search the LibreOffice Help.
To assist a user with identifying keyboard shortcuts, shortcuts are indicated by text next to menu items and in tooltips for some tools on toolbars. In Writer, for example, some commonly used keyboard shortcuts, for example, are as follows:
File > Open on the Menu bar includes text indicating that Ctrl+O (macOS ⌘+O) is a keyboard shortcut.
Align Left tool in the Formatting toolbar has a tooltip indicating that Ctrl+L (macOS ⌘+L) is a keyboard shortcut.
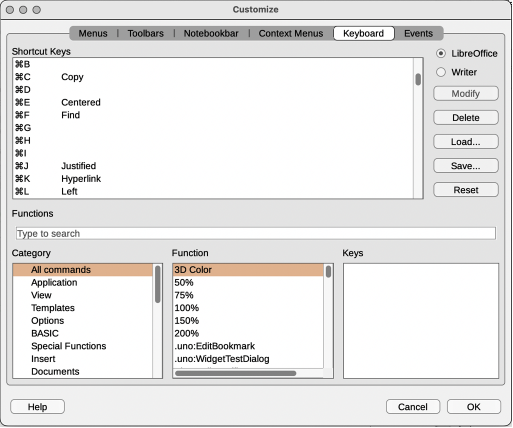
A list of the available keyboard shortcuts in LibreOffice can be found on the Keyboard page of the Customize dialog. Go to Tools > Customize on the Menu bar and click on Keyboard to open the Keyboard page. Examples of keyboard shortcuts for Linux/Windows see Figure 1 and for macOS see Figure 2.
Figure 1: Customize dialog — Keyboard page for Linux/Windows
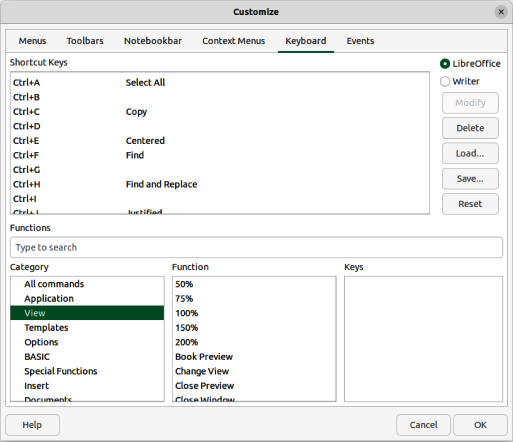
Figure 2: Customize dialog — Keyboard page for macOS
Note
Some keyboard shortcuts listed may not be available if the computer operating system uses the same shortcuts as LibreOffice for other tasks. To resolve any conflicts, assign different keys to these shortcuts by reconfiguring either LibreOffice (see Chapter 13, Customizing LibreOffice), or the computer operating system (see operating system documentation or help).
In addition to keyboard shortcuts, LibreOffice supports some assistive technology tools like screen magnification software, screen readers, and on-screen keyboards. Please note that except for the Windows platform, accessibility support relies on Java technology for communications with assistive technology tools. This means that the first program startup may take a few seconds longer, because the Java runtime environment has to be started as well.
The current list of supported assistive tools can be found on at https://wiki.documentfoundation.org/Accessibility.
Some keystrokes and menu items are different on a macOS computer from those used in Windows or Linux computers. This due to the way the different operating systems work and the different types of keyboards used. Also, the labelling on the keyboards may vary depending on the age of the computer and style of keyboard being used.
Tables 1, 2 and 3 show the most common variations in keyboard shortcuts and keyboard labelling. Table 4 shows examples of using macOS keyboard shortcuts. For more information on keyboard shortcuts, see LibreOffice Help.
Table 1: Shift, Control and Alt keys
|
Windows or Linux |
macOS |
|
Control or Ctrl |
⌘ or Cmd or Command |
|
Alt |
⌥ or Option or Alt |
|
Shift or ⇧ |
Shift or ⇧ |
|
Caps Lock |
⇪ or Caps Lock |
|
Control or Ctrl |
⌃ or Control or Ctrl |
Table 2: Home and End keys
|
Windows or Linux |
macOS |
|
Home |
Fn+Left Arrow |
|
End |
Fn+Right Arrow |
Table 3: Page Up and Page Down
|
Windows or Linux |
macOS |
|
Screen Up |
Fn+Up Arrow |
|
Page Up |
⌥ or Option or Alt+Fn+Up Arrow |
|
Screen Down |
Fn+Down Arrow |
|
Page Down |
⌥ or Option or Alt+Fn+Down Arrow |
Table 4: Example of using macOS keyboard shortcuts
|
Windows or Linux |
macOS equivalent |
Effect |
|
Tools > Options |
LibreOffice > Preferences |
Access setup options |
|
Right-click |
Control+click or right‑click depending on computer setup |
Opens a context menu |
|
Ctrl (Control) |
⌘ (Command) |
Used with other keys |
|
Alt |
⌥ (Option) or Alt, depending on keyboard |
Used with other keys |
|
F11 |
⌘+T |
Open Styles deck in Sidebar |
Note
Actual keys available on a macOS keyboard depend on the type of keyboard being used. For example, a macOS laptop keyboard does not have a Delete key, but a macOS keyboard with a numeric keypad does have a Delete key.
Note
In computers using macOS, some keyboard shortcuts are not available and these unavailable keyboard shortcuts are indicated in the following tables with a blank cell.
Some of the shortcut keys may be assigned to the computer operating system and are not available for LibreOffice. Either assign different keys in LibreOffice using Tools > Customize > Keyboard on the Menu bar, or in the computer operating system. For more information, see Chapter 13, Customizing LibreOffice or the documentation/help for the computer operating system.
LibreOffice functions can be used by using keyboard shortcuts. For example, the Ctrl+O (macOS ⌘+O) keyboard shortcut is shown next to Open in the File menu on the Menu bar. To use this keyboard shortcut, press and hold down the Ctrl (macOS ⌘) key and then press the O key. Release both keys together after the dialog opens.
Table 5: Keyboard shortcuts for opening menus and menu items
1) Press Alt, F6, or F10 to select the first item on the Menu bar (normally the File menu). In macOS, selection is the first tool on the Standard toolbar and this tool is normally New.
2) Press the right, or left arrow, to move the selection right, or left.
3) Press the Home key (macOS Fn+left arrow) or End key (macOS Fn+right arrow) to move menu selection to the first or last item on the Menu bar.
4) Press the down, or up arrow, to move the selection down, or up, the list of menu commands.
5) If necessary, press the right arrow to open any submenus on the selected menu. Submenus are indicated by a triangle ► or chevron > next to the name of a selected menu item.
6) If necessary, press the down, or up, arrow to move the selection down or up the list of submenu commands.
7) If necessary, press the left arrow to close a submenu.
8) Press Enter to run the selected menu, or submenu command.
1) Press F6 repeatedly until the first icon on a toolbar is selected.
2) On a horizontal toolbar, press the right or left arrows to move tool selection to the right or left.
3) On a vertical toolbar, press the up or down arrows to move tool selection upward or downward.
4) Press the Home key (macOS Fn+left arrow) or End key (macOS Fn+right arrow) to move tool selection to the first or last tool on a toolbar.
5) Press Enter to action the selected tool on the toolbar.
6) To insert an object into a drawing or presentation after selecting the required object on the Drawing toolbar, use the key combination Ctrl+Enter (macOS ⌘+Enter) to insert the object in the center of the drawing page or slide.
Note
If a tool on a toolbar has an editable text field, for example Load URL or Line Width, the Tab or Shift+Tab keys are then used to move the selection right or left onto the next tool on the toolbar.
Navigate through a document using keyboard shortcuts as shown in Table 6.
Table 6: Keyboard shortcuts for navigation
|
Windows Linux |
macOS |
Effect |
|
Left Arrow |
Left Arrow |
Moves the cursor one character to the left. |
|
Shift+Left Arrow |
Shift+Left Arrow |
Moves the cursor one character to the left and selects the character. |
|
Ctrl+Left Arrow |
⌥+Left Arrow |
Moves the cursor to the beginning of the previous word. |
|
Right Arrow |
Right Arrow |
Moves the cursor one character to the right. |
|
Shift+Right Arrow |
Shift+Right Arrow |
Moves the cursor one character to the right and selects the character. |
|
Ctrl+Right Arrow |
⌥+Right Arrow |
Moves the cursor to the beginning of the next word. |
|
Up Arrow |
Up Arrow |
Moves the cursor up one line. |
|
Shift+Up Arrow |
Shift+Up Arrow |
Moves the cursor up one line in the text and selects the lines of text. |
|
Ctrl+Up Arrow |
⌥+Up Arrow |
Moves the cursor to the beginning of the paragraph. |
|
Down Arrow |
Down Arrow |
Moves the cursor down one line. |
|
Ctrl+Down Arrow |
⌘+Down Arrow |
Moves the cursor to the end of the paragraph. |
|
Ctrl+Shift+Down Arrow |
⌥+Shift+Down Arrow |
Moves the cursor to the end of the paragraph. Selects the text in the paragraph from the cursor position to the end of the paragraph. |
|
Home |
Fn+Left Arrow or Ctrl+A |
Moves the cursor to the beginning of the current line. |
|
Shift+Home |
|
Moves the cursor to the beginning of the line and selects the text from the cursor position. |
|
Ctrl+Home |
⌘+Up Arrow |
Moves the cursor to the beginning of the document. |
|
End |
Fn+Right Arrow or Ctrl+E |
Moves the cursor to the end of the current line. |
|
Shift+End |
|
Moves the cursor to the end of the line and selects the text from the cursor position. |
|
Ctrl+End |
⌘+Down Arrow |
Moves the cursor to the end of the document. |
|
Page Up |
Fn+Up Arrow |
Scrolls up one page. |
|
Ctrl+Page Up |
⌘+Fn+Up Arrow |
Moves the cursor to the header. |
|
Page Down |
Fn+Down Arrow |
Scrolls down one page. |
|
Ctrl+Page Down |
⌘+Fn+Down Arrow |
Moves the cursor to the footer. |
Select and delete text using keyboard shortcuts as follows:
Select text while moving the cursor, hold down the Shift key as the cursor is moved.
Double‑click on a word with the cursor to select the word.
Triple‑click in a sentence with the cursor to select the whole of the sentence.
Click four times in a paragraph with the cursor to select the whole of the paragraph.
Select all of the text or objects in a document, use Ctrl+A (macOS ⌘+A).
Use Ctrl+Delete to delete everything from the cursor position to the end of the word.
Use Ctrl+Backspace to delete everything from the cursor position to the beginning of the word.
For macOS, use ⌘+Delete (if the keyboard has a Delete key) to delete everything from the cursor position to the end of the word.
For macOS, use ⌘+Backspace to delete everything from the cursor position to the beginning of the line.
When opening any dialog, one element or option is highlighted indicating that the element or option has focus on it. For example, a button, option field, entry in a list box, or checkbox. How the element or option is highlighted depends on the computer operating system and how the computer is setup.
Table 7: Keyboard shortcuts for controlling dialogs
|
Shortcut Keys |
Result |
|
Enter |
Activates selected button. When no button is selected, Enter is equivalent to clicking OK. |
|
Esc |
Closes dialog without saving any changes made while the dialog was open. Esc is also equivalent to clicking Cancel. When a drop-down list is open and selected, Esc closes the list. |
|
Spacebar |
Checks or clears an empty checkbox. |
|
Up or Down Arrow |
Moves focus up or down a list. Increases or decreases value of a variable. Moves focus vertically within a section of dialog. |
|
Left or Right Arrow |
Moves focus horizontally within a section of a dialog. |
|
Tab |
Advances focus to the next section or element of a dialog. |
|
Shift+Tab |
Returns focus to the previous section or element in a dialog. |
|
Alt+Down Arrow |
Shows items in a drop-down list. |
The keyboard shortcuts for controlling documents and windows in LibreOffice are shown in Table 8.
Table 8: Keyboard shortcuts for controlling documents and windows
|
Windows Linux |
macOS |
Effect |
|
Ctrl+O |
⌘+O |
Opens the Open dialog to select and open a document. |
|
Ctrl+S |
⌘+S |
Saves the current document. If the document is a previously unsaved file, the shortcut opens the Save As dialog. |
|
Ctrl+N |
⌘+N |
Creates a new document. |
|
Shift+Ctrl+N |
⌘+Shift+N |
Opens the Templates dialog. |
|
Ctrl+P |
⌘+P |
Opens the Print dialog to print the document. |
|
Ctrl+F |
⌘+F |
Opens the Find toolbar. |
|
Ctrl+H |
⌥+⌘+F |
Opens the Find and Replace dialog. |
|
Ctrl+Shift+F |
|
Searches for the last entered search term. |
|
Ctrl+Shift+J |
|
Toggles the view between full-screen mode and normal mode in Writer or Calc. |
|
Ctrl+Shift+R |
⌘+Shift+R |
Opens and closes the rulers. |
|
F1 |
F1 |
Opens the LibreOffice Help contents in your default browser. If the local Help package is not installed, LibreOffice opens the online Help located at https://help.libreoffice.org. |
|
Shift+F1 |
Shift+F1 |
Turns the cursor into a What’s This? question mark. Shows the tip for an item underneath the cursor. The shortcut does not work with the online help. |
|
Shift+F2 |
Shift+F2 |
Turns on Extended Tips for the currently selected command, icon or control. The shortcut does not work with the online help. |
|
Ctrl+Shift+F10 |
⌘+Shift+F10 |
Docks and undocks floating toolbars, Sidebar and Navigator. |
|
Ctrl+F4 or Alt+F4 |
⌘+F4 |
Closes the current document. Closes LibreOffice when the last open document is closed. |
|
Ctrl+Q |
⌘+Q |
Exits LibreOffice. |
The keyboard shortcuts for editing and formatting documents in LibreOffice are shown in Table 9.
Table 9: Keyboard shortcuts for editing and formatting documents
|
Windows Linux |
macOS |
Effect |
|
Enter |
Enter |
When an OLE object is selected, activates the software used to create the OLE object. When a drawing object is selected, activates text mode. |
|
Ctrl+X |
⌘+X |
Cuts selected text or objects from a document and places them in the clipboard. |
|
Ctrl+C |
⌘+C |
Copies selected text or objects and places them in the clipboard. |
|
Ctrl+V |
⌘+V |
Places text or objects from the clipboard that have copied or cut into the document. |
|
Ctrl+Alt+ |
⌘+⌥+Shift+V |
Pastes unformatted text from the clipboard. The text is pasted using the format that exists at the insertion point. |
|
Ctrl+Shift+V |
⌘+Shift+V |
Opens the Paste Special dialog. |
|
Ctrl+A |
⌘+A |
Selects all text and objects in a document. |
|
Ctrl+Z |
⌘+Z |
Undoes last action. |
|
Ctrl+Y |
⌘+Y |
Redoes last action. |
|
Ctrl+Shift+Y |
⌘+Shift+Y |
Repeats last command. |
|
Ctrl+I |
⌘+I |
Applies the Italic attribute to selected characters and text. |
|
Ctrl+B |
⌘+B |
Applies the Bold attribute to selected characters and text. |
|
Ctrl+U |
⌘+U |
Applies the Underline attribute to selected characters and text. |
|
Ctrl+M |
⌘+M |
Removes direct formatting from selected text or objects. This command is also available in Format > Clear Direct Formatting in the Menu bar. |
The general keyboard shortcuts for using the Sidebar in LibreOffice are shown in Table 10.
Table 10: General keyboard shortcuts for Sidebar
|
Windows Linux |
macOS |
Effect |
|
Tab |
Tab |
Moves the focus in the Sidebar. |
|
Shift+Tab |
Shift+Tab |
Moves the focus in the reverse direction in the Sidebar. |
|
Shift+F10 |
Shift+F10 |
Opens a context menu for the selected element in the Sidebar. |
|
Home |
Fn+Left Arrow |
Moves focus to first entry. |
|
End |
Fn+Right Arrow |
Moves focus to last entry. |
|
Up or Down Arrow |
Up or Down Arrow |
Moves the selection up or down and opens the panels in the selected deck. |
|
Right Arrow |
Right Arrow |
Opens any sub-elements in the selected element. |
|
Left Arrow |
Left Arrow |
Closes any sub-elements in the selected element. |
|
Ctrl+Enter |
⌘+Enter |
Opens the Properties dialog for the selected element. |
The keyboard shortcuts for the Gallery on the Sidebar in LibreOffice are shown in Table 11.
Table 11: Keyboard shortcuts for the Gallery
|
Windows Linux |
macOS |
Effect |
|
Ctrl+R |
|
Opens the Enter Title dialog. Only themes added to LibreOffice can be renamed. Themes installed with LibreOffice cannot be renamed. |
|
Ctrl+D |
⌘+D |
Deletes themes that have been added to LibreOffice. Themes installed with LibreOffice cannot be deleted. |
|
Insert |
|
Inserts a new theme into the Gallery and opens the Insert of New Theme dialog. |
|
Ctrl+Shift+Insert |
⌘+Shift+ |
Inserts the selected object as a linked object into the current document. |
|
Ctrl+I |
Ctrl+I |
Inserts a copy of the selected object into the current document. |
|
Ctrl+P Spacebar Enter |
Ctrl+P Spacebar Enter |
Switches between a view of a list of object previews and a selected object. |
The keyboard shortcuts for using a database table in LibreOffice are shown in Table 12.
Table 12: Keyboard shortcuts for a database table
|
Windows Linux |
macOS |
Effect |
|
Ctrl+Shift+F4 |
⌘+Shift+F4 |
Opens and closes a database table in a document for editing. |
|
Spacebar |
Spacebar |
Toggles row selection, except when the row is in edit mode. |
|
Ctrl+ |
⌘+Spacebar |
Toggles row selection. |
|
Shift+ |
Shift+ |
Selects the current column. |
|
Ctrl+Page Up |
⌘+⌥ + Fn+ Up Arrow |
Moves the cursor to the first row. |
|
Ctrl+Page Down |
⌘+⌥ + Fn+ Down Arrow |
Moves the cursor to the last row. |
Keyboard shortcuts for controlling macros in LibreOffice are shown in Table 13. For more information on macros, see Chapter 11, Getting Started with Macros.
Table 13: Keyboard shortcuts for controlling macros
|
Windows Linux |
macOS |
Effect |
|
Ctrl+* |
⌘+* |
Runs a macro field. The multiplication sign is only available on a numeric keypad. |
|
Shift+Ctrl+Q |
⌘+Ctrl+Q |
Stops a running macro. |
Each character in LibreOffice can be entered into a document by typing its Unicode hexadecimal number and then the keyboard shortcut Ctrl+Alt+X (mac OS ⌘+⌥+X) to create the character. For example, to enter the copyright sign into text, type U+00A9 followed immediately by Ctrl+Alt+X (mac OS ⌘+⌥+X) and the copyright sign © appears at the cursor position in the text.
Note
Unicode hexadecimal numbers in the range U+0000 to U+0020 are not converted into characters using the keyboard shortcut Ctrl+Alt+X (mac OS ⌘+⌥+X).
In addition to using the built-in keyboard shortcuts listed in this Appendix, custom keyboard shortcuts can be defined. For more information, see Chapter 13, Customizing LibreOffice.
To check if a keyboard shortcut is is already in use, open the Keyboard page in the Customize dialog and scroll though the listed keyboard shortcuts. Go to Tools > Customize on the Menu bar to open the Customize dialog.
For help with keyboard shortcuts, or using LibreOffice with a keyboard only, search LibreOffice Help using the keywords “shortcut keys” or “accessibility”.