Copyright
This document is Copyright © 2026 by the LibreOffice Documentation Team. Contributors are listed below. This document may be distributed and/or modified under the terms of either the GNU General Public License (https://www.gnu.org/licenses/gpl.html), version 3 or later, or the Creative Commons Attribution License (https://creativecommons.org/licenses/by/4.0/), version 4.0 or later. All trademarks within this guide belong to their legitimate owners.
Contributors
Contributors for this edition:
Peter Schofield
Contributors for previous editions:
Claire Wood, Dimona Delvere, Gary Schnabl ,Hazel Russman, Jean Hollis Weber, Kees Kriek, Linda Worthington, Michele Zarri, Peter Hillier-Brook, Peter Schofield, Rachel Kartch, Regina Henschel, T. Elliot Turner, Vasudev Narayanan
Feedback
Please direct any comments or suggestions about this document to the Documentation Team Forum at https://community.documentfoundation.org/c/documentation/loguides/ (registration is required) or send an email to: loguides@community.documentfoundation.org.
-
Note
Everything sent to a forum, including email addresses and any other personal information that is written in the message, is publicly archived and cannot be deleted. Emails sent to the forum are moderated.
Publication date and software version
Published August 2026. Based on LibreOffice 26.2 Community.
Other versions of LibreOffice may differ in appearance and functionality.
Introduction
Impress is the presentation module included with LibreOffice (LO) for creating presentations in the Open Document Presentation (ODP) format. Impress allows the inclusion of various elements such as charts, drawing objects, text, multimedia, and more, making presentations visually appealing and engaging. ODP presentations can be opened by other presentation software like Microsoft PowerPoint and exported in different formats, such as PPT.
Presentation slides can incorporate various techniques, including animation and slide transitions, enhancing the professionalism and interest of the presentation for the audience.
Several design and creation views are available in Impress, including the Slide Sorter, which provides an overview of slides in thumbnail format, and the Notes page, which displays both the slide and the notes for distribution. Additionally, the Presenter Console is useful for rehearsing presentations and presenting them to audiences.
While using graphics in presentations requires some knowledge of drawing, it is recommended to refer to the Draw Guide for detailed instructions on creating graphics, including 3D animation.
-
Notes
When LibreOffice is installed on a computer, a menu entry for each module is added to the system menu. The name and location of these menu entries depends on the operating system and graphical user interface in use.
The New icon displayed depends on the LibreOffice module currently open when creating a new document, presentation, spreadsheet, or drawing.
Opening Impress
By default, when no other LibreOffice module is open, the LibreOffice Start Center opens with the following options:
-
Click on Impress Presentation to create a new presentation.
-
Click on Open File and navigate to the folder containing a presentation.
-
Click on Remote Files and navigate to a server and folder containing presentations.
Alternatively, access LibreOffice from the computer system menu. The specific menu options may vary depending on the operating system being used. For further details and examples, refer to the Getting Started Guide.
-
In Windows, use the Start menu.
-
In Linux with a Gnome desktop, use the Applications menu.
-
In macOS, use the Applications menu.
When a LibreOffice module is open, access the presentation creation options using the menu bar or the Standard toolbar.
-
On the Menu bar, go to File > New > Presentation.
-
Click on the triangle ▼ next to New on the Standard toolbar and select Presentation from the drop-down menu.
When starting Impress, the main Impress window (Figure 1) and Select a Template dialog (Figure 2) open. Templates included with Impress are designed for the two standard sizes of presentation slides: 4:3 and 16:9 ratios. Templates adapt to other available sizes. Go to Slide > Slide Properties > Paper Format on the Menu bar, or Format in the Slide panel in the Properties deck on the Sidebar to select slide size.
To start Impress without the Select a Template dialog opening, deselect the option Show this dialog at startup at the lower left of the dialog. Alternatively, go to Tools > Options > LibreOffice Impress > General (macOS LibreOffice > Preferences > LibreOffice Impress > General) on the Menu bar and deselect the option New Document > Start with Template Selection.
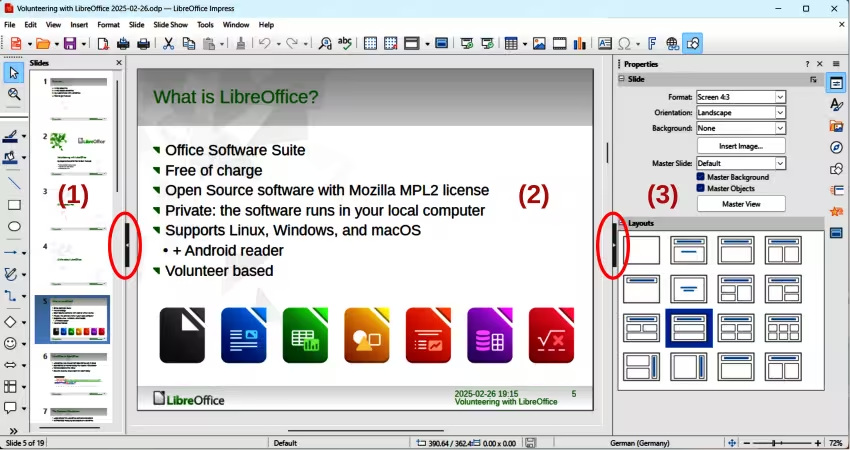
Figure 2: Select a Template dialog
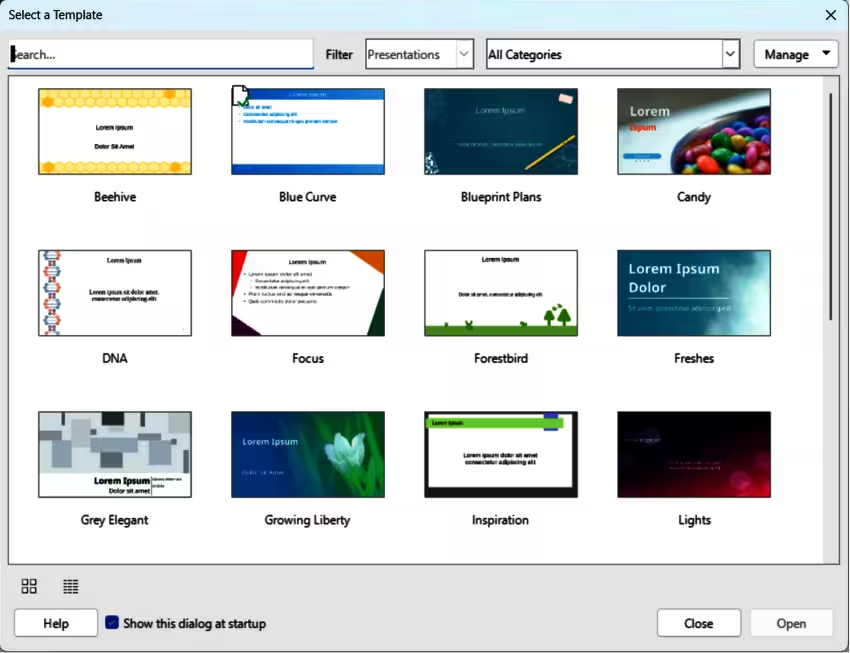
The Slides pane and/or Sidebar (Figure 1) can be closed by clicking the X in the upper right corner of each pane. Alternatively, go to View > Slide Pane or View > Sidebar on the Menu bar to deselect. To reopen a pane, select View > Slide Pane or View > Sidebar on the Menu bar.
To maximize the Workspace area click on the Hide/Show marker in the middle of the vertical separator line (highlighted in Figure 1). Clicking on the Hide/Show marker hides the Slides pane or Sidebar, but does not close the Slides pane or Sidebar. To restore the Slides pane or Sidebar, click again on its Hide/Show marker.
Impress main window
The Impress main window (Figure 1) has three main sections: Slides pane, Workspace, and Sidebar. Located at the top of the main window is the Menu bar and toolbars. Toolbars can be displayed or hidden during the creation of a presentation.
Menu bar
The Menu bar, situated at the top of the main window, provides a comprehensive set of menus that are common to all LibreOffice modules. However, the commands may differ between each LibreOffice module for File, Edit, View, Insert, Format, Tools, Window, and Help. The Impress module has two extra menus for Slide and Slide Show. When a menu is selected, a submenu may open to show the available commands. The Menu bar can be customized and for more information, see the Getting Started Guide.
Workspace
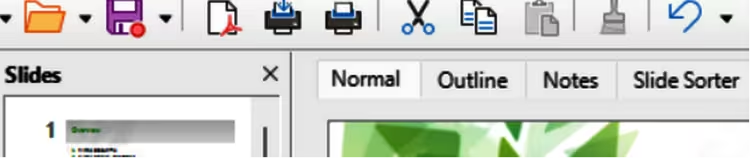
By default, the Workspace opens in Normal view which is normally positioned at the top of the main window. The Workspace has four standard views: Normal; Outline; Notes; Slide Sorter. Each view is opened by clicking on its tab at the top of the Workspace (Figure 3). For more information on workspace views, see “Workspace views” page 1.
If master slides are used, the master views become available: Master Slide; Master Notes; Master Handout. Unlike the standard views, master views do not use tabs. The master views are selected by going to View on the Menu bar. For more information on master slides, see Chapter 2, Using Slide Masters, Styles, and Templates.
Slides pane
The Slides pane displays thumbnail images of slides in the order that they appear in a presentation. Clicking on a slide in the Slides pane selects it and places the slide in the Workspace where changes can be made. Slide order in a presentation can be altered, see Chapter 9, Slide Shows & Photo Albums for more information.
-
To display or close the Slides pane, go to View > Slide Pane on the Menu bar.
-
To close the Slides pane, click on the X in the right top corner of the Slides pane.
-
To display or hide the Slides pane, use the Hide/Show marker on the left of the Workspace (highlighted in Figure 1).
Figure 3: Example of Workspace view tabs
Several additional operations can be performed on one or more slides in the Slides pane. These additional operations are available in a context menu that is displayed when right-clicking on a slide in the Slides pane.
-
Add new slides to a presentation.
-
Duplicate a slide.
-
Rename a slide.
-
Hide a slide so that it will not show in a presentation.
-
Delete a slide from a presentation.
-
Move slides in the slide order by dragging and dropping it to the desired position.
-
Change the layout for a slide, or a group of slides.
-
Navigate to select slides in the presentation.
-
Move a slide to another position in the slide sequence.
-
Change slide properties by opening the Slide Properties dialog.
-
Change slide properties by right-clicking on a slide and selecting Slide Properties from the drop-down menu.
-
Change the master slide of a slide by right-clicking on a slide and selecting Change Slide Master from the drop-down menu.
Sidebar
The Impress Sidebar (Figure 5) is normally located on the right side of the Workspace and is similar to the Sidebar in other LibreOffice modules. The Sidebar consists of several decks providing options to change slide layout to match a presentation requirements.
To display or hide the Sidebar, use one of the following methods.
-
Go to View > Sidebar on the Menu bar.
-
Use the keyboard shortcut Ctrl+F5 (macOS ⌘+F5).
-
Use the Hide/Show marker on the right of the Workspace (Figure 1).
-
To hide the Sidebar, click on the X in the right top corner of the Sidebar.
-
To display the Sidebar, click on one of the Sidebar icons to open a deck.
To open the Sidebar deck, use one of the following methods:
-
Click on the icon for the Sidebar deck displayed on the right side of the Sidebar.
-
Click on Sidebar Settings at the top right of the Sidebar and select a deck from the drop‑down list.
-
Use one of the available keyboard shortcuts for Sidebar decks. These keyboard shortcuts are displayed when the cursor is hovered over an icon.
-
Note
Actual decks and panels displayed in the Sidebar depends on the object type that is selected on a slide.
Properties
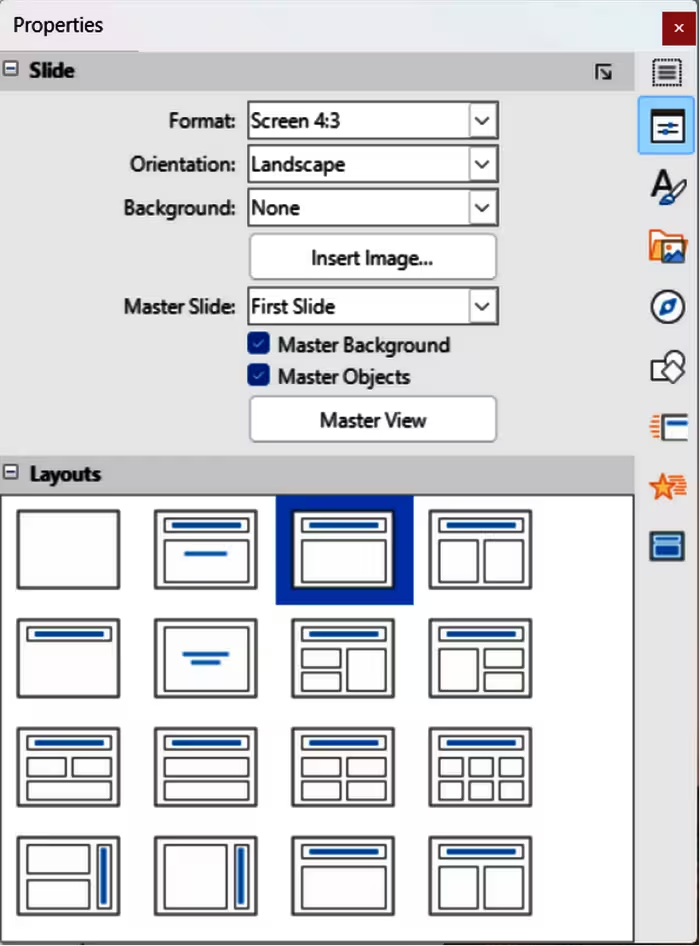
The Properties deck in the Impress sidebar has two panels (Figure 5). These panels are used to change slide properties and slide layout to the presentation requirements.
Figure 4: Sidebar Properties deck — Slide and Layouts panels
Styles
The Styles deck is used for the following tasks:
-
Application of drawing and presentation styles to a selected object.
-
Creating new styles for drawing and presentation objects
-
Modifying drawing and presentation styles to presentation requirements.
When saving changes to a style, changes are applied to all elements formatted with that style in a presentation. For more information on styles, see Chapter 2, Using Slide Masters, Styles, and Templates.
Gallery
The Gallery deck has objects that can be inserted into a presentation either as a copy or link.
-
A copied object is independent of the original object.
-
Changes to the original object have no effect on the copy.
-
A link remains dependent on the original object.
-
Changes to the original object are also reflected in the linked object.
Navigator
The Navigator deck displays all objects contained in a presentation allowing navigation between slides in a presentation, or selection of objects on a slide. It is recommended to give meaningful names to slides and objects in a presentation for easy identification when using the Navigator. For more information, see “Navigator” below.
Shapes
The Shapes deck contains panels that allows quick selection of basic shapes that are available on the Drawing toolbar.
-
Lines and Arrows
-
Curves and Polygons
-
Connectors
-
Shapes
-
Symbol Shapes
-
Block Arrows
-
Flowchart
-
Callouts
-
Stars and Banners
-
3‑D Objects
Slide Transition
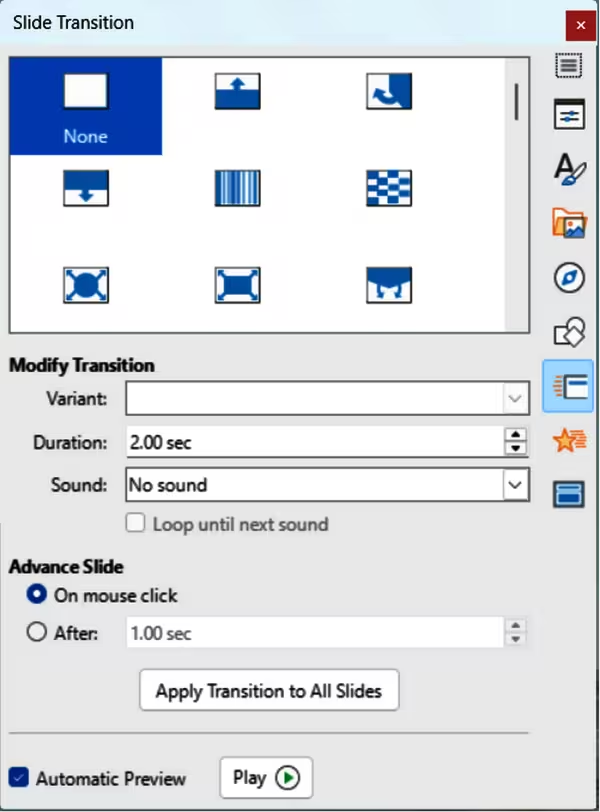
The Slide Transition deck provides a selection of slide transitions for use in presentations. There are controls to adjust transition speed, automatic or manual transition, and how long a selected slide is shown (automatic transition only). For more information on transitions, see Chapter 9, Slide Shows & Photo Albums.
Animation
The Animation deck is used to add, change, or remove animations for different elements or objects on a slide and adjust how objects appear during a slide show. For more information on animation, see Chapter 9, Slide Shows & Photo Albums.
Master Slides
The Master Slides deck provides access to slide designs for presentations, including several designs for master slides. The default master slide is blank, but the remaining master slides feature backgrounds and styled text. For more information on master slides, see Chapter 2, Using Slide Masters, Styles, and Templates.
Figure 5: Example of object size indicators
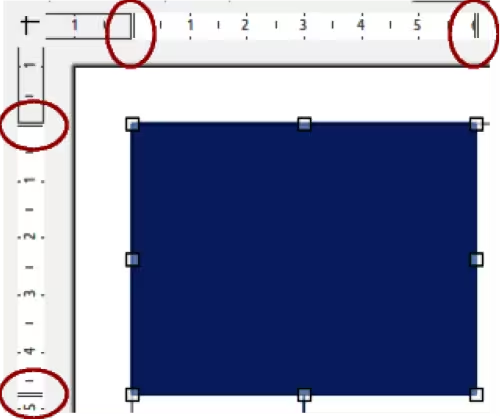
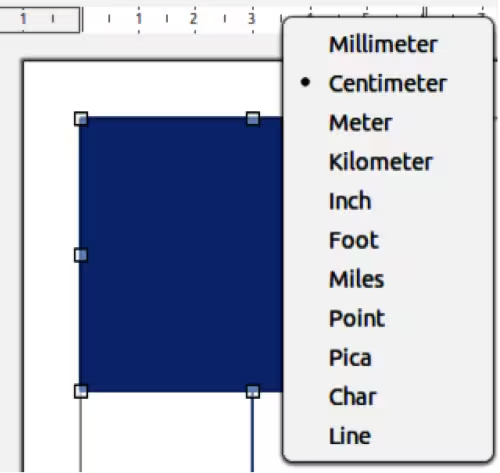
Figure 6: Example of changing ruler measurement units
Rulers
Rulers are positioned on the upper and left-hand sides of the Workspace. If the rulers are not visible, go to View > Rulers on the Menu bar. Rulers display the size of a selected object on a slide using double lines (highlighted in Figure 5). Rulers are also used to manage object handles and guide lines during object positioning.
-
Note
The current measurement unit dimensions may not correspond to the ruler units. Status Bar measurement units are defined in Tools > Options > LibreOffice Impress > General (macOS LibreOffice > Preferences > LibreOffice Impress > General).
To change the measurement units, right-click on a ruler and select the required measurement unit from the drop-down list, as shown in Figure 6 for the horizontal ruler. Note that horizontal and vertical rulers can be set to different measurement units.
Page margins in the drawing area are also represented on the rulers. Margins can be adjusted directly on the rulers by dragging them with the cursor. The margin area is indicated on the rulers or borders around the unused area of the ruler. This margin indication depends on computer setup and operating system, but is normally located in the top left corner of the Workspace.
Status bar
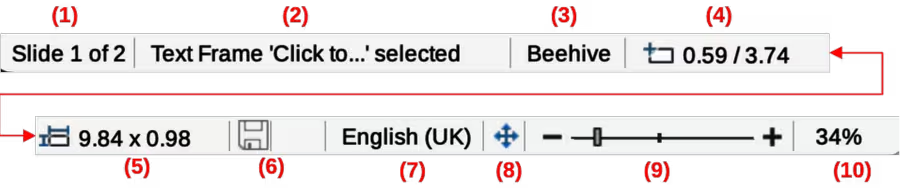
The Status Bar (Figure 7), located at the bottom of the Impress main window provides information for managing a presentation that is open. To hide the Status Bar, go to View on the Menu bar and deselect Status Bar.
Information area
Slide number
Figure 7: Impress Status Bar
-
Slide number
-
Information area
-
Master slide
-
Cursor position
-
Object size
-
Unsaved changes
-
Text language
-
Fit slide
-
Zoom slider
-
Zoom percentage
Table 1: Example of information on Status Bar
|
Example selection |
Examples of information shown |
|
Text area |
Text Edit: Paragraph x, Row y, Column z |
|
Charts, spreadsheets |
Embedded object (OLE) “ObjectName” selected |
|
Graphics |
Bitmap with transparency selected |
Master slide
Cursor position/Object size
-
When no object is selected, the position numbers show the current position (X and Y coordinates) of the cursor.
-
When an object is selected and resized using the cursor, the object size numbers show the size of the object (width and height).
-
If an object is selected, the position numbers show X and Y coordinates of the object upper‑left corner and the object size number pair displays the size of the object. These numbers do not relate to the object itself, but to the selection outline, which is the smallest possible rectangle that can contain the visible part or parts of an object.
Unsaved changes
Digital signatures
Text language
Fit slide
Zoom slider
Zoom percentage
Navigator
The Navigator displays all objects contained in a presentation providing a convenient way of navigating within a presentation and locating objects in the presentation.
-
To open the Navigator dialog (Figure 8) go to View > Navigator on the Menu bar (Ctrl+Shift+F5, macOS ⌘+Shift+F5).
-
Alternatively, click on Navigator in the Sidebar (Ctrl+Alt+4, macOS ⌘+⌥+4) to open the Navigator deck. This Sidebar deck is similar in appearance and function as the Navigator dialog.
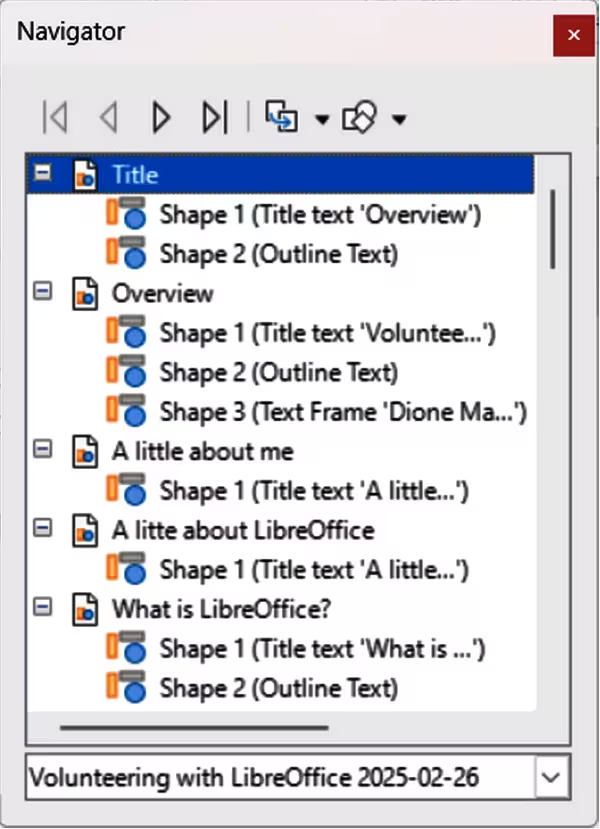
Functionality of the Navigator is more useful if meaningful names are applied to slides and objects (images, spreadsheets, and so on) instead of leaving them with default names (for example “Slide 1” and “Shape 1” and so on as shown in Figure 8). Using meaningful names makes slides or objects easily identified and located in a presentation.
Figure 8: Navigator dialog
Toolbars
Toolbars provide a range of functionalities to create slides for presentations. To display or hide various toolbars in Impress, go to View > Toolbars on the Menu bar and select the required toolbar from the submenu that opens. For example, Standard and Drawing toolbars are displayed by default, but Line and Filling, and Text Formatting toolbars are not normally displayed and have to be selected.
To change the tools available on any toolbar, right-click in an empty area on the toolbar and select Visible Buttons from the context menu. Installed tools are indicated by a check mark next to the tool name, or the tool icon is highlighted, depending on the computer operating system. Select a tool name to hide or show it in the toolbar. For more information, see Chapter 11, Setting Up and Customizing Impress; Appendix B, Toolbars; Getting Started Guide.
-
Note
Toolbar icons displayed depend on the icon style selected and the computer operating system. Select the icon size and style in Tools > Options > LibreOffice > View (macOS LibreOffice > Preferences > Options > LibreOffice > View). For more information, see Appendix B, Toolbars and Getting Started Guide.
Standard toolbar
Figure 9: Standard toolbar

Drawing toolbar
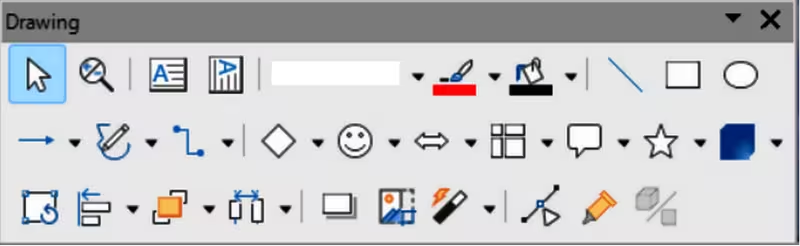
Figure 10: Drawing toolbar
Line and Filling toolbar
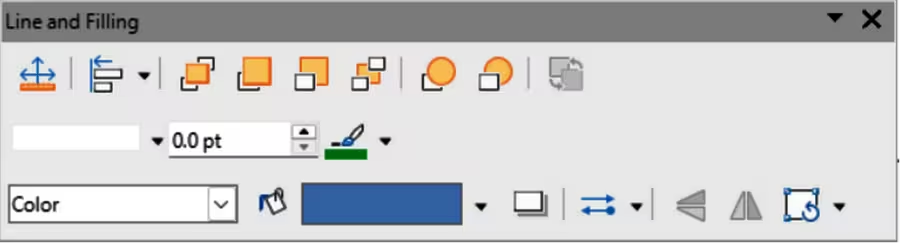
Figure 11: Line and Filling toolbar
Text Formatting toolbar
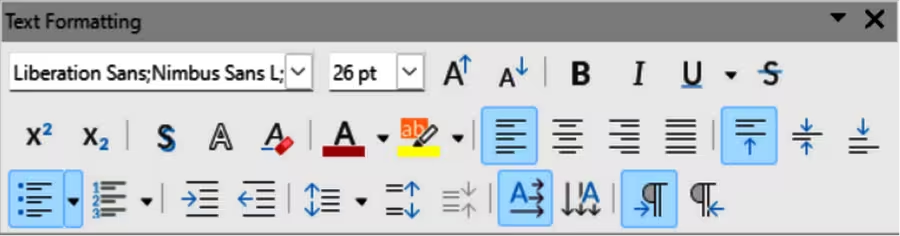
Figure 12: Text Formatting toolbar
Workspace views
The Impress Workspace has four standard views: Normal, Outline, Notes, and Slide Sorter. Each Workspace view is designed to make it easier to complete specific tasks.
The different views can be selected using one of the following methods:
-
Click on a tab at the top of the Workspace (Figure 4). If tabs are not displayed, then go to View > Views Tab Bar on the Menu bar.
-
Go to View on the Menu bar and select a Workspace view from options in the submenu.
Additionally, the Impress Workspace also has three master views available for creating master slides in a presentation. These master views have no tabs and are opened by selecting the required option in View on the Menu bar. The available options are Master Slide, Master Notes, and Master Handout. For more information on master slides, see Chapter 2, Using Slide Masters, Styles, and Templates.
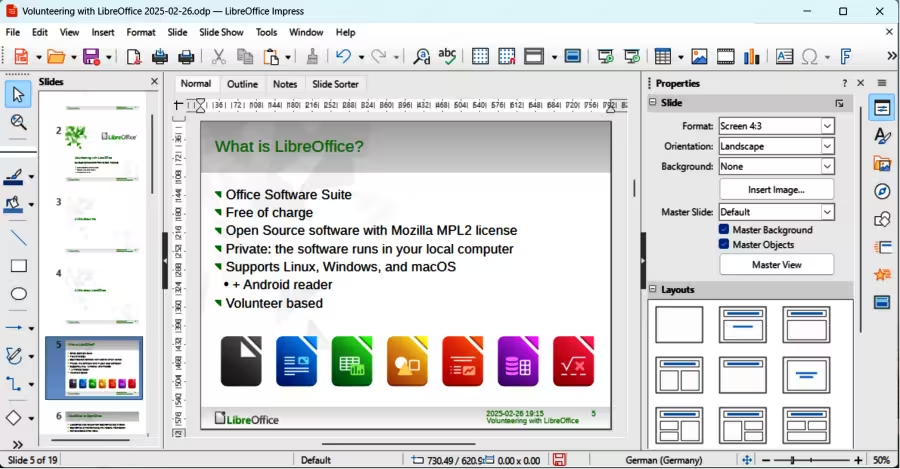
Normal view
Normal view (Figure 13) is the main standard view for creating individual slides in a presentation. In Normal view slides are designed with text, graphics, and any animation effects added and formatted. Placing a slide in Normal view of the Workspace, click on the slide thumbnail in the Slides pane, or click on the slide name in the Navigator dialog or Navigator deck in the Sidebar.
Figure 13: Example of Workspace Normal View
Outline view
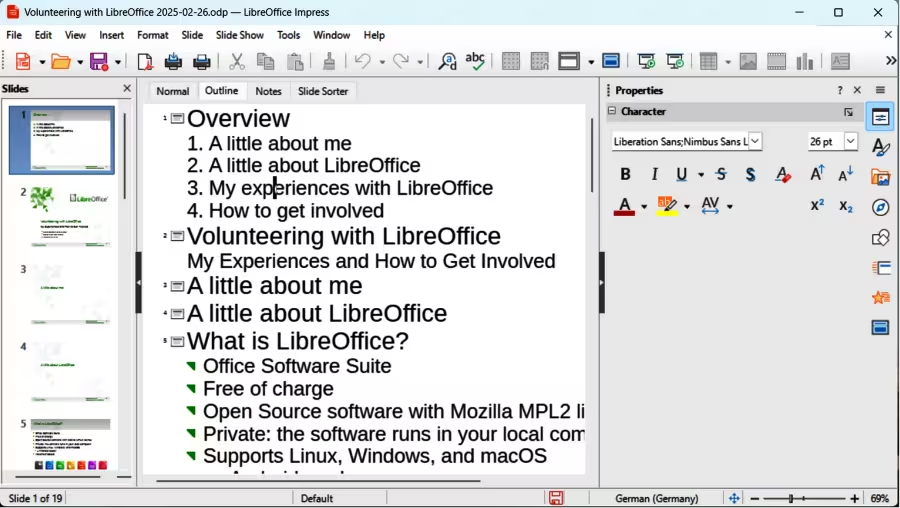
Outline view in the Workspace (Figure 14) displays all presentation slides in a sequential list. It displays topic titles, bulleted lists, and numbered lists for each slide in outline format. Only text contained in the default text boxes in each slide is displayed. If text boxes or graphic objects have been added to the slides, then these objects are not displayed.
Figure 14: Example of Workspace Outline view
Slide names are not included the Outline view, which is used for the following:
-
Making changes in the text of a slide.
-
Adding or deleting text in a slide as in Normal view.
-
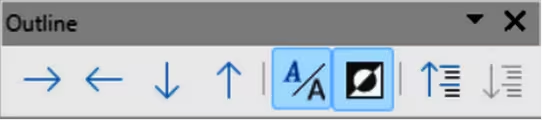
Moving a paragraph up or down by using the movement arrows on the Outline toolbar (Figure 15).
-
Changing outline level of a paragraph in a slide using the left and right arrow buttons on the Outline toolbar.
-
Comparing slides with an outline, if an outline has been prepared in advance. If another slide is required, it can be created directly in Outline, or Normal view.
Figure 15: Outline toolbar
Notes view
Use Notes view in the Workspace (Figure 16) to add notes to a slide. During a presentation the Notes view is not displayed to an audience on the external display being used for the presentation.
-
Click on Notes in the Workspace to open Notes view.
-
Select a slide in the Slides pane so that the slide appears in the Workspace.
-
In the text box below the displayed slide, click on the words Click to add notes and enter the required notes for the selected slide.
Figure 16: Example of Workspace Notes view
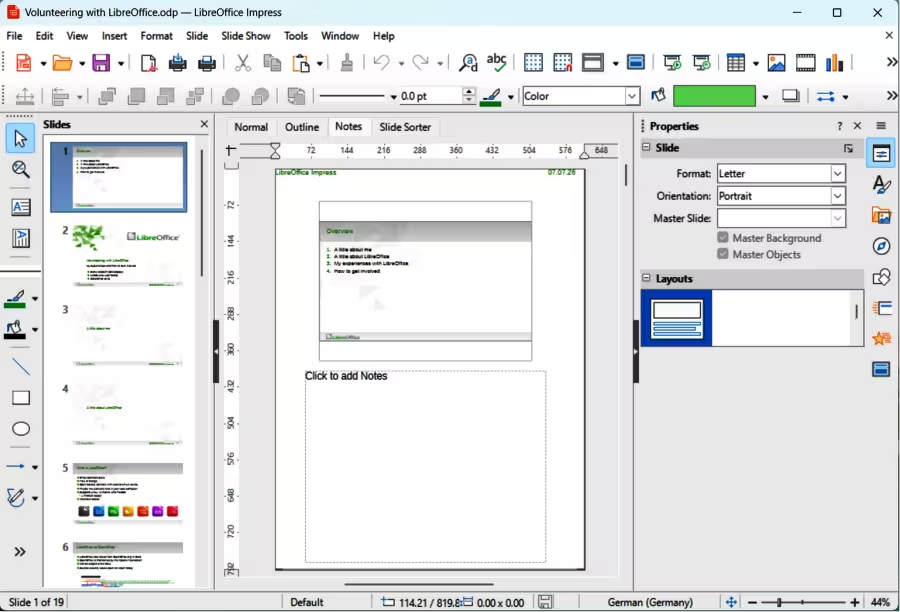
The Click to add notes text box can be resized using the resizing handles which appear when the border of the box is selected. To move or change the size of the box, click on a selection handle on the box border and drag it to resize the box.
-
Add or delete text in a slide as in Normal view.
-
Move a paragraph up or down using the arrows on the Outline toolbar (Figure 15).
-
Change paragraph outline level in a slide using the left and right arrows on Outline toolbar.
-
Compare slides with an outline, if an outline has been prepared. If another slide is required, it can be created directly in Outline, or Normal view.
Slide Sorter view
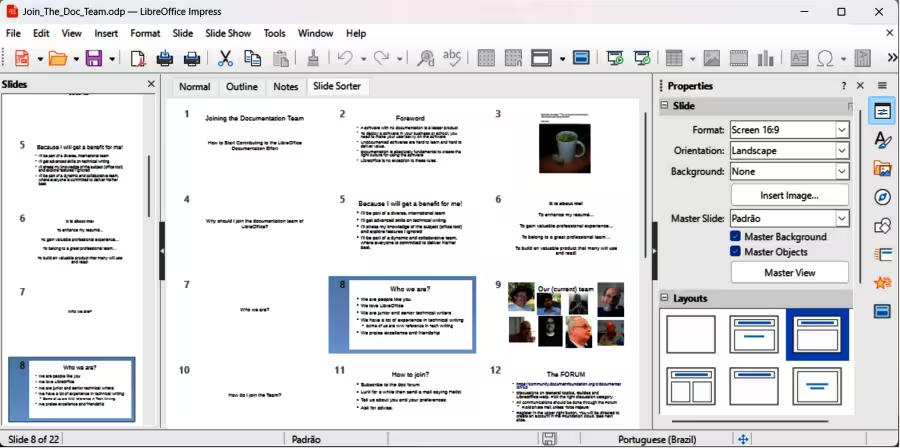
The Slide Sorter view in the Workspace (Figure 17) contains thumbnails of each slide used in a presentation. Use Slide Sorter view to work with one slide or a group of slides.
Figure 17: Example of Slide Sorter view
Customizing Slide Sorter view
-
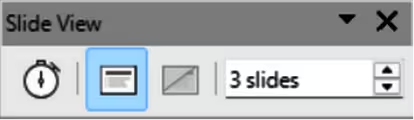
Go to View > Toolbars > Slide View on the Menu bar to open the Slide View toolbar (Figure 18).
-
Adjust the number of slides in the Slides per Row box, up to a maximum of 15.
Figure 18: Slide View toolbar
Changing slide order
To change the slide order in a presentation of a single slide or a group of slides using Slide Sorter view as follows:
-
Select a slide or a group of slides.
-
Drag and drop the slide or group of slides at the new position in the presentation.
Selecting a slide group
To select a group of slides in Slide Sorter view, use one of the following methods:
-
Ctrl key (macOS ⌘) — click on the first slide and, while holding the Ctrl key, select the required slides. The selected slides do not have to be next to each other.
-
Shift key — click on the first slide, and while pressing the Shift key, select the final slide for the group. This selects all of the slides between the first and the last slide selected.
-
Click and drag — position the cursor slightly to one side and outside the first slide, then click and drag the cursor until all of the slides required for the group are selected.
Working in Slide Sorter view
Working with slides in Slide Sorter view is similar to working with slides in the Slides pane. To make changes, right-click on a slide in Slide Sorter view and select one of the following commands from the context menu, as shown in Table 2:
Table 2: Slide Sorter commands
|
Command |
Action |
|
Cut |
Removes the selected slide and saves it to the clipboard. |
|
Copy |
Copies the selected slide to the clipboard without removing it. |
|
Paste |
Inserts a slide from the clipboard after the selected slide. |
|
New Slide |
Adds a new slide after the selected slide. |
|
Duplicate Slide |
Creates a duplicate of the selected slide and places the new slide immediately after the selected slide. |
|
Rename Slide |
Renames the selected slide. |
|
Hide Slide |
Any slides that are hidden are not shown in the presentation. |
|
Delete Slide |
Deletes the selected slide. |
|
Layout |
Allows changes to the layout of the selected slide. |
|
Move |
Allows moving or repositioning of the slide in the presentation order. |
Creating presentations
By default, Impress opens with the Select a Template dialog (Figure 2) displayed to select a template for a presentation. To create a presentation without a template, click on Cancel in the Select a Template dialog and a blank slide opens in the Workspace and Slides pane.
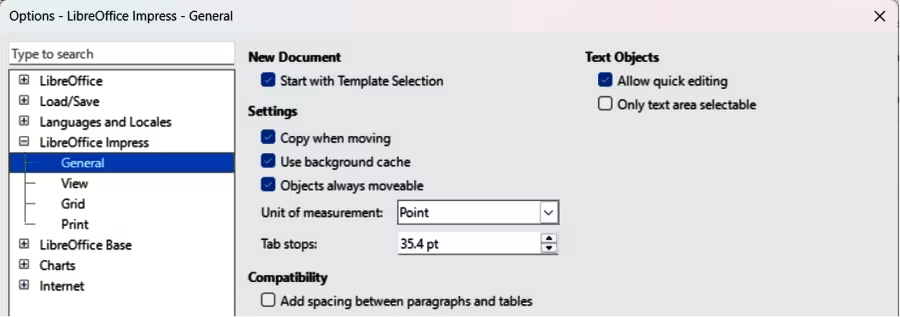
To prevent the Select a Template dialog from opening by default, go to Tools > Options > LibreOffice Impress > General (macOS LibreOffice > Preferences > LibreOffice Impress > General) on the Menu bar to open Options LibreOffice Impress General dialog (Figure 19) and deselect the option Start with Template Selection.
For more information on creating presentations, slide shows, and presentation settings, refer to Chapter 9, Slide Shows & Photo Albums and Chapter 11, Setting Up and Customizing Impress.
-
Tip
Decide on the presentation purpose and plan accordingly. Having ideas of audience type, structure, content, and presentation saves time when creating presentations.
Figure 19: Options LibreOffice Impress dialog — General page
New presentation
Inserting new slide
A new slide is inserted into a presentation using one of the following methods.
-
Go to Slide > New Slide on the Menu bar.
-
Right-click in the Slides pane and select New Slide from the context menu.
-
Use the keyboard shortcut Ctrl+M (macOS ⌘+M).
-
Go to Slide Sorter view in the Workspace, right-click on a slide and select New Slide from the context menu.
-
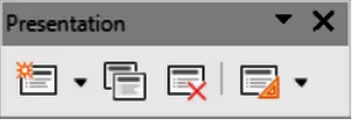
Click on New Slide in the Presentation toolbar (Figure 20). If the Presentation toolbar is not visible, go to View > Toolbars on the Menu bar and select Presentation from the submenu.
Figure 20: Presentation toolbar
-
Note
A new slide is inserted after the selected slide in the presentation. If a slide is not selected, then the new slide is inserted as the last slide in the presentation.
Duplicating slides
To duplicate a slide, select a slide for duplication in the Slides pane and use one of the following methods. A duplicate slide is inserted after the selected slide in the presentation.
-
Right-click on a slide in the Slides pane and select Duplicate Slide from the context menu.
-
Go to Slide Sorter view in the Workspace, right-click on a slide and select Duplicate Slide from the context menu.
-
Go to Slide > Duplicate Slide on the Menu bar.
-
Click on Duplicate Slide on the Presentation toolbar.
Slide format
Click on Properties on the Sidebar to open the Properties deck, then open the Slide panel (Figure 4) to display the format options available for a presentation. The Slide panel allows for formatting of all slides included in a presentation and selecting master slides for a presentation. For more information, see Chapter 2, Using Slide Masters, Styles, and Templates and Chapter 8, Adding and Formatting Slides and Notes.
Slide layout
By default, Title Slide layout is used for the first slide when a new presentation is created. The layouts included in Impress range from a blank slide to a slide with six contents boxes and a title. For more information on slide layouts, see Chapter 8, Adding and Formatting Slides, and Notes.
The first slide in a presentation is normally a title slide. The layouts Title Slide, which also contains a section for a subtitle, or Title Only are the most suitable layouts for the first slide in a presentation. For the remaining slides, select the most suitable layout to use for slide contents.
It is important to note that Impress does not provide the capability to create custom layouts. However, different elements in a slide layout can be resized and moved, see “Modifying slide elements” below.
Selecting slide layouts
The available layouts are shown in the Layouts panel on the Properties deck in the Sidebar. Select a slide, then select the slide layout using one of the following methods:
-
Go to the Properties deck on the Sidebar to open the Layouts panel (Figure 4).
-
Click on Slide Layout in the Presentation toolbar and open a pop-up dialog displaying the slide layouts available.
-
Click on Slide > Layout on the Menu bar to open a submenu displaying the layouts available.
-
Right-click on the selected slide and select Layouts to open a context menu displaying the layouts available.
-
Note
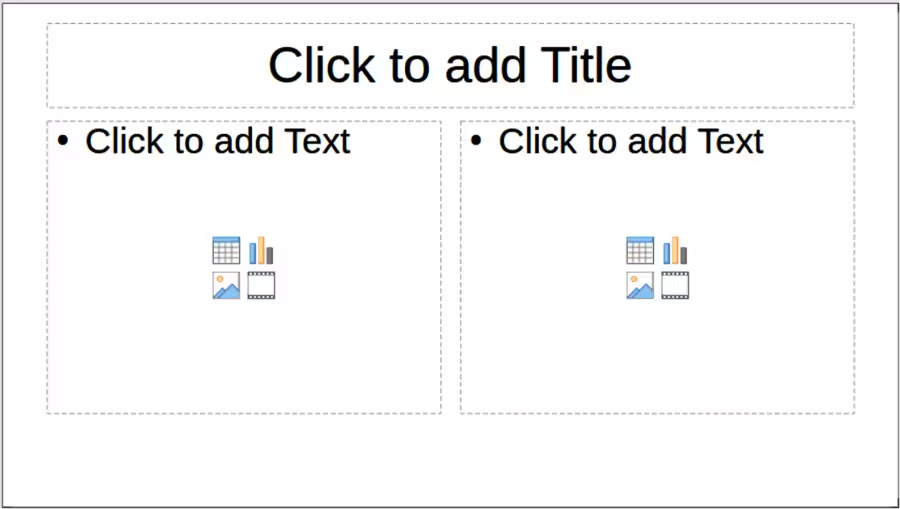
The icons that appear in the center of content boxes allow for the insertion of tables, charts, images, audio, or video into a content box, if required.
Changing slide layout
After selecting a slide in a presentation, change the slide layout using as follows:
-
Select a slide in the presentation.
-
Select a new layout for the slide using one of the methods available in “Selecting slide layouts” above.
Slide contents
Several layouts can contain one or more content boxes, as shown by the example in Figure 21. After selecting a content box, it can be configured to contain the following elements:
Figure 21: Example of slide content boxes
Slide title
Text
Table
Chart
Image
Audio or Video
-
Note
Text and graphic elements can be adjusted and formatted when creating a presentation. However, altering slide layout containing contents can have a significant effect. If the layout is changed after contents have been added, the contents are not lost, but may require reformatting.
Modifying slide elements
When a slide is inserted into a presentation, it contains elements that were included in the selected slide layout. However, it is unlikely that the predefined layouts suit all requirements for a presentation. Elements may need to be removed or objects inserted, for example, text or graphics.
Impress does not have the functionality to create new layouts, but it does allow for the resizing and moving of the slide elements. It is also possible to add slide elements without being limited to the size and position of content boxes.
When a slide is inserted into a presentation, it contains elements that were included in the selected slide layout. However, predefined layouts may not meet all of the presentation requirements. Elements may have to be removed or objects inserted, such as text and/or graphics.
-
Note
It is recommended that changes to slide elements in the layouts included in Impress are carried out using Normal view. While it is possible to make changes to a slide element when in the Master Slide view, the changes may affect other slides that use the same master slide. This may result in unpredictable results and requires extra care as well as a certain amount of trial and error.
Moving contents box
-
Click on the outer frame of the contents box so that the selection handles are displayed.
-
Place the cursor on the frame so that the cursor changes shape. This is normally a clenched hand, but depends on the computer setup and operating system.
-
Click and drag the contents box to its new position on the slide, then release.
Resizing contents box
-
Click on the outer frame so that the selection handles are displayed.
-
Place the cursor on a selection handle the frame so that the cursor changes shape.
-
Click and drag the selection handle on the frame to resize the contents box using one of the following options, then release.
-
Top and bottom selection handles change the height of a contents box.
-
Left and right selection handles change the width of a contents box.
-
Corner selection handles change width and height of a contents box.
Removing elements
-
Click a contents box or an element to highlight it and the selection handles are displayed.
-
Press Delete (macOS Ctrl+D), or Backspace key to remove the contents box or element.
Adding text
There are two ways of adding text to a slide – contents box or text box. For more information on text, see Chapter 3, Adding and Formatting Text.
Contents box
Text box
Adding images or objects
To add images or objects to a slide, for example a photograph, clipart, drawing, photograph, spreadsheet, click on Insert on the Menu bar and select the required option from the drop-down menu. For more information on adding objects, see the following chapters
-
Chapter 4, Adding and Formatting Images
-
Chapter 5, Managing Graphic Objects
-
Chapter 6, Formatting Graphic Objects
-
Chapter 7, OLE, Spreadsheets, Charts, and Other Objects
Modifying slide appearance
To change the background and other characteristics of all slides in a presentation, the master slide has to be modified, or a different master slide selected.
A master slide has a specified set of characteristics that serves as a template and is used as a starting point for creating other slides. These characteristics include slide background, objects in the background, formatting of any text used, and any background graphics.
Impress has a range of master slides, which are accessible in the Master Slides deck on the Sidebar. Additional master slides can be created and/or saved, or added from other sources. See Chapter 2, Using Slide Masters, Styles, and Templates for information on creating and modifying master slides.
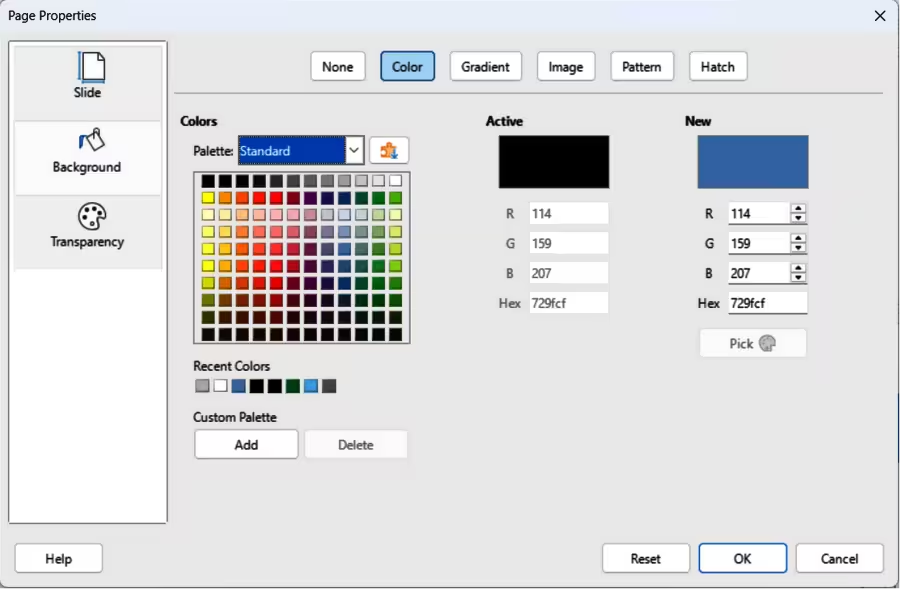
For example, to change the background of an individual slide or a master slide, follow these steps:
-
Right click on a slide or master slide and select Slide Properties from the context menu to open the Page Properties dialog (Figure 22).
-
Select Background and then select the type of background to use from None, Color, Gradient, Image, Pattern, and Hatch.
-
Make a selection from the various properties available for each type of background.
-
Click OK to apply save the changes and close the dialog.
-
Note
Inserting and formatting background is not covered in this chapter. For more information, see Chapter 6, Formatting Graphic Objects.
Figure 22: Page Properties dialog — Background Color page
Modifying presentations
By default, a presentation displays all the slides in the same order as they appear in Slide Sorter view on the Workspace. It is recommended to review the entire presentation before finally creating and saving the presentation. Run the presentation at least once (see “Running a presentation” below), then respond to the following questions. Also, there maybe more questions after running a presentation for the first time.
-
Are the slides in the correct order? If not, position of some of slides has to be changed.
-
Is the information well spaced and visible to all members of an audience in a large room?
-
Would an additional slide make a particular point clearer? If so, create another slide.
-
Are some of the slides unnecessary? Hide or delete the slides not required.
-
Would animations help some of the slides? This is considered an advanced technique.
-
Should some of the slides have a different slide transition than others? The transition of those slides should be changed.
Once the questions have been answered, make the necessary changes. Making changes can be carried out in Slide Sorter view on the Workspace.
-
Tip
If one or more slides are not necessary, hide the slide or slides, then view the slide show again to make sure the slides are not required. To hide a slide, right-click the slide in the Slides pane and select Hide Slide from the context menu. Do not delete a slide until this is done, or the slide may have to be created again.
Slide order
Change the slide order in a presentation using one of the following methods:
-
In Slide Sorter view, click on a slide that is being moved and drag it to a new position in the presentation.
-
In the Slides pane, click on the slide that is being moved and drag it to a new position in the presentation.
Animations
If animations are going to be added to slides in a presentation, click on Animation on the Sidebar to open the Animation deck to provide access to the following animation options:
Effect — Category; Effect; Start; Direction; Duration; Delay
Automatic preview.
Animation is an advanced technique and is beyond the scope of this chapter. For more information on animation, see Chapter 9, Slide Shows & Photo Albums.
Slide transitions
To make a presentation more professional, it is recommended to add transitions between each slide in a presentation. Click on Slide Transition on the Sidebar to open the Slide Transition deck (Figure 23) giving access to the various transition options as follows:
Modify Transition — Variant; Duration; Sound
Advance Slide — On mouse click; After
Automatic preview
Adding slide transitions is an advanced technique and is beyond the scope of this chapter. For more information on slide transitions, see Chapter 9, Slide Shows & Photo Albums.
Figure 23: Sidebar — Slide Transition deck
Running a presentation
When a presentation is completed, it is recommended to run the presentation and make sure that everything is correct before showing the presentation to an audience.
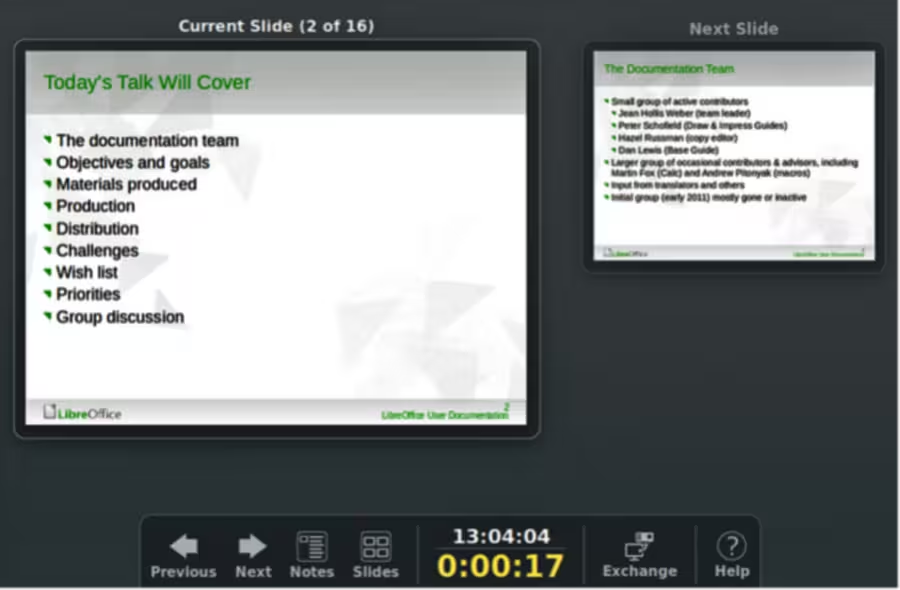
For displaying a presentation to an audience, Impress has a Presenter Console available. However, multiple displays must be connected to the computer for the Presenter Console to function. For more information and details about running a presentation and showing it to an audience, see Chapter 9, Slide Shows & Photo Albums.
Single displays
-
Start the slide using one of the following methods:
-
Go to Slide Show on the Menu bar and select Start from First Slide from the submenu or use the keyboard shortcut F5.
-
Go to Slide Show on the Menu bar and select Start from Current Slide from the submenu or use the keyboard shortcut Shift+F5.
-
To display each slide in the presentation during the slide show, use one of the following methods:
-
Press the spacebar to advance to the next slide in the presentation.
-
Press the arrow keys to show the next or previous slide in the presentation.
-
If Change slide by clicking on background has been selected in Slide Show Settings, position the cursor on the slide and click to move to the next slide.
-
When the slide show has ended or to exit the slide show before it has finished, press the Esc key to close the slide show and return to Impress.
Multiple displays
When multiple displays are connected to a computer, the Presenter Console (Figure 24) becomes available providing extra control over a presentation as follows:
-
On multiple displays, the audience sees the current slide in the presentation.
-
The current slide, next slide in the presentation, slide notes, and a presentation timer are displayed on the computer display providing control of how the slide show is presented to the audience.
-
Starting a slide show using Presenter Console and multiple displays is similar to running a slide show on a single display. For more information and details about using the Presenter Console, see Chapter 9 Slide Shows & Photo Album.
Figure 24: Presenter Console — Current Slide