Copyright
This document is Copyright © 2026 by the LibreOffice Documentation Team. Contributors are listed below. This document may be distributed and/or modified under the terms of either the GNU General Public License (https://www.gnu.org/licenses/gpl.html), version 3 or later, or the Creative Commons Attribution License (https://creativecommons.org/licenses/by/4.0/), version 4.0 or later. All trademarks within this guide belong to their legitimate owners.
Contributors
Contributors for this edition:
Peter Schofield
Contributors for previous editions:
Dimona Delvere, Felipe Viggiano, Hazel Russman, Jean Hollis Weber, Kees Kriek, Low Song Chuan, Michele Zarri. Peter Schofield, Regina Henschel, T. Elliot Turner
Feedback
Please direct any comments or suggestions about this document to the Documentation Team Forum at https://community.documentfoundation.org/c/documentation/loguides/ (registration is required) or send an email to: loguides@community.documentfoundation.org.
-
Note
Everything sent to a forum, including email addresses and any other personal information that is written in the message, is publicly archived and cannot be deleted. Emails sent to the forum are moderated.
Publication date and software version
Published August 2026. Based on LibreOffice 26.2 Community.
Other versions of LibreOffice may differ in appearance and functionality.
Designing presentations
The design and planning of a presentation is necessary to create an interesting presentation. While slide appearance can be changed as the presentation is developed, planning ahead saves time. Before creating a presentation, it is recommended to create an outline to determine the requirements for slide design, as follows:
-
Color combinations for background and text to enhance readability and visual appeal.
-
Would an image help an audience understand the contents better?
-
Is there text and images that have to appear on all the slides? For example company name and logo.
-
Would audiences benefit from having the slides numbered providing quick reference to slides?
-
Are background graphics or gradients required? Select options that do not distract from the slide content, such as colors used in charts.
-
How many master slides are required?
-
Will one slide design be sufficient for all presentation content?
Master Slides
What are master slides?
Master slides are the foundation or starting point for creating slides. Master slides are similar to page styles in Writer and control the basic formatting of slides based on a master slide. More than one master slide can be used in a presentation.
Master slides have a defined set of characteristics or attributes that are automatically applied to slides being created for a presentation, which may include, for example, background color, graphics, or gradients. Also, objects, such as logos, decorative lines, headers and footers, text frames, and text formatting can all be included on a master slide.
All characteristics of master slides are controlled by styles. When a new slide is added to a presentation, its styles are automatically inherited from the master slide in use. Changing a style in a master slide results in changes to all slides based on that master slide. However, it is possible to modify each individual slide without affecting the master slide.
Master slides use two types of styles: presentation styles and drawing styles. Presentation styles can be modified, but new presentation styles CANNOT be created. Drawing styles can be modified and new drawing styles can be created. For more information, see “Working with styles” below.
-
Note
It is recommended to use master slides. However, manual changes are required occasionally. For example, editing a slide to enlarge the chart area when text and chart layout is used.
Working with master slides
Impress includes several master slides, which are displayed in the Sidebar Master Slides deck (Figure 1). The Master Slides deck has three panels: Used in This Presentation, Recently Used, and Available for Use. Click the expand marker next to a panel name to show master slide thumbnails, or click the collapse marker to collapse a panel and hide thumbnails.
Figure 1: Sidebar Master Slides deck
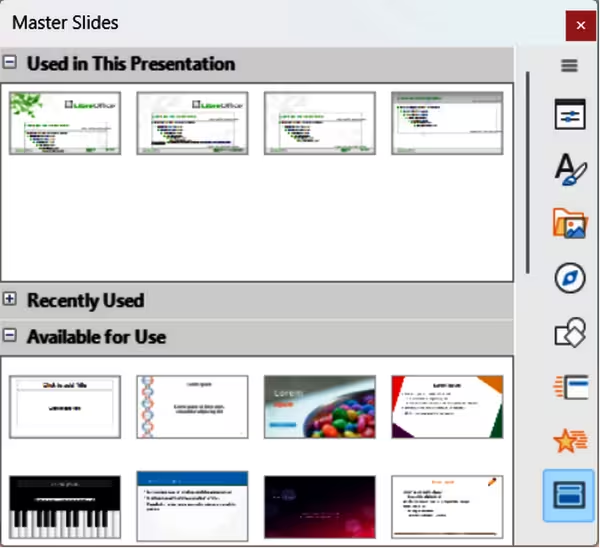
Used in This Presentation
Recently Used
Available for Use
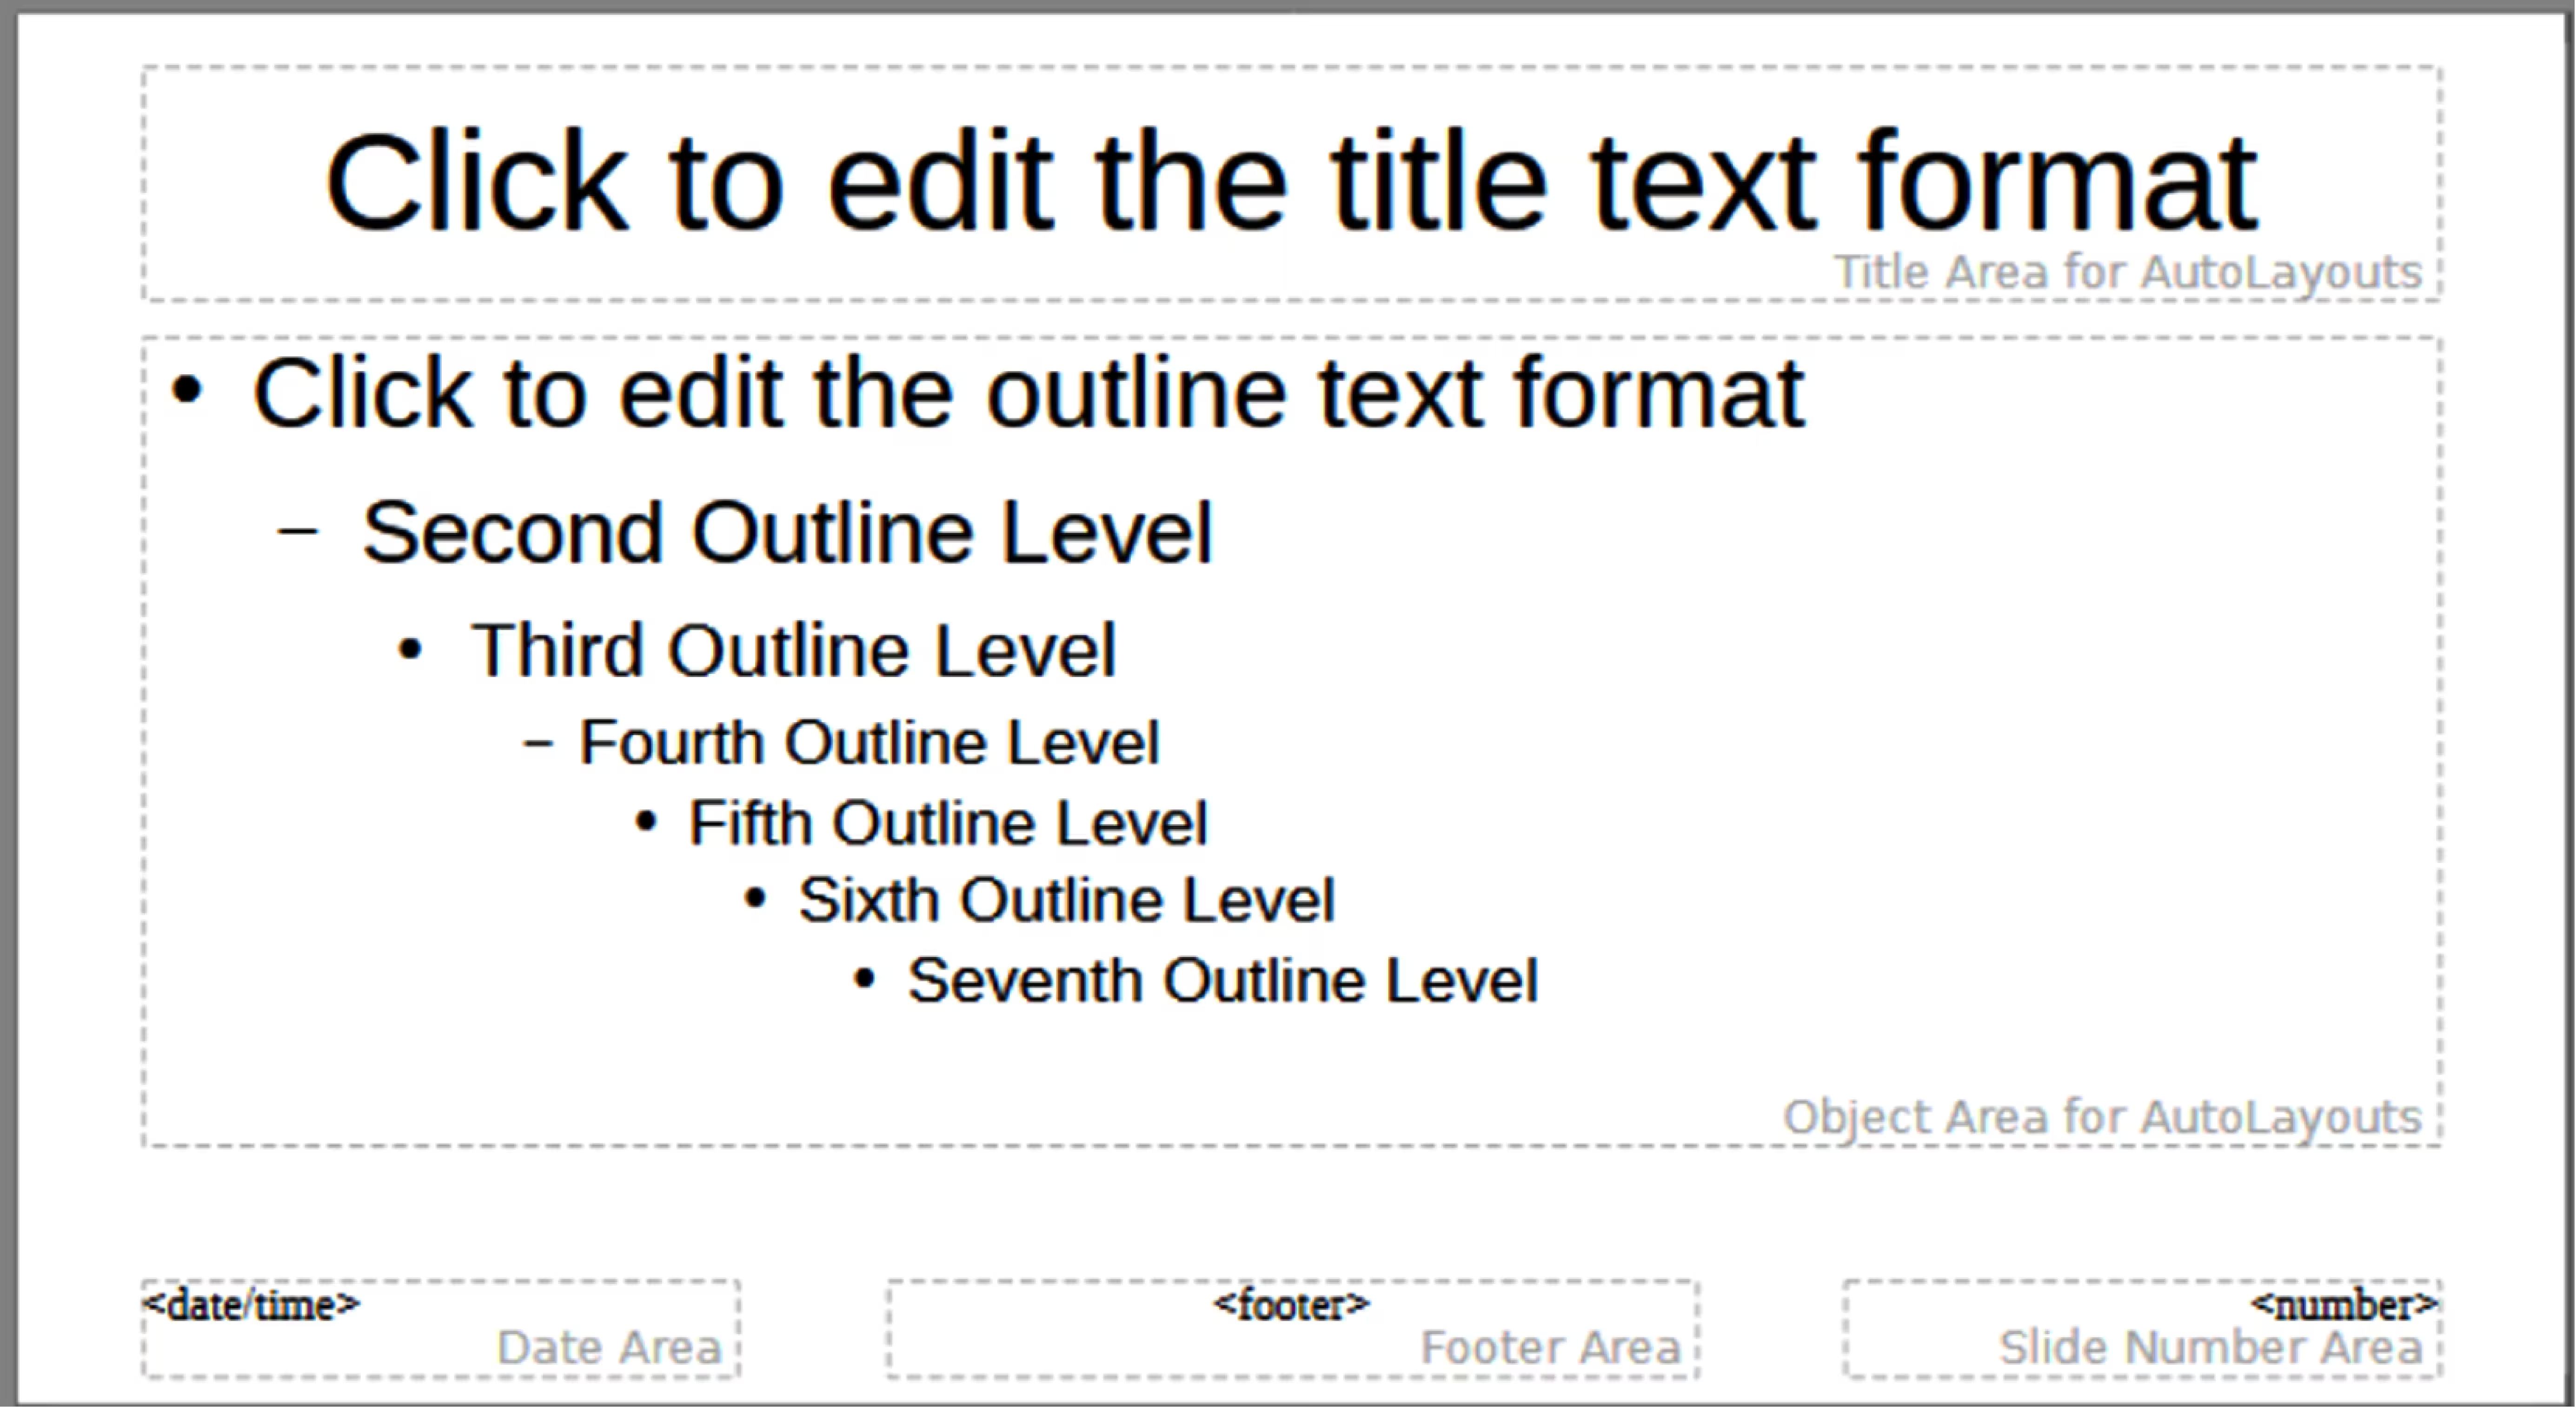
If a new presentation is being created without using a template, then a default template and default master slide are available (see Chapter 1, Introducing Impress for more information). The Impress default template and default master slide are a good starting point for creating presentations. An example of the default master slide is shown in Figure 2.
Creating master slides
-
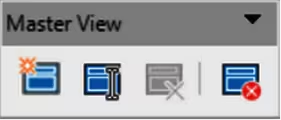
Go to View > Master Slide on the Menu bar to open Master View in the Workspace. The Master View toolbar also opens (Figure 3). If the Master View toolbar does not open, go to View > Toolbars on the Menu bar and select Master View.
-
Create a new master slide using one of the following methods and a new master slide appears in the Slides pane:
-
Click on New Master in the Master View toolbar.
-
Right-click on a master slide in the Slides pane and select New Master from the context menu.
-
Go to Slide > New Master on the Menu bar.
Figure 2: Example of a default Master Slide
-
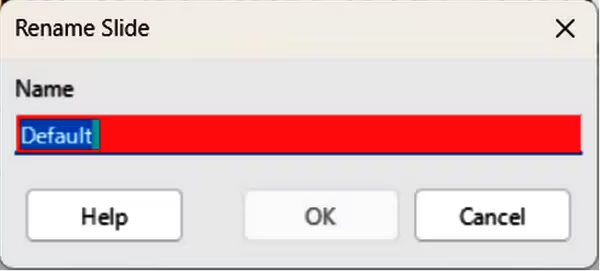
Rename the new master slide using one of the following methods to open the Rename Slide dialog (Figure 4):
-
Click on Rename Master in the Master View toolbar.
-
Right-click on the new master slide in the Slides pane and select Rename Master from the context menu.
Figure 3: Master View toolbar
-
Enter a memorable name for the new master slide in the Name text box, then click on OK to save the changes and close the dialog.
-
Make sure the new master slide is selected in the Slides pane and add all the required text, graphics and master elements for the new master slide. The chapters in this user guide provide information on adding, editing, formatting and managing the different types of objects on a master slide.
Figure 4: Rename Slide dialog
-
When finished creating a new master slide, use one of the following methods to return to Normal View:
-
Click on Close Master View on the Master View toolbar.
-
Go to View > Normal on the Menu bar.
-
Save the presentation file before continuing.
Applying master slides
To apply a master slide to all slides or selected slides in a presentation:
-
If required, select the slides where a master slide is going to be applied.
-
Click on Master Slides to open the Master Slides deck on the Sidebar (Figure 1).
-
Right-click on the required master slide in the Used in This Presentation panel in the Master Slides deck on the Sidebar.
-
Select Apply to All Slides or Apply to Selected Slides from the context menu.
Loading additional master slides
In presentations, it maybe necessary to combine multiple master slides used in different templates (for more information, see “Working with templates” below). For example, use a different layout for the first slide in a presentation, or add a slide from a different presentation.
-
Select the slide or slides in the Slides pane for changing the master slide.
-
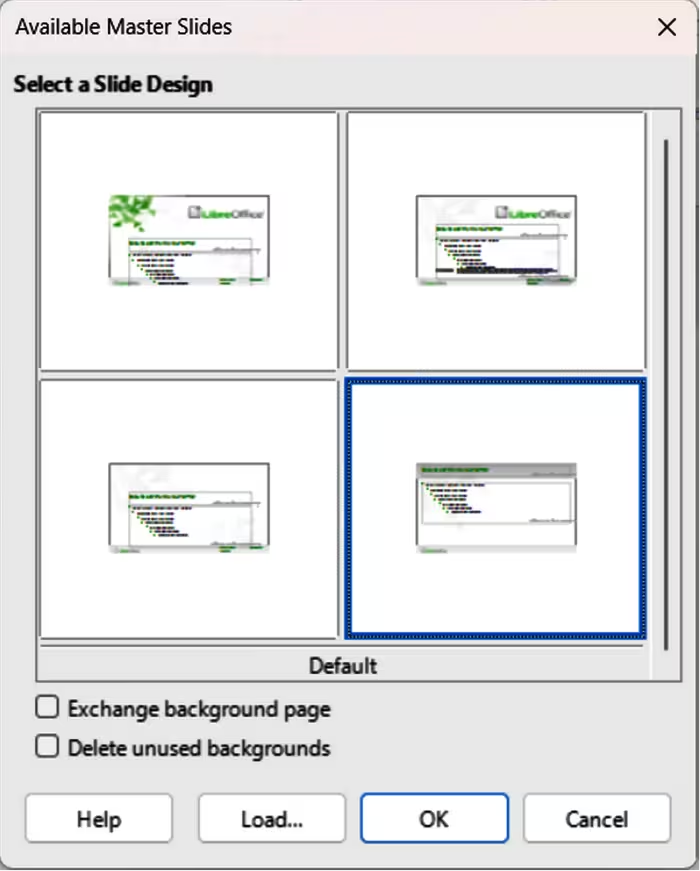
Go to Slide > Change Slide Master on the Menu bar to open the Available Master Slides dialog (Figure 5).
Figure 5: Available Master Slides dialog
-
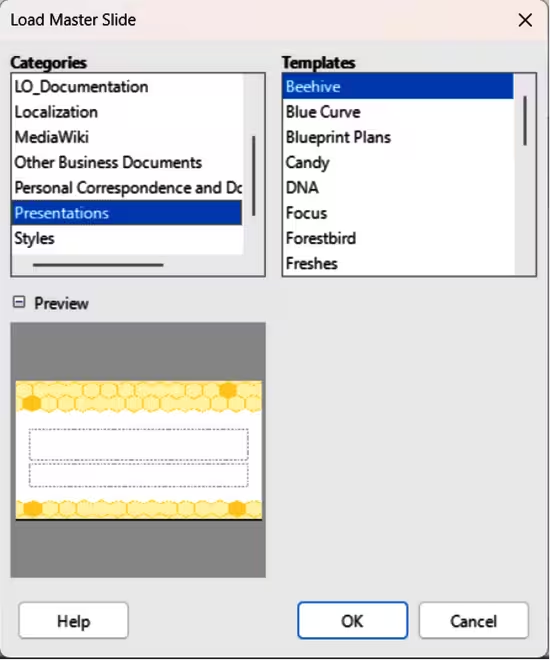
To add master slides, click on Load to open the Load Master Slide dialog (Figure 6).
-
In Categories, select the template category for master slides.
-
In Templates, select the template to use as a master slide for the selected slides.
Figure 6: Load Master Slide dialog
-
Click OK to close the Load Master Slide dialog and the master slides from the selected template appear in the Available Master Slides dialog.
-
In the Available Master Slides dialog, select the master slide required from the options available in the Select a Slide Design box.
-
To apply the selected master slide to all slides in a presentation, select Exchange background page.
-
To apply the slide design to selected slides only, deselect Exchange background page.
-
Click OK to apply the selected master slide and close the Available Master Slides dialog.
Editing master slides
The following items can be selected, applied and formatted on a master slide:
-
Background (color, gradient, hatching, or bitmap) — for more information, see “Selecting and applying backgrounds” below.
-
Background objects (for example, a logo or decorative graphics) — for more information, see “Adding images” below; Chapter 4, Adding and Formatting Pictures; Chapter 5, Managing Graphic Objects; and Chapter 6, Formatting Graphic Objects.
-
Size and placement of default frames for slide titles and content — for more information, see “Adding text and fields” below.
-
Text attributes for the main text area and notes — for more information, see “Adding text and fields” below and Chapter 3, Adding and Formatting Text.
-
Size, placement, and contents of header and footer elements to appear on every slide — for more information, for more information, see “Adding text and fields” below and Chapter 3, Adding and Formatting Text.
Editing
-
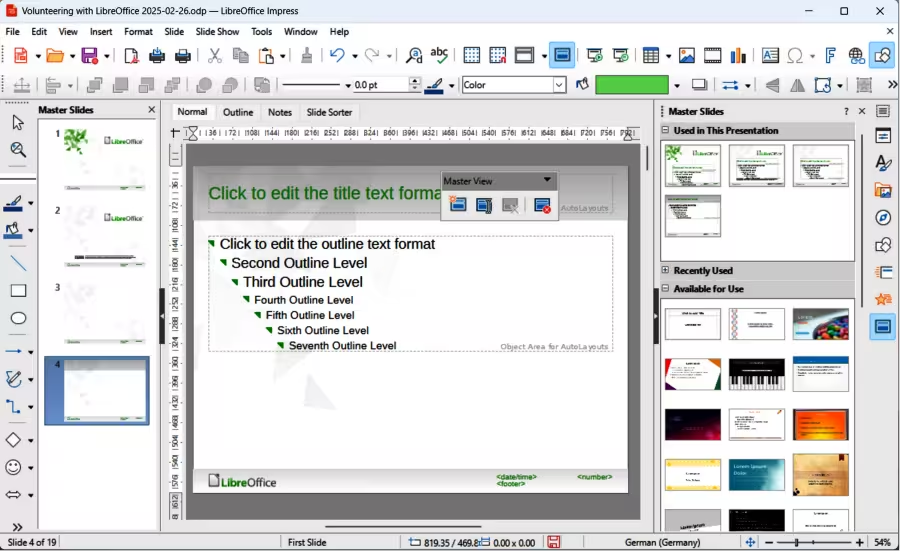
Select View > Master Slide on the Menu bar to open the Master Slide view (Figure 7). The Master View toolbar (Figure 3) also opens when the Master Slide view opens.
-
Select a master slide for editing in the Slides pane so that it appears in the Workspace.
-
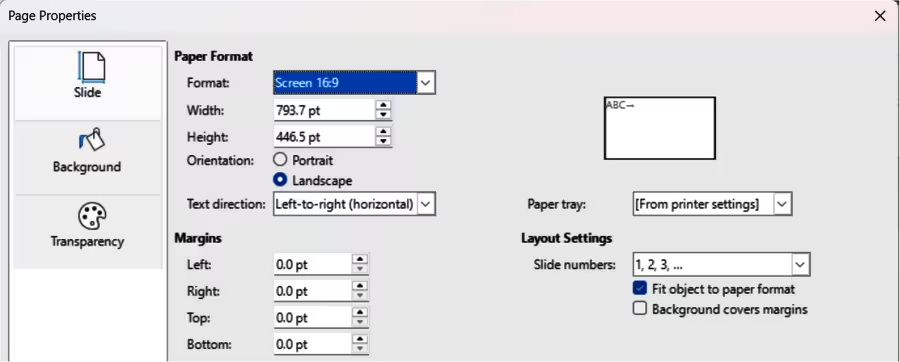
Go to Slide > Slide Properties on the Menu bar, or right-click in the Workspace and select Slide Properties from the context menu to open the Slide Properties dialog (Figure 8).
-
Use the various options in the Slide, Background, and Transparency pages in the Slide Properties dialog to make changes to the master slide format.
Figure 7: Example of Master Slide Vliew
-
Click OK to save the changes and close the Slide Properties dialog.
-
Select an object on the master slide, then right-click on the object to open a context menu.
-
Select one of the options from the context menu to edit the object. Selecting an option may open a context menu, dialog, application, or file browser window to carry out the necessary changes on the selected object.
-
Click on Close Master View on the Master View toolbar, or go to View > Normal on the Menu bar to exit from editing master slides.
-
Save the presentation file before continuing.
Figure 8: Page Properties dialog — Slide page
-
Note
Changes made to a master slide in Master Slide view appear on all slides using the same master slide. Always make sure to close Master Slide view and return to Normal view before working on any of the presentation slides.
Direct formatting
Any changes made directly or manually to any object on a slide in Normal view (for example, changes to bullet point style, color of the title area, and so on) are not overridden by subsequent changes made to the master slide used for that slide. If required, remove formatting of a directly formatted object to the style defined in the master slide, select a slide object and use one of the following to change the formatting:
-
Go to Format > Clear Direct Formatting on the Menu bar.
-
Right-click on an object and select Clear Direct Formatting from the context menu.
-
Note
The title and text boxes inherit properties of a master slide. If the position of these text boxes in the master slide has changed, the layout may appear corrupted. Some layout elements may have to be horizontally and/or vertically repositioned on a slide.
Selecting and applying backgrounds
Selecting and applying backgrounds can be applied to a number of elements in Impress. The following procedures are used when applying a background to master slides, slides, objects, default text areas, images and so on.
Using slide properties
-
Select View > Master Slide on the Menu bar. This also opens the Master View toolbar.
-
Select a master slide in the Slides pane so that it appears in the Workspace.
-
Go to Slide > Slide Properties on the Menu bar or right-click in the Workspace and select Slide Properties from the context menu to open the Slide Properties dialog.
-
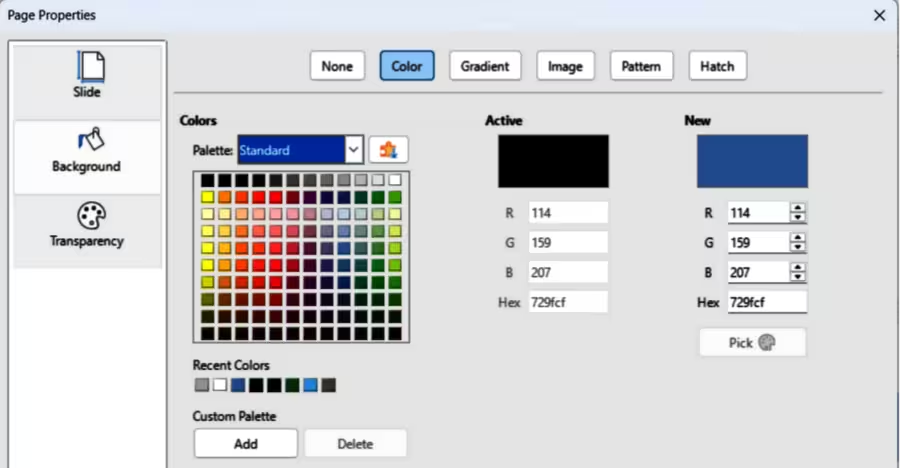
Click on the Background tab to open the Background page on the Slide Properties dialog (Figure 9).
Figure 9: Slide Properties dialog — Background Color page
-
Select the type of background required by clicking one of the following tabs: Color, Gradient, Image, Pattern, and Hatch. See Chapter 6, Formatting Graphic Objects for more information on how to use the options available for each type of background selected.
-
When satisfied with the slide background, click OK to save the changes and close the Slide Properties dialog.
-
Note
Custom fills can be created for each type of background. See Chapter 6, Formatting Graphic Objects for more information on creating background custom fills.
Using background style
-
Select View > Master Slide on the Menu bar. This also opens the Master View toolbar.
-
Select a master slide in the Slides pane so that it appears in the Workspace.
-
Click on Styles on the Sidebar to open the Styles deck.
-
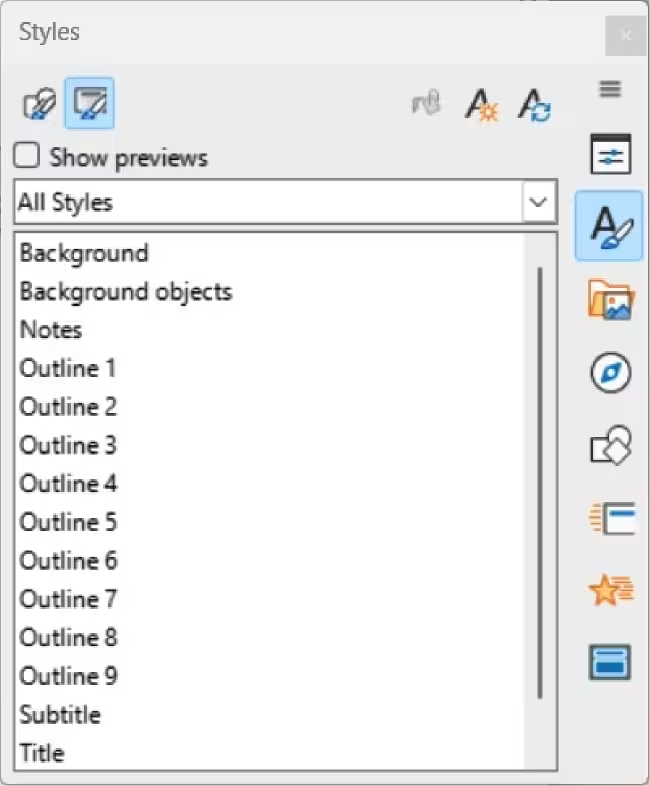
Click on Presentation Styles on the Styles deck to open the Presentation Styles list (Figure 10).
Figure 10: Sidebar Styles — Presentation Styles
-
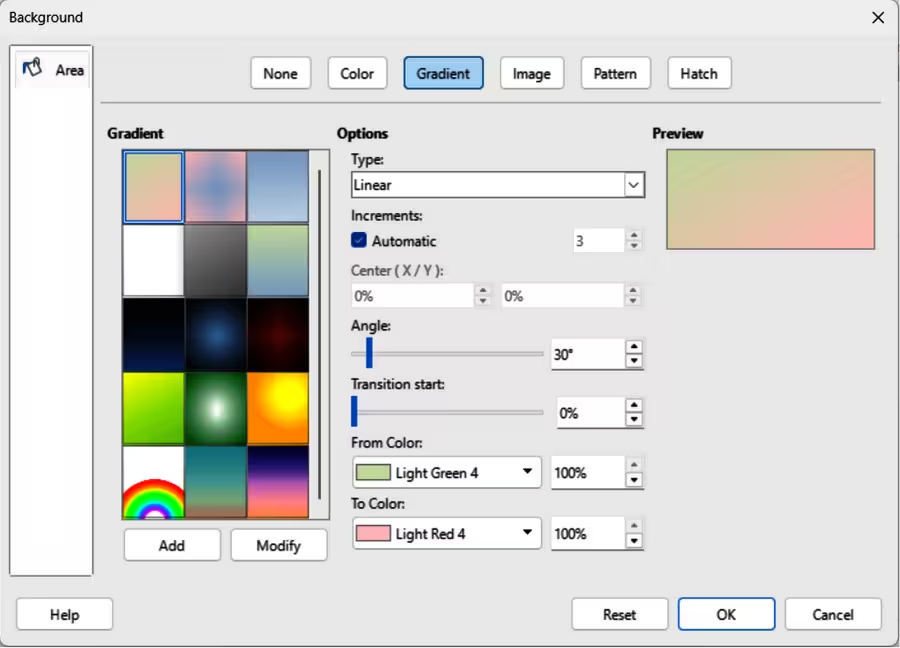
Right-click on the Background style and select Edit Style from the context menu to open the Background dialog (Figure 11) providing several options to format a slide background.
-
When satisfied with the background, click OK to save the changes and close the Background dialog.
-
Tip
Custom fills can be created for each type of background. See Chapter 6, Formatting Graphic Objects for more information on creating custom fills for each type of background.
Figure 11: Background dialog — Area Gradient page
Adding images
When the same image appears on every slide of a presentation, for example a company logo, the recommended solution is to use a master slide. Using master slides saves time when creating presentations allowing modification or repositioning of an image on all slides.
If the same image is added to each slide manually, modification and positioning has to be carried out on each individual slide in a presentation. Manual formatting of individual slides can create errors. Other objects can also be added to the background, for example decorative lines, text, shapes, and company logos.
LibreOffice supports a large number of image and graphic formats. For more information on working with images, see Chapter 4, Adding and Formatting Pictures; Chapter 5, Managing Graphic Objects; and Chapter 6, Formatting Graphic Objects.
For example, one of the most common actions when creating a presentation is to add an image to the master slide. To insert an image already available on the computer, follow these steps:
-
Select View > Master Slide on the Menu bar. Master Slide view also opens the Master View toolbar (Figure 3).
-
Select the master slide where the image is going to be added.
-
Select Insert > Image on the Menu bar to open the file browser.
-
Navigate to the directory where the image is located and select it.
-
Click Open to close the file browser and the image is placed centrally on the master slide.
-
Modify and/or position the image on the master slide.
-
Right-click on the image and select Arrange > Send to Back from the context menu. This moves the image to the background so that any information added to a slide then appears over the background image.
-
Note
LibreOffice can insert an image as a link to a file rather than embedding. Linking files is used when a presentation is not intended for distribution to other computers and remains in the same directory structure. If a presentation file is to be distributed to other computers, it is recommended to embed the image avoiding the “missing image” syndrome when the presentation is used on a different computer.
Default text areas
When a master slide is opened for editing, it contains five default text areas, as shown in Figure 2.
-
Title area for AutoLayouts
-
Object area for AutoLayouts
-
Date area
-
Footer area
-
Slide number area
-
Note
When a cursor is positioned over a selection handle, a visual indication is displayed of how the text area shape is affected when a selection handle is moved. Keep the Shift key pressed when moving a selection handle to maintain the width and height dimension ratio of a text area.
Quick positioning and resizing
Click in an area to display the selection handles around the text area. Use the selection handles to modify the size and position of a text area.
-
Select a text area so that the selection handles are visible.
-
Position the cursor on the border of a text area, not on a selection handle, and the cursor changes shape. Normally this is a clenched hand, but the shape is dependent on the computer setup and operating system.
-
Click and drag the text area to the required position.
-
Position the cursor on the left or right selection handle and the cursor changes shape.
-
Click and drag the left or right selection handle to change the width of the text area.
-
Position the cursor on the top or bottom selection handle and cursor changes shape.
-
Click and drag top or bottom selection handle to change height of default text area.
-
Position the cursor on a corner selection handle and the cursor changes shape.
-
Click and drag the corner selection handle to change both the height and width of the default text area at the same time.
Controlled positioning and resizing
To accurately control the shape, size and position of a text area, it is recommended to use the Position and Size dialog, or the Position and Size panel in the Properties deck on the Sidebar.
-
Select the text area by clicking on its border.
-
Use one of the following methods to access position and size options for a text area:
-
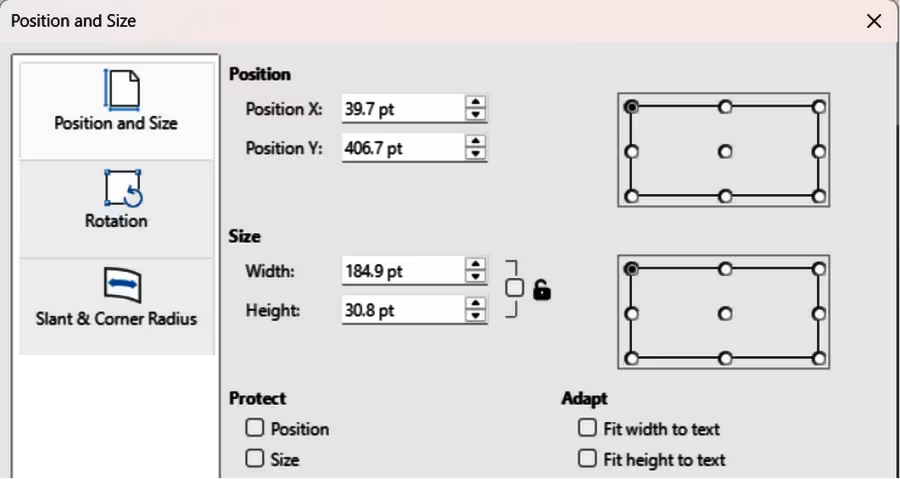
Go to Format > Text Box and Shape > Position and Size on the Menu bar to open the Position and Size dialog (Figure 12).
Figure 12: Position and Size dialog
-
Use the keyboard shortcut F4 to open the Position and Size dialog.
-
Right-click on the border of the text area and select Position and Size from the context menu to open the Position and Size dialog.
-
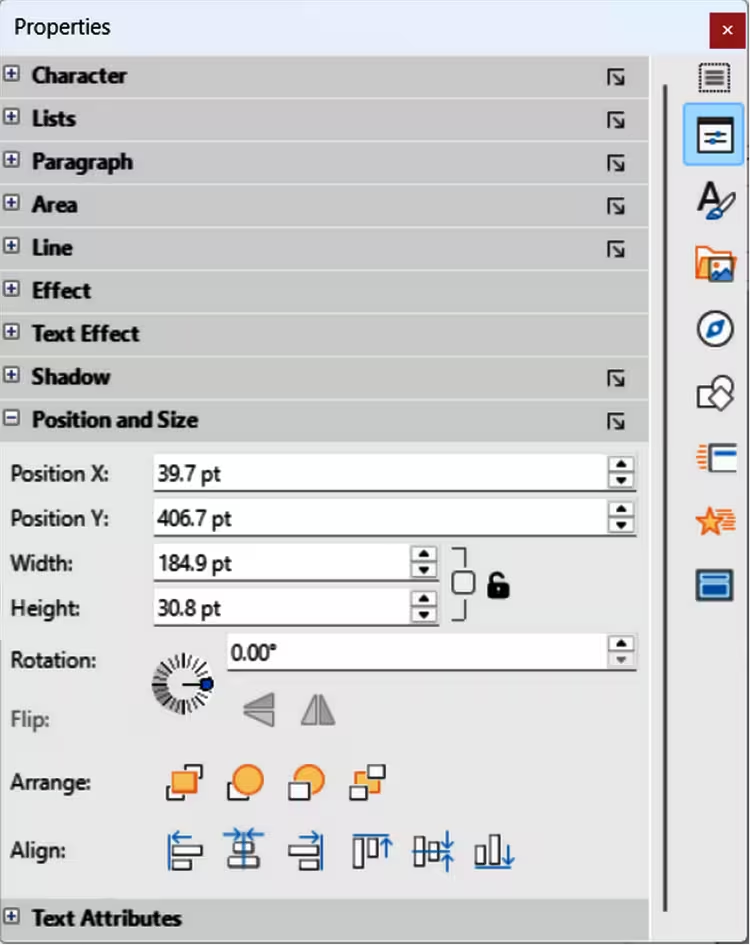
Click on Properties on the Sidebar to open the Properties deck, then open the Position and Size panel (Figure 13).
Only short descriptions of the most important functions are provided below. For more information on Position and Size options see the Draw Guide.
Figure 13: Sidebar Properties deck — Position and Size panel
Position
Base point
Available in the Position and Size dialog only. Allows selection of a point on the rectangular area surrounding an object and is used when repositioning an object. The default setting for the Base point is the top left corner means that the top left corner of the object is used to reposition the rectangular area.
Size
Base point
Available in the Position and Size dialog only. Allows point selection of a rectangular text area that does not move while resizing. Default setting of top left corner means that the top left corner position of the text area does not change during resizing.
Rotation
Slant & Corner Radius
Background
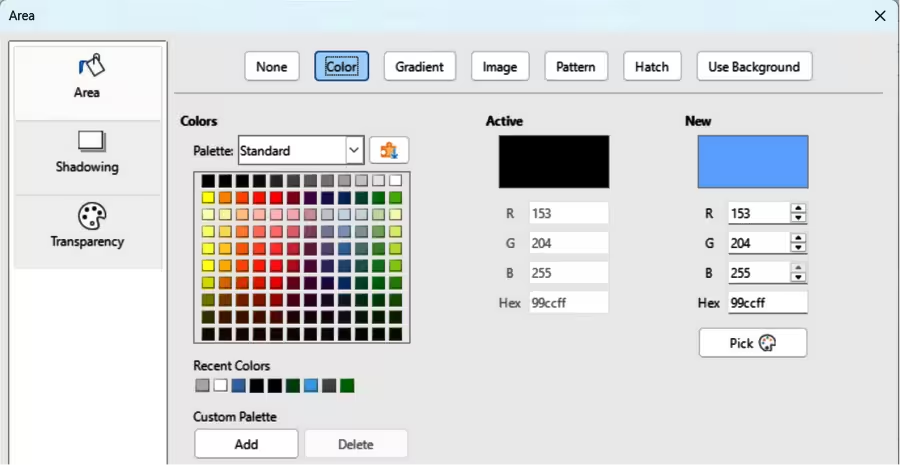
Change the type of area fill used for backgrounds in a default text area using one of the following methods. Available options depend on the type of area fill selected. See Chapter 6, Formatting Graphic Objects for more information on changing backgrounds.
-
Go to Format > Text Box and Shape > Area on the Menu bar to open the Area dialog (Figure 14).
Figure 14: Area dialog — Area Color page
-
Right-click on the text area and select Area from the context menu to open the Area dialog.
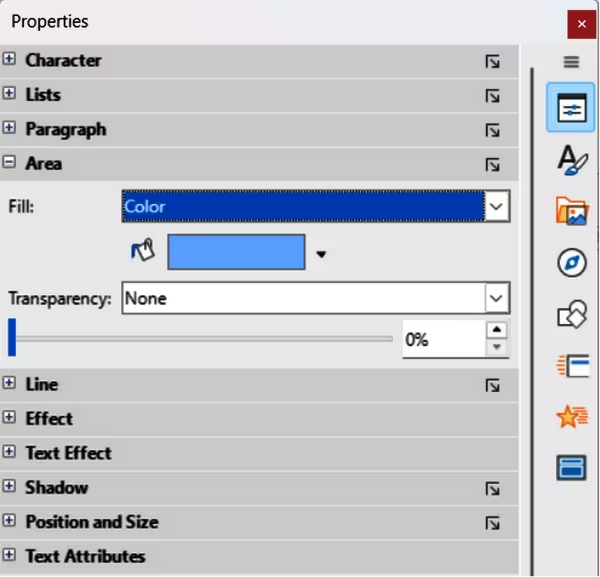
Figure 15: Sidebar Properties deck — Area panel
-
Click on Properties on the Sidebar to open the Properties deck, then open the Area panel (Figure 15).
Border
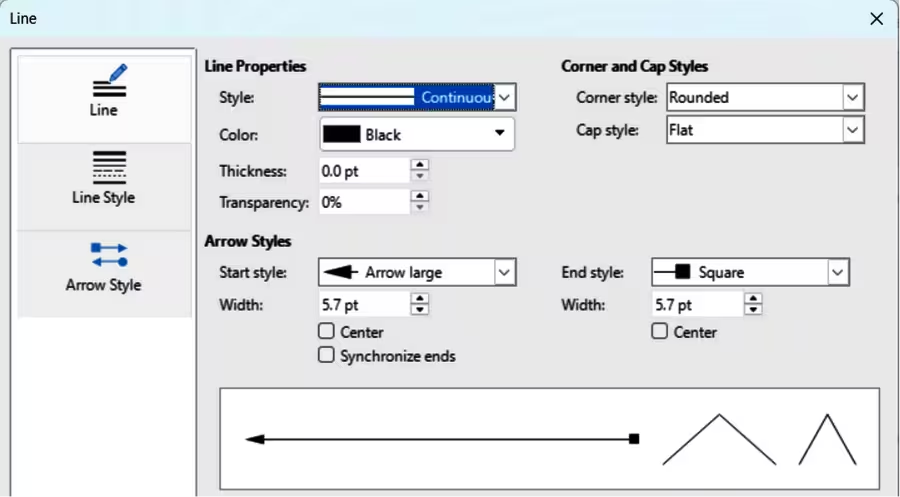
Change the line type used for borders in a text area using one of the following methods. Available options depend on the selected line type. See Chapter 6, Formatting Graphic Objects for more information on changing borders.
-
Go to Format > Text Box and Shape > Line on the Menu bar to open the Line dialog (Figure 16).
Figure 16: Line dialog — Line page
-
Right-click on the object and select Line from the context menu to open the Line dialog.
-
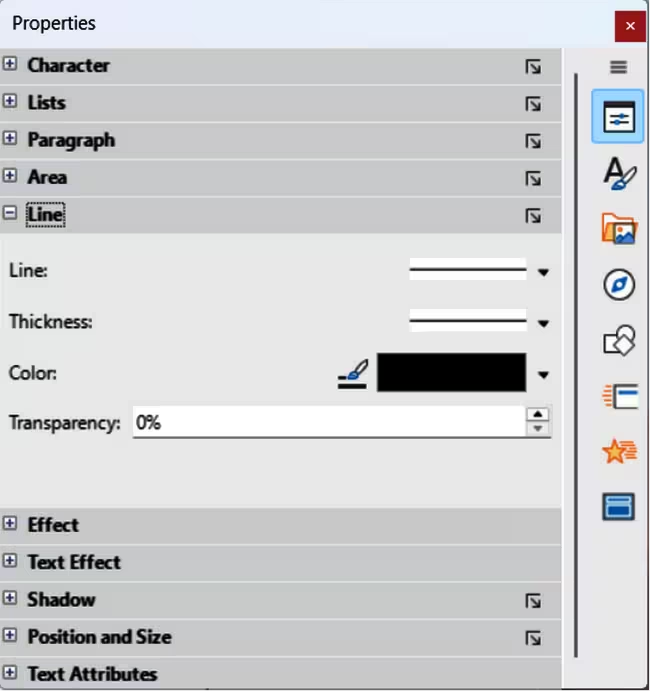
Click on Properties on the Sidebar to open the Properties deck, then open the Line panel (Figure 17).
Alignment
Change the alignment of a text area in relation to its position on a master slide, or alignment between a text area and other objects on a master slide using one of the following methods. See Chapter 5, Managing Graphic Objects for more information of default text areas.
-
Go to Format > Align Objects on the Menu bar and select the type of alignment from the options available in the context menu.
-
Right-click on the object and select Align Objects from the context menu, then select the type of alignment from the options available in the context menu.
-
Click on the triangle ▼ to the right of Align Objects on the Line and Filling toolbar and select the type of alignment from the options available.
-
Select the required alignment tool in the Position and Size panel in the Properties deck on the Sidebar.
Figure 17: Sidebar Properties deck — Line panel
Arrangement
Arrange the position of an object on a slide in relation to other objects on a slide using one of the following methods. See Chapter 5, Managing Graphic Objects for more information on changing position of default text areas in relation to other objects.
-
Go to Format > Arrange on the Menu bar and select the type of arrangement from the options available in the context menu.
-
Right-click on the object and select Arrange from the context menu, then select the type of arrangement from the options available in the context menu.
-
Click on the required arrangement tool on the left end of the Line and Filling toolbar.
-
Select the required arrangement tool in the Position and Size panel on the Properties deck on the Sidebar.
Adding text and fields
Adding text and fields to a master slide allows placing of information that will be displayed on all slides in a presentation. For example, presentation title, company name and logo, date, and slide number. For more information on adding and formatting text and fields, see Chapter 3, Adding and Formatting Text.
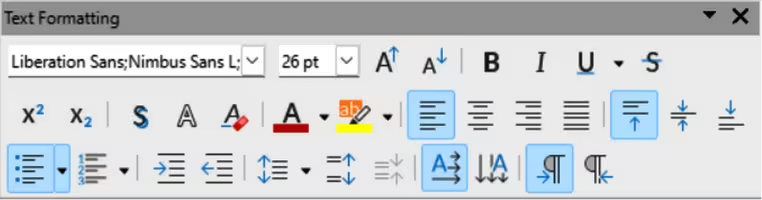
Figure 18: Text Formatting toolbar
Text
Text objects can be placed anywhere on the master slide and will appear on every slide in a presentation. Text objects can also be placed in the footer if the default fields in the footer of a presentation are not going to be used.
-
Select View > Master Slide on the Menu bar to open the master slide view. This also opens the Master View toolbar.
-
Select the master slide so that it appears in the Workspace.
-
Switch text editing mode on using one of the following methods. The Text Formatting toolbar (Figure 18) automatically opens replacing the Line and Filling toolbar.
-
Select Insert Text Box on the Standard or Drawing toolbar.
-
Go to Insert > Text Box on the Menu bar.
-
Use the keyboard shortcut F2.
-
Click once on the master slide so that a text box is created and there is a flashing cursor inside the text box.
-
Type or paste the text into the text object, then format the text. See Chapter 3, Adding and Formatting Text for more information.
-
Click outside the text object to close the Text Formatting toolbar and reopen the Line and Filling toolbar.
-
Click Close Master View on the Master View toolbar or go to View > Normal on the Menu bar when adding and formatting text to a master slide is completed.
Fields
Fields, for example author, slide title, or slide number, can be added as text objects to a slide or master slide, or replace a footer field. For more information on fields, see Chapter 3, Adding and Formatting Text.
Default footer sections
By default, a slide has three footer sections with each section containing a default field as follows:
Left section
Centre section
Right section
-
Note
Headers are not used in Impress slides. Footers are inserted using Normal view. Any editing and repositioning of footers is carried out using Master Slide view
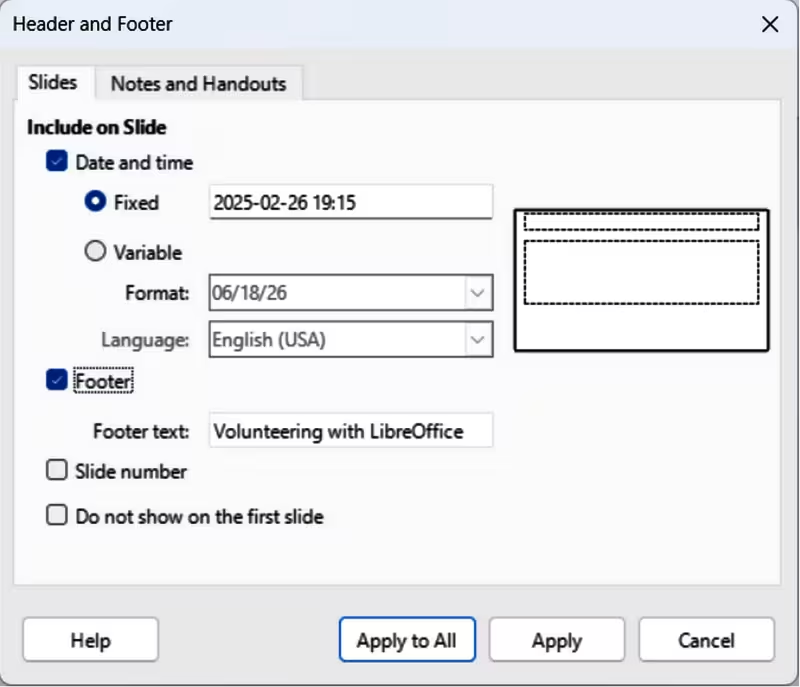
Figure 19: Header and Footer dialog — Slides page
Inserting and formatting footers
The default footer fields are set up using the Header and Footer dialog (Figure 19). The following procedure is an example for creating footer fields:
-
Select a slide and go to Insert > Header and Footer on the Menu bar to open the Header and Footer dialog.
-
Select Date and Time for the date and time to appear in the left section of the footer.
-
For a fixed date and time in the left footer section, select Fixed and enter the date to use in the text box.
-
For a variable date and time in the left footer section, select Variable, then the required format and language from the Format and Language drop down lists.
-
Note
Using a variable date and time means that each time the presentation is opened, the date and time are updated.
-
To place text in the footer centre section, select Footer and then type or paste the required text into the Footer text box.
-
To place the slide number in the right section of the footer, select Slide number.
-
If the footer is not going to appear on the first slide of a presentation, select Do not show on the first slide. The first slide is normally the title slide of a presentation.
-
Click Apply to save the changes and close the Header and Footer dialog.
-
To format the text used for the footer fields, see Chapter 3, Adding and Formatting Text for more information.
-
Click Close Master View on the Master View toolbar or go to View > Normal on the Menu bar when setting up the footer fields is completed.
Custom footer sections
The default fields in a footer section can be replaced with text or manual fields as follows:
-
Select View > Master Slide on the Menu bar to open the master slide view. This also opens the Master View toolbar.
-
Select the master slide so that it appears in the Workspace.
-
Highlight the default field in the footer section and press the Delete or Backspace key. A flashing text cursor appears in the footer section and the Text Formatting toolbar automatically opens replacing the Line and Filling toolbar.
-
Type in the text or insert a manual field into the footer section.
-
Format the text or manual field placed in the footer section. See Chapter 3, Adding and Formatting Text for more information.
-
Click outside the footer section to close the Text Formatting toolbar and reopen the Line and Filling toolbar.
-
Click Close Master View on the Master View toolbar or go to View > Normal on the Menu bar when setting up a custom footer section is completed.
-
Note
It is possible to format, resize, and reposition footer sections. See “Default text areas” above and Chapter 3, Adding and Formatting Text for more information.
Inserting fields
-
Select View > Master Slide on the Menu bar to open the master slide view. This also opens the Master View toolbar.
-
Select the master slide so that it appears in the Workspace.
-
Click anywhere on the master slide without selecting an object.
-
Go to Insert > Field on the Menu bar and select the required field from the context menu. By default, the field is placed in the centre of the master slide.
-
Reposition the field text box to the desired position on the master slide. See “Default text areas” above for more information.
-
Format the text placed in a field, see Chapter 3, Adding and Formatting Text for more information.
-
Click Close Master View on the Master View toolbar, or go to View > Normal on the Menu bar when inserting a field is completed.
Replacing default fields
-
Select View > Master Slide on the Menu bar to open the master slide view.
-
Select the master slide so that it appears in the Workspace.
-
Highlight all of the characters used in the default field being replaced in the footer.
-
Go to Insert > Field on the Menu bar and select the required field from the context menu.
-
Format the text placed in the field, see Chapter 3, Adding and Formatting Text for more information.
-
Click Close Master View on the Master View toolbar or go to View > Normal on the Menu bar when replacing the default footer fields is completed
-
Tip
To change slide number format (1, 2, 3 or a, b, c or i, ii, iii, and so on), go to Slide > Slide Properties on the Menu bar to open the Slide Properties dialog. In Layout Settings, select the number format to use from the Slide numbers drop down list.
Working with styles
Presentation styles are a set of formats that are applied to selected elements in a presentation, such as slides, text, lists, frames, borders, lines and area fills. Applying a style means applying a group of formats providing a consistent look to a presentation. For example, to manually change an attribute on the same object type on every slide in a presentation is time consuming and prone to errors. Using styles reduces time and provides greater accuracy.
Impress has two types of styles available for formatting text and graphic objects – Presentation Styles and Drawing Styles.
-
For information on formatting text, see Chapter 3, Adding and Formatting Text.
-
For information on formatting graphic objects, see Chapter 6, Formatting Graphic Objects and the Draw Guide.
-
For more information on styles used in LibreOffice refer to the Getting Started Guide.
-
Note
Text and title styles in Presentation Styles and Drawing Styles may seem confusing. However, this duplication is required because Impress uses Presentation Styles in the auto-layout text boxes when adding outline text to slides in a presentation. The title and other text styles available in Drawing Styles are used in normal text boxes without outline format, or for text associated with shapes or lines.
Presentation styles
Presentation Styles in Impress are used when creating a presentation using one of the Impress layouts and auto-layout text boxes are divided into four categories.
Background and Background objects
Notes
Outline 1 thru Outline 9
Subtitle and Title
Default master slide and slide layouts in Impress use auto layout boxes. Only Presentation Styles are used in the auto layout boxes. An example of text using Presentation Styles is shown in Figure 2.
Presentation Styles cannot be created or deleted, but can be formatted, modified or updated to the presentation requirements. Also, Presentation Styles used for objects cannot be changed to another presentation style. For example, text using Outline 2 style cannot be changed to Outline 3 style.
-
Note
Normal view is used for changing outline levels using the Tab key or Shift+Tab key combination, or Promote and Demote tools in the Outline toolbar. See Chapter 3, Adding and Formatting Text for more information.
Drawing styles
Drawing Styles in Impress define the characteristics of graphic and text objects placed on a slide. These styles include attributes for line, area, shadowing, transparency, text, connectors and dimensions.
For example, when creating organization charts in a presentation, create objects with a consistent appearance, such as line style, font type, shadow, and so on. The most efficient way to achieve this is to use a drawing style for the objects and apply the drawing style to each object. The benefit is that if there is a change to the background color of objects for example, all that is required is to modify the style rather than each individual object.
Drawing Styles included with Impress cannot be deleted, but can be formatted, modified, and updated. New or custom Drawing Styles can be created, see “Custom styles” below. A custom style is only available in the presentation where it was created.
-
Note
Any text added to a slide using text tools is automatically placed in a standard text box and allocated Default Drawing Style from Drawing Styles. For more information on formatting text, see Chapter 3, Adding and Formatting Text.
Accessing styles
Use one of the following methods to access styles available in Impress.
-
Use the keyboard shortcut F11 (macOS ⌘+T) and open the Styles deck on the Sidebar.
-
Go to Format > Styles on the Menu bar and select an option from the submenu that opens.
-
Click on Styles on the Line and Filling toolbar to open the Styles deck on the Sidebar.
-
Click on Styles on the Sidebar to open the Styles deck.
Editing styles
Formatting Presentation Styles and Drawing Styles is carried out in Normal or Master Slide view. Formatting options are available in dialogs for each style or using Format on the Menu bar. For more information on formatting text and objects, see Chapter 3, Adding and Formatting Text and Chapter 6, Formatting Graphic Objects.
Dialog formatting
-
Select an object on a slide or master slide and its style is highlighted in the Styles deck on the Sidebar.
-
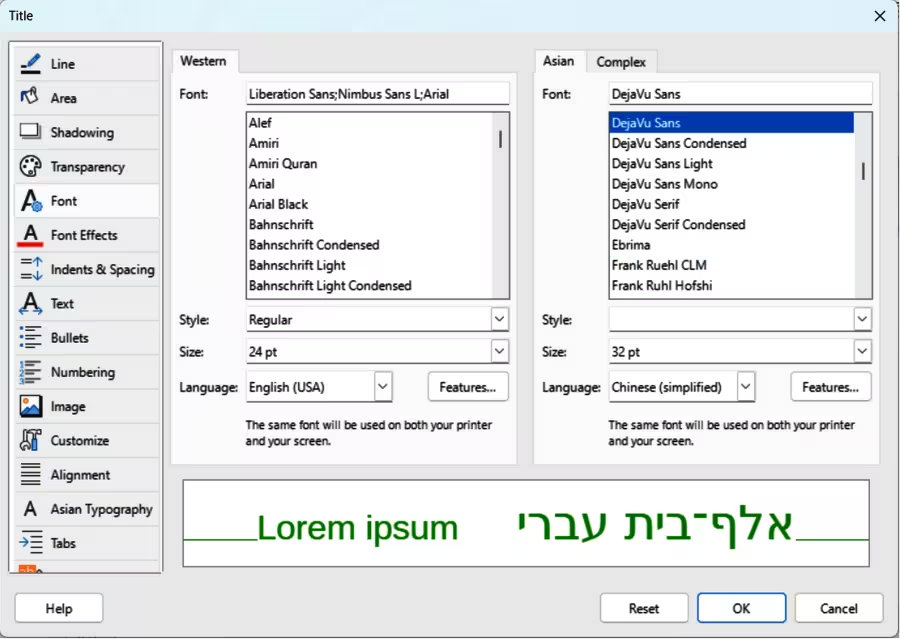
Go to Format > Styles > Edit Style on the Menu bar, or right-click on the highlighted style in the Styles deck on the Sidebar to open the formatting dialog for the selected style (Figure 20).
-
Select the required style option to open a dialog page providing options to format a style.
Figure 20: Title dialog — Font page
-
Select the required formatting options, then click OK to save the changes and close the dialog.
-
Note
Clicking on Reset before clicking OK removes all formatting changes made in the style formatting dialog.
Format menu
-
Open the Styles deck on the Sidebar. See “Accessing styles” above for more information.
-
Click on Presentation Styles or Drawing Styles at the top left of the Styles deck and select a style from the displayed list.
-
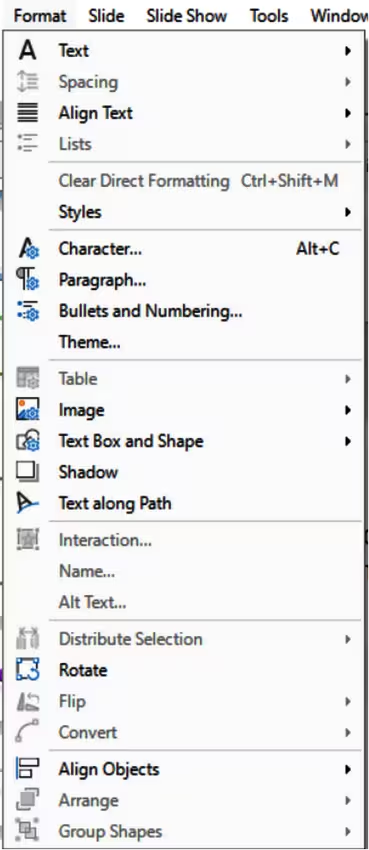
Go to Format on the Menu bar to open a submenu with various formatting options available (Figure 21). Depending on object selected, some formatting options will not be available and are greyed out.
-
Select a formatting option from the submenu. Depending on the option selected, another submenu may open giving further formatting options or a formatting dialog opens.
Figure 21: Example Main menu — Format options
Sidebar and main menu
-
Open the Styles deck on the Sidebar. See “Accessing styles” above for more information.
-
Click on Presentation Styles or Drawing Styles at the top left of the Styles deck and select a style from the displayed list.
-
Right-click on the style selected and select Modify from the context menu to open the formatting dialog for the style selected. An example dialog for formatting the Title style is shown in Figure 20.
-
Make the necessary changes to the selected style using the various options available in the dialog that has opened.
-
Click OK to save the changes and close the dialog.
Updating styles
Updating Presentation or Drawing Styles is similar to modifying, but changes to the text or object are carried out first. Updating styles can only be carried out in Normal view.
-
Select the text or object on a slide in Normal view.
-
Use the various tools on the Text Formatting toolbar, Line and Filling toolbar, or the options in Format on the Menu bar to format the selected object.
-
Open the Styles deck on the Sidebar. See “Accessing styles” above for more information.
-
Click on Presentation Styles or Drawing Styles at the top left of the Styles deck and select a style from the displayed list. The style used for the selected object is already highlighted.
-
Click on Update Style at the top right of the Styles deck and the style is updated to include the formatting changes made to the selected object.
Custom styles
Custom drawing styles can be created, but custom presentation styles cannot be created. When a custom drawing style is created, it is only available for the presentation being created.
-
Create or select an object on a slide to create a custom drawing style.
-
Format the object to the presentation requirements using the formatting options available in the Text Formatting toolbar, Line and Filling toolbar, or options in Format on the Menu bar.
-
Open the Styles deck on the Sidebar. See “Accessing styles” above for more information.
-
Click on Drawing Styles at the top left of the Styles deck to open the drawing styles list.
-
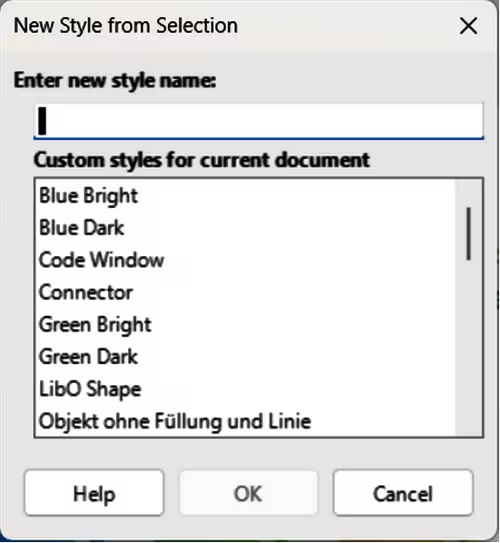
Click on New Style from Selection at the top right of the Styles deck and the New Style from Selection dialog opens (Figure 22).
-
Enter a name for the custom drawing style in the Enter new style name text box.
-
Click OK to close the New Style from Selection dialog. The custom drawing style created appears in the Drawing Styles list in the Styles deck on the Sidebar.
Figure 22: New Style from Selection dialog
Direct formatting
Direct formatting overrides any formatting applied to an object when a style is used. Direct formatting cannot be removed from an object by applying a style to it. To remove any direct formatting, select the object so that the selection handles are visible and use one of the following methods to clear any direct formatting:
-
Use the keyboard shortcut Ctrl+Shift+M (macOS Shift+M).
-
Go to Format > Clear Direct Formatting in the Menu bar.
-
If the object is a text object, highlight the text and click on Clear Direct Formatting on the Text Formatting toolbar.
-
If the object is a text object, highlight the text, right-click on the selected text and select Clear Direct Formatting from the context menu.
Assigning styles keyboard shortcuts
LibreOffice provides a set of predefined keyboard shortcuts allowing quick application of styles while working with a presentation. These shortcuts can be redefined or custom shortcuts created. For more information, see Appendix A, Keyboard Shortcuts and the Getting Started Guide.
Linked styles
Impress styles support linking or inheritance allowing styles to be linked to a parent style to inherit all formatting settings of the parent creating style families. For example, multiple boxes identically formatted, but only differ in color, define a style for the box including borders, area fill, font, and so on. Then create a number of hierarchically dependent styles, but differ only in the fill color attribute. For example, if the font size needs to be changed, only change the parent style and the linked (child) styles automatically change.
Working with templates
A template is a starting point for creating presentations. For example, create a template for business presentations to create new presentations with company logo, name and information on the first slide and the remaining presentation slides only show the company logo and name. For more information on templates and how to use them, see the Getting Started Guide.
Templates can contain anything that presentations can contain, such as text, graphics, a set of styles, and user-specific setup information such as measurement units, language, default printer, and toolbar and menu customization.
All document types created using LibreOffice are based on templates. Specific templates can be created for any document type (text, spreadsheet, drawing, presentation). If a template is not specified when creating a new document, then the default template for that type of document is used. The default templates are installed with LibreOffice and can be altered to match the presentation requirements, see “Setting default template” below for more information.
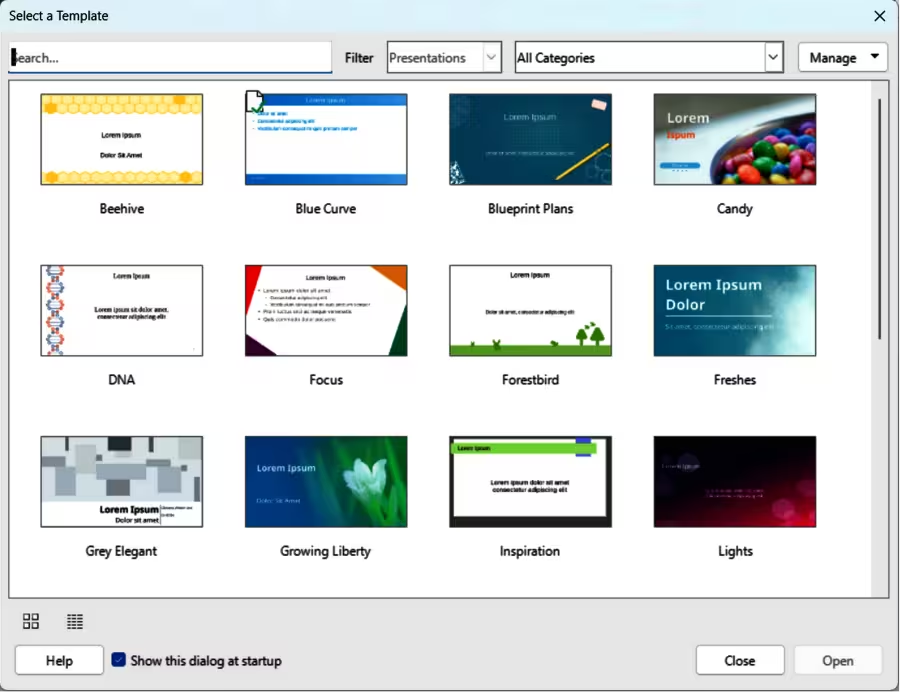
Impress normally starts with the Select a Template dialog (Figure 23). If one of the following options has been deselected, the Select A Template does not open when Impress is opened:
-
Start with Template Selection in the Options LibreOffice dialog.
-
Show this dialog at startup in the Template dialog.
When creating a presentation and the template dialog is active, several templates are available as a starting point for a presentation. If Select a Template dialog is deselected for new presentations, LibreOffice uses the LibreOffice default template for presentations. For more information on the presentation default template, see “Setting default template” below.
Figure 23: Select a Template dialog
Presentation templates
Impress comes with a set of predefined templates. These templates only contain backgrounds and background objects, providing a starting point to create presentations, or new templates.
Templates created are located in the My Templates folder after the template has been saved as a presentation template. These templates appear in the LibreOffice startup window and the Select a Template dialog the next time LibreOffice is started.
Use one of the following methods to create a new presentation using a template. After selecting a template, a new presentation opens and the template dialog closes.
-
Click on Templates in LibreOffice start up window and then select Presentation from the Filter drop-down list to display all the available presentation templates.
-
Go to File > New > Templates on the Menu bar to open the Templates dialog (this dialog is similar to the Select a Template dialog). Select Presentations from the Filter drop‑down list to display all the available presentation templates.
-
Use the keyboard shortcut Ctrl+Shift+N (macOS ⌘+Shift+N) to open the Templates dialog (this dialog is similar to the Select a Template dialog). Select Presentations from the first Filter drop-down list to display all the presentation templates.
-
If required, select a template category from the second Filter drop-down list to only display the available templates in the selected category.
Creating templates
-
Open a presentation or presentation template as a starting point for a new template.
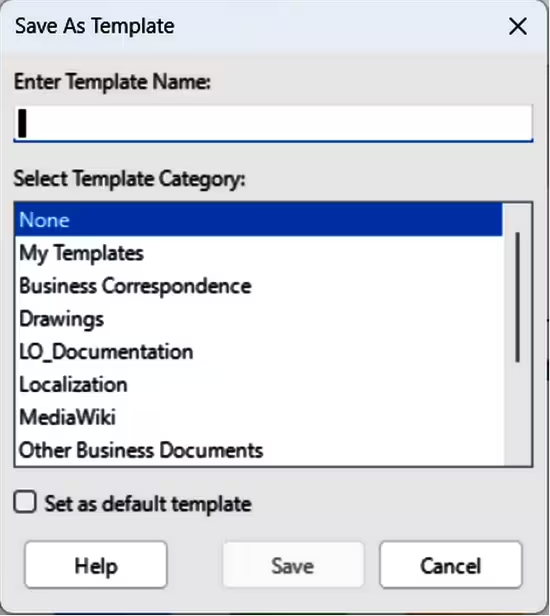
Figure 24: Save As Template dialog
-
Add and format the content and styles as required for the new presentation template.
-
Go to File > Templates > Save As Template on the Menu bar to open the Save as Template dialog (Figure 24).
-
Enter a name for the new template in the Enter Template Name text box.
-
Select a template category for the new template from the Select Template Category list.
-
If required, select the option Set as default template to use as the default template when Impress is opened and no template is selected.
-
Click on Save to save the new template and close the Save as Template dialog. The template appears in the LibreOffice startup window and the Select a Template dialog the next time LibreOffice started is opened.
-
Note
When saving new templates, it is important to save the template in a category given in the Save as Template dialog. This allows LibreOffice to find the new template and use it for creating new presentations.
Setting default template
If a new presentation is being created and no template is selected, LibreOffice creates the presentation from the default Impress template. This is normally a blank template. However, any presentation template can be set as the default template. The template has to be located in a category displayed in the Save as Template dialog so that LibreOffice can find it. The default template can always be reset to the original LibreOffice default template.
Changing default template
-
Go to File > New > Templates or File > Templates > Manage Templates on the Menu bar to open the Templates dialog. The Templates dialog is similar to the Select a Template dialog (Figure 23).
-
Select the template to use as the default LibreOffice presentation template.
-
Right-click on the selected template and select Set as Default from the context menu.
-
Click on Open and a new presentation opens using the new default template and sets the default presentation template in LibreOffice. The next time a new presentation is created and a template is not selected, the presentation is created using the new default presentation template.
-
Note
The new default template is indicated in the Templates dialog. The icon indicating the default template depends on computer setup and computer operating system.
Resetting default template
-
Go to File > New > Templates or File > Templates > Manage Templates on the Menu bar to open the Templates dialog.
-
Select the presentation template that is indicated as the default presentation template in the Select a Template dialog.
-
Right-click on the template and select Reset Default from the context menu.
-
Click on Close to close the Templates dialog. The next time that a new presentation is created and a template is not selected, the presentation is created using the original default LibreOffice presentation template.
Editing templates
-
Go to File > New > Templates or File > Templates > Manage Templates on the Menu bar to open the Templates dialog.
-
Right-click on the template to be edited and select Edit from the context menu and the template opens in Impress in read only mode.
-
Click on Edit Document at the top of the Workspace to start editing the template.
-
Make the necessary formatting changes to the styles, text and/or objects on the selected template.
-
Go to File > Save on the Menu bar or use the keyboard shortcut Ctrl+S (macOS ⌘+S) to save the changes.
-
Close the template or create a presentation using the edited template.
-
Notes
Any presentation created from the template before editing can be updated to show the changed template settings the next time the presentation is opened. A confirmation dialog opens asking if the updated styles are to be used, or keep the old styles. If keep the old styles is selected, then the presentation continues to use the old styles without any confirmation.
When editing templates, it is recommended NOT to edit and save templates supplied and installed with LibreOffice. Editing and saving these LibreOffice templates may cause problems with presentations that already use one of these templates.
Organizing templates
LibreOffice can only use templates that are in LibreOffice template categories (template folders). New LibreOffice template categories can be created and used to organize LibreOffice templates. For example, separate template categories for different projects or clients. Templates can also be imported and exported.
-
Tip
The location of folders used LibreOffice template categories varies with computer operating systems. To learn where the template folders are stored on a computer, go to Tools > Options > LibreOffice > Paths (macOS LibreOffice > Preferences > LibreOffice > Paths).
Creating custom categories
-
Go to File > New > Templates or File > Templates > Manage Templates on the Menu bar to open the Templates dialog.
-
Click on Manage at the top right of the Template dialog and select New Category from the context menu.
-
Enter a category name in Enter new category name box in the New Category dialog that opens.
-
Click OK to save the new category and the category appears in the Filter drop-down list for categories at the top of the Select a Template dialog.
Deleting custom categories
-
Go to File > New > Templates or File > Templates > Manage Templates on the Menu bar to open the Templates dialog.
-
Select the custom category for deletion from the drop-down list of categories at the top of the Templates dialog.
-
Click on Manage at the top right of the Template dialog and select Delete Category from the context menu.
-
Click Yes to confirm the deletion of the custom category.
-
Note
Template categories supplied with LibreOffice or installed using the Extension Manager cannot be deleted. Only custom template categories can be deleted.
Moving templates
-
Go to File > New > Templates or File > Templates > Manage Templates on the Menu bar to open the Templates dialog.
-
Right-click on the template that is going to be moved and select Move from the context menu.
-
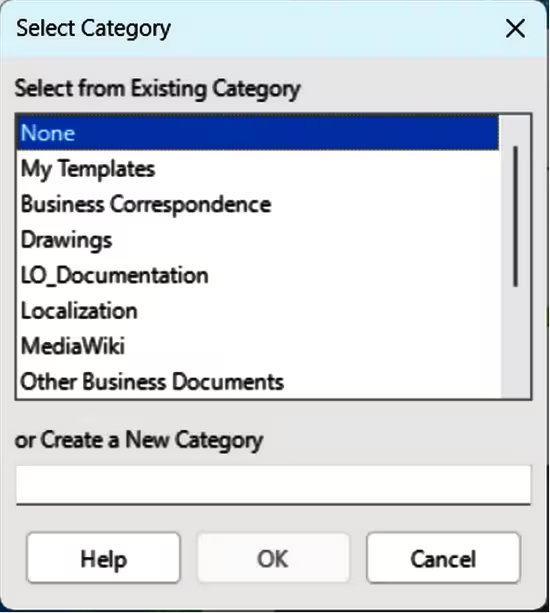
In the Select Category dialog (Figure 25), select a category from the displayed list of categories, or select Create a New Category to create a new category for the template.
-
Click OK to move the template to its new category and close the Select Category dialog.
-
Note
Only custom templates can be moved between template categories. Templates supplied with LibreOffice or installed using the Extension Manager cannot be moved.
Figure 25: Select Category dialog
Deleting templates
-
Go to File > New > Templates or File > Templates > Manage Templates on the Menu bar to open the Templates dialog.
-
Right-click on the template being deleted and select Delete from the context menu.
-
Click on Yes to confirm the deletion.
-
Note
Templates supplied with LibreOffice or installed using the Extension Manager cannot be deleted. Only templates that have been created in Impress or imported from other sources can be deleted.
Renaming templates
-
Go to File > New > Templates or File > Templates > Manage Templates on the Menu bar to open the Templates dialog.
-
Right-click on the template being renamed and select Rename from the context menu.
-
Enter a new template name in the text box that has opened, then click on OK to save the new template name.
-
Note
Templates supplied with LibreOffice or installed using the Extension Manager cannot be renamed. Only templates that have been created in Impress or imported from other sources can be renamed.
Importing templates
If a template is in a different location on a computer, then the template must be imported into a LibreOffice category for LibreOffice to recognize the template.
-
Go to File > New > Templates or File > Templates > Manage Templates on the Menu bar to open the Templates dialog.
-
Click on Manage at the top right of the Template dialog and select Import from the context menu to open the Select Category dialog.
-
Select a category from the displayed list or select Create a New Category in the Select Category dialog (Figure 25).
-
In the file browser window that opens, navigate to the folder where the template is located on the computer.
-
Select the template and click Open. The file browser window closes and the template appears in the selected category.
Exporting templates
-
Go to File > New > Templates or File > Templates > Manage Templates on the Menu bar to open the Templates dialog.
-
Right-click on the template being exported and select Export from the context menu.
-
Navigate to the folder where the template is to be exported to and click on OK. The template is exported to the selected location and the file browser window closes.