Copyright
This document is Copyright © 2026 by the LibreOffice Documentation Team. Contributors are listed below. This document may be distributed and/or modified under the terms of either the GNU General Public License (https://www.gnu.org/licenses/gpl.html), version 3 or later, or the Creative Commons Attribution License (https://creativecommons.org/licenses/by/4.0/), version 4.0 or later. All trademarks within this guide belong to their legitimate owners.
Contributors
To this edition
Peter Schofield
To previous editions
Jean Hollis Weber, Kees Kriek, Low Song Chuan, Michele Zarri, Peter Schofield, Rachel Kartch, Samantha Hamilton, T. Elliot Turner, Vasudev Narayanan
Feedback
Please direct any comments or suggestions about this document to the Documentation Team Forum at https://community.documentfoundation.org/c/documentation/loguides/ (registration is required) or send an email to: loguides@community.documentfoundation.org.
-
Note
Everything sent to a forum, including email addresses and any other personal information that is written in the message, is publicly archived and cannot be deleted. Emails sent to the forum are moderated.
Publication date and software version
Published August 2026. Based on LibreOffice 26.2 Community.
Other versions of LibreOffice may differ in appearance and functionality.
Introduction
This chapter provides information on creating, modifying, using, and deleting text boxes in Impress presentations. Additionally, it covers the creation, modification, and formatting of various text types that can be inserted into slides. Finally, it demonstrates how to insert ordered (numbered) or unordered (bulleted) lists, tables, fields, hyperlinks, and text columns.
Working with text boxes
Text boxes can be added to slides using one of the following methods:
-
Use a predefined Impress layout that includes AutoLayout text boxes, see "AutoLayout text boxes" below for more information.
-
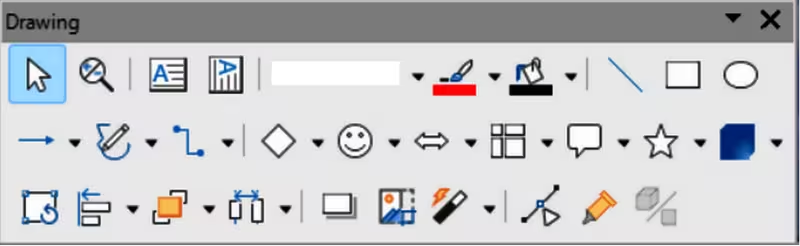
Create a text box using Insert Text Box for a horizontally aligned text box on the Standard toolbar (Figure 1) or the Drawing toolbar (Figure 2).
Figure 1: Standard toolbar

Figure 2: Drawing toolbar
-
Create a text box using Insert Vertical Text for a vertically aligned text box on the Standard toolbar or the Drawing toolbar.
-
Use the keyboard shortcut F2 to create text boxes for horizontal text.
-
Notes
The Insert Vertical Text tool for creating a vertical text box and inserting vertical text only becomes available when Asian and Complex text layout (CTL) options are selected. Go to Tools > Options > Language Settings > Languages (macOS LibreOffice > Preferences > Language Settings > Languages) on the Menu bar and select these options for vertical text to be available in Impress.
AutoLayout text boxes are only available when an Impress slide layout is selected from the Layout panel on the Sidebar Properties deck.
AutoLayout text boxes can be moved, resized and deleted in the same way as text boxes. See “Moving and resizing text boxes” below, “Text positioning” below, and “Deleting text boxes” below for more information.
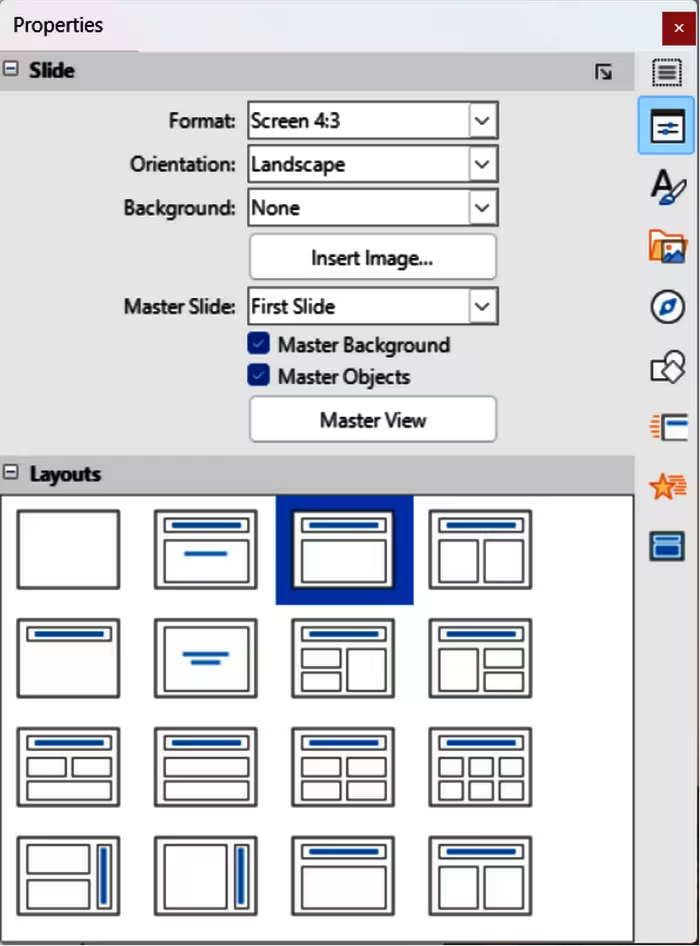
Figure 3: Sidebar Properties deck — Slide and Layouts panels
AutoLayout text boxes
AutoLayout text boxes are automatically inserted when an Impress slide layout is selected.
-
Make sure Normal view is selected in the Workspace and select a slide layout using one of the following methods:
-
Open the Layouts panel in the Properties deck on the Sidebar (Figure 3)
-
Go to Slide > Layout on the Menu bar opens a submenu listing available slide layouts.
-
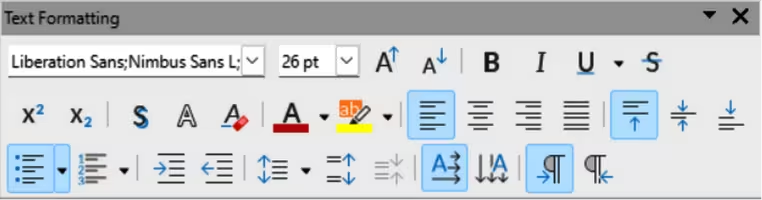
Click on Click to add Title or Click to add Text. This text automatically disappears and is replaced by a flashing text cursor. The Text Formatting toolbar (Figure 4) automatically opens replacing the Line and Filling toolbar.
-
Type or paste text into the AutoLayout text box and, if necessary, format the text to the presentation requirements.
Figure 4: Text Formatting toolbar
-
If required, copy, resize, and/or reposition the AutoLayout text box.
-
Click outside the AutoLayout text box to deselect it.
Creating text boxes
-
Note
If the Insert Text Box, or Insert Vertical Text tools are not visible on the Standard toolbar, open Visible Buttons on the toolbar and select the text box tools from the drop-down list to add the tools to the toolbars.
Horizontal text box
A horizontal text box is created as follows:
-
Click on Insert Text Box on the Standard or Drawing toolbar. The Text Formatting toolbar (Figure 4) automatically opens replacing the Line and Filling toolbar.
-
Click in the slide and a text box is automatically created with the text cursor flashing in a text box.
-
The text box increases in width as text is entered in a single line and the text box height does not change.
-
To create multiple lines and increase text box height, use the Enter key to create new single line paragraphs within the text box.
-
To create a multiple line horizontal text box, click and drag the cursor on the slide to set the width of the text box. As text is entered, the text box height automatically increases as text wraps to create multiple line paragraphs in the text box.
-
Type or paste the text into the text box.
-
Click outside the text box to deselect it.
Vertical text box
-
Click on Insert Vertical Text on the Standard or Drawing toolbar. The Text Formatting toolbar (Figure 4) automatically opens replacing the Line and Filling toolbar.
-
Click in the slide and a text box is automatically created with the text cursor flashing in a vertical text box.
-
The text box height increases as text is entered in a single line and the text box width does not change.
-
To create multiple lines and increase the text box width, use the Enter key to create new single line vertical paragraphs within the text box.
-
To create a multiple line vertical text box, click and drag the cursor on the slide to set the height of the text box. As text is entered, the text box width automatically increases as text wraps creating multiple line vertical paragraphs in the text box.
-
Type or paste the text into the text box.
-
Click outside the text box to deselect it.
Text box borders
By default, when an AutoLayout text box or a text box is created, the borders of the text box are only visible when a text box is selected. Use one of the following methods to create a visible border around the text box.
-
Note
If the properties of the line style used for the text box selected are changed using the Line dialog, then the line style properties are also changed in the Line and Filling toolbar, and the Line panel in the Properties deck on the Sidebar.
Line and Filling toolbar
-
Click on a text box to select the text box and the border is displayed indicating that the text box is in edit mode.
-
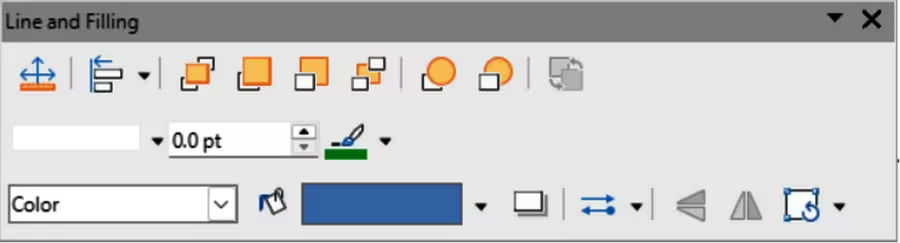
Using Line Style on the Line and Filling toolbar (Figure 5), select an option from the drop‑down list to use as a text box border. If the Line and Filling toolbar is not visible, go to View > Toolbars > Line and Filling on the Menu bar.
Figure 5: Line and Filling toolbar
-
In Line Width on the Line and Filling toolbar, enter a width for the line style selected for the text box border.
-
In Line Color on the Line and Filling toolbar, select a color from one of the available color palettes, or create a custom color.
-
Click outside the text box to exit edit mode.
Line dialog
-
Click on a text box to select it. A border is displayed indicating the text box is in edit mode.
-
Open the Line dialog (Figure 6) using one of the following methods:
-
Right-click on the text box border and select Line from the context menu.
-
Go to Format > Text Box and Shape > Line on the Menu bar.
-
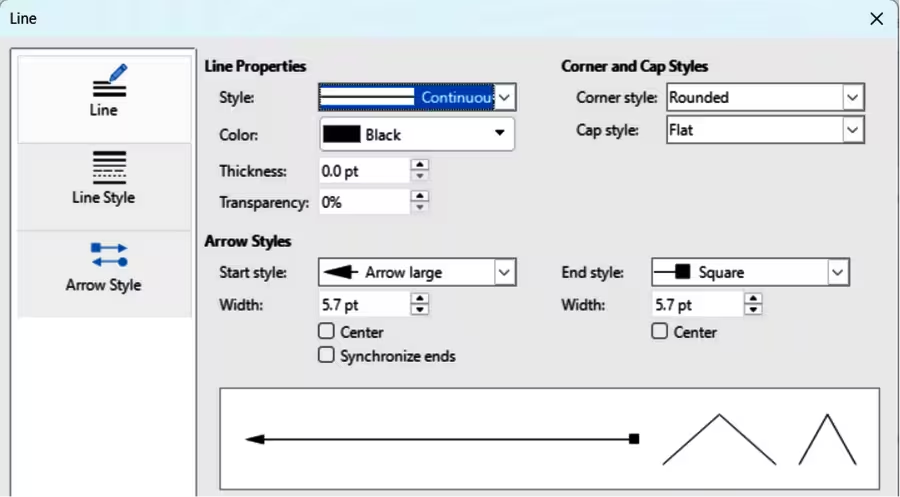
Click on Line to open the Line page.
-
In Style, select a line style from the drop-down list to use as a text box border.
-
In Color, select a color for the line style from one of the available color palettes, or create a custom color.
-
In Thickness, enter a width for the line style selected.
Figure 6: Line dialog — Line page
-
If necessary, in Transparency, enter a percentage value for the line style.
-
If necessary, in Corner Style, select the type of corner style from the options in the drop‑down list.
-
Click OK to save the changes and close the Line dialog.
-
Click outside the text box to exit edit mode.
-
Note
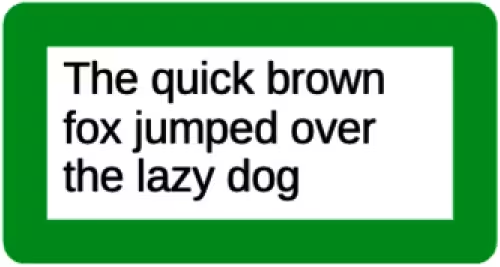
For a corner style to be clearly visible in a text box border, it is recommended to set the line width at a thickness 0.35cm, as shown by the example in Figure 7.
Figure 7: Example of using corner styles
Moving and resizing text boxes
Moving text box with cursor
-
Click in the text box to select it so that the border is displayed indicating that the text box is in edit mode.
-
Move the cursor over the border and the cursor changes shape to the move cursor for the computer operating system (for example, a hand).
-
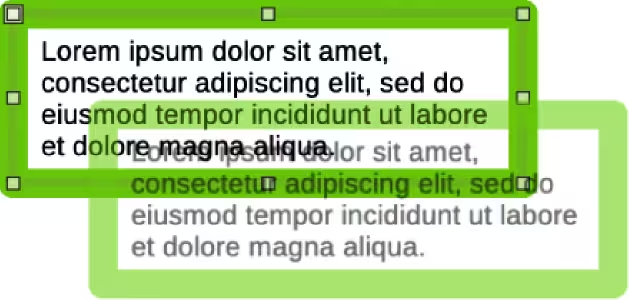
Click on the border and drag it to move the text box. A dashed outline of the text box shows where the text box will be placed as shown in Figure 8.
Figure 8: Example of moving text boxes
-
Release the cursor when the text box is in the required position.
-
Click outside the text box to exit edit mode.
Resizing text box with cursor
-
Click in the text box to select it so that the selection handles are displayed indicating that the text box is in edit mode.
-
Move the cursor over a selection handle and the cursor changes shape indicating the direction the text box will be resized.
-
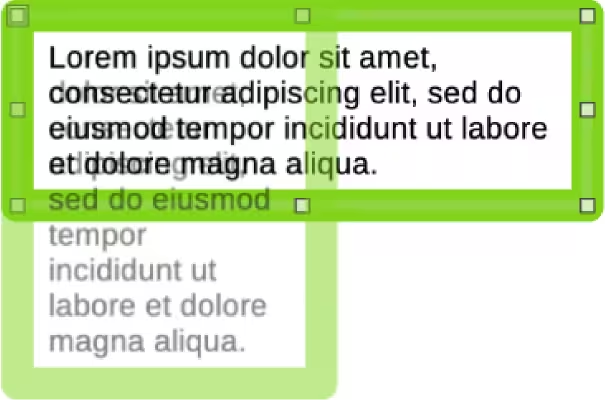
Click on a selection handle and drag it to resize the text box. A dashed outline appears indicating the new size of the text box as it is being resized, as shown in Figure 9. The selection handles are used to resize the text box as follows:
-
Corner handles change the width and height of the text box simultaneously.
-
Top and bottom selection handles change the height of the text box.
-
Right and left selection handles change the width of the text box.
Figure 9: Example of resizing text boxes
-
Release the cursor when the text box is at the required size.
-
Click outside the text box to exit edit mode.
-
Note
To maintain the proportions of a text box while resizing, press and hold the Shift key, then click on a selection handle and drag it. Make sure to release the cursor before releasing the Shift key.
Position and Size dialog
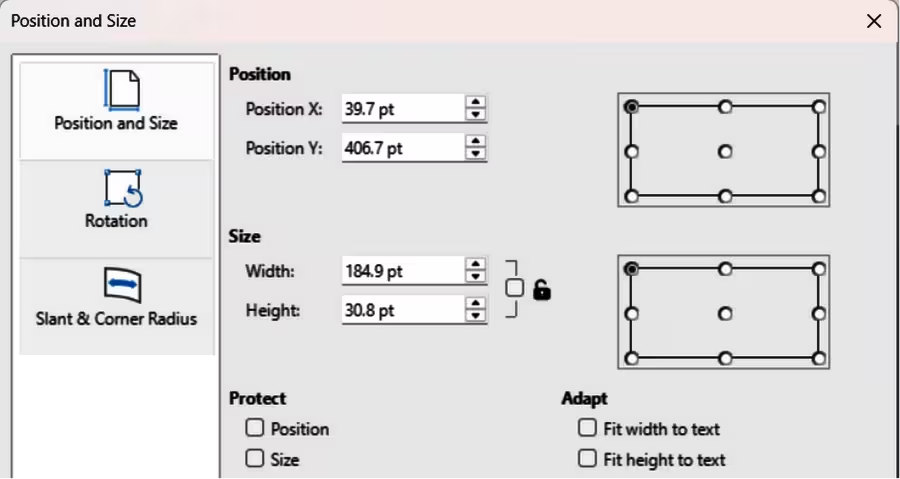
For more accurate control over the size and position of a text box, or AutoLayout text box, it is recommended to use the Position and Size dialog (Figure 10).
Figure 10: Position and Size dialog — Position and Size page
-
Click in the text box to select it so that the selection handles are displayed indicating that the text box is in edit mode.
-
Open the Position and Size dialog using one of the following methods:
-
Go to Format > Text Box and Shape > Position and Size on the Menu bar.
-
Right-click on the text box border and select Position and Size from the context menu.
-
Use the keyboard shortcut F4.
-
Click on Position and Size to open the Position and Size page.
-
Use the various options available on the Position and Size page to position the text box.
-
Click OK to save the changes and close the Position and Size dialog.
-
Click outside the text box to exit edit mode.
Position and Size options
The options available on the Position and Size page are as follows:
Position
Position X
Specify the horizontal position of a text box. The position values of a text box represent the distance of the Base point to the top left corner of the slide.
Position Y
Specify the vertical position of a text box. The position values of a text box represent the distance of the Base point to the top left corner of the slide.
Base point
Position a text box by selecting one of the nine available positions. By default, the Base point is the top left corner of a text box.
Size
Width
Specify the width of a text box. The size values represent the distance of the Base point relative to the top left corner of a slide.
Height
The height of a text box cannot be changed using the Position and Size dialog.
Base point
Position the text box by selecting one of the nine available positions. By default, the Base point is the top left corner of the text box.
Protect
Adapt
Position and Size on Sidebar
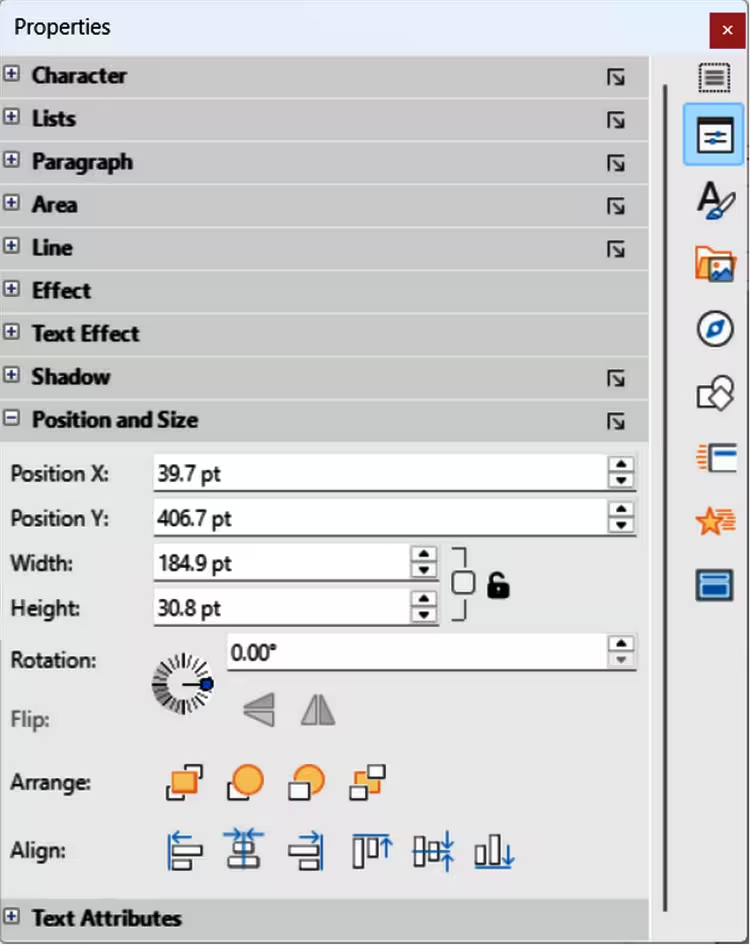
For more precise control over the size and position of a text box, the Position and Size panel in the Properties deck on the Sidebar (Figure 11) can also be used. However, there are fewer options available in the Position and Size panel on the Sidebar than what is available in the Position and Size dialog.
Figure 11: Sidebar Properties — Position and Size panel
-
Click in the text box to select it so that the selection handles are displayed indicating that the text box is in edit mode.
-
Click on Properties on the Sidebar to open the Properties deck, then click on Position and Size to open the Position and Size panel.
-
Specify measurement values in the Position X (horizontal) and Position Y (vertical) boxes to position of the text box on the slide. The position values of the text box represent the distance between the top left of the text box to the top left corner of the slide.
-
Specify measurement values in the Width and Height boxes to adjust the size of the text box. To maintain the width/height ratio of the text box, select Keep ratio.
-
When satisfied with the changes, click outside the text box to save the changes and exit edit mode.
Rotating text boxes
Using the cursor
-
Click in the text box border to select it so that the selection handles are displayed indicating that the text box is in edit mode.
-
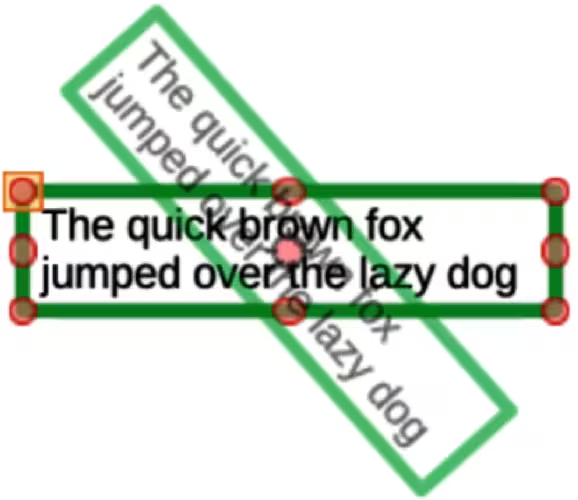
Click again on the text box border and the selection handles change shape and color, as shown by the example in Figure 12. A rotation centre appears in the centre of the text box.
-
Move the cursor over a corner selection handle and the cursor changes shape to indicate rotation.
Figure 12: Example of rotating text boxes
-
Click on a corner selection handle and drag it to rotate the text box. A ghosted image of the text box appears as the text box is being rotated.
-
Release the cursor when the text box has reached the desired rotation angle.
-
If necessary, click and drag the rotation centre to a different position to change the rotation angle. The rotation centre can be positioned outside of the text box.
-
Click outside the text box to exit edit mode.
Position and Size dialog
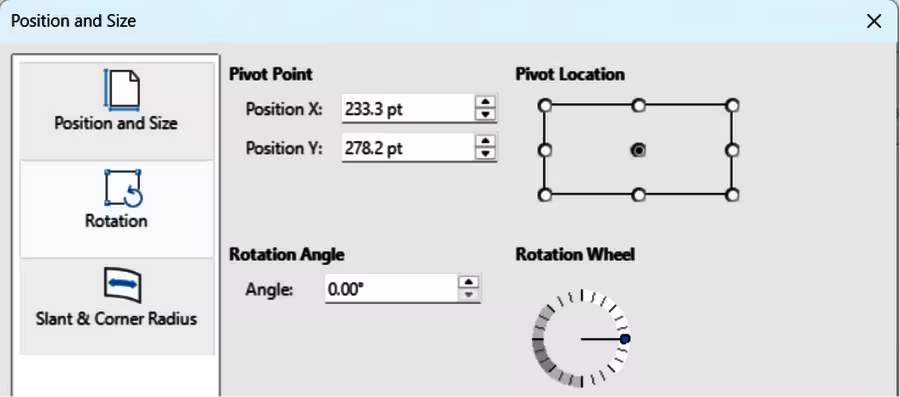
For more accurate control over the size and position of an AutoLayout text box or text box, it is recommended to use the options available on the Rotation page of the Position and Size dialog (Figure 13).
-
Click in the text box to select it and the selection handles are displayed indicating that the text box is in edit mode.
Figure 13: Position and Size dialog — Rotation page
-
Open the Position and Size dialog using one of the following methods:
-
Go to Format > Text Box and Shape > Position and Size on the Menu bar.
-
Right-click on text box border and select Position and Size from the context menu.
-
Use the keyboard shortcut F4.
-
Click on Rotation to open the Rotation page.
-
If required, in Pivot Point enter a measurement for Position X and/or Position Y to move the position of the pivot point.
-
Alternatively, select a pivot point from one of the 9 positions in Default settings.
-
In Rotation Angle, enter the number of degrees for rotation in the Angle text box.
-
Alternatively, click on the rotation angle indicator in Default settings and drag it to a new angle. The angle of rotation is displayed in the Angle text box.
-
Click OK to save the changes and to close the Position and Size dialog.
-
Click outside the text box to exit edit mode.
Position and Size panel on Sidebar
-
Click in the text box to select it so that the selection handles are displayed indicating that the text box is in edit mode.
-
Click on Properties on the Sidebar to open the Properties deck, then click on Position and Size to open the Position and Size panel (Figure 11).
-
In Rotation, enter the number of degrees for rotation in the text box.
-
Alternatively, click on the rotation angle indicator in Rotation and drag it to a new angle. The angle of rotation is displayed in the text box.
-
Click outside the text box to exit edit mode.
Corner radius
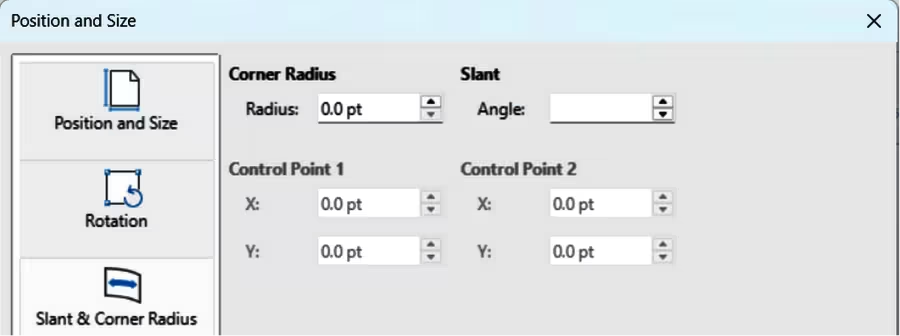
The Corner Radius option in the Slant & Corner Radius page of the Position and Size dialog (Figure 14) is only available when a text box has a border. See “Text box borders” above for more information on creating text box borders.
Figure 14: Position and Size dialog — Slant & Corner Radius page
-
Note
The options Slant, Corner Point 1, and Corner Point 2 on the Slant & Corner Radius page of the Position and Size dialog are NOT available for text box borders.
-
Click in the text box to select it so that the selection handles are displayed indicating that the text box is in edit mode.
-
Make sure that the text box has a visible border.
-
Open the Position and Size dialog using one of the following methods:
-
Go to Format > Text Box and Shape > Position and Size on the Menu bar.
-
Right-click on the text box border and select Position and Size from context menu.
-
Use the keyboard shortcut F4.
-
Click on Slant & Corner Radius to open the Slant & Corner Radius page.
-
In Corner Radius, enter a measurement in the Radius text box to change the radius of the corners on the text box.
-
Click OK to save the changes and to close the Position and Size dialog.
-
Click outside the text box to exit edit mode.
Text positioning
-
Click in a text box to select it so that the selection handles are displayed indicating that the text box is in edit mode.
-
Right-click in the text box and select Text Attributes from the context menu to open the Text dialog (Figure 15 ).
-
Use the various options on the Text page to position the text within the text box.
-
Click OK to save the changes and close the dialog.
-
Click outside the text box to deselect it.
Figure 15: Text dialog — Text page
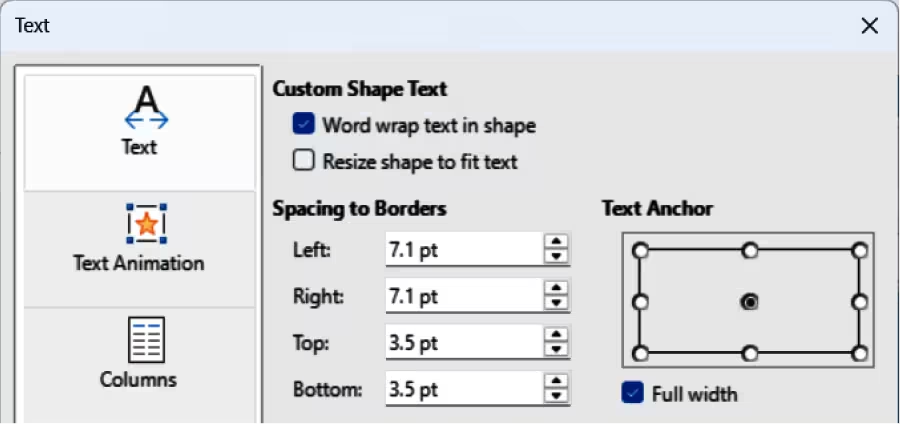
The options available in the Text dialog are as follows:
Drawing Object Text
Fit width to text
Width of the text box is automatically adjusted to the width of the text.
Fit height to text
Height of the text box is automatically adjusted to the height of the text.
Fit to frame
Text width and height are adjusted to match the width and height of the text box.
Spacing to Borders
Text Anchor
Text animation
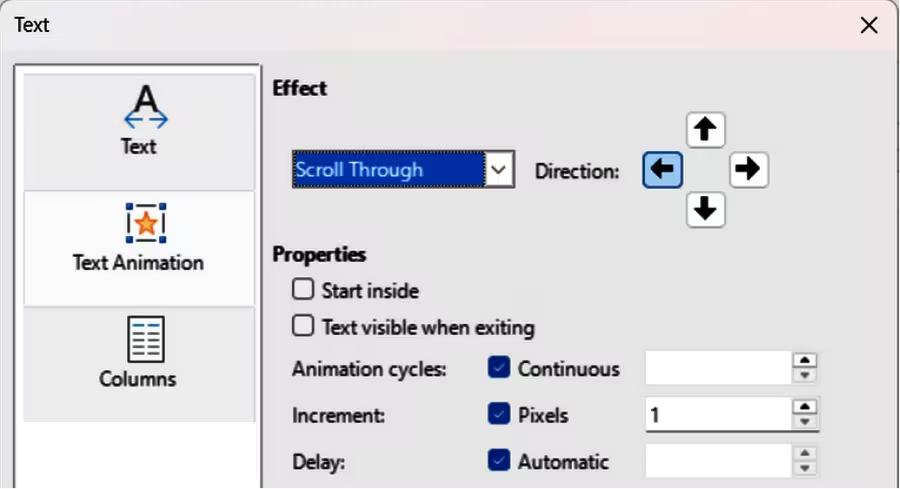
Text within an AutoLayout text box, or a text box, can be animated using the options available in the Text Animation page in the Text dialog (Figure 16). For more information on creating text animation and using text animation effects, see Chapter 9, Slide Shows.
Figure 16: Text dialog — Text Animation page
Text columns
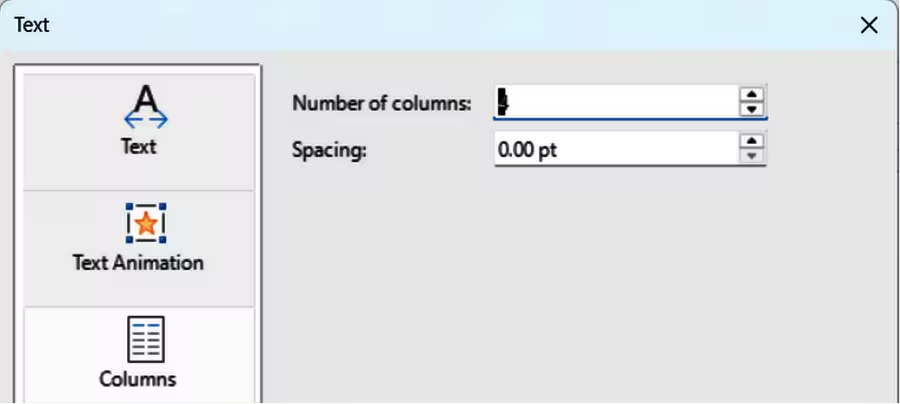
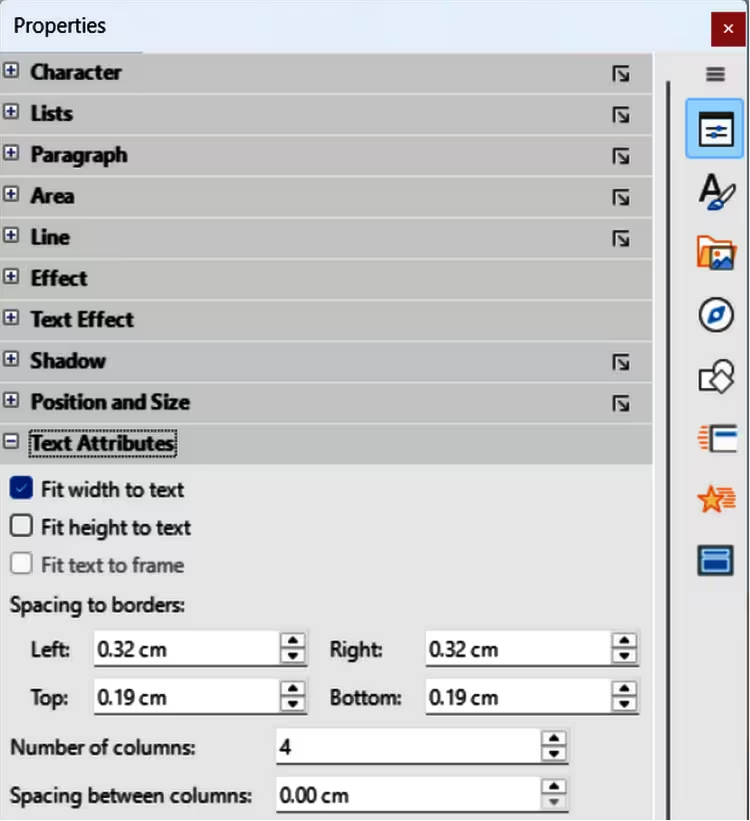
Text within an AutoLayout text box, or a text box, can be placed into columns using the options available in the Text Columns page in the Text dialog (Figure 17), or the Columns panel in Properties deck on the Sidebar (Figure 18).
-
Click in the text box to select it so that the selection handles are displayed indicating that the text box is in edit mode.
Figure 17: Text dialog — Columns page
-
Right-click in the text box and select Text Attributes from the context menu to open the Text dialog.
Figure 18: Sidebar Properties deck — Text Attributes
-
Click on Text Columns to open the Text Columns page in the Text dialog, or click on Columns in the Properties deck on the Sidebar to open the Columns panel.
-
Set the number of columns required in the Number of columns box and the required spacing between the columns in the Spacing box. An example of columns in a text box is shown in Figure 19.
-
Save the changes and deselect the text box using one of the following methods:
-
On the Text dialog, click OK to save the changes and close the dialog, then click outside the text box to deselect it.
-
On the Text Attributes panel in the Properties deck on the Sidebar, click outside the text box to deselect it and save the changes.
Figure 19: Example of text box columns

-
Note
When text columns are inserted into an AutoLayout text box, or text box, the whole of the text box has to be used for columns. A mixture of text columns and plain text cannot be used together in an AutoLayout text box, or a text box.
Deleting text boxes
-
Click in the text box to select it so that the border and selection handles are displayed indicating that the text box is in edit mode.
-
Press the Delete or Backspace key to delete the text box.
Text glow effect
A text glow effect can be only added to text that is already in a text box and is positioned on a slide when creating a presentation. See Figure 20 for an example of using the text glow effect.
-
Notes
Text glow effect cannot be added to text that is inside a graphic object. See Chapter 5, Managing Graphic Objects for information on using glow effect for objects.
Step 6 is not required if the color of the text is visible without the background effect of the color in a graphic object.
Figure 20: Example of text glow effect

-
Create a text box on a slide and create the required text.
-
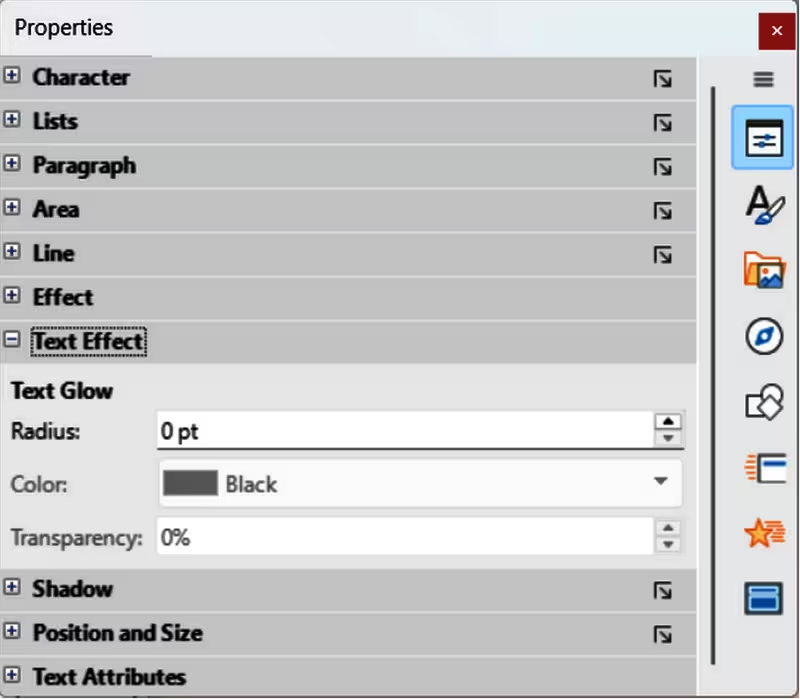
Make sure the text box is selected and open the Text Effect panel in the Properties deck on the Sidebar (Figure 21).
-
In Radius, enter a measurement value for the text glow effect radius.
-
In Color, select a color for the text glow effect from the drop-down list.
Figure 21: Sidebar Properties — Text Effect panel
-
In Transparency, if required, enter a percentage value for the text glow effect.
-
If required, select the text box and move the text box onto a graphic object to display the text glow effect, as shown by the example in Figure 20.
Inserting text
Pasting text
Text can be inserted into an AutoLayout text box, or text box, by copying text from another document then pasting into a text box. However, copied text may not match the formatting of the surrounding text or other slides in the presentation. It is recommended to make sure that the presentation style is consistent and does not become a patchwork of different styles, font types, bullet points, and so on.
-
Note
Presentation Styles in AutoLayout text boxes cannot be changed by selecting another presentation style. Make sure the AutoLayout text box uses the presentation style required. See Chapter 2, Master Slides, Styles and Templates for more information. Outline levels and outline styles are changed using the Tab key or Shift+Tab key combination.
-
Tip
It is advisable to paste text into a text box using the menu option Edit > Paste Special > Paste Unformatted Text, then apply the correct formatting later. This reduces the risk of creating formatting errors in a presentation.
Unformatted text
-
In another document or slide, highlight and copy the text.
-
Create a text box on a slide and make sure the text cursor is flashing in the text box. See “Working with text boxes” above for more information.
-
Paste unformatted text at the text cursor position in a selected text box using one of the following methods.
-
Go to Edit > Paste Special > Paste Unformatted Text on the Menu bar.
-
Click on the triangle ▼to the right of Paste on the Standard toolbar and select Unformatted text from the context menu.
-
Use the keyboard shortcut Ctrl+Shift+V (macOS ⌘+Shift+V) and select Paste unformatted text from the Paste Special dialog that opens.
-
Use the keyboard shortcut Ctrl+Alt+Shift+V (macOS ⌥+⌘+Shift+V) and unformatted text is pasted directly into the text box.
-
Format the pasted text to the presentation requirements using the tools on the Text Formatting toolbar, or the options in Format on the Menu bar. Alternatively, for text boxes only, apply a Drawing Style to the text.
Formatted text
Pasting formatted text into a text box, or AutoLayout text box, overwrites any formatting and replaces the text box style.
-
Highlight and copy the text in another document or slide.
-
Create a text box on a slide and make sure the text cursor is flashing in the text box. See “Working with text boxes” above for more information.
-
Paste formatted text into the text box using one of the following methods. Text is pasted at the cursor position in the text box and the text format of the pasted text overwrites any style formatting of the text box.
-
Go to Edit > Paste on the Menu bar.
-
Click on Paste on the Standard toolbar.
-
Use the keyboard shortcut Ctrl+V (macOS ⌘+V).
-
If necessary, format the text to the presentation requirements using the various tools on the Text Formatting toolbar, or the options available in Format on the Menu bar.
-
To clear any formatting of the pasted text and use the text box style, go to Format > Clear Direct Formatting on the Menu bar. See Chapter 2, Master Slides, Styles and Templates for more information.
-
Note
Custom Drawing Styles can be created in Impress and are only available for the Impress presentation being created. However, custom Drawing Styles can be used in a template allowing them to be used in presentations that use the same presentation template.
Inserting special characters
Special characters can be inserted into text, for example mathematical, geometric, monetary symbols and so on.
-
Click at the position in the text where the special character is to be inserted.
-
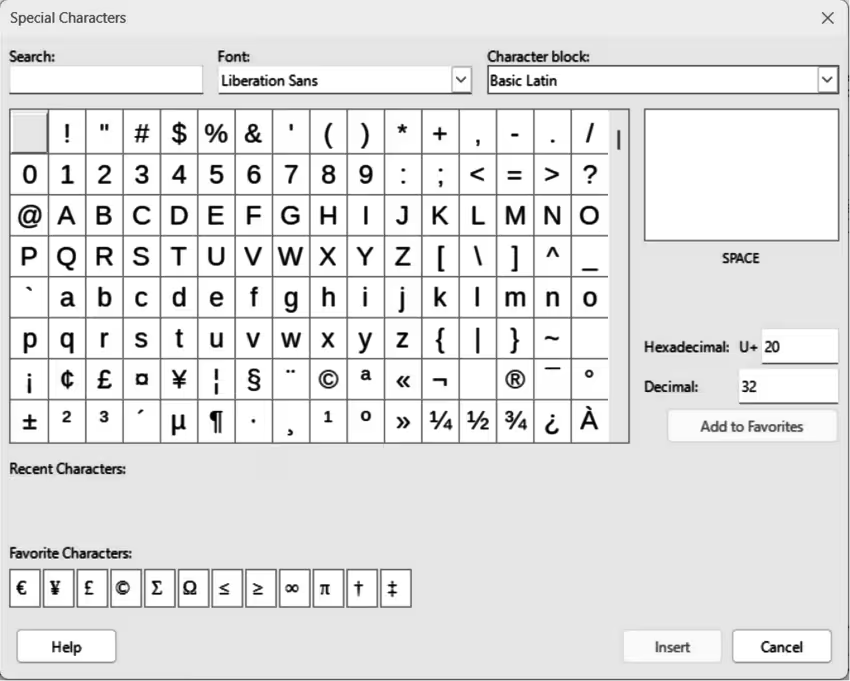
Go to Insert > Special Character on the Menu bar to open the Special Characters dialog (Figure 1).
-
Select the font and character subset from the Font and Character block drop-down lists.
-
Locate and select the special character from the special characters available. The selected special character appears in the preview box and its name is displayed below the preview box.
-
Alternatively, select the special character from the display of Recent Characters or Favorite Characters.
-
Click on Insert to close the dialog and insert the special character at the cursor position in the text.
-
Alternatively, double-click on the selected special character to insert it at the cursor position in the text. This also closes the dialog.
-
Tip
If a special character is frequently used, click on Add to Favorites and the special character is added to the display of Favorite Characters.
Figure 22: Special Characters dialog
Inserting formatting marks
Formatting marks are special characters that can be inserted into text. For example, it may not be desirable for words that are separated by a space or hyphen to span over two lines. The solution is to insert a non-breaking space or non-breaking hyphen.
-
Click at the position where the formatting mark is to be inserted into the text.
-
Go to Insert > Formatting Mark on the Menu bar to open a submenu.
-
Select the formatting mark required and it is inserted into the text at the cursor position.
The formatting marks that are available in Impress are as follows:
No-break Space
Non-breaking Hyphen
Soft hyphen
Narrow No-break Space
Zero-width Space
Word Joiner
Left-to-Right Mark
Right-to-Left Mark
Formatting text
Text formatting creates a presentation with a consistent and professional look without any distracting elements. Understanding of an audience is enhanced by preventing any distracting elements in a presentation. Text formatting can be applied (for example color, alignment, bullet types) to characters, words, sentences, paragraphs, and lists.
Text formatting tools are available on the Text Formatting toolbar and drop‑down menus in Format on the Menu bar. For more information on text formatting, see the Writer Guide.
Quick font resizing
After selecting text, the font size can be quickly increased or decreased using the tools Increase Font Size (Ctrl+]) (macOS ⌘+]) and Decrease Font Size (Ctrl+[) (macOS ⌘+[) on the Text Formatting toolbar. The amount by which the font size changes depends on the standard sizes available for the font in use.
-
Note
When text is inserted into AutoLayout text boxes, the font size is automatically adjusted to fit the text to the size of a AutoLayout text box. For example, when a long piece of text is inserted into an AutoLayout text box, the font size decreases to fit the text into a AutoLayout text box.
Selecting text
Text must be selected before it can be formatted using one of the following methods. Formatting changes only apply to the selected text.
-
To format all the text in a text box, click once on the border of the text box to display the selection handles. Any formatting changes applies to all text in a text box.
-
To format only part of the text, select text using one of the following methods:
-
Click in the text and drag the cursor over the text to highlight the text.
-
Double-click on text to select a complete word, or triple click to select a whole paragraph.
-
Click in the text, press and hold the Shift key, then use arrow keys to select text.
Using styles
When text is entered into a text box or AutoLayout text box is formatted with a set of predefined attributes known as a style. The style used depends on the type of text box being used. For more information on using, modifying and updating styles, see Chapter 2, Master Slides, Styles and Templates.
Sometimes it is quicker and more efficient to apply manual or direct formatting. However, it is recommended to use styles in situations where the same formatting is required several times in a presentation. This creates consistency to a presentation reducing any possibility of introducing errors. Impress has two style categories – Presentation Styles and Drawing Styles.
Presentation Styles
-
Presentation Styles are used in AutoLayout text boxes, master slide backgrounds, and master slide background objects. The style applied to the text depends on the type of AutoLayout text box.
-
Presentation Styles cannot be deleted, renamed, or replaced by another Presentation Style to change the formatting of the text. For example, to change an outline style for another outline style, the outline level has to be changed using the keyboard shortcuts Tab or Shift+Tab.
-
Presentation Styles can be modified to change the text formatting, or updated to change the style after formatting the text.
-
Note
In contrast to Writer, where the use of styles is recommended whenever feasible, manual or direct formatting is more frequently required in Impress. This is because presentation styles in Impress are limited. For instance, it is not possible to have two distinct Outline 1 levels using different types of bullet points for the same outline level. Additionally, the absence of support for character styles necessitates the manual or direct formatting of text sections when necessary.
Drawing Styles
Drawing Styles are used for text in text boxes and any graphic object placed on a slide. For information on formatting graphic objects, see Chapter 6, Formatting Graphic Objects.
When text is entered into a text box, the default Drawing Style is applied to the text. This style can be changed by selecting another drawing style.
Drawing Styles that are part of the LibreOffice installation cannot be deleted or renamed, but can be modified to change the text formatting, or updated to match the text formatting. Custom Drawing Styles can be created, but are only available for the presentation being created. However, when creating a presentation template, custom Drawing Styles used in a template are available for any presentation that uses the same template.
Text formatting
Direct formatting
Direct or manual text formatting can be applied directly to characters, words, sentences, and paragraphs. Direct formatting overrides any formatting that has been applied to text.
-
Format text using one of the following methods. Any formatting applied to text is immediate.
-
Use the formatting tools on the Text Formatting toolbar.
-
Go to Format on the Menu bar and select a formatting option from the drop-down menu. Selecting a formatting option opens either a context menu, or dialog, providing further formatting options.
-
Use the options available in the Paragraph and Character dialogs.
-
Use the options available in the Paragraph and Character panels in the Properties deck on the Sidebar.
-
Click outside the text box to deselect the text.
Paragraph dialog
-
Select text in a paragraph, or the whole paragraph. See “Selecting text” above for more information.
-
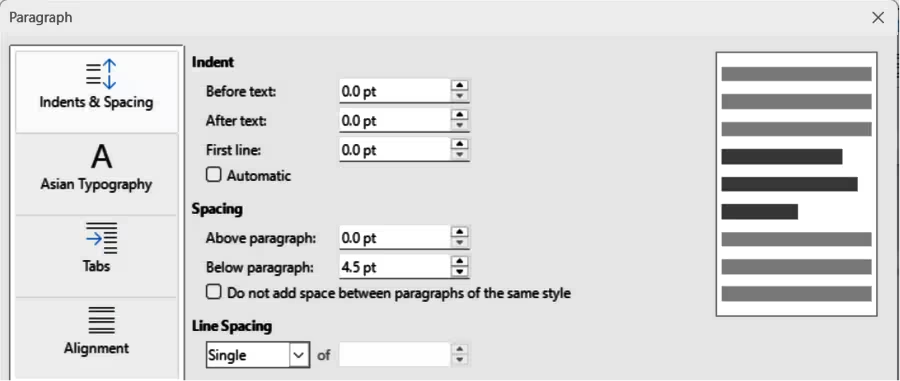
Use one of the following methods and open the Paragraph dialog (Figure 23). Any formatting applied to a paragraph is immediate.
-
Right click on the selected text and select Paragraph from the context menu.
-
Go to Format > Paragraph on the Menu bar.
-
Use the various options available on the tabbed pages of the Paragraph dialog to format the text.
-
Click OK to save the changes and close the dialog.
-
Click outside the text box to deselect the text.
Figure 23: Paragraph dialog — Indents & Spacing page
-
Note
For information on the various formatting options available for text in the pages of the Paragraph dialog, refer to the Writer Guide.
Sidebar Paragraph panel
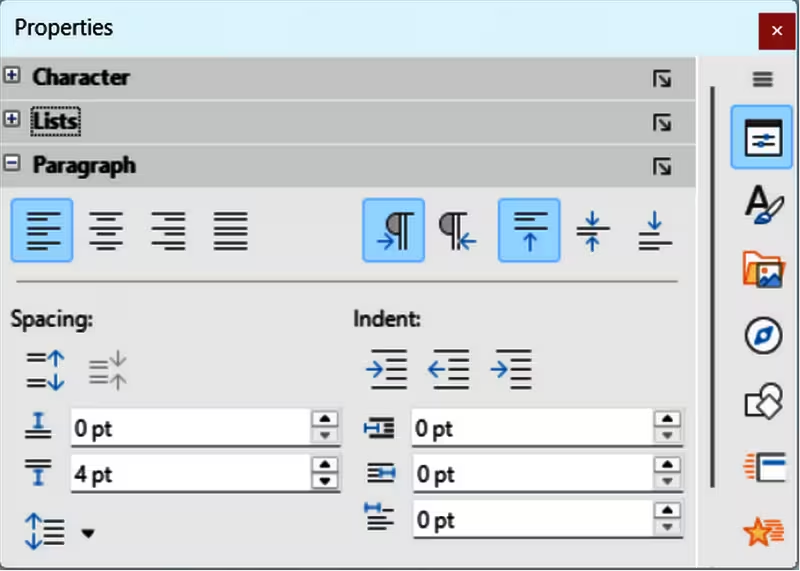
An alternative method of formatting paragraphs is to use the Paragraph panel (Figure 24) in the Properties deck on the Sidebar. The formatting options are limited, but are similar in use to the formatting options available the Paragraph dialog. Any formatting applied to a paragraph using the Sidebar is immediate.
-
Select the text box so that the selection handles and border are displayed.
-
On the Sidebar, click on Properties to open the Properties deck.
Figure 24: Sidebar Properties deck — Paragraph panel
-
Click on Paragraph to open the Paragraph panel.
-
Format the text using the various tools available in the Paragraph panel.
-
If necessary, click on More Options on the right of the title bar to open the Paragraph dialog to format text.
-
Note
For information on the various formatting options available for text in the Paragraph panel on the Sidebar, refer to the Writer Guide.
Character formatting
Direct formatting
Direct or manual text formatting can be applied directly to characters, words, and sentences. Direct character formatting overrides any formatting that has been applied to text when using direct text formatting and presentation or drawing styles.
-
Select the characters or words for formatting. See “Selecting text” above for more information.
-
Format characters using one of the following methods.
-
Various formatting tools on the Text Formatting toolbar.
-
Go to Format on the Menu bar. Selecting a formatting option opens either a context menu or dialog where further formatting options are selected.
-
Use the options available in the Character dialog. Clicking OK on the dialog applies the formatting changes.
-
Use the options available in the Character panel in the Properties deck on the Sidebar. Formatting applied to character(s) is immediate.
-
Click outside the text box to deselect the text.
Character dialog
-
Select the characters or words in the text box for formatting. See “Selecting text” above for more information.
-
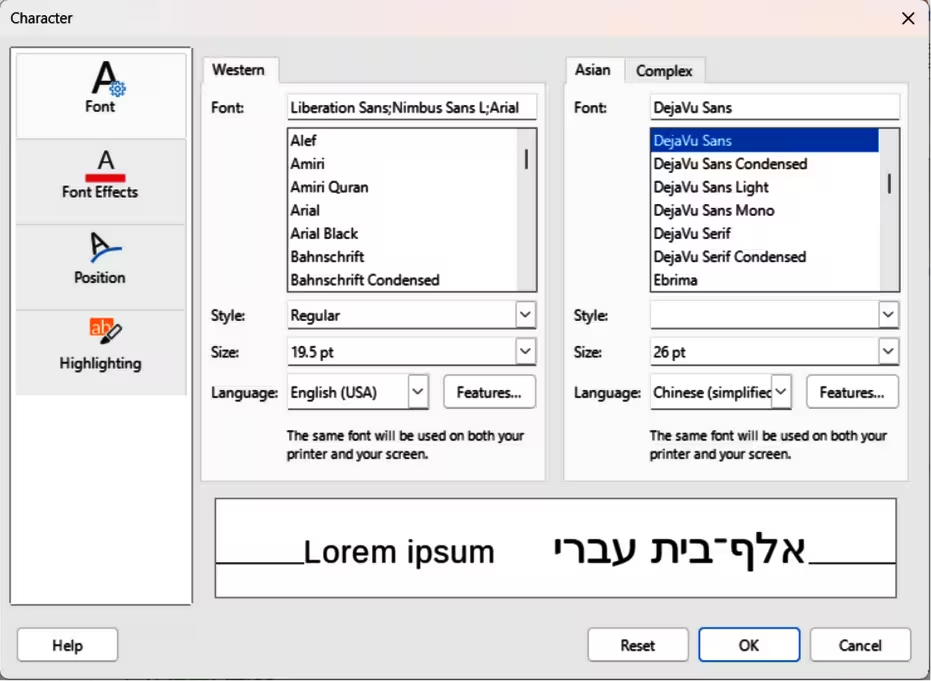
Open the Character dialog (Figure 25) using one of the following methods:
-
Right-click on the selected text box and select Character from the context menu.
-
Go to Format > Character on the Menu bar.
-
Use the various options available on the tabbed pages of the Character dialog to format the selected characters.
-
Click OK to save the changes and close the dialog.
-
Click outside the text box to deselect it.
-
Note
For information on the various formatting options available for characters in the pages of the Character dialog, refer to the Writer Guide.
Figure 25: Character dialog — Fonts page
Sidebar Character panel
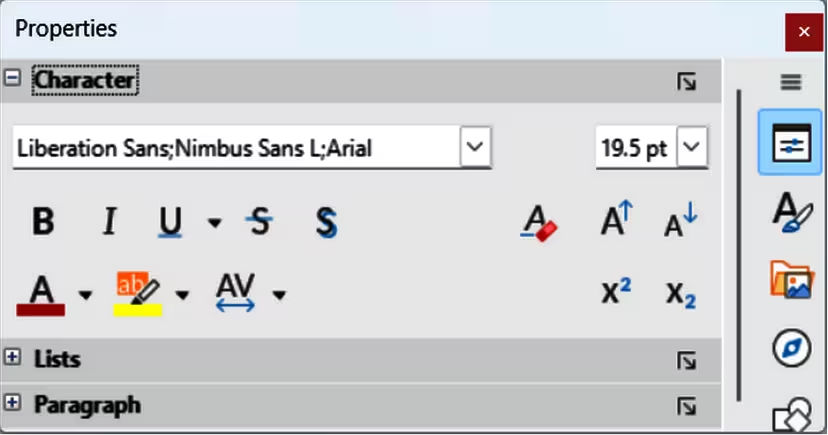
An alternative method of formatting characters is to use the Character panel (Figure 26) in the Properties deck on the Sidebar. Formatting options available in the Character panel are limited, but similar in use to the formatting options available in the various pages of the Character dialog.
-
Select the characters or words in the text box for formatting. See “Selecting text” above for more information.
-
On the Sidebar, click on Properties to open the Properties deck.
-
Click on Character to open the Character panel.
Figure 26: Sidebar Properties deck — Character panel
-
Format the text using the various tools available in the Character panel.
-
If necessary, click on More Options on the right of the title bar to open the Character dialog to format text.
-
Note
For information on the various formatting options available for characters in the pages of the Character panel on the Sidebar, refer to the Writer Guide.
Creating lists
The procedure for creating unordered (bulleted) or ordered (numbered) lists differs depending on the type of text box used. However, the tools for managing and formatting a list are the same. Creating unordered or ordered lists in Impress is similar to Writer. For more information on unordered or ordered lists, see the Writer Guide. For more information on creating text boxes, see “Working with text boxes” above.
AutoLayout text boxes
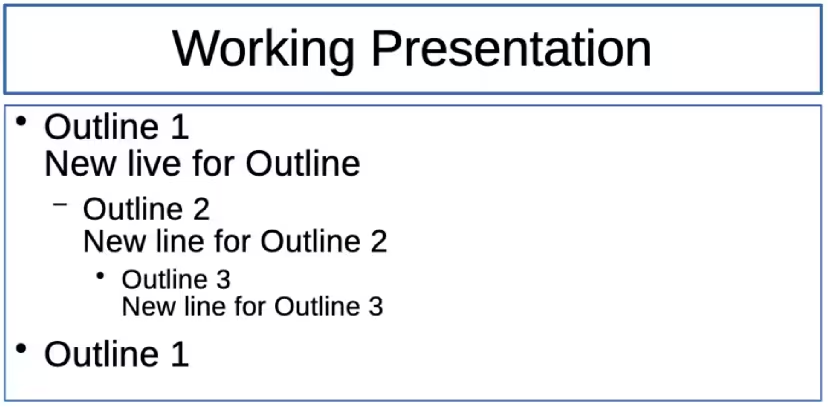
In AutoLayout text boxes and, by default, the outline styles are unordered lists. An example of outline styles is shown in Figure 27. Outline styles are presentation styles and cannot be deleted, but can be modified or updated to the presentation requirements. See Chapter 2, Master Slides, Styles and Templates for more information on styles.
Figure 27: Example of outline styles in unordered list
-
Note
In AutoLayout text boxes, promoting or demoting an item in a list changes the presentation style to match the outline level. For example, second outline level corresponds to Outline 2 style, third outline level to Outline 3 style, and so on. Each outline level may change formatting of a list point.
Creating lists
Creating lists in AutoLayout text boxes, or text boxes uses a similar procedure. To customize the list appearance being created, or to change from unordered to ordered or ordered to unordered, see “Formatting lists” below for more information.
-
Create a new presentation and make sure Normal view is selected in the Workspace.
-
Select a layout for the slide using one of the following methods:
-
Right-click in a blank area on the slide and select a layout type from the context menu that opens.
-
Go to Slide > Layout on the Menu bar and select a layout from the drop-down list.
-
Select a layout from the layouts displayed in the Layouts panel in the Properties deck on the Sidebar.
-
Click on the text Click to add Text and start typing the first list item.
-
When the first list point is finished, click on Enter to create a new list point.
-
Use the keyboard combination Shift+Enter to create a new line without creating a new list point. This new line has the same indentation as the text in the list point.
-
To demote the outline level of a list point, use one of the following methods:
-
Click on the Tab key.
-
Use the keyboard shortcut Alt+Shift+Right Arrow (macOS ⌥+Shift+Right Arrow).
-
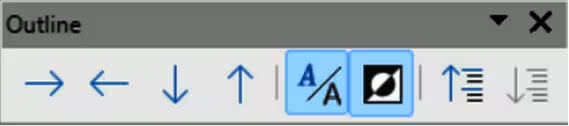
Click on Demote on the Outline toolbar (Figure 28).
Figure 28: Outline toolbar
-
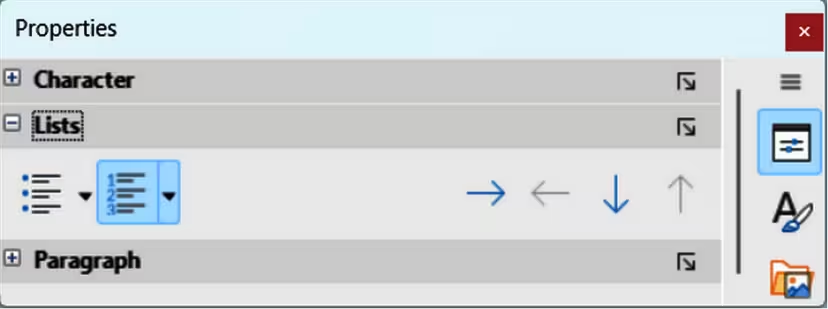
Click on Demote on the Lists panel in the Properties deck on the Sidebar (Figure 29).
-
Go to Format > Lists on the Menu bar and select Demote from the submenu.
Figure 29: Sidebar Properties deck — Lists panel
-
To promote the outline level of a list point, use one of the following methods:
-
Use the keyboard shortcut Shift+Tab.
-
Use the keyboard shortcut Alt+Shift+Left Arrow (macOS ⌥+Shift+Left Arrow).
-
Click on Promote on the Outline toolbar (Figure 28).
-
Click on Promote on the Lists panel in the Properties deck on the Sidebar (Figure 29).
-
Go to Format > Lists on the Menu bar and select Promote from the submenu.
-
To move a list point lower in the list order without changing the outline level, use one of the following methods:
-
Click on Move Down on the Outline toolbar (Figure 28).
-
Click on Move Down on the Lists panel in the Properties deck on the Sidebar (Figure 29).
-
Go to Format > Lists on the Menu bar and select Move Down from the submenu.
-
Use the keyboard shortcut Alt+Shift+Down Arrow (macOS ⌥+Shift+Down Arrow).
-
To move a list point higher in the list order without changing the outline level, use one of the following methods:
-
Click on Move Up on the Outline toolbar (Figure 28).
-
Click on Move Up on the Lists panel in the Properties deck on the Sidebar (Figure 29).
-
Go to Format > Lists on the Menu bar and select Move Up from the submenu.
-
Use the keyboard shortcut Alt+Shift+Up Arrow (macOS ⌥+Shift+Up Arrow).
-
To change the type and appearance of a list, see “Formatting lists” below for more information.
-
Note
Do not change the outline style of a list point by selecting the list point and then selecting another outline style. In Impress it is not possible to change presentation styles used in outline levels.
Formatting lists
-
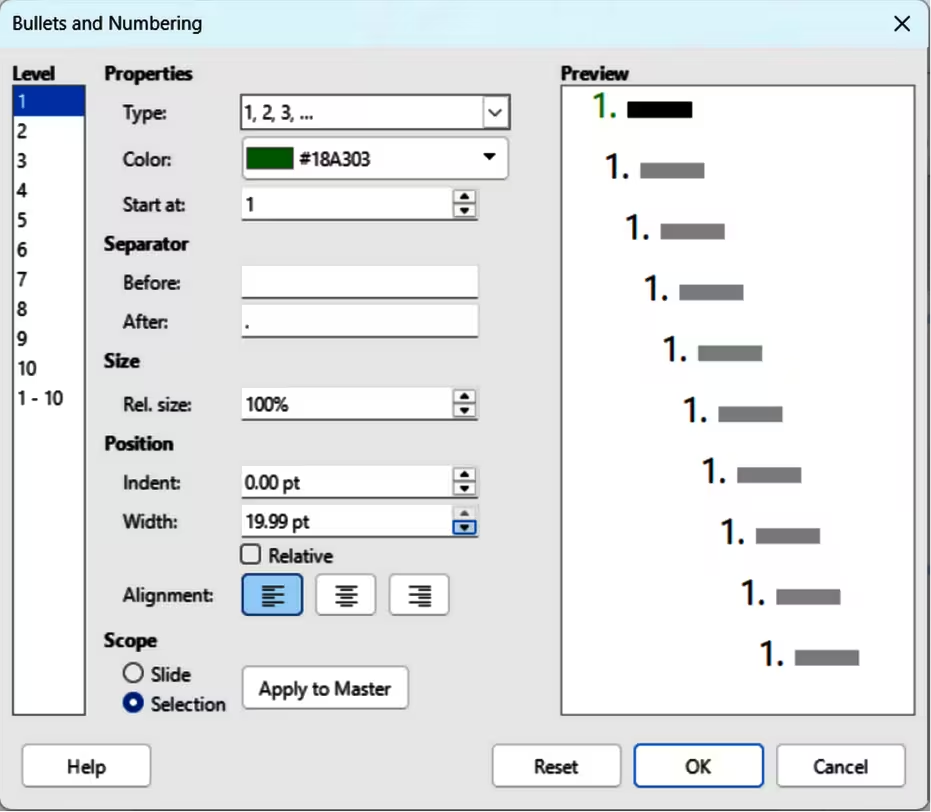
Change the list type, properties, size, position, and scope for the entire list or for a single list point using the Bullets and Numbering dialog (Figure 30). Right‑click on a list item and select Bullets and Numbering from the context menu to open the Bullets and Numbering dialog.
Figure 30: Bullets and Numbering dialog
-
Change the list type, promote or demote a list point, or move a list point up or down in the list order using the Lists panel in the Properties deck on the Sidebar.
-
Promote or demote a list point, or move a list point up or down in the list order using the Outline toolbar (Figure 28).
-
Change the list type using the tools on the Text Formatting toolbar.
-
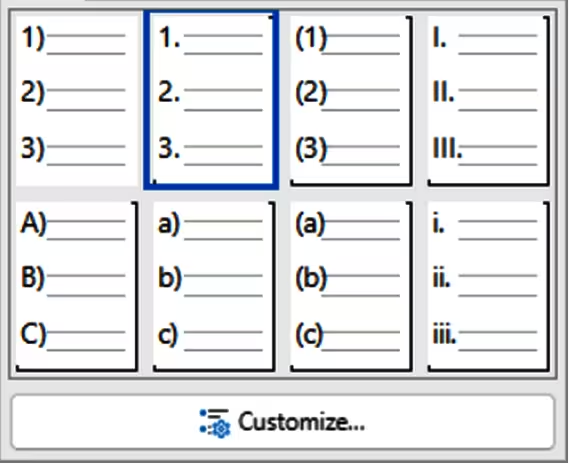
Click on Customize after clicking on the triangle ▼ on the right of Toggle Unordered List or Toggle Ordered List on the Text Formatting toolbar, or in the Lists panel in the Properties deck on the Sidebar. This opens the Bullet Library dialog (Figure 31) and Numbers Library dialog (Figure 32).
Figure 31: Bullet Library dialog
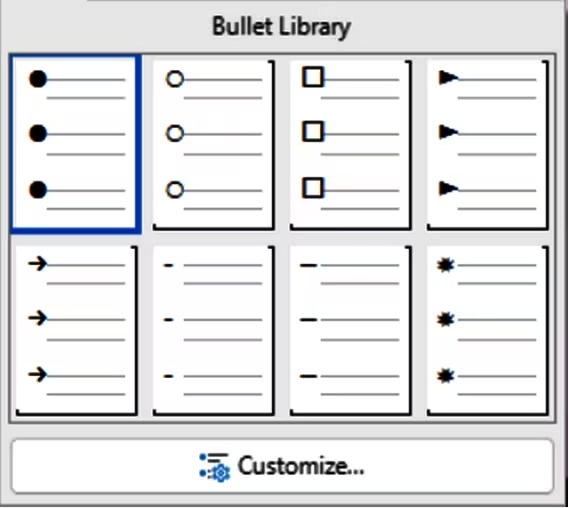
Figure 32: Numbers Library dialog
-
Note
For more information on the options available in the Bullets and Numbering dialog for unordered or ordered lists, see the Writer Guide.
Text callouts
A text callout is a short line of text connected by a line to indicate a feature of an illustration or drawing. Two types of text callouts are available –– Callouts for horizontal text and Vertical Callouts for vertical text (Figure 33).
Figure 33: Examples of text callouts

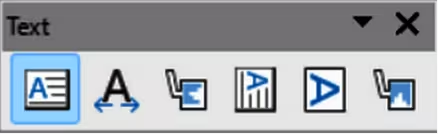
The text callouts are a legacy from earlier versions of LibreOffice and are available on the Text toolbar (Figure 34). These tools can also be installed on other toolbars by customizing a toolbar, for example Standard or Line toolbar. For more information on customizing toolbars, see Appendix B, Toolbars or the Getting Started Guide.
Figure 34: Text toolbar
-
Note
More callout shapes can be found by selecting Callout Shapes on the Drawing toolbar, or the Callouts panel in the Shapes deck on the Sidebar. These callouts have the same purpose as text callouts, but have different options available.
Creating text callouts
-
Click on Callouts for horizontal text, or Vertical Callouts for vertical text on the Text toolbar.
-
Click in the slide and drag the cursor to create the callout.
-
Double click in the callout box to enter text mode.
-
Type the required text, then click in a blank space in the slide. The callout box adjusts its size horizontally and/or vertically to fit the text within the callout box.
-
Select the callout and click on the selection handle at the end of the connector line, then drag the end of the connector line to the required position.
-
With the callout still selected, click on the callout box and drag it to the required position.
-
Click in a blank space in the slide to deselect the text callout and save the changes.
-
Note
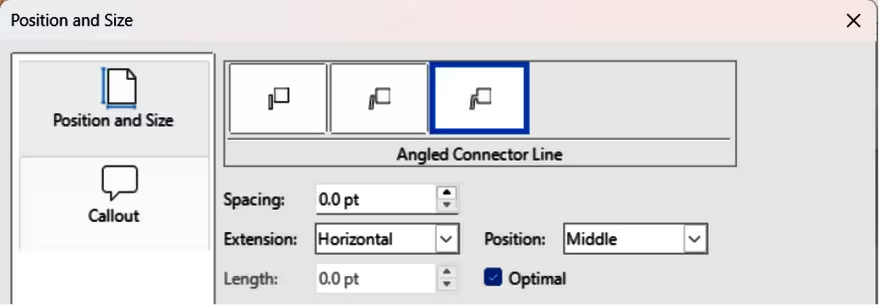
The Callout page in the Position and Size dialog (Figure 35) is ONLY available when a text callout has been selected. It is not available for Callout Shapes available on the Drawing toolbar, or in the Callouts panel in the Shapes deck on the Sidebar.
Figure 35: Position and Size dialog — Callout page
Editing text callouts
-
Double click in the callout box to enter text mode and, if required, edit and format the text.
-
Click in a blank space in the slide to save the changes to the text.
-
Select the text callout so that the selection handles are displayed.
-
Right click on the selected text callout and select an option from the context menu to change the attributes for position, size, line, and area of the text callout. For more information, see Chapter 3, Working with Objects, and Chapter 4, Changing Object Attributes.
-
Click on the selection handle at the end of the connector line and drag it to change the position of the line end or the length of the connector line.
-
Select the text callout and open the Position and Size dialog (Figure 35) using one of the following methods:
-
Right-click on selected callout and select Position and Size from the context menu.
-
Go to Format > Position and Size on the Menu bar.
-
Use the keyboard shortcut F4.
-
Click on the Callout tab to open the formatting options available for text callouts.
-
Select the style of text callout from Straight Line, Angled Line, or Angled Connector Line.
-
In Spacing, enter the amount of space required between the end of the callout line and the callout box.
-
In Extension, select from the drop-down list how the callout line from extends the callout box.
-
If Optimal, From top, or From left option is selected in Extension, in the By text box enter a distance value. This creates a space between the start point of the connector line and the callout box.
-
If Horizontal, or Vertical option is selected in Extension, in the Position text box select Top, Middle, or Bottom to position the start point of the connector line on the callout box.
-
In Length, enter the length of the callout line segment that extends from the callout box to the angle point of the connector line.
-
In Optimal, select this option to display the angle point in a connector line at an optimal distance from the callout box.
-
Click in a blank space on the slide to deselect the text callout and save the changes.
Tables
Tables are an effective way to convey structured information in presentations. Tables can be directly created within a presentation, eliminating the need to embed a Calc spreadsheet or a Writer text table. However, Impress tables do have limited functionality when compared to a Calc spreadsheet, or a Writer text table.
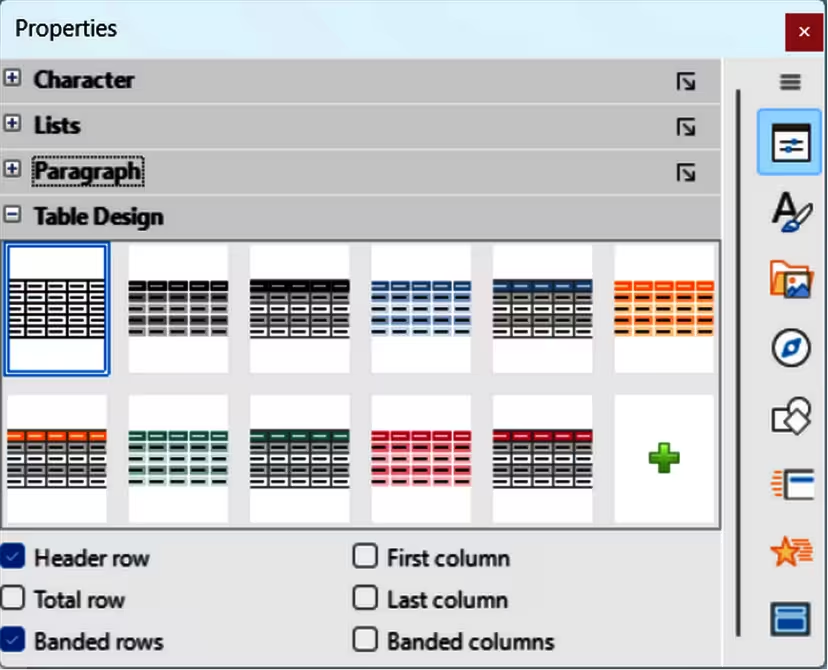
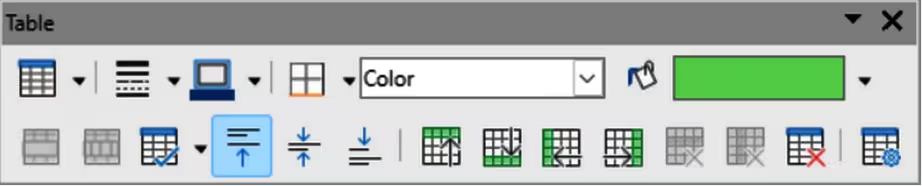
Several predefined table designs are available in the Table Design panel, located in the Properties deck on the Sidebar (Figure 36). The Table Design panel is only available when a table is selected in a slide. Additionally, when working with tables in Impress, the Table toolbar (Figure 37) automatically opens providing tools for creating and formatting a table.
Figure 36: Sidebar Properties deck — Table Design panel
-
Note
When a table is inserted into a slide, the table is created inside a text box at the centre of the slide with the default style and settings already applied. The text box is the same size as the rows and columns of the table. The default table style and settings are hard coded into LibreOffice. The table is then formatted to the presentation requirements using the tools and options available.
Figure 37: Table toolbar
Inserting tables
When inserting a table into a slide, it is useful to know the number of rows and columns required as well as an approximate idea of how the table will look. The table can then be formatted if necessary after being inserted onto a slide.
Insert Table dialog
-
Select a slide and, if necessary, format the slide layout to create space for the table.
-
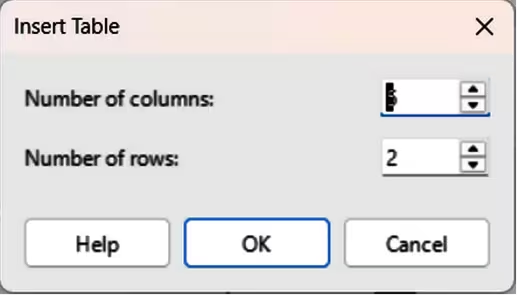
Go to Insert > Table on the Menu bar to open the Insert Table dialog (Figure 38).
Figure 38: Insert Table dialog
-
Specify the Number of columns and Number of rows in the text boxes.
-
Click OK to insert the table in the centre of the slide and close the dialog.
Table graphic
-
Select a slide and, if necessary, format the slide layout to create space for the table.
-
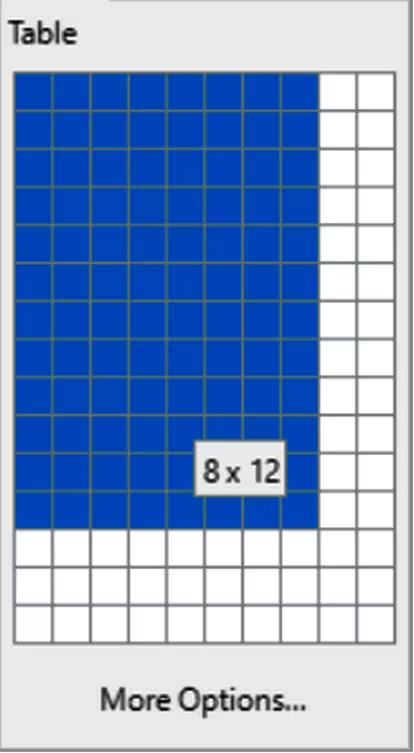
Click on Table on the Standard or Table toolbar to open the Table graphic (Figure 39).
-
Click and drag the cursor across and down in the table graphic to create the required number of rows and columns.
Figure 39: Example Insert Table graphic
-
Release the cursor to insert the table in the centre of the slide and close the Table graphic.
-
Alternatively, click on More Options in the Table graphic to open the Insert Table dialog (Figure 38) and create the rows and columns required.
Formatting tables
Sidebar Table Design panel
-
Insert a table into a slide or select a table in a slide.
-
Click on Table Design in the Properties deck on the Sidebar to open the Table Design panel (Figure 36) and display the available designs.
-
Select a design for the table and the types of rows and columns from the available options.
-
Note
The Table Design panel in the Properties deck on the Sidebar only becomes available when a table is selected on a slide.
Table Design options
Header row
Total row
Banded rows
First column
Last column
Banded columns
Table toolbar
When a table is selected, the Table toolbar (Figure 38) automatically opens. If the Table toolbar does not open when a table is selected, go to View > Toolbars > Table on the Menu bar. The Table toolbar provides essential formatting tools for tables.
Table
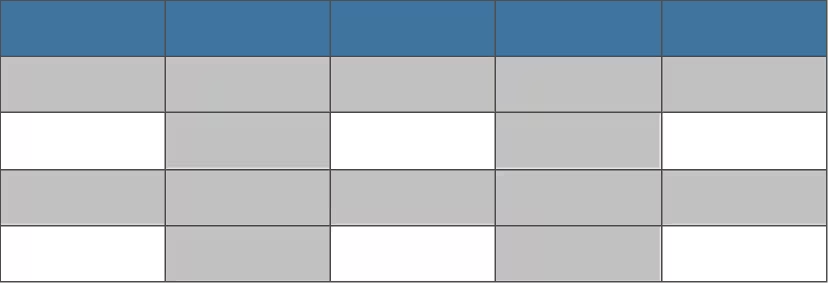
Figure 40: Example of a banded table
Border Style
Border Color
Borders
Area Style/Filling
Merge Cells
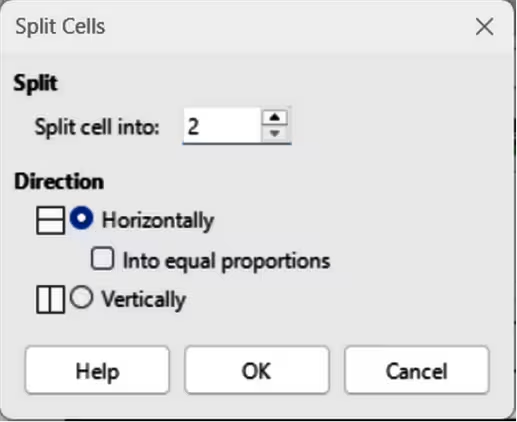
Split Cells
Figure 41: Split Cells dialog
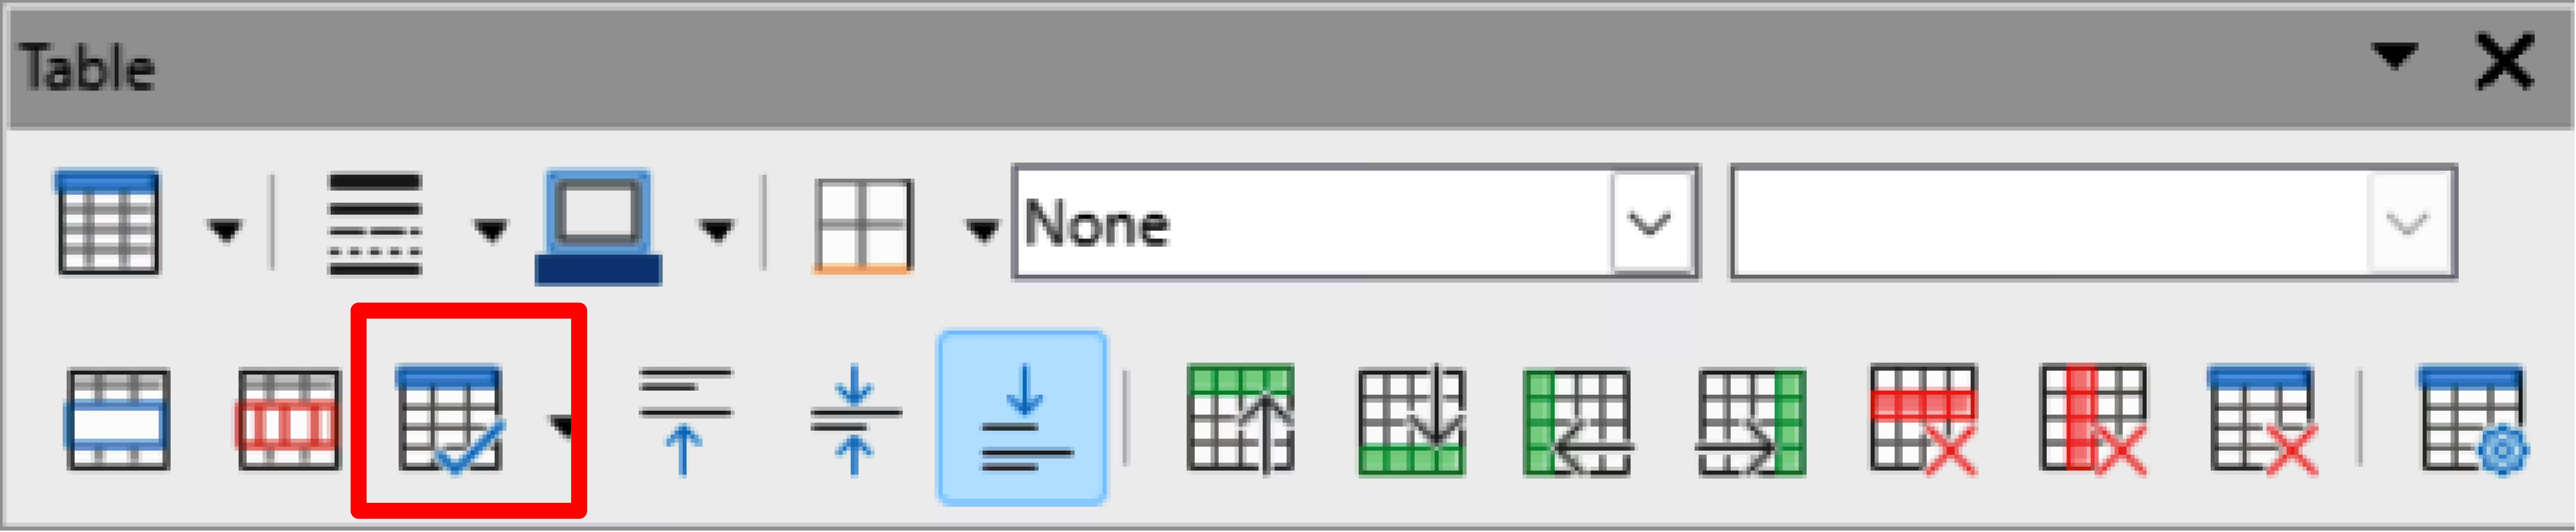
Optimize
Figure 42: Table toolbar — Optimize tool highlighted
Minimal Row Height
Adjust the row height for selected row(s) so that the tallest content in each selected row fits exactly.
Optimal Row Height
Set row height for selected table rows so that each row has the same height as the row with the tallest content.
Distribute Rows Equally
Adjust the height of the selected rows to match the height of the tallest row in the selection.
Minimal Column Width
Adjust the column width for the selected columns so that the longest paragraph in each column can fit exactly on a single line, without increasing the table width.
Optimal Column Width
Adjust column width for selected columns to fit the column’s content, without changing the width of the table or the unselected columns.
Distribute Columns Evenly
Adjust the width of selected table columns so that each column has the same width. The table width and unselected columns remain unchanged.
Align Top, Centre Vertically, Align Bottom
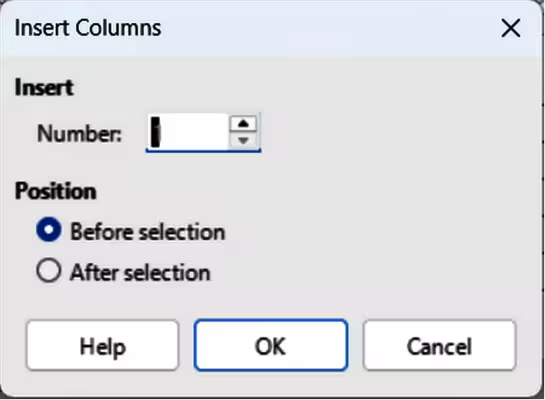
Insert Row , Insert Row Below, Insert Column Before, Insert Column After
Delete Row, Delete Column, Delete Table
Figure 43: Insert Rows dialog
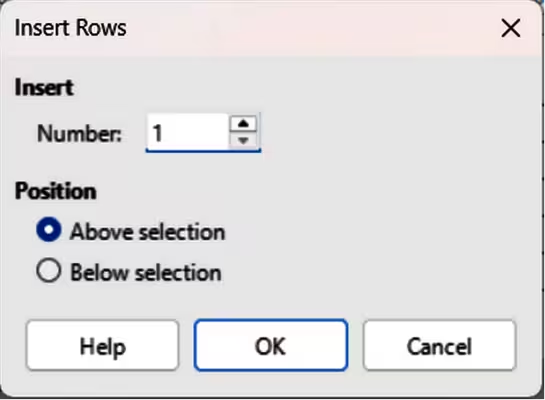
Figure 44: Insert Columns dialog
Select Table, Select Column, Select Rows
Table Design
Table Properties
Table Properties dialog
The Table Properties dialog is opened using one of the following methods:
-
Right-click in a table and select Table Properties from the context menu.
-
Go to Format > Table > Properties on the Menu bar.
-
Click on Table Properties in the Table toolbar.
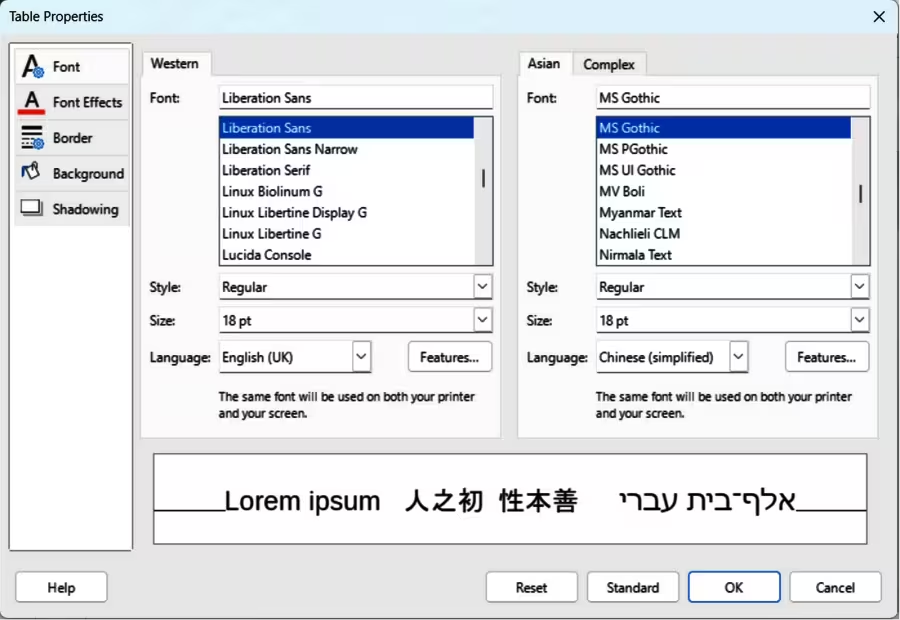
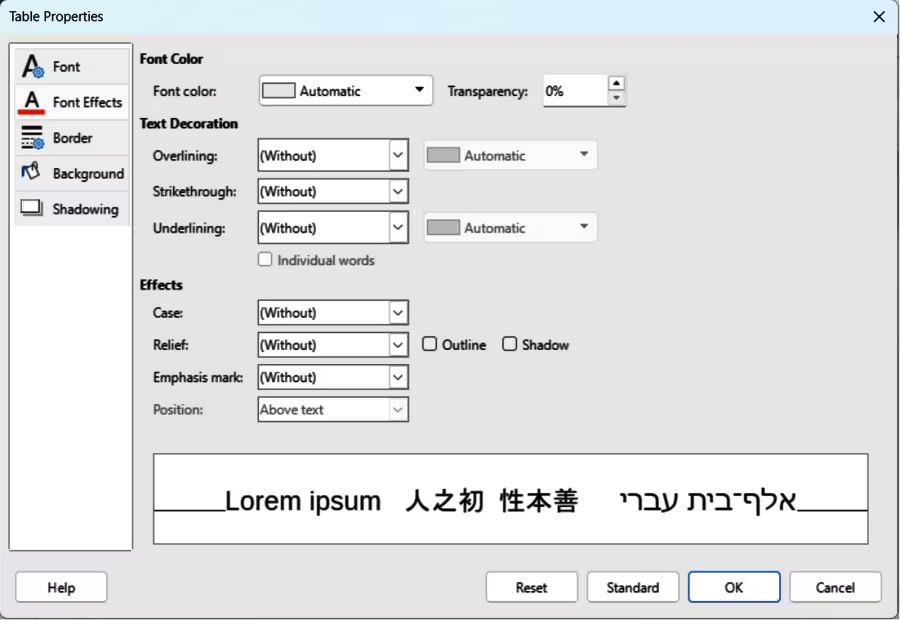
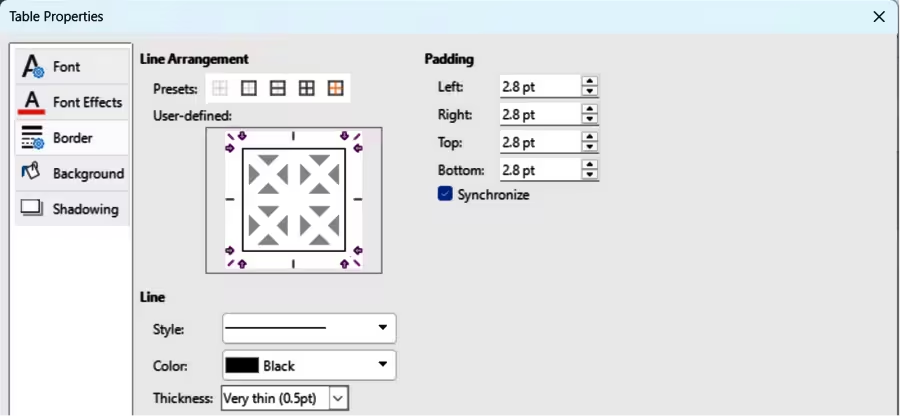
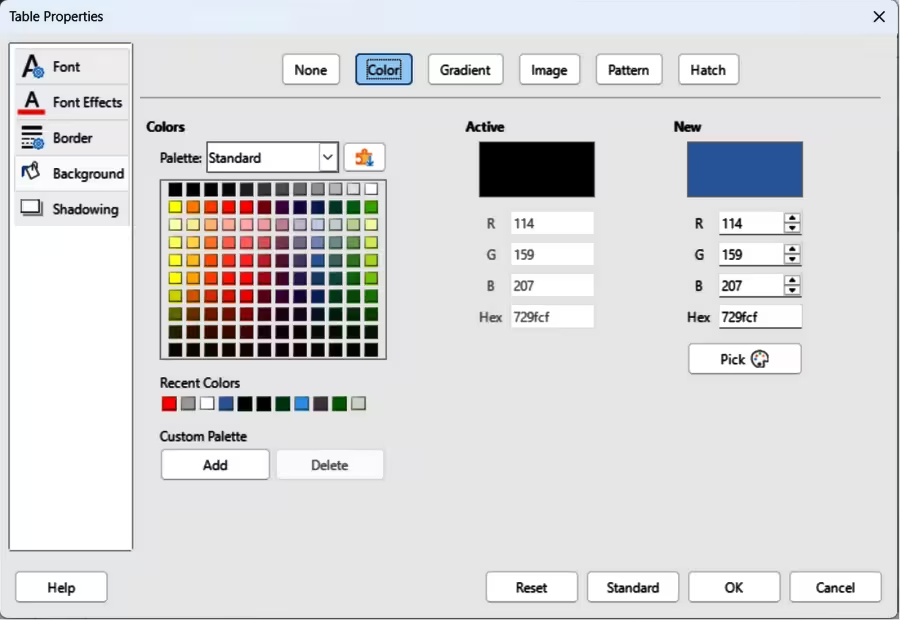
The Table Properties dialog has five tabbed pages that provide formatting options and the formatting options available on each dialog page are as follows:
Font
Figure 45: Table Properties dialog — Font page
Font Effects
Figure 46: Table Properties dialog — Font Effects page
Borders
Figure 47: Table Properties dialog — Border page
Background
Figure 48: Table Properties dialog — Background Color page
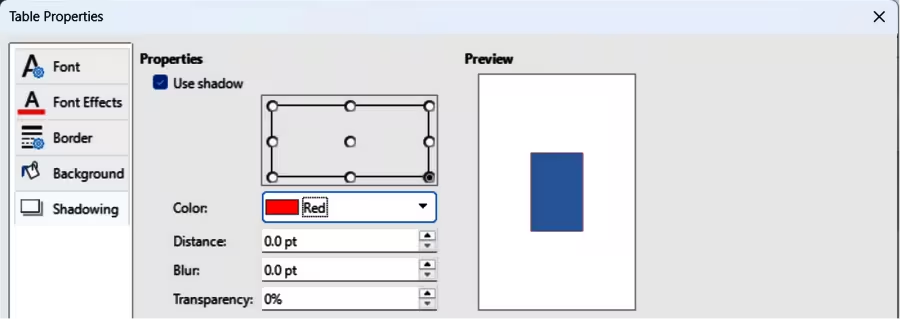
Shadowing
Figure 49: Table Properties dialog — Shadowing page
Position and size
Tables are placed into text boxes when created and are treated just like any other graphic object in an Impress presentation. Only the Position and Size dialog can be used for tables. See “Position and Size dialog” above for more information. Select the table, then open the Position and Size dialog using one of the following methods:
-
Right-click on the table and select Position and Size from the context menu.
-
Go to Format > Text Box and Shape > Position and Size on the Menu bar.
-
Use the keyboard shortcut F4.
The position of the table text box can also be changed by clicking on the border and dragging to move the table text box to a new position. The table text box size can be changed by clicking and dragging on the selection handles. See “Working with text boxes” above for more information.
-
Note
When the size of a text box containing a table is changed, the table also increases or decreases in size to keep the text box filled with the table.
Using fields
Fields allow automatic insertion of text into a slide. Fields are used when creating templates and slide masters. For more information, see Chapter 2, Slide Masters, Styles, and Templates.
Inserting fields
-
Select the slide so that it appears in the Workspace.
-
Go to Insert > Field on the Menu bar and select the type of field from the options in the submenu. The field is placed centrally on the selected slide in a text box.
-
If necessary, position and resize the field text box. See “Working with text boxes” above for more information.
-
If necessary, format the text used for the field information. See “Formatting text” above for more information.
Field types
Date (fixed)
Date (variable)
Time (fixed)
Time (variable)
Author
Slide Number
Slide Title
Slide Count
File Name
Using hyperlinks
When inserting text that can be used as a hyperlink, such as a website address or URL, Impress formats it automatically, creating a hyperlink, applying color, and underlining. If default settings are not being used in Impress, then the hyperlink has to be inserted manually.
-
Tips
To prevent automatically turning website addresses or URLs into hyperlinks, go to Tools > AutoCorrect Options > Options and deselect URL Recognition.
To change color of hyperlinks, go to Tools > Options > LibreOffice > Application Colors (macOS LibreOffice > Preferences > LibreOffice > Application Colors), scroll to Unvisited links and/or Visited links. Select the checkboxes, then select new colors from the color palettes for the links and click OK. Note that this color change changes the color for all hyperlinks across all LibreOffice modules.
-
Note
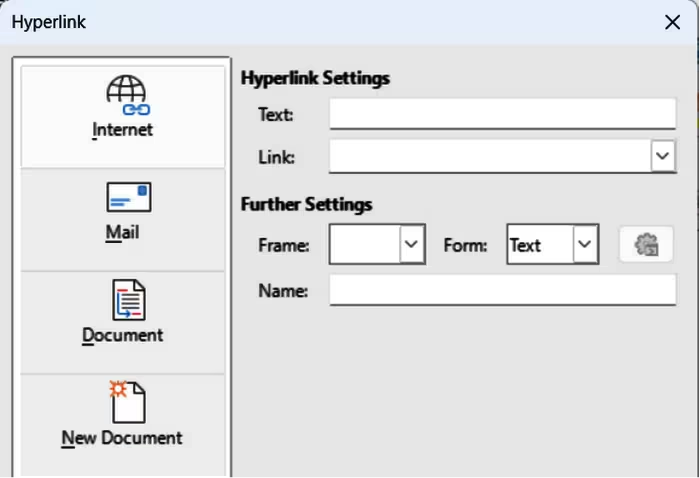
The top right part of the dialog changes depending on the hyperlink type. A comprehensive description of all options, and their interactions, is beyond the scope of this chapter. The most common presentation choices are shown below.
Inserting hyperlinks
-
Select the slide where the hyperlink is going to be inserted.
-
Go to Insert > Hyperlinks on the Menu bar or use the keyboard shortcut Ctrl+K (macOS ⌘+K) to open the Hyperlink dialog (Figure 50).
Figure 50: Hyperlink dialog — Internet page
-
On the left hand side, select the type of hyperlink for insertion.
-
Create the hyperlink using the Hyperlink dialog, then click Apply to insert the hyperlink into the slide. The hyperlink is inserted into a text box.
-
Click Close or OK to close the dialog.
Hyperlink types
Internet
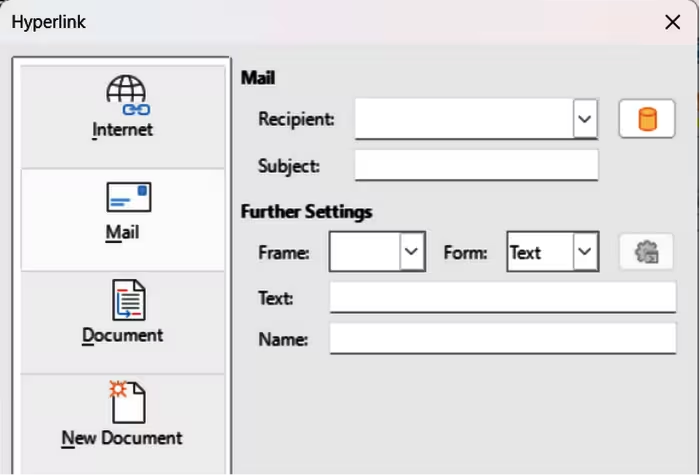
Figure 51: Hyperlink dialog — Mail page
Document
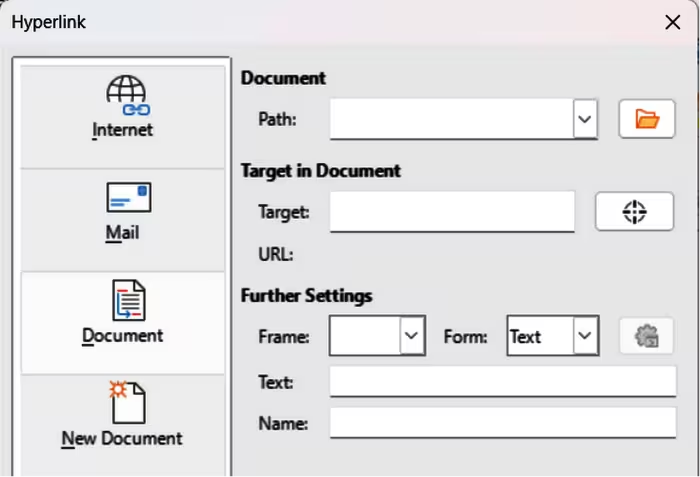
Figure 52: Hyperlink dialog — Document page
New Document
Further Settings
Figure 53: Hyperlink dialog — New Document page
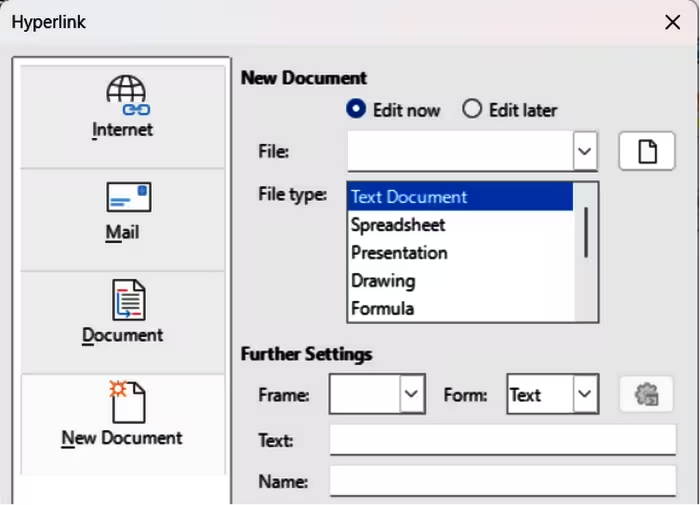
Frame
Set the value to determine how the hyperlink opens. This applies to documents that open in a web browser.
Form
Specifies if the link is to be presented as text or as a button.
Text
Specifies the text that will be visible to the user.
Name
Applicable to HTML documents. It specifies text that will be added as a NAME attribute in the HTML code behind the hyperlink.
-
Note
DO NOT click directly on the hyperlink text. Clicking hyperlink text opens the hyperlink.
Formatting hyperlinks
A hyperlink is inserted in the centre of the current slide. To edit the text, the size of a hyperlink text box, or to reposition the hyperlink on the slide:
-
Click and drag a selection marquee over the hyperlink text to display a text box border and selection handles.
-
Right-click on the selected hyperlink and select the type of formatting required from the options available in the context menu.
-
To reposition hyperlink, click and drag on the text border to move the hyperlink on the slide.
-
Select Position and Size from the context menu or press the F4 key to open the Position and Size dialog. Options can be selected to move the hyperlink or resize the text box. See “Working with text boxes” above for more information