Copyright
This document is Copyright © 2026 by the LibreOffice Documentation Team. Contributors are listed below. This document may be distributed and/or modified under the terms of either the GNU General Public License (https://www.gnu.org/licenses/gpl.html), version 3 or later, or the Creative Commons Attribution License (https://creativecommons.org/licenses/by/4.0/), version 4.0 or later. All trademarks within this guide belong to their legitimate owners.
Contributors
To this edition
Peter Schofield
To previous editions
Jean Hollis Weber, Kees Kriek, Peter Schofield, Rachel Karch, Samantha Hamilton, T. Elliot Turner.
Feedback
Please direct any comments or suggestions about this document to the Documentation Team Forum at https://community.documentfoundation.org/c/documentation/loguides/ (registration is required) or send an email to: loguides@community.documentfoundation.org.
-
Note
Everything sent to a forum, including email addresses and any other personal information that is written in the message, is publicly archived and cannot be deleted. Emails sent to the forum are moderated.
Publication date and software version
Published August 2026. Based on LibreOffice 26.2 Community.
Creating slide shows
LibreOffice Impress provides tools to organize and display a slide show, including:
-
Selecting slides to show in the required sequence.
-
Run the show automatically or manually.
-
Transitions between slides.
-
Animations on individual slides.
-
Interactions when clicking on a button or link.
-
Presenter console.
Basic settings
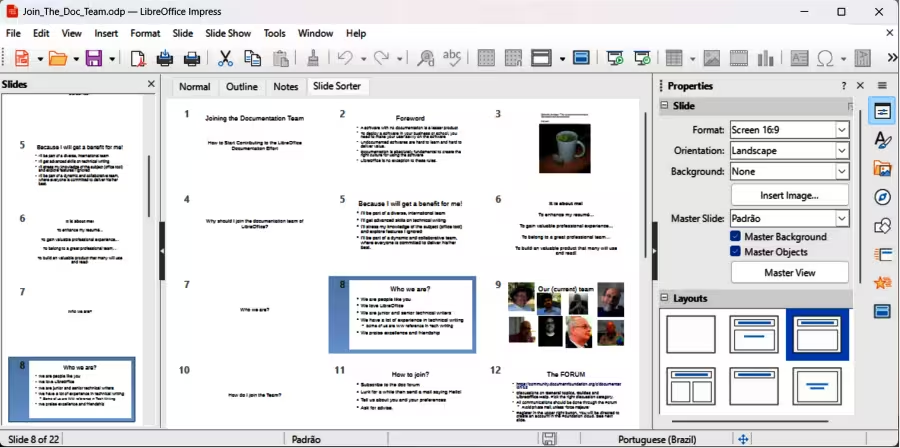
Most tasks associated in creating a slide show are carried out in the Slide Sorter view where all slides in the presentation are displayed in the Workspace.
-
Open the Slide Sorter view (Figure 1) using one of the following methods:
Figure 1: Example of Slide Sorter view in Workspace
-
Go to View > Slide Sorter on the Menu bar.
-
Click on the Slide Sorter tab at the top of the Workspace.
-
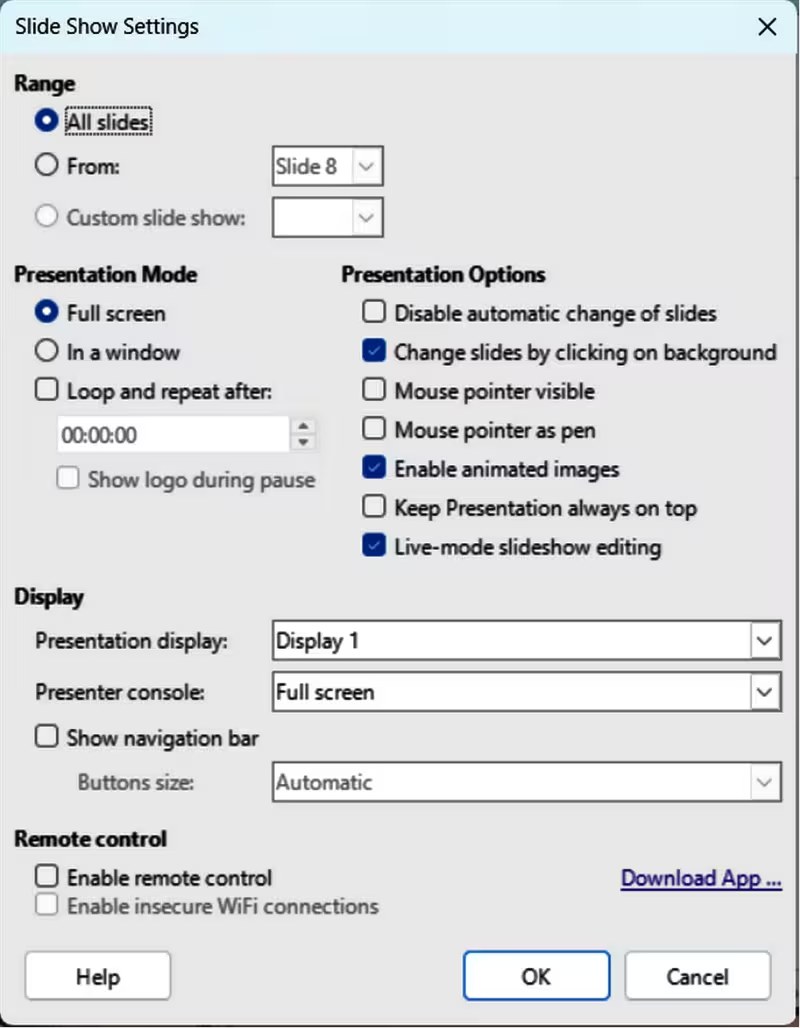
Go to Slide Show > Slide Show Settings on the Menu bar to open the Slide Show Settings dialog (Figure 2).
-
Select the options required for the slide show.
-
Click OK to save the changes and close the Slide Show Settings dialog.
Slide show options
Range
Figure 2: Slide Show Settings dialog
All slides
Includes all slides, except for slides marked Hidden (see “Hiding slides” below). Slides are shown in sequence they occur in the file. To change the sequence, either rearrange the slides in Slide Sorter view or select the custom slide show option.
From
Starts the show at the slide selected from the drop-down list. For example, there may be several slides at the beginning describing the company, but when presenting this slide show to work colleagues, this introduction could be skipped.
Custom slide show
Displays the slides in a different sequence from the sequence previously setup. This setting is not available until a custom slide show has been setup (see “Custom slide show” below). Many different custom shows can be setup as required from one set of slides and they appear in the drop-down list for this option.
Presentation Mode
Full screen
Shows the slides full screen without the LibreOffice program controls visible and exits the show after the last slide.
In a window
Runs the slide show in the Impress window and exits the show after the last slide.
Loop and repeat after
Restarts the slide show after the last slide has displayed and after a specified time delay. Setting this option allows a slide show to automatically run continuously. A pause slide is displayed between the last slide and the start slide. Press the Esc key at any time to stop the show. If zero is entered as time delay, the show restarts immediately without showing a pause slide.
Show logo
Shows the LibreOffice logo on the pause slide when Loop and repeat after option is selected.
-
Note
Before selecting the option Loop and repeat after, make sure that the option After is selected and an interval time setting has been entered. The option After is in Advance slide options in the Slide Transitions deck on the Sidebar. If no interval time is set for After, then the option Loop and repeat after will not function.
Options
Change slides manually
Prevents slides from changing automatically even if an automatic transition has been set up.
Mouse pointer visible
Shows the mouse pointer during a slide show. If a laser pointer or other device is being used to highlight items of interest during the show, this can be useful.
Mouse pointer as pen
Enables writing or drawing on slides during the presentation. Anything written with the pen is not saved when exiting the slide show. The color of the pen cannot be changed.
Animations allowed
Displays all frames of animated GIF files during the slide show. If this option is not selected, only the first frame of an animated GIF file is displayed. This has nothing to do with the slide animations described in “Animations” below.
Change slides by clicking on background
Advances to the next slide when the slide background is clicked. Also, pressing the spacebar advances to the next slide.
Presentation always on top
Prevents any other program window from appearing on top of the presentation.
Multiple Displays
Presentation display
Select from the drop-down list which display to use for full screen slide show mode. Only available if the computer being used for the slide show is connected to more than one display monitor.
-
Note
Multiple Displays setting is not saved with a presentation file. It is saved as a local setting in the computer user configuration. This means that if a presentation is opened using another computer, the local settings for that computer are applied.
Hiding slides
Some slides may not be required in a slide show. The solution is to hide slides or create a custom slide show to suit presentation requirements. For example, draft slides are not shown, or there may be slides containing sensitive information that is not to be shown to an audience.
Hiding slides
-
In the Slides pane, or Slide Sorter view in the Workspace, select the slides for hiding.
-
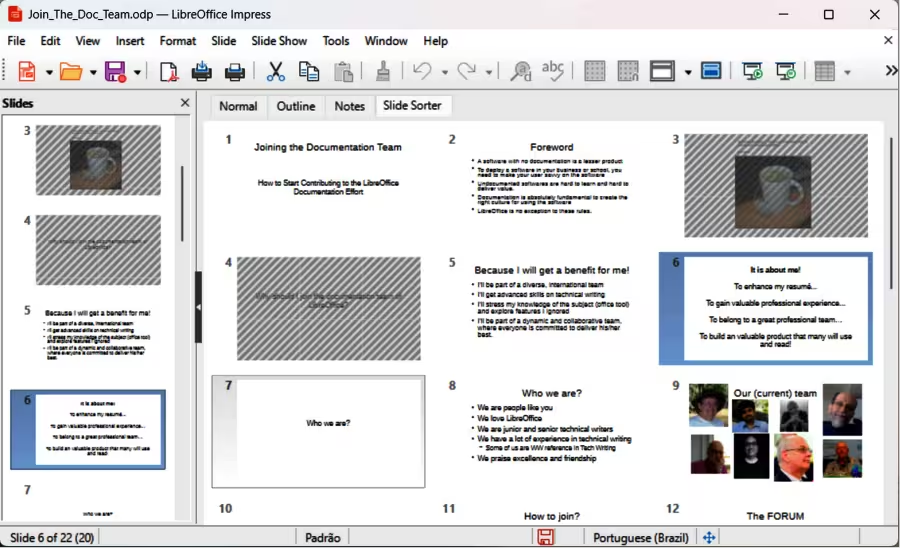
Hide the selected slides using one of the following methods. Hidden slides are displayed greyed out indicating that it is hidden as shown in Figure 3. Hidden slides are not deleted and remain in the presentation file.
Figure 3: Example of hiding slides in Slide Sorter view
-
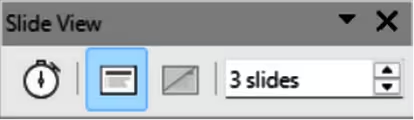
Click on Hide Slide in the Slide View toolbar (Figure 4).
-
Right-click on the selected slide and select Hide Slide from the context menu.
-
Go to Slide > Hide Slide on the Menu bar.
Figure 4: Slide View toolbar
Showing hidden slides
-
In the Slides pane, or Slide Sorter view, select the hidden slides.
-
Show the selected slides using one of the following methods. Show Slide is only active when there hidden slides in a presentation.
-
Click on Show Slide in the Slide View toolbar.
-
Right-click on the selected slide and select Show Slide from the context menu.
-
Go to Slide > Show Slide on the Menu bar.
Custom slide show
To show the slides in a different order, rearrange the slides in the Slides pane or Slide Sorter view in the Workspace, or create a custom slide show.
Creating custom slide show
-
Select which slides are to be included in the custom slide show and select the order in which the slides are to be shown.
-
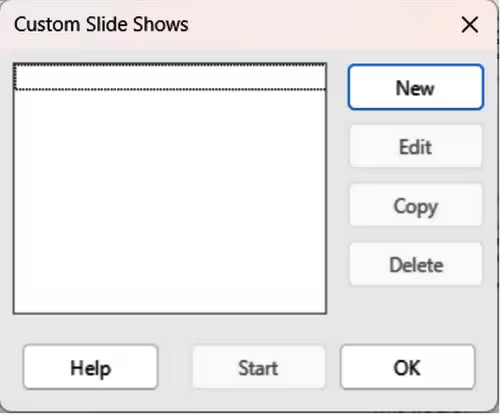
Go to Slide Show > Custom Slide Show on the Menu bar to open the Custom Slide Shows dialog (Figure 5).
Figure 5: Custom Slide Shows dialog
-
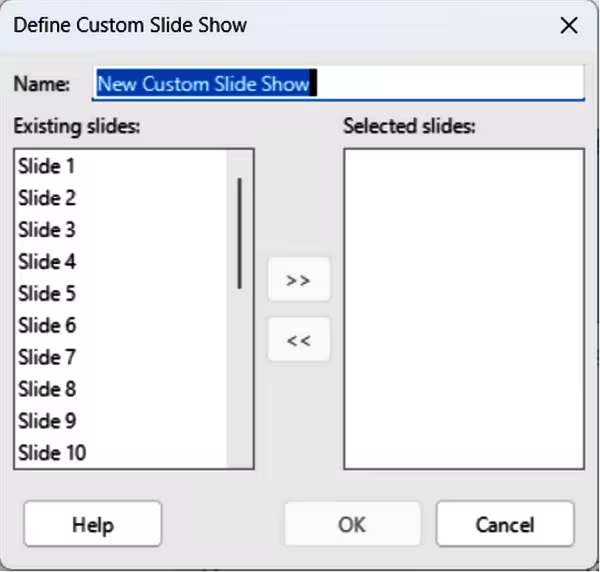
Click on New to open the Define Custom Slide Show dialog (Figure 6).
Figure 6: Define Custom Slide Show dialog
-
Enter a name for the new custom slide show in the Name text box.
-
In Existing slides, select the slides using one of the following methods:
-
Click on an individual slide to select it.
-
Hold down the Shift key and click the first and last slide to create a consecutive group of slides.
-
Hold down the Ctrl key (macOS ⌘) and click on individual slides to create a group of slides.
-
Click on >> to include the slides in the Selected slides box.
-
If required, rearrange the slide order in the Selected slides box by clicking on a slide name and dragging it to a new position in the list.
-
Click OK to close the Define Custom Slide Shows dialog.
-
Click on Start in the Custom Slide Shows dialog to test the custom slide show as a presentation.
-
Click OK to save the custom slide show and close the Custom Slide Shows dialog.
Using custom slide show
-
Go to Slide Show > Custom Slide Show on the Menu bar to open the Custom Slide Shows dialog.
-
Select the required custom slide show and click on Start to run the selected custom slide show.
-
When the presentation has ended, click OK to close the Custom Slide Shows dialog.
Editing custom slide show
-
Go to Slide Show > Custom Slide Show on the Menu bar to open the Custom Slide Shows dialog.
-
Select the name of the custom slide show for editing.
-
Click on Edit and the Define Custom Slide Show dialog opens.
-
Add or remove slides, change slide order, or change the name of the custom slide show in the Define Custom Slide Show dialog.
-
Click OK to save the custom slide show and close the Custom Slide Shows dialog.
-
Click on Start in the Custom Slide Shows dialog to test the edited custom slide show as a presentation.
-
Click OK to close the Custom Slide Shows dialog.
Copying custom slide show
-
Go to Slide Show > Custom Slide Show on the Menu bar to open the Custom Slide Shows dialog.
-
Select the required custom slide show and click on Copy. The name of the selected custom slide show is repeated with (Copy 1) added to the name.
-
Select the name of the copied custom slide show and click on Edit and the Define Custom Slide Show dialog opens.
-
Change the name of the copied custom slide show in the Define Custom Slide Show dialog.
-
Click OK to save the copied custom slide show and close the Define Custom Show dialog.
-
Click OK to close the Custom Slide Shows dialog.
Deleting custom slide show
-
Go to Slide Show > Custom Slide Show on the Menu bar to open the Custom Slide Shows dialog.
-
Select the custom slide show for deletion and click on Delete. Deletion is immediate and no confirmation message appears.
-
Click OK to close the Custom Slide Shows dialog.
Slide transitions
Slide transitions are effects and/or sounds placed between slides as slides change in a slide show. Transitions add a professional touch to slide shows, smoothing transition between slides.
Adding transitions
-
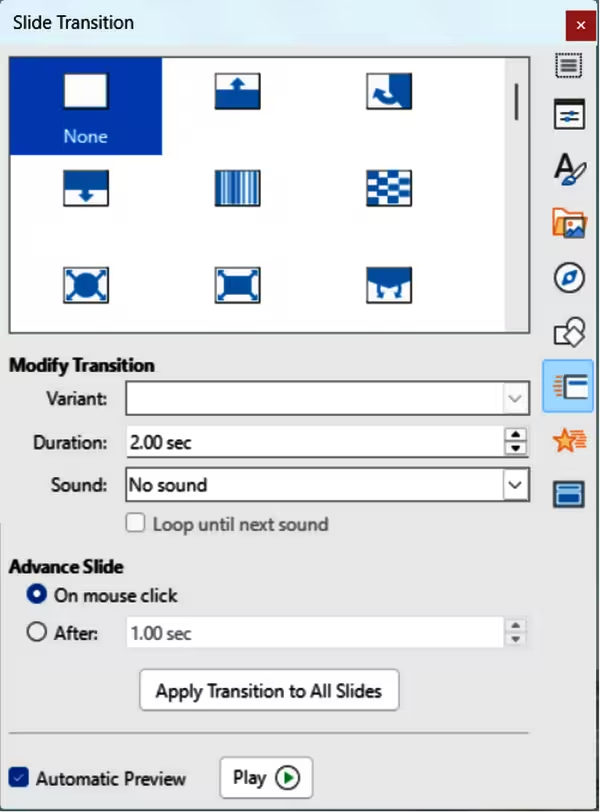
Click on Slide Transition in the Sidebar to open the Slide Transition deck (Figure 7).
-
Open a presentation file to add slide transitions.
-
In the Slides pane, or Slide Sorter view, select the slide to apply a slide transition.
Figure 7: Sidebar Slide Transition deck
-
Click on the required transition from the displayed list in Slide Transition to apply it to the selected slide.
-
In Modify Transition, select from the drop-down list one of the available options. The available options change to match the selected transition.
-
In Advance Slide, select the slides change in a presentation. Only one option can be selected.
-
To apply the same transition to all slides in the presentation, click on Apply Transition to All Slides option in Advance Slide.
-
To check how the transition looks, click on Play in Advance Slide.
-
Alternatively, to automatically preview how the transition looks when it is applied to a slide, select Automatic Preview in Advance Slide.
-
Note
A time must be entered in After to automatically open the next slide and allow the option Loop and repeat after to function when it is required for a presentation to automatically run continuously.
-
Tip
A single type of transition can be applied to all the slides in a presentation, or a different transition to individual slides in the presentation. While using many different transitions may look good, it may make the presentation look unprofessional.
Transition options
Slide Transition
Modify Transition
Variant
Select an option from the drop-down list. The available options change according to the transition that has been selected.
Duration
Enter a time for how long the transition takes.
Sound
Select a sound from the drop-down list that is played when a transition activates. If a sound is selected, Loop until next sound option becomes active. Select this option to play the sound repeatedly until another sound starts. If there are no subsequent sounds in a slide show, the selected sound plays continuously for the remainder of the show. Sounds can be played when None is selected for the transition effect.
Advance Slide
On mouse click
Each time the mouse is clicked, the presentation advances to the next slide.
After
Enter a time in the box to elapse before the next slide in the presentation advances automatically into view.
Automatic Preview
Removing transitions
-
Note
Slides with transitions are indicated by a star in the bottom left corner of the slide when viewed in the Slides pane or Slide Sorter view.
-
Click on Slide Transition in the Sidebar to open the Slide Transition deck.
-
In the Slides pane, or Slide Sorter view, select the slide, or slides to remove the slide transition.
-
Select None at the top of the available transitions in the Slide Transition deck.
Playing music
Music can be played during a slide show instead of a sound as a transition effect. When using music in a slide show, make sure any musical copyright or licensing for the music is not being infringed.
-
Click on Slide Transition in the Sidebar to open the Slide Transition deck.
-
Open a presentation file to add slide transitions.
-
In the Slides pane, or Slide Sorter view, select the slide where music is going to be added as part of the slide transition.
-
In Modify Transition, select Other sound from the Sound drop-down list.
-
In the file browser window that opens, navigate to where the music file is located and select the music file required.
-
Click on Play to check if the music file is suitable.
-
If the music is suitable, click Open to add the music to the selected slide and close the file browser window.
-
To play a music file continuously in the slide show, select Loop until next sound in Modify Transition. The music file restarts once it is finished until the next music file is inserted in the slide show.
-
Notes
It is recommended not to select Apply Transition to All Slides. This prevents the selected music file restarting as each slide opens in the presentation.
A music file is linked to a slide show, not embedded. If a slide show is going to be displayed on different computers, a music file must be available on the computer displaying the slide show and the link to the music file must be established before starting the slide show.
Animations
Slide animations are similar to transitions, but applied to individual elements in a single slide, such as title, chart, shape, or individual bullet points. Animations can make a presentation interesting and memorable. However, heavy use of animations can be fun, but distracting and even annoying for an audience expecting a professional presentation.
Applying animations
Animations are applied using Normal view making it easier to select individual objects on a single slide.
On a slide, an element such as a graphic or a text box has selection handles when selected. If a portion of the text in a text box is selected, selection handles do not display.
The following procedure is an example of applying an animation to an object. The options available for an animation depend on the Category, Effect and slide element that have been selected for creating an animation.
-
Note
At present it is not possible to apply animations to elements in master slides. This means that to display the items in a text box one by one and use the same animation on more than one slide, the effects have to be applied to each slide. Alternatively, copy the animated element from one slide to another.
-
Open the Normal view using one of the following methods:
-
Go to View > Normal on the Menu bar.
-
Click on the Normal tab at the top of the Workspace.
-
Select a slide in the Slides pane so that it appears in Normal view on the Workspace.
-
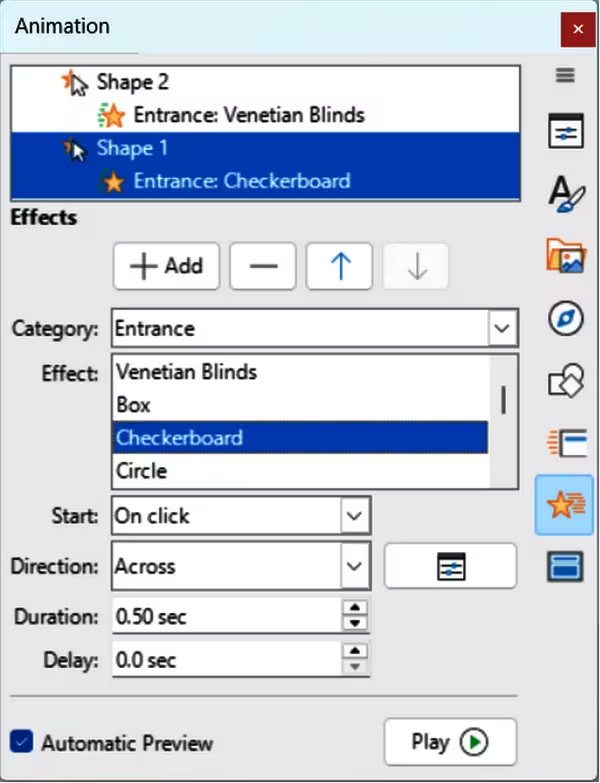
On the Sidebar, select Animation to open the Animation deck (Figure 8).
-
On the selected slide, select a slide element that is going to be animated.
Figure 8: Sidebar Animation deck
-
In Effects, click on +Add to open the animation options and add the slide element into the Animation box, then create the animation as follows:
-
In Category, select a category from the options in the drop-down list.
-
In Effect, select an animation effect from the available options in the Effect drop‑down list.
-
In Start, select how the animation starts from the available options in the drop-down list.
-
In Direction, select the direction of the animation from the available options in the drop‑down list.
-
In Duration, enter a time for the duration of the animation in the box.
-
In Delay, enter a time for the delay before the animation starts in the box.
-
If more animation options are required, see “Additional animation options” below for more information.
-
If required, select Automatic Preview to automatically check how the animation looks when it is applied to a slide element.
-
Click on Play to check how the animation looks when applied to a slide element.
Changing animation
-
Open the Normal view using one of the following methods:
-
Go to View > Normal on the Menu bar.
-
Click on the Normal tab at the top of the Workspace.
-
On the Sidebar, select Animation to open the Animation deck (Figure 8).
-
Select a slide that has animated elements in the Slides pane so that it appears in Normal view.
-
In the Animation box, select the slide element using the animation effect that is to be changed.
-
Use the procedure in “Applying animations” above to select a new animation effect for the selected element.
-
Click on Play to check how the animation looks when applied to a slide element.
Removing animation
-
Open the Normal view using one of the following methods:
-
Go to View > Normal on the Menu bar.
-
Click on the Normal tab at the top of the Workspace.
-
On the Sidebar, select Animation to open the Animation deck (Figure 8).
-
Select the slide that uses the animated element that is going to be removed.
-
In Effects, click on Remove Effect to remove the animation from the selected element.
Additional animation options
Some animations have additional options that can be set or changed. Available options are dependent on the animation selected.
-
Open the Normal view using one of the following methods:
-
Go to View > Normal on the Menu bar.
-
Click on the Normal tab at the top of the Workspace.
-
On the Sidebar, select Animation to open the Animation deck (Figure 8).
-
Select the slide and element to apply additional animation options.
-
Click on Options to the right of the Direction drop-down list and open the Effect Options dialog.
-
Select the options required for the animation effect from the options available on each page of the Effect Options dialog.
-
Click OK to save the changes and close the Effect Options dialog.
Effect options
Specifies the settings and enhancements for the selected animation using the following options on the Effect page in the Effect Options dialog (Figure 9).
Figure 9: Effect Options dialog — Effect page
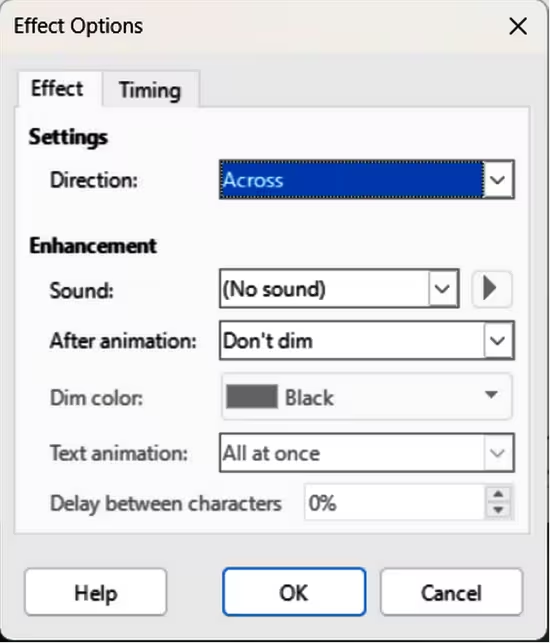
Direction
Sound
(No sound)
No sound is played during animation of the effect.
(Stop previous sound)
Sound of the previous effect is stopped as soon as the current effect runs.
Other sound
Displays a file open dialog to select a sound or music file.
After animation
Don't dim
No after-effect runs.
Dim with color
After the animation a dim color fills the shape.
Hide after animation
Hides the shape after the animation ends.
Hide on next animation
Hides the shape on the next animation.
Dim color
Text animation
All at once
Animates the text all at once.
Word by word
Animates the text word by word.
Letter by letter
Animates the text letter by letter.
Delay between characters
Timing options
Specifies the timing for the selected animation using the following options on the Timing page of the Effects Options dialog (Figure 10).
Start
On click
Animation stops at this effect until the next mouse click.
With previous
Animation runs immediately.
After previous
Animation runs as soon as the previous animation ends.
Figure 10: Effect Options dialog — Timing page
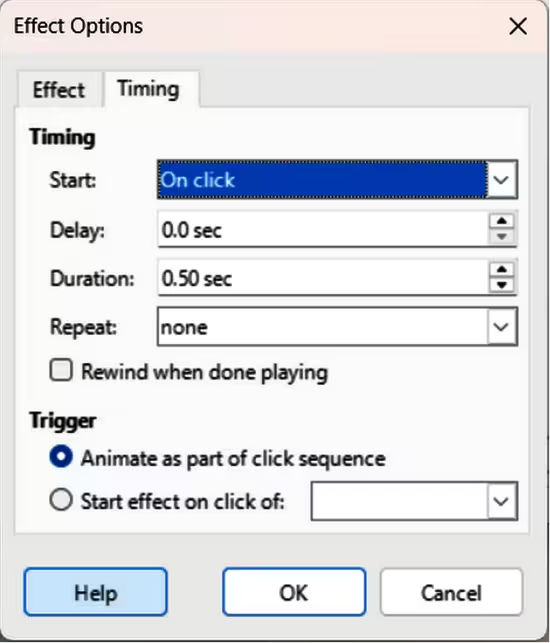
Delay
Duration
Repeat
none
Animation effect is not repeated.
2, 3, 4, 5, 10
Select how many times the animation effect is repeated.
Until next click
Animation effect is repeated until the next mouse click.
Until end of slide
Animation effect repeats as long as the slide is displayed.
Rewind when done playing
Animate as part of click sequence
Start effect on click of
Text animation options
Specifies the text animation settings for the selected animation using the following options on the Text Animation page of the Effects Options dialog (Figure 11).
Group text
As one object
All paragraphs are animated as one object.
All paragraphs at once
All paragraphs are animated at once, but paragraphs can have different effects.
By 1st level paragraphs
First level paragraphs, including sub-level paragraphs, are animated one after another.
Figure 11: Effect Options dialog — Text Animation page
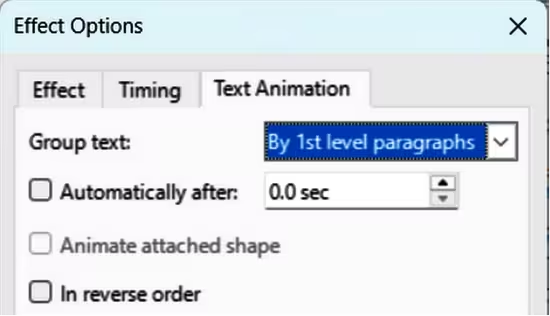
Automatically after
Animate attached shape
In reverse order
Animation example
Creating animations on a slide takes practice to achieve the animation effect required. The following steps explains how to setup the simple example animation using multiple animations.
-
Go to View > Normal on the Menu bar to open Normal view in the Workspace.
-
Select a slide for animation.
-
On the Sidebar, select Animation to open the Animation deck.
-
Select the elements on the slide, then click on Add Effect to open the animation options on the Animation deck. The selected elements appear in the box on the Animation deck.
-
Select the first element (Shape 1) and select Entrance from the Category drop-down list and select the following options for the animation:
-
Effect — Venetian Blinds
-
Start — On click
-
Direction — Vertical
-
Duration — 0.50 sec
-
Delay — 3.0 sec
-
Select the second element (Shape 3) and select Entrance from the Category drop‑down list and select the following options for the animation:
-
Effect — Appear
-
Start — After previous
-
Delay — 3.00 sec
-
Go to Slide Show > Rehearse Timings on the Menu bar and check the animation of these two objects.
Using interactions
Interactions are where objects on a slide are used to create an event when clicked on with the cursor. These objects with interactions can be buttons, images, or text objects.
-
Go to View > Normal on the Menu bar to open Normal view in the Workspace.
-
Select a slide to add an interaction to an object on the slide.
-
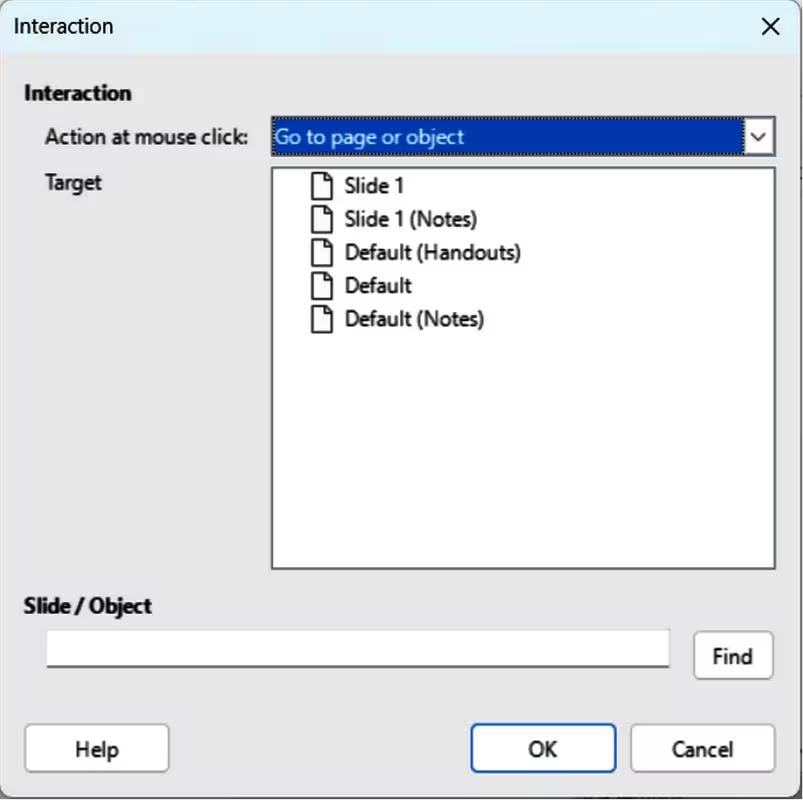
Select the object, then right-click on the object and select Interaction from the context menu, or go to Format > Interaction on the Menu bar. to open the Interaction dialog (Figure 12).
-
Select an interaction from the Action at mouse click drop-down list. The options available for further selection and interaction setup depend on the type of interaction that has been selected.
-
Click OK to save the changes and close the Interaction dialog.
Figure 12: Interaction dialog
Slide shows
Running slide shows
-
Open a presentation and start the slide show using one of the following methods:
-
Use the keyboard shortcut F5 to start from the first slide or Shift+F5 to start from the current slide.
-
Go to Slide Show > Start from First Slide or Start from Current Slide on Menu bar.
-
Click on Start from First Slide on the Slide Sorter toolbar.
-
If slide transition is set to Automatically after x sec, the slide show starts and runs after the set time has elapsed.
-
If slide transition is set to On mouse click, use one of the following methods to advance the slides:
-
Click the left mouse button.
-
Press the down arrow key.
-
Press the right arrow key.
-
Press the page down key.
-
Press the spacebar.
-
To navigate backwards through a slide show one slide at a time, use one of the following methods:
-
Press the up arrow key.
-
Press the left arrow key.
-
Press the page up key.
-
Right-click on slides during a slide show to open a context menu with navigation options.
-
When the last slide has displayed, the message Click to exit presentation is displayed on screen. Press the Esc key or click the mouse button to exit the slide show.
-
To exit the slide show and return to the Impress workspace at any time, press the Esc key during the slide show.
-
Note
During the slide show, any animations on a slide are run in the configured order as the slide is displayed.
Context menu navigation and options
If the slide show consists of more than one slide, right-clicking on the screen opens a context menu displaying navigation options as follows:
Next
Previous
Go to Slide
Mouse Pointer as Pen
Pen Width
Change Pen Color
Erase all ink on Slide
Screen
End Show
Automatic slide show repeat
-
Select a slide in Normal and open the Slide Transition deck in the Sidebar.
-
In the Advance Slide panel, make sure the option After is selected and a time setting is entered in the box before the next slide is advanced. For more information on transitions, see “Slide transitions” above.
-
Go to Slide Show > Slide Show Settings on the Menu bar to open the Slide Show Settings dialog (Figure 2).
-
In Presentation Mode, select the option Loop and repeat after and insert a time delay in the box before the slide show is displayed again.
-
If required, select Show logo if a company logo is to be displayed during the pause between slide shows.
-
Click OK to save the settings and close the Slide Show Settings dialog.
Slide show timing
Default timing
-
Click on Slide Transition icon in the Sidebar to open the Slide Transition deck.
-
Select None in Slide Transition as the transition effect.
-
Select the option After in Advance Slide and enter a time in the box.
-
Click on Apply Transition to All Slides in Advance Slide to set the default timing for the slide show.
-
Go to Slide Show > Start from First Slide on the Menu bar to check how the presentation runs.
-
If necessary, adjust the default timing until the slide show runs as required.
Variable timing
-
Select Slide Show > Rehearse Timings on the Menu bar. The slide show starts in fullscreen mode and a timer appears in the lower left corner of the display.
-
When advancing to the next slide, click on the timer to set the time duration for the displayed slide and advance to the next slide.
-
If required, to keep the default time duration for a slide, click on the slide and not the timer.
-
Continue until the time duration is set for all slides in the slide show. Impress records the time duration set for each slide.
-
To exit from rehearsal timing of the slide show, press the Esc key, or click on the slide.
Presenter Console
Impress includes a Presenter Console as part of the LibreOffice installation only works with operating systems that support two displays. If the Presenter Console is not included, the extension can be downloaded from the LibreOffice website and installed on a computer. For more information, see Chapter 11, Setting up and Customizing Impress.
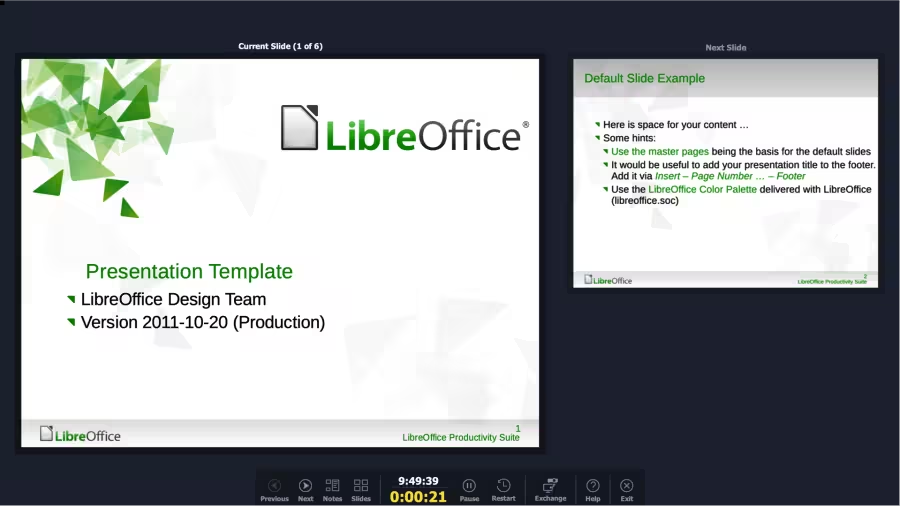
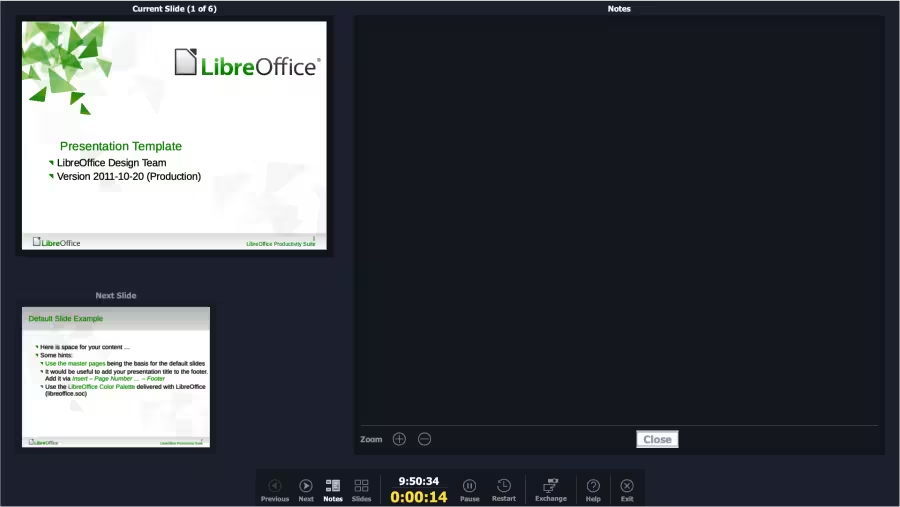
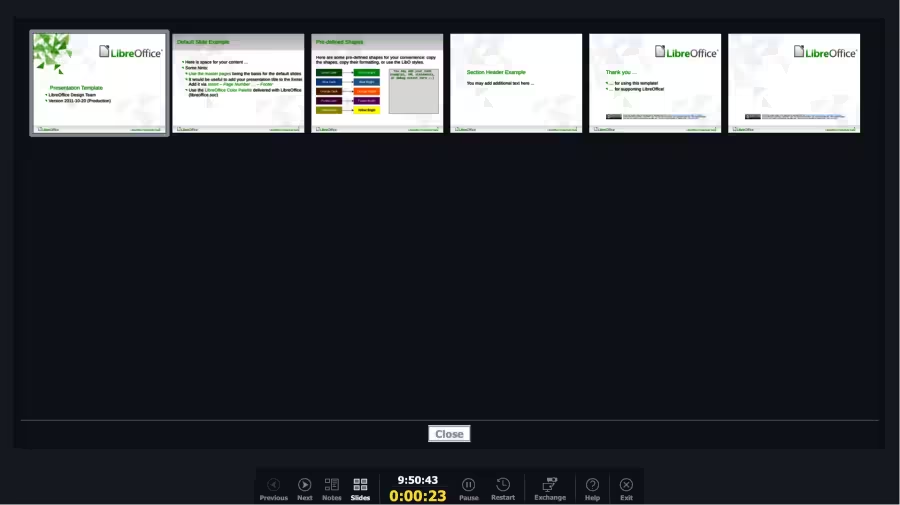
The Presenter Console provides extra control over slide shows when using dual displays, for example a laptop for control and a large display or projector for an audience. The view on the control display includes the current slide that can be seen by the audience, the next slide in the presentation, any slide notes, and a presentation timer. The Presenter Console provides the following views when making a presentation:
Default or Current Slide view
Figure 13: Presenter Console — Default or Current Slide view
Notes view
Figure 14: Presenter Console — Notes view
Slides view
Figure 15: Presenter Console — Slides view
Exchange
Photo albums
Use Impress to create a photo album from images, ranging from one to four images on each slide. Photo albums can be a slide show with graphics, images, or photographs.
Creating photo album
-
Create a new presentation or open an existing presentation.
-
Select the slide that is going to precede the photo album. In a new presentation, this is the first slide.
-
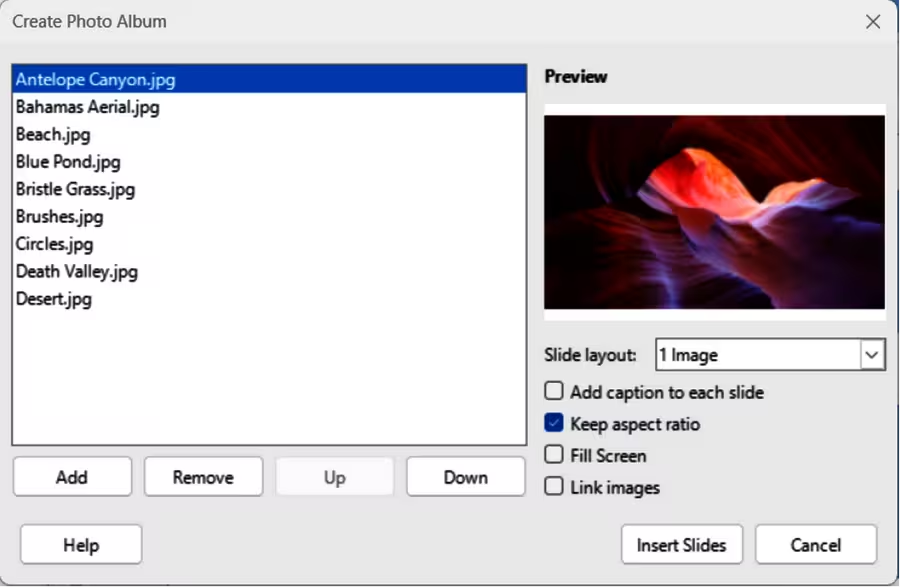
Go to Insert > Media > Photo Album on the Menu bar to open the Create Photo Album dialog (Figure 16).
Figure 16: Create Photo Album dialog
-
Click on Add to open a file browser.
-
Navigate to the folder where the photographs are located.
-
Select the photographs and click on Open. This closes the file browser and the selected files appear in the Create Photo Album dialog.
-
Select the number of images per slide in the Slide layout drop-down list.
-
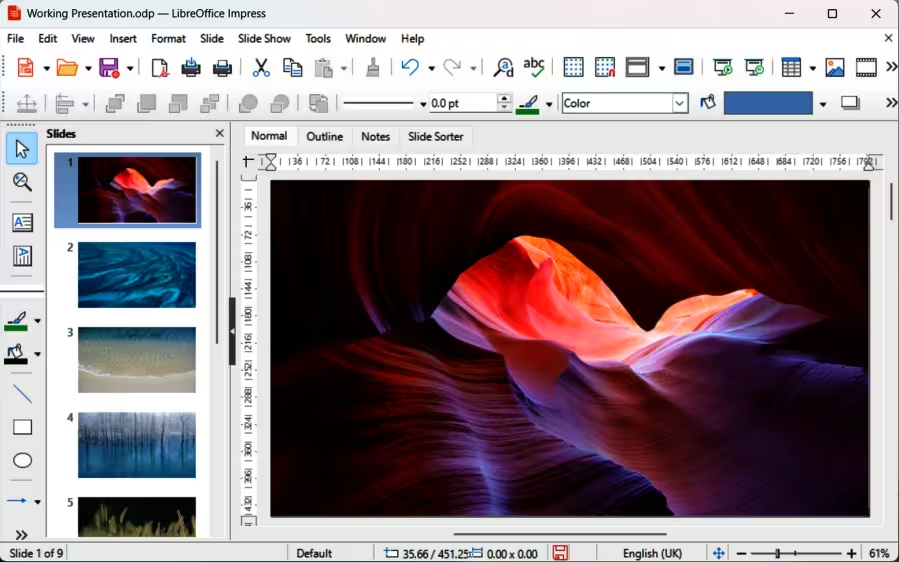
If required, select Add caption to each slide inserting a text box on each slide allowing a caption to be added to the photographs, as shown by the example in Figure 17.
-
If required and there is only one image per slide, select Fill Screen for each photograph to fill the entire slide.
-
Create the required sequence of photographs by moving the files up or down in the list of selected files.
Figure 17: Example slide in a Photo Album
-
When the sequence is ready, click Insert Slides to create the number of slides required for the photo album. Impress creates a presentation with as many slides that are required to contain the photographs. The sequence of slides can be changed if necessary.
-
If required, move photographs between slides and create frames for photographs. For more information, see “Editing photo albums”.
-
If required, run the photo album as a slide show. See “Creating slide shows” above and “Slide shows” above.
Editing photo albums
When a photo album is created, full images of photographs are placed within the boundaries of the slides created for the photo album. Each photograph in the photo album can be edited just like any other object that can be placed on a slide. For more information on formatting photographs, see the following chapters of this user guide:
-
Chapter 4, Adding and Formatting Images
-
Chapter 5, Managing Graphic Objects
-
Chapter 6, Formatting Graphic Objects
To enhance the photo album, frames can be added to each photograph in the photo album and photographs enhanced using options available on the Sidebar. Experiment with different levels for the following options to create the right effect for each photograph in the photo album.
-
Select a slide in the photo album to open the Image, Line and Effect panels in the Properties deck on the Sidebar.
-
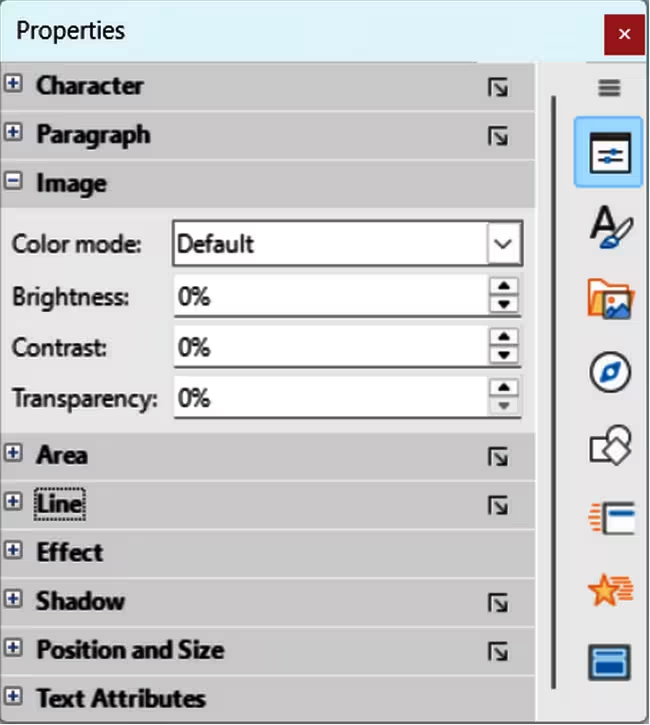
In the Image panel (Figure 18), adjust the following options, as required, to enhance the photograph.
-
Color mode –– select the color mode from the options in the drop-down list.
-
Brightness –– select the brightness level as a percentage.
Figure 18: Sidebar Properties deck — Image panel
-
Contrast –– select the contrast level as a percentage.
-
Transparency –– select the transparency level as a percentage.
-
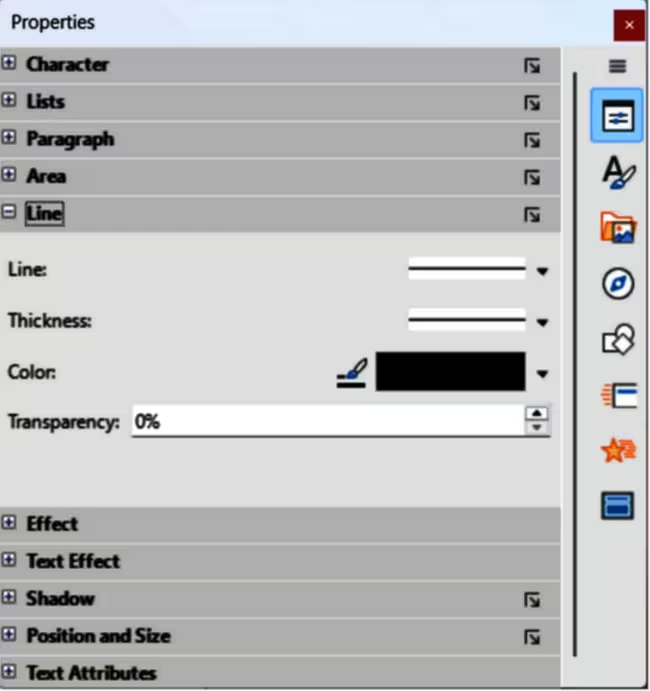
In the Line panel (Figure 19), select the following options, as required, to create a frame around the photograph.
-
Line –– select the line style from the drop-down list.
-
Width –– select the line width from the drop-down list or enter a line width in the Custom Line Width box.
-
Color –– select a color from the available color palettes, or create a custom color for the line frame.
-
Transparency –– select the transparency level as a percentage for the line frame.
Figure 19: Sidebar Properties deck — Line panel
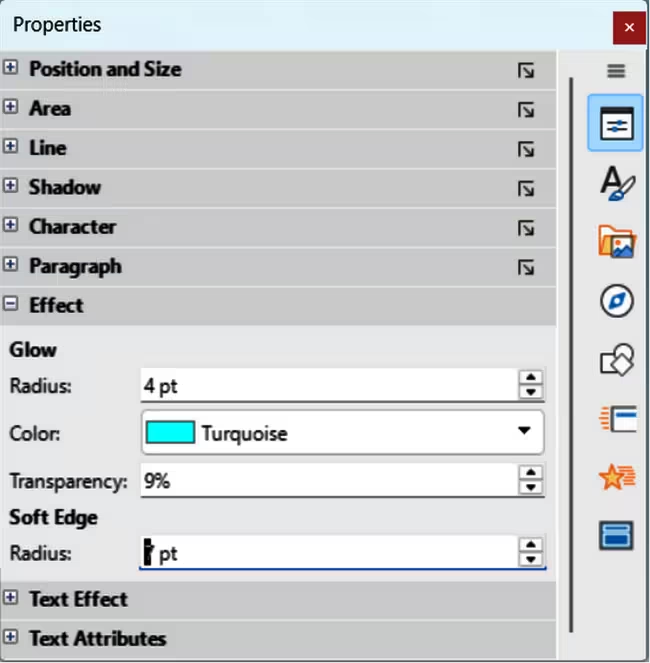
-
In the Effect panel (Figure 20), select the following options, as required, to create a soft frame around the photograph.
-
Glow Radius –– adjust the radius value to apply a soft frame around the outside of the photograph.
-
Glow Color –– select a color for the soft frame from the available color palettes.
-
Glow Transparency –– enter a transparency value to adjust the transparency of the soft frame.
-
Soft Edge Radius –– adjust the radius value to reduce the internal width of the soft frame and make the photograph look smaller.
Figure 20: Sidebar Properties deck — Effect panel