Copyright
This document is Copyright © 2026 by the LibreOffice Documentation Team. Contributors are listed below. This document may be distributed and/or modified under the terms of either the GNU General Public License (https://www.gnu.org/licenses/gpl.html), version 3 or later, or the Creative Commons Attribution License (https://creativecommons.org/licenses/by/4.0/), version 4.0 or later. All trademarks within this guide belong to their legitimate owners.
Contributors
To this edition
Peter Schofield
To previous editions
Jean Hollis Weber, Kees Kriek, Peter Schofield, Rachel Karch, Samantha Hamilton, T. Elliot Turner, Vasudev Narayanan.
Feedback
Please direct any comments or suggestions about this document to the Documentation Team Forum at https://community.documentfoundation.org/c/documentation/loguides/ (registration is required) or send an email to: loguides@community.documentfoundation.org.
-
Note
Everything sent to a forum, including email addresses and any other personal information that is written in the message, is publicly archived and cannot be deleted. Emails sent to the forum are moderated.
Publication date and software version
Published August 2026. Based on LibreOffice 26.2 Community.
Saving slide shows
Slide shows (presentations) created in Impress are, by default, saved in the Open Document Presentation (ODP) format. Impress can also open and save slide shows in other presentation formats, see “Other presentation formats” below for more information.
ODP file format
-
Create a slide show. For more information on creating slide shows, refer to the chapters in this user guide.
-
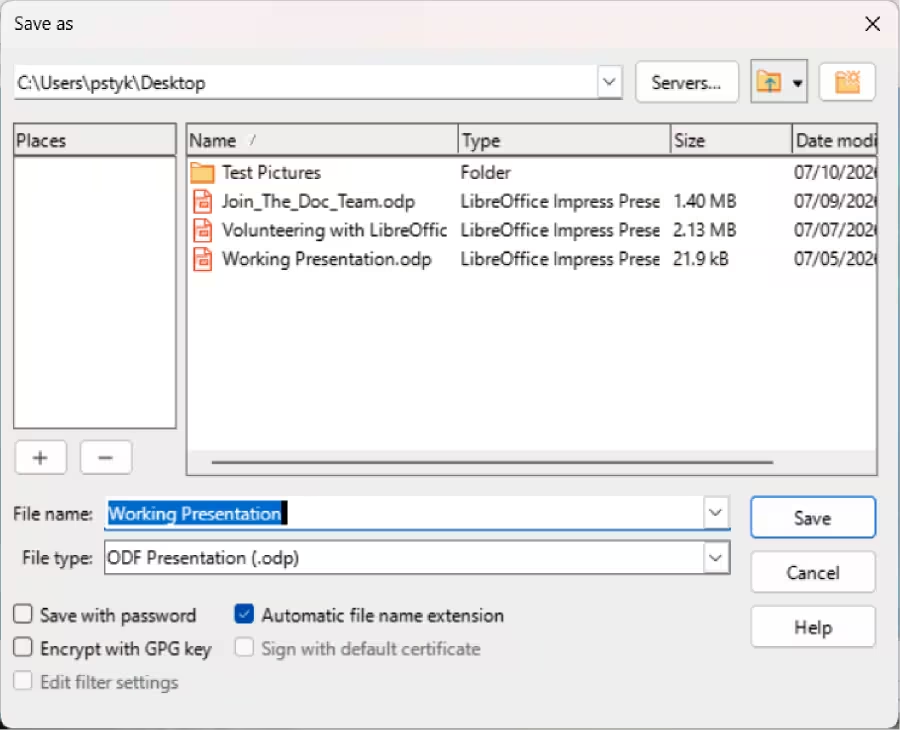
Save the slide show using one of the following methods to open the Save as dialog (Figure 1).
Figure 1: Save as dialog
-
Click on Save on the Standard toolbar (Figure 2).
-
Go to File > Save on the Menu bar.
-
Use the keyboard shortcut Ctrl+S (macOS ⌘+S).
Figure 2: Standard toolbar

-
Navigate to the folder where the slide show is to be saved.
-
Enter a filename in the File name: text box.
-
Select the default ODF Presentation (.odp) from the File type: drop-down list.
-
Click on Save to save the slide show and close the file browser window.
-
Note
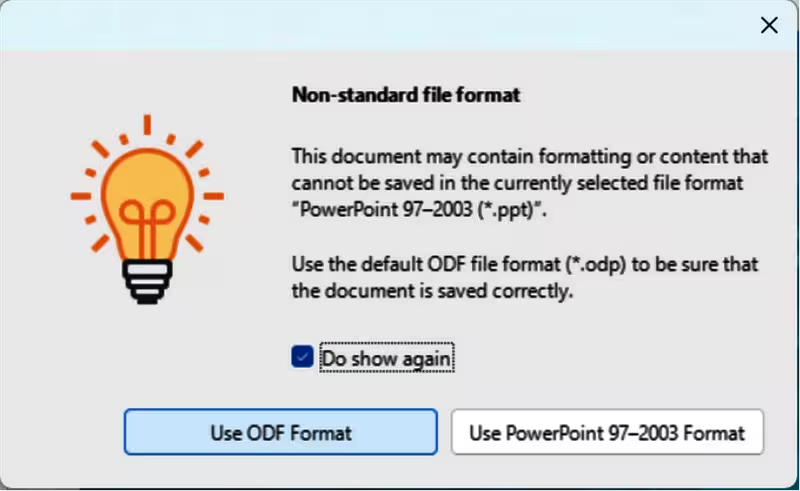
If the slide show is not being saved in the ODP presentation format, a Non-standard file format Format dialog (Figure 3) opens to confirm file format selected.
Figure 3: Non-standard file format dialog
Other presentation formats
-
Create a slide show. For more information on creating slide shows, refer to the chapters in this user guide.
-
Save a slide show in a presentation format that Impress recognizes using one of the following methods to open the Save as dialog.
-
Click the downward pointing triangle ▼ to the right of Save on the Standard toolbar and select Save As from the drop-down menu.
-
Go to File > Save As on the Menu bar.
-
Use the keyboard shortcut Ctrl+Shift+S (macOS ⌘+Shift+S).
-
Navigate to the folder where the slide show is to be saved.
-
Enter a filename in the File name: text box.
-
Select the required presentation format from options in the File type: drop-down list.
-
Click on Save to save the slide show and close the file browser window.
Printing
-
Note
The following printing procedures given are examples only. Printing procedures depend on computer operating system and setup, and type of printer being used.
Default printer
-
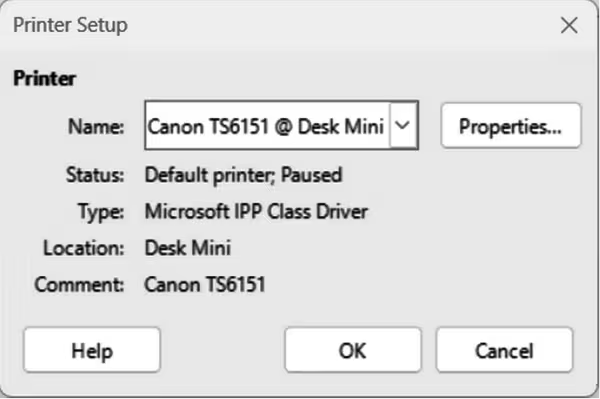
Go to File > Printer Settings on the Menu bar to open the Printer Setup dialog (Figure 4) to specify the default printer.
-
Select the required default printer from the printers listed in the Name: drop-down list.
Figure 4: Printer Setup dialog
-
Click on Properties to open a printer properties dialog for the selected printer and select the required options available in the dialog. Available options depend on the type of printer and the computer operating system being used.
-
Click OK to save the selected options and close the printer properties dialog.
-
Click OK to save the default printer selection and close the Printer Setup dialog.
Quick printing
To quickly print a document or presentation, click on Print Directly on the Standard toolbar to send the document file to the default printer defined for the computer. If Print Directly is not visible on the Standard toolbar, it is added as follows:
-
Right-click in an empty area on the Standard toolbar and select Visible Buttons from the context menu.
-
Select Print Directly from the list of available tools and the Print Directly tool is added to the Standard toolbar.
-
Note
Print Directly can be changed to use the printer defined for the document instead of the default printer defined for the computer. Go to Tools > Options > Load/Save > General (macOS LibreOffice > Preferences > Load/Save > General) on the Menu bar and select the option Load printer settings with the document.
Controlling printing
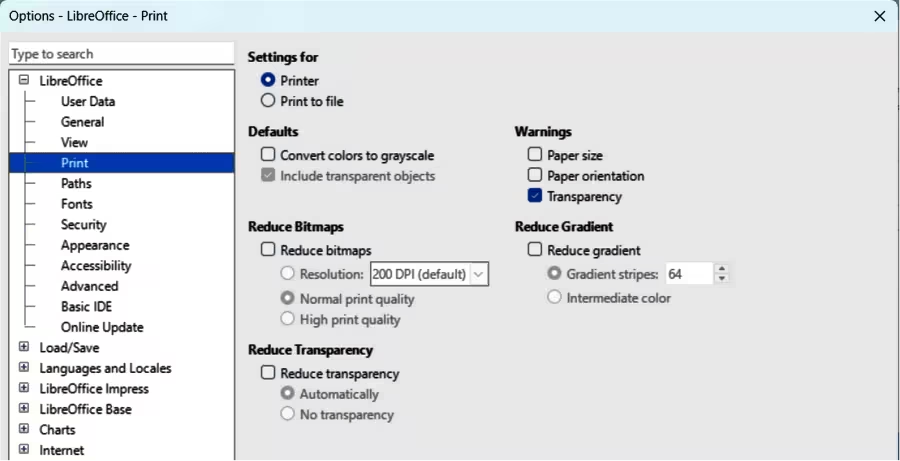
To specify the default print settings for all LibreOffice modules, go to Tools > Options > LibreOffice > Print (macOS LibreOffice > Preferences > LibreOffice > Print) to open the Options LibreOffice Print dialog (Figure 5).
Figure 5: Options LibreOffice Print dialog
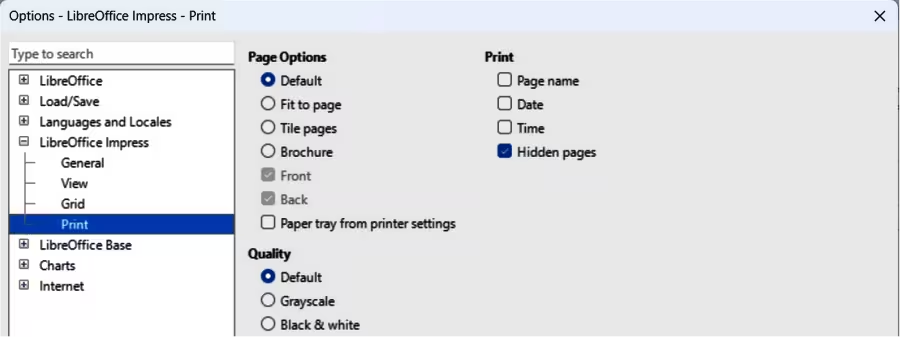
To specify the default print settings only for LibreOffice Impress, go to Tools > Options > LibreOffice Impress > Print (macOS LibreOffice > Preferences > LibreOffice Impress > Print) to open the Options LibreOffice Impress Print dialog (Figure 6).
-
Notes
Due to different computer operating systems, computer setup, and printer types, the Impress print dialog that opens may differ from the print dialogs displayed in this chapter.
Any print options selected in the Impress print dialog only applies to the printing of the current Impress document that is open in Impress.
Figure 6: Options LibreOffice Impress Print dialog
Windows or Linux printing
To open the print dialog for printing using a Windows or Linux operating system, use one of the following methods:
-
Go to File > Print on the Menu bar.
-
Use the keyboard shortcut Ctrl+P.
-
Click on Print on the Standard toolbar.
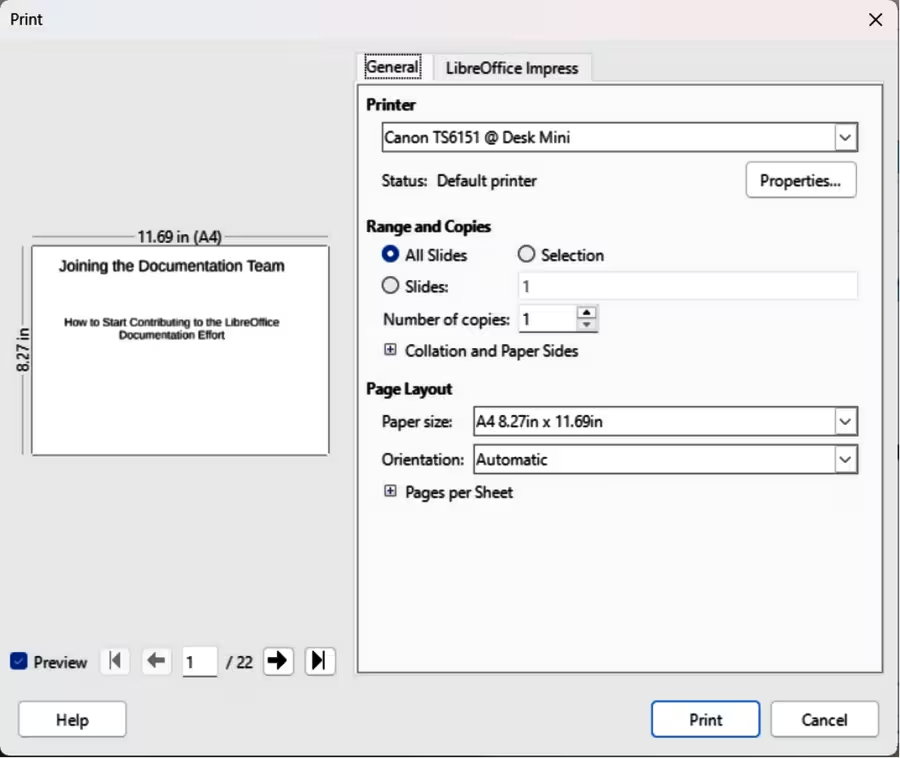
Figure 7: Print dialog — General — Windows/Linux
General options
The following general options are an example of what may be available on the General page of the Print dialog (Figure 7).
Printer
Properties
Range and Copies
All Slides
Prints all the slides in the presentation.
Selection
Prints the slides selected in Impress.
Slides
Select the page number(s) to print. For multiple pages, use the format 1, 3, 7 or 1 – 5, 7, 9 for page number selection.
Number of copies
Enter number of printed copies required for the document.
Include
Select from the drop-down list Odd and Even Pages, Odd Pages, or Even Pages.
Paper sides
Select from the drop-down list Print on one side (simplex), Print on both sides (duplex long edge), or Print on both sides (duplex short edge).
Order > Collate
Collates multiple printed copies into separate documents.
Order
Select from Create separate print jobs for collated output (only available when more than one copy is being printed) or Print in reverse order.
Page Layout
Paper size
Select the paper size to use from drop-down list.
Orientation
Select from the drop-down list Automatic, Portrait, or Landscape.
Pages per sheet
Select from the drop-down list how many pages are printed on one sheet of paper.
Order
Select from the drop-down list the printing order of multiple pages on one sheet of paper.
Draw a border around each page
When multiple slides are printed on one sheet of paper, a border is drawn around each slide.
Brochure
Prints the document so the pages can be folded into a brochure or booklet.
LibreOffice Impress options
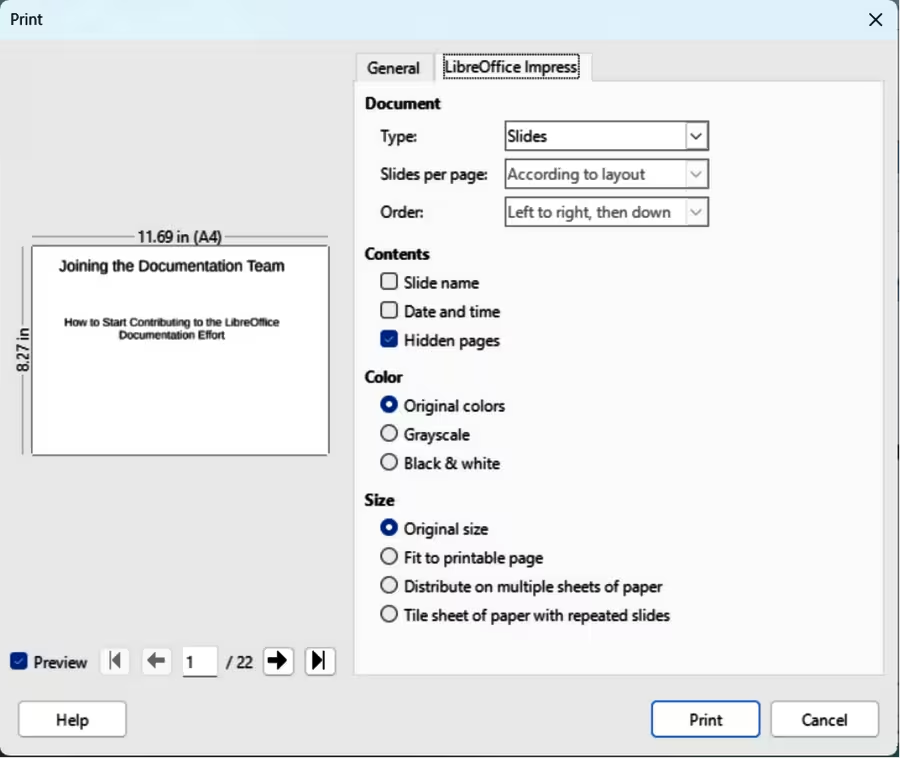
The following options are available on the LibreOffice Impress page of the Print dialog (Figure 8) where settings are defined specific to the current document type:
Figure 8: Print dialog — LibreOffice Impress — Windows/Linux
Contents
Color
Size
Original size
Prints the slide using its original size.
Fit to printable page
Presentation size is changed so that it fits on the paper size used for printing.
Distribute on multiple sheets of paper
Used if the slides are too large for the paper size being used.
Tile sheet of paper with repeated slides
Used to print several slides of a presentation on a sheet of paper.
macOS printing
LibreOffice Impress options
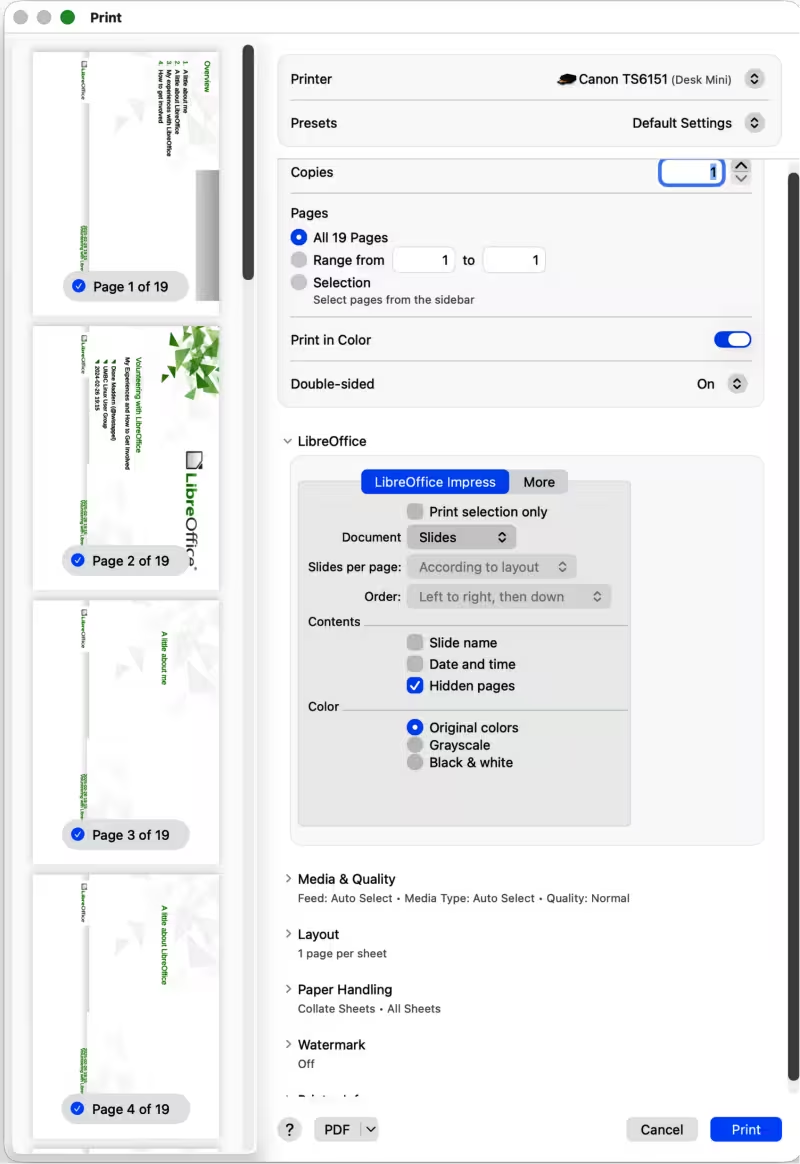
By default, when the Print dialog opens, some LibreOffice Impress printing options are already selected, as shown in Figure 9.
Printer
Presets
Copies
Black & White
Select this option to print the presentation without color. Black & White converts all colors into the two values of black and white.
Two-Sided
Select this option to print the presentation on both sides of a page. This option is only available if the printer is capable of double-sided printing.
Pages
All
Prints all the pages in the document.
From: to:
Enter a range of page number(s) to print. For example — From: 1 to: 6.
Print selection only
Document
Figure 9: Print dialog — LibreOffice Impress — macOS
Slides per page
Order
Contents
Color
LibreOffice More options
To access more printing options not displayed, click on More to open the second page of LibreOffice Impress options, as shown by the example in Figure 10.
Size
Original size
Prints the slides using the original size.
Fit to printable page
Slide size is changed so that it fits on the paper size used for printing.
Distribute on multiple sheets of paper
Used if the slides are too large for the paper size being used.
Tile sheet of paper with repeated slides
Used to print multiple copies of a slide on a page.
Brochure
Include
Use only paper tray from printer preferences
When selected, the printer tray selected on the printer overrides the selected tray in the printer properties on the computer.
All Slides
All slides in the slide show are printed.
Slides
Enter the slide number(s) in the text box that are to be printed. For multiple slides, use the format 1, 3, 7 or 1 – 5, 7, 9 for slide number selection.
Selection
Figure 10: Print dialog — LibreOffice Impress — More — macOS
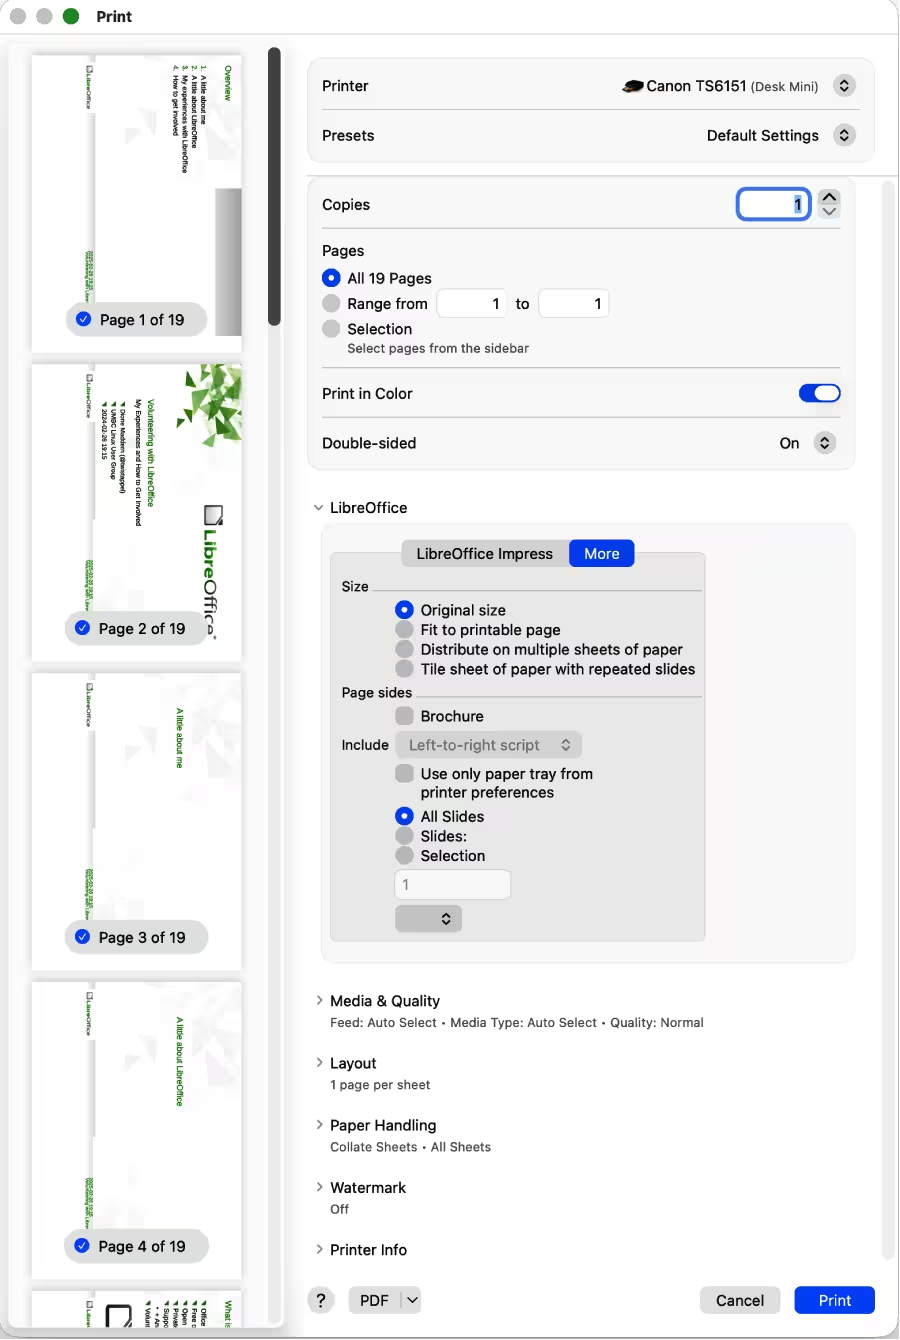
Prints the slides selected in LibreOffice Impress in the Slides pane.
Media & Quality printing macOS
Select Media & Quality from the drop-down list to open more options for general printing (Figure 11).
Media & Quality
Feed from
Select from the drop-down list the paper tray to use if the printer has more than one paper tray.
Figure 11: Print dialog — LibreOffice Impress — Media & Quality — macOS
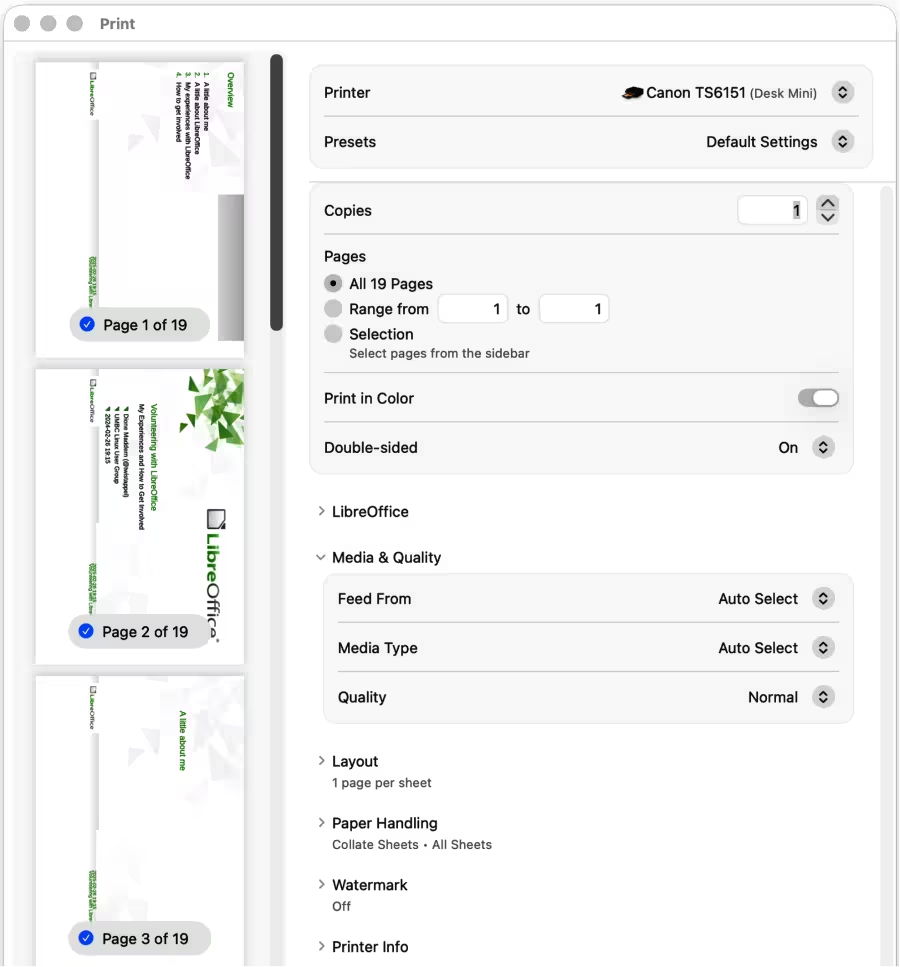
Media Type
Select from the drop-down list the paper type that has been loaded into the paper tray being used, for example Envelope, Photo, Plain Paper.
Quality
Select the level of printing quality required.
Layout
Pages per sheet
Select from the drop-down list how many slides are printed on one sheet of paper.
Layout Direction
Select the printing order of multiple slides on one sheet of paper.
Figure 12: Print dialog — LibreOffice Impress — Layout — macOS
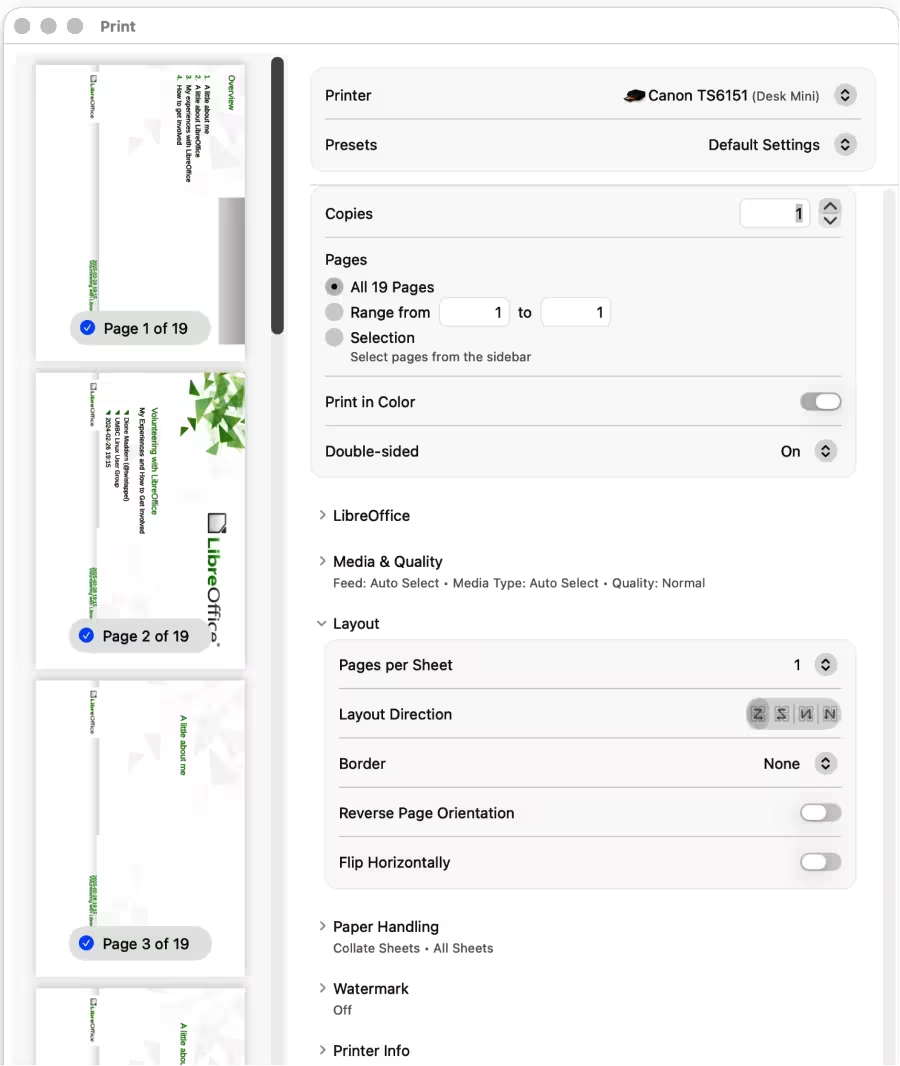
Border
When multiple slides are printed on one sheet of paper, a border is drawn around each slide.
Two-Sided
Select from the drop-down list how a multi-page document is going to be bound: Off; Long-Edge binding; Short-Edge binding, Booklet.
Reverse page orientation
If LibreOffice prints the slides in the wrong order, select this option and print the document again.
Flip horizontally
If LibreOffice prints the pages in the wrong orientation, select this option and print the document again.
Select Paper Handling from the drop-down list to open more options for general printing (Figure 13).
Figure 13: Print dialog — LibreOffice Impress — Paper Handling — macOS
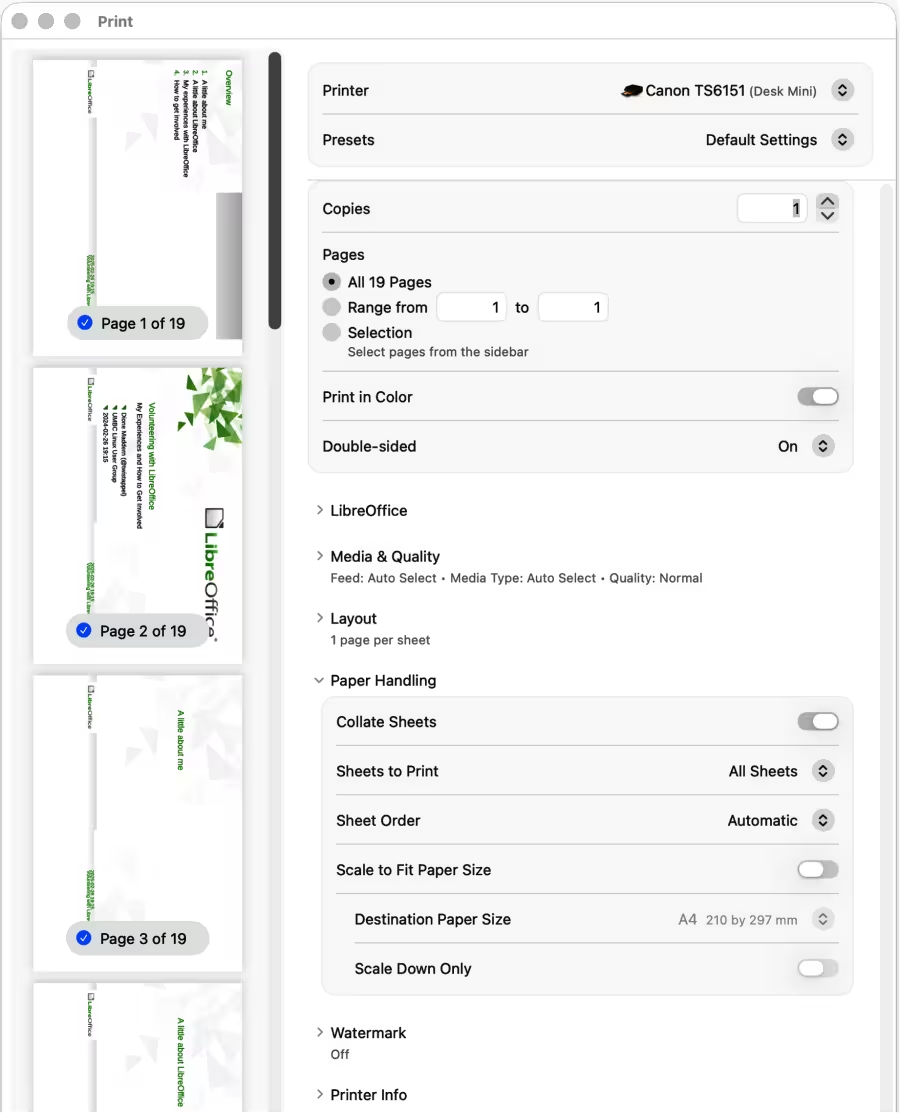
Paper Handling
Collate pages
When selected collates multiple printed copies into separate documents.
Pages to Print
Select which slides in the presentation to print from the drop-down list: All pages; Odd only; Even only.
Page Order
Select the page printing order from the drop-down list: Automatic; Normal; Reverse.
Scale to fit paper size
Adjusts the printed slide to fit the paper size.
Destination Paper Size
Select a paper size from the options in the drop‑down list. Only available if Scale to fit paper size has been selected.
Scale Down Only
When selected, a page is scaled down to fit the paper size available.
Create a Watermark before printing a presentation using the following options (Figure 14).
Apply Watermark
Figure 14: Print dialog — LibreOffice Impress — Watermark — macOS
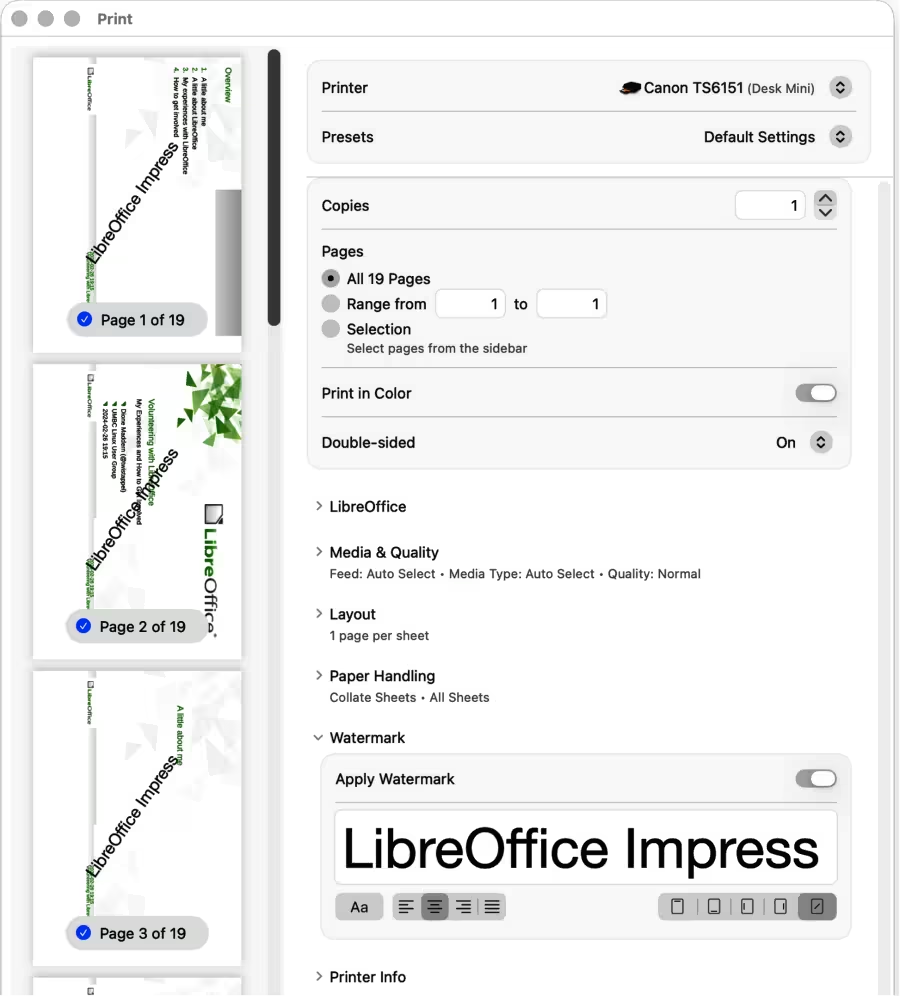
Text box
Justification
Position
Printing examples
The following printing procedures are examples only. Actual printing procedure depends on computer operating system, computer setup, and the printer being used. For more information on printing, see the Writer Guide.
Printing slides
-
Open the Print dialog using one of the following methods:
-
Go to File > Print on the Menu bar.
-
Use the keyboard shortcut Ctrl+P (macOS ⌘+P).
-
Click on Print on the Standard toolbar.
-
Click on General to open the page for general print options and, if necessary, select a printer from the Printer drop-down list of printers available.
-
If necessary, in Printer click on Properties to display a properties dialog for the selected printer and select the options required. Available printer properties depend on the printer selected and computer operating system being used.
-
If necessary, click OK to save the printer properties selection and close the printer properties dialog.
-
In Range and Copies, select which slides to print, odd or even pages, the paper sides to print on (simplex or duplex), number of copies, collate multiple copies, and the print order.
-
In Page Layout, select the paper size, orientation, pages per sheet, and, if necessary, brochure printing.
-
Click on LibreOffice Impress to open the page for LibreOffice Impress print options.
-
In Document, select the document type, slides per page and the printing order from the drop-down lists.
-
In Contents, select whether to print slide name, date and time, and/or hidden pages.
-
In Color, select the type of color to print.
-
In Size, select the printed size, to fit on a printable page, to distribute on multiple sheets of paper, or tile sheet of paper with repeated slides.
-
Click OK to print the slides and close the Print dialog.
Brochure printing
When brochure printing, slides are printed so that they are in the correct order to form a booklet or brochure. The printer procedures below are only examples. Actual brochure printing procedure depends on the computer operating system and type of printer being used. It is best to experiment to find the correct method for brochure printing.
Single sided printing
The following procedure is an example of creating a brochure or booklet using a printer that is only capable of printing single sided.
-
Open the Print dialog using one of the following methods:
-
Go to File > Print on the Menu bar.
-
Use the keyboard shortcut Ctrl+P (macOS ⌘+P).
-
Click on Print on the Standard toolbar.
-
Click on General to open the page for general print options and, if necessary, select a printer from the Printer drop-down list of printers available.
-
Click on Properties to open the printer properties dialog for the printer being used and check the printer is set to the same page orientation as specified for the page setup for the slides. Usually page orientation does not matter, but is IMPORTANT for brochures.
-
Click OK to close the properties dialog and return to the Print dialog.
-
In Range and Copies, select All Slides. A minimum of four slides is required to create a brochure.
-
In Range and Copies, select the Number of copies required to match the required number of brochures.
-
In Layout, select Brochure.
-
In Range and Copies, select Even slides option in Include.
-
Click OK to print the even slides in the presentation.
-
Take the printed slides out of the printer and put them back into the printer in the correct orientation to print on the other side of the paper. It maybe necessary to experiment and find out what the correct arrangement is for the printer being used.
-
In Range and Copies, select Odd slides option in Include.
-
In Range and Copies, select the same Number of copies used for printing the even slides.
-
Click OK to print the odd slides in the presentation and close the Print dialog.
-
Assemble the brochures and bind them, if required.
Double sided or duplex printing
Printing a brochure on a printer that is capable of double sided, or duplex printing, makes the creation of brochures simpler.
-
Open the Print dialog using one of the following methods:
-
Go to File > Print on the Menu bar.
-
Use the keyboard shortcut Ctrl+P (macOS ⌘+P).
-
Click on Print on the Standard toolbar.
-
Click on General to open the page for general print options and, if necessary, select a printer from the Printer drop-down list of printers available.
-
Click on Properties to open the printer properties dialog for the printer being used and check the printer is set to the same page orientation as specified for the page setup for the slides. Usually page orientation does not matter, but is IMPORTANT for brochures.
-
Click OK to close the properties dialog and return to the Print dialog.
-
In Range and Copies, select All Slides. A minimum of four slides is required to create a brochure.
-
In Range and Copies, select Print on both sides (duplex long edge) or Print on both sides (duplex short edge) option. Normally, long edge binding is used for portrait printing and short edge binding is used for landscape printing.
-
In Range and Copies, select the Number of copies required to match the required number of brochures.
-
In Range and Copies, select the Collate option. This option is only active when printing multiple copies of the same document.
-
In Layout, select Brochure.
-
Click OK to close to the Print dialog and print the required number of pages for the brochures.
-
If required, bind the brochures to match either long edge or short edge binding.
Emailing
LibreOffice provides two methods of emailing a slide show directly from the Impress module as an attachment in ODP format or PDF format. For more information on emailing LibreOffice documents, see the Getting Started Guide.
-
Note
A default email program must be available for the emailing facility in Impress to work correctly.
Exporting
Impress can export presentations in PDF format as well as other file formats. PDF format is a standard file format for file viewing and is recommended when sending a presentation to someone who can only view a presentation file using a PDF viewer. For more information on exporting LibreOffice documents, see the Getting Started Guide.
Quick PDF export
-
Make sure the presentation file is open in Impress.
-
Use one of the following methods to export the file as a PDF file and open a file browser window.
-
Click on Export Directly as PDF on the Standard toolbar.
-
Go to File > Export As > Export Directly as PDF on the Menu bar.
-
In the file browser window, navigate to the folder where the PDF file is to be saved.
-
In the Name text box, enter a filename for the PDF file or use the filename that is displayed in this text box. The file format is fixed as PDF and cannot be changed.
-
Click on Save to save the slide show file as a PDF file and close the file browser window.
PDF export
For more control over the content and quality of a PDF file, it is recommended to use the PDF Options dialog. For more information on the options available when exporting a slide show as a PDF file, see the Getting Started Guide.
-
Make sure the presentation file is open in Impress.
-
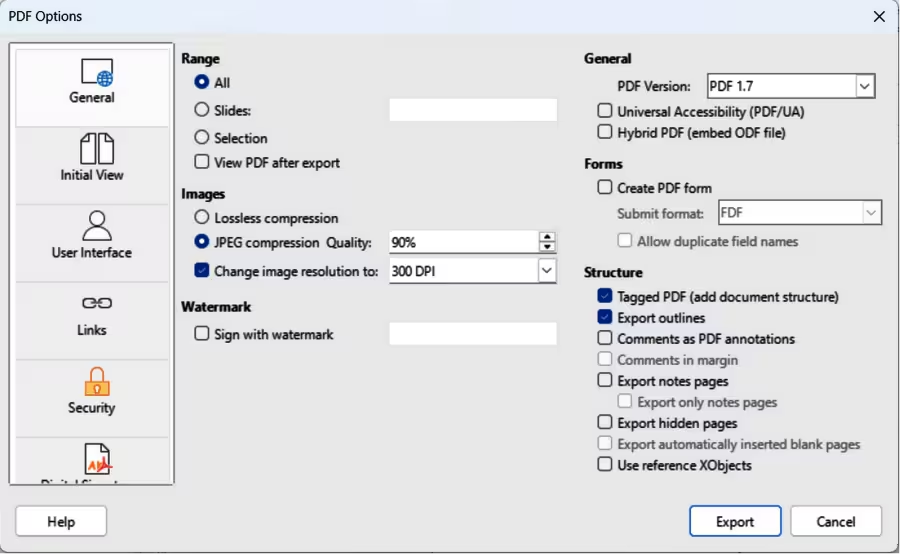
Go to File > Export as > Export as PDF on the Menu bar to open the PDF Options dialog (Figure 15).
Figure 15: PDF Options dialog — General page
-
Using the various pages in the PDF Options dialog, select the options required for the PDF file. For more information, see the Getting Started Guide.
-
Click on Export to open a file browser window.
-
In the file browser window, navigate to the folder where the PDF file is to be saved.
-
In the Name text box, enter a filename for the PDF file or use the filename that is displayed in this text box. The file format is fixed as PDF and cannot be changed.
-
Click on Export to save and export the file to the selected location.
Export in other formats
-
Make sure the presentation file is open in Impress.
-
Go to File > Export on the menu bar to open a file browser window and navigate to where the presentation file is going to be saved.
-
Enter a name for the exported file in the File name text box.
-
In the Save as type box, select the required format from the available options in the drop‑down list.
-
Click on Save to export the file to the selected location. Depending on format selected, an options dialog may open allowing further options to be selected for the file format selected.
-
Click on OK to save the exported file and close the options dialog. For more information on exporting files, see the Getting Started Guide.
Redaction
Presentations can be redacted to remove or hide any sensitive information allowing for selective disclosure of information. When a presentation is redacted, it is exported as a new PDF file with all the redacted portions removed and replaced by redaction blocks of pixels. A redacted document is exported in PDF format for publication, or sharing.
-
Note
When a redacted document is exported as a new PDF file, any redacted portions are removed from the new document and replaced by redaction blocks of pixels. This prevents any attempt to restore, or copy the original redacted contents.
Redaction tools
The tools available on the Redaction toolbar (Figure 16) are as follows:
Rectangle Redaction
Freeform Redaction
Figure 16: Redaction toolbar
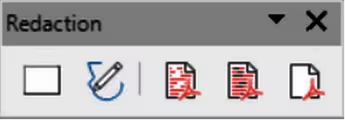
Redacted Export (Black)
Redacted Export (White)
Export Preview PDF
Presentation redaction
A copy of the presentation is automatically transferred to LibreOffice Draw for redaction to be carried out. For more information on redaction, see the Draw Guide and Getting Started Guide.
-
Open the presentation to be redacted, then go to Tools > Redact on the Menu bar and the following happens:
-
The document is copied, prepared and transferred to LibreOffice Draw as an untitled file.
-
LibreOffice Draw opens with the untitled document displayed.
-
The Redaction toolbar automatically opens. If the Redaction toolbar is not displayed, go to View > Toolbars on the Menu bar in LibreOffice Draw and select Redaction.
-
Click on Rectangle Redaction or Freeform Redaction in the Redaction toolbar.
-
Draw the required shapes to redact the sensitive areas in the document. The redaction shape is gray allowing the sensitive areas in the document to be visible before they are redacted.
-
Click on Export Preview PDF in the Redaction toolbar to create a preview copy of the PDF file to review the redaction areas before the redaction is finalized.
-
If required, delete the preview PDF copy after reviewing the redaction areas in the file.
-
Click on Redacted Export (White), or Redacted Export (Black) in the Redaction toolbar to export the presentation file as a redacted PDF file.
-
Navigate to the folder in the file browser window that opens where the redact PDF file is going to be saved and enter a name for the file.
-
Click on Save to create the redacted PDF file. The gray redaction shapes are converted to white, or black shapes and the document is exported as a PDF
Automatic redaction
Automatic redaction is used to define words and patterns that are automatically marked for redaction. Automatic redaction is useful for documents that have multiple occurrences of names and other personal information (for example credit cards, phone numbers, and so on). Manually redacting this type information in a document would require significant effort, but automatic redaction makes redaction of a document easier and more efficient. For more information on automatic redaction, see the Draw Guide and Getting Started Guide.