Copyright
This document is Copyright © 2021 by the LibreOffice Documentation Team. Contributors are listed below. You may distribute it and/or modify it under the terms of either the GNU General Public License (http://www.gnu.org/licenses/gpl.html), version 3 or later, or the Creative Commons Attribution License (http://creativecommons.org/licenses/by/4.0/), version 4.0 or later.
All trademarks within this guide belong to their legitimate owners.
Contributors
|
Peter Schofield |
Claire Wood |
Jean Hollis Weber |
|
Felipe Viggiano |
Regina Henschel |
Samantha Hamilton |
|
Olivier Hallot |
Dave Barton |
|
|
Peter Schofield |
Dimona Delvere |
Michele Zarri |
|
T. Elliot Turner |
Jean Hollis Weber |
Hazel Russman |
|
Chad D. Lines |
Low Song Chuan |
Jaimon Jacob |
|
Muhammad Sufyan Zainalabidin |
Dan Lewis |
Agnes Belzunce |
|
Peter Hillier-Brook |
Gary Schnabl |
Claire Wood |
|
Rachel Kartch |
Linda Worthington |
|
Feedback
Please direct any comments or suggestions about this document to the Documentation Team’s mailing list: documentation@global.libreoffice.org
Note
Everything sent to a mailing list, including your email address and any other personal information that is written in the message, is publicly archived and cannot be deleted.
Publication date and software version
Published February 2021. Based on LibreOffice 7.0.
What is Impress?
Impress is the presentation (slide show) program included in LibreOffice. Impress creates presentations in the ODP format, which can be opened by other presentation software or can be exported in different presentation formats.
You can create slides that contain many different elements, including text, bulleted and numbered lists, tables, charts, and a wide range of graphic objects such as clip-art, drawings and photographs. Impress also includes a spelling checker, a thesaurus, text styles, and background styles.
This chapter introduces the Impress user interface. The remaining chapters in this guide explain all the features available in Impress that can be used to create more sophisticated slide shows.
To use Impress for more than very simple slide shows, requires some knowledge of the slide elements. Slides containing text use styles to determine the appearance of that text. Creating drawings in Impress is similar to using the Draw program included in LibreOffice. See the Draw Guide for more details on how to use the drawing tools.
Starting Impress
You can start Impress in several ways:
-
From the LibreOffice Start Center that opens when LibreOffice is opened and no other LibreOffice module is open.
-
Click on Impress Presentation to create a new presentation;
-
Click on Open File and navigate to the folder where there is an existing presentation.
-
From the system menu using the standard menu from which most applications are started. Details vary with your operating system. See the Getting Started Guide for more information and some examples are listed below:
-
Start menu in Windows.
-
Applications menu in Linux with a Gnome desktop.
-
Applications menu in macOS.
-
From any open module of LibreOffice, go to File > New > Presentation on the Menu bar, or click on New on the Standard toolbar and select Presentation from the drop-down menu.
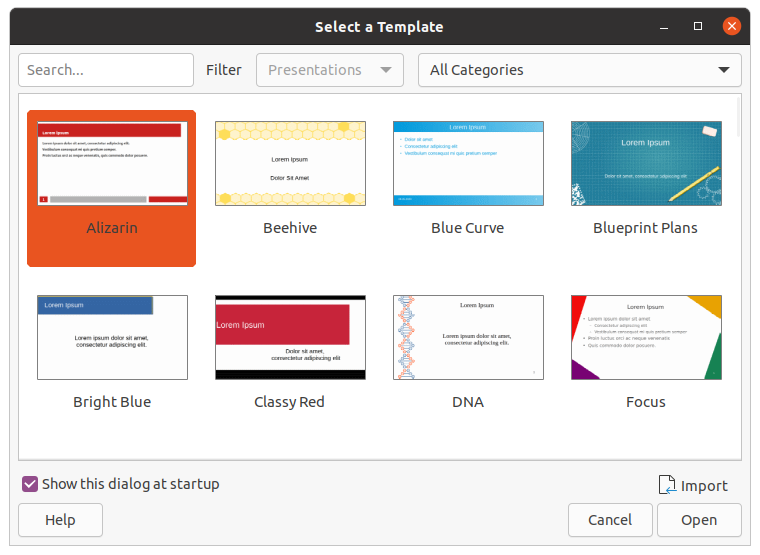
When you start Impress for the first time, the main Impress window opens, as default, with the Select a Template dialog displayed (Figure 1). Templates included with Impress are designed to fit the two standard sizes of presentation slides: 4:3 and 16:9 ratios. However, templates will adapt to other sizes that are available and can be selected by going to Slide > Properties > Paper Format on the Menu bar or Format in the Slide section in the Properties deck on the Sidebar.
Note
When LibreOffice was installed on your computer, a menu entry for each component is normally added to your system menu. The exact name and location of these menu entries depend on the operating system and graphical user interface.
The New icon displayed on the Standard toolbar will depend on which LibreOffice module you have open when you want to create a new presentation.
Figure 1: Select a Template dialog
Tip
To start Impress without the Select a Template dialog (Figure 1), deselect Show this dialog at startup in the lower left of the dialog.
In Windows or Linux, go to Tools > Options > LibreOffice Impress > General on the Menu bar and deselect Start with Template Selection under New Document.
In macOS, LibreOffice > Preferences > LibreOffice Impress > General on the Menu bar and deselect Start with Template Selection under New Document.
Main Impress window
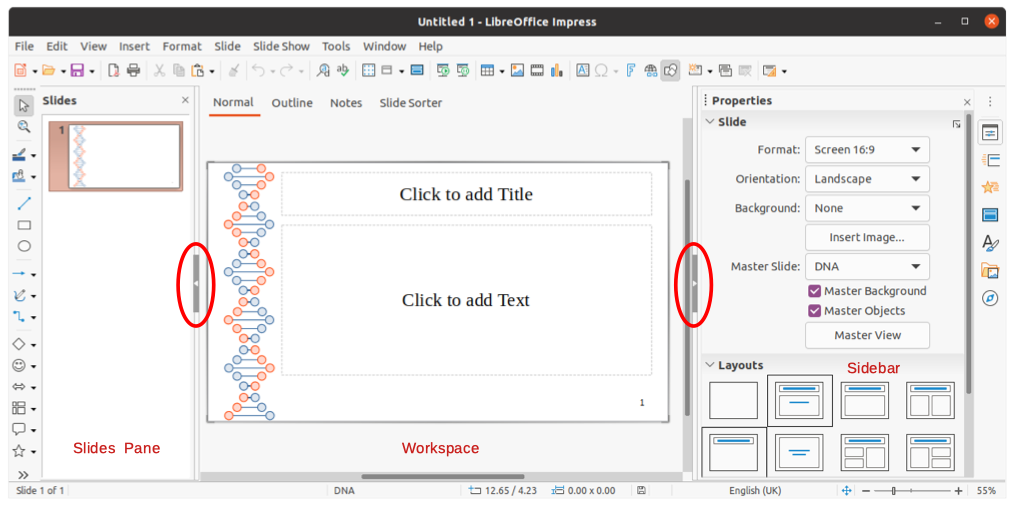
The main Impress window (Figure 2) has three main sections: Slides pane, Workspace, and Sidebar. At the top is a menu bar and toolbars. Toolbars can be displayed or hidden during the creation of a presentation.
Tip
You can close the Slides pane or Sidebar by clicking the X in the upper right corner of each pane or go to View > Slides pane or View > Sidebar on the Menu bar to deselect the pane. To reopen a pane, select View > Slides pane or View > Sidebar on the Menu bar.
Figure 2: Impress main window with Hide/Show markers highlighted
Tip
You can maximize the Workspace area by clicking on the Hide/Show marker in the middle of the vertical separator line (highlighted in Figure 2). Using the Hide/Show marker hides, but does not close, the Slides pane or Sidebar. To restore a pane, click again on its Hide/Show marker.
Menu bar
The Impress Menu bar, at the top of the main window, provides several menus common to all LibreOffice modules. The commands may differ between the modules for File, Edit, View, Insert, Format, Tools, Window, and Help. Impress has two extra menus for Slide and Slide Show. When you select one of the menus, a sub-menu drops down to show commands. The Menu bar can be customized and for more information, see the Getting Started Guide.
Workspace
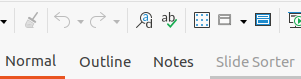
The Workspace (normally the center of the main window) opens in the Normal view. It has four standard views selected using tabs: Normal, Outline, Notes, and Slide Sorter (Figure 3). For more information on workspace views, see “Workspace views” below.
If you are using master slides, then master views become available: Master Slide, Master Notes and Master Handout. There are no tabs for master views and can only be selected by going to View on the Menu bar. For more information on master slides, see Chapter 2, Using Slide Masters, Styles, and Templates.
Figure 3: Workspace view tabs
Slides pane
The Slides pane contains thumbnail images of slides in a presentation in the order in which they will be shown. This slide show order cam be changed and is describe in Chapter 9, Slide Shows. Clicking on a slide image in the Slides pane selects it and places the slide in the Workspace where you can make changes to the displayed slide.
-
To display or close the Slides pane, go to View > Slides pane on the Menu bar.
-
To close the Slides pane, click on the X in the right top corner of the Slides pane.
-
To display or hide the Slides pane, use the Hide/Show marker on the left of the Workspace (Figure 2).
Several additional operations can be carried out on one or more slides in the Slides pane. These additional operations are available from a context menu when you right click in the Slides pane.
-
Add new slides to a presentation.
-
Hide a slide so that it will not show in a presentation.
-
Delete a slide from a presentation.
-
Rename a slide.
-
Duplicate a slide (copy and paste).
-
Move a slide to another position in the slide order by dragging and dropping it to the desired position.
Sidebar
The Impress Sidebar, normally located on the right side of the Workspace, is similar to the Sidebar in the other LibreOffice modules and consists of seven decks. To open a deck, use one of the following methods:
-
Click on its icon on the right side of the Sidebar.
-
Click on Sidebar Settings at the top right of the Sidebar and select a deck from the drop-down list.
-
Go to View on the Menu bar and select the deck required from the drop down menu.
To display or hide the Sidebar, use one of the following methods:
-
Go to View > Sidebar on the Menu bar.
-
Use the keyboard shortcut Ctrl+F5.
-
Use the Hide/Show marker on the right of the Workspace (Figure 2).
-
To close the Sidebar, click on the X in the right top corner of the Sidebar.
-
To display the Sidebar, click on one of the Sidebar icons to open a deck.
Properties
-
When a slide is selected and appears in the Workspace, the sections available to change slide layout are Slide and Layouts.
-
When an object on a slide is selected, the sections available to change object format are Character, Paragraph, Area, Lists, Shadow, Line, and Position and Size.
Slide transition
Animation
Master Slides
Styles
Gallery
Navigator
Rulers
You should see rulers (bars with numbers) on the upper and left-hand sides of the workspace. If they are not visible, enable the rulers by selecting View > Rulers in the Menu bar. The rulers show the size of a selected object on the page using double lines (highlighted in Figure 4). You can also use the rulers to manage object handles and guide lines when positioning objects.
Figure 4: Rulers showing object size
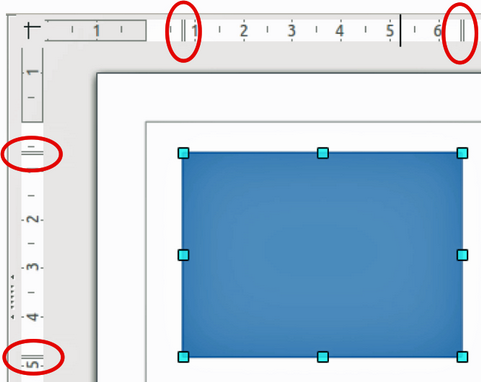
Figure 5: Changing ruler units
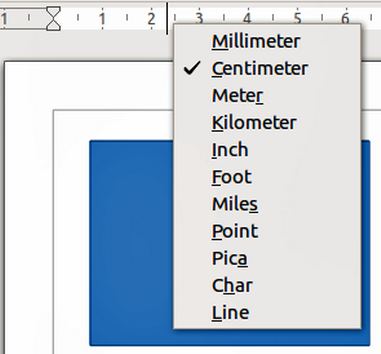
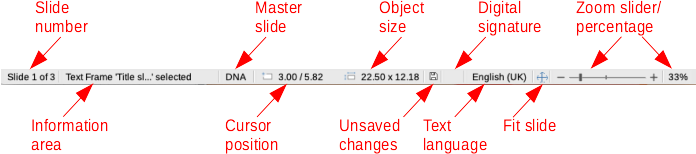
Figure 6: Status bar
The page margins in the drawing area are also represented on the rulers. You can change the margins directly on the rulers by dragging them with the mouse. The margin area is indicated by the grayed out area on the rulers as shown in Figure 4.
To change the measurement units of the rulers, which can be defined independently, right-click on a ruler and select the measurement unit from the drop down list, as illustrated for the horizontal ruler in Figure 5.
Status bar
The Status bar (Figure 6), located at the bottom of the main window, contains information that you may find useful when working on a presentation. You can hide the Status bar by going to View on the Menu bar and deselecting Status Bar.
Note
The sizes are given in the current measurement unit and might not be the same as the ruler units. The measurement unit on the Status bar is defined in Tools > Options > LibreOffice Impress > General.
Slide number
Information area
|
Example selection |
Examples of information shown |
|
Text area |
Text Edit: Paragraph x, Row y, Column z |
|
Charts, spreadsheets |
Embedded object (OLE) “ObjectName” selected |
|
Graphics |
Bitmap with transparency selected |
Master slide
Cursor position/Object size
-
When no object is selected, the position numbers show the current position (X and Y coordinates) of the mouse cursor.
-
When an object is selected and being resized with the mouse, the object size numbers show the size of the object (width and height).
-
If an object is selected, the position numbers shows X and Y coordinates of the upper-left corner and the object size number pair displays the size of the object. These numbers do not relate to the object itself, but to the selection outline, which is the smallest possible rectangle that can contain the visible part or parts of the object.
-
When an object is selected, clicking in either of these areas opens the Position and Size dialog.
Unsaved changes
Digital signatures
Text language
Fit slide
Zoom slider
Zoom percentage
Figure 7: Navigator dialog
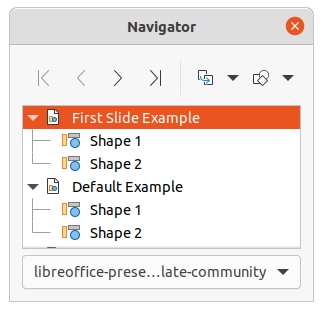
Navigator
The Navigator displays all objects contained in a presentation. It provides another convenient way to move around a presentation and find items in it.
To open the Navigator dialog ( Figure 7) go to View > Navigator on the Menu bar, or use the keyboard shortcut Ctrl+Shift+F5. Alternatively, click on Navigator in the Sidebar to open the Navigator deck that is similar in appearance and function as the Navigator dialog.
The Navigator is more useful if you give your slides and objects (pictures, spreadsheets, and so on) meaningful names, instead of leaving them with default names, such as “Slide 1” and “Shape 1” and so on (as shown in Figure 7). This will allow you to easily locate a slide or object in your presentation.
Toolbars
Many toolbars can be used during slide creation. To display or hide the various toolbars in Impress, go to View > Toolbars on the Menu bar and select from the drop down menu that appears which toolbars you want to display. For example, the Standard and Drawing toolbars are shown by default, but the Line and Filling and Text Formatting toolbars are not shown.
You can select the icons or buttons that you want to appear on toolbars. To change the visible icons or buttons on any toolbar, right-click in an empty area on the toolbar and select Visible Buttons from the context menu. Visible icons or buttons are indicated by a check mark next to the icon name. Click on an icon name to hide or show it in the toolbar. For more information, see Chapter 11, Setting Up and Customizing Impress and the Getting Started Guide.
The toolbars that are widely used when creating a presentation are as follows:
Standard toolbar
Figure 8: Standard toolbar

Drawing toolbar
Figure 9: Drawing toolbar

Line and Filling toolbar
Figure 10: Line and Filling toolbar

Text Formatting toolbar
Figure 11: Text Formatting toolbar

Note
The appearance of the toolbar icons varies depending on your operating system and the selection of icon size and style in Tools > Options > LibreOffice > View. For more information about working with toolbars, see the Getting Started Guide.
Workspace views
The Impress workspace has four standard views selected using tabs: Normal, Outline, Notes, and Slide Sorter. These tabs are normally displayed the top of the Workspace ( Figure 3). If the tabs are not displayed, then go to View > Views Tab Bar on the Menu bar. You can also select the different Workspace views by going to View on the Menu bar and selecting a view from the drop down menu.
If you are using master slides, then master views become available in the Workspace: Master Slide, Master Notes and Master Handout. There are no tabs for master views and can only be selected by going to View on the Menu bar and selecting Master Slide, Master Notes or Master Handout. For more information on master slides, see Chapter 2, Using Slide Masters, Styles, and Templates.
Normal view
Normal view is the main standard view for creating individual slides in a presentation. In Normal view you can design slides, add and format any text or graphics, and add any animation effects to text or graphics.
To place a slide in Normal view of the Workspace ( Figure 3), either click on the slide thumbnail in the Slides pane or click on the slide name in the Navigator.
Outline view
Outline view in the Workspace ( Figure 12) contains all of the slides of the presentation in their numbered sequence. It shows topic titles, bulleted lists, and numbered lists for each slide in outline format. Only the text contained in the default text boxes in each slide is shown. If you have added text boxes or graphic objects to the slides, then these objects are not displayed. Slide names are not included.
-
Use Outline view for the following:
-
Making changes in the text of a slide:
-
Add or delete text in a slide as in Normal view.
-
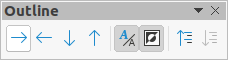
Move a paragraph in a slide up or down by using the movement arrows on the Outline toolbar ( Figure 13).
-
Change the outline level of a paragraph in a slide using the left and right arrow buttons on the Outline toolbar.
Figure 12: Outline view in Workspace
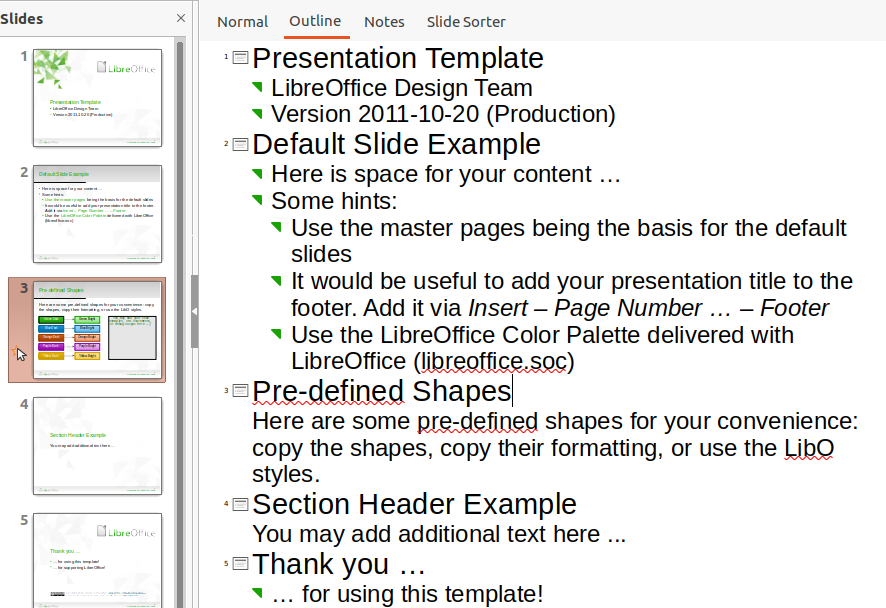
Figure 13: Outline toolbar
-
Comparing slides with your outline (if you have prepared one in advance). If you notice from your outline that another slide is needed, you can create it directly in Outline view, or you can return to Normal view to create it.
Note
If the Outline toolbar does not appear when in Outline view, then go to View > Toolbars on the Menu bar and select Outline from the drop down list.
Notes view
Use Notes view in the Workspace ( Figure 14) to add notes to a slide. These notes are not seen when the presentation is shown to an audience using an external display connected to your computer.
1) Click the Notes tab in the Workspace.
2) Click the slide in the Slides pane so that the slide appears in the Workspace.
3) In the text box below the slide, click on the words Click to add notes and begin typing your notes.
You can resize the Click to add notes text box using the resizing handles which appear when you click on the edge of the box. You can also move or change the size of the box by clicking and dragging on the box border.
When text is inserted in the Click to add notes text box, it is automatically formatted using the predefined Notes style that you can find in Presentation Styles in the Styles deck on the Sidebar. You can format the Notes style to suit your needs. For more information, see Chapter 8, Adding and Formatting Slides, and Notes.
Figure 14: Notes view in Workspace
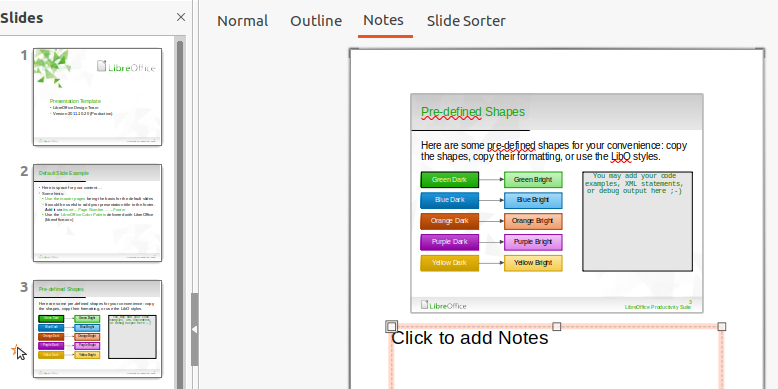
Figure 15: Slide Sorter view in Workspace
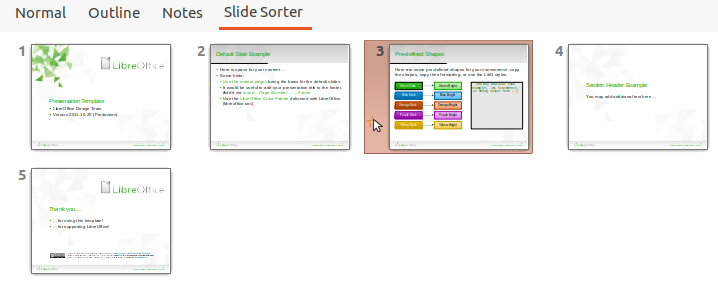
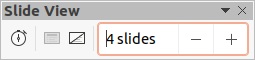
Figure 16: Slide View toolbar
Slide Sorter view
The Slide Sorter view in the Workspace ( Figure 15) contains all the thumbnails of slides used in your presentation. Use this view to work with one slide or a group of slides.
Customizing Slide Sorter view
To change the number of slides per row in Slide Sorter view:
1) Go to View > Toolbars > Slide View on the Menu bar to show the Slide View toolbar ( Figure 16)
2) Adjust the number of slides, up to a maximum of 15, in the Slides per Row box.
Changing slide order
Changing the slide order in a presentation of a single slide or a group of slides using Slide Sorter view is as follows:
1) Select a slide or a group of slides .
2) Drag and drop the slide or group of slides at the location you want.
Selecting a group of slides
To select a group of slides, use one of these methods:
-
Click on the first slide and, while holding the Ctrl key, select the required slides. The selected slides do not have to be next to each other.
-
Click on the first slide, and while pressing the Shift key, select the final slide for the group. This selects all of the slides between the first and the last slide selected.
-
Position the cursor slightly to one side and outside the first slide, then click and hold the left mouse button and drag the cursor until all of the slides you want in the group are selected.
Working in Slide Sorter view
You can work with slides in Slide Sorter view just as you can in the Slides pane. To make changes, right-click on a slide and choose one of the following from the context menu:
-
Cut – removes the selected slide and saves it to the clipboard.
-
Copy – copies the selected slide to the clipboard without removing it.
-
Paste – inserts a slide from the clipboard after the selected slide.
-
New Slide – adds a new slide after the selected slide.
-
Duplicate Slide – creates a duplicate of the selected slide and places the new slide immediately after the selected slide.
-
Rename Slide – allows you to rename the selected slide.
-
Hide Slide – any slides that are hidden are not shown in the slide show.
-
Delete Slide – deletes the selected slide.
-
Layout – allows you to change the layout of the selected slide.
-
Move – allows you to move or reposition the slide in the slide show order.
Creating Presentations
By default, Impress opens with the Select a Template dialog displayed ( Figure 1) where you can select a template to use in your presentation. To create a new presentation without using a template, click on Cancel in the Select a Template dialog and a blank slide appears in the Workspace and Slides pane.
Tip
The first thing to do is decide on the purpose of the presentation and plan the presentation. Having an idea of who the audience will be, the structure, the content, and how the presentation will be delivered, will save you a lot of time from the start.
To prevent the Select a Template dialog from opening when you create a new presentation, go to Tools > Options > LibreOffice Impress > General on the Menu bar to open Options – LibreOffice Impress – General dialog ( Figure 17) and deselect the option Start with New Template Selection.
For more information on creating presentations, slide show options, and presentation settings, see Chapter 9, Slide Shows and Chapter 11, Setting Up and Customizing Impress.
Figure 17: Options LibreOffice Impress General dialog
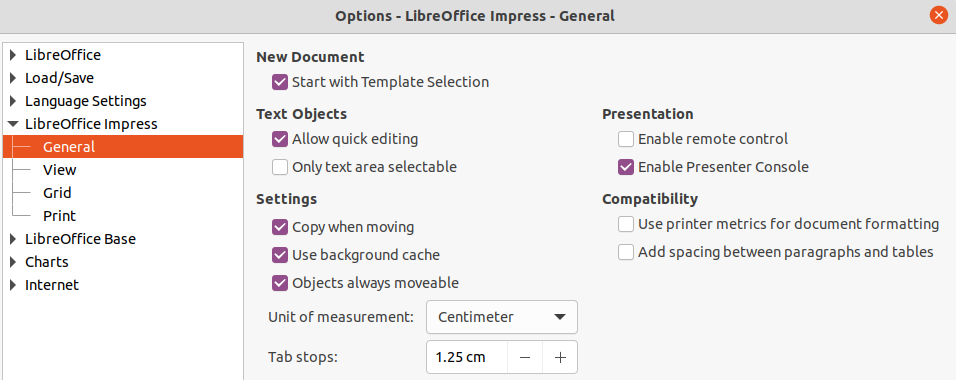
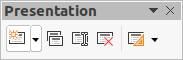
Figure 18: Presentation toolbar
New presentation
When you create a new presentation, Impress shows only one slide in the Slides pane and Workspace ( Figure 2). You can add new slides or duplicate slides to your presentation as follows.
Inserting new slide
A new slide is inserted into a presentation using one of the following methods.
-
Go to Slide > New Slide on the Menu bar.
-
Right-click in the Slides pane and select New Slide from the context menu.
-
Use the keyboard shortcut Ctrl+M.
-
Go to Slide Sorter view in the Workspace, right-click on a slide and select New Slide from the context menu.
-
Click on New Slide icon in the Presentation toolbar ( Figure 18). If the Presentation toolbar is not visible, go to View > Toolbars on the Menu bar and select Presentation from the drop down list.
Note
A new slide is inserted after the selected slide in the presentation. If a slide is not selected, then the new slide is inserted as the last slide in the presentation.
Duplicate slide
To duplicate a slide, select the slide you want to duplicate in the Slides pane and use one of the following methods. A duplicate slide is inserted after the selected slide in the presentation.
-
Right-click on a slide in the Slides pane and select Duplicate Slide from the context menu.
-
Go to Slide Sorter view in the Workspace, right-click on a slide and select Duplicate Slide from the context menu.
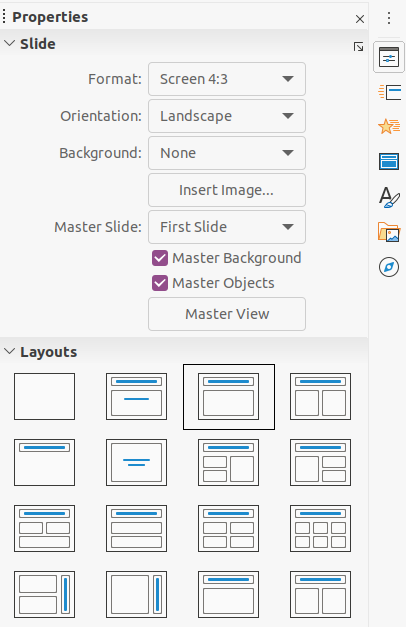
Figure 19: Slide and Layouts sections in Properties on Sidebar
-
Go to Slide > Duplicate Slide on the Menu bar.
-
Click on the Duplicate Slide icon in the Presentation toolbar ( Figure 18).
Slide format
Click on Properties on the Sidebar and open the Slide section ( Figure 19) to display the format options available for your presentation. The Slide section allows you to quickly format all the slides included in your presentation and select master slides for your presentation. For more information on formatting slides and using master slides, see Chapter 2, Using Slide Masters, Styles, and Templates and Chapter 8, Adding and Formatting Slides and Notes.
Slide layout
By default in Impress, the Title Slide layout is used for the first slide when you create a new presentation. The layouts included in Impress range from a blank slide to a slide with six contents boxes and a title. For more information on slide layouts, see Chapter 8, Adding and Formatting Slides and Notes.
The first slide in a presentation is normally a title slide. The layouts Title Slide, which also contains a section for a subtitle, or Title Only are the most suitable layouts for the first slide in a presentation. For the remaining slides you will probably use the Title, Contents layout.
Impress does not have the functionality to create custom layouts. However, you can resize and move the different elements in a slide layout. For more information, see “Modifying slide elements” below.
Tip
To view the names for slide layouts, use the tooltip feature. Position the cursor on an icon in the Layout section (or on any other tool icon) in the Properties deck on the Sidebar and its name will be displayed in a small rectangle.
Selecting slide layout
After selecting a slide in your presentation, select a slide layout using one of the following methods:
-
Click on the required layout in Layouts section of the Properties deck in the Sidebar ( Figure 19).
-
Go to Slide > Layout on the Menu bar and select the required layout from the drop down list.
-
Right click on a slide in the Slides pane, select Layout from the context menu and select a layout from the drop down list.
-
Click on Slide Layout on the Presentation toolbar ( Figure 18) and select a layout from the options available.
Note
Text and graphic elements can be readjusted at any time during the preparation of a presentation, but changing the layout of a slide that already contains some contents can have a dramatic effect. It is therefore recommended that you pay particular attention to the layout you select. If you do need to change the layout after contents have been added, the contents are not lost though they may need to be reformatted.
Changing slide layout
After selecting a slide in your presentation, change the slide layout using one of the following methods:
-
Click on the required layout in Layouts section of the Properties deck in the Sidebar ( Figure 19).
-
Go to Slide > Layout on the Menu bar and select the required layout from the drop down list.
-
Right click on a slide in the Slides pane, select Layout from the context menu and select the required layout from the drop down list.
-
Click on the Slide Layout icon on the Presentation toolbar ( Figure 18) and select a layout from the options available.
Slide contents
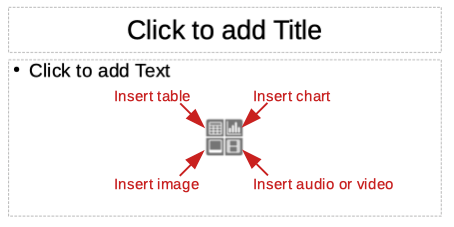
Several layouts contain one or more content boxes. Each of these boxes can be configured to contain one of the following elements: slide title, text, table, chart, image or audio/video, as shown in Figure 20.
Figure 20: Selecting slide contents type
-
Slide title – click on Click to add Title and type a title in the text box. Impress enters text editing mode and the Text Formatting toolbar (Figure 11) automatically opens. For more information on formatting text, see Chapter 3, Adding and Formatting Text.
-
Text – click on Click to add Text and type your contents in the text box. Impress enters text editing mode and the Text Formatting toolbar automatically opens. For more information on formatting text, see Chapter 3, Adding and Formatting Text.
-
Table – click on Insert Table and the Insert Table dialog opens. Enter the number of columns and rows, then click OK. The dialog closes and a table is inserted into the slide. Impress enters text editing mode and the Text Formatting toolbar automatically opens. For more information on using tables, see Chapter 3, Adding and Formatting Text.
-
Chart – click on Insert Chart and the Impress default chart is placed in the slide. The Chart Type section in the Properties deck on the Sidebar opens allowing you to edit the chart to your requirements. For more information on using charts, see Chapter 7, OLE, Spreadsheets, Charts, and Other Objects.
-
Image – click on Insert Image and a file browser opens. Navigate to where the image you want to use is located. Select the file and click on Open. The image is placed into the slide and the file browser closes. The Image section in Properties on the Sidebar opens allowing you to edit the image file. For more information on using images, see Chapter 4, Adding and Formatting Pictures and Chapter 7, OLE, Spreadsheets, Charts, and Other Objects.
-
Audio or video – click on Insert Audio or Video and a file browser opens. Navigate to where the audio or video file you want to use is located. Select the file and click on Open. The image is placed into the slide and the file browser closes. The Media Playback section in Properties on the Sidebar opens allowing you to operate the audio or video file. For more information on using audio and video, see Chapter 7, OLE, Spreadsheets, Charts, and Other Objects.
Modifying slide elements
When a slide is inserted into your presentation, it contains elements that were included in the selected slide layout. However, it is unlikely that the predefined layouts will suit all your needs for your presentation. You may want to remove elements that are not required or insert objects such as text and/or graphics.
Although Impress does not have the functionality to create new layouts, it allows you to resize and move the slide elements. It is also possible to add slide elements without being limited to the size and position of content boxes.
Note
It is recommended that changes to slide elements in the layouts included in Impress are only be made using normal view, which is the default. Attempting any changes to a slide element when in master view is possible, but may result in unpredictable results and requires extra care as well as a certain amount of trial and error.
Moving contents box
1) Click on the outer frame so that the selection handles are displayed.
2) Place the mouse cursor on the frame so that the cursor changes shape. This is normally a clenched hand, but depends on your computer setup.
3) Click the mouse button and drag the contents box to its new position on the slide, the release the mouse button.
Resizing contents box
1) Click on the outer frame so that the selection handles are displayed.
2) Place the mouse cursor on a selection handle the frame so that the cursor changes shape.
3) Click the mouse button and drag the selection handle on the frame to resize the contents box, then release the mouse button.
-
Top and bottom selection handles change the height of a contents box.
-
Left and right selection handles change the width of a contents box.
-
Corner selection handles change width and height of a contents box.
Removing elements
1) Click a contents box or an element to highlight it and the selection handles are displayed.
2) Press the Delete or Backspace key to remove the contents box or element.
Adding text
There are two ways of adding text to a slide – contents box or text box. For more information on text, see Chapter 3, Adding and Formatting Text.
-
Contents box – click Click to add text (Figure 20) in the contents box and type your text. Outline styles are automatically applied to the text as you insert it. You can change the outline level of each paragraph as well as its position within the contents box by using the arrow buttons on the Outline toolbar (Figure 13) and Workspace Outline view (Figure 12).
-
Text box – click on Text on the Standard toolbar (Figure Figure 8) or Drawing toolbar (Figure 9) to select text mode, then click on your slide. A text box is created and the Text Formatting toolbar (Figure 11) automatically opens. Type your text and click outside the text box to end text mode.
Adding images or objects
To add images or objects to a slide, for example a picture, clipart, drawing, photograph, or spreadsheet, click on Insert on the Menu bar and select from the drop down menu the image or object type you require. For more information on adding objects, see the following chapters:
-
Chapter 4, Adding and Formatting Images
-
Chapter 5, Managing Graphic Objects
-
Chapter 6, Formatting Graphic Objects
-
Chapter 7, OLE, Spreadsheets, Charts, and Other Objects
Modifying slide appearance
To change the background and other characteristics of all slides in the presentation, you need to modify the master slide or select a different master slide.
A master slide is a slide with a specified set of characteristics that acts as a template and is used as the starting point for creating other slides. These characteristics include the background, objects in the background, formatting of any text used, and any background graphics.
Impress has included a range of master slides, found in the Master Slide section on the Properties deck in the Sidebar. You can also create and save additional master slides or add more from other sources. See Chapter 2, Using Slide Masters, Styles, and Templates for information on creating and modifying master slides.
For example, to change the background of an individual slide or a master slide:
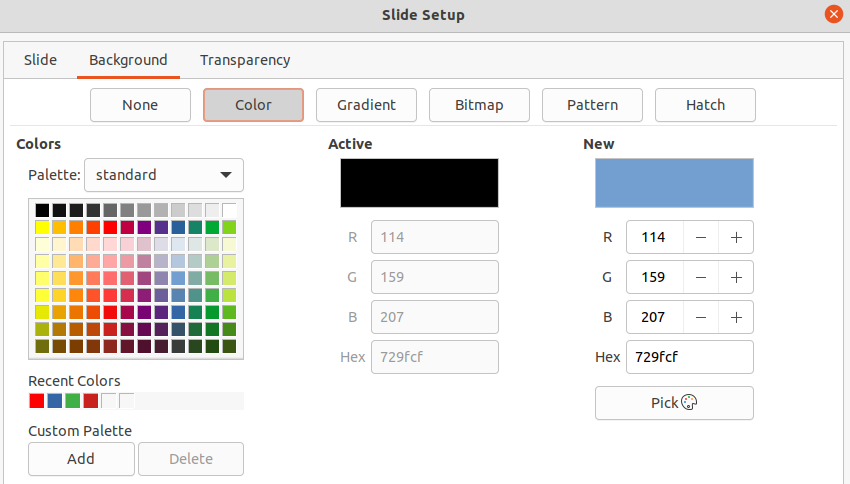
1) Right click on a slide or master slide and select Properties from the context menu to open the Slide Setup dialog (Figure 21).
2) Select Background and then select the type of background to use from None, Color, Gradient, Bitmap, Pattern and Hatch.
3) Make your selection from the various properties that are available for each type of background.
4) Click OK to apply your changes and close the dialog.
Note
Inserting and correctly formatting background is beyond the scope of this chapter. For more information, see Chapter 6, Formatting Graphic Objects.
Modifying slide shows
Figure 21: Slide Setup dialog - background
By default, a slide show will display all the slides in the same order as they appear in Slide Sorter view on the Workspace (Figure 15).
Now is a good time to review the entire presentation and answer some questions. Run the slide show at least once (see “Running a slide show” below) before answering them. You may have some questions of your own.
-
Are the slides in the correct order? If not, some of them will need to be moved.
-
Is the information well spaced and visible to members of an audience at the back of a large room? They may not be able to see information at the bottom of a slide, so you may need to design your presentation to fit the top three-quarters of the screen.
-
Would an additional slide make a particular point clearer? If so, another slide needs to be created.
-
Do some of the slides seem unnecessary? Hide or delete them.
-
Would animations help some of the slides? This is considered an advanced technique.
-
Should some of the slides have a different slide transition than others? The transition of those slides should be changed.
Tip
If one or more slides seem to be unnecessary, hide the slide or slides, and view the slide show a few more times to make sure they are not needed. To hide a slide, right-click the slide in the Slides pane and select Hide Slide from the context menu. Do not delete a slide until you have done this or you may have to create that slide again.
Once you have answered these and your own questions, make the necessary changes. Making changes is done easily in Slide Sorter view on the Workspace.
Slide order
Change the slide order in your presentation using one of the following methods:
-
In the Slide Sorter view, click on the slide you want to move and drag it to its new position in the presentation.
-
In Slides pane, click on the slide you want to move and drag it to its new position in the presentation.
Animations
If you want to add animations to slides in your presentation, click on Animation on the Sidebar to open the Animation deck giving access to the various animation options as follows:
-
Animation category.
-
Animation effect.
-
How the animation starts.
-
Animation direction, duration and delay.
-
Automatic preview.
Animation is an advanced technique and is beyond the scope of this chapter. For more information on animation, see Chapter 9, Slide Shows.
Slide transitions
To give your presentation a professional look, it is recommended to add transitions between each slide in your presentation. Click on Slide Transition on the Sidebar to open the Slide Transition deck giving access to the various transition options as follows:
-
Transition type.
-
Modify the transition.
-
How the slide advances in the presentation.
-
Automatic preview
Adding slide transitions is an advanced technique and is beyond the scope of this chapter. For more information on slide transitions, see Chapter 9, Slide Shows.
Running a slide show
When you have completed your presentation, it is recommended to run a slide show as a test to make sure that everything is to your satisfaction. For more information and details about running a slide show, see Chapter 9, Slide Shows.
1) To run a slide show after completing your presentation, use one of the following methods:
-
Go to Slide Show on the Menu bar and select Start from First Slide from the context menu or use the keyboard shortcut F5. The Presenter Console (Figure 22) automatically opens.
-
Go to Slide Show on the Menu bar and select Start from Current Slide from the context menu or use the keyboard shortcut Shift + F5. The Presenter Console automatically opens.
2) If the option Automatically after X seconds has been selected, the slide show will automatically run after the selected time has elapsed.
3) If the option On mouse click has been selected, use one of the following methods to move to the next slide.
-
Click the mouse button to advance to the next slide.
-
Use the arrow keys on the keyboard to go to the next slide or back to the previous one.
-
Press the Spacebar on the keyboard to advance to the next slide.
-
Click on the arrows displayed at the bottom of the Presenter Console to move to the next slide or back to the previous one.
4) When the slide show has ended or to exit the slide show before it has finished, press the Esc key to close the Presenter Console and return to your presentation in Impress.
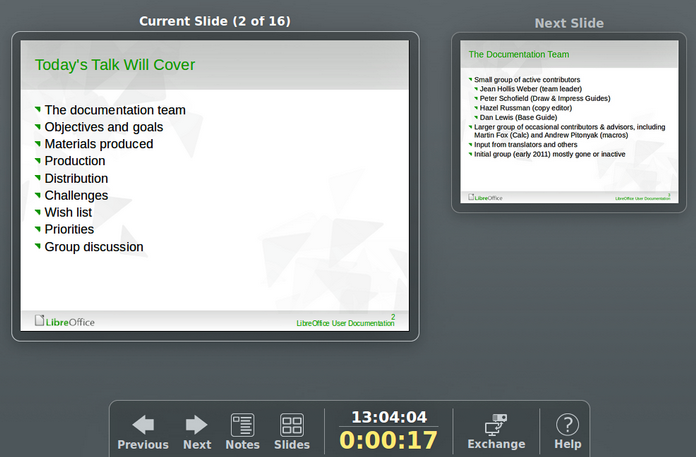
Presenter Console
The Presenter Console (Figure 22) in LibreOffice Impress can also be used when an extra display for presentation has been connected your computer. The Presenter Console provides extra control over slide shows by using different display views:
-
On an external display the audience sees the current slide in the presentation.
-
On your computer display you see the current slide, the upcoming slide, any slide notes, and a presentation timer.
For more information and details about using the Presenter Console, see Chapter 9 Slide Shows.
Figure 22: Impress Presenter Console