
Impress Guide 7.4
Chapter 8,
Adding and Formatting Slides, Notes, Comments, and Handouts
This document is Copyright © 2022 by the LibreOffice Documentation Team. Contributors are listed below. This document maybe distributed and/or modified under the terms of either the GNU General Public License (https://www.gnu.org/licenses/gpl.html), version 3 or later, or the Creative Commons Attribution License (https://creativecommons.org/licenses/by/4.0/), version 4.0 or later. All trademarks within this guide belong to their legitimate owners.
Contributors for this edition:
Peter Schofield
Kees Kriek
Contributors for previous editions:
Peter Schofield
Kees Kriek
Samantha Hamilton
Michele Zarri
T. Elliot Turner
Jean Hollis Weber
Rachel Kartch
Please direct any comments or suggestions about this document to the Documentation Team mailing list: loguides@community.documentfoundation.org.
Note
Everything sent to a mailing list, including email addresses and any other personal information that is written in the message, is publicly archived and cannot be deleted.
Published October 2022. Based on LibreOffice 7.4 Community.
Other versions of LibreOffice may differ in appearance and functionality.
Some keystrokes and menu items are different on macOS from those used in Windows and Linux. The table below gives some common substitutions used in this document. For a detailed list, see LibreOffice Help.
|
Windows or Linux |
macOS equivalent |
Effect |
|
Tools > Options |
LibreOffice > Preferences |
Access setup options |
|
Right-click |
Control+click, Ctrl+click, or right-click depending on computer setup |
Open a context menu |
|
Ctrl or Control |
⌘ and/or Cmd or Command, depending on keyboard |
|
|
Alt |
⌥ and/or Alt or Option depending on keyboard |
Used with other keys |
|
F11 |
⌘+T |
Open the Styles deck in the Sidebar |
A new slide is inserted into a presentation after the selected slide that is displayed in the Workspace. If slide masters have been used in the presentation, the inserted slide uses the master slide of the selected slide displayed in the Workspace.
1) Open an existing presentation, or create a new presentation.
2) Make sure Normal view is selected in the Workspace.
3) Select the slide in the presentation where a new slide is going to be inserted after the selected slide, then use one of the following methods to insert a new slide:
Go to Slide > New Slide on the Menu bar.
Right-click on the selected slide in the Slides pane and select New Slide from the context menu.
Right-click on the selected slide in the Slide Sorter view and select New Slide from the context menu.
Use the keyboard shortcut Ctrl+M (macOS ˄+M).
4) To insert a new slide at the end of a presentation make sure there are no slides selected in the Slides pane, then use one of the following methods:
Go to Slide > New Slide on the Menu bar.
Right-click in an empty area in the Slides pane and select New Slide from the context menu.
1) Open an existing presentation, or create a new presentation.
2) Make sure Normal view is selected in the Workspace.
3) Select the slide in the presentation where a new slide is going to be inserted after the selected slide. Alternatively, to insert a slide at the end of the presentation, make sure there are no slides selected in the Slides pane.
4) Go to Slide > Insert Slide from File on the Menu bar to open the Insert File dialog (Figure 1).
Figure 1: Insert File dialog
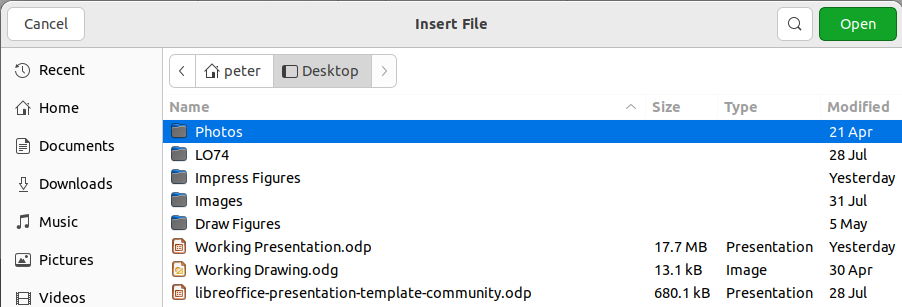
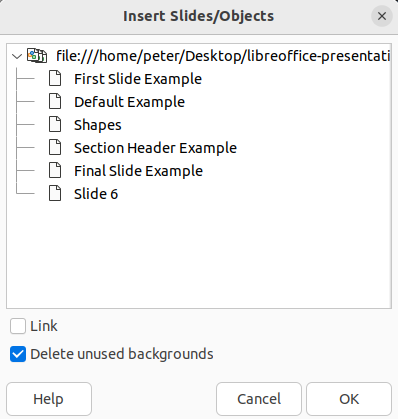
Figure 2: Insert Slides/Objects dialog
5) Navigate to the presentation file where the slide is located and select the file, then click on Open to open the Insert Slides/Objects dialog (Figure 2).
6) Click on the triangle ▶ next to the filename in the Insert Slides/Objects dialog to expand the list of slides.
7) Select the slides required for insertion into the presentation.
8) If required, select Link to embed the slide as an OLE object.
9) If required, select Delete unused backgrounds to remove any unreferenced background slides and presentation layouts from the presentation.
10) Click OK to insert the slide into the presentation and close the dialog.
Note
When inserting a slide from a file, a slide can be optionally linked instead of copying. This embeds the slide into a presentation using OLE. See Chapter 7, OLE, Spreadsheets, Charts, and Other Objects for more information about embedding OLE objects.
Tip
Figure 2 shows the importance of giving descriptive names to slides in a presentation to help with identification. Refer to “Renaming slides” on page 1 for more information.
1) Open the presentation that contains the required slide(s) for copying.
2) Make sure that the Slide Sorter view is open in the Workspace to easily locate the slide(s) for copying.
3) Select the required slide(s) and copy using one of the following methods:
Go to Edit > Copy on the Menu bar.
Right-click and select Copy from the context menu.
Click on Copy in the Standard toolbar.
Use the keyboard shortcut Ctrl+C (macOS ⌘+C).
4) Open the presentation where the copied slide(s) is going to be pasted into.
5) Make sure that Slide Sorter view is open in the Workspace.
6) Select the slide at the point where the copied slide(s) is going to be pasted. Alternatively, to paste a slide at the end of the presentation, make sure that there are no slides selected.
7) Paste the copied slide(s) into the presentation using one of the following methods:
Go to Edit > Paste on the Menu bar.
Right-click and select Paste from the context menu.
Click on Paste in the Standard toolbar.
Use the keyboard shortcut Ctrl+V (macOS ⌘+V).
1) Open both presentations where slides are going to be moved or copied between.
2) Make sure that both presentations are open in Slide Sorter view in the Workspace.
3) In the target presentation, select the slide at the point where the copied slides are going to be inserted. Alternatively, to insert slides at the end of the target presentation, make sure that there are no slides selected.
4) In the source presentation, select the required slides that are being moved or copied.
5) To move the slides, click on the selected slides then drag and drop the selected slides into the target presentation.
6) To copy the slides, click on the selected slides and hold down the Ctrl key (macOS ⌘) while dragging and dropping the slides into the target presentation.
Tip
Duplicating a slide is a good way of preventing slides from being shown with too much information, which can make it difficult for an audience to understand. If a slide becomes crowded with information, try duplicating the slide and splitting the information points over two or more slides. All the formatting, backgrounds, and so on are preserved in each duplicated slide.
Duplicating a slide is an easy method of adding slides to a presentation if the new slides are to inherit formatting, layout, and animations from a selected slide.
1) Open Normal or Slide Sorter view in the Workspace.
2) Select the slides for duplication in the Slide Sorter view or the Slides pane.
3) Go to Slide > Duplicate Slide on the Menu bar, or right click on the selected slides and select Duplicate Slide from the context menu. The duplicated slides are inserted into the presentation after the selected slides.
1) Open Normal or Slide Sorter view in the Workspace.
2) Select a slide and open the Rename Slide dialog using one of the following methods:
Go to Slide > Rename Slide on the Menu bar.
Right-click on the selected slide in the Slides pane and select Rename Slide from the context menu.
Right-click on the selected slide in the Slide Sorter view and select Rename Slide from the context menu.
3) In the Rename Slide dialog that opens, type a new name for the slide in the Name text box.
4) Click OK to save the change and close the Rename Slide dialog.
Occasionally there may be a slide with too many points to fit in the space available. Instead of reducing the font size or using other methods to squeeze more text onto the slide, it is better to subdivide the contents of the slide into two or more slides.
1) Select the slide for expansion in the Slides pane.
2) Go to Slide > Expand Slide on the Menu bar to create new slides from the first outline level on the original slide. The first outline level becomes the title of each new slide. Outline levels below each first level on the original slide are moved up one outline level in the new slides. An example of expanded slides is shown in Figure 3.
3) If necessary, rearrange the new slides in the presentation order.
Figure 3: Example of expanding slides
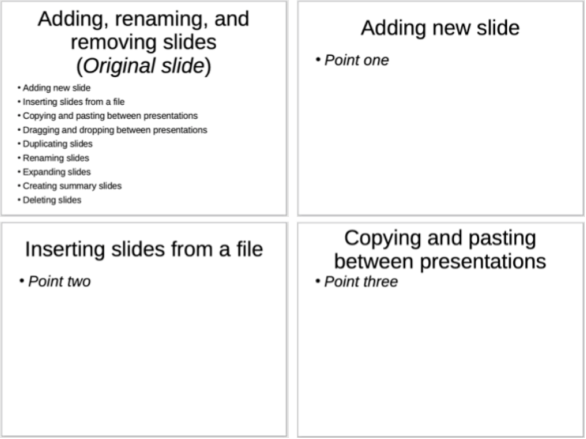
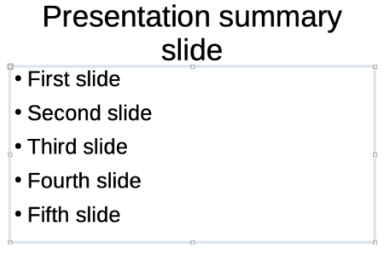
Figure 4: Example summary slide
Summary slides are normally used when creating an agenda for a presentation.
1) Select the slide that will be the first slide to appear in the summary.
2) Go to Slide > Summary Slide on the Menu bar to create a summary slide at the end of the presentation. Bullet points are created using the titles of the slides in the presentation. An example summary slide is shown in Figure 4.
3) If necessary, move the summary slide to a position where it is to appear in the presentation.
Note
When expanding a slide or creating a summary slide, the selected slide must contain an outline.
Select a slide or slides in the Slides pane, Normal view, or Slide Sorter view in the Workspace, then use one of the following methods to delete slides:
Go to Slide > Delete Slide on the Menu bar.
Right-click on selected slides and select Delete Slide from the context menu.
Press the Delete or Backspace key.
When planning a presentation it may be useful to develop an outline from a LibreOffice Writer file. Once the outline is created, one or more separate slides can be created for each of the top level outline elements.
1) Open the file in Writer that is going to be used as a base to create a presentation outline.
2) Go to File > Send > Outline to Presentation on the Writer Menu bar. A new presentation is created and opens in Impress Outline view. The heading paragraph styles are converted into the Impress outline styles. An example outline from a Writer document is shown in Figure 5.
Figure 5: Example outline from LibreOffice Writer
Figure 6: Create AutoAbstract dialog
3) If necessary, duplicate, or expand slides and manually change slide contents to create a presentation. For more information, see “Duplicating slides” on page 1 and “Expanding slides” on page 1.
Note
To create a presentation from a Writer document, the Writer document must contain headings formatted using heading paragraph styles.
1) Open the file in Writer that is going to be used as a base to create a presentation outline.
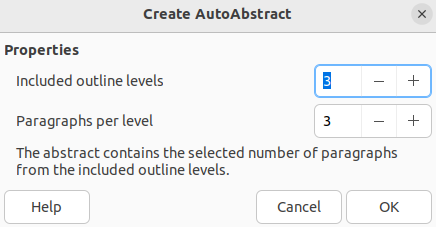
2) Go to File > Send > AutoAbstract to Presentation on the Writer Menu bar to open the Create AutoAbstract dialog (Figure 6).
3) Select the number of outline levels for the presentation in the Included outline levels box. For example, if three levels are selected, all headings formatted with Heading 1 to 3 styles are included as Outline levels 1 to 3. An example outline from a Writer document is shown in Figure 5.
4) Select the number of paragraphs for each outline level for in the presentation in the Paragraphs per level box. For example, if three paragraphs are selected, each outline level will contain three paragraphs.
Figure 7: Outline toolbar
5) Click OK to close the Create AutoAbstract dialog and an outline is created in a new Impress presentation.
6) Some outline levels may have too many points to fit on one slide. If necessary, duplicate or expand slides and manually change slide contents to create a simpler presentation. For more information, see “Duplicating slides” on page 1 and “Expanding slides” on page 1.
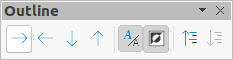
7) When the presentation is created, some hierarchical structure of the outline may be lost. If necessary, use Promote or Demote tools on the Outline toolbar (Figure 7) to move the outline points to the correct level.
Note
To create a presentation using AutoAbstract and send content from Writer to Impress, the text must contain headings formatted with the heading paragraph styles.
1) Open the file in Writer containing an outline that is going to be used as a base to create a presentation outline.
2) Highlight the outline and select Edit > Copy on the Menu bar, or right click on the selected outline and select Copy from the context menu.
3) Create a new presentation in Impress, or create a new slide in an existing presentation.
4) Select the required layout for the slides. For more information, see Chapter 1, Introducing Impress.
5) Paste the copied outline into the text area of the slide. Do not worry if the text does not fit the space on the slide.
6) If the slide contains too much text, duplicate or expand slides and manually change slide contents to create a simpler presentation that an audience can better understand. For more information, see “Duplicating slides” on page 1 and “Expanding slides” on page 1.
7) When the presentation is created, some hierarchical structure of the outline may be lost. If necessary, use Promote or Demote tools on the Outline toolbar (Figure 7) to move the outline points to the correct level.
Use master slides in a presentation to create a professional look and avoid manually modifying the formatting of each individual slide. Multiple master slides can be used in a single presentation to provide the same look to groups of slides or individual slides. See Chapter 2, Master Slides, Styles, and Templates for more information about using master slides.
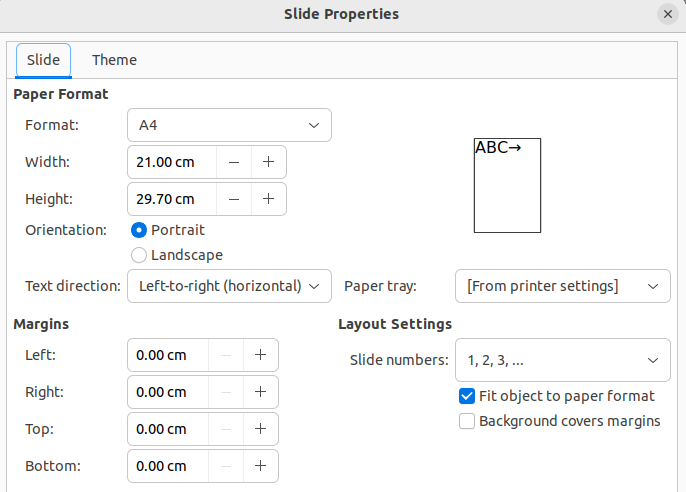
Figure 8: Slide Properties dialog
1) Make sure Normal view is selected in the Workspace.
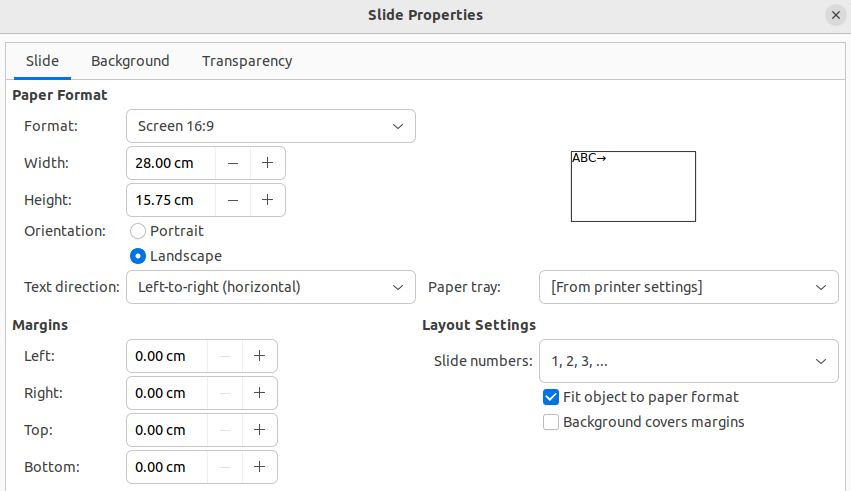
2) Open the Slide Properties dialog (Figure 8) using one of the following methods:
Go to Slide > Slide Properties on the Menu bar.
Right-click in an empty area on the slide and select Slide Properties from the context menu.
3) Use the various options available in the Slide, Background, and Transparency pages in the Slide Setup dialog to setup the slide. See Chapter 2, Master Slides, Styles and Templates for more information on the various options available in the Slide Properties dialog.
4) Click OK to save the changes and close the Slide Setup dialog.
Any options selected in the Slide panel (Figure 9) in the Properties deck on the Sidebar are applied immediately to the slide.
1) Make sure Normal view is selected in the Workspace.
2) Click on Properties in the Sidebar to open the Properties deck.
3) Click on Slide to open the Slide panel in the Properties deck.
4) Select the slide size to use from the predefined sizes in the Format drop-down list.
5) Select the slide orientation to use from the Orientation drop-down list.
6) Select the slide background to use from the Background drop-down list. The background type selected changes the options available. For more information on slide backgrounds, see Chapter 2, Master Slides, Styles and Templates.
Figure 9: Slide panel in Properties deck on Sidebar
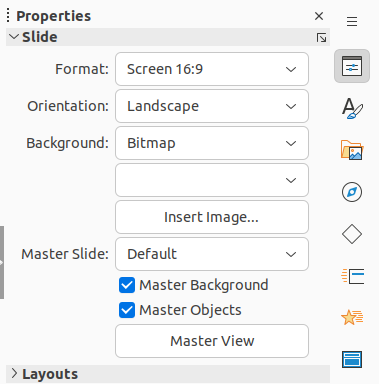
7) If necessary, select the master slide to use from the Master Slide drop-down list.
8) If necessary, select to use or deselect not to use Master Background or Master Objects on the slide. Only available if a master slide has been used for the slide.
9) If necessary, click on Master View to check on how the master slide selected looks and if it matches the presentation requirements.
A master slide can be applied to all the slides in a presentation, or only to selected slides to allow the use of more than one master slide in a presentation. For more information on master slides, see Chapter 2, Master Slides, Styles and Templates.
1) Make sure Normal view is selected in the Workspace.
2) In the Sidebar, click on Master Slides to open the Master Slides deck (Figure 10) and display the master slides available for use.
3) Select a master slide from the options available in the panels for Used in This Presentation, Recently Used, or Available for Use.
4) Apply the selected master slide to slides using one of the following methods:
For all slides in the presentation, right-click on the selected master slide and select Apply to All Slides from the context menu.
For selected slides only, right-click on the selected master slide and select Apply to Selected Slides from the context menu.
1) Make sure Normal view is selected in the Workspace.
2) Select a slide in the Slides panel so that it appears in the Workspace.
Figure 10: Master Slides deck on Sidebar

Figure 11: Available Master Slides dialog
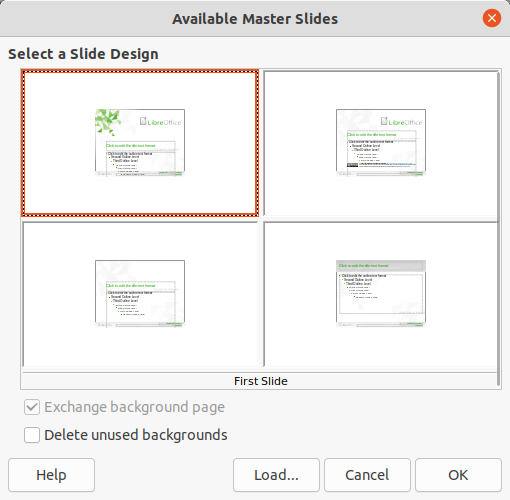
Figure 12: Load Master Slide dialog
3) Right-click in a blank area on the slide in the Workspace and select Change Slide Master from the context menu to open the Available Master Slides dialog (Figure 11).
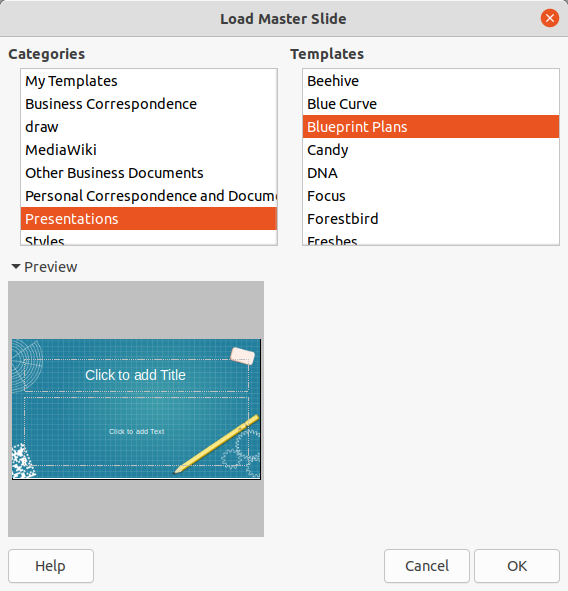
4) Navigate the master slides displayed in the Select a Slide Design preview box to locate the required master slide. If the required master slide is not displayed, then click on Load to open the Load Master Slide dialog (Figure 12).
a) Select the category of master slide required from the Categories list.
b) Select the template required from the Templates list and a preview of the template appears in the Preview box.
c) Click OK to close the Load Master Slide dialog and the master slide templates appear in the Select a Slide Design preview box in the Available Master Slides dialog.
5) Select the required master slide from the master slides displayed and click OK. The slide changes to show the new master slide and the Available Master Slides dialog closes.
1) Make sure Normal view is selected in the Workspace.
2) Select a slide in the presentation.
3) Open the Slide Properties dialog using one of the following methods:
Go to Slide > Slide Properties on the Menu bar.
Right-click in an empty area on the slide and select Slide Properties from the context menu.
4) Click on Background to open the Background page (Figure 13) and select the type of background required. For more information on background types, see Chapter 2, Master Slides, Styles, and Templates, and Chapter 6, Formatting Graphic Objects.
Figure 13: Slide Properties dialog - Background page
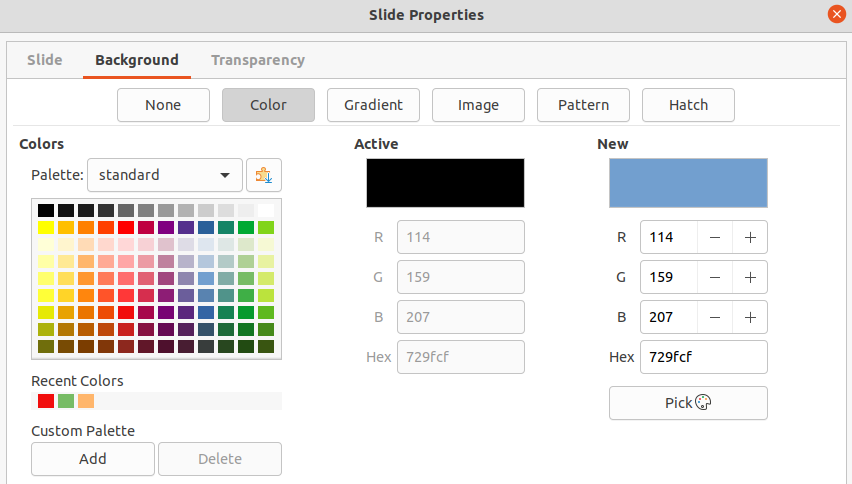
5) Select from the various options offered by the different background types the background effect for the selected slide.
6) Click OK to save the changes to the background and close the Slide Properties dialog.
Note
Only the background for one slide in a presentation can be changed at a time. To change the background on more than one slide at a time, master slides have to be used. For more information on slide backgrounds, see Chapter 2, Master Slides, Styles and Templates.
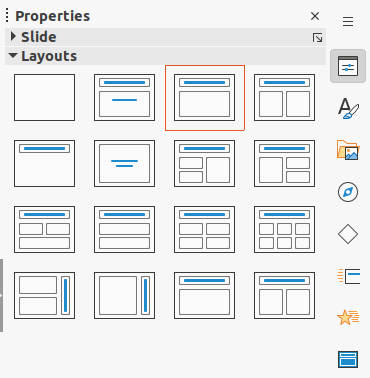
After creating a new slide, a layout is then selected to suit the slide contents and the presentation requirements. Impress comes with predefined layouts that can be applied as a starting point for a slide and Figure 14 shows the predefined layouts that are available. If the layouts available in Impress do not fit the presentation requirements, layout elements can be rearranged, duplicated, resized, or deleted as necessary.
1) Make sure Normal or Slide Sorter view is selected in the Workspace.
2) Select a slide in the presentation.
3) Change the slide layout using one of the following methods:
Select a layout in the Layouts panel in the Properties deck on the Sidebar.
Go to Slide > Layout on the Menu bar and select a layout from the options in the submenu.
Right-click on the slide in the Slides pane and select Layout from the context menu, then select a layout from the options in the submenu.
Figure 14: Layouts panel in Properties deck on Sidebar
Right-click on the slide in Slide Sorter view in the Workspace and select Layout from the context menu, then select a layout from the options in the context menu.
Right-click in an empty area on the slide in Normal view in the Workspace and select Layout from the context menu, then select a layout from the options in the submenu.
4) When the slide layout has changed, make the necessary formatting, resizing, and repositioning adjustments to the elements on the slide. For more information on adjustments of slide elements, refer to the other chapters in this guide.
Notes
If the layout is changed on a slide that already contains text and objects, Impress does not delete these elements, but repositions the elements according to the selected layout. This may result in some elements overlapping or being out of position.
Custom defined layouts cannot be created and saved in Impress for use on several slides. It is recommended to create a master slide or template that uses a custom layout and can be used on several slides. For more information on master slides and templates, see Chapter 2, Master Slides, Styles, and Templates.
Hovering the cursor over a layout in the Layouts panel in the Properties deck on the Sidebar displays the layout type. These layout types match the layout list that is displayed in a context menu or submenu.
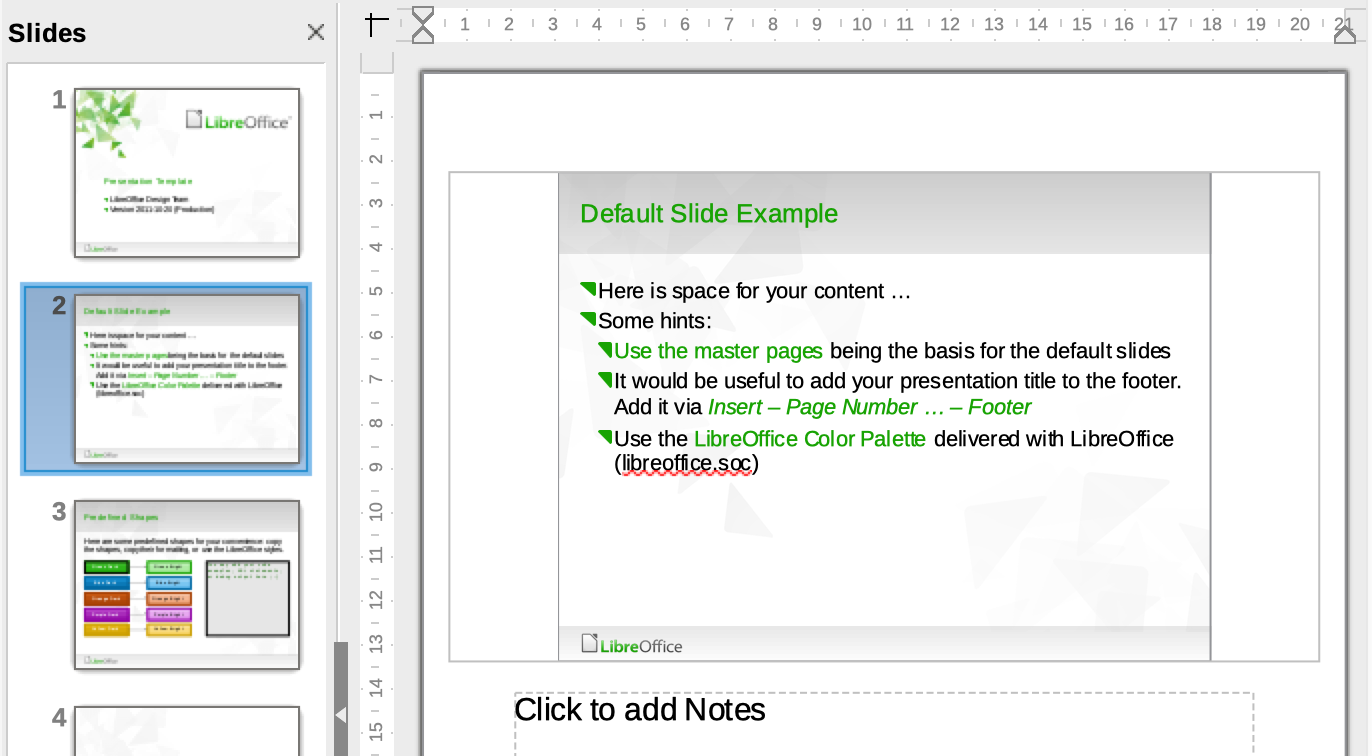
Notes provide a convenient way to create reminders or add extra information to slides in a presentation. Notes are not displayed on the main presentation display during a presentation. When using dual displays, notes can be displayed on the second display as a presentation cue.
Figure 15: Notes view in Workspace
Notes
When using a second display, it is recommended to use the Presenter Console. The Presenter Console allows the display on a second screen of presentation notes, the next slide, and other useful information while a slide is shown on the display that the audience sees. For more information on the Presenter Console, see Chapter 1, Introducing Impress and Chapter 9, Slide Shows & Photo Albums.
The notes text box and slide image can be moved and resized on the Notes page. Also, more text boxes can be added to the Notes page. Refer to the other chapters in this guide for more information.
1) Select a slide to add notes to and open the Notes view (Figure 15) using one of the following methods:
Click on Notes at the top of the Workspace.
Go to View > Notes on the Menu bar.
2) Click on Click to add notes below the slide then type or paste text or graphics as required into the notes box.
3) To add notes to another slide, repeat Steps 1 and 2.
4) When adding notes is complete, return to Normal view in the Workspace.
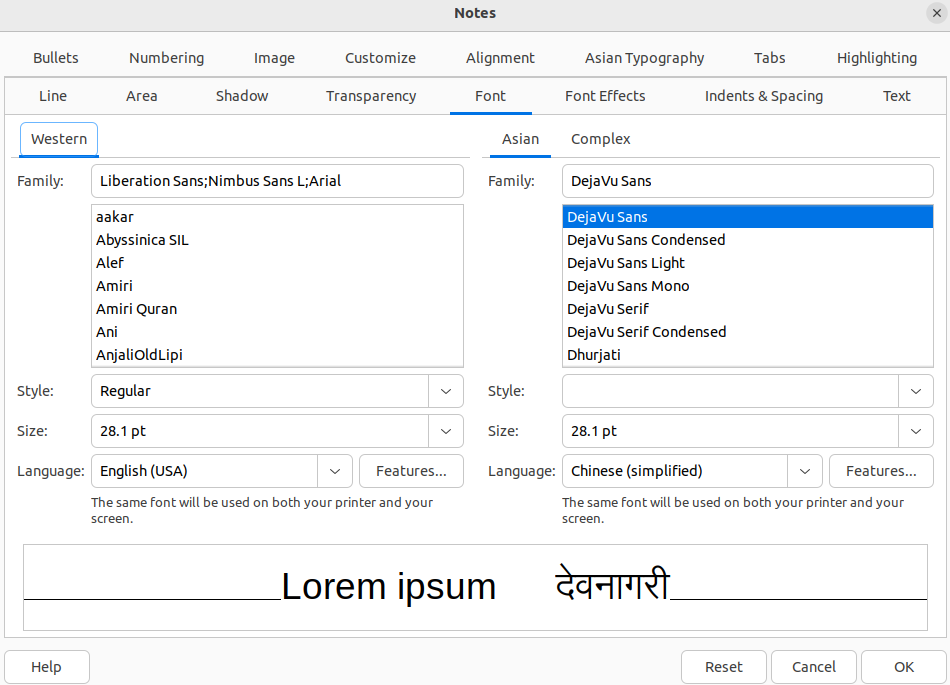
When text is inserted in the Notes text box, it is automatically formatted using the predefined Notes style that is in Presentation Styles in the Styles deck on the Sidebar. The Notes style cannot be deleted, but can be modified to match the presentation requirements.
Figure 16: Notes dialog - Font page
Text boxes can also be added to the notes page and then modified to suit the presentation requirements. Also, text styles for any text in a text box can be created to suit the text requirements. Any text styles created are placed in the Custom category. These custom styles can be deleted when there is no further requirement for the custom style.
For more information on creating styles, adding text, and formatting text, see Chapter 2, Slide Masters, Styles and Templates, or Chapter 3, Adding and Formatting Text.
1) Click on Styles on the Sidebar to open the Styles deck.
2) Click on Presentation Styles at the top of the Styles deck to open Presentation Styles.
3) Right click on Notes and select Modify from the context menu. This opens the Notes dialog (Figure 16).
4) Use the various pages and options in the Notes dialog to modify the Notes presentation style to the presentation requirements.
5) Click OK to save the changes and close the Notes dialog.
1) Select a slide to add notes to and open the Notes view (Figure 15 above) using one of the following methods:
Click on Notes at the top of the Workspace.
Go to View > Notes on the Menu bar.
2) Click on Click to add notes below the slide then type or paste text or graphics as required into the notes box.
3) Format the text to the presentation requirements. For more information on creating styles, adding text, and formatting text, see “Adding text” on page 1, Chapter 2, Slide Masters, Styles and Templates, or Chapter 3, Adding and Formatting Text.
4) Format any objects or images that have been placed on the slide notes. For more information on formatting objects, see the other chapters in this user guide.
5) When formatting is complete, go to View > Normal on the Menu bar and close the Notes view.
The slide layout for a presentation is carried out using Master Notes. For more information on formatting master slides, see Chapter 2, Slide Masters, Styles and Templates.
1) Select a slide that has notes added.
2) Open Master Notes view (Figure 17), go to View > Master Notes on the Menu bar.
3) Open the Slide Properties dialog for master notes (Figure 18) using one of the following methods:
Go to Slide > Slide Properties on the Menu bar.
Right-click in an empty area on the master note and select Slide Properties from the context menu.
Figure 17: Master Notes view
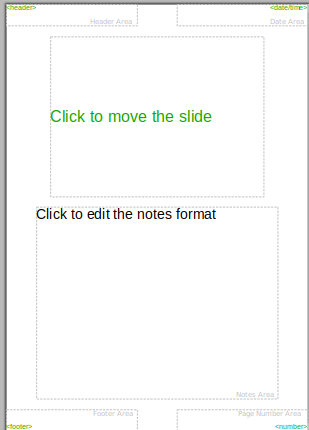
Figure 18: Slide Properties dialog - Slide page for Master Notes
4) Use the options available in the Slide Properties dialog to format the presentation slide layout.
5) When formatting is complete, go to View > Normal on the Menu bar and close Master Notes view.
Headers and footers for slide notes page are created and formatted using master slides. The header and footer areas are as follows:
Header text
Date and time – fixed or variable
Footer text
Page number.
1) Select a slide that has notes added.
2) Go to View > Master Notes on the Menu bar to open Master Notes view.
3) Go to Insert > Header and Footer on the Menu bar to open the Header and Footer dialog (Figure 19).
4) Click on Notes and Handouts to open the Notes and Handouts page.
5) To add header text to the notes page, select Header and enter the text for the header in the Header text text box.
6) To add the date and time to the notes page, select Date and time and enter a fixed or variable date and time as follows:
If the date and time is fixed, select Fixed and enter the date and time required in the Fixed text box.
If the date and time is variable, select Variable, then select the date and time format from the Format drop-down list and select the language used from the Language drop‑down list. The language selected affects the available date and time formats.
Figure 19: Header and Footer dialog - Notes and Handouts page
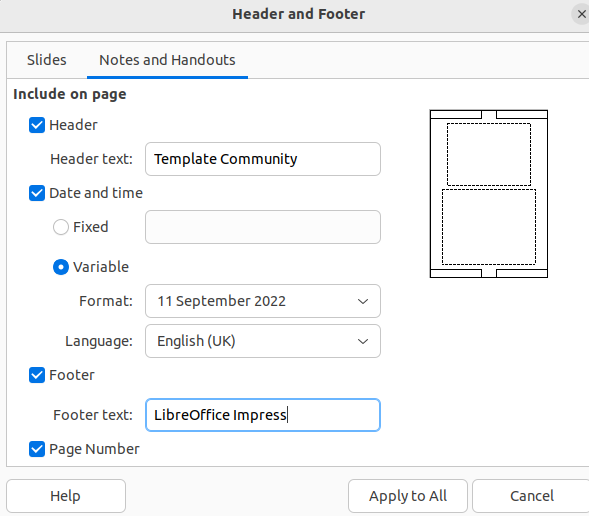
7) To add footer text to the notes page, select Footer and enter the text for the footer in the Footer text text box.
8) To add page numbers to the notes page, select Page Number so that the page number appears on each notes page in a presentation.
9) Click on Apply to All to save the changes and close the Header and Footer dialog.
For more information on printing slides and notes, see Chapter 10, Printing, E‑mailing, Exporting, and Saving Slide Shows.
1) Select a slide that has notes added and open the Notes view. See “Adding notes” on page 1.
2) Go to File > Print on the Menu bar, or use the keyboard shortcut Ctrl+P to open the Print dialog (Figure 20).
3) Select LibreOffice Impress to open the LibreOffice Impress page and access the options for printing notes.
4) In Document, select Notes from the Type drop-down list.
5) In Contents, Color, and Size, select any additional options that are required, for example Slide name, Original colors, Fit to printable page.
6) Click OK to print and close the Print dialog.
1) Select a slide that has notes added and open the Notes view. See “Adding notes” on page 1.
Figure 20: Print dialog - LibreOffice Impress - Linux or Windows
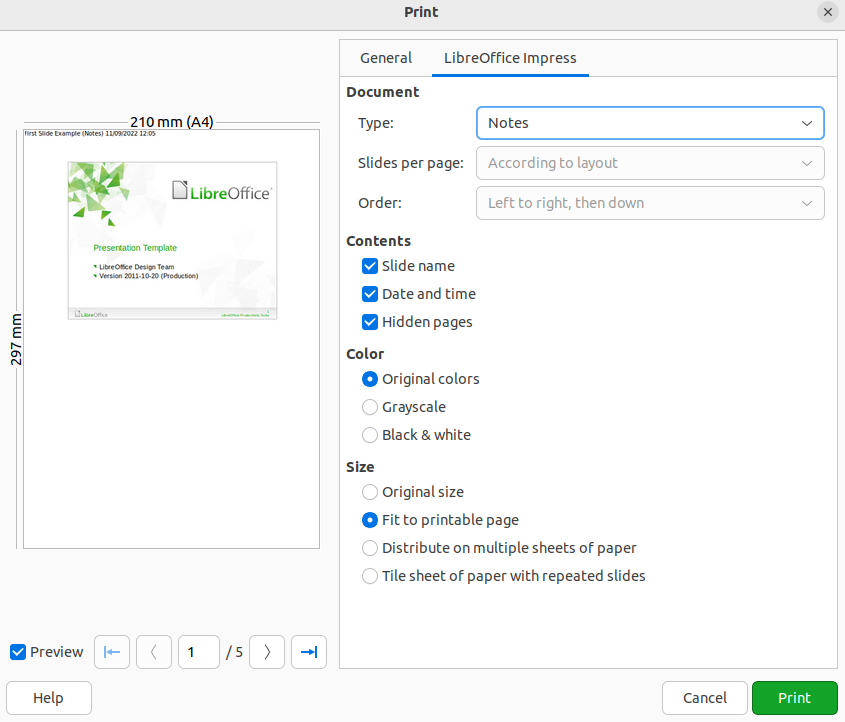
Figure 21: Print dialog - LibreOffice Impress - macOS
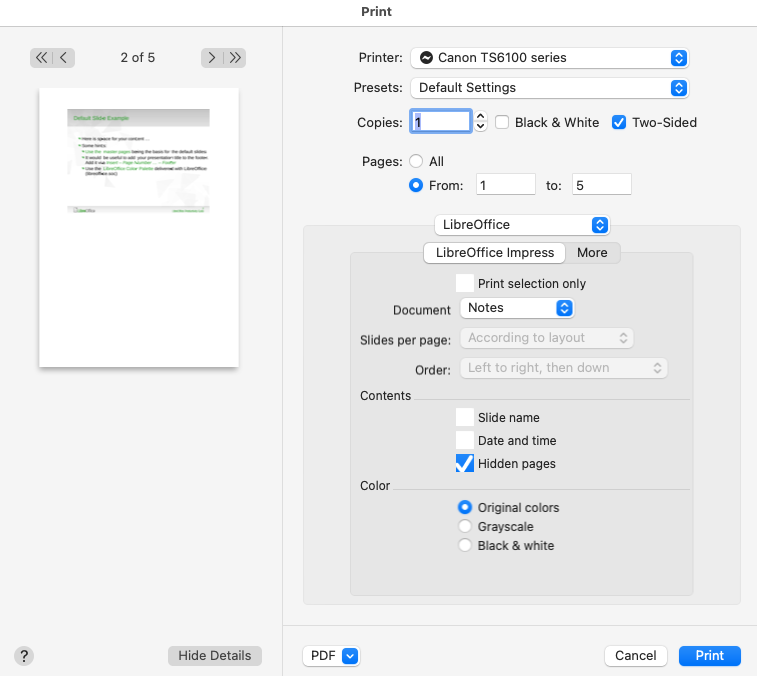
2) Go to File > Print on the Menu bar, or use the keyboard shortcut ⌘+P to open the Print dialog (Figure 21).
3) Make sure that LibreOffice is selected from the drop-down list.
4) In LibreOffice Impress, select Notes from the Document drop-down list.
5) In Contents, Color, and Size, select any additional options that are required, for example Slide name, Original colors, Original size.
6) Click on More and make sure that Original size and All slides are selected.
7) Click OK to print and close the Print dialog.
The PDF contains separate pages for the slides and the notes. For example, if the presentation has 10 slides, the PDF contains 20 pages consisting of 10 pages of individual slides followed by 10 pages of notes formatted for the paper size selected.
1) Select a slide that has notes added and open the Notes view. See “Adding notes” on page 1.
2) Go to File > Export As > Export as PDF on the Menu bar to open the PDF Options dialog (Figure 22).
3) Click on General to open the General page.
4) In Structure, select the option Export notes pages.
5) If necessary, select Export only notes pages to create a PDF file that only contains the presentation notes.
Figure 22: PDF Options dialog - General page
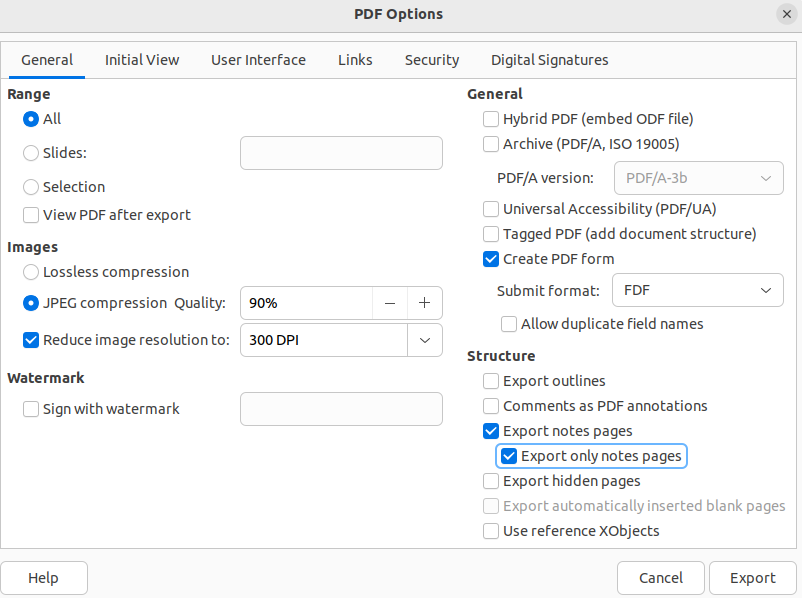
Figure 23: Example of inserting comments
6) If required, open the other pages in the PDF Options dialog and select the necessary options to create a PDF file.
7) Click on Export to open a file browser window and navigate to the folder where the PDF file is to be saved.
8) Enter a filename, then click on Save to save the file in the designated folder and close the file browser window and PDF Options dialog.
1) Select Tools > Options > LibreOffice > User Data (macOS LibreOffice> Preferences > LibreOffice > User Data) to configure the name and initials that appear in a comment. This is necessary so that user initials appear in comments and identify the comment author.
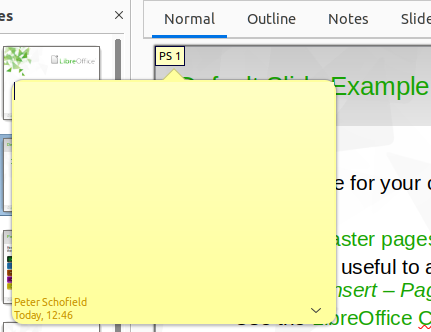
2) In Normal view, go to Insert > Comment on the Menu bar, or use the keyboard shortcut Ctrl+Alt+C (macOS ⌥+⌘+C) to insert a comment (Figure 23).
A small comment marker containing the user initials creating the comment appears in the upper left-hand corner of the slide along with a larger comment box. Impress automatically adds the user name and current date at the bottom of the comment box.
If more than one user edits the document, each user is automatically allocated a different background color.
3) Type or paste the text into the comment box.
4) If necessary, move the small comment marker anywhere to a different position on the slide. This is normally on or near an object being referred to in the comment.
5) To show or hide the comment markers, go to View > Comments on the Menu bar.
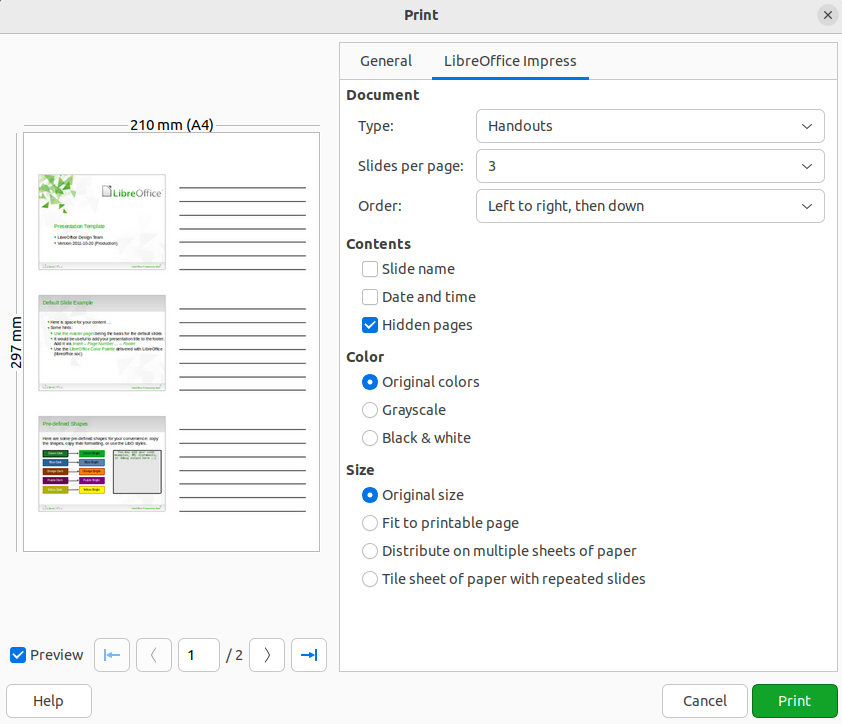
Handouts are used to distribute a copy of the presentation slides to each member of an audience and are printed using the printing options available in Impress. Figure 24 shows an example of handouts ready for printing.
Figure 24: Example Print dialog - LibreOffice Impress Handouts page
Note
The printing of handouts depends on the printer, computer operating system, and computer setup. The following printing procedure for handouts is only an example of how to print handouts.
1) If required, create headers and footers for the handouts as follows:
a) Go to Insert > Header and Footer on the Menu bar to open the Header and Footer dialog.
b) Click on Notes and Handouts to open the Notes and Handouts page.
c) Select the required header and footer options from the default options. See “Headers and Footers” on page 1 for more information.
d) Click on Apply to All to save the options for the handouts and close the Header and Footer dialog.
2) Go to File > Print on the Menu bar, or use the keyboard shortcut Ctrl+P (macOS ⌘+P) to open the Print dialog.
3) For Linux or Windows, click on LibreOffice Impress to open the page for handout printing and select the printing options from the Document drop–down lists as follows:
Type: — select Handouts from the drop down list.
Slides per page: — select how many slides are printed on a sheet of paper.
Order: — select the order in which the slides are printed on a sheet of paper.
4) For macOS, make sure LibreOffice is selected and select the printing options from the LibreOffice Impress drop–down lists as follows:
Document: — select Handouts from the drop down list.
Slides per page: — select how many slides are printed on a sheet of paper.
Order: — select the order in which the slides are printed on a sheet of paper.
5) In Contents, select Slide name, Date and time, or Hidden pages if one or all of these options are to be printed on the handouts.
6) In Color, select one option on how the handouts are printed.
7) In Size, select one option on how the handouts are printed.
8) Click on Print to print the handouts and close the Print dialog.