
Impress Guide 7.4
Chapter 10,
Saving Slide Shows, Printing, Emailing, and Exporting
This document is Copyright © 2022 by the LibreOffice Documentation Team. Contributors are listed below. This document maybe distributed and/or modified under the terms of either the GNU General Public License (https://www.gnu.org/licenses/gpl.html), version 3 or later, or the Creative Commons Attribution License (https://creativecommons.org/licenses/by/4.0/), version 4.0 or later. All trademarks within this guide belong to their legitimate owners.
Contributors for this edition:
Peter Schofield
Kees Kriek
Contributors for previous editions:
Peter Schofield
Kees Kriek
Michele Zarri
Jean Hollis Weber
Elliot Turner
Vasudev Narayanan
Rachel Kartch
Please direct any comments or suggestions about this document to the Documentation Team mailing list: loguides@community.documentfoundation.org.
Note
Everything sent to a mailing list, including email addresses and any other personal information that is written in the message, is publicly archived and cannot be deleted.
Published October 2022. Based on LibreOffice 7.4 Community.
Other versions of LibreOffice may differ in appearance and functionality.
Some keystrokes and menu items are different on macOS from those used in Windows and Linux. The table below gives some common substitutions used in this document. For a detailed list, see LibreOffice Help.
|
Windows or Linux |
macOS equivalent |
Effect |
|
Tools > Options |
LibreOffice > Preferences |
Access setup options |
|
Right-click |
Control+click, Ctrl+click, or right-click depending on computer setup |
Open a context menu |
|
Ctrl or Control |
⌘ and/or Cmd or Command, depending on keyboard |
|
|
Alt |
⌥ and/or Alt or Option depending on keyboard |
Used with other keys |
|
F11 |
⌘+T |
Open the Styles deck in the Sidebar |
Slide shows created in Impress are, by default, saved in the Open Document Presentation (ODP) format. However, Impress can open and save a slide show in other widely used and recognized presentation formats, see “Other presentation formats” on page 1 for more information.
1) Create a slide show. For more information, see Chapter 1, Introducing Impress and Chapter 9, Slide Shows and Photo Albums.
2) Save the slide show using one of the following methods to open a file browser window. An example file browser is shown in Figure 1.
Click on Save on the Standard toolbar.
Go to File > Save on the Menu bar.
Use the keyboard shortcut Ctrl+S (macOS ⌘+S).
3) Navigate to the folder where the slide show is to be saved.
4) Enter a filename in the text box. The title of this text box depends on the computer operating system and computer setup.
Figure 1: File browser for saving slide show
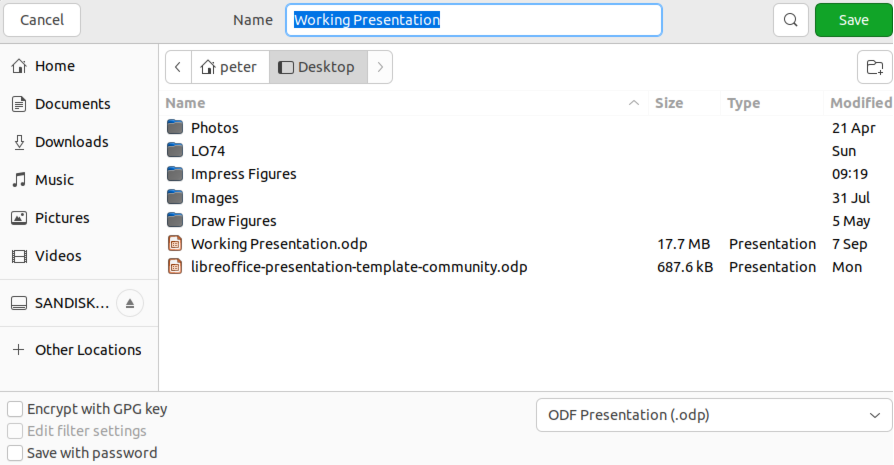
Figure 2: Confirm File Format dialog
5) In the file type drop-down list at the bottom of the file browser window, make sure the file format is the default ODF Presentation (.odp). The name of the file type drop-down list depends on computer operating system and computer setup.
6) Click on Save to save the slide show and close the file browser window.
1) Create a slide show, or open an existing slide show in ODP format. For more information, see Chapter 1, Introducing Impress and Chapter 9, Slide Shows and Photo Albums.
2) To save a slide show in a presentation format that Impress recognizes, use one of the following methods:
Click the triangle ▼ to the right of Save on the Standard toolbar and select Save As from the drop-down menu.
Go to File > Save As on the Menu bar.
Use the keyboard shortcut Ctrl+Shift+S (macOS ⌘+Shift+S).
3) In the file browser window that opens, navigate to the folder where the slide show is to be saved. An example file browser is shown in Figure 1.
4) Enter a filename in the text box. The title of this text box depends on the computer operating system and computer setup.
5) In the file type drop-down list at the bottom of the file browser window, select the required presentation format. The name of the file type drop-down list depends on computer operating system and computer setup.
6) Click on Save to save the slide show and close the file browser window
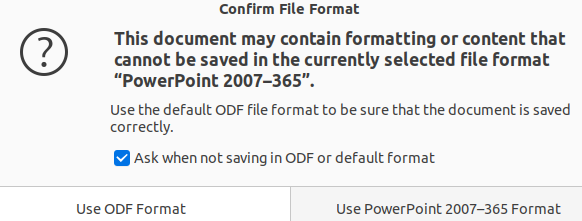
Note
If the slide show is not being saved in the ODP presentation format, a Confirm File Format dialog (Figure 2) opens asking confirmation of the file format selected.
Only presentation file formats that Impress is compatible with are displayed in the file type drop-down list.
1) To specify the default printer, go to File > Printer Setup on the Menu bar to open the Printer Setup dialog. An example of a Printer Setup dialog is shown in Figure 3.
2) Select the required default printer from the printers listed in the Name drop-down list.
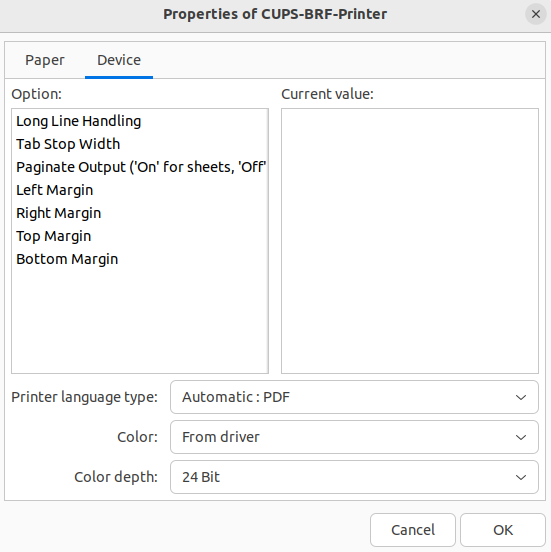
3) Click on Properties to open a printer properties dialog for the selected printer and select the required options from those available in the dialog. The options available in this dialog depends on the type of printer connected to the computer and the computer operating system being used.
4) Click OK to save the selected options and close the printer properties dialog.
5) Click OK to save the default printer selection and close the Printer Setup dialog.
Figure 3: Printer Setup dialog
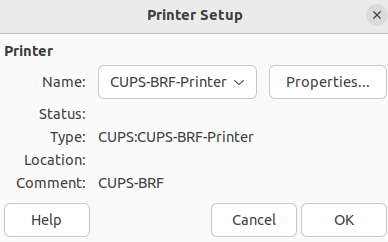
Figure 4: Standard toolbar with Print Directly

To quickly print a document or presentation, click on Print Directly on the Standard toolbar (Figure 4) to send the entire document to the default printer that is defined for the computer.
If Print Directly is not visible on the Standard toolbar, it can be added as follows:
1) Right-click in an empty area on the Standard toolbar and select Visible Buttons from the context menu.
2) Select Print Directly from the list of available tools and the Print Directly tool is added to the Standard toolbar.
Note
The action of Print Directly can be changed by sending a document to the printer defined for the document instead of the default printer defined for the computer. Go to Tools > Options > Load/Save > General (macOS LibreOffice > Preferences > Load/Save > General) on the Menu bar and select the option Load printer settings with the document.
For more control over printing, open and use the Print dialog that can be opened using one of the following methods.
Go to File > Print on the Menu bar.
Use the keyboard shortcut Ctrl+P (macOS ⌘+P).
Click on Print on the Standard toolbar.
Note
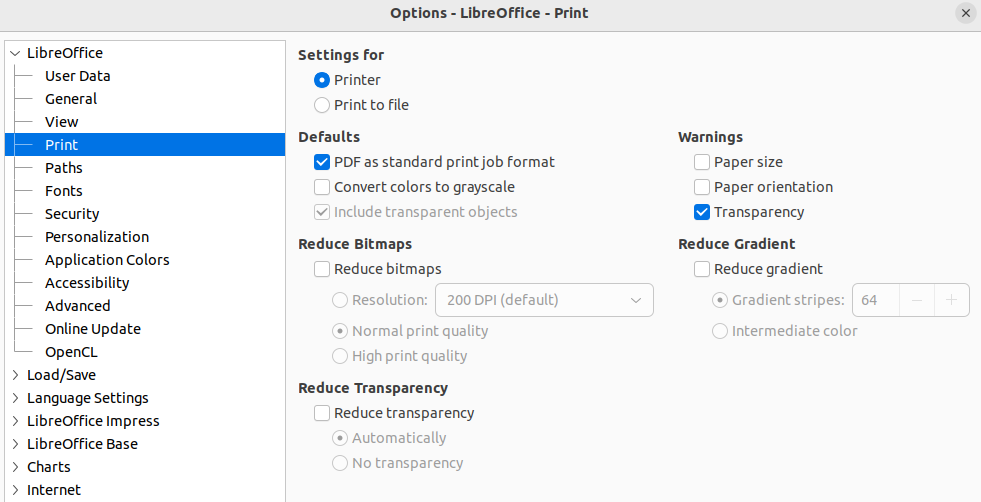
The options selected in the Print dialog only apply to the printing of the current document that is open in Impress. To specify default print settings for LibreOffice, go to Tools > Options > LibreOffice > Print (macOS LibreOffice > Preferences > LibreOffice > Print) on the Menu bar to open the Options LibreOffice Print dialog (Figure 5).
Figure 5: Options LibreOffice Print dialog
Notes
Any print options selected with the Print dialog when printing from Impress overrides the default printer settings that have been set using Options LibreOffice Print dialog shown in Figure 5.
Due to different computer setups and different operating systems, the print dialog that opens may differ from the dialogs displayed in this chapter. However, the printing options available for LibreOffice remain the same.
The following general options are an example of what may be available on the General page of the Print dialog (Figure 6).
Printer
Properties
Range and Copies
All Slides
Prints all the slides in the presentation.
Selection
Prints the slides selected in LibreOffice Impress.
Slides
Select the page number(s) to print. For multiple pages, use the format 1, 3, 7 or 1 – 5, 7, 9 for page number selection.
Figure 6: Print dialog - General page - Linux or Windows
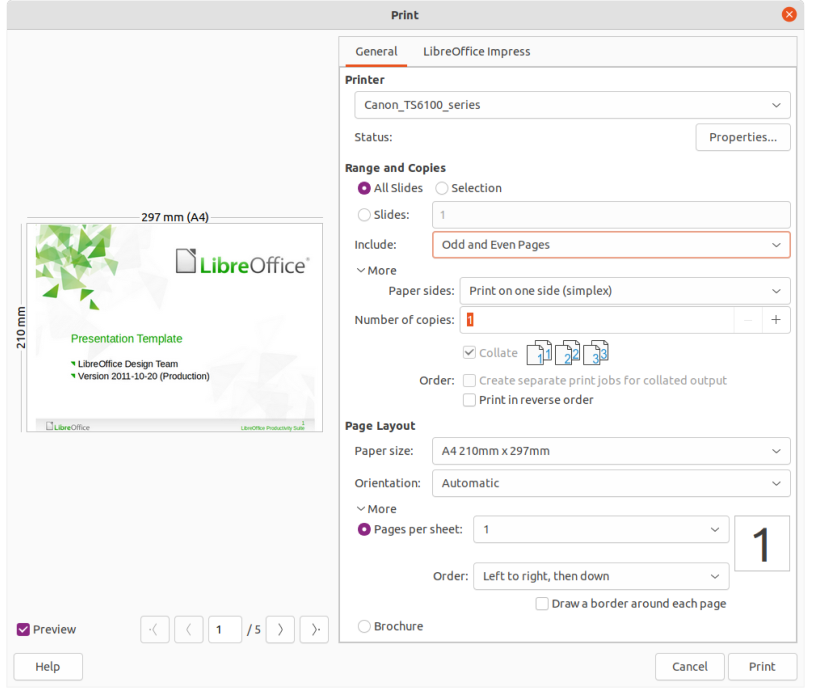
Include
Select from the drop-down list Odd and Even Pages, Odd Pages, or Even Pages.
More > Paper sides
Select from the drop-down list Print on one side (simplex), Print on both sides (duplex long edge), or Print on both sides (duplex short edge).
More > Number of copies
Enter number of printed copies required for the document.
More > Collate
Collates multiple printed copies into separate documents.
More > Order
Select from Create separate print jobs for collated output (only available when more than one copy is being printed) or Print in reverse order.
Page Layout
Paper size
Select the paper size to use from drop-down list
Orientation
Select from the drop-down list Automatic, Portrait, or Landscape.
More > Pages per sheet
Select from the drop-down list how many pages are printed on one sheet of paper.
More > Order
Select from the drop-down list the printing order of multiple pages on one sheet of paper.
More > Draw a border around each page
When multiple slides are printed on one sheet of paper, a border is drawn around each slide.
More > Brochure
Prints the document so the pages can be folded into a brochure or booklet.
The following options are available on the LibreOffice Impress page of the Print dialog (Figure 7) where settings are defined specific to the current document type:
Contents
Color
Figure 7: Print dialog - LibreOffice Impress page - Linux or Windows
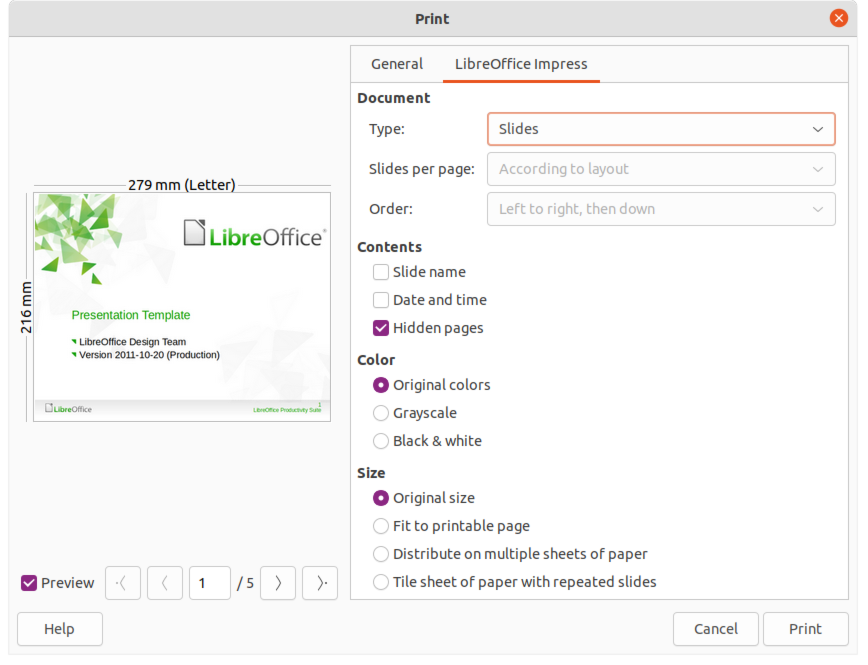
Size
Original size
Prints the slide using its original size.
Fit to printable page
Presentation size is changed so that it fits on the paper size used for printing.
Distribute on multiple sheets of paper
Used if the slides are too large for the paper size being used.
Tile sheet of paper with repeated slides
Used to print several slides of a presentation on a sheet of paper.
By default, when the Print dialog opens, the page for LibreOffice Impress printing options is already selected, as shown in Figure 8.
Figure 8: Print dialog - LibreOffice Impress page - macOS
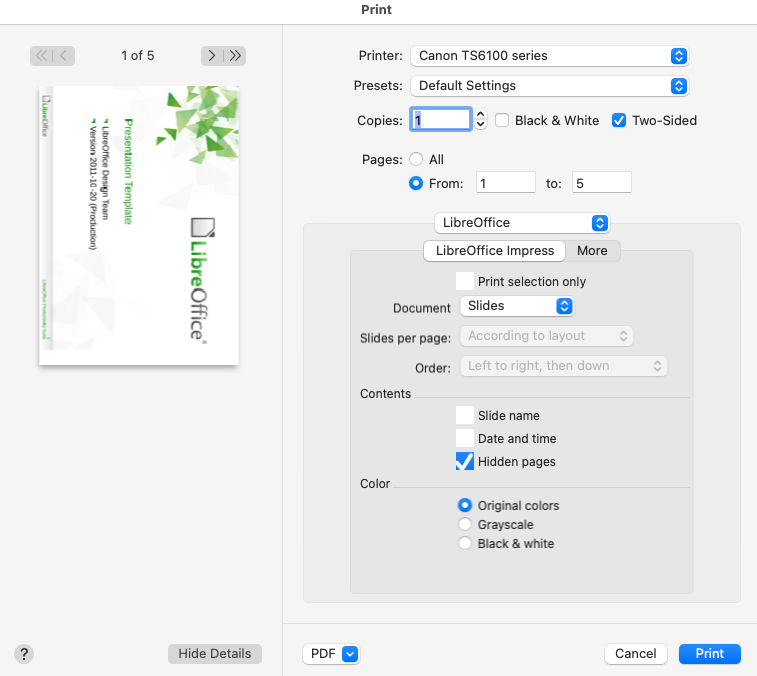
Printer
Presets
Copies
Black & White
Two-Sided
Pages
All
Prints all the pages in the document.
From: to:
Select the page number(s) to print. For multiple pages, use the format 1, 3, 7 or 1 – 5, 7, 9 for page number selection.
Print selection only
Document
Slides per page
Order
Contents
Color
To access more printing options in LibreOffice Impress, click on More to open the second page of LibreOffice Impress options, as shown by the example in Figure 9.
Size
Original size
Prints the slides using the original size.
Fit to printable page
Slide size is changed so that it fits on the paper size used for printing.
Figure 9: Print dialog - LibreOffice Impress More page - macOS
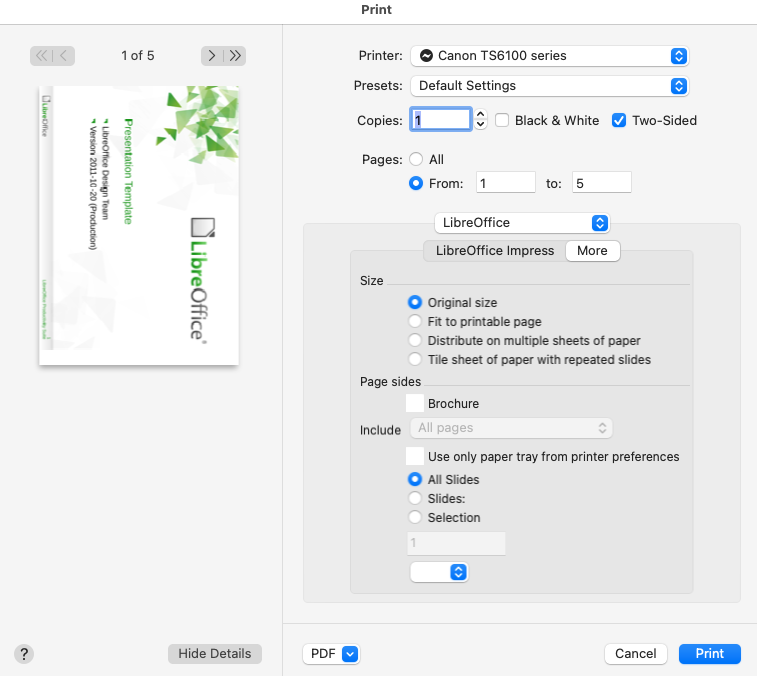
Distribute on multiple sheets of paper
Used if the slides are too large for the paper size being used.
Tile sheet of paper with repeated slides
Used to print multiple copies of a slide on a page.
Brochure
Include
Use only paper tray from printer preferences
When selected, the printer tray selected on the printer overrides the selected tray in the printer properties on the computer.
All Slides
All slides in the slide show are printed.
Slides
Enter the slide number(s) in the text box that are to be printed. For multiple slides, use the format 1, 3, 7 or 1 – 5, 7, 9 for slide number selection.
Selection
Prints the slides selected in LibreOffice Impress in the Slides pane.
Click on the LibreOffice drop-down list to select the general printing. The following options are an example only.
Media & Quality
Feed from
Select from the drop-down list the paper tray to use if the printer has more than one paper tray.
Media Type
Select from the drop-down list the paper type that has been loaded into the paper tray being used, for example Envelope, Photo, Plain Paper.
Quality
Select the level of printing quality required.
Layout
Pages per sheet
Select from the drop-down list how many slides are printed on one sheet of paper.
Layout Direction
Select the printing order of multiple slides on one sheet of paper.
Border
When multiple slides are printed on one sheet of paper, a border is drawn around each slide.
Two-Sided
Select from the drop-down list how a multi-page document is going to be bound: Off; Long-Edge binding; Short-Edge binding, Booklet.
Reverse page orientation
If LibreOffice prints the slides in the wrong order, select this option and print the document again.
Flip horizontally
If LibreOffice prints the pages in the wrong orientation, select this option and print the document again.
Paper Handling
Collate pages
When selected collates multiple printed copies into separate documents.
Pages to Print
Select which slides in the document to print from the drop-down list: All pages; Odd only; Even only.
Page Order
Select the page printing order from the drop-down list: Automatic; Normal; Reverse.
Scale to fit paper size
Adjusts the printed slide to fit the paper size.
Destination Paper Size
Select a paper size from the options available in the drop‑down list. Only available if Scale to fit paper size has been selected.
Cover Page
Watermark
The following printing instructions are examples only. Actual method of printing may differ from these examples as this depends on computer operating system, computer setup, and the printer being used. For more information on printing, see the Writer Guide.
1) Open the Print dialog using one of the following methods:
Go to File > Print on the Menu bar.
Use the keyboard shortcut Ctrl+P (macOS ⌘+P).
Click on Print on the Standard toolbar.
2) Click on General to open the page for general print options and, if necessary, select a printer from the Printer drop-down list of printers available.
3) If necessary, in Printer click on Properties to display a properties dialog for the selected printer and select the options required. An example of a printer properties dialog is shown in Figure 10. Actual printer properties available depend on the printer selected and computer operating system being used.
4) If necessary, click OK to save the printer properties selection and close the printer properties dialog.
Figure 10: Example of a printer properties dialog
5) In Range and Copies, select which slides to print, odd or even pages, the paper sides to print on (simplex or duplex), number of copies, collate multiple copies, and the print order.
6) In Page Layout, select the paper size, orientation, pages per sheet, and, if necessary, brochure printing.
7) Click on LibreOffice Impress to open the page for LibreOffice Impress print options.
8) In Document, select the document type, slides per page and the printing order from the drop-down lists.
9) In Contents, select whether to print slide name, date and time, and/or hidden pages.
10) In Color, select the type of color to print.
11) In Size, select the printed size, to fit on a printable page, to distribute on multiple sheets of paper, or tile sheet of paper with repeated slides.
12) Click OK to print the slides and close the Print dialog.
Slides can be printed so that, when printed, the slides are in the correct order to form a booklet or brochure. The printer procedures below are only examples.
Actual brochure printing procedure depends on the computer operating system and type of printer being used. It is best to experiment to find the correct method for brochure printing.
The following procedure is an example of how to create a brochure or booklet using a printer that is only capable of printing single sided.
1) Open the Print dialog using one of the following methods:
Go to File > Print on the Menu bar.
Use the keyboard shortcut Ctrl+P (macOS ⌘+P).
Click on Print on the Standard toolbar.
2) Click on General to open the page for general print options and, if necessary, select a printer from the Printer drop-down list of printers available.
3) Click on Properties to open the printer properties dialog for the printer being used and check the printer is set to the same page orientation as specified for the page setup for the slides. Usually page orientation does not matter, but it is important for brochures.
4) Click OK to close the properties dialog and return to the Print dialog.
5) In Range and Copies, select All Slides. A minimum of four slides is required to create a brochure.
6) In Range and Copies, select the Number of copies required to match the required number of brochures.
7) In Layout, select Brochure.
8) In Range and Copies, select Even slides option in Include.
9) Click OK to print the even slides in the presentation.
10) Take the printed slides out of the printer and put them back into the printer in the correct orientation to print on the other side of the paper. It maybe necessary to experiment and find out what the correct arrangement is for the printer being used.
11) In Range and Copies, select Odd slides option in Include.
12) In Range and Copies, select the same Number of copies used for printing the even slides.
13) Click OK to print the odd slides in the presentation and close the Print dialog.
14) Assemble the brochures and bind them, if necessary.
Printing a brochure on a printer that is capable of double sided or duplex printing makes the task of creating brochures a lot simpler.
1) Open the Print dialog using one of the following methods:
Go to File > Print on the Menu bar.
Use the keyboard shortcut Ctrl+P (macOS ⌘+P).
Click on Print on the Standard toolbar.
2) Click on General to open the page for general print options and, if necessary, select a printer from the Printer drop-down list of printers available.
3) Click on Properties to open the printer properties dialog for the printer being used and check the printer is set to the same page orientation as specified for the page setup for the slides. Usually page orientation does not matter, but it is important for brochures.
4) Click OK to close the properties dialog and return to the Print dialog.
5) In Range and Copies, select All Slides. A minimum of four slides is required to create a brochure.
6) In Range and Copies, select Print on both sides (duplex long edge) or Print on both sides (duplex short edge) option. Normally, long edge binding is used for portrait printing and short edge binding is used for landscape printing.
7) In Range and Copies, select the Number of copies required to match the required number of brochures.
8) In Range and Copies, select the Collate option. This option is only active when printing multiple copies of the same document.
9) In Layout, select Brochure.
10) Click OK to close to the Print dialog and print the required number of pages for the brochures.
11) If necessary, bind the brochures to match either long edge or short edge binding.
LibreOffice provides two methods of emailing a slide show directly from the Impress module as an attachment in ODP format or PDF format. For more information on emailing LibreOffice documents, see the Getting Started Guide.
Note
There must be a default email program available for the emailing facility in LibreOffice Impress to work correctly.
1) Make sure the presentation file is open in Impress.
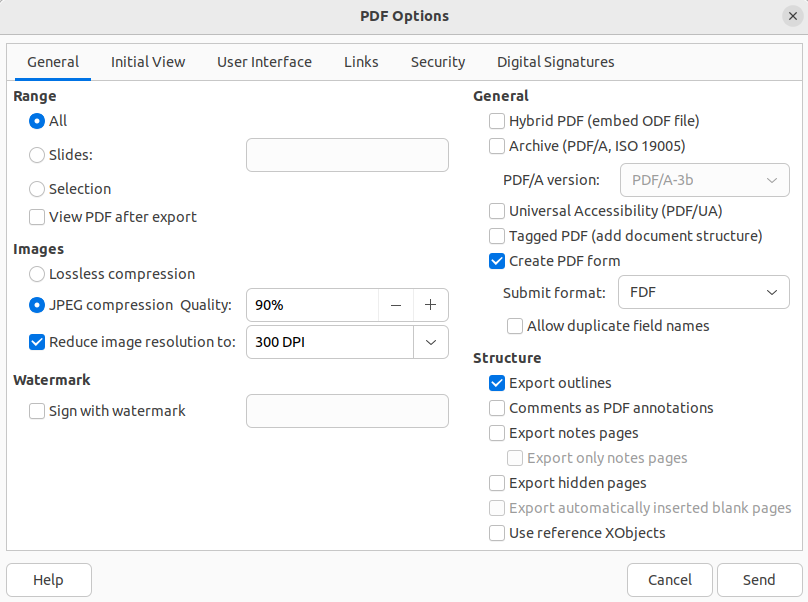
Figure 11: PDF Options dialog - General page
2) Go to File > Send > Email Document on the Menu bar and the default email program opens with the presentation file already attached to the email.
3) Enter the name of the recipient, subject line, and message then send the email.
1) Make sure the presentation file is open in Impress.
2) Go to Format > Send > Email as PDF on the Menu bar and the PDF Options dialog (Figure 11) opens.
3) If necessary, select the required PDF options to create a PDF version of the slide show. Normally, the default options already selected are sufficient to create a PDF file that the email recipient will be able to open.
4) Click on Send to close the PDF Options dialog and the default email program opens with the PDF file already attached to the email.
5) Enter the name of the recipient, subject line, and message then send the email.
Impress can export presentations in the PDF format as well as other file formats. The PDF format is a standard file format for file viewing and is ideal for sending the file to someone who can only view a slide show file using a PDF viewer. For more information on exporting LibreOffice documents, see the Getting Started Guide.
1) Make sure the presentation file is open in Impress.
2) Use one of the following methods to export the file as a PDF file and open a file browser window.
Click on Export Directly as PDF on the Standard toolbar.
Go to File > Export As > Export Directly as PDF on the Menu bar.
3) In the file browser window, navigate to the folder where the PDF file is to be saved.
4) In the Name text box, enter a filename for the PDF file or use the filename that is displayed in this text box. The file format is fixed as PDF and cannot be changed.
5) Click on Save to save the slide show file as a PDF file and close the file browser window.
For more control over the content and quality of a PDF file, it is recommended to use the PDF Options dialog. For more information on the options available when exporting a slide show as a PDF file, see the Getting Started Guide.
1) Make sure the presentation file is open in Impress.
2) Go to File > Export as > Export as PDF on the Menu bar to open the PDF Options dialog.
3) Using the various pages in the PDF Options dialog, select the options required for the PDF file. For more information, see the Getting Started Guide.
4) Click on Export to open a file browser window.
5) In the file browser window, navigate to the folder where the PDF file is to be saved.
6) In the Name text box, enter a filename for the PDF file or use the filename that is displayed in this text box. The file format is fixed as PDF and cannot be changed.
7) Click on Export to save and export the file to the selected location.
Presentations can be exported as a series of web pages (HTML format) that can be viewed in any browser.
Note
Exporting presentations as web pages (HTML) does not retain any animation effects or slide transitions.
1) Make sure the presentation file is open in Impress.
2) Create a folder to contain the HTML pages that are generated and this folder will be selected as the destination for the HTML pages.
3) Go to File > Export on the menu bar to open a file browser window and navigate to the folder where the HTML version of the presentation is going to be saved.
4) Enter a name for the HTML file in the Name text box at the top of the file browser window.
5) At the bottom of the file browser, select HTML Document (Impress) (.html; .htm) format from the drop-down list.
Figure 12: HTML Export dialog - Assign Design page
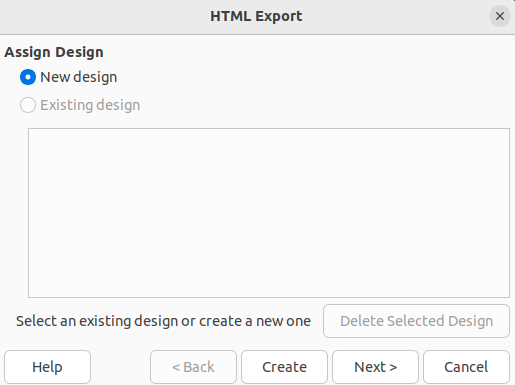
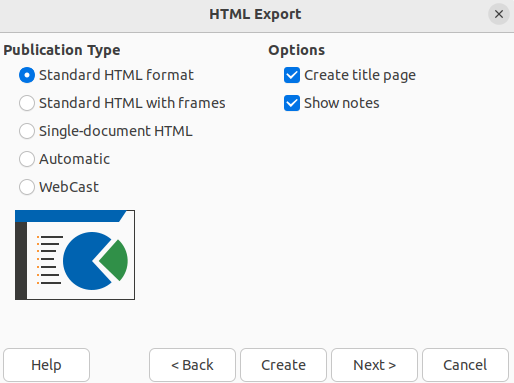
Figure 13: HTML Export dialog - Publication Type page
6) Click on Save and the HTML Export dialog opens at the Assign Design page (Figure 12).
7) Select a design for all of the HTML pages, either from an existing design, or by creating a new design. If there is no previously saved design available, the Existing design option is not available.
8) Click on Next to select the publication type to use for creating the web pages, as shown in Figure 13. The available options change depending on publication type selected.
Standard HTML format — one page for each slide with navigation links to move from slide to slide.
Standard HTML with frames — one page with a navigation bar on the left-hand side and uses slide title as navigation links. Click on links to display pages in right-hand side.
Single-document HTML — creates one HTML document from the slide show.
Automatic — one page for each slide with each page set with the refresh meta tag so a browser automatically cycles from one page to the next.
Figure 14: HTML Export dialog - Save Images As page
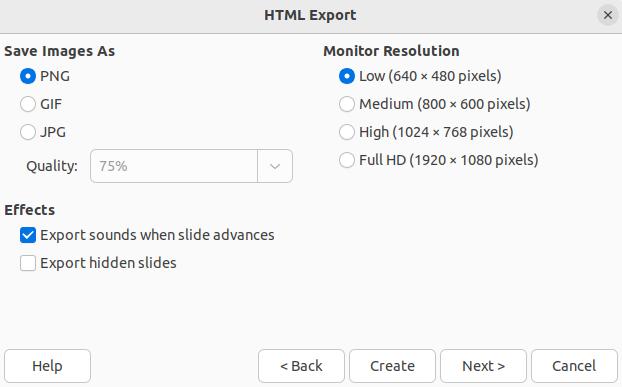
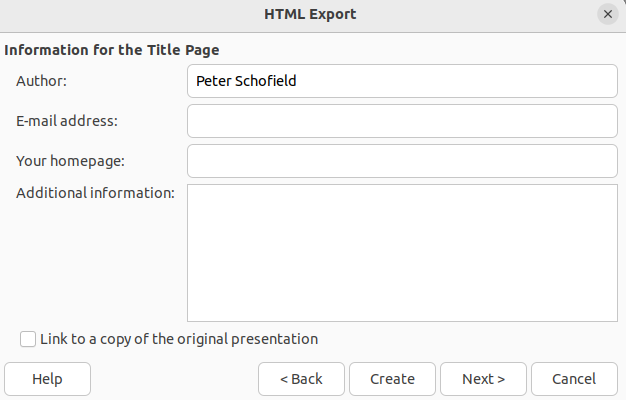
Figure 15: HTML Export dialog - Title page
WebCast — generates an ASP or Perl application to display the slides. Currently, LibreOffice has no direct support for PHP.
9) Click on Next to select the format for saving images (PNG, GIF or JPG) from the options available in Save Images As (Figure 14).
10) In Quality, enter a percentage value for the images being saved. Only available if JPG format has been selected.
11) In Monitor Resolution, select the type of resolution from the options available. When selecting a monitor resolution, consider what type of display users may have. For example, if high resolution is selected, then users with a medium-resolution display has to scroll sideways to see the entire slide.
12) In Effects, select whether sounds and/or hidden slides are exported.
13) Click on Next and enter the necessary details for a title page (Figure 15). This page does not display if the Create title page option was NOT selected when selecting Publication Type.
Figure 16: HTML Export dialog - Button Style page
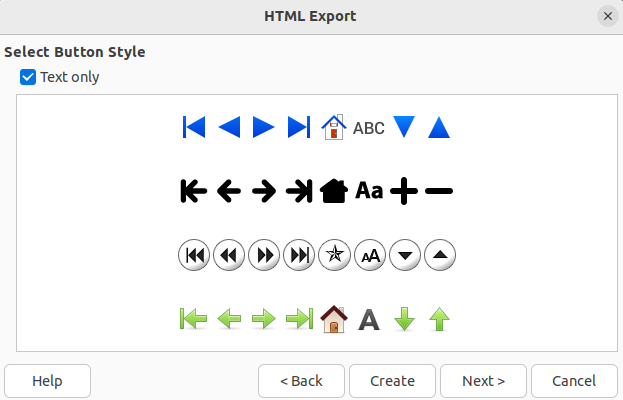
Figure 17: HTML Export dialog - Color Scheme page

14) Click on Next to select the style of navigation buttons to use when moving from one page to another from the options available in Select Button Style (Figure 16). If buttons are not being used, make sure Text only is selected.
15) Click on Next to select the color scheme for the web pages from the options available in Select Color Scheme (Figure 17). Available schemes include the existing scheme for the presentation, one based upon browser colors, and a user-defined scheme. A new scheme can be saved so that it appears on the first page of the HTML export wizard.
16) Click on Create to generate the HTML files. If this is a new design, a dialog opens to save the design for future use.
1) Make sure the presentation file is open in Impress.
2) Go to File > Export on the menu bar to open a file browser window and navigate to where the slide show is going to be saved.
3) Enter a name for the exported file in the Name text box at the top of the file browser.
4) At the bottom of the file browser, select the required format from the options in the drop‑down list.
5) Click on Save to export the file to the selected location. Depending on the format selected, an options dialog may open allowing further options to be selected for the file format selected.
6) Click on OK to save the exported file and close the options dialog. For more information on exporting files, see the Getting Started Guide.