
Math Guide 25.2
This document is Copyright © 2025 by the LibreOffice Documentation Team. Contributors are listed below. This document may be distributed and/or modified under the terms of either the GNU General Public License (https://www.gnu.org/licenses/gpl.html), version 3 or later, or the Creative Commons Attribution License (https://creativecommons.org/licenses/by/4.0/), version 4.0 or later. All trademarks within this guide belong to their legitimate owners.
To this edition
For previous editions
Please direct any comments or suggestions about this document to the Documentation Team Forum at https://community.documentfoundation.org/c/documentation/loguides/ (registration is required) or send an email to: loguides@community.documentfoundation.org.
Note
Everything sent to a forum, including email addresses and any other personal information that is written in the message, is publicly archived and cannot be deleted. Emails sent to the forum are moderated.
Published April 2025. Based on LibreOffice 25.2 Community.
Other versions of LibreOffice may differ in appearance and functionality.
Some keystrokes and menu items are different on macOS from those used in Windows and Linux. The table below gives some common substitutions used in this document. For a detailed list, see LibreOffice Help.
|
Windows or Linux |
macOS equivalent |
Effect |
|
Tools > Options |
LibreOffice > Preferences |
Access setup options |
|
Right-click |
Control+click, Ctrl+click, or right click depending on computer setup |
Open a context menu |
|
Ctrl or Control |
⌘ and/or Cmd or Command, depending on keyboard |
|
|
Alt |
⌥ and/or Alt or Option depending on keyboard |
Used with other keys |
|
F11 |
⌘+T |
Open the Styles deck in the Sidebar |
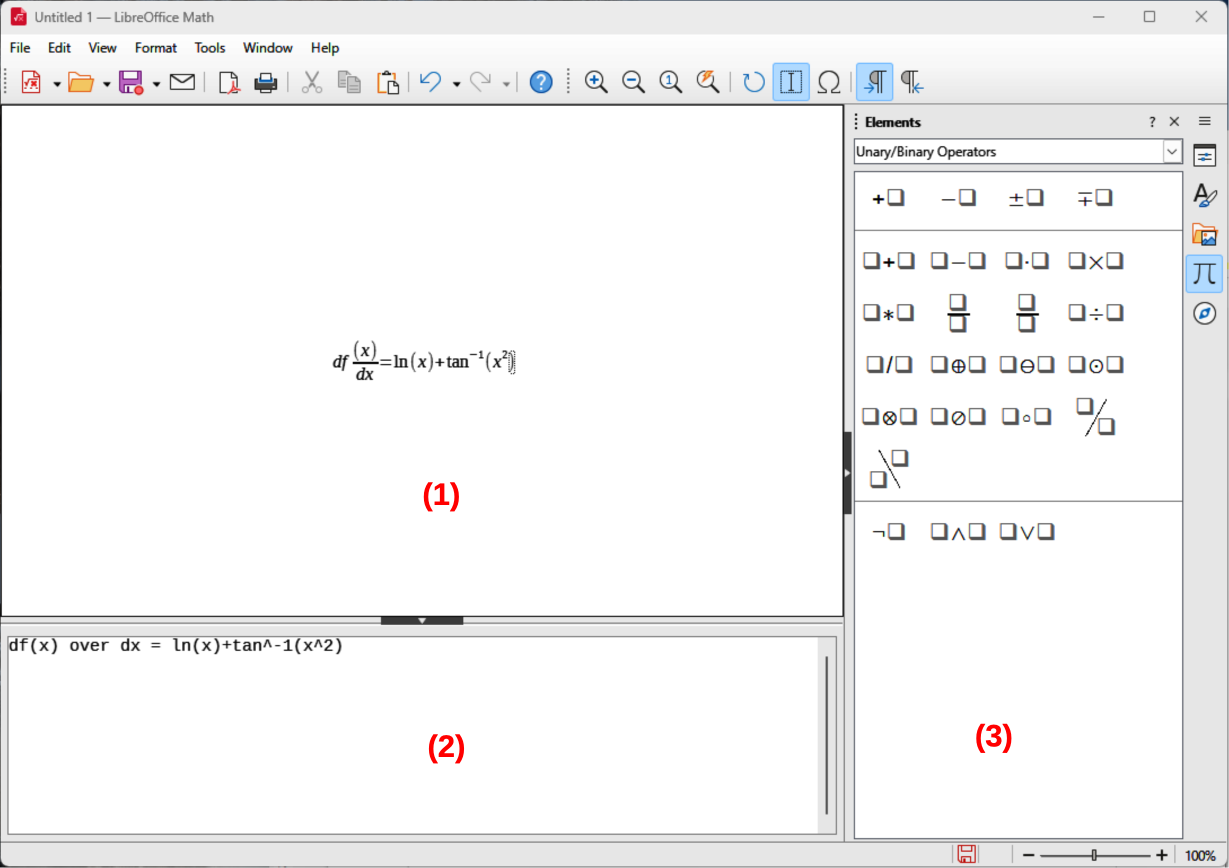
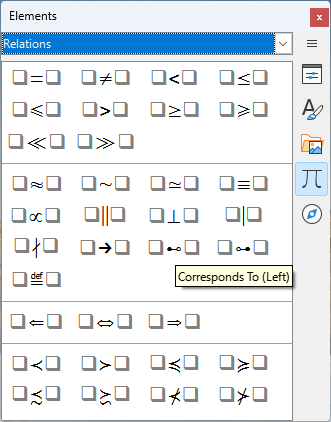
Math is a formula editor included as a separate LibreOffice module and is used to create or edit formulas (equations), in a symbolic form. These formulas can then be used in LibreOffice documents or as stand-alone objects. An example of the opening window for Math is shown in Figure 1. When using Math, the Elements panel in the Sidebar also opens (Figure 2).
Note
The images used in this document are examples ONLY. Actual images displayed when using Math does depend on computer setup and the computer operating system being used.
When creating formulas in Math, a markup language is used to represent formulas and this markup language is designed to be easily read wherever possible. For example, when the text df(x) over dx = ln(x)+tan^-1(x^2) into the Formula Editor, the following formula appears in the Formula Preview.
Using the Formula Editor in Math, a formula is created as a separate file for insertion into a formula library. Alternatively, formulas can be directly inserted into a document when using Writer, Calc, Impress, or Draw. For more information see the user guides for the specific LibreOffice module being used.
Figure 1: Math opening window
|
|
|
Figure 2: Sidebar Elements panel — Relations page
As characters are entered the markup language, the formula being created appears in the Formula Preview window during and after input of the markup language, as shown in Figure 1. For more information on creating formulas as a separate document or file, see “Creating formulas” below.
Use one of the following methods to create a formula as a separate document or file:
In the LibreOffice Start Center, click on Math Formula.
Go to File > New > Formula on the Menu bar.
On the Standard toolbar, click the triangle to the right of the New icon and select Formula from the context menu.
When Math is open, use the keyboard shortcut Ctrl+N (macOS ⌘+N).
When the formula is completed as a new document or file, save the formula in ODF format.
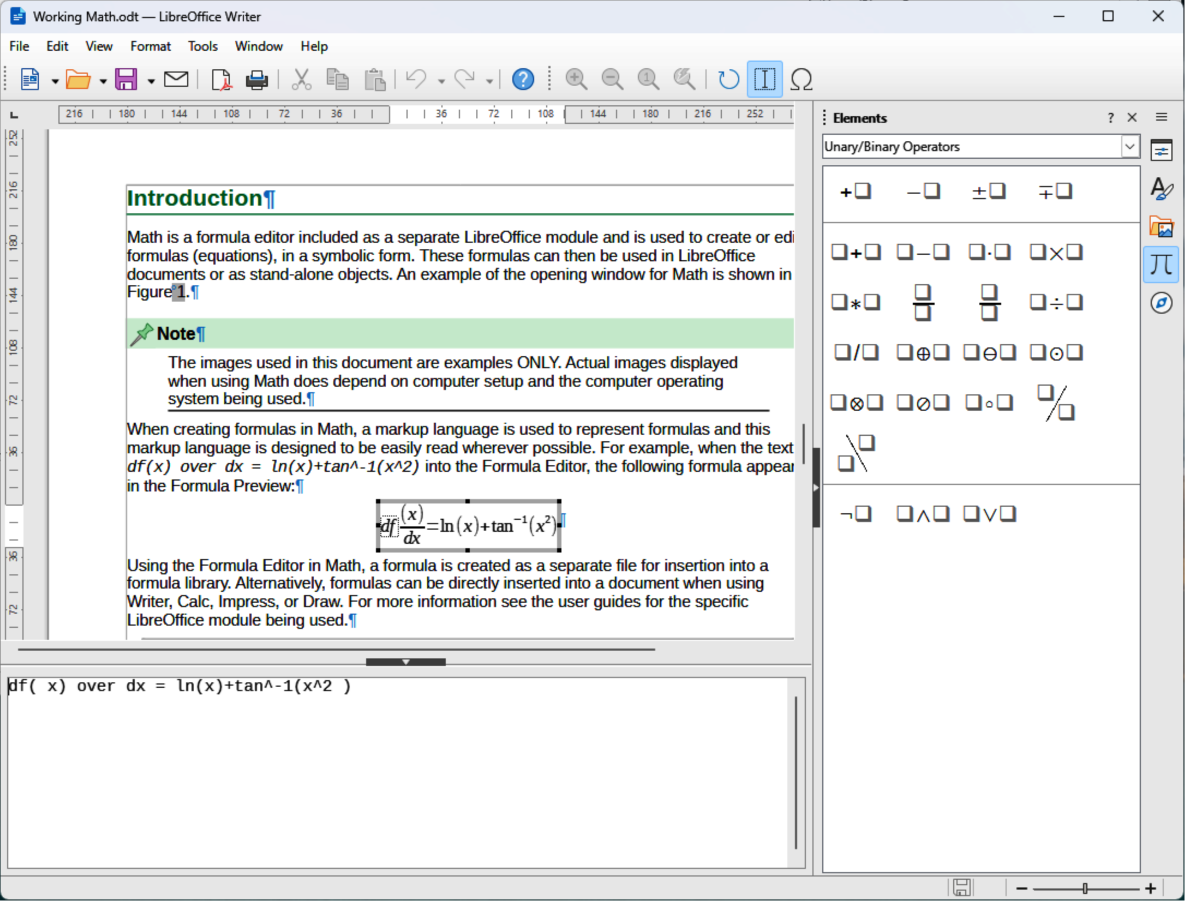
A formula can also be created and inserted directly into a Writer, Calc, Draw, or Impress document. An example of creating a formula in a Writer document is shown in Figure 3. The formula box is automatically selected ready for a formula to be entered or edited.
Figure 3: Example of creating a formula in Writer
Depending on the LibreOffice module being used when inserting a formula, the cursor position changes of where to insert the formula.
In Writer, click in the paragraph where the formula is being inserted.
In Calc, click in the spreadsheet cell where the formula is being inserted.
In Draw and Impress, the formula is automatically inserted into the center of the drawing or slide.
Formulas are inserted as OLE objects into documents, as follows:
Go to Insert > OLE Object > Formula Object on the Menu bar to open the Formula Editor.
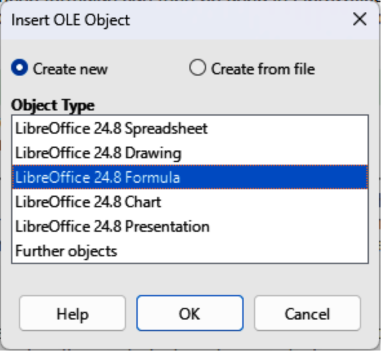
Alternatively, go to Insert > OLE Object > OLE Object on the Menu bar to open the Insert OLE Object dialog (Figure 4).
Select Create new, then select LibreOffice XX Formula in Object Type.
Click OK to open the Formula Editor.
Create or edit the formula in the Formula Editor.
When the formula has been created or edited, close the Formula Editor using one of the following methods:
Press the Esc key.
Click outside the formula in the document. Double-click on the formula in the document to open the Formula Editor again to edit the formula.
Figure 4: Insert OLE Object dialog
For more information on inserting formulas as OLE objects, refer to the following:
Chapter 2, Formulas in Writer
Chapter 3, Formulas in Calc, Draw, and Impress
Writer, Calc, Draw, or Impress Guides.
Tips
If formulas are frequently inserted into documents, it is recommended to add Formula Object tool to the Standard toolbar, or create a keyboard shortcut. For more information, see Chapter 4, Customization or the Getting Started Guide.
Using the Elements panel on the Sidebar, or the context menus to create a formula is a convenient way to learn the markup language used used to create formulas.
When using the Elements panel on the Sidebar, it is recommended to have Extended Tips selected in LibreOffice Options. Extended Tips helps in identifying the categories and symbols used in formulas. Go to Tools > Options > LibreOffice > General (macOS LibreOffice > Preferences > LibreOffice > General) on the Menu bar and select Extended Tips in the Help section.
Formulas are created using one of the following methods:
In the Elements panel on the Sidebar (Figure 2 above), select a category from the context menu, then select a formula element from the available options.
Right-click in the Formula Editor (Figure 1 above) and select a category from the context menu, then select a formula element from the drop-down list.
Enter markup language directly in the Formula Editor.
The Elements panel (Figure 2 above) on the Sidebar is a visual tool for creating and formatting formulas. It organizes mathematical symbols and operators into categories, which are available in a drop-down list for each category.
Select View > Elements on the Menu bar to open the Elements panel in the Sidebar.
Select the category required for the formula from the Categories drop-down list at the top of the Elements panel.
Select the symbol required from the options available in the Elements panel. The available symbols change according to the selected category.
After selecting a symbol, the symbol appears in Formula Preview and the Formula Editor is updated with the markup language used for the selected symbol.
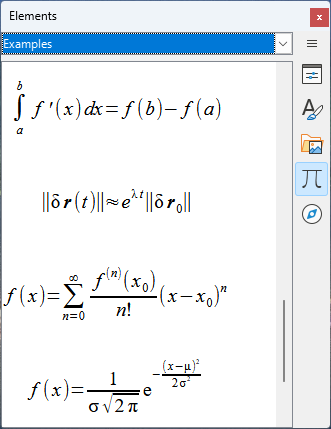
Alternatively, select an example from the Examples list in the Categories drop-down list on the Sidebar (Figure 5).
Figure 5: Sidebar Elements panel — Examples page
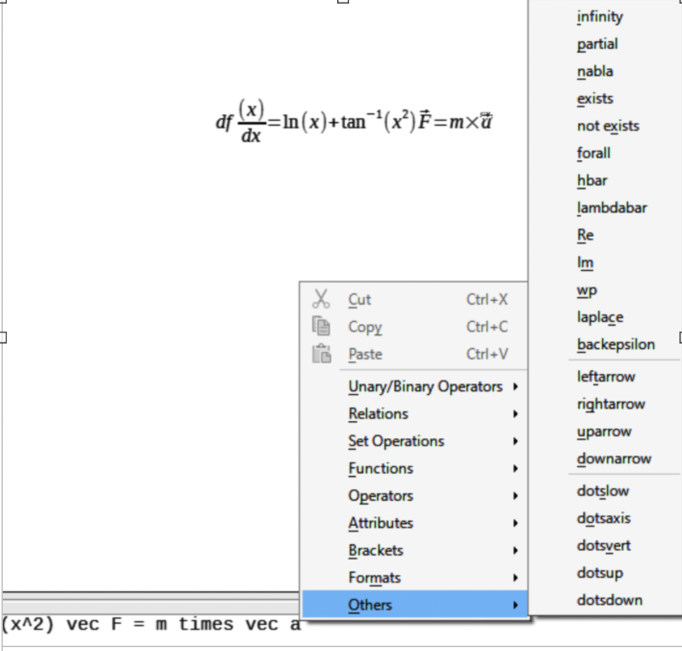
The Formula Editor also provides a context menu to access categories and markup language options when creating a formula. An example is shown in Figure 6.
Right-click in the Formula Editor to open the context menu.
Select a category from the options listed in the context menu.
Select a markup language option from the options available in the drop-list.
Note
The Elements panel and the context menu in the Formula Editor provide the most common options and symbols used in formulas. Other options and symbols not listed have to be entered manually using markup language. For a complete list of commands and symbols available in Math, see Appendix A, Commands Reference.
Figure 6: Example of Category Options in Formula Editor
Markup language is entered directly into the Formula Editor. For example, typing 5 times 4 into the Formula Editor creates a simple formula. Using markup language is the recommended method for creating formulas. Table 1 shows examples of using markup language to enter commands. For a full list of commands that can be used in the Formula Editor, see Appendix A, Commands Reference.
Table 1: Example commands using markup language
|
Display |
Command |
Display |
Command |
|
|
a = b |
|
sqrt {a} |
|
|
a^2 |
|
a_n |
|
|
int f(x) dx |
|
sum a_n |
|
|
a <= b |
|
infinity |
|
|
a times b |
|
x cdot y |
Greek characters are commonly used in formulas, but cannot be entered into a formula using the Elements panel in the sidebar, or the context menu in the Formula Editor. Use English names for Greek characters in markup language when entering Greek characters into a formula. See Appendix A, Commands Reference for a list of Greek characters that can be entered using markup language.
For a lowercase Greek character, type a percentage % sign, then type the character name in lowercase using the English name. For example, typing %lambda creates the Greek character .
For an UPPERCASE Greek character, type a percentage % sign, then type the character name in UPPERCASE using English. For example, typing %LAMBDA creates the Greek character .
For an italic Greek character, type a percentage % sign followed by the i character, then type the English name of the Greek character in lower or UPPER case. For example, typing %iTHETA creates the italic Greek character .
Greek characters can also be entered into a formula using the Symbols dialog.
Make sure the cursor is at the correct position in the Formula Editor.
Go to Tools > Symbols on the Menu bar, or click Symbols in the Tools toolbar (Figure 7) to open the Symbols dialog.
Figure 7: Tools toolbar

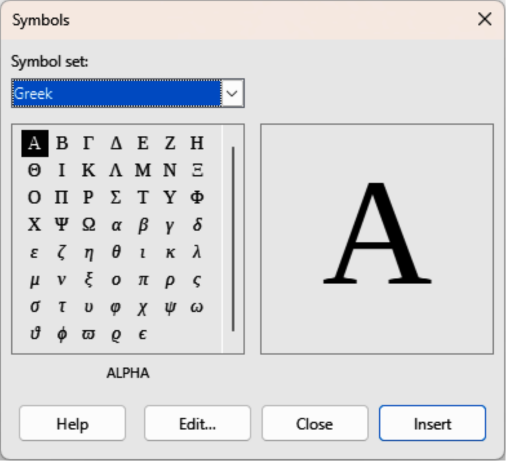
Select Greek in the Symbol set drop-down list (Figure 8).
Figure 8: Symbols dialog — Greek
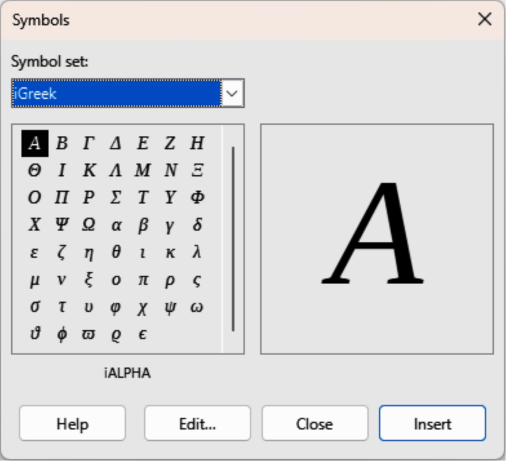
For italic characters, select iGreek in the Symbol drop-down list (Figure 9).
Figure 9: Symbols dialog — iGreek
Double-click the Greek character required, or select the Greek character and click Insert. When selected, the name of the character is shown below the symbol list.
Click on Close to close the Symbols dialog.
A simple formula is created in Math as follows:
Make sure the cursor is located and flashing in the Formula Editor.
Enter Multiplication symbol using one of the following methods:
Select the category Unary/Binary Operators in the Elements panel on the Sidebar, then select the Multiplication icon.
Right-click in the Formula Editor and select Unary/Binary Operators, then a times b from the context menu.
Using markup language, type 5 times 4 in the Formula Editor.
Note
The first two methods above place the formula text <?> times <?> in the Formula Editor and the symbol  appears in the document. The third method above, using markup language in the Formula Editor, places the formula directly into the document and it is not necessary to carry out the following steps.
Select the first placeholder <?> before the word times in the Formula Editor and replace with the character 5. The formula in the document updates automatically.
Select the second placeholder <?> after the word times in the Formula Editor and replace it with the character 4. The formula in the document updates automatically.
Note
If necessary, to prevent a formula in a document from updating automatically, go to View on the Menu bar and deselect AutoUpdate Display. The formula can be updated manually when necessary. Press the F9 key or select View > Update on the Menu bar.
Example 2
The formula for Pi where value is rounded to 5 decimal places is created as follows. The Greek character (pi) is known, but the required markup language Similar Or Equal symbol is not known.
Make sure the cursor is located and flashing in the Formula Editor.
Enter %pi in the Formula Editor to create the Greek character for Pi (π).
Select the category Relations, then select the symbol Is Similar Or Equal using one of the following methods:
In the Elements panel on the Sidebar, select Relations from the drop-down list and then select the Is Similar Or Equal icon  .
.
Right-click in the Formula Editor and select Relations > a simeq b from the context menu.
Delete the first placeholder symbol <?> before the word simeq in the Formula Editor.
Select the second placeholder symbol <?> after the word simeq in the Formula Editor and enter 3.14159 to delete the second placeholder symbol. The formula now appears in the document.
How a formula is edited and opening formula editing mode depends on whether the formula is in Math or another LibreOffice module.
To select the formula and open Formula Editor using one of the following methods:
In Math, double-click on a formula element in the formula that appears in Formula Preview to select the formula element in the Formula Editor, or directly select a formula element in the Formula Editor.
In Writer, Calc, Impress, or Draw, double-click on the formula, or right-click on the formula and select Edit in the context menu, to open the Formula Editor and enter editing mode. The cursor is positioned at the start of the formula in the Formula Editor.
Note
If a formula element cannot be selected using the cursor, click on Formula Cursor in the Tools toolbar (Figure 7 above) to activate the formula cursor.
Select the formula element to be changed using one of the following methods:
Click on the formula element in Formula Preview, then position the cursor at the beginning of the formula element in Formula Editor and select the formula element.
Double-click on the formula element in Formula Preview to select the formula element.
Position the cursor in the Formula Editor at the formula element to edited, then select the formula element.
Double-click directly on the formula element in the Formula Editor to select it.
Make all necessary changes to the selected formula element.
Go to View > Update on the Menu bar, press the F9 key, or click on Update on the Tools toolbar to update the formula.
Save the changes to the formula using one of the following methods:
In Math, save the changes to the formula after editing before closing Math.
In Writer, Calc, Impress, or Draw, click anywhere in the document away from the formula to exit editing mode and save the document.
Math knows does not use order of operation within a formula. Braces (curly brackets) have to be used to define the order of formula operations. The following examples show how braces are used in a formula.
Math recognized the 2 before and the x after the over command belong to a fraction and has represented them accordingly. If x+1 is required rather than x to be a denominator, x+1 must be bracketed together using braces to create the correct formula. Inserting braces as shown in
Example 2
Math has recognized the minus sign as a prefix for the 1 and has placed it as the numerator of the fraction. If it is required that the whole fraction is negative with the minus sign in front of the fraction, the fraction must be placed in braces to instruct Math that all the characters are part of the whole fraction. Adding braces into the markup language
Example 3
Braces are used in markup language to define the formula layout and are not displayed or printed. If braces used within a formula are to be printed, use the commands lbrace and rbrace within the markup language.
Replace the braces with lbrace and rbrace in the markup language as follows:
To use a matrix in a formula, the matrix command has to be used.
Example 1
To create a simple example of a 2x2 matrix. In matrices, rows are separated by two hashes (##) and entries within each row are separated by one hash (#).
Example 2
Normally, when brackets are used within a matrix, the brackets do not scale as the matrix increases in size. The following example shows a formula where the parentheses do not scale to the size of the resulting matrix.
Example 3
To solve this problem, Math provides scalable brackets that change in size to match the matrix size. The commands left( and right) have to be used to create scalable brackets around a matrix. The following example shows how to create a matrix with scalable parentheses.
Scalable brackets can be used with any formula element, such as fraction, square root, and so on.
To create a matrix where some values are empty, the grave accent (`) is used so that Math places a small space in the position where grave accent (`) has been placed, as shown in the following example:
Tips
Use the commands left[ and right] to obtain square brackets. A list of all brackets available within Math can be found in Appendix A, Commands Reference.
If all brackets are to be scalable, go to Format > Spacing on the Menu bar to open the Spacing dialog. Click on Category and select Brackets from the drop-down list, then select the option Scale all brackets from the drop-down list.
When using brackets in a formula, Math expects that for every opening bracket there will be a closing bracket. If a closing bracket is not used, Math places an inverted question mark next to where the closing bracket should have been placed.
For example, lbrace a; b creates because the right bracket rbrace is missing. This inverted question mark disappears when all brackets are paired. This is corrected by using lbrace a; b rbrace, which creates . However, there are cases where an unpaired bracket is required.
A backslash \ is placed before a non scalable bracket to indicate that the subsequent character is not a bracket, but a literal character.
Example
The unpaired brackets in the formula [ a; b [ results in an inverted question mark being entered because Math expects that [ will be closed by ]. To correct the error, use a backslash for every bracket into the Formula Editor.
To create unpaired scalable brackets or braces in a formula, the markup commands left, right, and none are used.
Example
The following formula uses the stack command to create a two-line formula and adds a bracket only to the right side of the stack. This effect is achieved by using the left lbrace command combined with the right none command. The first command indicates that the left bracket is a lbrace and the second command none tells Math that there is no right bracket added to the right side of the formula.
In the normal installation of Math, Math creates functions using normal characters and variables in italic characters. However, if Math fails to recognize a function, Math can be forced to recognize that a function has been entered. Using the markup command func before a function forces Math to recognize following text as a function.
For a full list of functions available in Math, see Appendix A, Commands Reference.
Some Math functions have to be followed by a number or variable. If a number or variable is missing, Math places an inverted question mark where the missing number or variable should be. To remove the inverted question mark and correct the formula, enter a number, variable, or pair of empty brackets as a placeholder.
Tip
Navigate through formula errors using the function key F3 to move to the next error, or use the function key combination Shift+F3 to move to the previous error.
When creating a formula that requires more than one line, for example , the first reaction is to use the Enter key. However, when the Enter key is used, the markup language in the Formula Editor goes to a new line, but the resulting formula does not have two lines. To add a new line into a formula, the markup command newline has to be used
Table 2 shows how the markup command newline is used to add a new line to a formula. The first example simply adds an Enter command to break the line in the markup language. This does not create a new line in the formula. The second example uses the newline command. The newline command creates a two-line formula.
Table 2: Examples of multiple line formulas
|
Markup Language |
Resulting Formula |
|
x = 3 |
|
|
x = 3 newline y = 1 |
|
It is not possible in Math to create multiple line formulas when a line ends with an equals sign and continue the formula on a new line. A term on the right side of the equals sign must be entered to create multiple line formulas.
If a multiple line formula is required to have an equals sign at the end of a line without a term after the equals sign, use empty quotes “”, empty braces {}, grave character `, or tilde character ˜.
By default, the alignment of a multiple line formula is center aligned. For more information on alignment using the equals sign, see “Aligning formulas using equals sign” below.
Spacing between elements in a formula is not set by using space characters in the markup language. To add spaces into a formula, use one of the following options:
Grave ` to add a small space.
Tilde ~ to add a large space.
Space characters between quotes “ ”. Space characters are considered as text.
Note
Any spaces at the end of a line in the markup language are ignored by default. For more information, see Chapter 4, Customization.
The sum and int commands are used for summations and integrals with the parameters from and to used to set the lower and upper limits. The parameters from and to can be used singly or together as shown by the following examples. For more information on the sum and int commands, see Appendix A, Commands Reference.
Table 3 shows how to add upper and lower bounds to summations and integrals. Note that brackets are used to define which parts of the formula correspond to the desired bounds.
Table 3: Example of using summations and integrals
|
Markup Language |
Resulting Formula |
|
sum from k = 1 to n a_k |
|
|
sum to infinity 2^{-n} |
|
|
sum from{ i=1 } to{ n } sum from{ j=1; i <> j } to{ m } x_ij |
|
|
int from 0 to x f(t) dt |
|
|
int_0^x f(t) dt |
|
|
int from Re f |
|
When adding derivatives to a formula, indicate in Math that it is a fraction by using the over command. The over command is combined with the character d for a total derivative, or the partial command for a partial derivative to achieve the effect of a derivative. Braces {} are used on each side of elements to enclose the elements and make the derivative as shown in Table 4.
Table 4: Examples of adding derivatives
|
Markup Language |
Resulting Formula |
|
{df} over {dx} |
|
|
{partial f} over {partial y} |
|
|
{partial^2 f} over {partial t^2} |
|
Note
To write function names with primes, as is normal in school notation, add the symbols to the catalog first. For more information, see Chapter 4, Customization.
Characters that are used as controls in markup language cannot be entered directly as normal characters. Control characters are: %, {, }, &, |, _, ^ and ". For example, 2% = 0.02 cannot be entered into markup language and expect the same characters to appear in a formula. To overcome this limitation in markup language, use one of the following methods:
Use double quotes to mark that character as text, for example 2"%"= 0.02 displays in a formula as . However, double quotes cannot be used to enter a double quote character as text, see “Text in formulas” below.
Add the character to the Math Catalog, for example the double quote character.
Use commands, for example lbrace and rbrace for literal braces.
Note
The Special Characters dialog used by other LibreOffice modules is not available in Math. If special characters are required in Math, then it is recommended to add the characters to the Math Catalog. See Chapter 4, Customization for more information.
To include text in a formula, enclose any text in double-quotes, for example x " for " x >= 0 in markup language creates the formula . All characters, except double quotes, can be used in text.
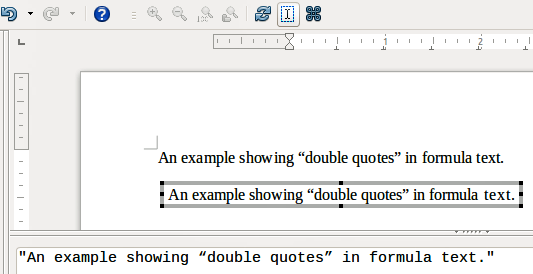
However, if double quotes are required in formula text, any text text created in Writer must be contained within typographic double quotes. The text is then copied and pasted as the text into the Formula Editor as shown in Figure 10.
Figure 10: Example of using double quotes to create formula text
The font used for text in a formula is the default font that has been set in the Fonts dialog. For more information on how to change fonts used in formulas, see Appendix A, Commands Reference.
By default, text alignment is left-justified in formulas. For more information, see Appendix A, Commands Reference.
Formatting commands are not interpreted within text used in formulas. To use formatting commands within formula text, the text flow must be broken by using double quotes in the Formula Editor.
Example
Enter the following text in the Formula Editor using markup language to create text in a formula:
The example above shows how markup language is used to change the text color to blue and use bold text for the word “isosceles” in the formula. Note that the commands are applied to any text placed between the double quotes. The formatting command color blue bold is not applied to the rest of the text in the example because it is a separate quote block.
Math does not have a command for aligning formulas on a character. However, a matrix can be used to align formulas on the equals sign (=) character. The markup commands alignr, alignl and alignc are used to align each value inside a matrix to the right, left or center, respectively.
Example
|
matrix{ alignr x+y # {}={} # alignl 2 ## alignr x # {}={} # alignl 2-y } |
|
Note
The empty braces each side of the equals sign are required. The equals sign is a binary operator and requires an expression on each side. Spaces, or characters ` or ~ on each side of the equals sign can be used, but it is recommended to use braces because braces are easier to see within markup language.
Note
Only the default font or font size can be changed in a formula. Any formulas that were already inserted into a document will continue to use the previous settings for default font and font size. The font and font size of these previously inserted formulas have to be changed individually to use the new setting for default font and font size.
Tip
The extension Formatting of All Math Formulas can be used to change font name and font size for all or selected formulas in a document. The extension and instructions for use can be downloaded from the LibreOffice website using the following link: https://extensions.libreoffice.org/en/extensions/show/formatting-of-all-math-formulas.
To change the font size used in a formula already inserted into a LibreOffice document:
Click in the markup language in the Formula Editor.
Go to Format > Font size on the Menu bar to open the Font Sizes dialog (Figure 11).
Figure 11: Font Sizes dialog
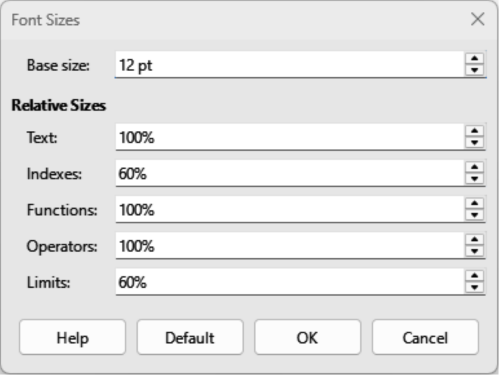
Select a different font size from the options available in Base size, or enter a new font size in the text box.
Click OK to save the changes and close the dialog.
Example
To change the default font size used for all formulas in a LibreOffice document:
Before inserting any formulas into a document, go to Format > Font size on the Menu bar to open the Font Sizes dialog (Figure 11).
Select a different font size from the options available in Base size, or enter a new font size in the text box.
Click on Default and select Yes in the conformation dialog that opens to save the change in font size.
Click on OK to save the changes and close the Font Sizes dialog. Any new formulas created will use the new base size font for formulas.
The Font Sizes dialog ((Figure 11) specifies the font sizes used in a formula. Change the base size and all elements in the formula created after the change will use the new base font size.
Base size
Relative Sizes
Text
Select the text size in a formula relative to the base size.
Indexes
Select the relative size for indexes in a formula in proportion to the base size.
Functions
Select the relative size for names and function elements in a formula in proportion to the base size.
Operators
Select the relative size of the mathematical operators used in a formula in proportion to the base size.
Limits
Select the relative size for the limits in a formula in proportion to the base size. This is used to determine the size for commands from and to used in summations and integrals.
Default
To change the fonts used for a formula in a LibreOffice document:
Click in the markup language in the Formula Editor.
Go to Format > Fonts on the Menu bar to open the Fonts dialog (Figure 12).
Figure 12: Fonts dialog
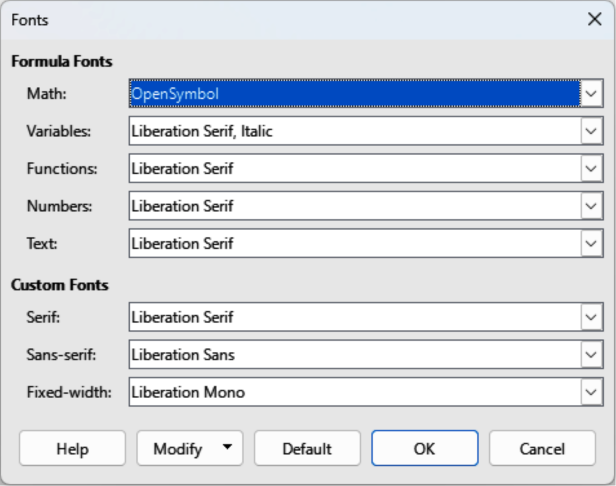
Select a new font for each of the various options in the drop-down lists in the Fonts dialog.
If the font required does not appear in the drop-down list, click Modify and select the option from the context menu to open a fonts dialog.
Select the font required and click OK to add the font to the drop-down list for the selected option.
Click OK to save the changes and close the Fonts dialog.
To change the default fonts used for all formulas in a LibreOffice document:
Before inserting any formulas into a document, go to Format > Font size on the Menu bar to open the Fonts dialog (Figure 12).
Select a new font for each the various options from the drop-down lists.
If the font required does not appear in the drop-down list, select Modify and then select an option from the context menu to open a fonts dialog.
Select the font required and click OK to add the new font to the drop-down list for the selected option.
Click on Default and select Yes in the conformation dialog that opens to save the change in font type.
Click OK to save the changes and close the Fonts dialog.
Formula Fonts
Variables
Selects the fonts used for the variables in a formula.
Functions
Selects the fonts used for the function names and properties.
Numbers
Selects the fonts for the numbers in a formula.
Text
Defines the font used for text in a formula.
Custom Fonts
Serif
Specifies the font used for a serif font format.
Sans
Specifies the font used for a sans font format.
Fixed
Specifies the font used for a fixed font format.
Modify
Default
Notes
When a new font is used for a formula, the old font remains available and can be selected again.
Variables are written in italics. For all other formula elements, the basic font form is used. The font style can be altered in the formula by using the commands italic or bold. To stop using an italic or bold font, use nitalic or nbold after the variable
The alignment settings determine how formula elements located above one another are aligned horizontally relative to each other.
To change the spacing used in the current formula in a LibreOffice document:
Click in the markup language in the Formula Editor.
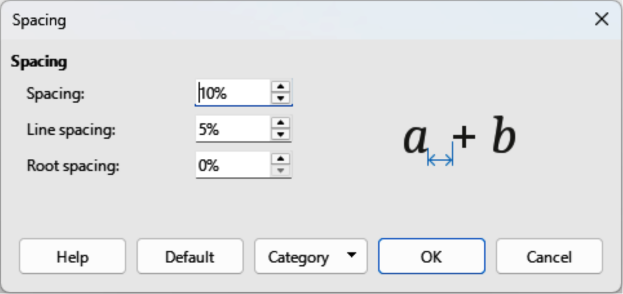
Go to Format > Spacing on the Menu bar to open the Spacing dialog (Figure 13).
Click Category and select one of the options from the drop-down list. The options in the Spacing dialog change depending on which category is selected.
Enter new values for the spacing category and click OK.
Check the spacing format in the formula. If the spacing format is not correct, repeat the steps above.
To change the default spacing used for all formulas in a LibreOffice document:
Before inserting any formulas into a document, go to Format > Spacing on the Menu bar to open the Spacing dialog (Figure 13).
Click Category and select one of the options from the drop-down list. The options in the Spacing dialog change according to the category selected.
Make the required changes to the category option, then click Default and confirm the changes to the formula spacing. Any new formulas created will use the new spacing for formulas.
Click OK to save the changes and close the Spacing dialog.
Figure 13: Spacing dialog
Note
Only new formulas inserted after the change in formula spacing will use the new setting for formula spacing. For any formulas inserted into a document before the default spacing was changed, the new default spacing will not be applied. The formula spacing on each formula already inserted into a document will have to be changed manually.
Use the Category options available in the Spacing dialog (Figure 13) to change the spacing for a formula element. The dialog that opens depends on the selected category. A preview window displays which spacing is being changed.
Category
Spacing
Spacing
Determines the spacing between variables and operators
Line Spacing
Determines the spacing between lines.
Root Spacing
Determines the spacing between the root sign and radicals.
Indexes
Superscript
Determines the spacing for superscript indexes.
Subscript
Determines the spacing for subscript indexes.
Fractions
Numerator
Determines the spacing between the fraction bar and the numerator.
Denominator
Determines the spacing between the fraction bar and the denominator.
Fraction Bars
Excess length
Determines the excess length of the fraction line.
Weight
Determines the weight of the fraction line.
Limits
Upper limit
Determines the spacing between the sum symbol and the upper limit.
Lower limit
Determines the spacing between the sum symbol and the lower limit.
Brackets
Excess size (left/right)
Determines the vertical distance between the upper edge of the contents and the upper end of the brackets.
Spacing
Determines the horizontal distance between the contents and the upper end of the brackets.
Scale all brackets
Scales all types of brackets. If ( a over b) is entered into the Formula Editor, the brackets surrounds the whole height of the argument.
Excess size
Adjusts the percentage excess size. At 0% the brackets are set so that they surround the argument at the same height. The higher the value that is entered, the larger the vertical gap between the contents of the brackets and the external border of the brackets. The option can only be used in combination with Scale all brackets.
Matrices
Line spacing
Determines the spacing between matrix elements in a row.
Column spacing
Determines the spacing between matrix elements in a column.
Symbols
Primary height
Defines the height of the symbols in relation to the baseline.
Minimum spacing
Determines the minimum distance between a symbol and variable.
Operators
Excess size
Determines the height from the variable to the operator upper edge.
Spacing
Determines the horizontal distance between operators and variables.
Borders
Left
The left border is positioned between the formula and background.
Right
The right border is positioned between the formula and background.
Top
The top border is positioned between the formula and background.
Bottom
The bottom border is positioned between the formula and background.
Preview Field
Default
Notes
When adding formulas into a LibreOffice document, there may be spacing between the formula and surrounding text, even if all formula borders are set to zero. This is because formulas are OLE objects embedded into a frame that, by default, adds 0.2 cm to the left and right of the formula.
Extra spacing can be removed using one of two methods. First method is to edit the object properties by right-clicking the formula and then going to Properties > Wrap to adjust the Spacing fields to the required values. The second method is to change the spacing options for the formula frame style or create a new style. For more information on changing the formula spacing, see Chapter 2, Formulas in Writer. For more information on how to edit styles in general, see the Writer Guide.
Example
The formula alignment is used for determining how formula elements are located above one another and aligned horizontally relative to each formula element.
Notes
It is not possible to align formulas on a character and formula alignment cannot be used to align text elements. Text elements are always aligned to the left.
It is possible to align sections of a formula using the commands alignl, alignc and alignr. Using these commands, matrices and text elements in a formula can be aligned.
To change the alignment used for a formula in a LibreOffice document:
Click in the markup language in the Formula Editor.
Go to Format > Alignment on the Menu bar to open the Alignment dialog (Figure 14).
Select Left, Centered, or Right for horizontal alignment.
Figure 14: Alignment dialog
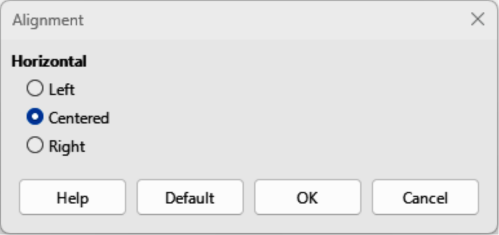
Select OK and check the result in the Formula Preview. If necessary, repeat steps 1 to 3 to correct the formula alignment.
To change the default alignment used for all formulas in a LibreOffice document:
Click in the markup language in the Formula Editor.
Go to Format > Alignment on the Menu bar to open the Alignment dialog (Figure 14).
Select Left, Centered, or Right for horizontal alignment.
Select Default and confirm the changes to the formula alignment. Any new formulas created will use the new formula alignment.
Select OK and check the result in the Formula Preview. If necessary, repeat steps 1 to 4 to correct the formula alignment.
Note
Only formulas inserted after changing in formula alignment use the new default settings. For any formulas already inserted into a document before the default alignment was changed, the new default alignment is not applied. The formula alignment on each formula already inserted into a document has to be changed manually.
The color of formula characters can be changed using markup language. Use the command color followed by a color name, RGB value, or HTML hex value.
The color command only works if the color command immediately follows the color name, RGB value, or hex value. For example, entering color red 5 times 4 gives the result . Only the number 5 is colored red.
To change the color of the whole formula, the complete formula has to be placed inside brackets. For example, entering color red {5 times 4} gives the result .
For information on the named colors available in Math, see Appendix A. These colors are listed in the Attributes category of the Elements panel on the Sidebar (Figure 2 above).
RGB (Red, Green and Blue) values for colors are from 0 to 255. To use RGB values, enter the command color rgb R G B followed by the RGB values of the required color.
Example
HTML colors can be used in a formula and these are defined using a hex number. Use the command hex 000000, where 00000 is the corresponding hex number for the color required. For example, using the command color hex FF0000 decision creates the output .
It is not possible to use a background color for formulas. The formula background color is, by default, the same color as the document or frame where the formula has been inserted. In Writer, object properties can be used to change the background color of a formula. For more information, see Chapter 2, Formulas in Writer.
If formulas are going to be regularly inserted documents, a formula library can be created using the Formula Editor. Individual formulas are saved as separate files using the ODF format file type ODF, or the MathML format for file type MML. Math, Writer, Calc, Draw, or Impress can be used to create formulas and added to a formula library.
Note
MathML 2.0 stands for Mathematical Markup Language (MathML) Version 2.0. MathML is an XML format that describes mathematical notation and enables the use of mathematics in the World Wide Web. For more information on MathML format, visit the website at https://www.w3.org/TR/MathML2/overview.html.
Create a computer folder to contain formula files and give the folder a memorable name, for example Formula Library.
Go to File > New > Formula on the Menu bar, or click on Math Formula in the Start Center to open LibreOffice Math and the Formula Editor. See “Formulas as separate documents or files” above for more information.
Create the formula required.
Go to File > Save As on the main Menu bar, or use the keyboard shortcut Ctrl+Shift+S (macOS ⌘+Shift+S) to open the Save As dialog.
Navigate to the folder created for a formula library.
Type a memorable name for the formula in the file name or save as box.
Select in the File type drop-down list select ODF Formula (.odf) or MathML 2.0 (.mml) as the file type for the formula.
Click Save to save the formula and close the Save As dialog.
Create a computer folder to contain formula files and give the folder a memorable name, for example Formula Library.
Open a document using Writer, Calc, Draw, or Impress.
Go to Insert > Object > Formula Object on the Menu bar to open the Formula Editor and create a formula. See “Formulas in LibreOffice documents” above for more information.
Right-click on the formula object and select Save Copy as in the context menu to open a Save As dialog.
Navigate to the folder you have created for your formula library.
Type a memorable name for your formula in the File name box.
Select in the File type drop-down list either ODF Formula (.odf) or MathML 2.0 (.mml) as the file type for the formula.
Click Save to save the formula and close the Save As dialog.
A formula in the formula library cannot be inserted into a document by dragging and dropping, or by using Insert > File on the Menu bar. A formula from the formula library must be inserted into a document as an OLE object.
Open a document using Writer, Calc, Draw, or Impress.
Go to Insert > OLE Object > OLE Object on the Menu bar to open the Insert OLE Object dialog (Figure 15).
Select the option Create from file.
Click Search to open the file browser and navigate to the formula library folder.
Figure 15: Insert OLE Object dialog — Create from file page
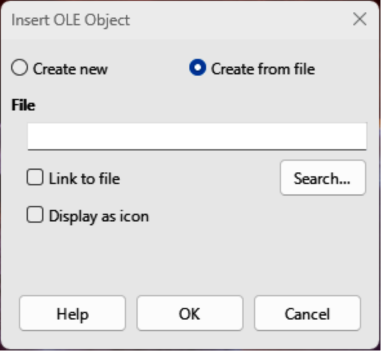
Select the file for formula required and click Open in the file browser, or double-click on the formula required.
If required, select the option Link to file or Display as icon.
Click OK to insert the formula as an OLE object in the document and close the Insert OLE Object dialog.