Copyright
Document copyright © for 2026 is held by the LibreOffice Documentation Team. Contributors are listed below. All trademarks in this guide belong to their legitimate owners. This document maybe distributed and/or modified under the terms of the GNU General Public License (https://www.gnu.org/licenses/gpl.html), version 3 or later, or the Creative Commons Attribution License (https://creativecommons.org/licenses/by/4.0/), version 4.0 or later.
Contributors
Contributors for this edition:
Peter Schofield, Ed Olson, B. Antonio Fernandez, Olivier Hallot
Contributors for previous editions:
Barbara Duprey, Bruce Byfield, David Blymire, Felipe Viggiano, Gillian Polack, Jean Hollis Weber, John A Smith, Kees Kriek, Klaus-Jürgen Weghorn, Olivier Hallot, Ron Faile Jr.
Feedback
Please direct any comments or suggestions about this document to the Documentation Team Forum at https://community.documentfoundation.org/c/documentation/loguides/ (registration is required) or send email to: loguides@community.documentfoundation.org.
-
Note
Everything sent to a mailing list, including email addresses, is publicly archived and cannot be deleted.
Publication date and software version
Published March 2026. Based on LibreOffice 26.2.
Other versions of LibreOffice may differ in appearance and functionality.
Using LibreOffice on macOS
Some keystrokes and menu items are different on macOS from those used in Windows and Linux. The table below gives some common substitutions used in this document. For a detailed list, see LibreOffice Help.
|
Windows or Linux |
macOS equivalent |
Effect |
|
Tools > Options |
LibreOffice > Preferences |
Access setup options |
|
Right-click |
Control+click or right-click depending on computer setup |
Open a context menu |
|
Ctrl (Control) |
⌘ (Command) |
Used with other keys |
|
Alt |
⌥ (Option) or Alt |
Used with other keys |
|
F11 |
⌘+t |
Open Styles deck in Sidebar |
What is a master document?
A master document (.odm) is a Writer document which includes features for handling linked subdocuments. Separate text documents (.odt) are inserted into a master document unifying the formatting, table of contents, bibliography, index, and other material contained in a text document.
All features of a text document are available in a master document including printing, export to PDF, and export as a Writer text document.
Master documents are normally used for producing large documents such books, theses, or long reports.
Suggested elements to insert in a master document
In a long document, include in the master document only the elements that belong to the final version and are common to all chapters or subdocument. For example:
-
Book cover, title, subtitle.
-
Book control variables, if any.
-
Book ISBN, Copyright, forewords, acknoledgement.
-
Table of contents.
-
Indexes and bibliography.
-
Book end-notes.
-
Back cover.
The list above is not mandatory and can be adjusted based on your needs.
Suggested elements to insert in in chapters or subdocuments
Place in chapter or subdocuments any contents of the final version of the document. Text, figures, tables, sections and more.
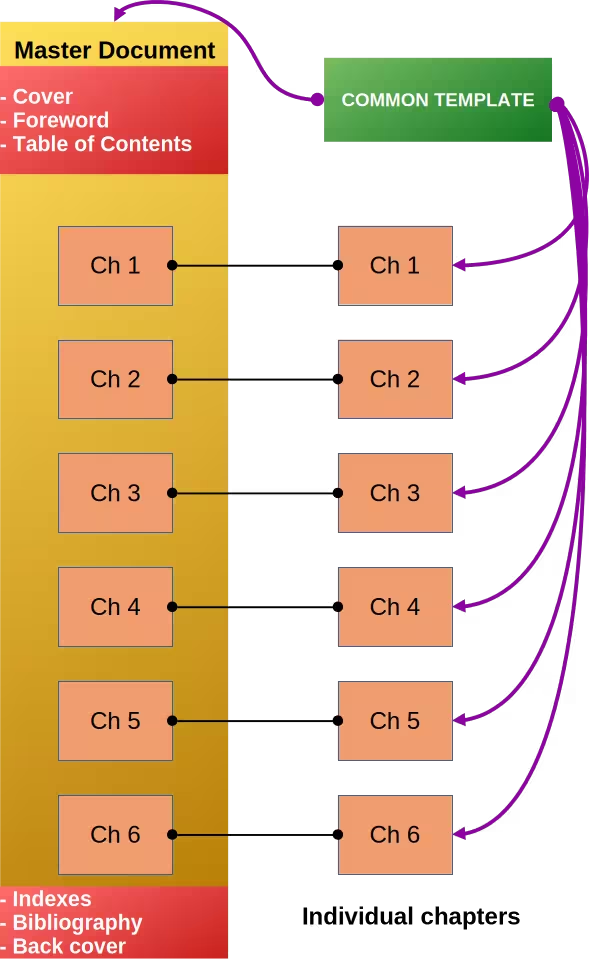
Figure 1 illustrates an example of a document structure using a master document.
Why use master documents?
Master documents are created and used for the following situations:
-
There is no existing document, but the intention is to create a large book, user guide, or manual that contains several chapters, which have possibly been created by several authors.
-
There are several existing documents (chapters) available that have created by one or more authors which are being combined into one book and controlled by the master document.
-
An existing document (book, user guide, or manual) is to be split into several subdocuments (chapters) and controlled by a master document.
-
The file size or number of pages of a document is large. Writing, reviewing, editing, and controlling is easier when carried out on subdocuments of a large document.
-
For security or reliability, chapters are saved in different locations minimizing risks of losing a complete document (single point of failure)
-
For long reports requiring updates to subdocuments that do not affect the report structure
-
Files published as stand-alone documents as well as being part of a larger document. The chapters of this Writer Guide are an example of this usage
-
Subdocuments used in more than one large document
There are several methods for creating master documents. Each method has advantages and disadvantages. Different methods are described in this chapter, with examples of each method.
Figure 1: Example of master document structure
Creating master documents
Using File > New > Master Document creates a master document file (.odm) using the default LibreOffice template.
If the master document is to be created using a custom master document template, use File > Templates > Manage Templates and select the master document template in the available templates listed under Text documents
-
Note
Master documents and subdocuments do not have to be created in any specific order. Subdocuments can be added at any time to a master document.
Creating a master document
Create a master document as follows:
-
Go to File > New > Templates on the main menu bar, then select and open the required master document template.
-
Make sure the correct page style is selected for the first page of the master document, for example Front Cover or Title Page.
-
Add the required graphic or text for the new master document.
-
Continue selecting page styles and adding any required text or graphics for the new master document.
-
Save the master document.
Creating subdocuments
A document file that becomes a subdocument when it is linked to a master document. The subdocument can still be used as a stand-alone document.
If a document was created using a different template, it is recommended to switch to the same template used in the master document. For instructions on changing a document’s template, refer to Chapter 10, Working with Templates.
Style settings in a master document override the settings for the same style in a subdocument. Overriding happens when a subdocument is opened in a master document, then edited or printed from the master document.
-
Go to File > New > Templates on the main menu bar and select the subdocument template that matches the template used for the master document.
-
Delete any text or graphics in the template that is not required for the new subdocument.
-
Make sure the correct page style is selected for the first page of the subdocument, for example First Page.
-
Continue adding any required text or graphics for the new subdocument.
-
Click File > Save As and save the subdocument in the project folder using a filename that is meaningful to the master document.
-
Notes
For best results, create master documents using files that share the same template. However, you can also build a master document from files with different templates. Keep in mind that using documents with varying templates may require additional formatting adjustments.
Adding subdocuments to the master document
-
Make sure the master document is open and displayed in Writer.
-
Open the Navigator dialog using one of the following methods:
-
Go to View > Navigator on the main menu bar.
-
Click on Navigator on the Sidebar.
-
Use the keyboard shortcut F5.
-
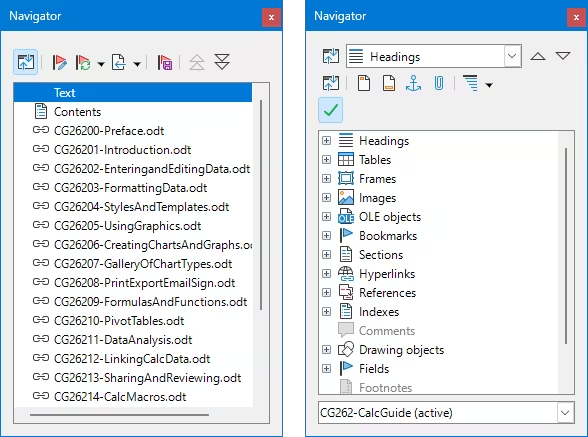
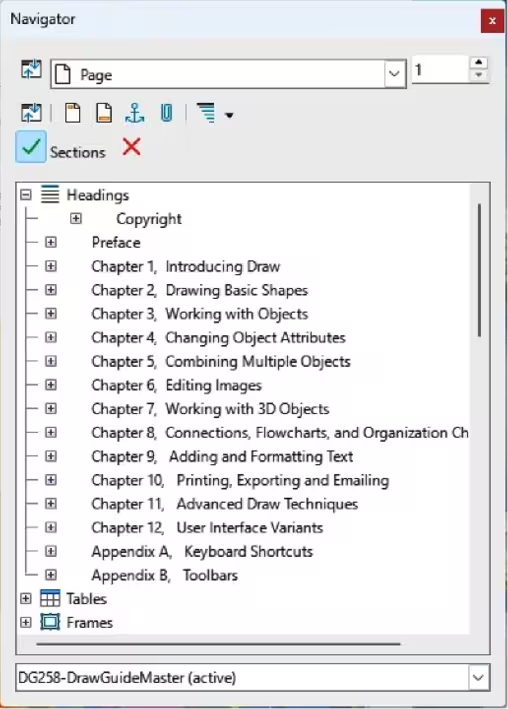
Click on Toggle Master View at the top of the Navigator dialog to make sure that Master View Linked Files (Figure 2 ) is displayed.
-
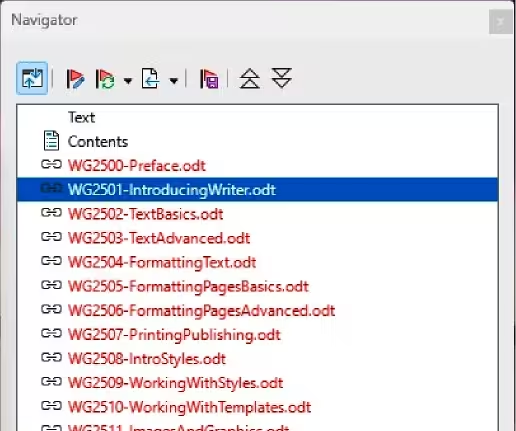
In the Navigator dialog, select Text then click Insert > File on the Navigator dialog toolbar, or right‑click on Text and select Insert > File in the context menu to open the file browser dialog.
-
Select the required subdocument file and click on Open to insert the file into the master document.
-
If the subdocument is incorrectly positioned, select the filename in the Navigator dialog.
-
Move the subdocument to its correct position using the Move Up or Move Down tool, or dragging and dropping the subdocument in the Navigator dialog.
Figure 2: Navigator dialog — Master View and Master View Sections
-
Note
Subdocuments are added to a master document BEFORE the item highlighted in the Navigator. Refer to Figure 3 on page 9 that displays Text highlighted. Any subdocuments added to the document list for the master document would be positioned before Text.
First text section
The first text section in a master document contains the front cover, copyright page, and table of contents for a master document. The first text section is positioned at the top of the list of subdocuments in a master document.
If this section is incorrectly positioned, you can move it to the top of the subdocument file list in the Navigator dialog using Steps 4 thru 7 in Adding subdocuments to the master document above. Make sure to save the master document after repositioning the first text section.
Front cover
The front cover normally consists of graphics, such as a company logo, document title, and version number, if applicable. The front cover of the Writer Guide is an example.
Copyright page
A copyright page is used to legally protect creative work, deter plagiarism, and provide essential publication details like copyright information, author, and year of publication. The copyright establishes document ownership, informs LibreOffice users that the work is protected and serves as a point of contact for copyright inquiries. Also included are disclaimers, acknowledgments, and publishing information for cataloging and tracking.
Table of contents
The table of contents is created from the chapter titles, headings and page numbers with links to navigate directly to the correct page. See Chapter 15, Tables of Contents, Indexes, Bibliographies in the Writer Guide for information on creating a table of contents.
Rear text section
The rear text section in a master document normally contains the bibliography, index and back cover for a master document.
This text section is positioned at the bottom of the list of subdocuments in a master document. If this section is incorrectly positioned, then it is moved to the bottom of the subdocument file list in the Navigator dialog using Steps 4 thru 7 in Adding subdocuments to the master document above. Make sure to save the master document after repositioning this text section.
Bibliography
A bibliography is a list of all sources that have been referred to during the creation of chapters for a master document. It can give credit to original authors, support the information in the master document, and provide a guide for users to explore further for information. Each entry includes enough detail for the source to be found, such as the author, title, publication place, and date. See Chapter 15, Tables of Contents, Indexes, Bibliographies in the Writer Guide for information on creating a bibliography.
Index
An index is a list of topics positioned after bibliography and lists subjects, names, and other important terms alphabetically, followed by the page number(s) where the information can be found. See Chapter 15, Tables of Contents, Indexes, Bibliographies in the Writer Guide for information on creating a bibliography.
Rear cover
The rear cover normally consists of graphics, such as a company logo, document title, and version number, if applicable. The rear cover of the Writer Guide is an example.
Master document Navigator
In Writer, the Navigator dialog has two versions available when working with master documents. Click on Toggle Master View at the top of the Navigator dialog to change the dialog version:
-
Master View Linked Files (Figure 2 left) displays all the subdocument files that are linked to the master document.
-
Master View Sections (Figure 2 right) displays all available sections in subdocuments linked to the master document.
-
Note
Every element in a LibreOffice document file—such as images, tables, sections, and objects—has a unique name in its properties. When creating a master document, LibreOffice automatically renames the elements of subdocuments to ensure all names remain unique within the master document.
-
Note
Subdocument files linked to a master document are read-only and cannot be edited. When working with master documents, double-click on a subdocument filename in the Navigator dialog and open the subdocument file in edit mode.
Styles in master document and subdocuments
A document file becomes a subdocument when it is linked to a master document. The same document file can also be linked and used as a subdocument for several master documents.
Each master document may have different style definitions (font, type size, color, page size, margins, and so on) that affects format of the final document. However, individual documents linked to a master document retain their original format and characteristics.
The relationship between styles in a document master and subdocuments is as follows:
-
If a style with the same name exists in both the Master document and subdocuments (such as 'Default Paragraph Style'), the style defined in the Master document takes precedence, ensuring consistency throughout the final document.
-
When a subdocument is opened individually, its style properties remain as defined within that document and are not overridden by those in the Master document. This preserves the document’s unique styling.
-
Any user-defined styles used in subdocuments that do not exist in the master document are automatically imported into the master document.
-
If multiple subdocuments contain a user-defined style with the same name (e.g., 'MyTextBody') and that style does not exist in the Master document, it will be imported into the Master document using the properties defined in the first linked subdocument. This imported style will then be applied to the final document.
-
The direct formatting applied to subdocuments remains when added to the document master.
Table 1: Style precedence in master documents
|
Sub document |
Master document |
Result in master document |
|
Style “A” |
Style “A” |
Style A from master document |
|
User-defined Style “B” |
(not present) |
The first occurrence of Style “B” in linked documents is imported by master document. |
|
Direct formatting |
|
Direct formatting from subdocument. |
-
Tips
When modifying or creating a style, make sure the style is modified or created in both the subdocument template and the master document template. Doing so ensures that when a subdocument or master document is opened, the styles are updated using the same format.
Master document template
If you need to create several master documents with the same layout, you can create a master document template.
-
Create a master document in Writer using File > New > Master Document on the main menu bar.
-
In the new document file that opens, add the required content for the new template. For example page styles, body text, headings, table of contents (table of contents), company logo, copyright statement, and so on.
-
Create or modify all required paragraph and character styles that are required for a new master document template.
-
Go to File > Templates > Save as Template. Select a category and give a name to the template. Click on Save.
-
Alternatively, go to File > Save as on the main menu bar to open the Save As dialog and select ODF Master Document Template (*.otm) as the file type. Select the required location, enter a filename for the new master document template and click on Save to save the master document template.
-
Tip
It is recommended to create a master document template using a subdocument template as a basis. The template must contain formatting styles for document front and back covers, table of contents, and any other parts required for a master document. For more information on creating templates, refer to Chapter 10, Working with Templates
-
Note
Master document templates are text document templates, with extension *.otm. They are visible under the Filter list box as text document.
Subdocument template
Create a subdocument template from an existing template or document, then modify the page, paragraph, character, and other styles to match the master document template. When all style modifications are complete, use File > Save As Template to create the template. It is recommended to use a similar filename to match the master document template filename. For more information on creating templates, see Chapter 10, Working with Templates.
Updating master documents
Master documents are containers for linking individual subdocuments. A master document must be updated periodically, especially after editing subdocuments, to refresh indexes, table of contents, page numbering, references, and so on.
-
When opening a master document, Writer may display a prompt to update the links to the subdocuments. Click on Yes to update the master document.
-
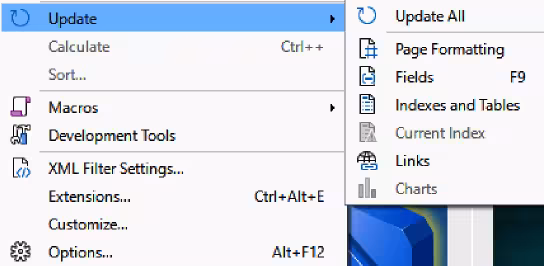
To update a master document, go to Tools > Update on the main menu bar and select an option listed from the submenu that opens (Figure 3 ).
-
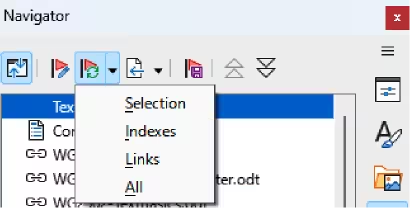
To update a master document, go to Update on the Navigator dialog and select an option from the drop-down list (Figure 4 ).
Figure 3: Example of Update All on Main Menu bar
Depending on document complexity, updating may take time because Writer checks all linked files to rebuild the master document so that all references are updated.
Figure 4: Example of updating using Navigator dialog
Creating master document from a document
Writer can create a master document from a completed document. The selected document is split into a master document and subdocuments using the outline level for document headings. The outline level selected would normally be the chapter title. This is a quick method of creating a master document and subdocuments, but it will be necessary to edit the master document and subdocuments created.
-
Note
It is recommended to use a new filename when a document is split into a master document and subdocuments. This prevents any duplication of filenames used for the new master document and its subdocuments.
-
Open the document and select File > Send > Create Master Document on the main menu bar.
-
Navigate to the required folder, or create a new folder, where the new master document and its subdocuments are going to be saved into.
Figure 5: Example of creating master document from a document
-
Enter a new filename for the master document in the File name box.
-
In Styles: select the outline level from the drop-down list to split the document file into subdocuments. By default this is Outline: Level 1. For more information on outline levels, see Chapter 8, Introduction to Styles.
-
Click on Save and the document is split into subdocuments and the master document is created, as shown by the example in Figure 5 . The subdocuments have been created using the chapter title for Outline: Level 1.
-
Note
The first page for a new subdocument uses the default page style. The page style can be changed, for example First Page, to match the required formatting being used for subdocuments.
Editing master document
After creating a master document, it can be edited using the same methods when editing other text documents. The subdocuments listed in a master document cannot be edited directly from the master document.
Editing subdocuments
The subdocuments listed in the master document cannot be edited directly. A subdocument file must be opened in Writer using one of the following methods:
-
Double-click on the subdocument filename in the Navigator dialog to open the file in Writer.
-
Going to the folder where the subdocument is located and opening the file in Writer.
After editing a subdocument file and saving it, manually update the table of contents, bibliography, and index in the master document.
Adding, deleting, renaming, or reordering subdocuments
Adding
To add a subdocument, see “Adding subdocuments to the master document” above for information on how to add a subdocument to a master docuement.
Deleting
To delete a subdocument, right-click the file name in the Navigator dialog and select Delete.
Renaming
When a subdocument file is renamed and the master document is then opened, the subdocument displays as a broken link and the filename is highlighted in red. Use the following procedure to re-establish the link between the subdocument file and its master document.
-
Open the Navigator dialog (refer to Master document Navigator above).
-
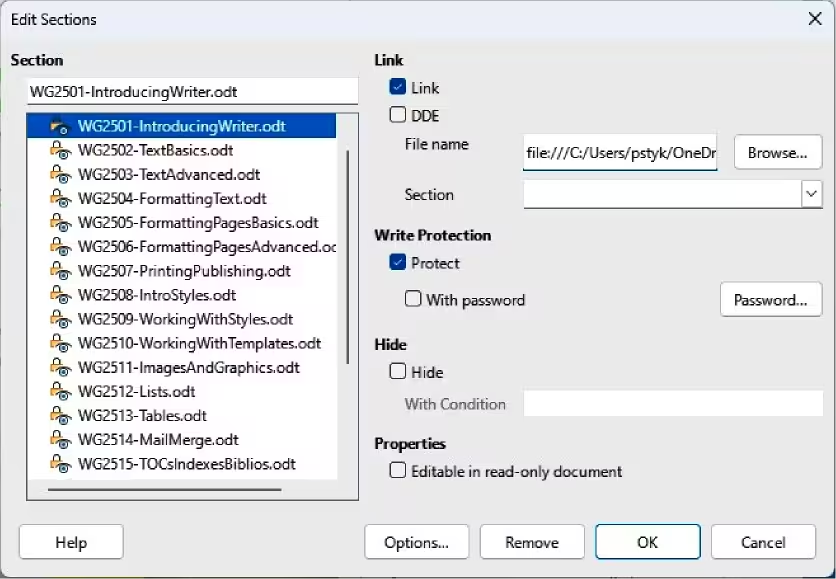
Right-click the filename with the broken link in the Navigator dialog (Figure 6 ) to select it and open the Edit Sections dialog (Figure 7 )
-
Make sure that Link is selected, then click on Browse to open the file browser dialog.
-
Navigate to the location of the renamed file and select the file.
Figure 6: Navigator dialog — Broken links
-
Click OK to save the changes.
-
Repeat Steps 1) thru 5) above until links for all files required for the master document have been located and linked to the master document.912%
Figure 7: Edit Sections dialog
Reordering chapters
Chapters in a master document are reordered by dragging and dropping the chapter entries in the Navigator. The master document will display the new order.
After reordering chapters, update the master document to rebuild the Table of contents, refresh references and update indexes.
Exporting master documents as text documents
Master documents are files that are linked to subdocuments. Linked files are useful when writing and editing a large document. However, sometimes a copy of a master document as one file is required, for example when sending a document to a publisher for printing.
Use the following procedure to create a document file in ODT format from a master document without affecting the master document:
-
Open the master document and update all links.
-
Go to File > Export on the main menu bar to open the Export dialog.
-
On the Export dialog, select a location and enter a name for the text file.
-
Make sure the ODF Text Document (.odt) is selected in the File format list, which is the default option, then click on Export to create the document file
-
Close the master document and open the document file.
-
Select Yes to update any links in the document file.
-
Break the links and remove the write protection, go to Format > Sections on the main menu bar to open the Edit Sections dialog (Figure 7 )
-
Select the first item in the Section list, then go to the last item and Shift+click to select all the items.
-
Deselect Link in the Link section and Protect in the Write Protection section.
-
Click OK to close and dialog
-
Save the ODT
Anchoring Images and Objects
A master document reorganizes page flow, page numbers, and cross-references when the subdocuments are collated. Images and graphics may not be displayed where they are expected.
For example, an image anchored to a paragraph may shift to the next page if the master document’s page margins differ from those of the subdocument, causing the content to reflow.
While it’s not always possible to completely prevent mismatches in image or object positioning, anchoring images or objects As Character provides better control over their placement, at the expense of a more restrictive image position in the text flow. Using To paragraph or To character anchoring might require you to review the master document and manually adjust positions in the subdocuments.
-
Note
Using the anchor To Page is deprecated and not recommended for images and graphics in a text document.
Keep subdocuments images or graphics positioned correctly on a page as follows:
-
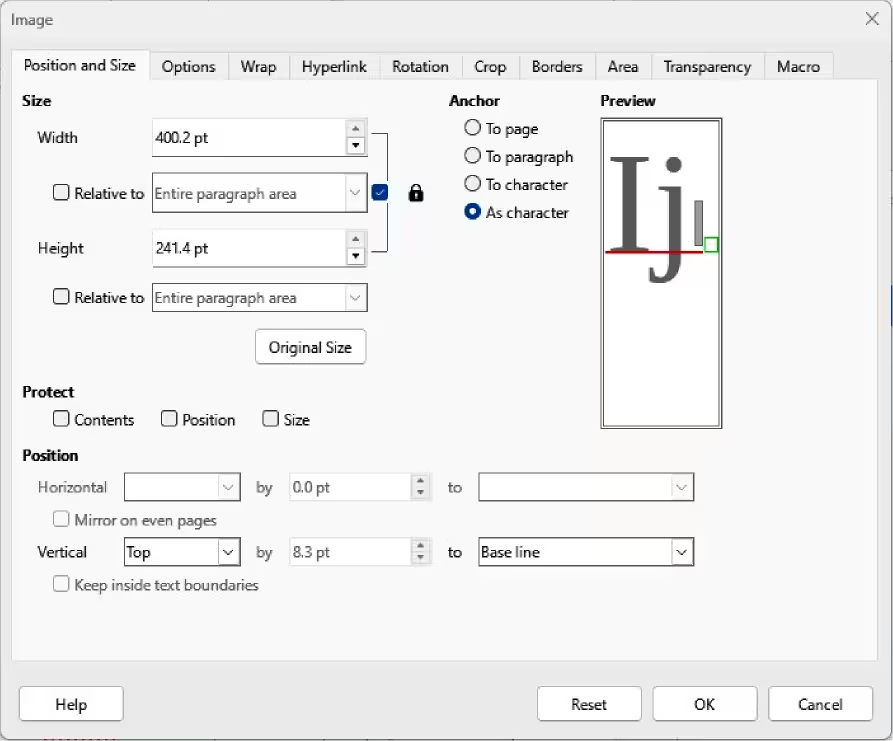
Right-click the image and select Properties in the context menu to open the Image dialog (Figure 8 ).
-
Make sure the Position and Size page is open.
-
In Anchor, select As character, To Paragraph or To Character as the anchor type for the image or graphic.
-
If required, in Position, select the required horizontal and vertical options to the image or graphic.
-
Click OK to save the changes.
-
Note
Remember: using the same template for master document and subdocuments is the best practice to avoid rework in content formatting.
Figure 8: Image dialog
Section OLE (not to publish)
