Copyright
This document is Copyright © 2021 by the LibreOffice Documentation Team. Contributors are listed below. You may distribute it and/or modify it under the terms of either the GNU General Public License (https://www.gnu.org/licenses/gpl.html), version 3 or later, or the Creative Commons Attribution License (https://creativecommons.org/licenses/by/4.0/), version 4.0 or later.
All trademarks within this guide belong to their legitimate owners.
Contributors
|
Jean Hollis Weber |
Kees Kriek |
Rafael Lima |
|
Jean Hollis Weber |
Toni Blackwelder |
Kees Kriek |
|
Shravani Bellapukonda |
Randolph Gamo |
Jenna Sargent |
|
Dante Legaspi |
Felipe Viggiano |
Pulkit Krishna |
|
Colleen Hayes |
John A Smith |
Peter Schofield |
|
Bruce Byfield |
Gillian Polack |
Cathy Crumbley |
|
Hazel Russman |
Leo Moons |
David Blymire |
|
Jeremy Cartwright |
John M. Długosz |
Barbara Duprey |
|
Jamie Eby |
Ron Faile Jr. |
Gary Schnabl |
|
Klaus-Jürgen Weghorn |
Rafael Atias |
|
Feedback
Please direct any comments or suggestions about this document to the Documentation Team’s mailing list: documentation@global.libreoffice.org
Note
Everything you send to a mailing list, including your email address and any other personal information that is written in the message, is publicly archived and cannot be deleted.
Publication date and software version
Published April 2021. Based on LibreOffice 7.1 Community.
Other versions of LibreOffice may differ in appearance and functionality.
Introduction
This chapter covers the more advanced tools for working with text in Writer:
-
The built-in language tools
-
Advanced find-and-replace techniques, including wildcards
-
Track changes and insert comments
-
Footnotes and endnotes
-
Linking to other parts of a document
-
Line numbering
This chapter assumes that you are familiar with the basic text techniques described in Chapter 2, Working with Text: Basics. We recommend that you also display formatting aids, such as end-of-paragraph marks, tabs, breaks, and other items in Tools > Options > LibreOffice Writer > Formatting Aids. For information on formatting text, see Chapter 4.
Using built-in language tools
Writer provides some tools that make your work easier if you mix multiple languages within the same document or if you write documents in various languages:
-
The functions in Tools > Language
-
Language settings in Options
-
Paragraph and character styles
-
The functions available on the status bar
The main advantage of changing the language for a text selection is that you can then use the correct dictionaries to check spelling and apply the localized versions of AutoCorrect replacement tables, thesaurus, and hyphenation rules. A grammar checking dictionary may also be available for the selected language.
You can also set the language for a paragraph or a group of characters as None (Do not check spelling). This option is especially useful when you insert text such as web addresses or programming language snippets that you do not want to check for spelling.
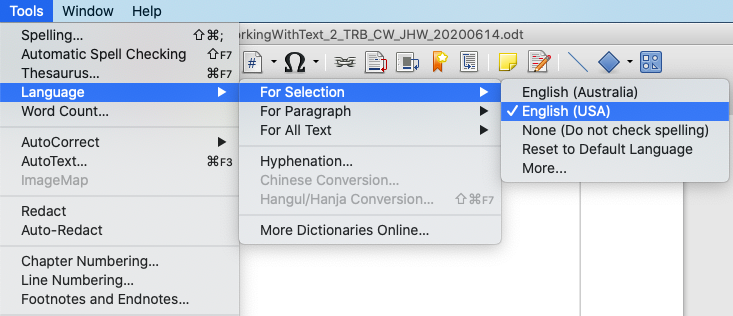
Using Tools > Language
You can set the language for the whole document, for individual paragraphs, or even for individual words and characters, from Tools > Language on the Menu bar (Figure 1):
-
For Selection applies a specified language to the selected text. If the language you wish to apply is not listed in the submenu, choose More... to open the Character dialog.
-
For Paragraph applies the specified language to the paragraph where the cursor is located. If the language you wish to apply is not listed in the submenu, choose More...
-
For All Text applies the specified language to all of the document, including text inserted after making the change. If the language you wish to apply is not listed in the submenu, choose More...
The Reset to Default Language option on the submenu is the fastest way to return a selection, paragraph, or all text to the default language set in Tools > Options (described below).
The Tools > Language menu options include two that are activated when Asian is selected in Tools > Options > Language Settings > Languages > Default languages for documents: Chinese Conversion and Hangul/Hanja Conversion. These options are not covered in this book.
Figure 1: Options available through Tools > Language on the Menu bar
Using language settings in Options
Another way to change the language of a whole document is to use Tools > Options > Language Settings > Languages. In the Default languages for documents section (Figure 2), you can choose a different language for all the text that is not explicitly marked as a different language.
Caution
A change in the default language from the Options dialog is a general change of settings of LibreOffice and will therefore apply to all the documents created in the future. If you want to change the language for the current document only, be sure to select the For the current document only option (Figure 2).
Figure 2: Options available in the Languages settings
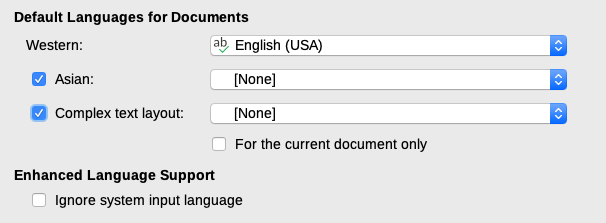
Note
The spelling checker works only for those languages in the list that have a checkmark symbol next to them. If you do not see this symbol next to your preferred language, you can install the dictionary using Tools > Language > More Dictionaries Online.
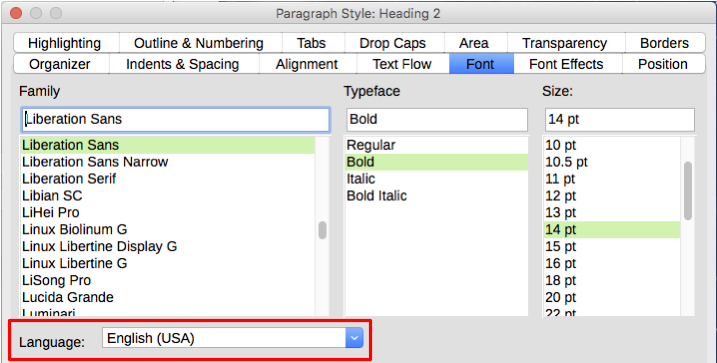
Using paragraph and character styles
Changing the language on the Font tab of the Paragraph Styles dialog (Figure 3) will change the language for all paragraphs that use that paragraph style. If you will have whole paragraphs in different languages in a single document, you can use a different paragraph style for each language. For example, you might define Text Body-EN and Text Body-FR in a document containing paragraphs in both English and French.
See Chapter 9, Working with Styles, for information on how to manage the language settings of a style.
Figure 3: Setting the language for a paragraph style
Using the Status bar
You can set paragraphs to be checked in a language that is different from the language of the rest of the document by putting the cursor in the paragraph (or selecting more than one paragraph) and changing the language on the Status bar (Figure 4). This change affects only the selected paragraphs.
The language used for checking spelling is also shown in the Status bar, next to the page style in use. You can change the language for the paragraph or the entire document; click the language in the Status bar to pop up a menu of choices.
Figure 4: Language choices on the Status bar
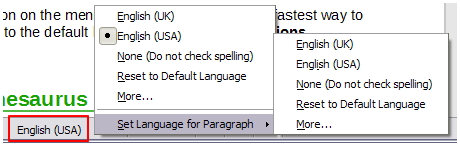
The Reset to Default Language option on the menu and submenu is the fastest way to return a paragraph or the entire document to the default language set in Tools > Options (described above).
Advanced find and replace techniques
In addition to finding and replacing words and phrases (described in Chapter 2), you can use Writer’s Find and Replace dialog to find and replace paragraph styles and text formatting.
Find and replace paragraph styles
Combining material from several sources may result in unwanted paragraph styles in your document. To quickly change all the paragraphs from one style to another (preferred) style:
1) On the Find and Replace dialog with Other Options displayed, select Paragraph Styles. The Find and Replace boxes now contain a list of paragraph styles in use in the document.
2) Select the styles you want to search for and replace.
3) Click Find, Find All, Replace, or Replace All.
Repeat steps 2 and 3 for each style that you want to replace.
Find and replace text formatting
To clear any previous search criteria, place the cursor in the Find box and then click the No Format button. To clear the selected Replace options, place the cursor in the Replace box and click the No Format button.
Unlike Find and Replace for Paragraph Styles described above, the formats or attributes to be searched for do not appear inside the Find or Replace box. Instead, the formats or attributes to be found or replaced appear below the Find and Replace boxes (Figure 5). Clicking on the down-arrow to the right does not bring up options.
Figure 5: Find and replace formatting
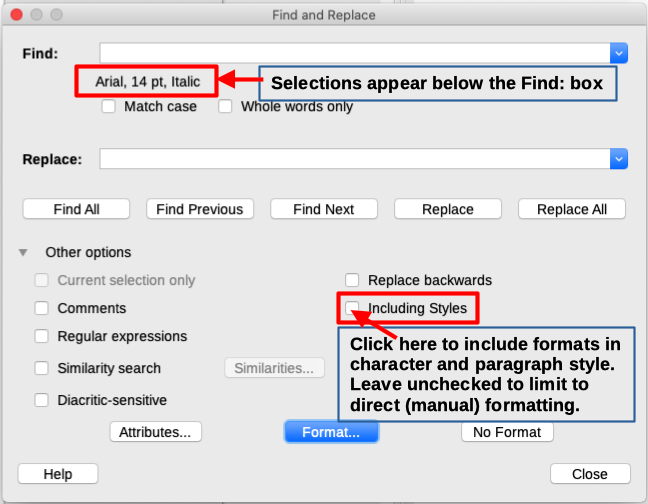
1) To find a type of formatting in the document, ensure Other options is selected.
2) Click the Format button to open the Search for Formatting dialog, which looks much like the Character dialog. Select a format from any of the tabs (for example: bold, 14 pt, Spacing above paragraph).
3) To find this format that has been applied only by direct formatting, leave the Including Styles box unchecked. To find this format also applied inside a character or paragraph style, select the Including Styles box.
4) Choose Find All to have all formats found highlighted. Choose Find Previous or Find Next to find one format instance at a time.
5) To replace the chosen format, click inside the Replace box, then choose Format and choose a replacement from the tabbed options.
6) Replace the formats one at a time using Find Previous > Replace or Find Next > Replace. Use Replace All to change all formats at once.
1) Type the word or phrase in the Find box.
2) In the Replace box, type in the new text you want to use and choose the formats you would like to change. However, if you want to keep the same word or phrase and only change its format, ensure you also type the word or phrase in the Replace box. Otherwise, Writer will remove the word or phrase from the document.
3) Replace the words and formats one at a time using Find Previous > Replace or Find Next > Replace. Use Replace All to change all words and formats at once.
Similarity search
This option finds terms that are similar to the Find: text. For example, a similarity search can find words that differ by two characters.
Select Similarity search and click the Similarities button to open a dialog where you can modify the text search by length and number of characters different from the search term (Figure 6).
Figure 6: Similarity search dialog
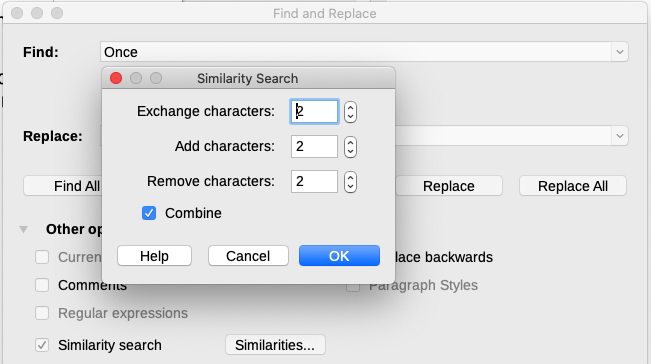
Exchange characters
Add characters
Remove characters
Combine
Search with wildcards and regular expressions
A wildcard is a special character that represents one or more unspecified characters. Wildcards make text searches more powerful but often less specific. LibreOffice enables you to use combinations of characters known as regular expressions which are more specific than simple wildcards but less so than a literal string. Regular expressions are very powerful but not very intuitive. They can save time and effort by combining multiple finds into one.
Table 1 shows a few of the regular expressions used by LibreOffice.
Tip
The online help describes many more regular expressions and their uses.
To use wildcards and regular expressions when searching and replacing:
1) On the Find and Replace dialog, click Other Options to see more choices. On this expanded dialog, select the Regular expressions option.
2) Type the search text, including the wildcards, in the Search for box and the replacement text (if any) in the Replace with box. Not all regular expressions work as replacement characters; the line break (\n) is one that does work.
3) Click Find, Find All, Replace, or Replace All (not recommended).
Table 1: Examples of search wildcards (regular expressions)
|
To find |
Use this expression |
Examples and comments |
|
Any single character |
. (a period or full stop) |
b.d finds bad, bud, bid, and bed. |
|
One of the specified characters |
[xyz] |
b[iu]n finds bin and bun. |
|
Any single character in this range |
[x-y] |
[r-t]eed finds reed, seed, and teed; ranges must be in alphabetically ascending order. |
|
Any single character except the characters inside the brackets |
[^x] |
p[^a]st finds post and pest, but not past. |
|
The beginning of a word |
\<start |
\<log finds logbook and logistics, but not catalog. |
|
The end of a word |
end\> |
log\> finds catalog, but not logistics. |
|
A paragraph marker |
$ |
Does not work as a replacement character. Use \n instead. |
|
A line break |
\n |
Finds a line break that was inserted with Shift+Enter. When used as a replacement character, it inserts a paragraph marker. |
Note
To search for a character that is defined as a wildcard, type a backslash (\) before the character to indicate that you are using it literally. For example, to find the text $5.00, you would conduct a search using \$5\.00.
Tracking changes to a document
You can use several methods to keep track of changes made to a document.
-
Make your changes to a copy of the document (stored in a different folder, under a different name, or both), then use Writer to compare the two files and show the changes. This technique is particularly useful if you are the only person working on the document, as it avoids the increase in file size and complexity caused by the other methods.
-
Save versions that are stored as part of the original file. However, this method can cause problems with large or complex documents, especially if you save a lot of versions. Avoid this method if you can.
-
Use Writer’s change marks (often called “redlines” or “revision marks”) to show added or deleted material or changed formatting. Later, you or another person can review and accept or reject each change.
Note
Not all changes are recorded. For example, changing a tab stop from align left to align right, changing a paragraph style, and changes in formulas (equations) or linked graphics are not recorded.
Preparing a document for review
When you send a document to someone else to review or edit, you may want to prepare it first so that the editor or reviewer does not have to remember to turn on the revision marks. After you have protected the document, any subsequent user must enter the correct password in order to turn off protection or accept or reject changes.
1) Open the document. Check whether it contains multiple versions by clicking File > Versions. If multiple versions are listed, save the current version as a separate document with a different name and use this new document as the review copy.
2) With the review copy open, make sure that change recording is turned on. The Edit > Track Changes > Record menu item is highlighted when recording is turned on.
3) Click Edit > Track Changes > Protect. On the Enter Password dialog, type a password (twice) and click OK.
Tip
An alternative to steps 2 and 3 above is to choose File > Properties > Security tab, select the Record changes option, then click Protect and enter the password.
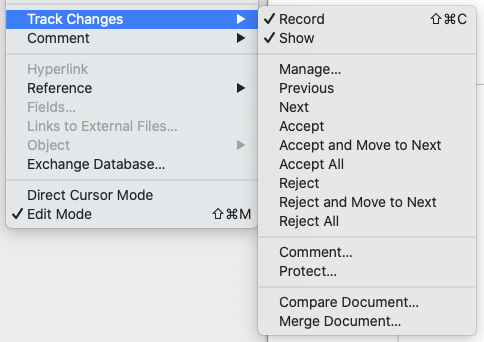
Track Changes menu and toolbar
In addition to the Track Changes menu (Figure 8), Writer provides a convenient toolbar (Figure 7) that includes buttons for the same functions.
Figure 7: Track Changes toolbar

|
1 Show Changes |
5 Accept Change |
9 Accept & go to Next |
13 Insert Change Comment |
|
2 Record Changes |
6 Reject Change |
10 Reject & go to Next |
14 Protect Changes |
|
3 Previous Change |
7 Accept All Changes |
11 Manage Changes |
15 Compare Documents |
|
4 Next Change |
8 Reject All Changes |
12 Insert Comment |
16 Merge Documents |
Figure 8: Track Changes menu
Recording changes
To modify the default settings, see Chapter 20, Customizing Writer, for instructions on setting up how changes will be displayed.
1) To begin tracking (recording) changes, click Edit > Track Changes > Record. To show or hide the display of changes, click Edit > Track Changes > Show.
Tip
Hold the mouse pointer over a tracked change; you will see a Help Tip showing the type of change, the author, date, and time of day for the change. If Extended Tips are enabled, you will also see any comments recorded for this change.
2) To enter a comment on a tracked change, place the cursor in the area of the change and then click Edit > Track Changes > Comment or click the Insert Track Change Comment button on the Track Changes toolbar.
3) To stop recording changes, click Edit > Track Changes > Record again.
Tip
See also “Adding other comments” below for a way to annotate text that is not associated with a tracked change.
Accepting or rejecting changs
To accept or reject recorded changes, use any of these tools:
-
Track Changes toolbar (Figure 7)
-
Items on the Track Changes menu (Figure 8)
-
Right-click (context) menu
-
Manage Changes dialog
The results of accepting or rejecting a change are as follows:
-
Accept: incorporates the change into the document and removes the change indication marking.
-
Reject: reverts the change to its original state and removes the change indication marking.
Track Changes menu and toolbar
Right-click (context) menu
1) If tracked changes are not showing, click Edit > Track Changes > Show.
2) Hover the mouse pointer over a recorded change. A box appears with information about the type of change, who made it, and the date and time.
3) Right-click the changed text. In the context menu, choose Accept Change or Reject Change.
Manage Changes dialog
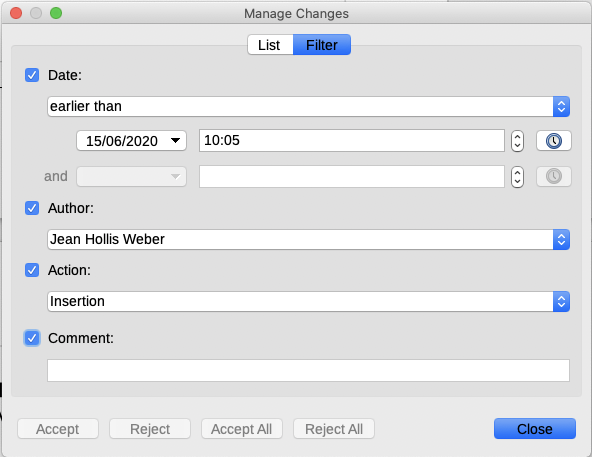
1) Click Edit > Track Changes > Manage. The Manage Changes dialog (Figure 9) opens, showing changes that have not yet been accepted or rejected.
2) When you select a change in the dialog, the change itself is highlighted in the document, so you can see what the editor changed.
3) Click Accept or Reject to accept or reject the selected change. You can also click Accept All or Reject All if you do not want to review the changes individually.
To show only the changes of certain people or only the changes on specific days or various other restrictions, use the Filter tab (Figure 10) on the Manage Changes dialog. After specifying the filter criteria, return to the List tab to see those changes that meet your criteria.
Figure 9: The List tab of the Manage Changes dialog
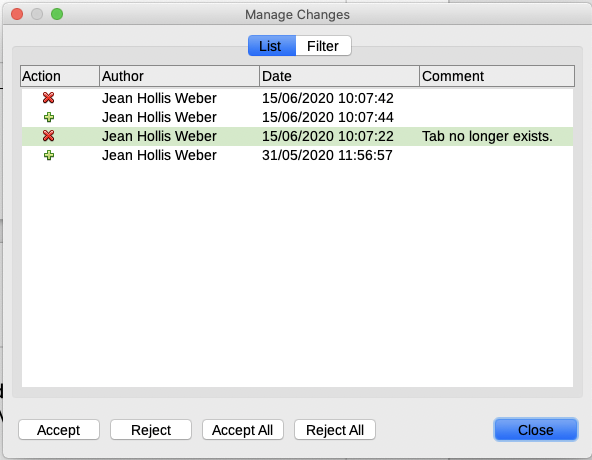
Figure 10: The Filter page of the Manage Changes dialog
Comparing documents
Sometimes reviewers may forget to track the changes they make. You can find the changes if you compare the original document and the one that is edited. To compare them:
1) Open the edited document. Select Edit > Track Changes > Compare Document.
2) A file browser dialog opens. Select the original document and click Open.
Writer finds and marks the changes and displays the Manage Changes dialog. From this point, you can go through and accept or reject changes as described earlier.
Merging modified documents
The processes discussed to this point are effective when you have one reviewer at a time. Sometimes, however, multiple reviewers all return edited copies of a document. Writer provides a facility to merge documents containing tracked changes into the original document, but the condition for making this work is very specific: the edited documents may differ only and exclusively in the recorded changes – all other original text must be identical.
To merge documents, all of the edited documents (but not the original document) need to have recorded changes in them.
1) Open the original document into which you want to merge all copies.
2) Click Edit > Track Changes > Merge Document. A file selection dialog opens.
3) Select the edited copy of the document to be merged with the first. If there have been no subsequent changes to the original document, the copy is merged into the original.
4) After the documents merge, you will see the recorded changes from the copy in the original document.
5) Repeat until all copies are merged.
All recorded changes are now included in the open copy. Save this file under another name.
Adding other comments
Writer provides another type of comment, which authors and reviewers can use to exchange ideas, ask for suggestions, or mark items needing attention.
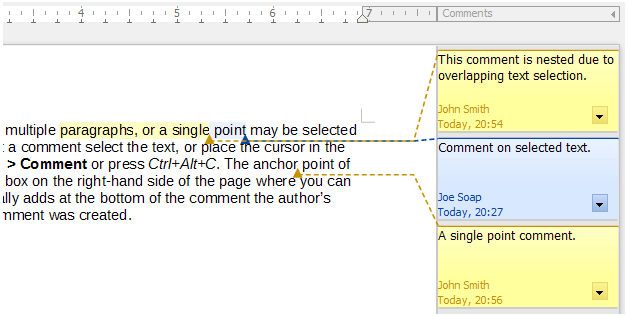
You can select a block of text, including multiple paragraphs, to be highlighted for a comment, or you can insert a comment at a single point. To insert a comment, select the text, or place the cursor in the place the comment refers to. Right-click and choose Insert > Comment or press Ctrl+Alt+C or click the Insert Comment button (not the same as the Insert Track Change Comment button) on the Track Changes toolbar.
The anchor point of the comment is connected by a dotted line to a box on the right-hand side of the page where you can type the text of the comment. A Comments button is also added to the right of the horizontal ruler (Figure 11); you can click this button to toggle the display of the comments on and off.
Writer automatically adds the author’s name and a time stamp indicating when the comment was created. Select Tools > Options > LibreOffice > User Data to enter or change the name you want to appear in the Author field of the comment.
When you are finished with your comment, click somewhere else on a page of your document. Otherwise, you will not be able to move away from the comment box.
If more than one person edits the document, each author is automatically allocated a different background color. Figure 11 shows an example of text with comments from two different authors. If an author selects text that overlaps another author’s comments, then the comments from the second author are nested with those of the first author.
Figure 11: Comments in LibreOffice
Right-click a comment to open a context menu where you can delete the current comment, all the comments from the same author, or all the comments in the document. From this menu, you can also choose Format all comments to open a dialog to apply some basic formatting to the text of the comment. You can also change font type, size, and alignment from the Menu bar.
When the document has been reviewed and commented and requires your action in its contents, you can mark the comment Resolved or Unresolved, using options on the comment’s context menu. When you mark the comment resolved, the word Resolved is inserted under the date in the comment box. You can toggle the display of all resolved comments in the document by using View > Resolved Comments on the Menu bar.
To navigate from one comment to another, open the Navigator (F5), scroll to find and expand the Comments section. Double-click the comment text to move the cursor to the anchor point of the comment in the document.
You can navigate the comments by selecting Comment in the Navigate By box at the top of the Navigator and clicking the Up and Down arrows next to it, to move to the next or previous comment.
You can also navigate the comments using the keyboard. Use Ctrl+Alt+Page Down to move to the next comment and Ctrl+Alt+Page Up to move to the previous comment.
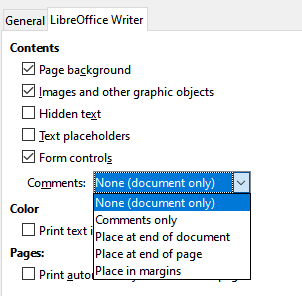
To print the comments in a document, choose one of the options below from the print dialog (File > Print > LibreOffice Writer tab).
Figure 12: Options for printing comments
Using footnotes and endnotes
Footnotes appear at the bottom of the page on which they are referenced. Endnotes are collected at the end of a document.
To work effectively with footnotes and endnotes, you need to:
-
Insert footnotes and define their format, if the default values do not meet your needs; see below.
-
Define the location of footnotes on the page, and the color and line style for separator lines, if the defaults to not meet your needs. See Chapter 5, Formatting Pages: Basics.
Inserting footnotes and endnotes
To insert a footnote or an endnote:
1) Position the cursor where you want the footnote or endnote marker to appear.
2) Select Insert > Footnote and Endnote on the Menu bar and choose Footnote or Endnote, or click the Insert Footnote or Insert Endnote button on the Standard toolbar.
3) A footnote or endnote marker is inserted in the text and, depending on your choice, the cursor is relocated either to the footnote area at the bottom of the page or to the endnote area at the end of the document. Type the footnote or endnote content in this area.
To change the default Footnote/Endnote settings, go to Tools > Footnotes and Endnotes on the Menu bar.
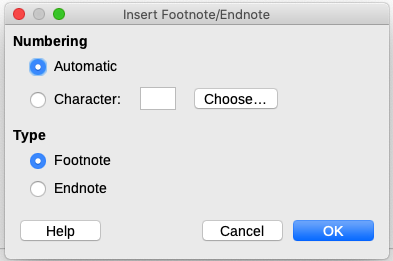
To choose whether to use the automatic numbering sequence specified in the footnote settings or specify a custom number, go to Insert > Footnote and Endnote > Footnote or Endnote on the Menu bar to open the Insert Footnote/Endnote dialog (Figure 13).
You can edit an existing footnote or endnote in the same way you edit any other text.
To delete a footnote or endnote, delete the footnote marker. The contents of the footnote or endnote are deleted automatically, and the numbering of other footnotes or endnotes is adjusted automatically.
Figure 13: Inserting a footnote/endnote
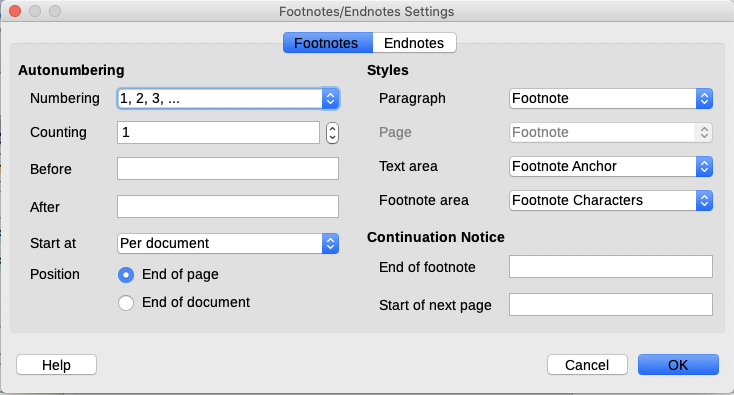
Formatting footnotes and endnotes
To format the footnotes themselves, click Tools > Footnotes and Endnotes. On the Footnotes/Endnotes Settings dialog (Figure 14), choose preferred settings.
Figure 14: Defining footnote formatting
Linking to another part of a document
Typed cross-references to other parts of a document can easily get out of date if you reorganize the order of topics, add or remove material, or reword a heading. Writer provides two ways to ensure that references are up to date:
The two methods have the same result if you Ctrl+click the link when the document is open in Writer: you are taken directly to the cross-referenced item. However, they also have major differences:
-
The text in a hyperlink does not automatically update if you change the text of the linked item (although you can change it manually), but changed text does automatically update in a cross-reference.
-
When using a hyperlink, you do not have a choice of the content of the link (for example text or page number), but when using a cross-reference, you have several choices, including bookmarks.
-
To hyperlink to an object such as a graphic, and have the hyperlink show useful text such as Figure 6, either give such an object a useful name instead of leaving it as the default name (“Graphics6”) or use the Hyperlink dialog to modify the visible text. In contrast, cross-references to figures with captions automatically show useful text, and you have a choice of several variations of the name.
-
If you save a Writer document to HTML, hyperlinks remain active but cross-references do not. (Both remain active when the document is exported to PDF.)
Using cross-references
To ensure that the text of cross-references update if you reword a heading, caption, or other linked item, use automatic cross-references. For details, see Chapter 17, Fields.
Using bookmarks
Bookmarks are listed in the Navigator and can be accessed directly from there with a single mouse click. In HTML documents, bookmarks are converted to anchors that you can jump to by hyperlink. You can also cross-reference to a bookmark. For more information, see Chapter 17, Fields.
Using hyperlinks
When you type text (such as website addresses or URL) that can be used as a hyperlink, and then press the spacebar or the Enter key, Writer automatically creates the hyperlink and applies formatting to the text (usually a color and underlining).
If this does not happen, you can enable this feature using Tools > AutoCorrect > AutoCorrect Options. On the Options tab, select the URL Recognition option.
If you do not want LibreOffice to convert a specific URL to a hyperlink, you can go to Edit > Undo on the Menu bar, or press Ctrl+Z immediately after the formatting has been applied, or place the cursor in the hyperlink, right-click, and select Remove Hyperlink in the context menu.
You can also insert hyperlinks to other parts of your document, to other documents or parts of documents, and to email addresses, using the Navigator and the Hyperlink dialog, and you can modify all hyperlinks using the Hyperlink dialog. For details, see Chapter 12, Creating HTML Files, in the Getting Started Guide.
The standard (default) behavior for activating hyperlinks within LibreOffice is to use Ctrl+click. This behavior can be changed in Tools > Options > LibreOffice > Security > Options by deselecting the option Ctrl-click required to open hyperlinks. If clicking in your links activates them, check that page to see if the option has been deselected.
Editing hyperlinks
To edit a hyperlink, click anywhere in the link text and then open the Hyperlink dialog by clicking the Hyperlink icon on the Standard Toolbar or choosing Edit > Hyperlink from the Menu bar. Make your changes and click Apply. If you need to edit several hyperlinks, you can leave the Hyperlink dialog open until you have edited all of them. Be sure to click Apply after each one. When you are finished, click Close.
To change the color of hyperlinks, go to Tools > Options > LibreOffice > Application Colors, scroll to Unvisited links and/or Visited links, select those options, pick the new colors and click OK. This will change the color for all hyperlinks in all components of LibreOffice, which may not be what you want.
Rearranging headings and text using the Navigator
You can use the Navigator (Figure 15) to move headings and their associated text to another location in a document by doing the following:
1) If necessary, click the expansion symbol (+ sign or arrow) to the left of a heading to expand the list of subheadings.
2) (Optional) If you have several subheading levels, you can more easily find the headings you want by changing the Heading Levels Shown selection to show only 1 or 2 levels of headings.
3) Click the heading of the block of text that you want to move and drag the heading to a new location on the Navigator. Or, click the heading in the Navigator list, and then click either the Promote Chapter or Demote Chapter icon. All of the text and subsections under the selected heading with it move up or down in the document.
Figure 15: Promote/Demote in Navigator
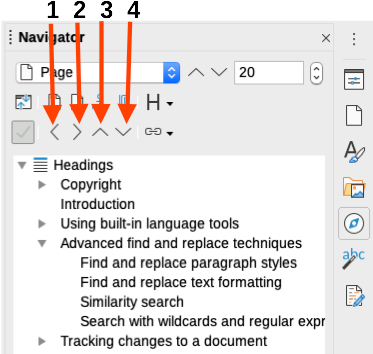
|
1 Promote Level |
3 Promote Chapter |
|
2 Demote Level |
4 Demote Chapter |
Tip
The names Promote Chapter and Demote Chapter might be better described as Move Up or Move Down (within the document, without changing the heading level) to distinguish them more clearly from Promote Level and Demote Level, which change the heading level—from Level 1 to Level 2, for example.
-
To change the outline level of a heading and its associated subheadings, select the heading in the Navigator, then click either the Promote Level or Demote Level icon. This action does not change the location of the headings, only their levels.
-
To change the outline level of only the selected heading, but not its associated subheadings, hold down Ctrl, and then click the Promote Level or Demote Level button.
Inserting material from other documents
You may wish to reuse material from other files in the document you are writing. For example, you might be writing a set of instructions that include some common paragraphs. You could, of course, retype or copy and paste the common paragraphs into each document. However, if the common paragraphs are edited, you may need to update that information in every document where it occurs.
Writer provides some tools for making these tasks easier:
-
The Section dialog, described in Chapter 6, Formatting Pages: Advanced.
-
Two items in the Navigator’s drag modes, described below.
To use the Navigator tools, first select the item you want to insert from the source document, then choose Insert as Link or Insert as Copy. You cannot create links or copies of graphics, OLE objects, references, or indexes using this method.
Insert as Link
Insert as Copy
Line numbering
Line numbers in the margin are often used in legal documents, poetry, and lists of programming code. Writer can insert line numbers in an entire document or for selected paragraphs. Line numbers are included when you print the document. You can also add a separator between line numbers. Figure 16 shows an example with numbering on every line.
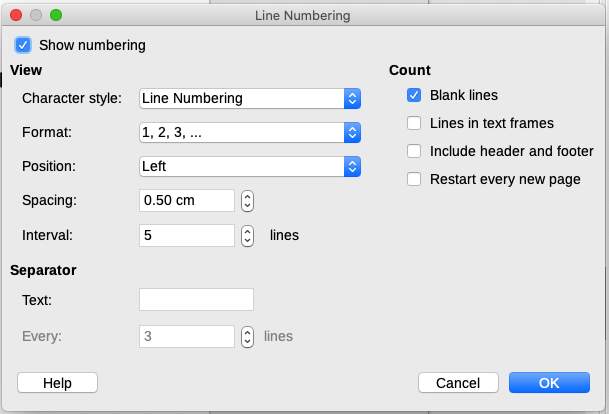
You can choose how many lines are numbered (for example, every line or every tenth line), the numbering type, and whether numbers restart on each page. In addition, a text separator (any text you choose) can be set on a different numbering scheme (one every 12 lines, for example).
To add line numbers to an entire document, click Tools > Line Numbering and select the Show numbering option in the top left corner of the Line Numbering dialog (Figure 17). Then select any options you want and click OK.
Figure 16: Line numbering example
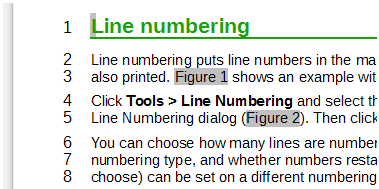
Figure 17: Line Numbering dialog
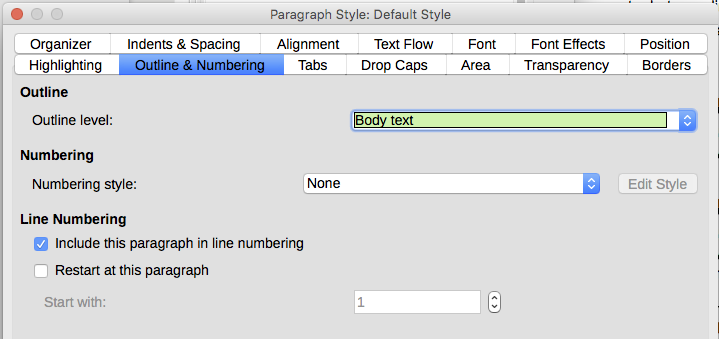
To disable line numbering for the entire document, you can edit the Default Style paragraph style (because all paragraph styles are based on the Default Style):
1) In the Sidebar, go to the Styles pane and click the Paragraph Styles icon.
2) Right-click the Default Style paragraph style and choose Modify.
3) Click the Outline & Numbering tab (see Figure 18).
4) In the Line Numbering area, clear the Include this paragraph in line numbering box.
5) Click OK.
Figure 18: Disabling line numbering for a document
To enable line numbering for specific paragraphs:
1) First disable the feature for the document (as above), then select the paragraphs where you want to add the line numbers.
2) Choose Format > Paragraph, and then click the Outline & Numbering tab (Figure 17).
3) Select Include this paragraph in line numbering
4) Click OK.
Alternatively, you can disable line numbering for specific paragraphs (while leaving most of them enabled) by selecting the paragraphs, choosing Format > Paragraph, going to the Outline & Numbering tab, and deselecting Include this paragraph in line numbering.
You can also create a paragraph style that includes line numbering, and apply it to the paragraphs that you want to add line numbers to. For example, to number the lines of example code in a document, you will probably want to use a font or indentation that is different from normal text.
To specify the starting line number:
1) Click in the paragraph and choose Format > Paragraph.
2) On the Outline & Numbering tab, make sure Include this paragraph in line numbering is selected.
3) Select Restart at this paragraph and enter a line number in the Start with box.
4) Click OK.