Copyright
This document is Copyright © 2021 by the LibreOffice Documentation Team. Contributors are listed below. You may distribute it and/or modify it under the terms of either the GNU General Public License (https://www.gnu.org/licenses/gpl.html), version 3 or later, or the Creative Commons Attribution License (https://creativecommons.org/licenses/by/4.0/), version 4.0 or later.
All trademarks within this guide belong to their legitimate owners.
Contributors
|
Jean Hollis Weber |
Kees Kriek |
Rafael Lima |
|
Jean Hollis Weber |
Toni Blackwelder |
Kees Kriek |
|
Shravani Bellapukonda |
Randolph Gamo |
Jenna Sargent |
|
Dante Legaspi |
Felipe Viggiano |
Pulkit Krishna |
|
Colleen Hayes |
John A Smith |
Peter Schofield |
|
Bruce Byfield |
Gillian Polack |
Cathy Crumbley |
|
Hazel Russman |
Leo Moons |
David Blymire |
|
Jeremy Cartwright |
John M. Długosz |
Barbara Duprey |
|
Jamie Eby |
Ron Faile Jr. |
Gary Schnabl |
|
Klaus-Jürgen Weghorn |
Rafael Atias |
|
Feedback
Please direct any comments or suggestions about this document to the Documentation Team’s mailing list: documentation@global.libreoffice.org
Note
Everything you send to a mailing list, including your email address and any other personal information that is written in the message, is publicly archived and cannot be deleted.
Publication date and software version
Published April 2021. Based on LibreOffice 7.1 Community.
Other versions of LibreOffice may differ in appearance and functionality.
Introduction
This chapter covers the basics of formatting text in Writer, the word-processing component of LibreOffice:
-
Formatting paragraphs and characters
-
Using autoformatting
-
Creating bulleted, numbered, and outline lists
It assumes that you are familiar with the text techniques described in Chapter 2, Working with Text: Basics and Chapter 3, Working with Text: Advanced.
We recommend that you also follow the suggestions in Chapter 20, Customizing Writer, about displaying formatting aids, such as end-of-paragraph marks, and selecting other setup options.
Page formatting is covered in Chapters 5 and 6.
Formatting: direct (manual) or styles
There are two basic ways to format text:
Direct (or Manual) formatting
Styles
Using styles is recommended
Writer is a style-based program. Because styles apply whole groups of formats at the same time, they enable you to easily format a document consistently and to change the formatting of an entire document with minimal effort. Therefore, the use of paragraph and character styles is highly recommended.
In addition, styles are used by LibreOffice for many processes, even if you are not aware of them. For example, Writer relies on heading styles (or other styles you specify) when it compiles a table of contents.
For information on styles and how to use them, see Chapters 8 and 9 in this book.
Applying styles is quick and easy using the Styles deck of the Sidebar.
Caution
Manual formatting (also called direct formatting) overrides styles, and you cannot get rid of the manual formatting by applying a style to it.
Removing manual formatting
To remove manual formatting, select the text and choose Format > Clear Direct Formatting on the Menu bar, or right-click and choose Clear Direct Formatting on the context menu, or click the Clear Direct Formatting icon on the Formatting toolbar, or press Ctrl+M on the keyboard.
Formatting paragraphs using styles
Styles can be applied to paragraphs in several ways, as described in Chapter 8, Introduction to Styles:
-
Set Paragraph Style drop-down list at the left end of the Formatting toolbar and the Formatting (Styles) toolbar
-
Set Paragraph Style drop-down list at the top of the Properties deck of the Sidebar
-
Paragraph tab of the Styles deck on the Sidebar
-
Styles menu on the Menu Bar (limited to common styles)
-
Keyboard shortcuts Ctrl+1 to Ctrl+5 (paragraph styles Heading 1 to Heading 5)
-
Formatting (Styles) toolbar using View > Toolbars > Formatting (Styles); see Figure 1.
Figure 1: Formatting (Styles) toolbar

Formatting paragraphs directly
You can apply many formats to paragraphs using the icons on the Formatting toolbar and on the Paragraph panel of the Sidebar’s Properties deck (View > Sidebar) or commands on the Format menu on the Menu bar. Other formatting options are provided in the Paragraph dialog (page below).
Formatting toolbar
On the Formatting toolbar, the icons and formats include:
-
Set Paragraph Style (drop-down list)
-
Align Left, Align Center, Align Right, Justified
-
Align Top, Center Vertically, Align Bottom
-
Toggle Bulleted List (with a palette of bullet types)
-
Toggle Numbered List (with a palette of numbering types)
-
Set Outline List Style (with a palette of outline types)
-
Set Line Spacing (choose from 1, 1.15, 1.5, 2, or custom spacing)
-
Increase Paragraph Spacing, Decrease Paragraph Spacing
-
Increase Indent, Decrease Indent, Hanging Indent
-
Paragraph (to open the Paragraph dialog)
-
Set Line Spacing
Not all toolbar icons are visible in a standard installation, but you can customize the toolbar to include those you use regularly (see Chapter 1, Introducing Writer).
Sidebar Properties deck
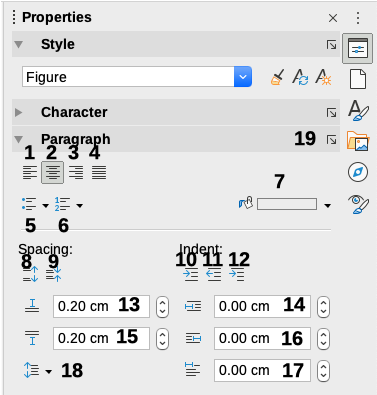
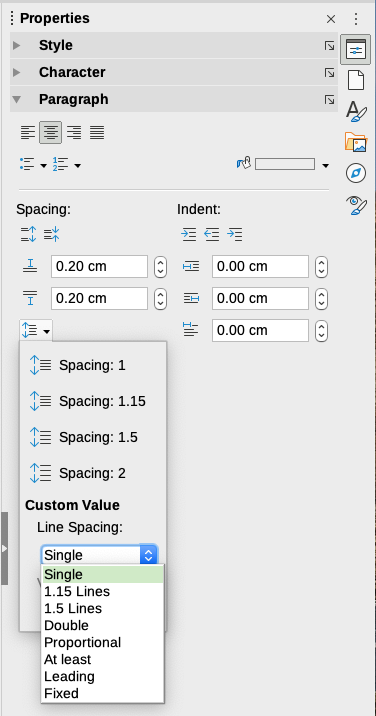
The Sidebar Properties deck (Figure 2) includes panels for applying styles, manually formatting characters, and manually formatting paragraphs. click the expansion symbol (+ or triangle) to open the panels if necessary.
Style panel
Character panel
Paragraph panel
Each panel’s title bar has a More Options button on the right, which opens the relevant dialog (Paragraph Style, Character, or Paragraph) containing additional settings. Changing the values of any of these settings affects only the paragraph where the cursor is located, or several paragraphs if more than one are selected. If you wish to change the values for many paragraphs of that type, you should use a paragraph style.
Figure 2: Style and Paragraph panels of the Properties deck in the Sidebar
|
1 |
Align Left |
8 |
Increase Spacing |
15 |
Indent From Left |
|
2 |
Align Center |
9 |
Decrease Spacing |
16 |
Indent From Right |
|
3 |
Align Right |
10 |
Increase Indent |
17 |
Indent First Line |
|
4 |
Align Justified |
11 |
Decrease Indent |
18 |
Line Spacing |
|
5 |
Bullets |
12 |
Hanging Indent |
19 |
More Options – opens relevant dialog |
|
6 |
Numbering |
13 |
Above Paragraph Spacing |
||
|
7 |
Background Color |
14 |
Below Paragraph Spacing |
|
|
Alignment options
You can use the buttons labelled 1–4 in Figure 2 to choose the alignment of a paragraph: Left, Right, Centered, or Justified. Figure 3 shows examples of the alignment options applied to text.
Figure 3: Text alignment options
Left aligned text.
Center aligned text.
Right aligned text.
Justified text inserts spacing between words to force the text to reach from margin to margin, if the text is longer than a single line.
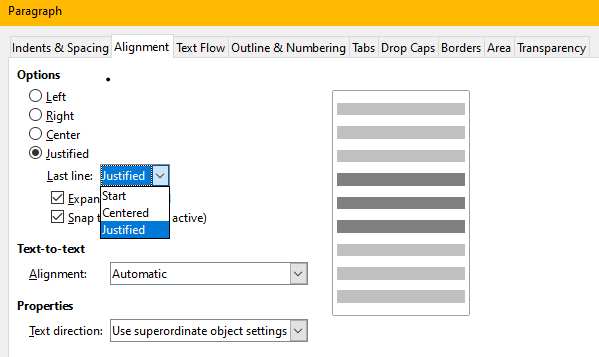
When using justified text, the last line is by default aligned to the left. However, you can also align the last line to the center of the paragraph area or justify it so that spaces are increased between the words in order to fill the whole line. If you select the Expand single word option, then whenever the last line of a justified paragraph consists of a single word, this word is stretched by inserting spaces between characters so that it occupies the full length of the line.
Figure 4 shows an example of the effect obtained when choosing each of these options for a typical text font. In most cases, leave the setting on the default (left-aligned); but for some dramatic purposes (such as a very large font on a poster), you might prefer one of the other choices.
Figure 4: Examples of choices for the last line of a justified paragraph
Three options are available for the alignment of the last line of a justified paragraph. This is an example of a left-aligned last line.
Three options are available for the alignment of the last line of a justified paragraph. This is an example of a centered last line.
Three options are available for the alignment of the last line of a justified paragraph. This is an example of a justified last line.
When the last line of a justified paragraph contains a single word, you can stretch the word to fill the entire line. This is an example with the Expand single word option selected.
These options are controlled in the Alignment tab of the Paragraph dialog (Figure 5), reached by choosing Format > Paragraph from the Menu bar, or by right-clicking in the paragraph and selecting Paragraph from the context menu, or by clicking the More Options button on the Paragraph panel in the Properties deck of the Sidebar.
Figure 5: Options for the last line of a justified paragraph
Line and paragraph spacing
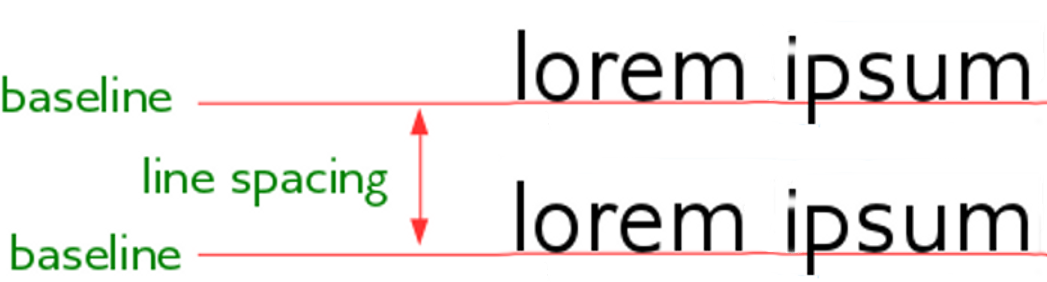
Line spacing (button 18, Figure 2) refers to the distance from one baseline (the imaginary line at the bottom of a letter like “n” or “m”) to the next baseline. It is determined by the size of the font, as illustrated in Figure 6.
The Line Spacing submenu is shown in Figure 7. Here you can choose among standard spacings or define a custom value: Proportional (for example, 110%), At least (the amount specified in the Value box), Leading, or Fixed. To see the differences between these choices, do a few sample paragraphs and change the selections.
Figure 6: Line spacing is the distance between two baselines
Note
All options except Fixed or At Least use the font’s default. These two allow you to set your own spacing, which is especially useful at small font sizes to increase readability.
Figure 7: Line spacing submenu
Paragraph spacing refers to the vertical spacing between one paragraph and the paragraphs above and below it. As shown in Figure 2, the current values are shown in the Above Paragraph Spacing box (13) and the Below Paragraph Spacing box (14). You can change either or both of these settings independently.
Tip
Paragraph spacing is often used in computer documentation, such as this book. Paragraph indentation (see next topic) is more commonly used in other documents. For good design, use paragraph spacing or paragraph indentation, never both.
Paragraph indentation
You can use the buttons labeled 10, 11, and 12 in Figure 2 to increase the amount of space to leave between the left and right page margins and the paragraph.
The distances are determined by settings 15 (Before Text Indent; that is, from the left margin), 16 (After Text Indent; that is, from the right margin), and 17 (First Line Indent, which indents the first line from the left margin, or from the specified indentation from the margin).
Button 12, Switch to Hanging Indent, leaves the first line at the left margin (or the specified indentation from the margin) and indents all the other lines of the paragraph by the amount specified by button 17 or in the Paragraph dialog.
This paragraph is an example of a paragraph with a first line indent. It is typical of paragraphs in books.
This paragraph is an example of a paragraph with a hanging indent. It is often used for numbered paragraphs or those with an icon or other image on the left.
Note
In right-to-left languages, the behavior of the Before Text and After Text indents is the opposite: “before” is on the right margin; “after” is on the left margin.
Paragraph background color
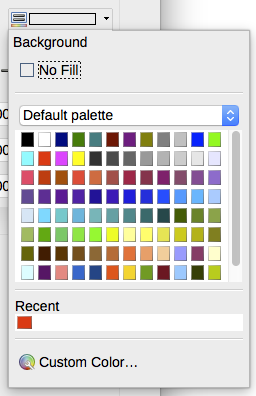
Click the button labeled 7 in Figure 2 to open a palette from which you can choose a color for the background of the paragraph. From this palette, you can also click Custom Color to open the Pick a Color dialog, where you can define new colors to be added to the palette.
Figure 8: Selecting a background color for a paragraph
Note
If the paragraph has been indented from the right or left margin, the background color is not applied to the area of the indent. To extend the color to the margin, use a frame, table, or other method; see Chapter 6, Formatting Pages: Advanced.
Settings on the Paragraph dialog
The paragraph dialog includes several more tabs: Tabs (covered in “Setting tab stops and indents” below), Borders, Drop Caps, Area (more choices than just color), Transparency, Text Flow, and Outline & Numbering. For more information, see Chapter 8, Introduction to Styles, and Chapter 9, Working with Styles.
Borders
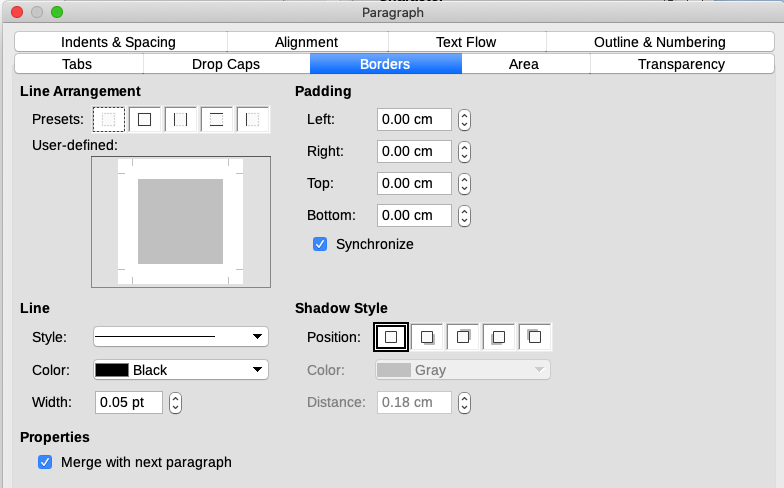
Borders are useful for setting a paragraph off from the surrounding text, to include digressions from the main topic. For example, the Tips, Notes, and Cautions in this book use a border below the text.
You can add borders to any combination of top, bottom, and sides of paragraphs. You can choose the style (solid, dotted, dashed, doubled), width, and color of the lines; these choices apply to all borders on a paragraph. The spacing from each line to the paragraph’s contents can be set individually for the top, bottom, left, and right.
On this dialog you can also choose to apply a shadow to a paragraph; “distance” refers to the width of the shadow.
Select the Merge with next paragraph option to suppress top or bottom lines when the indent, border, and shadow styles of the next paragraph are the same as the current paragraph.
Figure 9: Options for paragraph borders
Drop caps
Drop capitals are enlarged letters that mark the start of a new chapter or section. To improve consistency, they are best set up in a paragraph style that you apply to the relevant paragraphs. See Chapter 9, Working with Styles, for details.
Area
Area (also called “fill” and “background” in some parts of LibreOffice) includes five types of fill (background): color, gradient, bitmap, pattern, and hatching. Select a fill type to display the choices available for that type. These choices are covered in more detail in Chapter 5, Formatting Pages: Basics. You can also create your own fills.
Figure 10: Types of fill for paragraph backgrounds

Transparency
Transparency affects the paragraph’s background. It is useful for creating watermarks and making colors or images more pale (for more contrast with the text). The available choices are shown in Chapter 5, Formatting Pages: Basics, and are covered in detail in the Draw Guide.
Text Flow
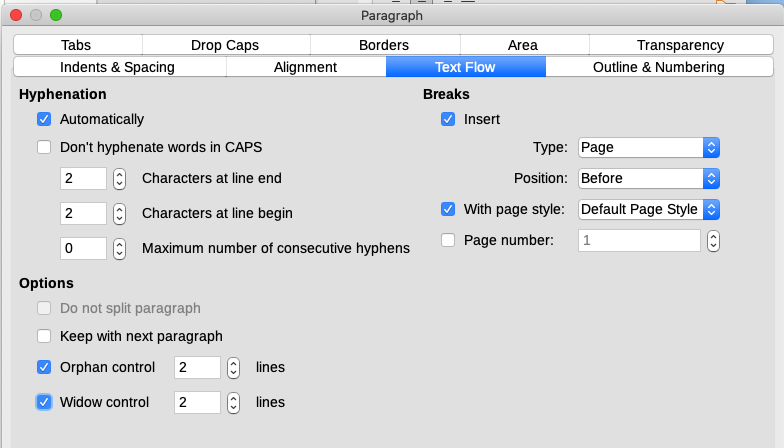
The Text Flow tab (Figure 11) has several sections. Hyphenation is covered in Chapter 2, Working with Text: Basics, and breaks are covered in Chapter 5, Formatting Pages: Basics.
In the Options section, you can specify how paragraphs are treated at the bottom of a page. Do not split paragraph and Keep with next paragraph should be self-explanatory. The other options allow you to avoid a single line at the bottom of a page (called an orphan) or a single line at the top of a page (a widow).
Figure 11: Options for text flow: hyphenation, breaks, and keeping text together
Outline & Numbering
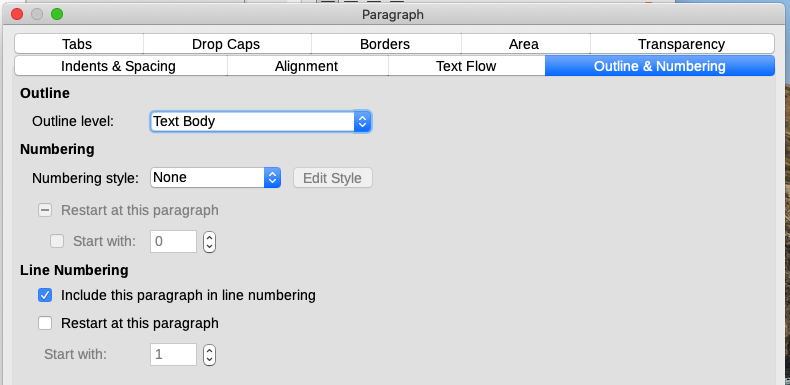
The Outline & Numbering tab on the Paragraph dialog provides options for choosing the outline level of the paragraph and its numbering (list) style. If the paragraph is part of a numbered list, you can specify that list numbering restarts at the paragraph, and what number to restart with.
This tab does not cover the same functions as the Chapter Numbering dialog (Tools > Chapter Numbering), but the Outline level selected here is related to the outline defined there. See Chapter 8, Introduction to Styles, and Chapter 9, Working with Styles, for a discussion of these features. Line numbering is discussed in Chapter 3, Working with Text: Advanced.
Figure 12: Selecting outline level, paragraph numbering, and line numbering
Setting tab stops and indents
The horizontal ruler shows the tab stops. Any tab stops that you have defined will overwrite the default tab stops. Tab settings affect indentation of full paragraphs (using the Increase Indent and Decrease Indent buttons on the Formatting toolbar or the Paragraph panel of the Properties deck in the Sidebar) as well as indentation of parts of a paragraph (by pressing the Tab key on the keyboard).
Tip
Many indents, for example at the beginning of a paragraph, can be set in the paragraph style, so you don’t need to use the Tab key to activate them.
Using the default tab spacing can cause formatting problems if you share documents with other people. If you use the default tab spacing and then send the document to someone else who has chosen a different default tab spacing, tabbed material will change to use the other person’s settings. Instead of using the defaults, define your own tab settings, as described in this section.
Figure 13: Specifying tab stops and fill characters
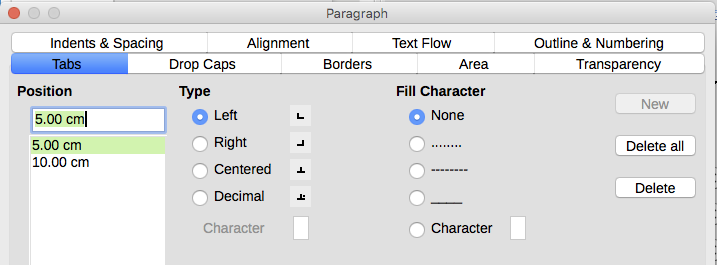
To define indents and tab settings for one or more selected paragraphs, right-click a paragraph and choose Paragraph to open the Paragraph dialog; then select either the Tabs tab (Figure 13) or the Indents & Spacing tab of the dialog. Alternatively, you can double-click the horizontal ruler to open the Indents & Spacing tab of the Paragraph dialog.
A better strategy is to define tabs for the paragraph style. Refer to Chapters 8 and 9 for more about paragraph styles.
Tip
Using tabs to space out material on a page is not recommended. Depending on what you are trying to accomplish, a table or frame is usually a better choice.
Changing the default tab stop interval
Caution
Any changes to the default tab setting will affect the existing default tab stops in any document you open afterward, as well as tab stops you insert after making the change.
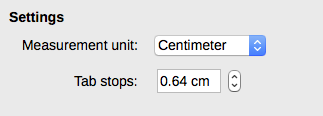
To set the measurement unit and the spacing of default tab stop intervals, go to Tools > Options > LibreOffice Writer > General.
Figure 14: Selecting a default tab stop interval
Changing measurement units for tab stops and rulers
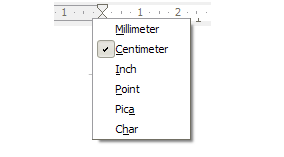
You can also set or change the measurement unit for rulers in the current document by right-clicking on the ruler to open a list of units, as shown in Figure 15 for the horizontal ruler. Click one of them to change the ruler to that unit. The selected setting applies only to that ruler.
Figure 15: Changing the measurement unit for a ruler
Formatting characters using styles
To apply a character style, highlight the characters or words and apply the selected character style from any of the following:
-
Character Styles tab of the Styles deck on the Sidebar
-
Styles menu on the Menu bar (limited)
-
Right-click context menu (limited)
-
Formatting (Styles) toolbar (Figure 1)
For more about character styles, refer to Chapter 8, Introduction to Styles, and Chapter 9, Working with Styles.
Formatting characters directly
You can apply many formats to characters using the buttons on the Formatting toolbar and by using the Characters panel of the Properties deck of the Sidebar. Not all toolbar buttons are visible in a standard installation, but you can customize the toolbar to include those you use regularly; see Chapter 1, Introducing Writer. These formats include:
-
Font Name, Font Size
-
Bold, Italic, Underline, Double Underline, Overline, Strikethrough, Outline
-
Superscript, Subscript
-
Uppercase, Lowercase
-
Increase Font Size, Decrease Font Size
-
Font Color (with a palette of colors)
-
Background Color (with a palette of colors)
-
Highlighting (with a palette of colors)
To change the characteristics of an entire paragraph (for example the font name, size, or color), and for many other purposes, it is highly recommended that you use styles rather than manually formatting characters. For information on styles and how to use them, see Chapters 8 and 9. Applying styles is quick and easy using the Styles and Formatting deck of the Sidebar.
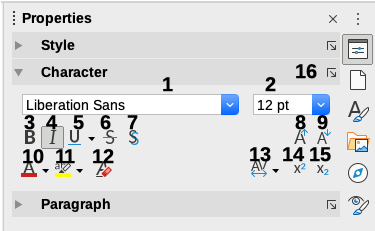
Figure 16 shows the Character panel in the Properties deck of the Sidebar. Clicking the down-arrow next to a button opens the control for further choices, such as font color or character spacing. The appearance of the buttons may vary with your operating system and the selection of icon size and style in Tools > Options > LibreOffice > View.
Click the More Options button (15) to open the Character dialog, which includes more choices than are available through the Formatting toolbar or the Sidebar.
Note
Just as direct paragraph formatting overrides the current paragraph style, applying direct character formatting to characters overrides the current character style formatting.
Font name, size, and effects
To change the font name and size used for selected characters, you can use the drop-down menus on the Formatting toolbar, the Character panel in the Sidebar, or the Character dialog.
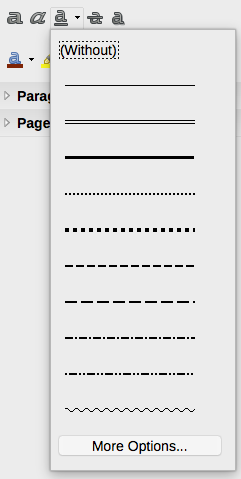
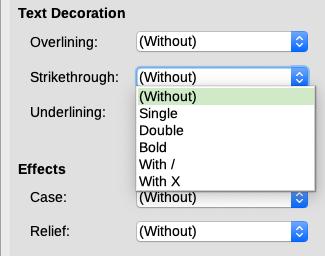
Similarly, you can apply bold, italics, underline, strikethrough, or shadow effects to selected characters from the Formatting toolbar, the Character panel in the Sidebar, or the Character dialog. The Underline effect has a drop-down menu of line types (Figure 17). The Formatting toolbar includes other effects that are not in the Sidebar: overline and double underline; these buttons may not be visible in a default installation.
To choose the color of the font or its highlighting, open the appropriate color palette (10 or 11; similar to the one shown in Figure 8). The highlighting selection over-rides any background color that has been applied to the paragraph.
To increase or decrease the font size of selected characters, you can click the relevant buttons on the Formatting toolbar or the Character panel in the Sidebar; however, you have no control over the amount of the increase or decrease, which is usually 2 points. For finer control, use the Font Size drop-down list instead.
Figure 16: Character panel in the Properties deck of the Sidebar
|
1 |
Font Name |
6 |
Strikethrough |
11 |
Highlight Color |
|
2 |
Font Size |
7 |
Toggle Shadow |
12 |
Clear Direct Formatting |
|
3 |
Bold |
8 |
Increase Font Size |
13 |
Set Character Spacing |
|
4 |
Italic |
9 |
Decrease Font Size |
14 |
Superscript |
|
5 |
Underline |
10 |
Font Color |
15 |
Subscript |
|
|
|
|
|
16 |
More Options – opens Character dialog |
Figure 17: Selecting the line style for the Underline effect
To change characters into subscripts or superscripts (using the default values for size and position), select them and click the relevant buttons on the Formatting toolbar or the Character panel in the Sidebar. For more control, use the Character dialog.
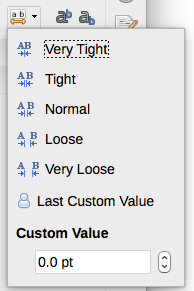
To quickly change the spacing between characters, select them and choose from the Character Spacing drop-down menu in the Sidebar (Figure 18).
Figure 18: Changing character spacing
Settings on the Character dialog
The Character dialog has six tabs, shown in this section. Most of these pages are the same as the abs on the Character Style dialog (see Chapter 9, Working with Styles).
Font and Font Effects
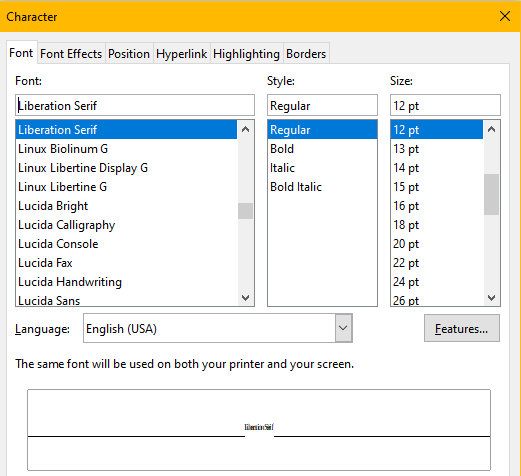
On the Font tab (Figure 19), you can specify the font’s family, style (choices vary with the font, but typically include regular, bold, and italic), and size; and the language for the paragraph, if it differs from the language for the document. The box at the bottom shows a preview of the selections.
Figure 19: Font tab of the Character dialog
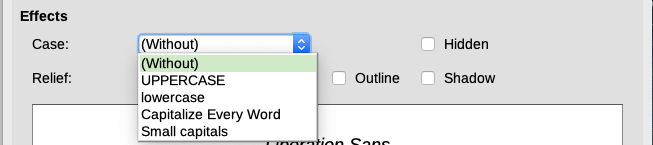
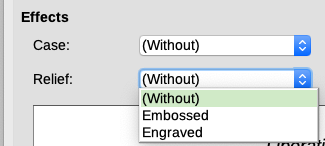
On the Font Effects tab (Figure 20), you can choose the color of the font and a range of effects, many of which are not suitable for formal documents. Figures Figure 21 and Figure 22 show the choices in some of the drop-down lists.
Figure 20: Font Effects tab of the Character dialog
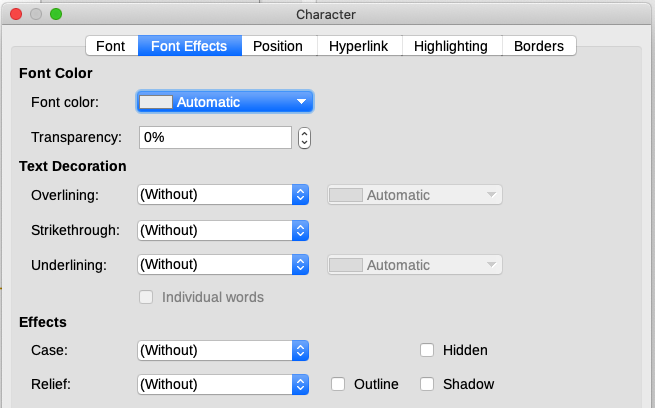
Figure 21: Choices for Case effect
Position
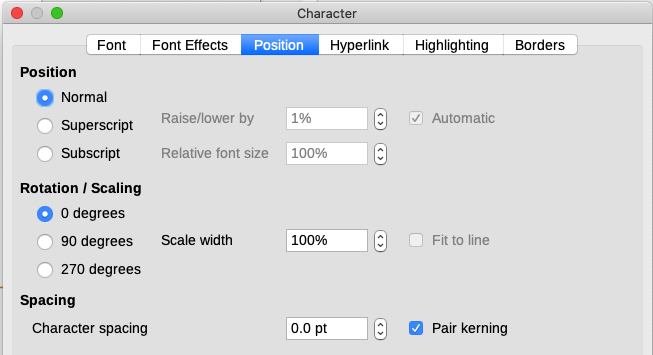
The Position tab (Figure 23) collects the options that affect the position of text on the page. This tab is divided into three sections: Position, Rotation/Scaling, and Spacing.
The Position section controls the appearance of superscripts and subscripts.
The Rotation/Scaling section controls the rotation of the characters. The Scale width box controls the percentage of the font width by which to compress or stretch the rotated text.
The Spacing section controls the spacing between individual characters. The Pair Kerning option (selected by default) automatically adjusts the character spacing for specific letter combinations. Kerning is only available for certain font types and, for printed documents, works only if your printer supports it.
Figure 23: Position tab of the Character dialog
Hyperlink
The Hyperlink tab of the Character dialog is an alternative to using the Hyperlink dialog (Insert > Hyperlink). It includes fewer choices and is specifically for text (not button) links. Hyperlinks can be to other parts of the same document, to other documents, or to web pages.
Figure 24: Hyperlink tab of the Character dialog
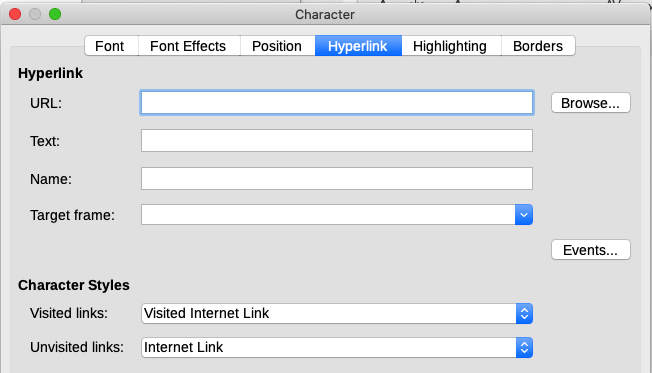
When LibreOffice recognizes a string of characters that may be a URL (internet address), it replaces the characters with a hyperlink and formats the hyperlink as specified in the Internet Link character style. On this dialog you can choose a different character style (if the style has been defined previously) or replace the URL with other text. To turn off this feature, choose Tools > AutoCorrect > AutoCorrect Options, go to the Options tab and deselect URL Recognition.
For more about creating and editing hyperlinks, see the Help system or Chapter 12 in the Getting Started Guide.
Highlighting
The Highlighting tab controls the background color for selected characters. It is similar to the Highlighting drop-down palette.
Borders
The Borders tab is the same as the Borders tab on the Paragraph dialog; see Borders.
Formatting lists using styles
Whenever possible, use paragraph styles for creating bulleted and numbered lists. Writer comes with two sets of paragraph styles for this purpose. However, these styles do not include options for settings such as the type of bullet or position of numbers. Those settings come from list styles, which are intended to be attached to paragraph styles. It is recommended to use them together in these ways:
-
Use paragraph styles List 1, List 2, List 3, and so on for creating bulleted lists. These styles use Bullet list styles.
-
Use paragraph styles Numbering 1, Numbering 2, Numbering 3, etc, for creating numbered lists. These styles use the list styles called Numbering 1, Numbering 2, etc.
With paragraph styles, you can easily create nested lists, in which list items have sub-items under them, as in an outline. This requires specifying the settings for the additional levels. Once you have set up nested lists, you can readily change the hierarchy of an item. To demote an item one level, position the cursor at the beginning of the line (after the bullet or number) and press the Tab key. To promote an item one level, press Shift+Tab.
For more about creating lists using styles, see Chapters 8 (Introduction to Styles), 9 (Working with Styles) and 12 (Lists: Tips and Tricks).
Formatting lists directly
You can directly format numbered or bulleted lists in several ways:
-
Use the Bullets and Numbering toolbar (Figure 25).
-
Use the Toggle Bulleted List and Toggle Numbered List buttons on the Formatting toolbar, the Formatting (Styles) toolbar, or the Paragraph panel of the Properties deck of the Sidebar (Figure 26).
-
Use the Bullets and Numbering dialog (Figures Figure 27 and Figure 28).
To produce a simple numbered or bulleted list, select the paragraphs in the list and then click the appropriate icon on the Paragraph panel on the toolbar.
Tip
It is a matter of personal preference whether you type your information first, then apply numbering/bullets or apply these as you type.
Note
Bullets and numbering applied in these ways cannot be removed with Format > Clear Direct Formatting on the Menu bar, or with the Clear Direct Formatting icon on the Formatting toolbar, or with Clear Direct Formatting on the context menu, or by using Ctrl+M. Rather, they are turned off or removed from selected text by toggling the relevant buttons on the Formatting toolbar, or on the Sidebar’s Properties deck.
Using the Bullets and Numbering toolbar
You can create a nested list (where one or more list items has a sub-list under it, as in an outline) by using the buttons on the Bullets and Numbering toolbar (Figure 25). You can move items up or down the list, create subpoints, change the style of bullets, add paragraphs without numbers or bullets (for list items that include more than one paragraph), and access the Bullets and Numbering dialog, which contains more detailed controls.
Use View > Toolbars > Bullets and Numbering to display the toolbar.
Figure 25: Bullets and Numbering toolbar

|
1 |
Demote One Level |
5 |
Move Down |
9 |
Insert Unnumbered Entry |
|
2 |
Promote One Level |
6 |
Move Up |
10 |
Restart Numbering |
|
3 |
Demote One Level with Subpoints |
7 |
Move Down with Subpoints |
11 |
Open the Bullets and Numbering dialog |
|
4 |
Promote One Level with Subpoints |
8 |
Move Up with Subpoints |
|
Tip
You can use keyboard shortcuts to move paragraphs up or down the outline levels. Place the cursor at the beginning of the numbered paragraph and press:
Tab = Down a level
Shift+Tab = Up a level
To insert a tab stop at the beginning of a numbered paragraph (that is, after the number but before the text), press Ctrl+Tab.
If you create a nested list using the buttons on the Bullets and Numbering toolbar, all the levels of the list (up to 10) initially apply the same numbering (or bullet) format. If you want to use a combination of numbering formats and bullets when creating nested lists, you can use these ways:
-
Click in each list item and then select one of the choices in the drop-down palettes under the Bullets and Numbering buttons on the Formatting toolbar or the Properties deck of the Sidebar, as described in “Using the Bullets and Numbering palettes on the Sidebar” below.
-
Use the Bullets and Numbering dialog, as described in “Using the Bullets and Numbering dialog” below.
However, a much better strategy is to define and apply a list style, as discussed in Chapter 12, Lists: Tips and Tricks.
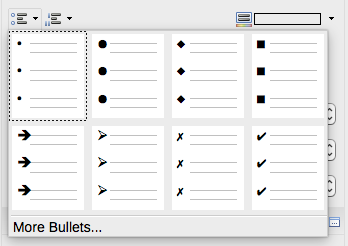
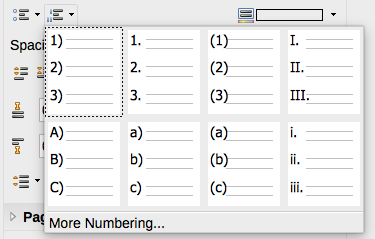
Using the Bullets and Numbering palettes on the Sidebar
The Bullets and Numbering palettes on the Paragraph panel on the Properties deck of the Sidebar can be used to create nested lists and access the Bullets and Numbering dialog. The Sidebar does not include tools for promoting and demoting items in the list, as found on the Bullets and Numbering toolbar.
Figure 26: Bullets and Numbering choices on the Properties deck of the Sidebar
Using the Bullets and Numbering dialog
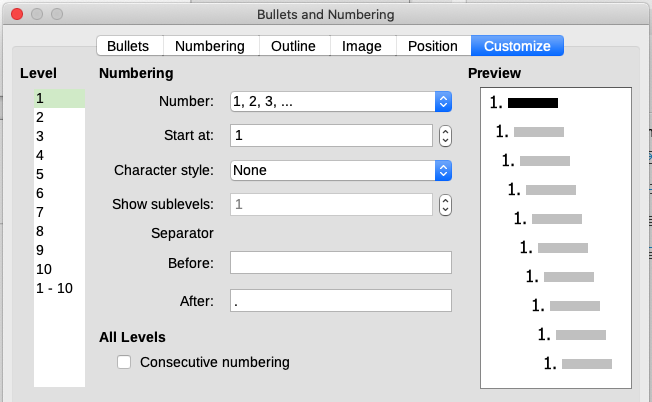
The Bullets and Numbering dialog has six tabs. Four tabs provide pre-defined symbols and sequences to choose from: Bullets, Numbering, Outline (choose from eight standard outline sequences), and Image (choose a bullet image). Two tabs provide detailed options for defining your own lists: Position (Figure 27) and Customize (Figure 28). These are the same as the tabs provided for list styles, discussed in Chapter 12, Lists: Tips and Tricks.
Figure 27: Position tab of the Bullets and Numbering dialog
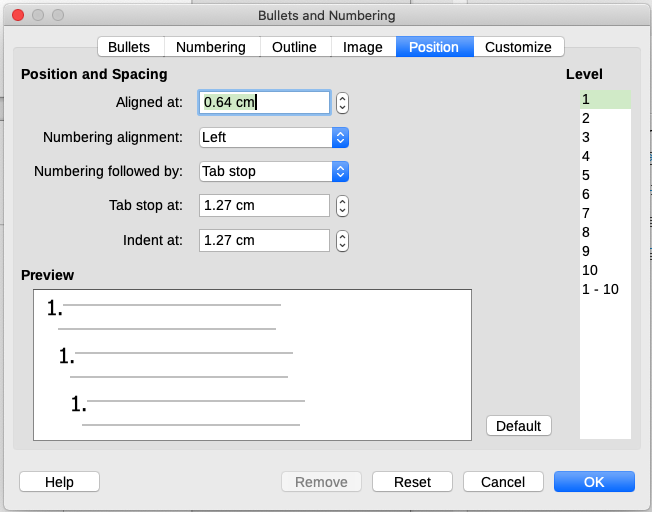
Figure 28: Customize tab of the Bullets and Numbering dialog
Autoformatting
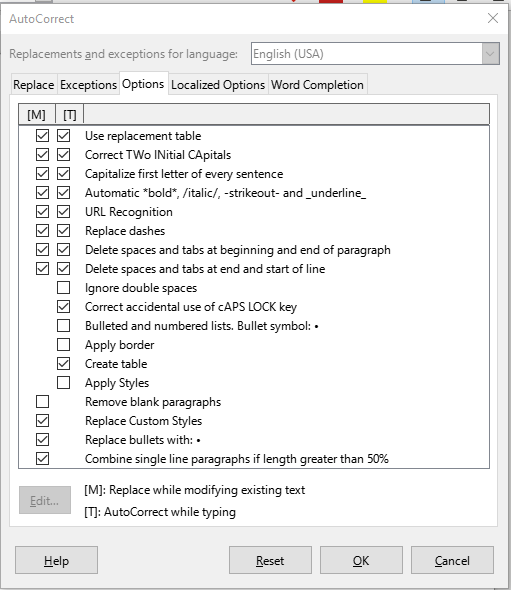
You can set Writer to automatically format parts of a document according to the choices made on the Options and Localized Options tabs of the AutoCorrect dialog (Tools > AutoCorrect > AutoCorrect Options). The Help describes each of these choices and how to activate the autoformats.
Tip
If you notice unexpected formatting changes occurring in your document, this is a good place to look for the cause.
To automatically format the file according to the options you have set, choose Tools > AutoCorrect and select or deselect the items on the submenu.
While Typing
Apply
Apply and Edit Changes
AutoCorrect Options
The Localized Options tab (Figure 29) controls the formatting of quotation marks and apostrophes (which look like a closing single quote). Most fonts include curly quotation marks (also known as “smart quotes”), but for some purposes (such as marking minutes and seconds of latitude and longitude) you may wish to format them as straight quotes.
|
Straight quotes |
Smart quotes |
|
' ' " " |
‘ ’ “ ” |
Tip
Most people keep the AutoCorrect setting for smart quotes and use the Special Characters dialog to insert straight quotes when needed. See Chapter 2, Working with Text: Basics.
Figure 29: Autoformatting quotation marks
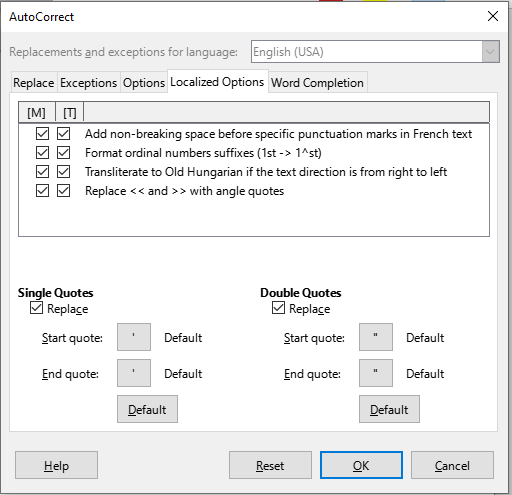
Figure 30: Autoformat choices on the Options tab of the AutoCorrect dialog