Copyright
This document is Copyright © 2021 by the LibreOffice Documentation Team. Contributors are listed below. You may distribute it and/or modify it under the terms of either the GNU General Public License (https://www.gnu.org/licenses/gpl.html), version 3 or later, or the Creative Commons Attribution License (https://creativecommons.org/licenses/by/4.0/), version 4.0 or later.
All trademarks within this guide belong to their legitimate owners.
Contributors
|
Jean Hollis Weber |
Kees Kriek |
Rafael Lima |
|
Jean Hollis Weber |
Toni Blackwelder |
Kees Kriek |
|
Shravani Bellapukonda |
Randolph Gamo |
Jenna Sargent |
|
Dante Legaspi |
Felipe Viggiano |
Pulkit Krishna |
|
Colleen Hayes |
John A Smith |
Peter Schofield |
|
Bruce Byfield |
Gillian Polack |
Cathy Crumbley |
|
Hazel Russman |
Leo Moons |
David Blymire |
|
Jeremy Cartwright |
John M. Długosz |
Barbara Duprey |
|
Jamie Eby |
Ron Faile Jr. |
Gary Schnabl |
|
Klaus-Jürgen Weghorn |
Rafael Atias |
|
Feedback
Please direct any comments or suggestions about this document to the Documentation Team’s mailing list: documentation@global.libreoffice.org
Note
Everything you send to a mailing list, including your email address and any other personal information that is written in the message, is publicly archived and cannot be deleted.
Publication date and software version
Published April 2021. Based on LibreOffice 7.1 Community.
Other versions of LibreOffice may differ in appearance and functionality.
Introduction
Writer provides several ways to control page layouts. Chapter 5, Formatting Pages: Basics, described the use of page styles and some associated functions. This chapter covers the use of:
-
Columns
-
Frames
-
Tables
-
Sections
-
Changing page orientation within a document
-
Borders and backgrounds
Note
All pages in a Writer document are based on page styles. The other layout methods described in this chapter build upon the underlying page style.
Tip
Page layout is usually easier if you select the options to show text, object, table, and section boundaries in Tools > Options > LibreOffice > Application Colors and the options for paragraph ends, tabs, breaks, and other items in Tools > Options > LibreOffice Writer > Formatting Aids.
Choosing a layout method
The best layout method depends on what the final document should look like, what sort of information will be in the document, and whether the document will be published in a fixed format (print, PDF) or a variable format (HTML, ePub) or more than one format. Here are some examples. The techniques mentioned are all described in this chapter.
-
For a book similar to this user guide with one column of text, some figures without text beside them, and some other figures with descriptive text, use page styles for basic layout, and use tables to place figures beside descriptive text, where necessary.
-
Use sections (with two or more columns) for an index or other document with two columns of text where the text continues from the left-hand column to the right-hand column and then to the next page, all in sequence. If the title of the document (on the first page) is full-page width, put it in a single-column section.
-
For a newsletter with a complex layout, two or three columns on the page, and some articles that continue from one page to some place several pages later, use page styles for basic layout, then place articles in linked frames. If necessary, anchor graphics to fixed positions on the page.
Tip
For a document to be published in HTML, EPUB, or another format that is not fixed, use minimal layout techniques. Some methods (columns, frames, wide tables) often do not export well to those formats.
Using columns to define the page layout
It is a good idea to define your basic page style (such as Default Page Style) with the most common layout to be used in your document, either single-column or multiple-column. You can then define extra page styles for pages with different numbers of columns.
Note
If you wish to combine different numbers of columns on a single page, you must use sections, as described in “Using sections for page layout” starting below.
To define the number of columns for a page style:
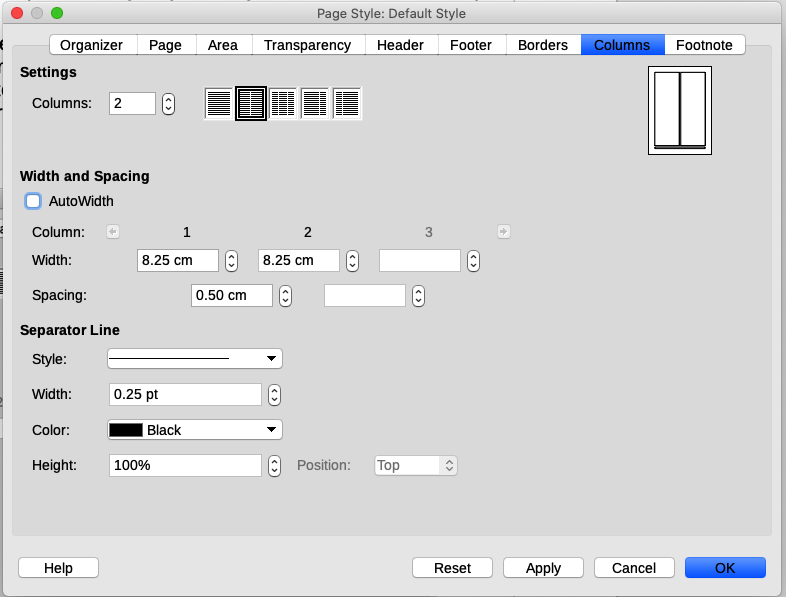
1) Choose Format > Page Style on the Menu bar, or right-click on the page and choose Page Style in the context menu, or click the More Options button in the Format section of the Page deck on the Sidebar, to open the Page Style dialog. Go to the Columns tab (see Figure 1).
2) In the Settings section, choose the number of columns and specify any spacing between them and whether you want a vertical separator line to appear between the columns. You can use one of Writer’s predefined column layouts, or you can create a customized column layout. The preview on the right shows how the column layout will look.
3) Click OK to save the changes.
Figure 1: Defining the number of columns on a page
Formatting column width and spacing
Select AutoWidth in the Width and Spacing section to create columns of equal or preset width. To customize the width and spacing of the columns:
1) In the Width and Spacing section, deselect the AutoWidth option.
2) In the Width selection boxes, enter a width for each column.
3) On the Spacing line, enter the amount of space that you want between each pair of columns.
If you specify more than three columns, use the arrow buttons on the Column line to scroll among the columns.
Formatting separator lines
Usually white space is all that is needed between columns, but if you prefer separator lines:
1) Using the Style drop-down list, select the line style from the three styles available.
2) Using the Width control, select the width of line to use, settable from 0.25pt to 9.0pt.
(1 point = 1/12 pica = 1/72 inch = 127/360 mm = 0.3527 mm.)
3) Using the Height control, select the height of line required, as a percentage of the column height. You can choose from the supplied values or type in measurements.
4) If you entered a height of less than 100%, use the Position drop-down list to select a vertical alignment for the separator lines. The vertical-positioning options are Top, Centered, or Bottom.
5) Select the line color from the Color drop-down list.
Distributing text across columns
As you add text to a column, the text flows from one column to the next. The last column may be shorter than the others.
To distribute text evenly, so that all the columns are approximately the same height, use a multi-column section instead; see “Formatting a section into columns” below.
Tip
Choose View > Formatting Marks (or press Ctrl+F10) to display end of paragraph markers (¶). Often, unexpected behavior of columns is due to extra paragraphs that are normally invisible but are taking up space.
Using frames for page layout
Frames can be very useful when producing newsletters or other layout-intensive documents. Frames can contain text, tables, multiple columns, pictures, and other objects. Use frames to:
-
Position something in a particular place on a page, for example, a logo or a “stop press” news box in one corner of a page.
-
Allow text on one page to continue on another page, somewhere more distant than the next one, by linking the content of one frame to another so the contents flow between them as you edit the text.
-
Wrap text around an object, such as a photograph.
Because LibreOffice does not allow you to define page styles with recurring frames (unless anchored in a header or footer), consider doing some quick sketches of the basic page layouts you need, indicating the approximate positions of different frames and their purposes. Keep the number of different page layouts as low as possible to avoid chaos in your design.
Pay special attention to the positioning of frames. A visually effective way to position a frame is to align its left margin with that of the paragraph above it. To do this, insert the frame in a blank paragraph of the same style as the paragraph above. Select Insert > Frame > Frame; in the Position section of the Type page of the Frame dialog (Figure 2), select From Left in the Horizontal selection box to position the frame exactly where you want it.
Also, think about the type of wrap and the spacing between the frame and text. Instead of placing a frame close to the text, use the Wrap page to place some white space between them.
You can format frames individually or define and apply frame styles; see Chapter 9, Working with Styles.
Creating a frame
You can create a frame in several ways:
-
Choose Insert > Frame > Frame to create an empty frame. The Frame dialog (Figure 2) opens. You can set the frame’s characteristics at this stage or click OK and come back to customize it later.
-
Select text and choose Insert > Frame > Frame to open the Frame dialog. Customize the frame (for example, to add space between the frame and the text) and click OK. The selected text is removed from the normal text flow and inserted into the frame.
-
Choose Insert > Frame > Frame Interactively to quickly draw an empty frame. The mouse cursor changes shape. Click and drag the mouse to draw an empty frame. To customize the frame, right-click it and choose Properties in the context menu.
-
Insert a formula or OLE object by selecting Insert > Object > [type of object]. The item is inserted and appears in a frame. To customize the frame, right-click it and choose Properties in the context menu.
To add content to a frame, first deselect the frame by clicking in an empty space somewhere else on the page. Then, click inside the frame to place the text cursor there. Now add content as you would on the main page. When you are done, deselect the frame.
Note
The menu item Insert > Frame > Floating Frame is for use with HTML documents.
Figure 2: Frame dialog

Frame toolbar
When you create or select a frame, the Frame toolbar (Figure 3) is displayed. By default, it replaces the Formatting toolbar. You can also display it by using View > Toolbars > Frame.
Figure 3: Buttons on Frame toolbar

|
1 Anchor |
6 Wrap Right |
11 Back One |
16 Border Style |
|
2 Wrap Off |
7 Wrap Through |
12 Send to Back |
17 Border Color |
|
3 Page Wrap |
8 Align |
13 To Foreground |
18 Background Color |
|
4 Optimal Page Wrap |
9 Bring to Front |
14 To Background |
19 Link Frames |
|
5 Wrap Left |
10 Forward One |
15 Borders |
20 Unlink Frames |
Moving, resizing, and changing frame attributes
When an object is added to Writer, it is automatically enclosed in a frame of a predetermined type. The frame sets how the object is placed on the page, as well as how it interacts with other elements in the document. You can edit the frame by modifying the frame style it uses or by manually formatting it when you add it to the document. Frame styles are discussed in Chapter 9, Working with Styles.
To change the size or location of a frame, first select the frame, then use either the mouse or the Frame dialog (Figure 2). Using the mouse is faster but less accurate.
Tip
You might want to use the mouse for gross layout and the dialog for fine-tuning.
You can re-size the frame manually in these ways:
-
Click on the green squares (sizing handles) and drag to the appropriate size.
-
Add content to it (the frame will re-size automatically if, for example, you add a large picture to it).
-
Go back to the Frame dialog and set the size and other characteristics.
To change the location of the frame using the mouse, drag and drop one of the edges or put the cursor anywhere within the frame. The cursor changes to a four-headed arrow when properly positioned for a drag-and-drop move.
To change the size of the frame, drag one of the sizing handles. Drag a handle on one of the sides to enlarge or reduce the text frame in one dimension only; drag a corner handle to enlarge or reduce it in both dimensions.
These resizing actions distort the proportions of the frame. Holding down the Shift key while dragging one of the handles makes the frame keep the same proportions.
To open the Frame dialog, select the frame, right-click, and choose Properties in the context menu.
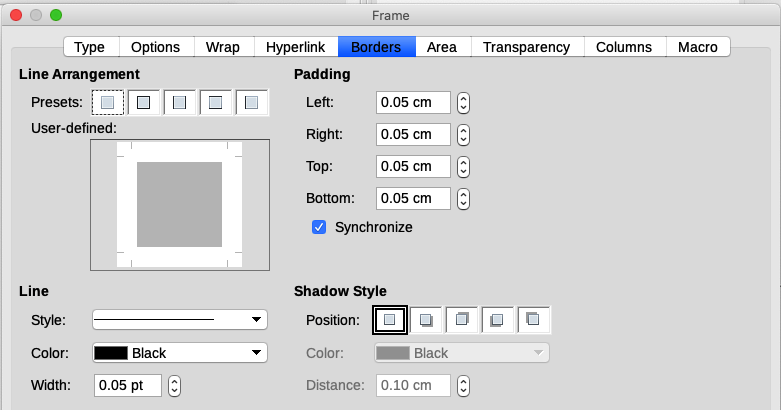
To add or remove a frame’s border, click the relevant button on the Frame toolbar (Figure 3) to display some choices; or open the Frame dialog, go to the Borders page (Figure 4), and in the Line Arrangement section, select the first Preset (Set No Borders); or assign a borderless style to the frame; see Chapter 9, Working with Styles, for information on frame styles.
Note
Do not confuse a frame’s border with the text boundaries that are made visible using the View menu (by selecting View > Text Boundaries).
Figure 4: Removing the border from a frame
Anchoring frames
To anchor a frame, click on it, then right-click and point to Anchor, or click the Anchor button on the Frame toolbar and select the type of anchor, or open the Frame dialog to the Type tab.
To Page (available only on Frame dialog, not the toolbar or context menu)
Linking frames
You can link frames to each other even when they are on different pages of a document. The contents will automatically flow from one to the next. This technique is very useful when designing newsletters, where articles may need to be continued on a different page.
Note
Text can only flow into a frame from one other frame, and flow on to one other frame. You can not link from a frame to more than one other frame.
To link one frame to another:
1) Select the frame to be linked from.
2) Click the Link Frames icon on the Frames toolbar.
3) Click the next frame in the series (which must be empty).
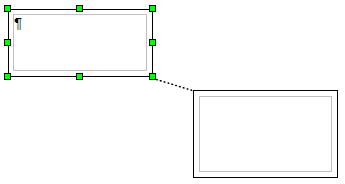
When a linked frame is selected, any existing links are indicated by a faint connecting line, as shown in Figure 5. Frames can be unlinked by selecting the Unlink Frames icon on the Frames toolbar.
Figure 5: Linked frames
The height of a frame that is being linked from is fixed; you can change this height manually or by using the Frame dialog, but it does not automatically adjust to the size of the contents (that is, the AutoHeight attribute is disabled). Only the last frame of a chain can adapt its height to the content.
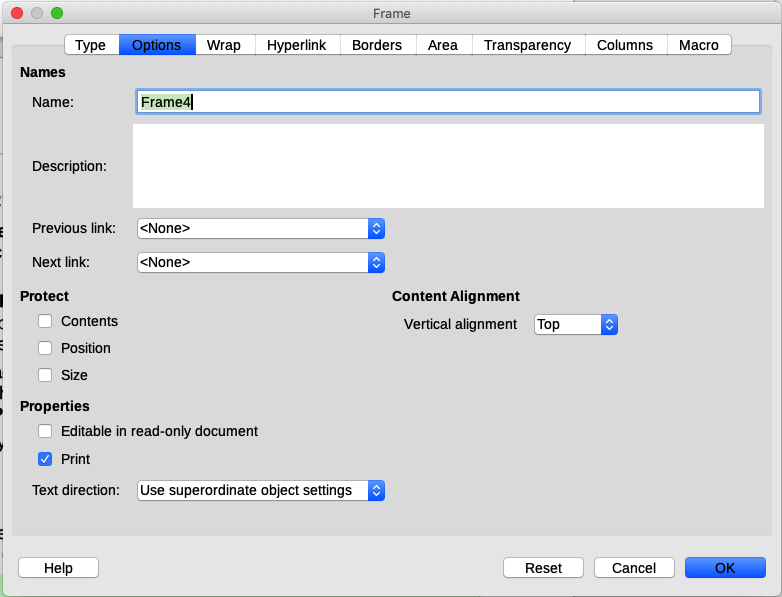
The Options page of the Frame dialog (Figure 6) shows the names of the selected frame and any frames it is linked to or from. You can change this information here. On this page, you can also select options to protect the contents, position, and size of the frame.
The Wrap, Borders, Area, Columns, Transparency, and Macro pages of the Frame dialog are the same as those for frame styles. Refer to Chapter 9, Working with Styles, for details.
Figure 6: Options page of the Frame dialog
Using tables for page layout
Writer’s tables can serve several purposes, such as holding data as you might see it in a spreadsheet, lining up material, and creating more complex page layouts. For information about using tables of data, see Chapter 13, Tables of Data.
This topic describes how to achieve some common layouts by using tables.
Positioning information in headers or footers
Instead of using tabs or frames, you can use a table in a header or footer to position different elements such as page number, document title, author, and so on. These elements are often inserted using fields, as described in Chapter 17, Fields.
Creating sideheads using tables
Sideheads and marginal notes are commonly used in documents such as resumes and computer user guides. The main body of the text is offset to leave white space (usually on the left-hand side) in which the sideheads or notes are placed. The first paragraph is aligned beside the sidehead, as in Figure 7.
Figure 7: Example of a sidehead
|
Example of a sidehead |
In some cases you may want to put only one or two paragraphs in the table itself and the rest of the text and graphics in ordinary paragraphs (formatted to line up with the paragraphs in the table) so that text and graphics will flow more easily from one page to another when you add or delete material. In other cases, you might put each paragraph in a separate row of the table and allow the table to break between pages. |
Note
Sideheads can also be created by placing text in a frame using the Marginalia frame style, as described in Chapter 9, Working with Styles.
Example
To create a table for use with a sidehead:
1) Place the cursor where you want the table to appear and choose Table > Insert Table (Ctrl+F12).
2) In the Insert Table dialog (Figure 8), define a two-column, one-row table with no heading. Choose None under Styles so the table will have no border. Click Insert.
3) Right-click the table and choose Table Properties in the context menu. On the Columns tab of the Table Properties dialog (Figure 9), set the column widths.
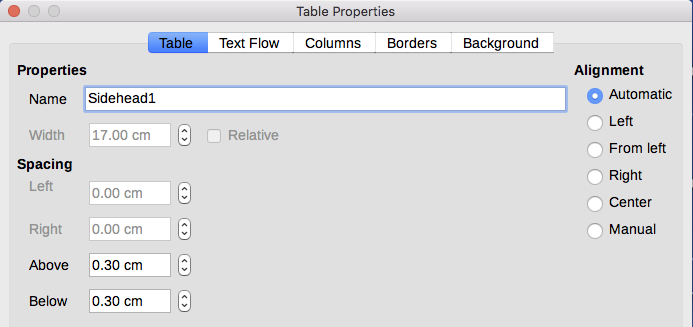
4) On the Table tab of the Table Properties dialog (Figure 10), in the Spacing section, make the Above and Below values the same as the Top and Bottom spacing you have defined for ordinary paragraphs of text. In the Properties section, optionally give this table a name. Click OK to save your settings.
Tip
To check the top and bottom spacing for a paragraph: position the cursor in the paragraph and open the Properties deck in the Sidebar. In the Paragraph section, look under Spacing for the values.
Figure 8: Defining a two-column borderless table with no heading
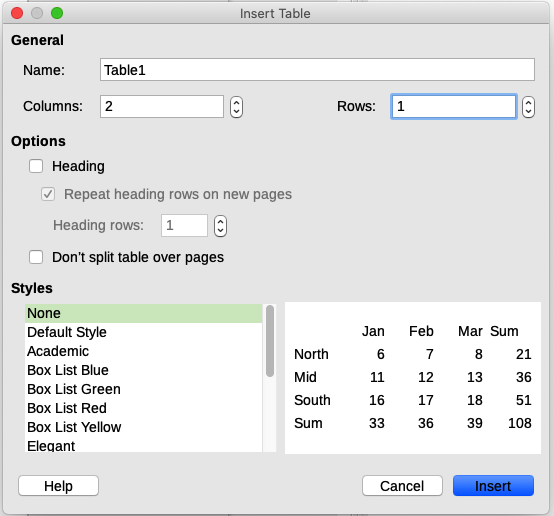
Figure 9: Defining a two-column table to line up with text offset at 3.3cm
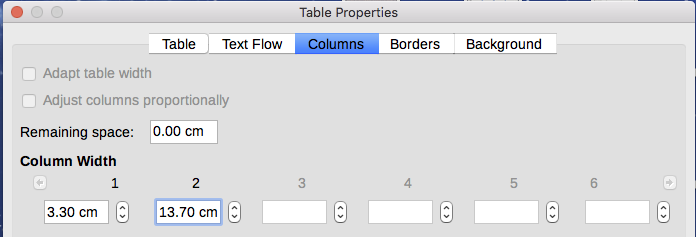
Figure 10: Defining the space above and below a table
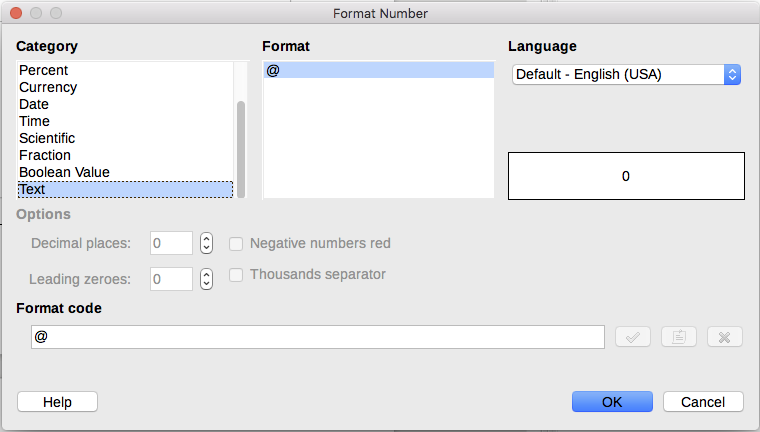
You may also want to turn off number recognition so that Writer will not try to format numbers if you want them to be plain text. To turn number recognition off:
1) Place the cursor in a table, and then select Table > Number Format on the Menu bar.
2) On the Format Number dialog (Figure 11), make sure the Category is set to Text.
3) Click OK.
Figure 11: Setting number format to Text
Tip
If you use this table format often, you may want to save it as a table style, using Table > AutoFormat Styles. See “Creating table styles” in Chapter 13, Tables of Data.
Using sections for page layout
A section is a block of text that has special attributes and formatting. You can use sections to:
-
Write-protect text.
-
Hide text.
-
Dynamically insert the contents of another document.
-
Add columns, margin indents, a background color, or a background graphic to a portion of your document.
-
Customize the footnotes and endnotes for a portion of your document.
Creating sections
To create a section:
1) Place the cursor at the point in your document where you want to insert the new section. Or, select the text that you want to place in the new section.
2) On the Menu bar, choose Insert > Section. The Insert Section dialog (Figure 12) opens.
3) Choose settings for each page of the dialog as described below. Click Insert.
The Insert Section dialog has five pages:
-
Use the Section page to set the section’s attributes.
-
Use the Columns page to format the section into columns.
-
Use the Indents page to set indents from the right and left margins of the section.
-
Use the Background page to add color or a graphic to the section’s background.
-
Use the Footnotes/Endnotes page to customize the section’s footnotes and endnotes.
Figure 12: Inserting a section using the Insert Section dialog

At any time before closing the dialog, you can reset a tabbed page other than the Section page to its default settings by clicking the Reset button. If you wish to undo changes to the Section page, you must do so manually.
Naming sections
Writer automatically enters a name for the section in the name box of the New Section list. To change the name, select it and type over it. The name is displayed in the Sections category of the Navigator window. Navigation is easier if you give your sections meaningful names.
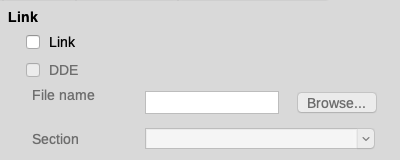
Linking sections
You can insert the contents of another document into the section and then have Writer update it whenever the other document is updated.
Note
If you want to insert only a part of the other document, be sure that part exists as a section in the document.
To link the section to another document, follow these steps:
1) In the Link section of the dialog (Figure 13), select the Link option.
2) Click the Browse button to the right of the File name field. The Insert dialog opens.
3) Find and select the required document and click the Insert button. The name of the selected document appears in the File name field.
4) If you want to insert only a section of the selected document, select the desired section from the Section drop-down list.
Figure 13: Linking sections
You can update links automatically or manually. See “Updating links” below.
Write-protecting sections
To write-protect the section so that its contents cannot be edited, select Protect in the Write protection area (Figure 14).
Note
Write-protection protects only the section’s contents, not its attributes or format.
Figure 14: Write-protecting sections
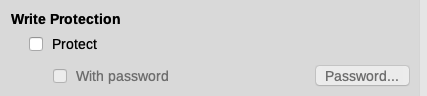
Password-protecting sections
Caution
Be very careful to remember or safely store the password, because it cannot be retrieved without advanced tools.
To prevent others from editing the section’s attributes or format, you can additionally protect the section with a password, as follows:
1) Select Protect and With password.
2) On the Enter Password dialog, type a password in the Password field and again in the Confirm field.
3) Click OK.
Anyone who tries to edit the section’s attributes or format will be prompted to enter the password.
Hiding sections
You can hide the section so that it will not be displayed on the screen or printed. You can also specify conditions for hiding the section. For example, you can hide the section only from certain users. Hiding is very useful for creating a single source document containing students’ and teachers’ copies of a document such as a test.
Note
You cannot hide a section if it is the only content on the page or if the section is in a header, footer, footnote, endnote, frame, or table cell.
To hide a section, select the Hide option in the Hide section of the dialog.
Figure 15: Hiding sections
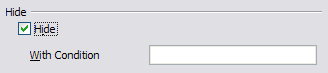
To hide the section only under certain conditions, enter the desired conditions in the With Condition field. The syntax and operators that you use to enter conditions are the same ones that you use to enter formulas. For syntax and a list of operators, see the Help under Conditions. See also Chapter 17, Fields.
If the section is write-protected with a password, the password must be entered to hide or reveal the text.
Formatting a section into columns
You can give some parts of a page one column and other parts of the page two or more columns. For example, you might have a page-width headline over a three-column news story.
Tip
You cannot select text on a multi-column formatted page and change it to a single column using this method. Instead, you need to define a single-column page style and then select the text you want to be in a two-column section on that page.
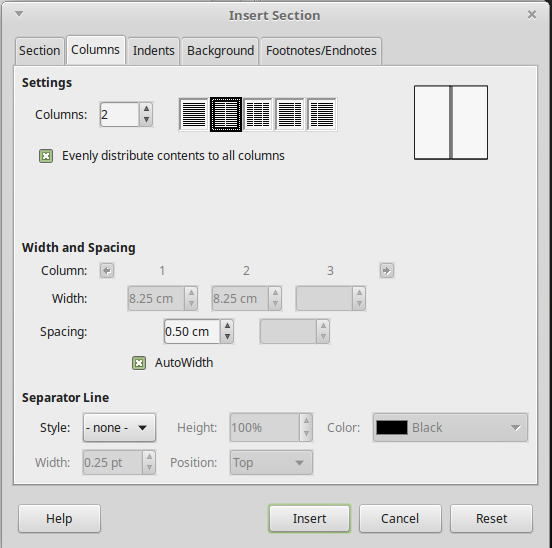
Use the Columns tab of the Insert Section dialog (Figure 16) to format the section into columns.
Figure 16: Choosing evenly distributed columns
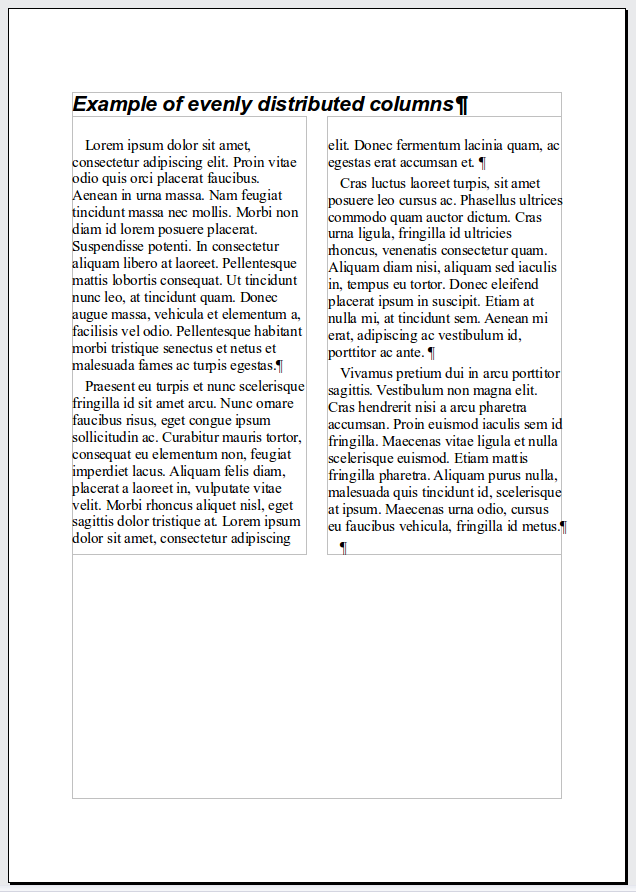
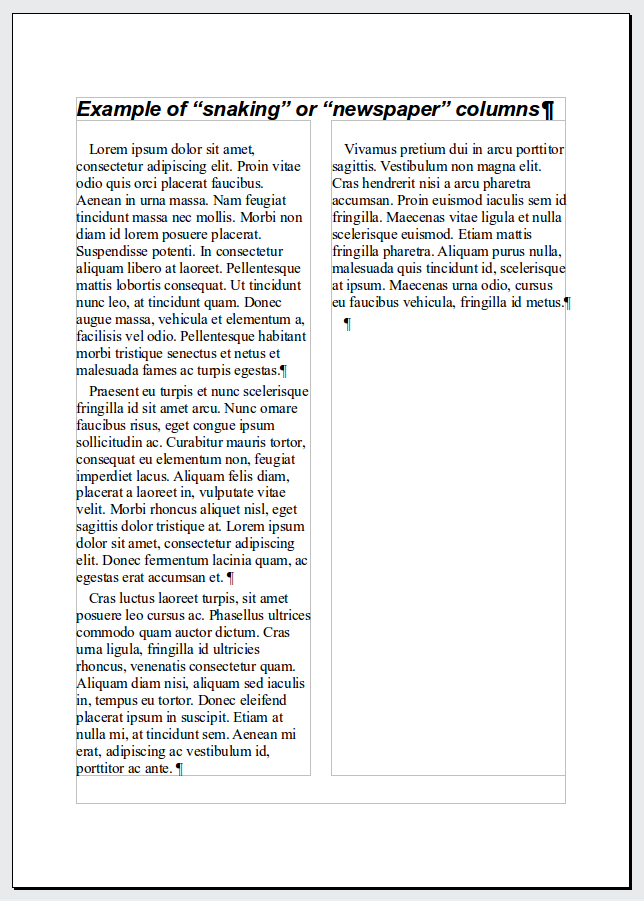
As you add text to the section, the text flows from one column to the next. You can distribute text across the columns in one of two ways, as shown in Figure 17.
Evenly distribute contents to all columns
|
Figure 17: (Left) Evenly distributed columns; (Right) Newspaper-style columns |
|
|
|
|
Indenting the section from margins
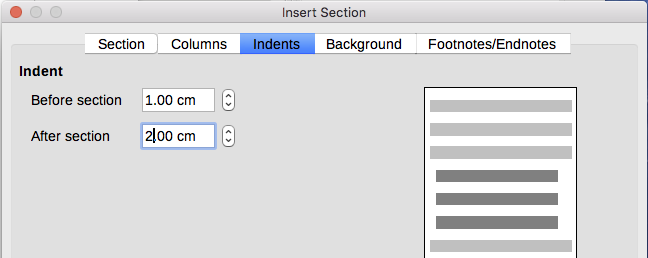
Use the Indents tab (Figure 18), to set indents from the right and left margins of the section.
Enter the desired left-margin indent in the Before section box. Enter the desired right-margin indent in the After section box. The preview box on the right-hand side of the tab shows you how the section will look with the indents applied.
Figure 18: Indenting sections
Changing the background of the section
Use the Background tab to add color or an image to the background of the current section. This page is similar to the Background tabs for paragraphs, frames, tables, and other objects. For more information, refer to “Defining borders and backgrounds” below and to the Draw Guide.
Customizing footnotes and endnotes in a section
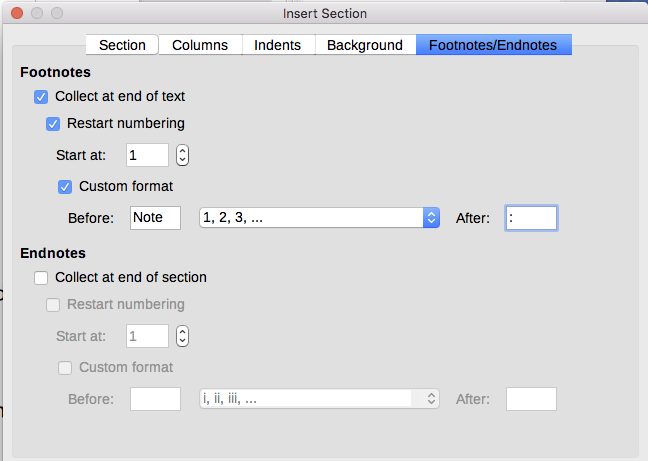
Use the Footnotes/Endnotes page of the Insert Section dialog (Figure 19) to customize the current section’s footnotes and endnotes.
Figure 19: Setting footnotes and endnotes for sections
Customizing footnotes
To number the section’s footnotes separately from the other footnotes in the document, and format the numbering, follow these steps:
1) In the Footnotes section of the page, make sure that Collect at end of text is selected.
2) Select Restart numbering.
3) To start the section’s footnotes at a number other than 1, enter the desired starting number in the Start at box.
4) Select the Custom format option. In the drop-down list, select a numbering format for the footnotes.
To add text to the selected numbering format, use the Before and After boxes. For example, if you want the footnote numbers to be preceded by the word Note and followed by a colon, fill the Before and After boxes as shown in Figure 19.
Customizing endnotes
If you want the section’s endnotes to appear at the end of the section rather than at the end of the document, select the Collect at end of section option in the Endnotes area.
To number the current section’s endnotes separately from the other endnotes in the document, and format the numbering, apply the procedures described above to the Endnotes settings.
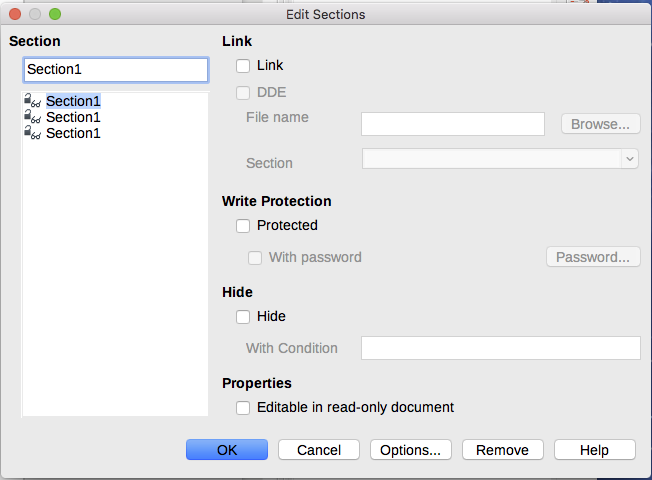
Editing and deleting sections
To edit a section, choose Format > Sections on the Menu bar. In the Edit Sections dialog (Figure 20), select the section you want to edit by clicking its name in the Section list.
Editing section attributes
To rename the selected section, type over its name in the Section name box.
On the Edit Sections dialog, you can also edit the selected section’s link, write-protect, and hide attributes. To learn how to edit these attributes, see “Linking sections” above, “Write-protecting sections” above, and “Hiding sections” above.
Figure 20: Edit Sections dialog
Editing the format of a section
To edit the format of the selected section, click the Options button.
The Options dialog has four tabs: Columns, Indents, Background, and Footnotes/Endnotes. These tabs are the same as those in the Insert Section dialog described earlier.
To reset a tab to the conditions in place when the dialog opened, click the Reset button. To save the Options settings, click OK. You are returned to the Edit Sections dialog.
Removing sections
To remove the selected section, click the Remove button. This does not delete the contents of the section; the contents become part of the main document. If the contents were linked, they are now embedded.
Updating links
You can set Writer to update linked sections automatically, and you can also update links manually.
Updating links automatically
To set Writer to update links without prompting you, or to turn off automatic updating, follow these steps:
1) Choose Tools > Options > LibreOffice Writer > General. The dialog displays general text document settings.
2) In the Update links when loading section of the dialog, select one of the options:
-
Always if you want Writer to update links automatically, without prompting you, whenever you open a document that contains links.
-
On request if you want Writer to prompt you before updating links.
-
Never if you do not want Writer to update links.
3) Click OK to save your settings.
Updating links manually
A protected section must first be unprotected before it can be updated.
To update a link manually:
1) Open the document that contains the link.
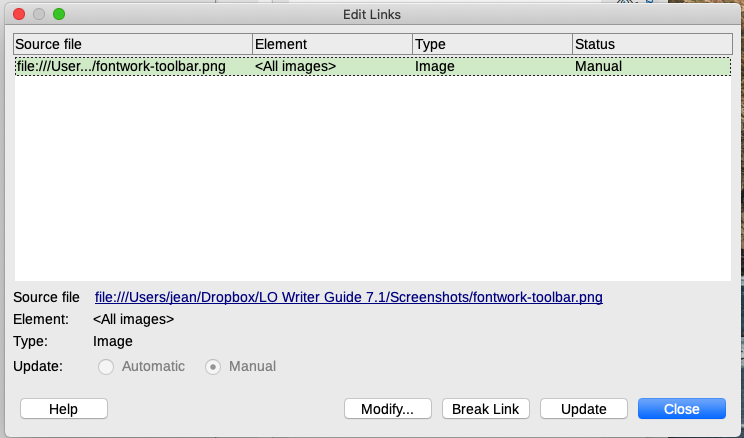
2) Choose Edit > Links to External Files.
3) The list in the Edit Links dialog (Figure 21) displays the names of all the files that are linked to the current document. Select the file that corresponds to the link that you want to update.
4) Click the Update button. The most recently saved contents of the linked file appear in the current document. To close the Edit Links dialog, click Close.
Figure 21: Edit Links dialog
Removing links
To remove a link to a file and embed its contents, go to the Edit Links dialog, select the file that corresponds to the link you want to remove, and click the Break Link button. This action does not delete the text in the Section; it just breaks the link. If desired, the text must be removed manually.
Changing page orientation within a document
A document can contain pages in more than one orientation. A common scenario is to have a landscape page in the middle or end of a document, where the other pages are in portrait orientation. Here are the steps to achieve it.
Setting up a landscape page style
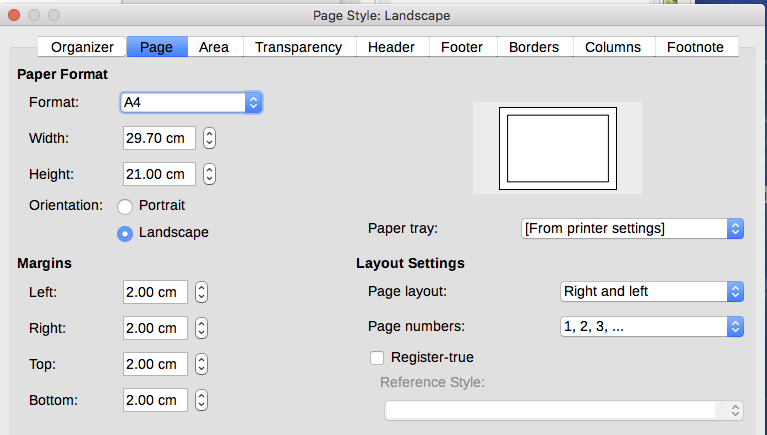
1) If you wish to keep the margins the same as on other pages, then note the margin settings of the current page style. (You can find the margin settings on the Page tab of the Page Style dialog.)
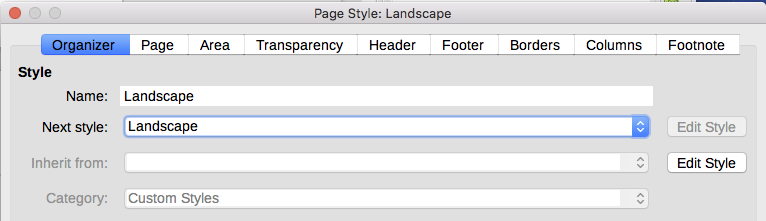
2) On the Styles deck of the Sidebar, right-click Landscape in the list of page styles and choose Modify.
3) On the Organizer tab of the Page Style dialog (Figure 22), make sure Next Style is set to Landscape (to allow for having more than one sequential landscape page).
Figure 22: Set the next page style to Landscape
4) On the Page tab of the Page Style dialog (Figure 23), make sure Orientation is set to Landscape. Change the margins so that they correspond with the margins of the portrait page. That is, the portrait top margin becomes the landscape left margin, and so on.
5) Click OK to save the changes.
Figure 23: Set orientation and margins for a landscape page
Inserting a landscape page into a portrait document
Now that you have defined the Landscape page style, here is how to apply it:
1) Position the cursor in the paragraph or table at the start of the page that is to be set to landscape. Right-click and choose Paragraph > Paragraph or Table Properties, respectively, in the context menu.
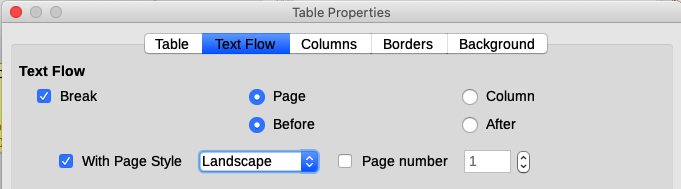
2) On the Text Flow page of the Paragraph dialog (Figure 24) or the Table Properties dialog (Figure 25), select Insert (or Break for a table) and With Page Style. Set the Page Style property to Landscape. Click OK to apply the new page style.
3) Position the cursor in the paragraph or table where the page is to return to portrait orientation and change the paragraph properties or table properties so that With Page Style is the portrait page style that was used before the Landscape page style. Click OK to return to the portrait page style.
Figure 24: Specifying a page break before a paragraph

Figure 25: Specifying a page break before a table
Portrait headers on landscape pages
When you define a header and footer on a landscape page, they will be aligned with the long side of the page. If your landscape pages are inserted between portrait pages, you might want the headers and footers to be on the short sides of the landscape pages, so the final printed product looks like the contents of the landscape pages have been rotated 90 degrees on portrait pages.
You can set up portrait headers and footers on landscape pages by using a trick involving frames. These are a bit tedious to set up, but once you have done so, you can copy and paste them to other landscape pages. This cannot be made part of the landscape page style. In the following example we want to insert a landscape page into our printed document, to have the same header and footer, and margins, as our portrait pages. We will use an A4 page size.
To set up portrait headers and footers on landscape pages:
1) Note the margin settings for the portrait page which is the same as the landscape page will be, that is to say, for a right landscape page, the settings from a right portrait page (see the table).
2) Set the frame for the footer in the same way as for the header. Apply these margin settings in the Landscape page style.
|
Portrait page (right page) |
Landscape page (right page) |
||
|
Top margin |
1.5 cm |
Right margin |
2.5 cm |
|
Bottom margin |
1.5 cm |
Left margin |
2.5 cm |
|
Left (inner) margin |
2.8 cm |
Top margin |
2.8 cm |
|
Right (outer) margin |
1.8 cm |
Bottom margin |
1.8 cm |
3) Copy and paste the footer from the portrait page into a blank paragraph in the text. Paste or move it into the landscape page. This text will then have the Footer style so the typeface, font size, and tab settings will match.
Figure 26: Copy the footer, paste, and select it

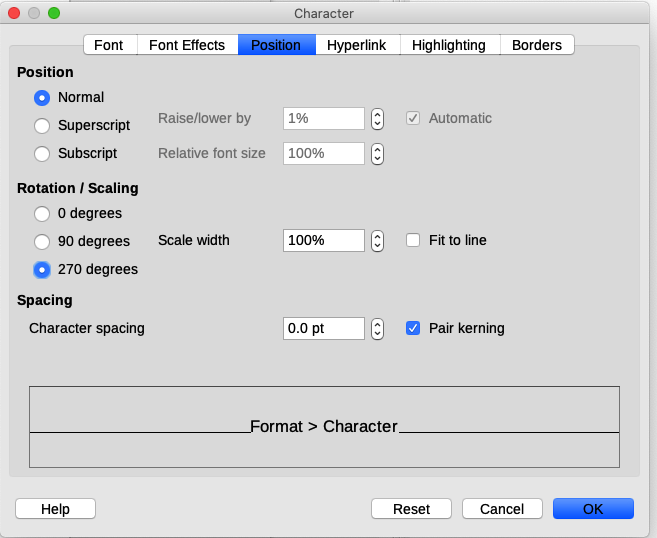
4) Select the text (including the fields) you just entered. Choose Format > Character. On the Character dialog, choose the Position tab and set Rotation / Scaling to 270 degrees (counterclockwise). Click OK.
Figure 27: Rotating the footer text 270 degrees
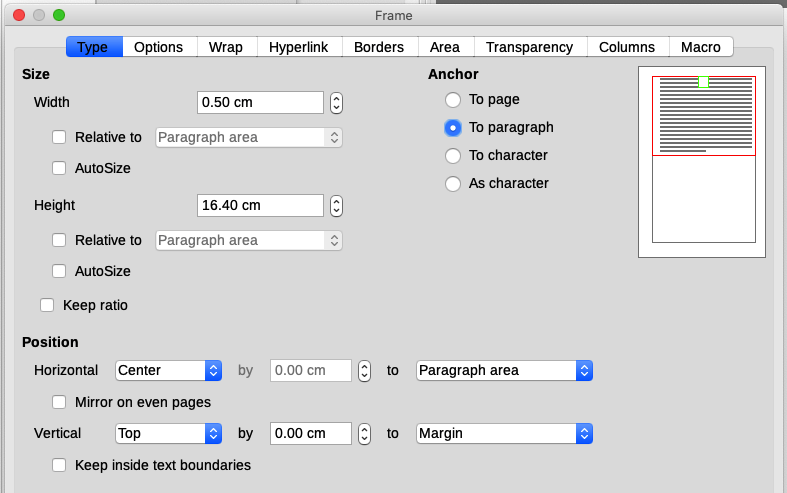
5) With the text still selected, choose Insert > Frame > Frame. In the Frame dialog (Figure 28), select the Type tab and enter the width, height, and horizontal and vertical position for the footer. Deselect the Automatic options in Width and Height if they are selected.
-
The width is the footer height taken from the Footer page of the portrait page style dialog.
-
The frame height is obtained by simple arithmetic. The A4 page-width is 21cm, minus the sum of the top and bottom margins of 2.8cm and 1.8cm resulting in a frame height of 16.4cm.
-
The horizontal position is the portrait page bottom margin.
-
The vertical position is the landscape page top margin.
6) If your footer has a line above the text, as in this book, on the Borders tab, select a right border and specify the line width and spacing to the frame’s contents.
7) Click OK to save these settings. The footer will now appear in the required position and orientation. Any fields will update.
8) Because tabs have been removed, insert the cursor in the frame, at the end of the text where the tab was, and insert as many spaces using the keyboard space bar, as you require for the layout to match that on the portrait page.
Repeat these steps (using appropriate settings) to set up a portrait header on the landscape page.
Figure 28: Defining the size and position of the footer frame
Caution
Make sure to return to the paragraph in the document from which you rotated the text, and return it to 0 degrees, or any text typed in this location will rotate.
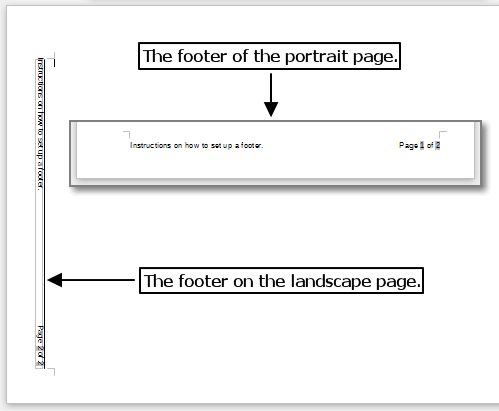
Figure 29: Footers in place for both page styles
Defining borders and backgrounds
You can apply borders and backgrounds to many elements in Writer. Paragraphs, pages, frames, sections, page styles, paragraph styles, character styles, and frame styles can include both borders and backgrounds. The dialog pages for borders and backgrounds are similar in each case. To illustrate their use, we will define a border and background for a frame.
Tip
Page backgrounds fill the entire page (sheet of paper), but page borders surround only the area within the margins, including the header or footer (if any exist).
Tables of data can also have borders and backgrounds, although the choices for background are limited to Color or Bitmap. See Chapter 13, Tables of Data, for details.
Adding a border
To begin, select the frame, right-click, and choose Properties in the context menu. Select the Borders tab (Figure 30).
Borders have three components: where they go, what they look like, and how much space is left around them.
-
Line Arrangement specifies where the borders go. Writer provides five default arrangements but you can click the line you want to customize in the User-defined area to get exactly what you want. Each line can be individually formatted.
-
Line specifies what the border looks like: the style, width, and color. Each parameter has a number of attributes to choose from. The attributes selected will apply to those borders highlighted by a pair of black arrows in the User-defined thumbnail on the left side of the dialog.
-
Padding specifies how much space to leave between the border and the contents of the element. Spaces can be specified to the left, right, top, and bottom. Select Synchronize to have the same spacing for all four sides.
-
Shadow Style properties always apply to the whole element. A shadow has three components: where it is (Position), how far from the element it is cast (Distance), and what color it is.
Figure 30: Frame dialog: Borders page

Adding a color to the background area
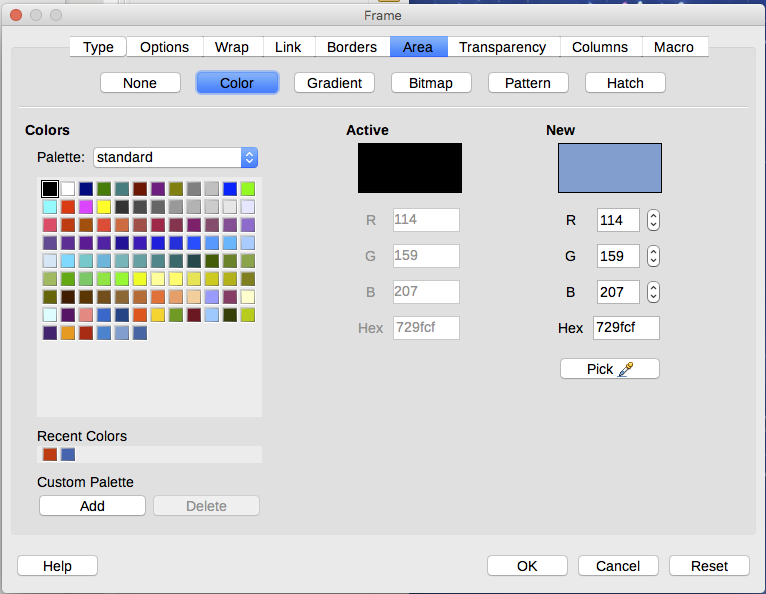
To begin, select the frame, right-click, and choose Properties in the context menu. On the Frame dialog, select the Area tab (Figure 31), then choose Color. Select from the color grid or create a new color to use for this frame, and then click OK to apply it to the background.
Figure 31: Frame dialog: Area page showing color choices
Tip
For selected words or other characters (right-click, Character > Character), the “background” is called highlighting. The only choices are Color or None.
Adding a bitmap (image) to the background
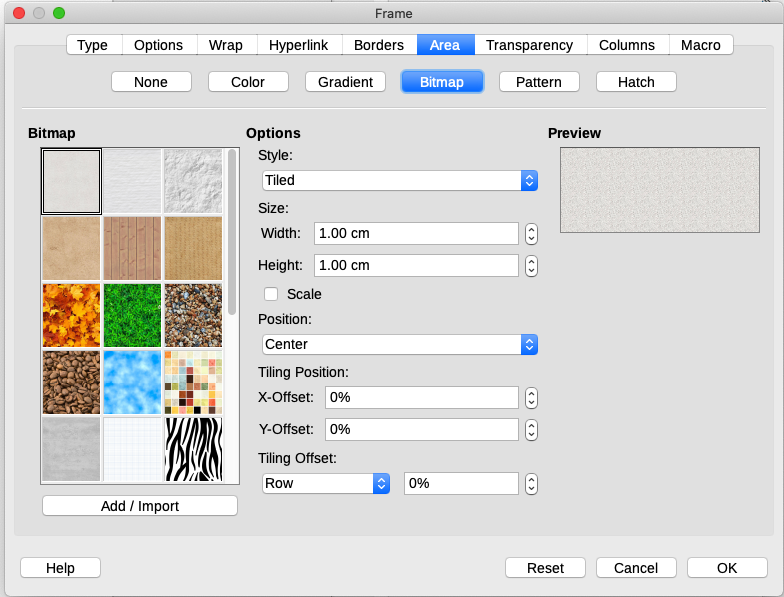
“Bitmap” is a term that covers photos and other images that are made up of pixels of color; the image may be in several formats. To add a bitmap to the background, choose the Area page, then choose Bitmap. The page now displays the bitmap options, as shown in Figure 32.
You can choose one of the supplied bitmaps from the list on the left, or you can add your own.
To use an image, select it from the thumbnails on the left.
1) In the Options area, choose the placement for the image:
-
Style – custom position/size, tiled, or stretched.
-
Size – specify the width and height. Select Scale to stretch or shrink the image to fit the selected size.
-
Position – select where the image is to be displayed.
2) Click OK to apply the image to the background.
To add an image:
1) Click the Add/Import button. The Import dialog opens.
2) Find the file you want and then click Open. The Import dialog closes, and the selected bitmap appears in the list of thumbnails on the left and in the preview box on the right of the Area page.
Figure 32: Frame dialog: Area page showing bitmap choices
Adding a gradient, pattern, or hatch to the background
To add a gradient, pattern, or hatch to the background, choose the Area page, then choose the required background type. The page now displays the options for that type, with an example in the preview pane to the right. Select the required design from the list or create a new design to use for this frame. Click OK to apply it to the background. See the Draw Guide for more about defining gradients, patterns, and hatching.
Deleting a color, gradient, bitmap, or other background
To delete a background, select None near the top of the Area page of the Frame dialog.
Adjusting the transparency of the background
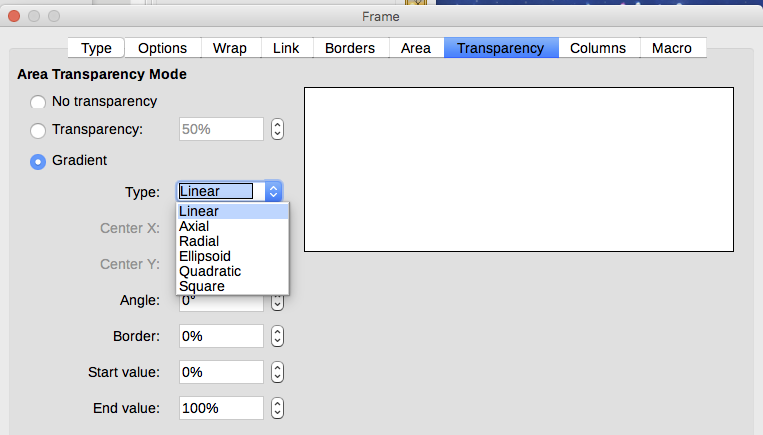
Transparency is useful for creating watermarks (a logo or text in the background of a page, typically showing the company name or a statement such as Draft) and making colors or images more pale (for more contrast with the text). Use the Transparency tab (Figure 33) to define the type of transparency. The choices are covered in detail in the Draw Guide.
Figure 33: Transparency options