Copyright
This document is Copyright © 2021 by the LibreOffice Documentation Team. Contributors are listed below. You may distribute it and/or modify it under the terms of either the GNU General Public License (https://www.gnu.org/licenses/gpl.html), version 3 or later, or the Creative Commons Attribution License (https://creativecommons.org/licenses/by/4.0/), version 4.0 or later.
All trademarks within this guide belong to their legitimate owners.
Contributors
|
Jean Hollis Weber |
Kees Kriek |
Rafael Lima |
|
Jean Hollis Weber |
Toni Blackwelder |
Kees Kriek |
|
Shravani Bellapukonda |
Randolph Gamo |
Jenna Sargent |
|
Dante Legaspi |
Felipe Viggiano |
Pulkit Krishna |
|
Colleen Hayes |
John A Smith |
Peter Schofield |
|
Bruce Byfield |
Gillian Polack |
Cathy Crumbley |
|
Hazel Russman |
Leo Moons |
David Blymire |
|
Jeremy Cartwright |
John M. Długosz |
Barbara Duprey |
|
Jamie Eby |
Ron Faile Jr. |
Gary Schnabl |
|
Klaus-Jürgen Weghorn |
Rafael Atias |
|
Feedback
Please direct any comments or suggestions about this document to the Documentation Team’s mailing list: documentation@global.libreoffice.org
Note
Everything you send to a mailing list, including your email address and any other personal information that is written in the message, is publicly archived and cannot be deleted.
Publication date and software version
Published April 2021. Based on LibreOffice 7.1 Community.
Other versions of LibreOffice may differ in appearance and functionality.
Introduction
A template is a model document that you use to create other documents. For example, you can create a template for business reports that has your company’s logo on the first page. New documents created from this template will all have your company’s logo on the first page.
Templates can contain anything that regular documents can contain, such as text, graphics, a set of styles, and user-specific setup information such as measurement units, language, the default printer, and toolbar and menu customization.
All documents in LibreOffice are based on templates. You can create, or download and install, as many templates as you wish, and you can set a default template for each type of document (text, spreadsheet, drawing, presentation). If you do not choose a template when you start a new Writer document, then the document is based on the default template for text documents. If you have not specified a default template, Writer uses the built-in blank template for text documents that is installed with LibreOffice. See “Setting a default template” below.
In Writer, you can create templates for master documents as well as for ordinary documents.
This chapter describes the use of LibreOffice’s template management features. You can also use templates in other ways, but the effects are a bit different. See “Other ways to manage templates” below for more information.
Creating a document from a template
To create a document from a template:
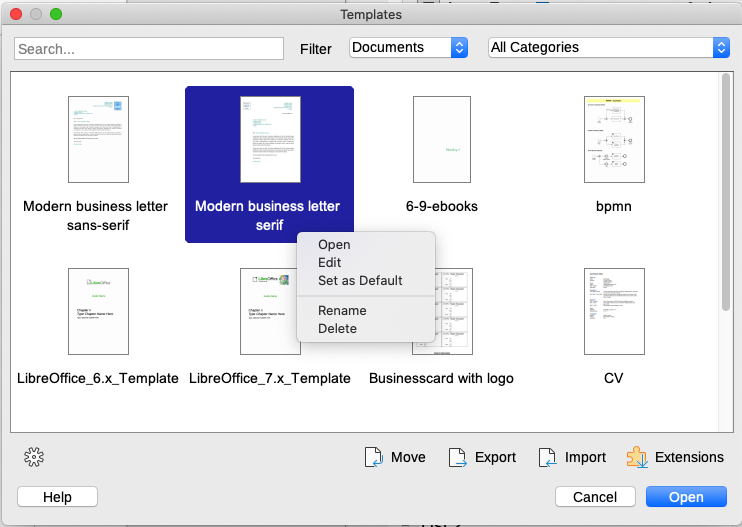
1) Open the Tempates dialog (Figure 1) using one of the following methods:
-
Choose File > New > Templates or File > Templates > Manage Templates on the Menu bar.
-
Press the key combination Ctrl+Shift+N.
-
Click the arrow next to the New icon on the Standard toolbar and select Templates.
-
Select Templates > Manage Templates in the Start Center (visible in LibreOffice when no document is open).
2) From the Filter lists at the top of the Templates dialog, you can select the type and category of template you want to use. The relevant templates are listed on the dialog.
3) Find and double-click the required template, or select the template and click Open. A new document based on the selected template opens in Writer. You can then edit and save the new document.
The template the document is based on is listed in File > Properties > General.
Tip
In the Start Center, you can click on the Templates button to view the available templates without opening the Templates dialog, then click on the required template to create a new document.
This method shows all the templates in all categories that are managed through the Templates dialog. You cannot filter this list as you can in the Templates dialog. If you have many templates in more than one category, you may find it easier to open the dialog and select a template there.
Figure 1: Templates dialog, showing context menu for a selected template
Note
The connection between a template and a document remains until the template is modified and you do not update the document to match the template.
If you copy or move the document to a different computer which does not have a copy of that template installed, the connection is broken even though it continues to be listed in the document’s properties. See “Changing the template assigned to a document” below for a way to reconnect a template to a document.
Creating a template
You can create templates in two ways: by saving a document as a template or by using a wizard.
Creating a template from a document
In addition to formatting, any settings that can be added to or modified in a document can be saved within a template. For example, printer settings; general behaviors set from Tools > Options, such as paths and colors; menu and toolbar customizations, described in Chapter 20, Customizing Writer.
Templates can also contain predefined text, saving you from having to type it every time you create a new document. For example, a letter template may contain your name, address, and salutation.
To create a template from a document:
1) Open a new or existing text (Writer) document.
2) Add any content that you want to appear in any document you create from the new template, for example company logo or a copyright statement.
3) Create or modify any styles that you want to use in the new template.
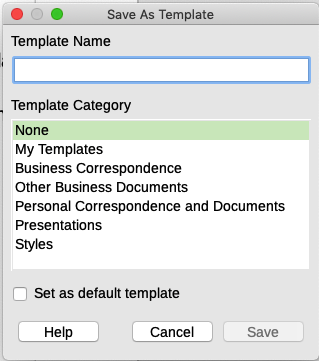
4) On the Menu bar, choose File > Templates > Save as Template. The Save as Template dialog (Figure 2) opens, displaying the existing categories and a box for the name for the new template.
5) Select a category, for example My Templates or Business Correspondence. You can also set this template as a default template at this time. Click Save.
Figure 2: Save as Template dialog
Creating a template using a wizard
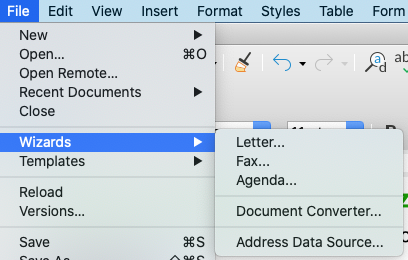
You can use wizards to create templates for letters, faxes, and agendas. To create a template using a wizard:
1) On the Menu bar, choose File > Wizards > [type of template required] (Figure 3).
Figure 3: Choosing a template wizard
2) Follow the instructions on the pages of the wizard. This process is slightly different for each type of template, but the format is similar.
3) In the last section of the wizard, you can specify the template name that will show in the Templates dialog and the file name and location for saving the template. The two names can be different but this may cause confusion. The default location is your user templates folder but you can choose a different location.
4) To set the file name or change the folder, click the Path icon (the three dots to the right of the location). On the Save As dialog, make your selections and click Save to return to the wizard.
5) Finally, you can choose whether to create a new document from the template immediately or manually change the template. Click Finish to save the template.
Adding templates obtained from other sources
LibreOffice refers to sources of templates as repositories. A repository can be local (a directory on your computer to which you have downloaded templates) or remote (a URL from which you can download templates).
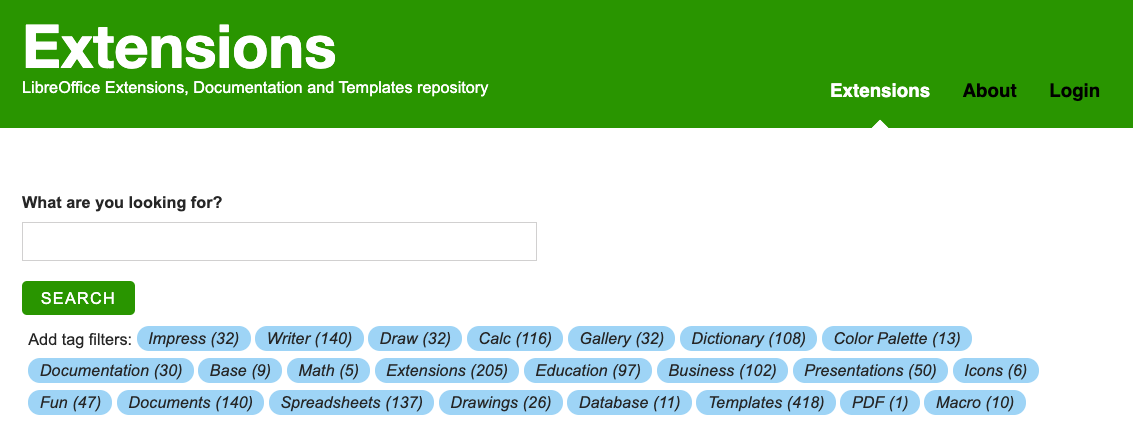
To get templates from the official LibreOffice template repository, type in your web browser’s address bar the URL https://extensions.libreoffice.org/. This opens the Extensions web page (Figure 4). In the Search section, click the Templates tag filter. You can narrow your search by also choosing other tag filters. such as Writer. After setting the filters, click the Search button. In the search results, find the required template and click on its name to display a page with details; click the Download button to put the template anywhere on your computer. Proceed to “Installing templates” below.
Figure 4: Searching for templates in the repository
On other websites, you may find collections of templates that have been packaged into extension (.OXT) files.
Note
At the bottom right of the Templates dialog is an Extensions button. It is functional only when Experimental Features are enabled. It causes a window to open and be populated by templates from the Extensions website.
Installing templates
You can install templates using either the Templates dialog or the Extension Manager.
To install templates using the Templates dialog:
1) Download the template or package and save it anywhere on your computer.
2) In the Templates dialog, click the Import button on the bottom right (Figure 1).
3) On the Select Category dialog, select the category where you want to import the template and click OK. A file browser window opens.
4) Find and select the template that you want to import and click Open. The file browser window closes and the template is imported and appears in the selected category.
To install templates using the Extension Manager:
1) Download the template or package and save it anywhere on your computer.
2) In LibreOffice, select Tools > Extension Manager on the Menu bar. In the Extension Manager dialog, click Add to open a file browser window.
3) Find and select the template or package of templates you want to install and click Open. The package begins installing. You may be asked to accept a license agreement.
4) When the package installation is complete, restart LibreOffice. The templates are available for use through the Templates dialog and the extension is listed in the Extension Manager.
See Chapter 20, Customizing Writer, for more about the Extension Manager.
Tip
You can manually copy new templates into the template folders. The location varies with your computer’s operating system. To learn where the template folders are stored on your computer, go to Tools > Options > LibreOffice > Paths. See “Adding locations to the Templates dialog” below for more information.
Editing a template
You can edit a template’s styles and content and then, if you wish, reapply the template’s styles to documents that were created from that template. You cannot reapply content.
To edit a template:
1) Open the Templates dialog, as described above.
2) In the Templates dialog, find the template that you want to edit. Right-click on it to open the context menu (see Figure 1), then click Edit. The template opens in Writer.
3) Edit the template as you would edit any other document. To save your changes, choose File > Save on the Menu bar.
Updating a document from a changed template
If you make any changes to a template and its styles, a confirmation message is displayed the next time you open a document that was created from the template before the changes.
To update the document:
1) Select Update Styles to apply the changed styles in the template to the document.
2) Select Keep Old Styles if you do not want to apply the changed styles in the template to the document (but see the Caution notice below).
Caution
If you choose Keep Old Styles, the document is no longer connected to the template, even though the template is still listed under File > Properties > General. To reconnect the document to the template, use the procedure described in “Changing the template assigned to a document” below.
Changing the template assigned to a document
At times you might want to associate a document with a different template, or perhaps you’re working with a document that did not start from a template or one that has become detached from its template.
You can change the template assigned to a document, or reconnect a document to a template, in two ways: manually or by using the Template Changer extension to LibreOffice.
-
To change or reassign a template manually, first create a new, blank document from the required template, as described in “Manually changing the template” below. Then copy the contents of the old document into the new document.
-
To use the Template Changer extension, first you need to download and install it, then restart LibreOffice to activate it. After that, you can open the document and use File > Templates > Change template (current document) on the Menu bar.
Note
Changing or updating a template affects only the formatting used in styles. It does not affect any content. You may also need to manually update content, for example a logo, copyright notice, or the layout of a copyright page.
Manually changing the template
For best results, the names of styles should be the same in the existing document and the new template. If they are not, you may need to replace old styles with new ones. See Chapter 2, Working with Text: Basics, for more about replacing styles.
To manually associate a document with a different template:
1) Open the Templates dialog as described above.
2) In the Templates dialog, double-click the template you want to use. A new document opens, containing any text or graphics that were in the template.
3) Delete any unwanted text or graphics from this new document. Use File > Save As to save the new document, but leave it open.
4) Open the document you want to change. (It opens in a new window.)
3) Use Edit > Select All, or press Ctrl+A, to select everything in the old document.
4) Use Edit > Copy, or press Ctrl+C, to copy the contents of the old document to the clipboard.
5) Click in the new document created in step 2. Use Edit > Paste, or press Ctrl+V, to paste the contents of the old document into the new one.
6) Update the table of contents if there is one. Save the new document using File > Save.
7) Close the old file without saving.
Caution
Any changes recorded (tracked) in the old document will be lost during this process. The resulting document will contain only the changed text.
Setting a default template
If you create a document by choosing File > New > Text Document on the Menu bar, or by clicking the Text Document button in the Start Center, Writer creates the document from the default template for text documents. You can, however, set a custom template to be the default. You can reset the default later, if you choose.
Setting a template as the default
Many default settings, such as page size and margins, font choices, line spacing, and so on, can be changed, but those changes apply only to the document you are working on. To make the changes the default settings for that document type, you need to replace the default template supplied with LibreOffice with a new one that you create.
You can set any template in the Templates dialog to be the default for that document type:
1) Open the Templates dialog as described above.
2) In the Templates dialog, open the category containing the template that you want to set as the default, then select the template.
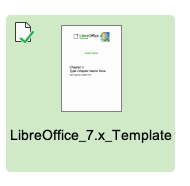
3) Right-click the selected template and select Set as Default from the context menu (Figure 1). An icon marks the template as the default (Figure 5).
The next time that you create a document of that type by choosing File > New, the document will be created from this template.
Figure 5: Default template icon
Resetting Writer’s default template as the default
To re-enable Writer’s original default template as the default:
1) Open the Templates dialog as described above.
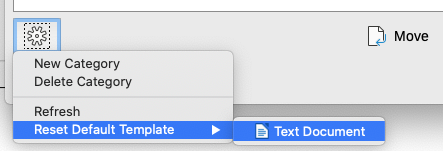
2) In the Templates dialog, click the Settings icon on the bottom left (Figure 6).
3) Point to Reset Default Template in the drop-down menu, and click Text Document.
This choice does not appear unless a custom template had been set as the default, as described in the previous section.
Figure 6: Resetting the default template for text documents
You can also reset the default template as follows:
1) Go to the Templates dialog and open the category containing the template you set as default. It is indicated by a green check mark.
2) Right-click on this template and select Reset Default in the context menu.
The next time that you create a document by choosing File > New, the document will be created from the original default template for the document type.
Organizing templates
LibreOffice can manage only those templates that are in its template categories, although you can create a document from a template that is not in one of these folders. You can create new template categories and use them to organize your templates. For example, you might have one category for report templates and another for letter templates. You can also import and export templates.
To begin, choose File > Templates > Manage Templates to open the Templates dialog.
Creating a template category
To create a template category:
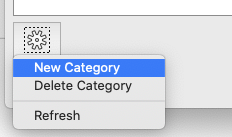
1) Click the Settings icon on the lower left of the Templates dialog.
2) Click New category in the context menu (Figure 7).
3) In the pop-up dialog, type a name for the new category and click OK. The new category now appears in the list of categories.
Figure 7: Creating a new template category
Deleting a template category
You cannot delete template categories supplied with LibreOffice. Nor can you delete categories added by the Extension Manager unless you first remove the extension that installed them.
However, you can delete a category that you created. Open the Templates dialog, click the Settings icon, and select Delete Category in the pop-up menu (Figure 7). On the Delete Category dialog, select the category to be deleted and then click OK. When a message box appears asking you to confirm the deletion, click Yes.
Moving a template
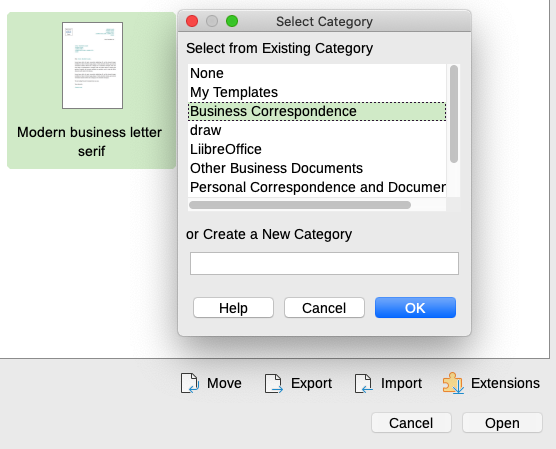
To move a template from one template category to another, select it in the Templates dialog, and click the Move icon near the bottom of the dialog (Figure 8). In the Select Category dialog, select the destination category and click OK. The selected template is moved to the folder. You can also create a new category into which to move the template.
Figure 8: Moving templates to another category
Renaming a template
You can also rename a template, for example if the current name is not informative. To rename a template, select it in the Templates dialog, right-click it and select Rename in the context menu. In the small dialog that opens, type a name in the Enter New Name text box and click OK. This action changes the Title on the Description tab of the template’s document properties. It does not change the file name of the template.
Deleting a template
You cannot delete templates supplied with LibreOffice. Nor can you delete any templates installed by the Extension Manager except by removing the extension that installed them.
However, you can delete templates that you have created or imported:
1) (Optional) In the Filter drop-down lists at the top of the Templates dialog, select the category that contains the template you want to delete.
2) Select the template to delete.
3) Right-click to open the context menu of the template and click Delete. A message box appears and asks you to confirm the deletion. Click Yes.
Tip
You can also press the Delete key on the keyboard to delete the selected template on the Templates dialog.
Exporting a template
To export a template to another location on your computer or network:
1) In the Templates dialog, select the template that you want to export.
2) Click the Export icon in the bottom right of the dialog. A file browser window opens.
3) Find the location where you want to export the template and select Select Folder or OK.
4) Click OK on the displayed information dialog.
Note
Exporting a template does not remove it from the Templates dialog. The action places a copy of the template in the location you specify.
Adding locations to the Templates dialog
You can include locations (folders) of your choice in the list of template folders that LibreOffice uses to populate the Templates dialog. To add folders to the list:
1) Go to Tools > Options > LibreOffice > Paths (Figure 9). Select Templates and click Edit.
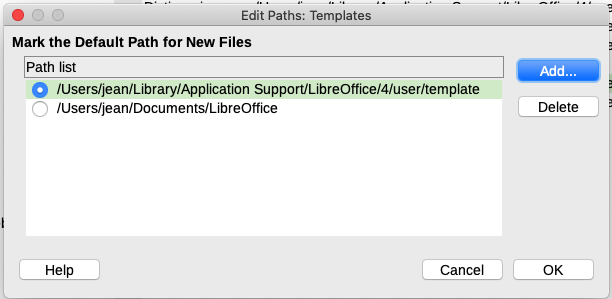
2) On the Edit Paths: Templates dialog (Figure 10), click Add. A file browser window opens. Find and select the folder you with to add, and click Select. The file browser closes and the selected folder appears in the list on the Edit Paths: Templates dialog.
3) (Optional) Mark the newly-added path as the default location for new template files.
4) Click OK to return to the Paths page of the Options dialog (Figure 9). Click OK to close the Options dialog.
5) Close LibreOffice and reopen it, to activate the new path.
When you next open the Templates dialog, you will find that any templates stored in the new location now appear in the dialog.
Figure 9: Paths options in LibreOffice
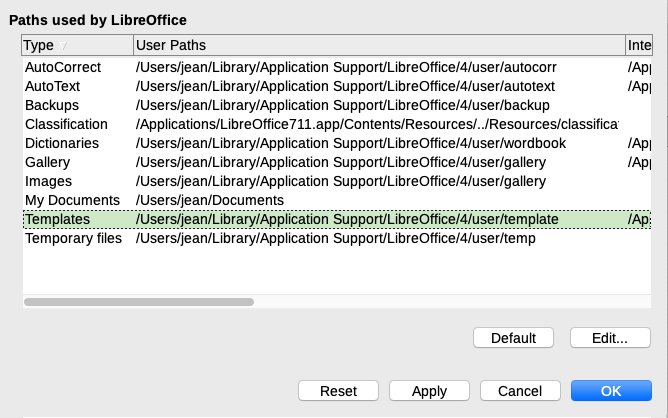
Figure 10: Edit Paths: Templates dialog after adding a location
Other ways to manage templates
You can create and use templates without using the Templates dialog. However, some results are different from those described earlier in this chapter.
Creating a document from a template
You can create a document from a template by double-clicking the template in your computer’s file browser window.
The resulting document is not associated with (linked to) the template from which it was created. The template is not listed in the document’s properties and any changes to the template cannot be directly applied to the document. For many purposes, such as writing a letter, this may be what you want.
Creating a template from a document
You can create a template from a document using File > Save As and selecting ODF Text Document Template (.ott) as the file type, then saving it anywhere you want, for example in a project folder.
The resulting template will not be visible in the Templates dialog, unless you import it or add the project folder to the locations shown in the Templates dialog (see “Adding locations to the Templates dialog” above).