Writer Guide 7.2
Chapter 12
Lists: Tips and Tricks
This document is Copyright © 2021 by the LibreOffice Documentation Team. Contributors are listed below. You may distribute it and/or modify it under the terms of either the GNU General Public License (https://www.gnu.org/licenses/gpl.html), version 3 or later, or the Creative Commons Attribution License (https://creativecommons.org/licenses/by/4.0/), version 4.0 or later.
All trademarks within this guide belong to their legitimate owners.
|
Jean Hollis Weber |
Kees Kriek |
|
|
Jean Hollis Weber |
Kees Kriek |
Felipe Viggiano |
|
Gillian Polack |
Bruce Byfield |
|
Please direct any comments or suggestions about this document to the Documentation Team’s mailing list: documentation@global.libreoffice.org
Note
Everything you send to a mailing list, including your email address and any other personal information that is written in the message, is publicly archived and cannot be deleted.
Published August 2021. Based on LibreOffice 7.2 Community.
Other versions of LibreOffice may differ in appearance and functionality.
Some keystrokes and menu items are different on macOS from those used in Windows and Linux. The table below gives some common substitutions for the instructions in this document. For a detailed list, see the application Help.
|
Windows or Linux |
macOS equivalent |
Effect |
|
Tools > Options |
LibreOffice > Preferences |
Access setup options |
|
Right-click |
Control+click or right-click depending on computer setup |
Open a context menu |
|
Ctrl (Control) |
⌘ (Command) |
Used with other keys |
|
F11 |
⌘+T |
Open the Styles deck in the Sidebar |
This chapter expands on information given in Chapter 9, Working with Styles, and provides some extra examples.
In many word processors, list options are included in paragraph styles, but Writer treats them as a separate type of style that can be linked to paragraph styles for use.
Writer’s separate list styles have two major advantages:
The same list style can be used with multiple paragraph styles, avoiding duplication of design work.
A paragraph’s associated list style can be changed with a single selection.
Tip
You cannot change the style used by the default toolbar icons for lists. You can create new toolbar buttons that apply list styles to paragraphs, but a better strategy is to create paragraph styles for lists and, if you wish, create toolbar icons for them. See Chapter 20, Customizing Writer, for information on creating toolbar buttons.
With list styles, you can create three types of list:
Bullet lists: Unordered lists whose items start with a bullet, special character, dingbat, or graphic.
Numbered lists: Ordered lists whose items start with a number, upper or lower case letters, or upper and lower case Roman numerals.
Outline lists: Hierarchical summaries of an argument or piece of writing, in which each level has its own numbering system.
All these types of list are in common use today, especially online.
Each type of list has its own set of conventions about how it is structured and used, as described in this section.
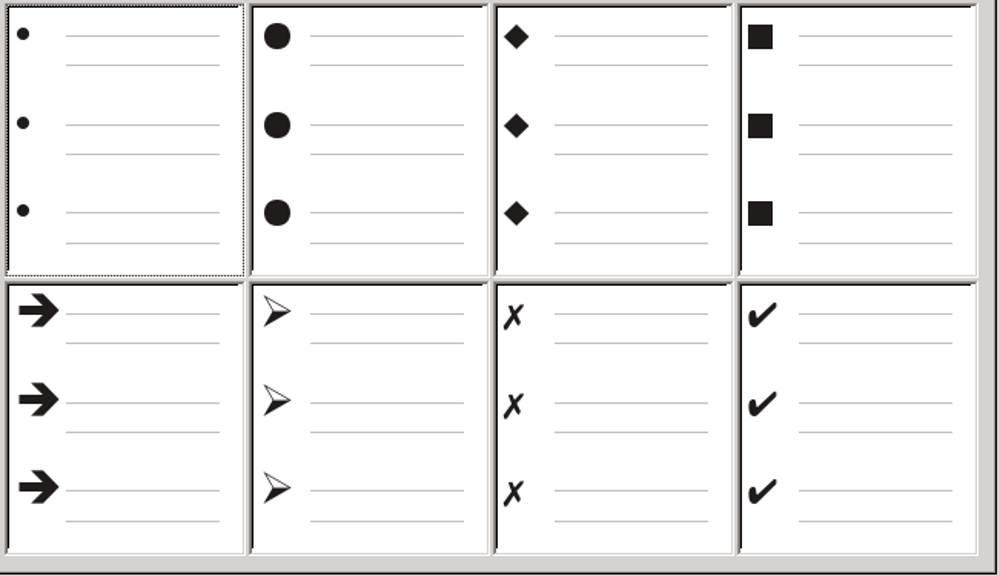
Bullet lists are popular in technical documents, presentations, many web sites, and other online documents. Writer provides several pre-defined bullet list styles (Figure 1), and you can select others in the Gallery or create your own bullets.
Figure 1: Writer’s pre-defined bullet types
Tip
Bullet list styles can be used for other purposes in addition to normal lists, especially if you choose a graphic for the bullet. See “Example: Styling the Tips, Notes, and Cautions in this book” on page 1.
The use of bullet lists follows well-defined conventions:
Are used only when the order of the points is irrelevant. You might want to arrange points for rhetorical effect, starting with one fairly important point and ending with your strongest point, but readers do not actually need to know one point before another.
Are introduced in the last sentence in the body text above them, either without any punctuation or with a colon.
Consist of points that are all grammatical completions of the last sentence in the paragraph before them. That means that each point has a similar grammatical structure to the others. In this bullet list, for instance, each point starts with a present tense verb.
May be sentence fragments, but should be consistent with each other. For example, they could be all nouns or participles.
Start with a bullet on, or indented from, the left margin, then indent for the text. If they are lists within lists, then the bullet has the same indent as the text in the top level list.
Can start with either an upper or lower case letter, as long as the convention is consistent throughout the list and the document.
End each point with the same punctuation. Commas, semi-colons, periods, or no punctuation are all valid choices. What matters is the consistency of list items and of all lists within the document.
Are generally no more than 6–8 items long. Much longer, and the ease of reading is lost.
Do not use an “and,” “or,” or any other word to introduce the last point in the list, even though that would be grammatically correct.
Are sometimes considered too informal to use. When in doubt, avoid them.
While people number lists all the time, the convention is that numbered lists should only be used when the order of the information matters. For instance, in a procedure from a technical manual, one step might be impossible – or even dangerous – without doing another one first.
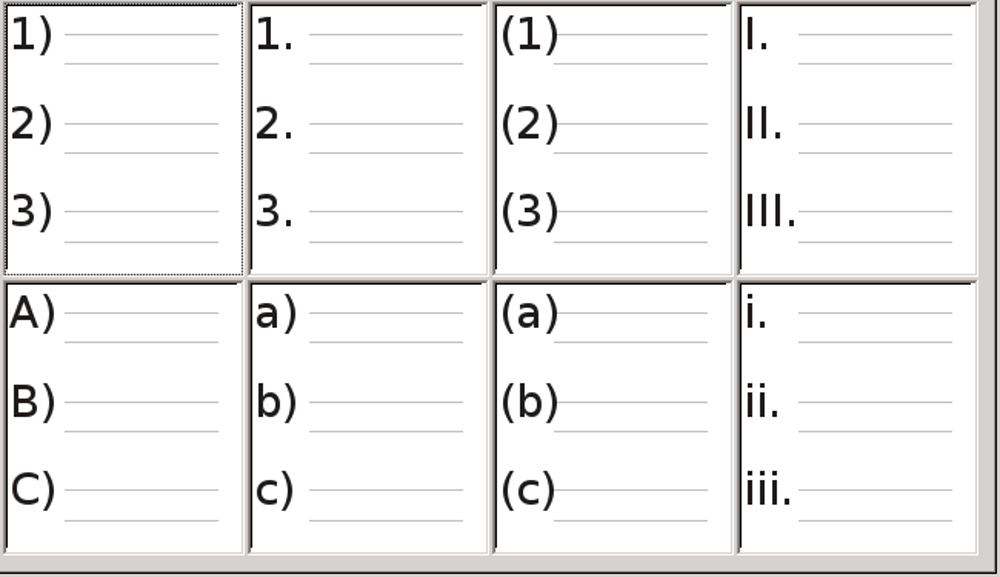
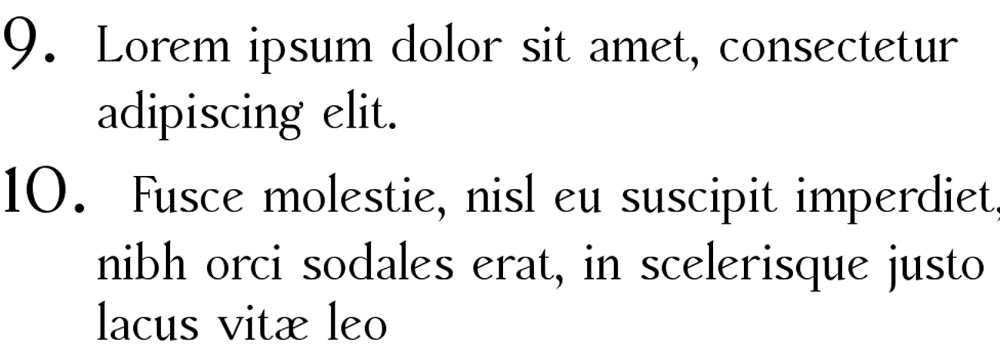
Writer provides several pre-defined numbered list styles (see Figure 2), and you can define others.
Figure 2: Writer’s pre-defined numbered lists
Numbered lists have fewer conventions than bullet lists, but they do have a few:
They are used when the order of items is important. If the order is irrelevant, use bullet lists instead.
They are generally introduced in the body text by a summary of the overall task they describe that ends in a colon. For example, To install the software update, follow these steps: or, simply To install:.
Each step can have multiple paragraphs, most of them unnumbered, describing what happens when it is performed or the alternatives.
The steps in a procedure should be less than a dozen (some suggest 6–8).
Tip
If each step has multiple paragraphs or you have more than about a dozen steps, you may need to break down the list into smaller lists or else present the points as ordinary body text.
Outline lists summarize the structure of a much longer, typically unwritten document. In finished technical and legal documents, they are used in headings to make the structure obvious, although this use is becoming less common than it was a few decades ago.
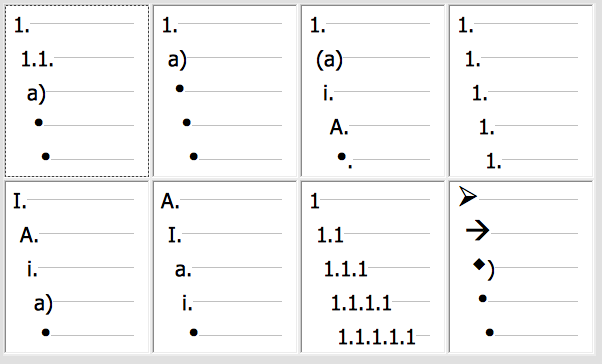
Writer gives several options for outline lists (see Figure 3). List styles create an outline method that uses a single paragraph style. When such a paragraph style is in use, you change the level and the numbering by pressing the Tab key to descend a level, and Shift+Tab to ascend a level. This single style outlining is by far the quickest to apply and learn.
You can choose to use outline lists when writing a document and then, before publication, remove the letters and numbers of the outline by changing or removing the numbering style associated with the paragraph style.
Figure 3: Writer’s pre-defined outline list styles
The conventions for outline lists are:
Usually, a different numbering system is used for each level to help distinguish them.
Levels can be ordered using Arabic numerals, upper and lower case Roman numerals, and upper and lower case letters.
Upper case Roman numerals are usually reserved for the top level, and upper case letters are used before lower case ones. Another alternative is Arabic numbers followed by lower case letters. However, these rules are not fixed.
In technical manuals, multiple levels used to be common in headings (for instance, I.A.2 or 1.1.1). This style has largely fallen out of practice except in a few specialized cases such as legal documents, for the obvious reason that they are hard to remember. Also, if each heading is indented, after two or three levels almost no space is left for text.
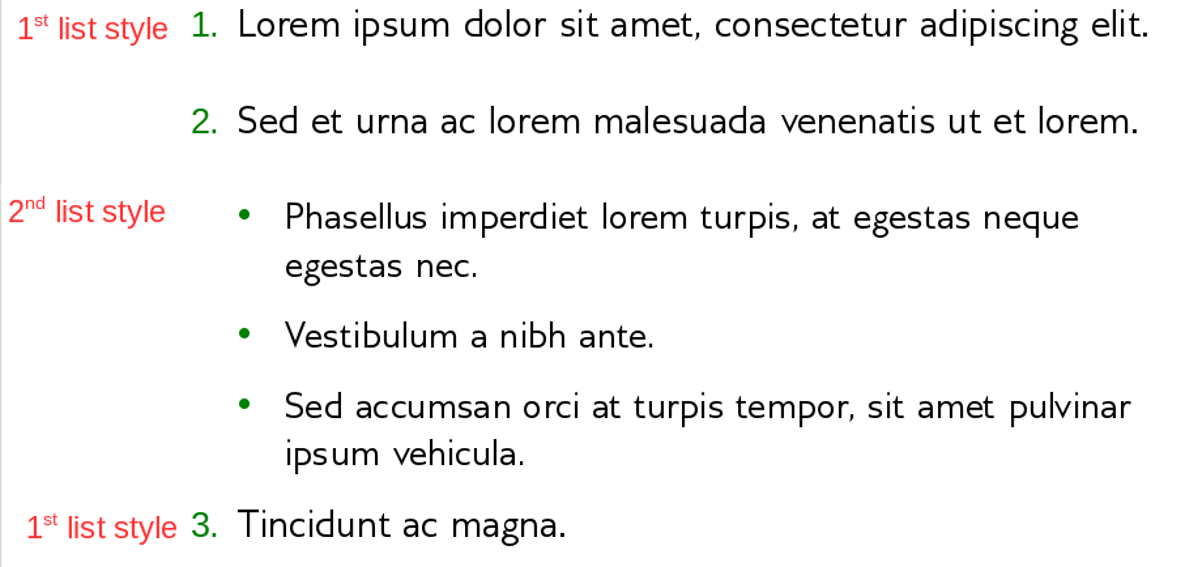
Paragraph styles are essential to lists and outlining. When applying a list style, the underlying paragraph style remains unchanged. If your list must also have a certain font size, indentations, and so on, you might expect to first apply a paragraph style and then a list style (or the other way around). However, you can embed a list style in a paragraph style using the Outline & List tab of the Paragraph Style dialog, and then apply only the paragraph style to the list.
This section gives an example of combining list and paragraph styles:
1) Create a list style you want to use for the paragraph. For example: MyNumberedList.
2) Create a new paragraph style.
3) On the Organizer tab of the Paragraph Style dialog:
a) Give the new paragraph style a name, say NumberedParagraph.
b) For the Next Style, choose NumberedParagraph (this will make the following paragraph also be in this style, until you choose a different style).
c) In Inherited from, choose None.
4) Set up this paragraph style to your liking. Because the indentation is controlled by the List style, to avoid undesired interactions do not change the indent settings on the Indents & Spacing tab. (You might want to change the spacing above and below the paragraph.)
5) On the Outline & List tab (Figure 4), choose the MyNumberedList style created in step 1 in the Numbering style list.
6) Click OK to save this style.
Figure 4: Assigning a Numbering style to a Paragraph style

To have full control, it is common practice to define three base paragraph styles for lists: List Start for the first element of the list, List Continue for the subsequent elements of the list, and List End for the last element of the list. You could also define a paragraph style to be used for unnumbered list items (one for each nested level you intend to use) as well as an introductory style for the paragraph preceding the start of the list, to allow for keeping the introductory paragraph with the first list item or for specifying spacing before the first list item that is different from the spacing between other paragraphs.
A nested list – a list within a list – is a numbered or bulleted list with subordinate (usually indented) numbered or bulleted lists. Rather than being just a list of numbered items (1, 2, 3...), a nested list may have item 1, then indented items numbered a, b, c or i, ii, iii or some other numbering or bulleted method before the main number 2. With numbering styles, you can achieve any combination of numbering formats you want. A nested list may even combine numbered items with bulleted items.
To nest a list, you have two choices. The first is to create a list style, and set up two or more list levels with different formatting choices on the Position and Customize tabs. The advantage of list levels is that each level can be formatted separately, but all the levels remain connected. You can switch to the next level below by pressing the Tab key, or to the one above by pressing Shift+Tab.
The preview pane can help you set up each list level, and the customized list style is associated with a paragraph style for use. To switch to a lower list level while using the associated paragraph style, press the Tab key before entering content; to switch to a higher list level, press Shift+Tab.
The second choice is to create two list styles, then associate each list style with a separate paragraph style.
Neither choice has any advantage over the other, since you are still dealing with the same options. However, in both cases, each nested list is typically indented more than the list level above it. Typically, too, each list level will use a different bullet style or numbering system.
Style names like Bulleted and Bulleted 2 or Nested will help to remind you of the relation between the two paragraph styles. For convenience, use the same names for both the Paragraph and List styles, since they cannot be mixed up.
Figure 5: Nested lists created using two separate list styles
LibreOffice has several ways to outline using paragraph styles. With Tools > Chapter Numbering, you can choose a numbering style for each paragraph style, making it part of the outline levels. Alternatively, you can associate each Heading style with a separate list style using the Styles deck on the Sidebar.
An easier form of outlining is to create a single list style for outlining. You can manually set up the different levels on the list style’s Customize tab, or you can get much the same result by selecting a pre-defined pattern from the list style’s Outline tab instead.
To use the paragraph style, press Enter+Tab to add a sub-level paragraph. The sub-level paragraph automatically uses the numbering pattern of the list style. To raise the level of a paragraph style, press Enter+Shift+Tab.
To set up a single paragraph style for outlining:
1) Create a list style and associate it with one of the pre-defined formats on the Outline tab.
2) Select or make a paragraph style for outlining. You cannot use the Heading 1-10 styles. Presumably, this restriction prevents confusion between a single paragraph style outline and the registered outline levels (see next section).
3) On the Organizer tab of the paragraph style, set the style to use itself as the Next style.
4) Assign the list style to the paragraph style using the Numbering field on the paragraph style’s Outline & List tab.
Outline levels are a concept used throughout LibreOffice to automate advanced features. For example, outline levels determine which paragraph styles are displayed by default in the Navigator under Headings, and in a table of contents.
By default, outline levels are mapped to the Heading 1–10 paragraph styles. Outline Level 1 is mapped to Heading 1, and so on. You can change these mappings, or add another paragraph style to an outline level in the Outline level field on the Outline & List tab (Figure 6).
Figure 6: Assigning a paragraph style to an outline level
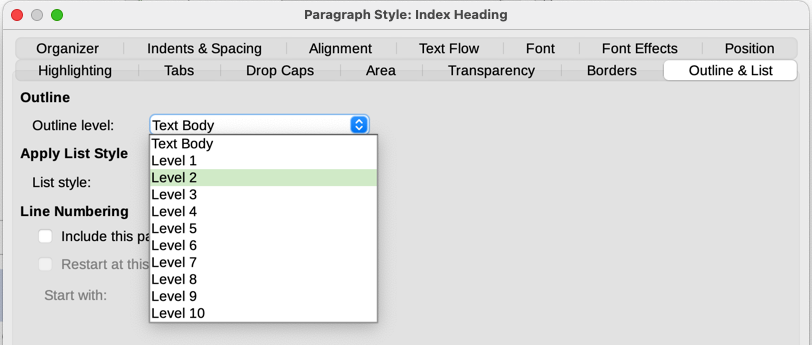
Tip
You can assign more than one paragraph style to an outline level, but only one paragraph style displays in Tools > Chapter Numbering.
List styles define properties such as indentation, numbering style (for example, 1,2,3; a,b,c; or bullets), and punctuation after the number, but they do not by themselves define properties such as font, borders, text flow, and so on. The latter are properties of paragraph styles.
Although you can apply list styles using the Styles menu on the Menu bar or the Styles deck on the Sidebar, those methods are not recommended.
Whenever possible, use paragraph styles for creating bulleted and numbered lists. Writer comes with two sets of paragraph styles for this purpose. It is recommended to use list styles and paragraph styles together in these ways:
Use paragraph styles List 1, List 2, List 3, and so on for creating bulleted lists. These styles use Bullet list styles.
Use paragraph styles Numbering 1, Numbering 2, Numbering 3, etc, for creating numbered lists. These styles use the list styles called Numbering 1, Numbering 2, etc.
Writer has several predefined list styles, which use different bullet symbols or number sequences (123, abc, ABC, and so on). As with any style, you can redefine the properties of these styles, for example the numbering or bullet symbol and the indentation. You can also define other list styles in these series or create your own series.
List styles can have up to ten levels, used for nested lists. To switch from one level to another, use the Promote One Level or Demote One Level icons on the Bullets and Numbering toolbar, or press the Tab key (one level down) or Shift+Tab keys (one level up), or right-click on the list element and select List > Promote One Level or Demote One Level in the context menu.
When creating more than one numbered list of the same type within the same chapter, Writer applies sequential numbering to all the lists. Sometimes this is what you want (for example, when placing illustrations between the numbered paragraphs), while at other times you want to restart the numbering.
To restart the numbering of any numbered list, right-click the paragraph and select List > Restart Numbering in the context menu or use the Restart at this paragraph option in the Numbering section on the Paragraph dialog (Figure 7).
Figure 7: Restarting paragraph numbering
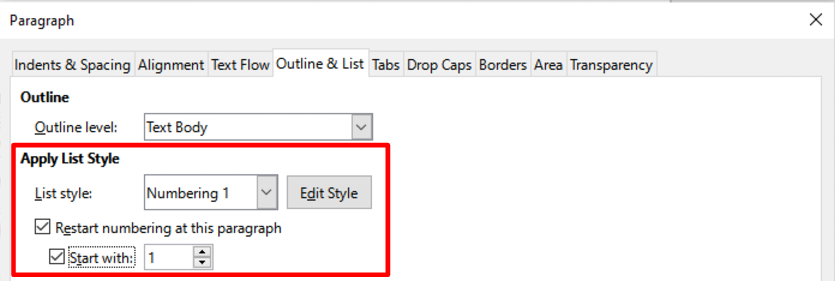
When editing a document, you may want to change from restarting numbering to continuing the numbering from a previous list. To do so, right-click on the list element and choose List > Continue previous numbering in the context menu.
Note
The Restart at this paragraph field in the Line Numbering section of the Outline & Lust tab is for line numbering, not paragraph numbering.
LibreOffice provides several default names for bullets and numbered lists. You can modify these styles, and you can add your own list styles and give them descriptive names like Arabic Numeral Blue or Lower Case Indented.
If you decide not to use these styles, you can right-click each of them in the Styles deck on the Sidebar and hide them. If you later decide to use them, go to the Hidden view and unhide them.
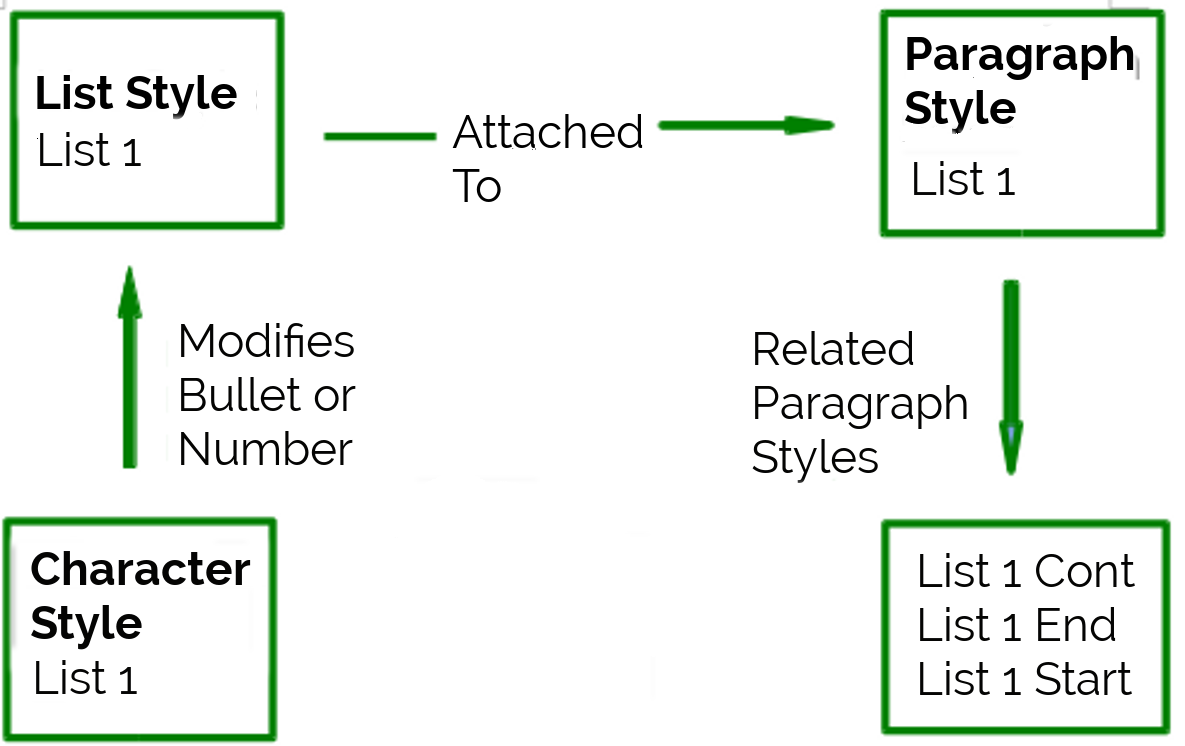
Tip
Using the same name for both the list style and the paragraph style with which it is linked can make working with different types of styles much easier. If you use a character style to define the bullet or number, give it the same name, too.
Figure 8: Give related styles similar names and you can locate the ones you need more quickly
You have two ways of formatting bullets and numbers in list styles.
The quick way is to select a list style from the Unordered, Ordered, Outline, or Image tabs of the List Style dialog (Figure 9). Each of these tabs give a variety of options, although not an exhaustive selection.
Even if the choices on the Image tab look old-fashioned, they can be useful; for instance, see “Example: Styling the Tips, Notes, and Cautions in this book” on page 1.
The second and more practical way is to customize bullets or numbered lists for yourself, using the Customize and Position tabs. Both tabs have ten levels. This setting is mostly useful for creating a single outline numbering style, in which the numbering changes each time you press the Tab key (see “Outline lists” on page 1). For most bulleted and numbered lists, either set the Level to 1, or leave the Level at the default 1-10.
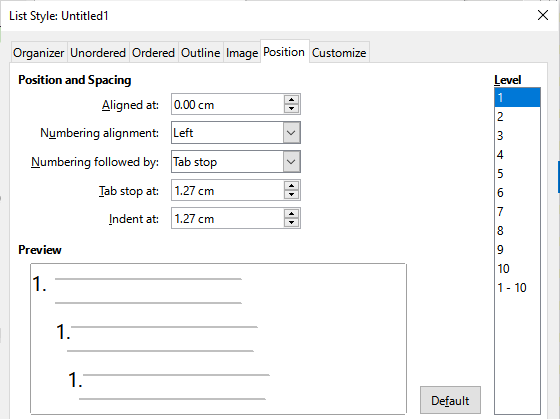
The Position tab of the List Style dialog (Figure 9) sets up the spacing before bullets or numbers, and between the bullet or number and the text.
When a list style is linked to a paragraph style, editing the fields on the Position tab in the List Style dialog results in changes to the Indent > Before text and Indent > First line settings on the Indents & Spacing tab for the paragraph style.
Figure 9: The Position tab is one of two tabs in the Numbering Style dialog for customizing lists
The reverse is also true. However, to avoid complications, make all the changes on the Position tab for the list style. Not only is that the logical place to look for changes on the list style, but adjusting the paragraph settings usually involves negative entries for the First Line field, which can complicate editing.
Figure 10: Fields on the Position tab for list styles and what they refer to
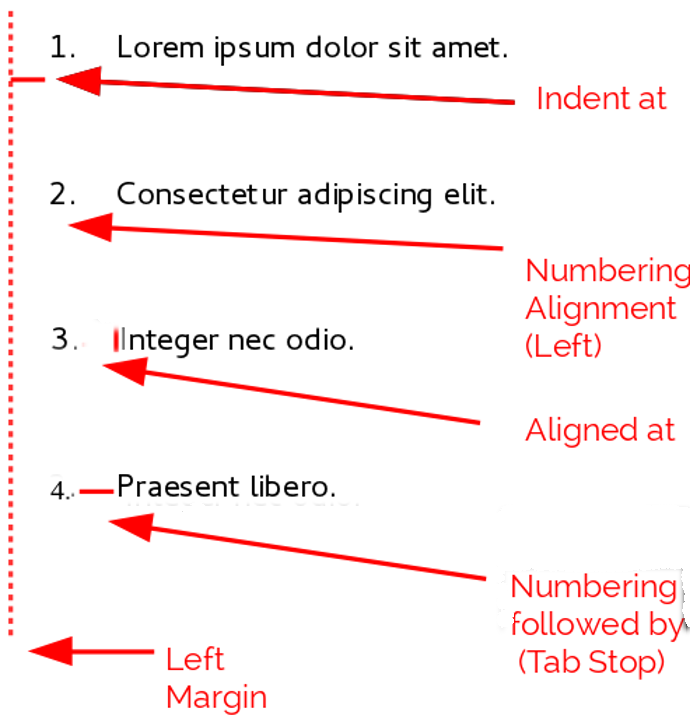
When you are defining a new list style, the important fields on the Position tab are:
Aligned at: The vertical position for numbers, measured from the left margin. In most cases, you can leave this field at 0 (at the left margin). However, if you use any Numbering alignment except Left, numbers set this field to another value.
Numbering alignment: How the bullet or number is aligned. Most of the time, you can leave this field at the default of Left, but if you are having trouble positioning text, changing the alignment to Center or Right can sometimes solve the problem, especially for lists or levels that require two-digit numbers.
Numbering followed by: Sets the space between the number or bullet and the text. Although the choices include space or nothing, the choice that offers the most control is Tab stop at. Set the exact tab in the Tab stop at field directly below the drop-down list.
Indent at: Sets the start of the text. This setting should be equal or greater to the tab stop set for Numbering followed by.
Figure 11: The dotted line is the margin in this example. If the value of the Numbering Alignment is 0, then choosing Center or Right can force the numbers into the left margin.

To create a numbered list, select a numbering style from the Number field on the Customize tab (Figure 12). The selections in the drop-down list begin with typical choices for Western European languages: Arabic, upper and lower case letters, and upper and lower case Roman numerals. Scroll down, and options for Bulgarian, Russian, Serbian, and Greek are available.
Figure 12: Select a numbering style from the Customize tab
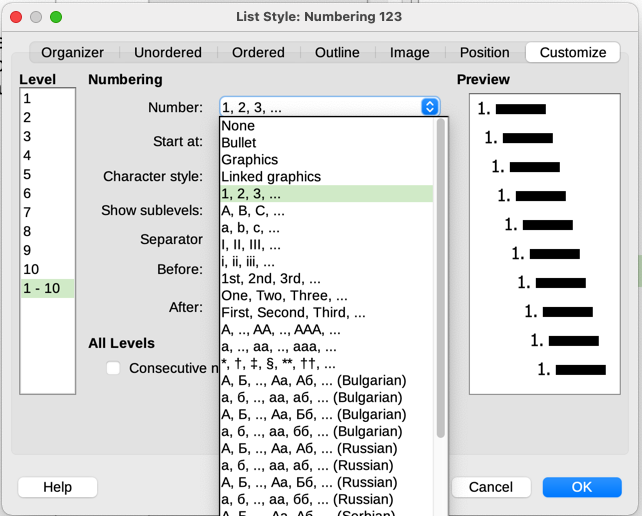
You can set up to 40 characters before or after the actual number using the Before and After fields. These characters are added automatically whenever the list style they are attached to is applied.
Common characters after a number might be a period, a parenthesis, or both. Alternatively, you might put a parenthesis both before or after the number, or text such as Step in the Before field. In a List Cont. style, you might add (Continued) before.
More elaborately, you might set a paragraph style to start at the top of the page, then attach to it a list style with text so that the paragraph style will automatically add text.
In a numbered list, you can choose the number of outline levels in the list by adjusting the Show sublevels field. For example, if you decided to show three sublevels, the first use of the third sublevel would be numbered 1.1.1.
Note
Using the Before, After, and/or Show sublevels fields means that the settings on the Position tab need to be adjusted so there is enough space between the number and the text.
By default, the Character Style field for numbered lists is set to the Numbering Symbols character style, and for bulleted lists to the Bullets character style.
For most purposes, you probably have no reason to change these defaults. Unless modified, these character styles use the same font and font size as the default character style of the list paragraph, and they apply to both the number and any text in the Before or After fields.
Common modifications include making the numbers or bullets larger, giving them a corporate color, making them bold, or using a condensed version of a font.
Note
You may need to change the text indent if you use a larger font, especially for two or three digit numbers. The line height may also need to be increased.
To have the numbers in a larger or different font, or a different color, from the text of the list, follow these steps:
1) Create a new character style for the numbers, or modify an existing character style. For this example, the new style is named Numbers Large.
On the Font tab of the Character Style dialog for Numbers Large, increase the font size. To change the color of the number, go to the Font Effects tab. Click OK to save the new or modified character style.
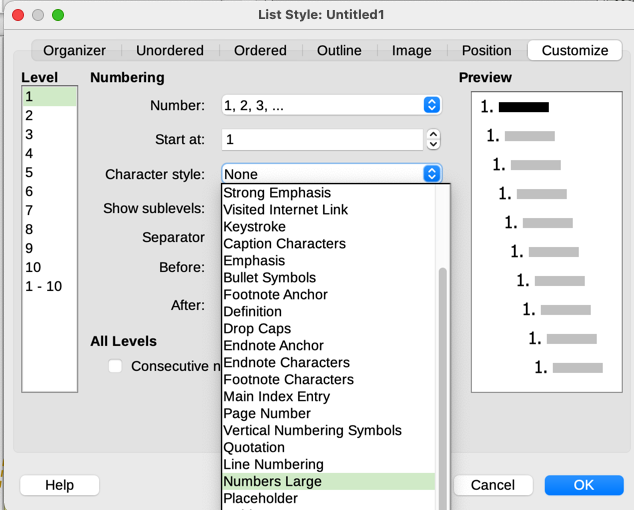
2) Create a new list style, or modify an existing list style. On the Customize tab of the List Style dialog (Figure 13), choose the character style you created or modified. For this example, choose Numbers Large. Click OK to save the style.
3) Create a new paragraph style, or modify an existing paragraph style. On the Outline & List tab of the Paragraph Style dialog, choose the numbering style you created or modified.
4) Apply the paragraph style in the usual way to the items of the list.
Caution
If you modify an existing character, list, or paragraph style, the changes will affect all lists in the document that use those styles.
Figure 13: Choosing the character style for the numbers of a list
Numbered lists with two digits can displace list items (Figure 14). You can correct this problem in several ways:
Never have a list with more than nine items. Rewrite lists that have more, combining steps or dividing one list into two or more shorter ones. This arrangement may also make your instructions easier to remember.
Add extra space between the number and the list item using the Indent at field on the Position tab of the dialog. Do not add so much space that the association between numbers and list items is lost.
Adjust the size of the numbers using the Character Style field on the Customize tab.
Set the Numbering Alignment to Right. Watch that this change does not extend numbers into the left margin.
Figure 14: Unless extra spacing is provided, the list items are displaced when the numbering enters two digits.
People occasionally ask for numbered lists that count down from the starting number, instead of up, presumably for Top 10 lists and other countdowns. Unfortunately, LibreOffice will not automatically generate numbers for reverse order in lists. A reverse order list must be entered manually.
The default character style for bullets is Bullets. It gives you a standard bullet for the Default Paragraph Style. However, you might want to change the symbol using the Character field on the Customize tab. Selecting the Character field opens a dialog from which you can choose any symbol supported by the current font.
Caution
When you use an unusual character style for bullets, be sure to embed the font used when you share a file.
If your design includes nested bullets – that is, bullet lists within bullet lists – you might want to create an additional list style with a name like Bullets2.
However, if you do use more than one bullet list style, make sure their designs are compatible. In fact, indenting the nested bullets and nothing more is enough to distinguish them from the top level bullets.
Depending on the characters you choose, bulleted list styles can serve as more than unordered lists. For example, a bullet list can be made into a checklist by selecting the font or character used for the bullet.
Figure 15: Three bullet list styles for checklists
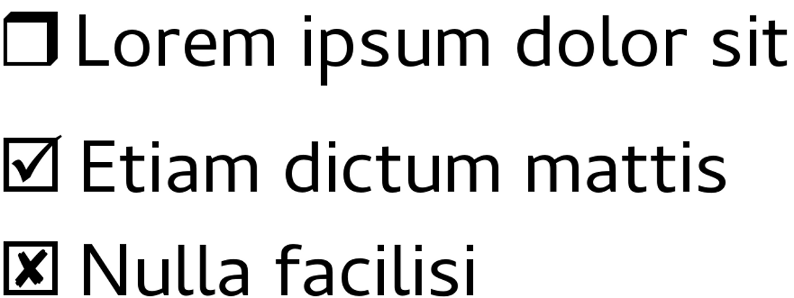
If you want a checklist to be used with a pen, set up the list style in the usual way, using a character style that uses the OpenSymbol font that ships with LibreOffice, and assign the character U+E00B (a shaded open box) as the bullet (that is two zeros, not lower case “o”s). Print the list, and it is immediately ready for use. Add some corporate branding and letterhead, and the To Do list can be used in business.
If you want to use the list on the computer, create two list styles, one that uses the character U+2752, and one that uses the character U+E531 (a box with a check mark). Create the list using the first style, then tick off an item by applying the second style to it.
Depending on the purpose of the list, you can also create a third list style that uses the character U+E532 (an X mark) to indicate items that were not completed.
Using an image instead of a standard bullet is a convenient way to add some originality to your document. However, you are limited by the small size at which most bullets display. Mostly, simple images with strong contrast work best as a substitute bullet. Often, a black and white image is most effective.
Images used for bullets are also a way to position an image on a page. In particular, they can be used to create warning signs and indications in a technical manual or an informal text.
In either case, select a graphic to use in Customize > Number in the dialog for the List style.
Choosing Graphics embeds the picture within the document file. By contrast, Linked graphics only adds a link to the graphic. You may need to scroll up in the Number drop-down list to see these choices.
Tip
If the image is cut off, either adjust the image size or else change the line spacing to At Least so the top half of the characters in a line is not chopped off.
Figure 16: The fields for using a graphic as a bullet appear after you have selected Graphics or Linked Graphics
After you choose Graphics or Linked graphics, the dialog displays a set of fields for editing the bullet:
The Select drop-down list has two choices for selecting an image: Gallery, which opens a list of bullets in the Gallery, and From file, which opens a file manager.
The Width and Height fields set the size at which the picture displays. They do not affect the original picture file.
Keep ratio, when selected, ensures that changing either the Width or Height field changes the other proportionally.
Alignment can usually be ignored, but can help when the height of the graphic is greater than the height of the text, as in the graphics for Tips, Notes, and Cautions in the LibreOffice guides.
List styles can be used for more than lists. For example, the Tips, Notes, and Cautions in the LibreOffice guides use list styles to position the graphics and text. Here is how the Tips are created and used. The others are done in the same way, but with a different logo and text.
Step 1. Create a paragraph style for the body of a tip, note, or caution.
The body of a tip, note, or caution in this book is indented under the heading and has a line under it to set it off from the main text.
1) On the Sidebar, go to Styles > Paragraph Styles. Right-click and choose New. Name the new style Text Note.
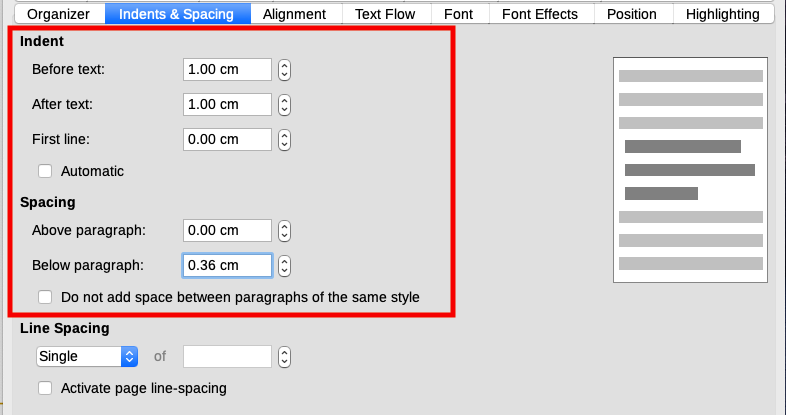
2) On the Indents & Spacing tab (Figure 17), specify the indentation and spacing for the body of the Tip.
Figure 17: Choosing indentation and spacing for the body of the Tip
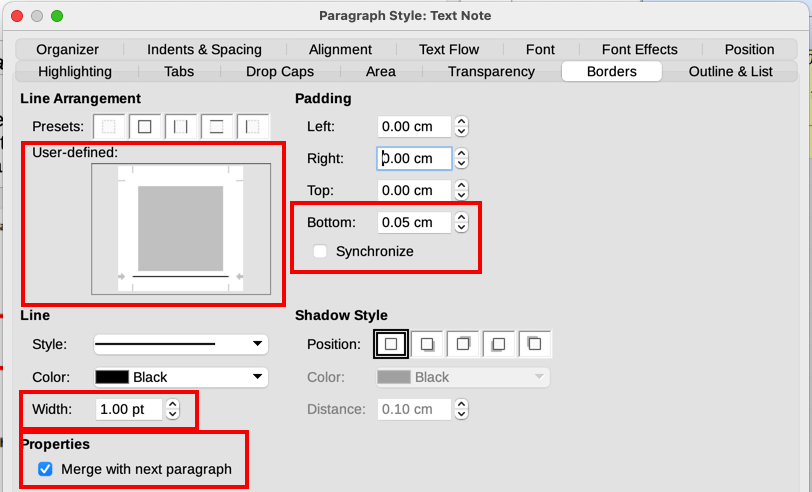
3) On the Borders tab (Figure 18), select a bottom border, increase the thickness, and specify the spacing between the text and the border. Choose Merge with next paragraph to cause the border to appear under only the final paragraph if the Tip includes more than one paragraph.
Figure 18: Defining the bottom border of the Tip body text
4) Style the paragraph (font and so on) in the usual way.
5) Click OK to save the paragraph style.
Step 2. Create a list style.
1) On the Sidebar, go to Styles > List Styles. Right-click and choose New. Name the new style Heading Tip.
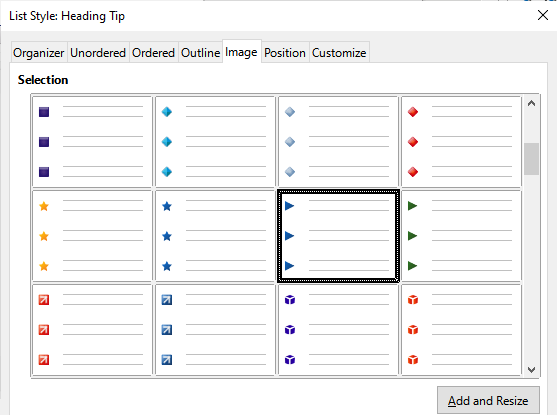
2) On the Image tab (Figure 19), select an appropriate image. (Or, skip this step and select an image on the Customize tab.)
Figure 19: Selecting a bullet image
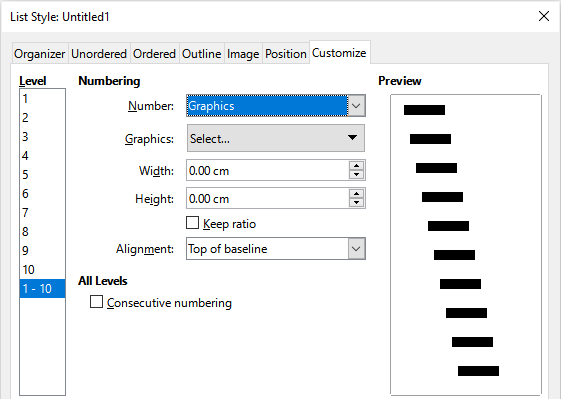
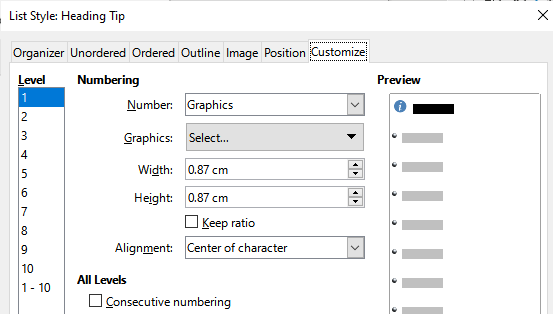
3) On the Customize tab (Figure 20), choose Graphics in the Number field. Optionally, click Select in the Graphics field and choose an image from a file or from the Gallery. (For the Tips, Notes, and Cautions in the LibreOffice guides, images were selected from external files.)
If the bullet image selected is too large or too small for your design, specify a width and height. You can use these fields to resize the original image.
In the Alignment field, select where you want the image to line up with the text.
Figure 20: Customizing the size and alignment of the bullet image
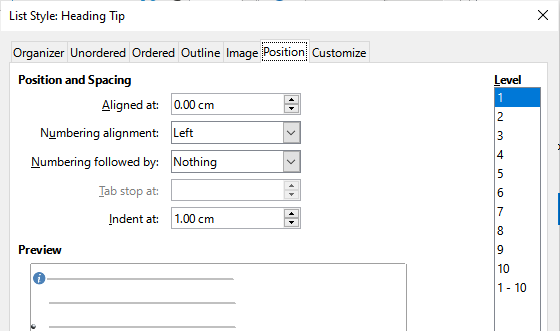
4) On the Position tab (Figure 21), choose settings as described in “Positioning bullets, numbers, and list items” on page 1.
5) Click OK to save the list style.
Figure 21: Choosing position and spacing settings for the bullet image
Step 3. Create a paragraph style for the Heading Tip and connect it to the list style.
1) In the Sidebar, go to Styles > Paragraph Styles. Right-click and choose New. Name the new style Heading Tip.
2) On the Organizer tab (Figure 22), specify the Next Style to be the one you created for the body of the Tip; in this case, Text Note.
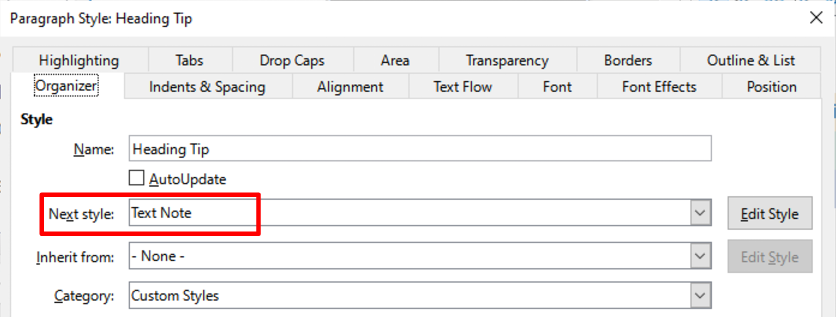
Figure 22: Specifying the Next style for the Heading Tip style
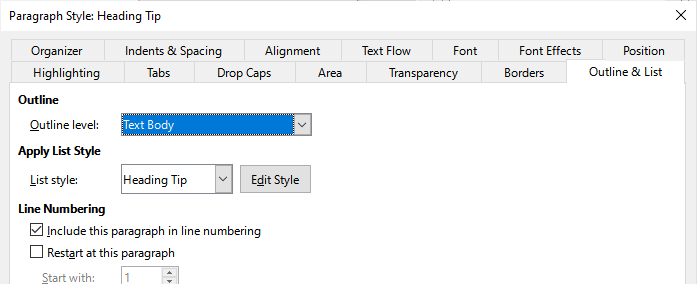
3) Style the paragraph in the usual way, then go to the Outline & List tab (Figure 23). In the Numbering style field, select the list style you created. Click OK to save the style.
Figure 23: Connecting the list style to the paragraph style
Step 4. Apply the paragraph styles to the heading and text of the Tip, Note, or Caution.
1) Type the word Tip in a new paragraph. (You must enter at least one character or a space, or else the graphic disappears when you press Enter, leaving the indent but no bullet.)
2) Apply the Heading Tip paragraph style.
3) Press Enter. The next paragraph should automatically have the Text Note paragraph style. Type the text for the body of the tip. (If you have already typed the text, then apply the style manually.)
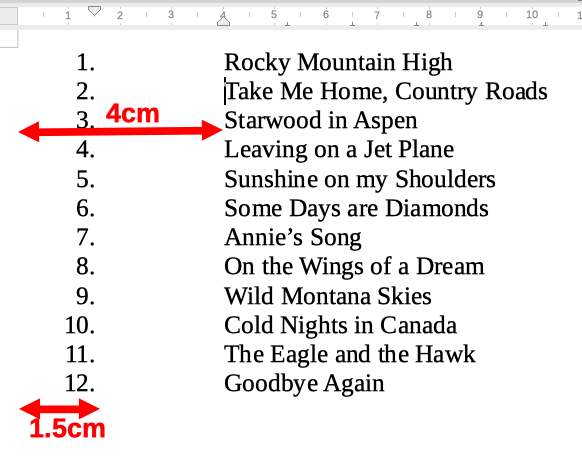
In this example, we will create a numbered list that is used to number the songs on a CD. The numbers are right-aligned, and some space is left between the number and the title of the track.
As we want to reuse the same numbered list for other CDs, we will define a new list style and a related paragraph style, then apply the paragraph style to the tracks list. (We could directly apply the list style to the items on the list, but using a paragraph style is better practice.)
As for the previous example, start by clicking the List Styles icon on the Styles deck of the Sidebar. Then right-click anywhere in the list box and choose New.
The List Style dialog is displayed. For the CDTracks style, we need to customize fields in the Organizer, Options, and Position tabs.
On the Organizer tab, type CDTrack in the Name box and leave the Category as Custom styles.
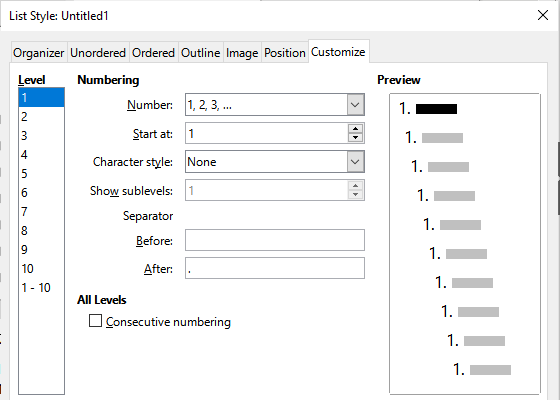
On the Customize tab (Figure 24), modify the options as follows:
1) In the Level box, choose 1.
2) In the Number list, choose 1, 2, 3,....
3) Make sure Start at is set to 1.
4) Leave the Character style field as None.
5) Show sublevels should be grayed out.
6) Leave the Before and After boxes empty.
7) Do not select Consecutive numbering.
Figure 24: Settings for the new numbering style on the Customize tab
As discussed earlier, the numbered list will adopt the settings of the underlying paragraph style. If you want to use a special font, size or color for the numbering symbol, you can create a character style and select it in the Customize tab.
If you want the word Track to appear before the number, add it to the Before field on the Customize tab. Do not forget to add a space to separate the word from the number.
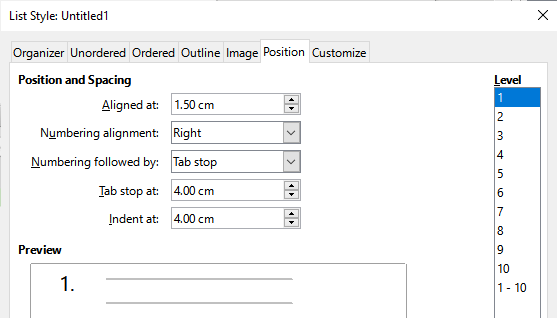
Set up the final parameters of the CDTrack list style on the Position tab (Figure 25).
1) In the Level box, choose 1.
2) For Aligned at, choose 1.5cm. (This refers to the alignment of the numbers.)
3) For Numbering alignment, choose Right.
4) For Numbering followed by, choose Tab stop.
5) For Tab stop at, choose 4.0cm.
6) For Indent at, choose 4.0cm. (This sets the indentation of the list.)
7) Click OK to finish.
Figure 25: Settings for the new numbering style on the Position tab
Although we could directly apply the list style to the items on the list, using a paragraph style is better practice, so we will do that. We will base our new CDTracks style on the Default Paragraph Style.
1) Start by clicking the Paragraph Styles icon on the Styles deck of the Sidebar. Then right-click on the Default Paragraph Style in the list box and choose New.
2) On the Organizer tab of the Paragraph Style tab, type CDTracks in the Name box and optionally set the Next style to be CDTracks.
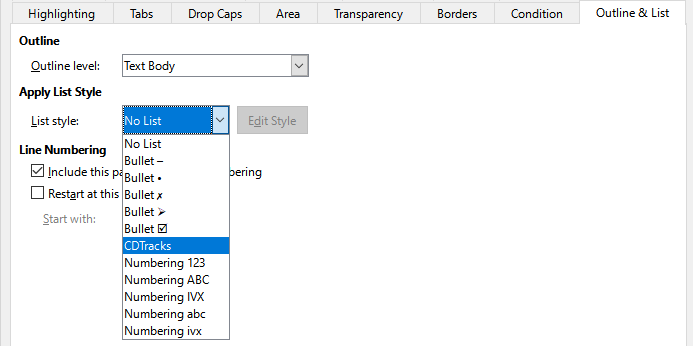
3) On the Outline & List tab (Figure 26), choose CDTrack in the Numbering style drop-down list.
4) Click OK to save the new paragraph style.
Figure 26: Selecting a numbering style for the new paragraph style
Now that the list style and paragraph style are available, they can be quickly applied to any list in the document.
1) If you are starting a new list, before pressing Enter to start a new line, double-click the desired paragraph style name in the Styles deck on the Sidebar. At the end of the list, press Enter, then double-click the paragraph style (on the Styles deck) you want for the rest of the text.
2) If you already have a list, select it and then double-click the desired paragraph style name on the Styles deck.
If you have more than one list in a document, the second and subsequent lists with the same paragraph style continue their numbering from the previous list. To restart at 1, place the cursor anywhere in the paragraph you want numbered 1, right-click, and choose List > Restart numbering in the context menu.