
Writer Guide 7.2
Chapter 15
Tables of Contents, Indexes, Bibiographies
This document is Copyright © 2021 by the LibreOffice Documentation Team. Contributors are listed below. You may distribute it and/or modify it under the terms of either the GNU General Public License (https://www.gnu.org/licenses/gpl.html), version 3 or later, or the Creative Commons Attribution License (https://creativecommons.org/licenses/by/4.0/), version 4.0 or later.
All trademarks within this guide belong to their legitimate owners.
|
Jean Hollis Weber |
Kees Kriek |
|
|
Jean Hollis Weber |
Kees Kriek |
Felipe Viggiano |
|
Bruce Byfield |
Gillian Polack |
Ron Faile Jr. |
|
John A Smith |
|
|
Please direct any comments or suggestions about this document to the Documentation Team’s mailing list: documentation@global.libreoffice.org
Note
Everything you send to a mailing list, including your email address and any other personal information that is written in the message, is publicly archived and cannot be deleted.
Published August 2021. Based on LibreOffice 7.2 Community.
Other versions of LibreOffice may differ in appearance and functionality.
Some keystrokes and menu items are different on macOS from those used in Windows and Linux. The table below gives some common substitutions for the instructions in this document. For a detailed list, see the application Help.
|
Windows or Linux |
macOS equivalent |
Effect |
|
Tools > Options |
LibreOffice > Preferences |
Access setup options |
|
Right-click |
Control+click or right-click depending on computer setup |
Open a context menu |
|
Ctrl (Control) |
⌘ (Command) |
Used with other keys |
|
F11 |
⌘+T |
Open the Styles deck in the Sidebar |
This chapter describes how to create and maintain a table of contents, an index, and a bibliography for a text document using LibreOffice Writer. Other types of index are mentioned briefly. To understand the instructions, you need a basic familiarity with Writer and styles (see Chapter 8, Introduction to Styles, and Chapter 9, Working with Styles).
Writer’s table of contents (TOC) feature lets you build an automated TOC from the headings in a document. Whenever changes are made to the text of a heading in the body of the document or the page on which the heading appears, those changes automatically appear in the table of contents when it is updated.
Before you start, make sure that the headings are styled consistently. For example, you can use the Heading 1 style for chapter titles and the Heading 2 and Heading 3 styles for chapter subheadings.
This section shows you how to:
Create a table of contents quickly, using the defaults.
Customize a table of contents.
Note
You can use any style you want for the different levels to appear in the TOC; the examples in this chapter uses the default Heading styles. You can specify other paragraph styles to appear in the TOC, as described in “Create From” on page 1.
Tips
If some of your headings do not show up in the table of contents, check that the headings have been tagged with the correct paragraph style. If a whole level of headings does not show up, check the settings in Tools > Chapter Numbering. See “Defining a hierarchy of headings” in Chapter 8, Introduction to Styles.
If you add or delete text (so that headings move to different pages) or you add, delete, or change headings, you need to update the table of contents. To do this: Right-click anywhere in the TOC and select Update Index in the context menu.
If you cannot place the cursor in the TOC, choose Tools > Options > LibreOffice Writer > Formatting Aids, and then select Enable cursor in the Protected Areas section.
The TOC appears with a gray background. This background is there to remind you that the TOC is a field; the text you see is generated automatically. The background is not printed and does not appear if the document is converted to a PDF. To turn off this gray background, go to Tools > Options > LibreOffice > Application Colors, then scroll down to the Text Document section and deselect Index and table shadings.
This change may leave a gray background showing behind the dots between the headings and the page numbers, because the dots are part of a tab. To turn that shading off, go to Tools > Options > LibreOffice Writer > Formatting Aids and deselect the option for Tabs in the Display formatting section.
Most of the time you will find the default table of contents to be all you need, although the formatting may be inelegant. To insert a default TOC:
1) Create a document, using the following paragraph styles for different heading levels (such as chapter and section headings): Heading 1, Heading 2, and Heading 3. These are what will appear in your TOC. Writer can evaluate up to ten levels of headings.
2) Click in the document where you want the TOC to appear.
3) Choose Insert > Table of Contents and Index > Table of Contents, Index or Bibliography.
4) Click OK. The result will be a typical table of contents with the entries generated as hyperlinks.
Caution
If you have Edit > Track Changes > Show enabled when editing a document and you update the TOC, then errors may occur, as the TOC will still include any deleted headings and deleted text may cause page numbering in the TOC to be wrong. To avoid this problem, be sure this option is deselected before updating a TOC.
Almost every aspect of the table of contents can be customized to suit the style and requirements of your document.
Start by clicking in the document where you want the table of contents to appear and choose Insert > Table of Contents and Index > Table of Contents, Index or Bibliography to open the Table of Contents, Index or Bibliography dialog shown in Figure 1.
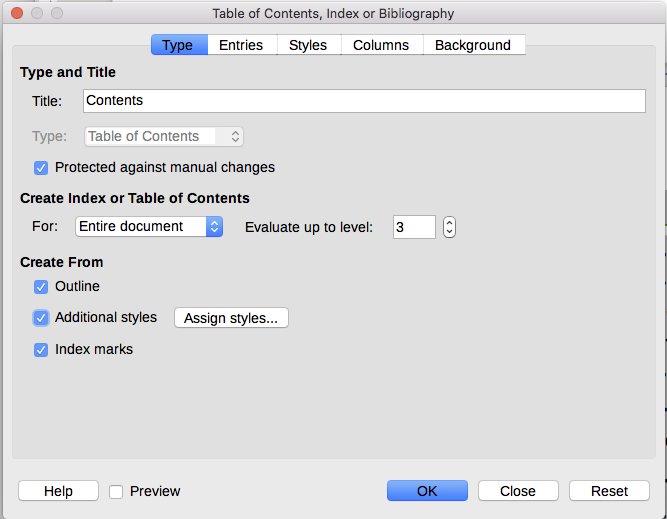
Figure 1: Type tab of Table of Contents, Index or Bibliography dialog
You can also access this dialog at any time by right-clicking anywhere in an existing table of contents and choosing Edit Index in the context menu.
The Table of Contents, Index or Bibliography dialog has five tabs. Each tab covers a different aspect of the TOC structure and appearance:
Use the Type tab to set the attributes of the TOC.
Use the Entries and Styles tabs to format the entries in the TOC.
Use the Columns tab to put the TOC into more than one column.
Use the Background tab to add color or an image to the background of the TOC.
You can display a preview box, located on the right-hand side of the dialog, to show as you work how the TOC will look: select the Preview option in the lower left of the dialog. The illustrations in this chapter show the dialog as it appears with the preview box hidden.
Note
The preview box shows the appearance from settings made on the Type, Entries, and Styles tabs. It does not show changes made on the Columns and Background tabs.
After making all your changes, click OK to apply them. To revert to the default settings for the Columns and Background tabs, select each tab in turn and click the Reset button. The settings on the Type, Entries and Styles tabs must be reset manually; the Reset button has no effect.
Use the Type tab (Figure 1) to set the attributes of the TOC.
Caution
You can change the type of index only when you first create it. Once you define an index type (for example, a table of contents) you cannot change it.
Protected against manual changes
Create Index or Table of Contents
Outline
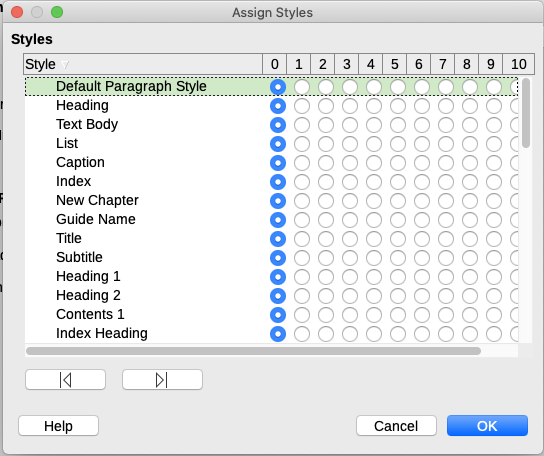
Figure 2: Assigning additional styles to TOC levels
Use the Entries tab (Figure 3) to define and format the entries in the TOC. Each outline level can be styled independently from the other levels by adding and deleting elements.
Figure 3: Entries tab of Table of Contents, Index or Bibliography dialog
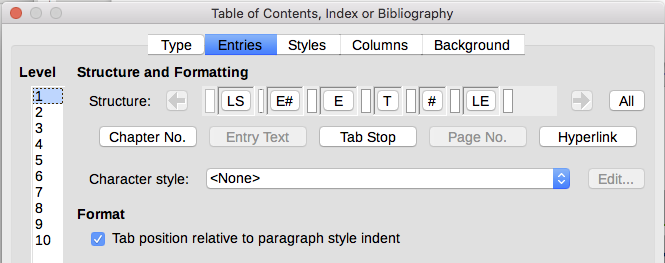
Click a number in the Level column to select the outline level whose elements you want to format. The Structure line contains the elements included in the entries for that level. Elements that can be added to the structure line are displayed just below the structure line, and are grayed out if they cannot be included:
The LS icon represents the start of a hyperlink.
The E# icon represents the “chapter number”, which means the heading number value assigned to a heading style in Tools > Chapter Numbering, not just for chapters but also for other levels of headings. See “Setting up heading numbering” in Chapter 8, Introduction to Styles.
The E icon represents the chapter (or sub-chapter) text: That is the text formatted with the paragraph style used for each level.
The T icon represents a tab stop.
The # icon represents the page number.
The LE icon represents the end of a hyperlink.
Each white field on the Structure line represents a blank space where you can add custom text or another element.
Caution
In the Chapter Numbering dialog (covered in Chapter 8), if you have included any text in the Before or After boxes in the Separator section for any given level, then that text will be part of the E# field for that level. Take care when building the structure line not to create any unwanted effects in the appearance of the TOC.
To add an element to the Structure line:
1) Click in the white field where you want to insert the element.
2) Click one of the active buttons just below the Structure line. For example, to add a tab, click the Tab Stop button. An icon representing the new element appears on the Structure line.
3) To add custom text, such as the word Chapter, type the text in the white field. Don't forget a trailing space.
To change an element in the Structure line, click the icon representing that element and then click a non-grayed out element in the row of buttons just below the Structure line. For example, to change a chapter number to a tab stop, click the E# icon on the Structure line (it shows then as being pressed) and then click the Tab Stop button in the row of available elements. To cancel before swapping an element, click in one of the white spaces.
If you wish to apply the displayed structure and formatting to all outline levels, click the All button on the right.
To delete an element from the Structure line, click the button representing that element and then press the Delete key on your keyboard. For example, to delete the default hyperlink setting, click the LS icon and then press the Delete key. Repeat this for the LE icon.
You might want an element to be a bit different from the rest of the line. For example, you might want the page number to be bold. To apply a character style to an element:
1) Be sure you have previously defined a suitable character style.
2) On the Structure line, click the button representing the element to which you want to apply a style.
3) In the Character Style drop-down list, select the desired style.
To view or edit the attributes of a character style, select the style in the Character Style drop-down list and then click the Edit button.
Tip
The default character style for hyperlinks (such as those inserted by Insert > Hyperlink) is Internet Link, which by default is underlined and shown in blue.
The default hyperlinks of TOC entries are set to the Index Link character style, which may be different in appearance from the Internet Link style. If you want them to appear the same as internet links, you can select the LS icon on the Structure line and change the character style selection for TOC entries to Internet Link.
You can also change the attributes for Index Link to what you want.
Click on the Tab stop icon on the Structure line to bring up these controls:
Fill character: select the tab character you wish to use; the first choice is none (blank).
Tab stop position: specify the distance to leave between the left page margin and the tab stop. Optionally, select Align right for the tab stop; this selection inactivates the distance.
When this option is selected, entries are indented according to the settings of their individual formats. Where a paragraph style specifies an indent on the left, tab stops are relative to this indent. If this option is not selected, tab stops are relative to the left margin position.
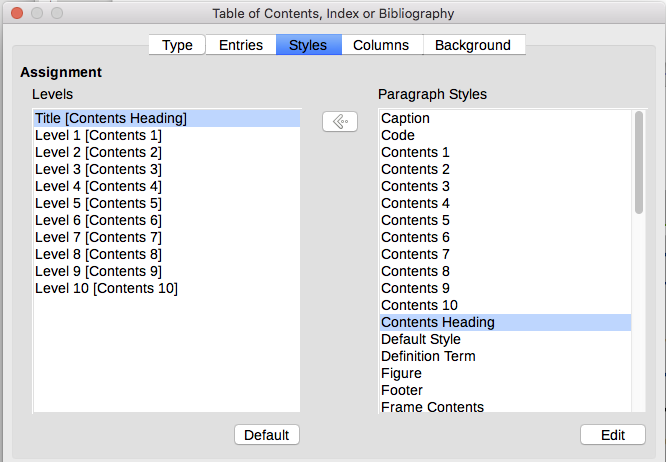
Use the Styles tab (Figure 4) to change which paragraph style is assigned to display the text of each level in the table of contents. In most cases, the best strategy is to keep the assigned styles but change their settings as needed to make the TOC appear the way you want.
To apply a custom paragraph style to an outline level:
1) In the Levels list, select the outline level.
2) In the Paragraph Styles list, click on the desired paragraph style.
3) Click the < button to apply the selected paragraph style to the selected outline level.
The style assigned to each level appears in square brackets in the Levels list.
To remove paragraph styling from an outline level, select the outline level in the Levels list, and then click the Default button.
To view or edit the attributes of a paragraph style, click the style in the Paragraph Styles list, and then click the Edit button.
Figure 4: Styles tab of the Table of Contents, Index or Bibliography dialog
Use the Columns tab to change the number of columns for the TOC. Multiple columns are more likely to be used in an index than in a TOC, so this tab is described in the section on indexes. See Figure 11.
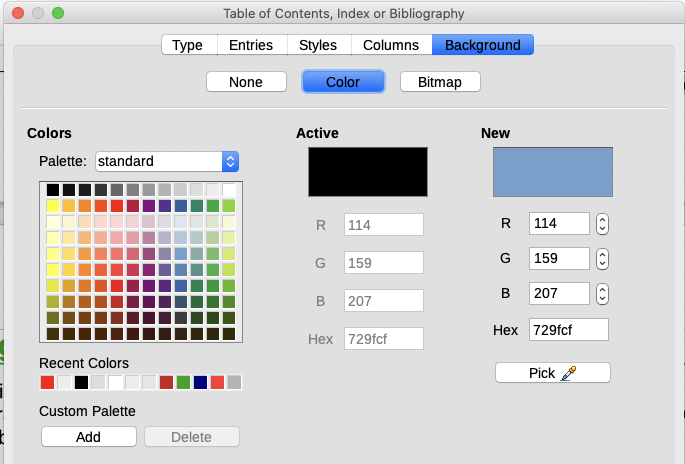
Use the Background tab (Figure 5) to add color or a bitmap (image) to the background of the TOC.
To add color to the background of the table of contents, select the Color button from the row of buttons near the top of the dialog, then select a color and click OK.
See “Adding custom colors” in Chapter 20, Customizing Writer, for more about defining and using background colors.
Figure 5: Background tab, showing Color choices
To add an image to the background of the table of contents:
1) From the row of buttons near the top of the dialog, select Bitmap. The Background tab now displays the bitmap options, as shown in Figure 6.
Figure 6: Image options on the Background tab
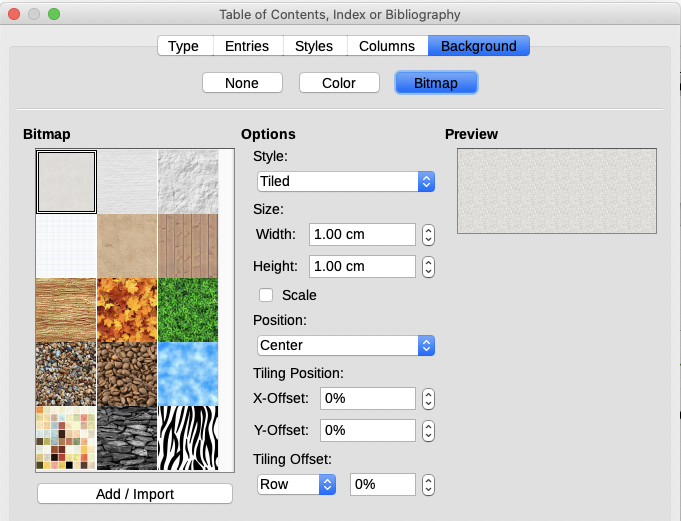
2) Select from the given bitmaps or click the Add/Import button to select an image from your computer’s file system.
3) Under Options, select the type of placement for the image.
Style – select custom position/size, tiled, or stretched.
Size – select the required Image aspect ratio or the Scale option.
Position – select where the image is to be displayed.
4) To apply the image, click OK.
To delete a color or an image from the table background, select None at the top of the dialog.
To edit an existing TOC, right-click anywhere in the TOC and choose Edit Index in the context menu. You can also open the Navigator in the Sidebar, click the expansion symbol (+ sign or triangle) next to Indexes, then double-click on Table of Contents.
The Table of Contents, Index or Bibliography dialog (Figure 1 on page Figure 1) opens. You can edit and save the TOC as described in the previous section.
Writer does not update the TOC automatically, so after any changes to the headings, you need to update it manually. Right-click anywhere in the TOC; in the context menu, choose Update Index.
You can also update the index from the Navigator: expand Indexes, right-click on the name of table of contents you want to update, and choose Index > Update.
To delete the TOC from a document, right-click anywhere in the TOC and choose Delete Index in the context menu. You can also delete the index from the Navigator by choosing Index > Delete in the menu shown in Figure 8. Writer will not prompt you to confirm the deletion.
An alphabetical index (referred to as an index) is a list of keywords or phrases used throughout a document that, if listed in order with page numbers, may help the reader find information quickly. Generally an index is found in the back of a book or document.
This section describes how to:
Add index entries manually.
Use a concordance file.
Create an alphabetic index quickly.
Customize the display of index entries.
Customize the appearance of the index.
View and edit existing index entries.
Before you can create an index, you must create some index entries, either manually or by using a concordance (see page 1). To create index entries manually:
1) To add a word to the index, place the cursor anywhere in that word. To add multiple words as one entry, select the entire phrase.
2) Choose Insert > Table of Contents and Index > Index Entry to display a dialog similar to that shown in Figure 8. When the dialog opens, the selected text appears in the Entry text input box. You can accept the word or phrase shown, or change it to whatever you want.
3) Click Insert to create the entry.
Tip
You can also open the Insert Index Entry dialog by clicking the Insert Index Entry icon at the right-hand end of the Insert toolbar, as shown in Figure 7.
Figure 7: Insert Index Entry icon on Insert toolbar

Tip
A cursor placed immediately before the first character of a word, or immediately after the last character of a word if it is followed by a space, counts as being in that word.
You can create multiple entries without closing the dialog. For each one:
1) Click at the location in the document that you want to index.
2) Click again on the dialog.
3) Change the entry if needed, and click Insert.
4) Repeat steps 1–3 until you have finished with the entries, then click Close.
Figure 8: Inserting an index entry
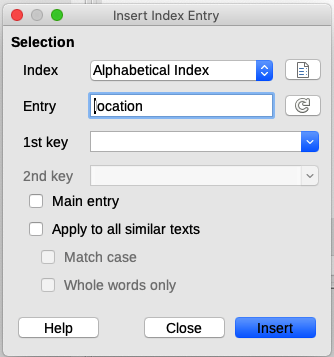
Below is a brief explanation of the fields in the Insert Index Entry dialog and how to use them.
Index
Entry
1st key
2nd key
Main entry
Apply to all similar texts
An index key is a primary entry under which subentries are grouped. For example, you might want to create a grouping similar to this:
LibreOffice
In this example, LibreOffice is the 1st key. The subentries (with the page numbers showing) are the indexed entries. To insert an index entry for the topic Writer, on the Insert Index Entry dialog (Figure 8 on page Figure 8), type Writer in the Entry box and LibreOffice in the 1st key box.
Note
If field shading is active (Tools > Options > LibreOffice > Application Colors > Text Document > Field shadings), when a selected word or phrase has been added to the index, it is shown in the text with a gray background. If the text of an index entry has been changed from the text of the word selected, the index entry is marked by a small gray rectangle at the start or end of that word.
A concordance is a plain text file that lists words to add to the index. It has one word or phrase defined on each line. Each line has a strict structure, consisting of seven fields, separated by semicolons:
Search_term;Alternative_entry;1st_key;2nd_key;Match_case;Word_only
No space is entered between the semicolon and a field’s content. A key is a higher level heading that a search term is placed beneath.
If you choose not to have an alternative entry, a first key or a second key, leave those fields blank, so that one semi-colon immediately follows another.
The last two fields are structured somewhat differently. If you want only entries that have the same upper or lower case letters as your entries, enter 1 in the second to last field. Similarly, entering 1 in the last field sets the index to only include instances where the entry is a whole word, and not part of a larger one. You can also leave the last two fields blank, as you can with any of the others.
For example, entering:
Macaw;Ara;Parrots;;0;0
Would produce an entry for macaw with
A listing under macaw.
An alternate listing under ara (the scientific name).
A listing of Parrots, Macaw.
No second key (notice the two semi-colons).
Inclusion of instances that start with a lower or upper case letter (both “macaw” and “Macaw”).
Inclusion of instances in which the term is a whole word or part of a longer word.
Whether creating a concordance is faster than adding entries manually is debatable, but a concordance is certainly more systematic. The disadvantage of a concordance is that it can produce an index that includes instances of common words that are irrelevant for your purposes. In many cases, a useful index may require a combination of manual entries and a concordance.
Now that you have some index entries, you can create the index.
Although indexes can be customized extensively in Writer, most of the time you need to make only a few choices.
To create an index quickly:
1) Click in the document where you want to add the index and click Insert > Table of Contents and Index > Table of Contents, Index or Bibliography to open the Table of Contents, Index or Bibliography dialog.
2) In the Type box on the Type tab (Figure 9), select Alphabetical Index.
3) In the Options section, you may want to deselect Case sensitive (so that capitalized and lower-case words are treated as the same word) and Combine identical entries with p or pp.
4) If you are using a concordance, select Concordance file in the Options section, then click the File button and select the concordance file you created.
5) Click OK. The result will be a typical index.
To customize an existing index, right-click anywhere in the index and choose Edit Index in the context menu.
The Table of Contents, Index or Bibliography dialog (Figure 9) has five tabs. All of them can be used to customize the index.
Use the Type tab to set the attributes of the index.
Use the Entries and Styles tabs to format the entries in the index.
Use the Columns tab to put the index into more than one column.
Use the Background tab to add color or an image to the background of the index.
After making your changes, click OK to save the index so it appears in your document.
Use the Type tab (Figure 9) to set the basic attributes of the index.
To give the index a different title, edit the Title field. To delete the title, clear the Title field.
Be sure the type of index is set to Alphabetical Index.
By default, to prevent the index from being changed accidentally, the option Protected against manual changes is selected; the index can only be changed by using the context menu or the dialog. If the option is not selected, the index can be changed directly, just like other text. However, any manual changes to an index will be lost when you update it, so they should be avoided.
Figure 9: Type tab for an alphabetic index
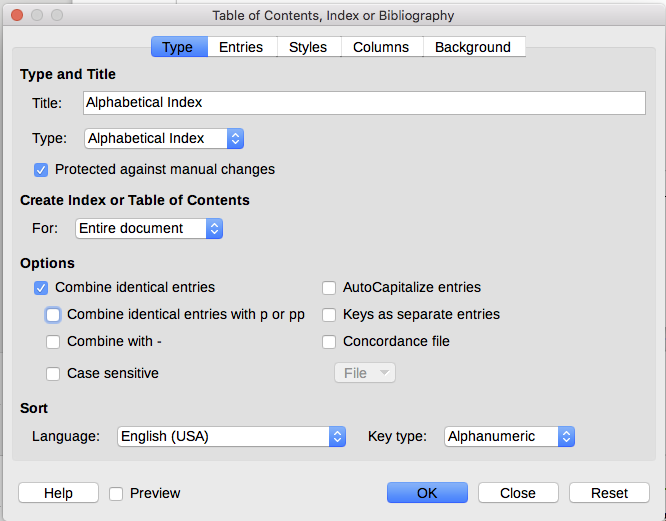
In the drop-down list in the Create Index or Table of Contents section, select Entire document. You can also choose to create an index for just the current chapter.
Other options determine how the index handles entries.
Combine identical entries
AutoCapitalize entries
Keys as separate entries
Concordance file
Use the Entries tab to set exactly how and what will be displayed for each of the entries. The tab is similar to Figure 10.
Note
Hyperlinking from the index to the location of entries in the text is not available.
Figure 10: Entries tab for an alphabetical index
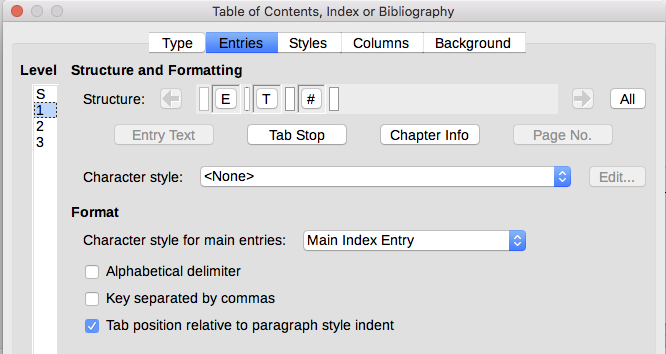
To begin, in the Level column select the index level whose elements you want to format. Level “S” refers to the single letter headings that divide the index entries alphabetically when the Alphabetical delimiter option is selected in the Format section. (You will be able to apply your changes to all index levels later.) In the Structure and Formatting section, the Structure line displays the elements for entries in that level. Each button on the line represents one element:
The E icon represents the entry text.
The T icon represents a tab stop.
The # icon represents the page number.
The CI icon represents chapter information. This is not present by default, but can be added by selecting the Chapter info button.
Each white field on the Structure line represents a blank space. You can add, change, or delete elements as described on page 1 for a table of contents.
The Chapter Info button inserts chapter information, such as the chapter heading and number. The information to be displayed is selected from the Chapter entry list that appears when this option is selected. This data is determined in the Chapter Numbering dialog (Tools > Chapter Numbering).
Each element on the Structure line may be given additional formatting. For example, you may want the page number to be a different size from the rest of the index text. To do this, apply a character style to one of the elements in the Structure line, as for a table of contents; see page 1.
Apply additional formatting using the options in the Format section.
Alphabetical delimiter. This separates the index entries into blocks that start with the same first letter, using that letter as a header. For example, if your index begins:
Then selecting this option will give you:
Key separated by commas. Arranges the entries in the index on the same line but separated by commas.
Tab position relative to Paragraph Style indent. When selected, entries are indented according to the settings of their individual formats. Where a paragraph style with an indent on the left is in use, tab stops will be relative to this indent. If this option is not selected, tab stops will be relative to the left margin position.
Use the Styles tab to change which paragraph style is assigned to display the text of each level in the index. In most cases, the best strategy is to keep the assigned styles but you can change their settings as needed to make the index appear the way you want.
The Background tab is the same as for TOCs. Refer to “Styles tab” on page 1 and “Background tab” on page 1 for detailed information on these tabs.
Use the Columns tab (Figure 11) to change the number of columns for the index.
Figure 11: Columns tab of the Table of Contents, Index or Bibliography dialog
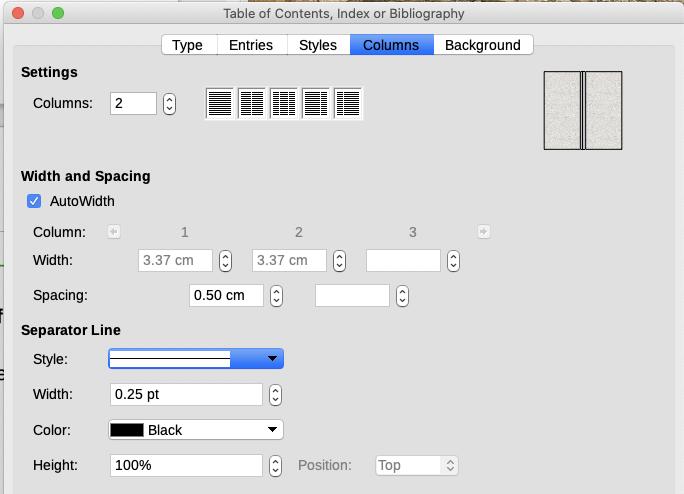
To display the index in more than one column:
1) Either enter the number of columns desired in the box labeled Columns or select the icon representing the number of columns.
2) To evenly distribute the columns according to the page width, select the AutoWidth box. If it is unchecked, you can manually set each of the following:
Width of each of the columns
Spacing between the columns
3) You can choose to have a separator line between the columns:
Style: The default is None, or select from three choices of line style.
Width: The width (thickness) of the line. The default is 0.25pt.
Color: Choose the color of the separator line. The default is Black.
Height: The height of the line, as a percentage of the full column height. The default is 100%
Position: Position of the line relative to the columns (top, centered, or bottom) if the height is less than 100%.
To modify the appearance of an index, right-click anywhere in the index and choose Edit Index in the context menu. The Table of Contents, Index or Bibliography dialog opens and you can edit and save the index using the five tabs described in the previous section.
To update or delete an index, right-click anywhere in the index and select Update Index or Delete Index.
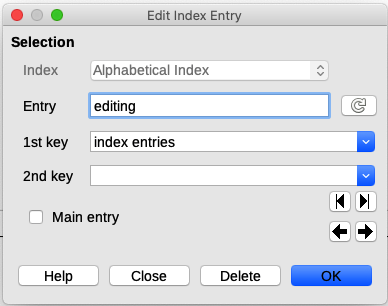
Once you have added the initial entries, you can make some amendments. You can view and edit these using the following steps:
1) Ensure that field shading is active (View > Field Shadings or Ctrl+F8), so you can locate index entries more easily.
2) Place the cursor in the field shading of an existing index entry in the body of the document, right-click, and select Index Entry in the content menu. In the case of a changed-text entry, the field shading is immediately before the word. Placing the cursor immediately before a word marked as a text entry will satisfy both selection criteria.
3) A dialog similar to Figure 12 appears. You can move through the various index entries using the forward and back arrow buttons. If there is more than one entry for a single word or phrase, a second row of buttons with a vertical bar at the point of the arrow head is displayed allowing you to scroll through each of these entries.
4) Make the necessary modifications or additions to the index entries, and then click OK.
Figure 12: Viewing and editing index entries
An alphabetical index is not the only type of index that you can build with Writer. Other types of indexes supplied with Writer include those for illustrations, tables, and objects, and you can even create a user-defined index. This chapter does not give examples of all the possibilities.
To create other indexes:
1) Place the cursor where you want the index created.
2) Select Insert > Table of Contents and Index > Table of Contents, Index or Bibliography on the Menu bar.
3) On the Table of Contents, Index or Bibliography dialog, in the Type drop-down list, select the index wanted.
4) Modify the various tabs, which are similar to those discussed in previous sections.
5) Click OK when everything has been set.
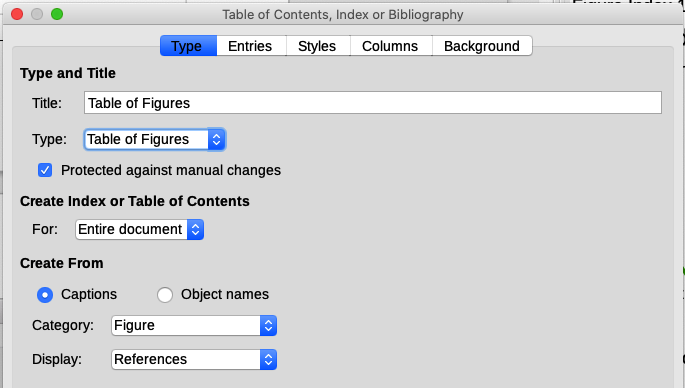
Creating an index (list) of figures or tables is easy if the figure captions were created using Insert > Caption or manually using a number range variable as described in Chapter 17, Fields.
1) On the Table of Contents, Index or Bibliography dialog, in the Type drop-down list, choose Table of Figures. You can change the title of the index to something else; we have used Table of Figures as our title.
2) Be sure Captions is selected in the Create From section, and choose the category of caption. The default for Category is Figure; in our example we have used Figure for the figure captions.
3) Under Display, you can choose References (to include the category, number, and caption text), Category and Number, or Caption Text. We have chosen References.
4) The other tabs of this dialog are similar to those described for tables of contents.
Figure 13: Creating other types of indexes
5) Click OK. The result is shown in Figure 14.
Figure 14: Resulting table of figures
A bibliography is a list of references used in a document. The references can be stored in a bibliographic database or within the document itself.
This section shows you how to:
Create a bibliographic database; add and maintain entries.
Add a reference (citation) into a document.
Format the bibliography.
Update and edit an existing bibliography.
Citations within the text require entries in different fields in the bibliography database, and different presentations in the text. Before creating a list of references, determine which citation style you need for a document. The five main styles are:
APA (American Psychological Association): Psychology, education, and other social sciences.
MLA (Modern Languages Association): Literature, art, and humanities.
Chicago: History and specific publications.
Turabian: A variation of the Chicago style for general use by university students.
AMA (American Medical Association): Medicine, Health, and Biology.
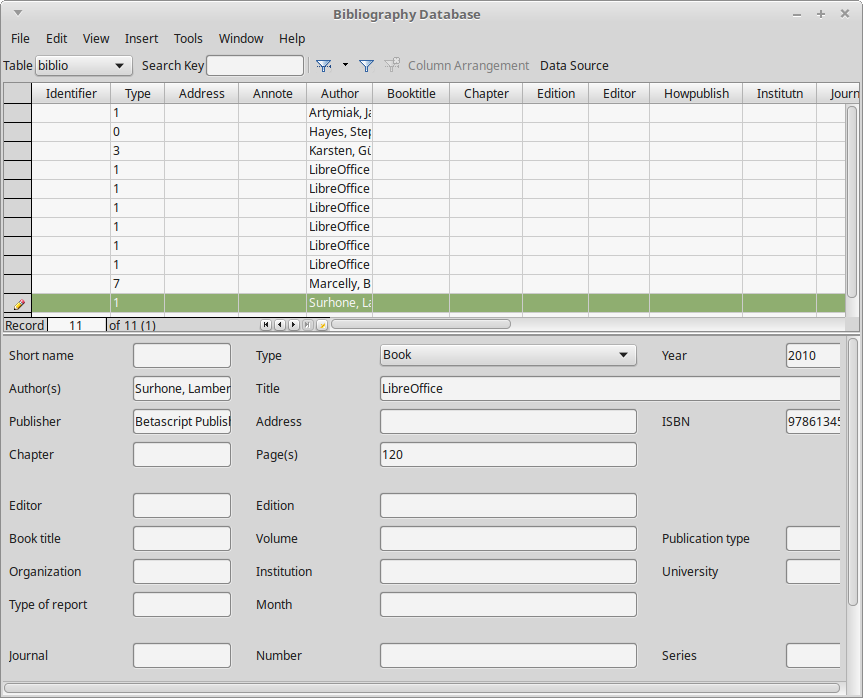
The Bibliography Database (Figure 15) is the source for citations in the text, no matter what citation style you use.
All citations use the Identifier field (first on the left) to set the format for a citation in the document. In this column, you can add the citation in the correct form for the citation style. All necessary information, including the Identifier field, should be entered before any citation is created in the document. The Identifier column in the database table and the Short Name field below the table are the same field.
Tip
Writer has a single bibliography database for all documents. Since formatting entries can be tedious, consider creating a template with citations for each type of source material.
Although you can create references within the document itself, creating a bibliographic database allows reuse in other documents and saves a lot of time.
For most of this section, the database table used is the sample one that comes with Writer. For information on creating a new table in the bibliographic database, see Chapter 8, Getting Started with Base, in the Getting Started Guide.
The bibliography database has to cover many different media and circumstances, which is why it contains so many fields. It also includes fields such as ISBN that no citation style uses, but might be useful to you during your research.
Note
Any single entry in the bibliography needs only about half a dozen fields filled in, no matter what citation format you use. What differs is the fields needed for each type of source material and the order of the fields in each citation style.
To open the database select Tools > Bibliography Database. The Bibliography Database window, similar to that in Figure 15, opens. The upper part of the tab shows all of the records, in a table layout similar to that of a spreadsheet. The lower part of the tab shows all the fields of the selected record.
Caution
The sample entries in the sample database for both the Identifier column and the Short Name field are meaningless. Replace them with the proper format for the citation style you are using.
Figure 15: Bibliography Database main window
To change the data source in use (for example, if you have more than one bibliographic database for different purposes), select Data > Choose Data Source on the Menu bar, or click the Data Source button on the toolbar near the top of the Database window. The Choose Data Source dialog lists registered data sources. Select one of them and click OK.
To add (register) a different data source, see instructions in Chapter 8, Getting Started with Base, in the Getting Started Guide.
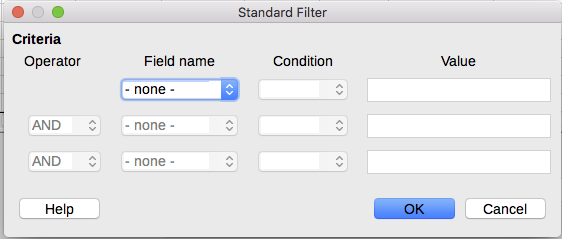
To set up a filter for specific records within the bibliographic database, select Data > Filter on the Bibliographic Database Menu bar, or click the Standard Filter button on the toolbar near the top of the window. In the Standard Filter dialog (Figure 16), choose the fields, conditions, and values for the filter and click OK.
Figure 16: Setting up a filter for the bibliographic database
Use the Bibliography Database dialog (Tools > Bibliography Database) to add entries to the database:
1) You can add records directly into the database using the fields in the lower section of the dialog shown in Figure 15 on page Figure 15.
2) Select Data > Record on the Menu bar of the Bibliography Database dialog, or click the + icon to the left of the horizontal scroll bar.
3) Enter a name for the entry in the Short Name box. Complete other fields as required. Use the Tab key to move between fields.
It is best to use a unique name in the Short name field. This field is used when inserting entries into documents.
4) To complete the entry, move to the last field and press Tab again, or click on any other cell in the table.
If your document requires [Author, date] style citations, use the Short name field of the database to record the information in the required format.
To maintain entries in the database, use the Bibliography Database dialog (Tools > Bibliography Database). Click the appropriate record and modify the fields as appropriate.
Modified entries are saved automatically to the database when the cursor moves off the record.
You can modify the bibliography database in several ways, as summarized below.
Note
For more information on how to use LibreOffice’s database features, see Chapter 8, Getting Started with Base, in the Getting Started Guide.
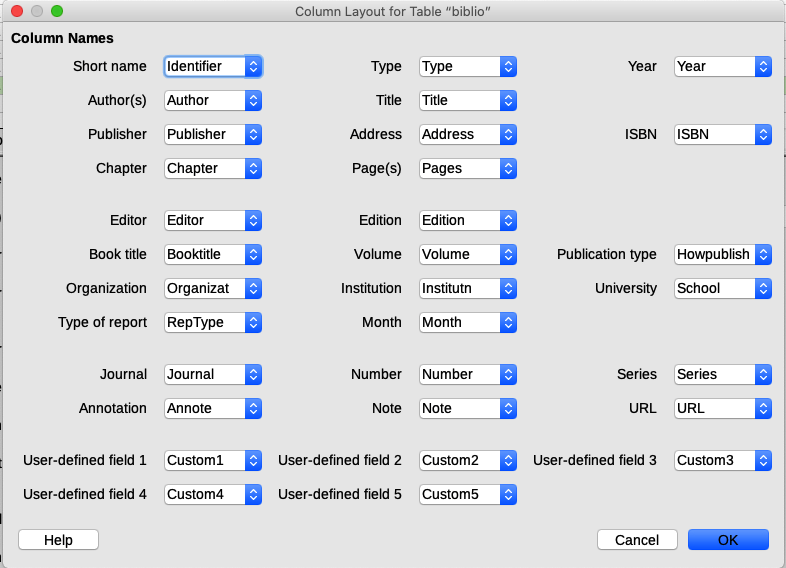
To change the details of columns in the bibliographic database, select Data > Column Arrangement on the Menu bar, or click the Column Arrangement button on the toolbar near the top of the window (Figure 15). On the Column Layout for Table “biblio” dialog (Figure 17), you can change which fields are allocated to which columns. As an example, you can select to have Author data go into the Identifier column, by changing the destination in the drop-down list. The Short name data column destination sets to <none> automatically, as you can't set duplicate destinations for data.
Figure 17: Changing column layout for bibliographic database
You can make changes to the bibliography database (for example, rename fields or change the length of fields) by doing the following:
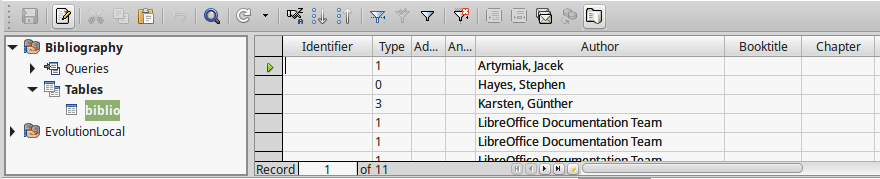
1) In the main document (not the Bibliography Database window), press Shif+Ctrl+F4 or click View > Data Sources to open the data source window, similar to Figure 18.
2) Make sure that the Bibliography database is selected as well as the correct table. You may have to expand some levels to be able to select the correct ones.
Figure 18: Data Source view of Bibliography database
3) Right-click the table entry (biblio in the example) and select Edit Database File in the context menu. This opens a window similar to Figure 19, which is the main menu for Base, the database component of LibreOffice.
4) If Tables (in the Database section on the left) is not selected, select it now.
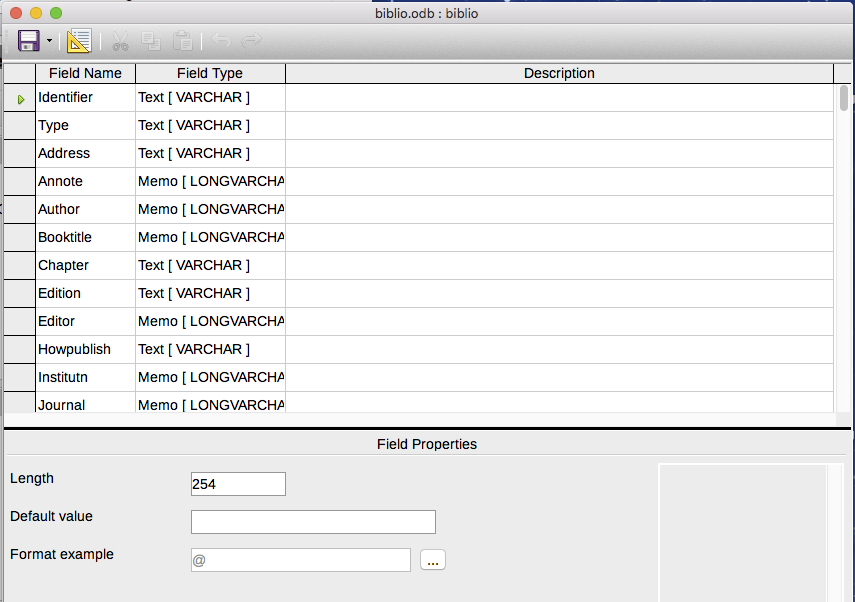
5) Right-click the biblio table name in the Tables section and select Edit in the context menu to display a window similar to that shown in Figure 20.
6) You can now select each of the fields. Select the text in the Field Name cell and change the entry as required. Click in the Field Type cell to open a selection menu to change the data type in that cell. In the Field Properties section, you can modify the data properties. For each field selected, a description of that field appears to the right of the section.
7) When finished, you will be asked to confirm that you want the changes saved.
Figure 19: Main window for working with databases
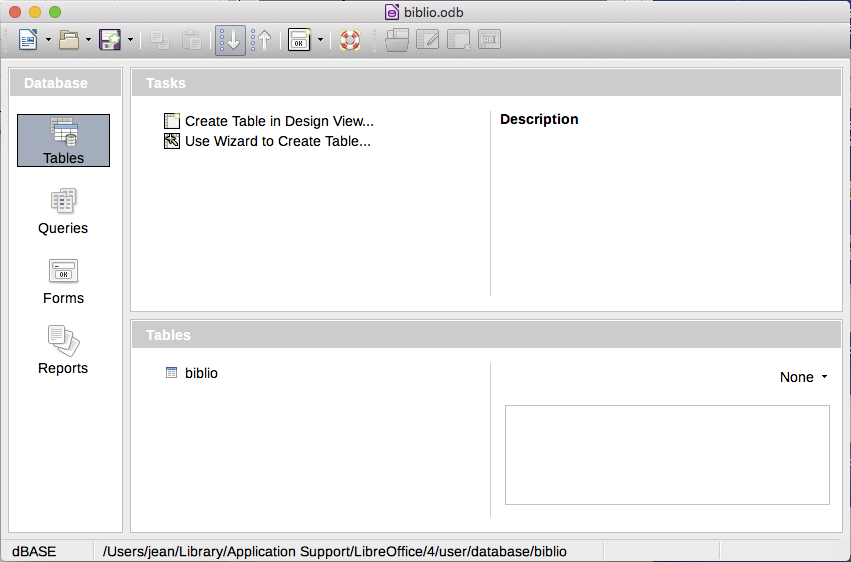
Figure 20: Modify table properties window
Writer supports two methods of adding references to your document:
From a bibliography database, such as the one built into Writer.
Directly from the keyboard.
To add references from the bibliographic database into a document:
1) Place the cursor where you want the reference to appear.
2) On the Menu bar, choose Insert > Table of Contents and Index > Bibliography Entry.
3) In the Insert Bibliographic Entry dialog (Figure 21), choose Bibliography database in the Bibliography Source section at the top of the dialog.
Figure 21: Inserting bibliographic entries into a document
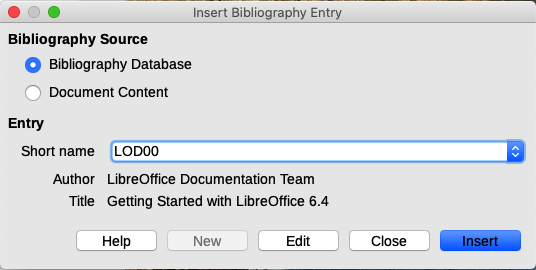
4) Select the reference from the Short name drop-down list in the middle of the dialog. The Author and Title of the selected reference are shown below the Short name field, to help you verify that it is the reference you want.
5) To insert the reference into the document, click Insert.
6) You can keep the dialog open and insert another reference into the document; you do not need to close and reopen it.
7) When you have finished inserting all the references, click Close.
You may choose to enter your bibliographic entries directly into the document, instead of from an external database. For example, you may not be working on your own computer.
Click in the document where you want to add the entry.
1) Select Insert > Table of Contents and Index > Bibliography Entry.
2) In the Insert Bibliographic Entry dialog (Figure 21), select Document content in the Bibliography Source section at the top of the dialog.
3) Click New to open the Define Bibliography Entry dialog.
a) Complete all the fields that are relevant to your entry. Type a unique name in the Short name box, because the Insert Bibliography Entry dialog uses this entry for the citation.
b) Select an option in the menu in the Type box to enable the OK button.
c) Click OK when all the fields wanted are completed.
d) Click Insert to add the Short name field to the document, and then click Close.
To re-use an entry in your document, restart the sequence above, and then select the Short name required from the current list of entries, instead of selecting to add a new entry.
To edit a reference:
1) Right-click the entry (the cursor then displays to the left of the entry).
2) In the context menu, select Bibliography Entry. The Edit Bibliography Entry dialog (similar to the Insert Bibliography Entry dialog) opens.
3) To quickly edit only the Short name, click the text box, edit the entry and then click Apply.
4) To edit more of the entry, click Edit to open the Define Bibliography Entry dialog.
Make any changes required and then click OK to return to the Edit Bibliography Entry dialog.
5) Click Apply to accept the changes and exit the dialog.
Note
Whatever the source of the citation, the modified references are stored only in the document. If the source is a bibliography database, that database remains unmodified.
1) Place the cursor at the point where you wish to insert the bibliography.
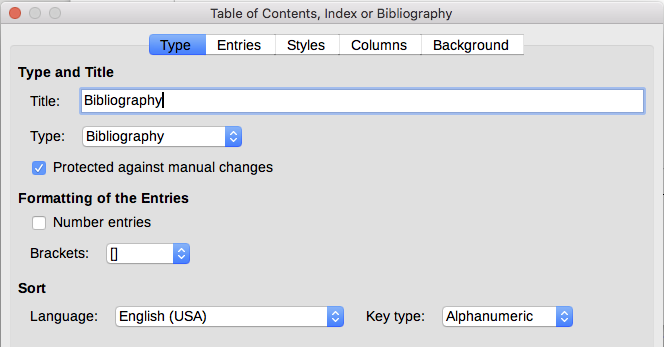
2) Select Insert > Table of Contents and Index > Table of Contents, Index or Bibliography and change the Type to Bibliography, to display a dialog similar to that shown in Figure 22.
Figure 22: Inserting a bibliography
Writer supports two ways of displaying references (citations) in the text of a document:
Using the text recorded in the Short name field of each bibliographic entry, for example (Smith, 2001) depending on citation style.
By numbering the referenced documents in the sequence they occur in the text, for example [1].
Tip
To specify which citation style is used in the document, use the Type tab on the Table of Contents, Index or Bibliography dialog (Figure 22).
Formatting the bibliography involves choices made in two places:
Table of Contents, Index or Bibliography dialog, covered in this section.
Bibliography 1 paragraph style (see page 1).
The basic settings are selected on this tab.
1) To give the bibliography a title, enter it in the Title field. (A title is not required.)
2) You can protect the bibliography from being changed accidentally, by selecting Protected against manual changes. If this option is selected, the bibliography can only be changed using the right-click menu or the Table of Contents, Index or Bibliography dialog. If the option is not selected, the bibliography can be changed directly on the document page, just like other text, but any manual changes will be lost when you update the bibliography.
3) To have the bibliographic entries (citations) numbered within the body of the document (for example, [1], [2]...), select Number entries. If, however, you wish to have the Short name field contents (from the database) appear in the document, deselect this option.
4) Select the type of brackets that you want for the referenced entries shown within the body of the document.
5) Define the sorting you require. Currently only alphanumeric sorting is supported. Sorting by the sequence that entries appear in the text is done on the Entries tab.
The structure of this tab (Figure 23) is similar to that for tables of contents and for indexes.
Figure 23: Entries tab for bibliographies
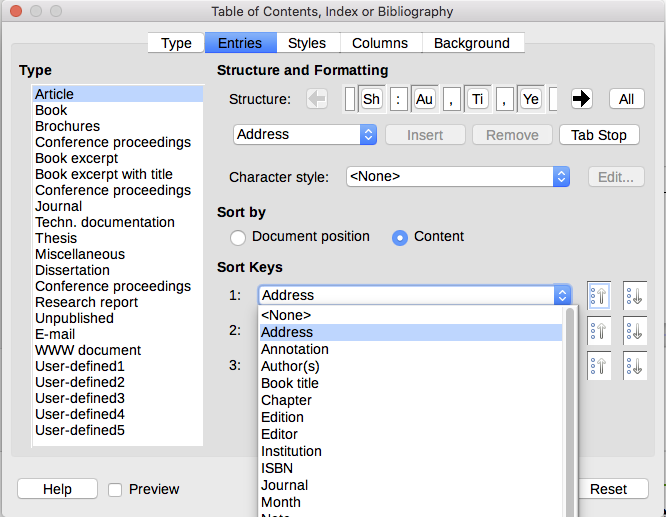
The Type section refers to the kind of source, such as a periodical or a web page. Each entry in the Type list has a default structure format. You can define how the entry will appear, based on its source, by selecting from the Type list of entries, or simply apply the same format to all entries by clicking the All button.
The Structure of the entry is based on the fields available in the bibliographic database. Consult the citation style required for your document and modify the Structure line as needed.
To remove elements from the Structure line, click the element then click the Remove button.
To add an element, click in the Structure line where it is to be inserted. Select either the Tab Stop, or an element in the drop-down list to the left of the Insert button, and then click Insert. The elements in the drop-down list are those fields found in the Bibliography Database.
All the elements on the Structure line can be formatted using the Character Style selection list. For example, you can define a character style so that book and journal titles are in italics or bold.
To determine how entries are sorted, modify the Sort by options. To sort by the sequence that entries appear in the text, choose Document position. In most modern citation styles, you will want Content (alphabetical descending order). Use Sort keys to group similar references.
Refer to “Styles tab” on page 1, “Columns tab” on page 1 and “Background tab” on page 1 for detailed information on these tabs.
You can modify the Bibliography 1 paragraph style to suit your requirements. For example, to number the entries in the bibliography list, you need to define a list style and link that list style to the Bibliography 1 paragraph style. To do this:
1) On the Styles deck in the sidebar, click on the List Styles icon. Right-click on Numbering 123 and choose New in the context menu.
2) In the List Style dialog, go to the Organizer tab and type a name for this style. In our example, we have named it Bibliography.
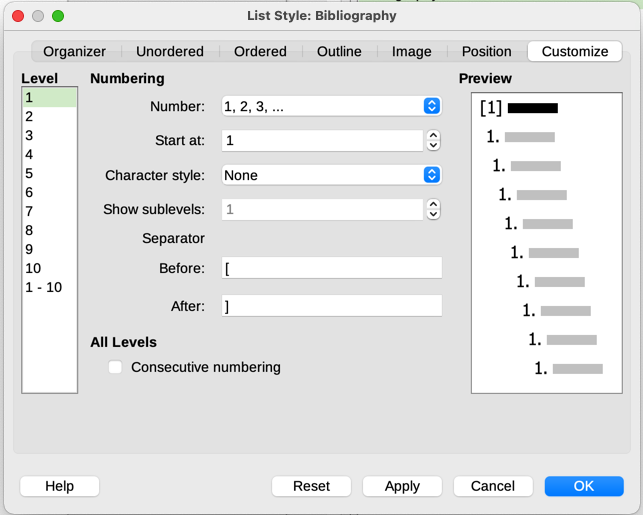
3) In our example we want to have the numbers enclosed in square brackets. To do this, go to the Customize tab and type [ in the Before box and ] in the After box, as shown in Figure 24. Remove any other punctuation, such as a period, that may be in the After box.
Figure 24: Specifying square brackets before and after the number in a list
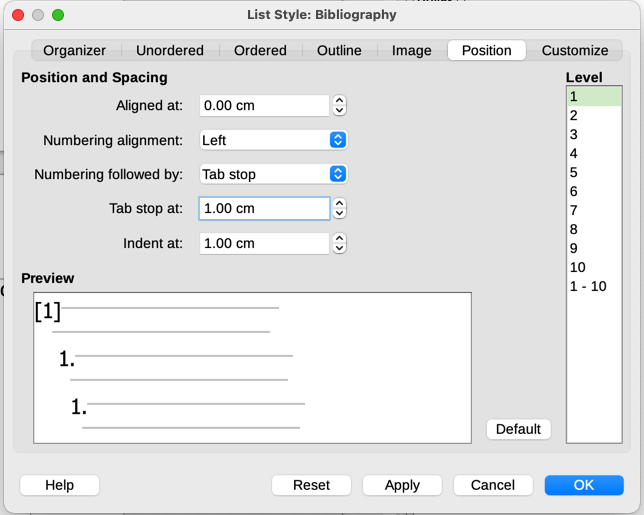
4) Now go to the Position tab of the List Style dialog (Figure 25). In the Indent at and Tab stop at boxes, specify how much indentation you want for the second and following lines of any item in the bibliography list of your document. Often you will need to experiment a bit to see what is the best setting. In our example, we have chosen 1 cm.
Figure 25: Setting the spacing between the margin and the text
5) Click OK to save these settings and close the List Style dialog. Return to the Styles deck, click the Paragraph Styles icon, choose All Styles in the list at the bottom of that window, then right-click on Bibliography 1 and choose Modify.
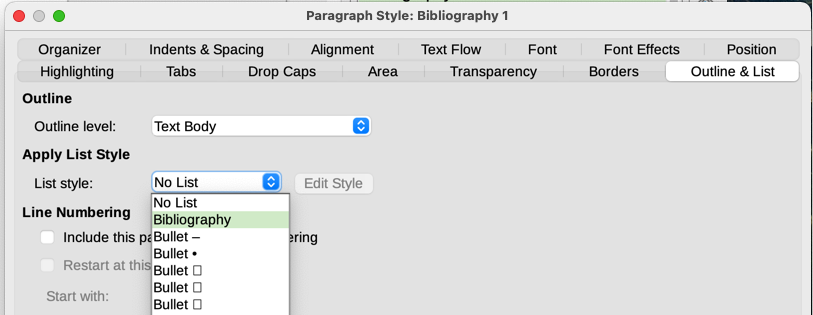
6) On the Paragraph Style dialog, go to the Outline & List tab and select Bibliography in the List Style drop-down list (Figure 26). Click OK to save this change to the Bibliography 1 paragraph style.
Figure 26: Applying a list style to a paragraph style
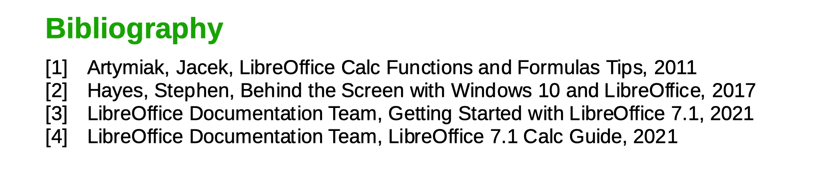
Now when you generate the bibliography, the list will look something like the one shown in Figure 27. You may also need to modify the structure line on the Entries tab (Figure 23).
Figure 27: Result of changing settings for Bibliography 1 paragraph style
Right-click anywhere in the bibliography. From the context menu, select:
Update Index to update the bibliography.
Edit Index to open the Table of Contents, Index or Bibliography dialog so you can edit and save the bibliography.
Delete Index to delete the bibliography without a confirmation request.
If you find Writer’s bibliography feature too limited, you may wish to try Zotero, which is free and open source, available for macOS, Windows, and Linux. It is reported to work well with Writer (https://www.zotero.org/).