
Writer Guide 7.2
Chapter 20
Customizing Writer
This document is Copyright © 2021 by the LibreOffice Documentation Team. Contributors are listed below. You may distribute it and/or modify it under the terms of either the GNU General Public License (https://www.gnu.org/licenses/gpl.html), version 3 or later, or the Creative Commons Attribution License (https://creativecommons.org/licenses/by/4.0/), version 4.0 or later.
All trademarks within this guide belong to their legitimate owners.
|
Jean Hollis Weber |
Kees Kriek |
|
|
Jean Hollis Weber |
Bruce Byfield |
Gillian Polack |
|
Cathy Crumbley |
John A Smith |
Ron Faile Jr. |
|
John M. Długosz |
Barbara Duprey |
Rafael Atias |
|
Kees Kriek |
|
|
Please direct any comments or suggestions about this document to the Documentation Team’s mailing list: documentation@global.libreoffice.org
Note
Everything you send to a mailing list, including your email address and any other personal information that is written in the message, is publicly archived and cannot be deleted.
Published August 2021. Based on LibreOffice 7.2 Community.
Other versions of LibreOffice may differ in appearance and functionality.
Some keystrokes and menu items are different on macOS from those used in Windows and Linux. The table below gives some common substitutions for the instructions in this document. For a detailed list, see the application Help.
|
Windows or Linux |
macOS equivalent |
Effect |
|
Tools > Options |
LibreOffice > Preferences |
Access setup options |
|
Right-click |
Control+click or right-click depending on computer setup |
Open a context menu |
|
Ctrl (Control) |
⌘ (Command) |
Used with other keys |
|
F11 |
⌘+T |
Open the Styles deck in the Sidebar |
This chapter briefly describes some of the setup options found under Tools > Options on the Menu bar in Writer. Additional options, and more details about the ones given here, are covered in the Help and in Chapter 2, Setting up LibreOffice, in the Getting Started Guide. Several of the most relevant options are discussed in other chapters of this book, in the context of tasks where they are most applicable.
This chapter also briefly describes some common customizations that you may wish to do. You can customize menus, toolbars, and keyboard shortcuts, add new menus and toolbars, and assign macros to events. Other customizations are made easy by extensions that you can install from the LibreOffice website or from other providers. You may also choose to activate and use some experimental features; see page 1.
Tip
Many options are intended for power users and programmers. If you don’t understand what an option does, it’s usually best to leave it on the default setting unless instructions in this book recommend changing the setting.
Note
Customizations to menus and toolbars can be saved in a template. To do so, first save them in a document and then save the document as a template as described in Chapter 10, Working with Templates. If you work on more than one project, you may find that having different menus and toolbars can be useful.
This section covers some of the settings that apply to all the components of LibreOffice (Writer, Calc, Impress, Draw, Math, and Base) and that are particularly important when using Writer.
To navigate to options that govern all LibreOffice components, click Tools > Options (LibreOffice > Preferences on macOS) and then click the marker (+ or triangle) by LibreOffice on the left-hand side. A list of pages drops down. Select an item in the list to display the relevant page on the right-hand side of the dialog.
Tip
The Reset button (located in the lower part of any page of the Options dialog) resets the values on that page to the values that were in place when you opened the dialog.
If you are using a version of LibreOffice other than US English, some field labels may be different from those shown in the illustrations.
Because Writer can use the name or initials stored in the LibreOffice – User Data page for several things, including document properties (‘created by’ and ‘last edited by’ information), the name of the author of comments and changes, and the sender address in mailing lists, you will want to ensure that the correct information appears here. If you do not want user data to be part of the document’s properties, deselect Use data for document properties.
The options on the LibreOffice – View page affect how the document window looks and behaves. Set them to suit your personal preferences. For details, see the Help or Chapter 2, Setting up LibreOffice, in the Getting Started Guide.
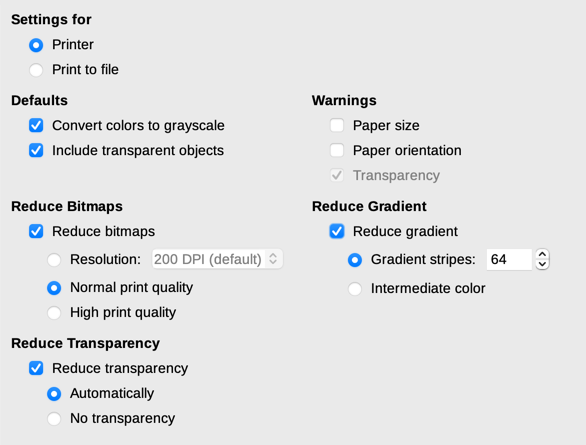
On the LibreOffice – Print page, set the print options to suit your default printer and your most common printing method.
In the Warnings section on the right side of the page, you can choose whether to be warned if the paper size or orientation specified in your document does not match the paper size or orientation available for your printer. Having these warnings turned on can be quite helpful, particularly if you work with documents produced by people in other countries where the standard paper size is different from yours.
Figure 1: Choosing general printing options for all components
Tip
If your printouts are incorrectly placed on the page or chopped off at the top, bottom, or sides, or the printer is refusing to print, a likely cause is incorrect page size in printer settings.
On the LibreOffice – Paths page, you can change the location of files associated with, or used by, LibreOffice to suit your needs. For example, you might want to store documents by default somewhere other than My Documents, or you might want to store project templates in folders not in the supplied template paths. Multiple paths are possible, so you can add locations. For more information, see “Paths” in Chapter 2, Setting Up LibreOffice, in the Getting Started Guide,
If you receive a document containing fonts that you do not have on your system, LibreOffice will use substitute fonts for those it does not find. On the LibreOffice – Fonts page, you can specify fonts different from the ones the program chooses.
Tip
Liberation fonts (Serif, Sans, and Mono) are often good choices to substitute for Times, Arial, and Courier.
Note
The choices made here do not affect the default fonts in your documents. To do that, see “Basic Fonts options” on page 1. To change more than the basic fonts, you need to create a new default template for Writer documents; see Chapter 10, Working with Templates
Use the LibreOffice – Security page to choose security options for saving documents and for opening documents that contain macros. For information on the options not mentioned here, refer to the Help or to the Getting Started Guide.
Security Options and Warnings
Click the Options button to open a separate dialog with several options, including:
Remove personal information on saving
Ctrl-click required to open hyperlinks
Writing, editing, and (especially) page layout are often easier when you can see the page margins (text boundaries), the boundaries of tables and sections, grid lines, and other features. In addition, you might prefer to use colors that are different from LibreOffice’s defaults.
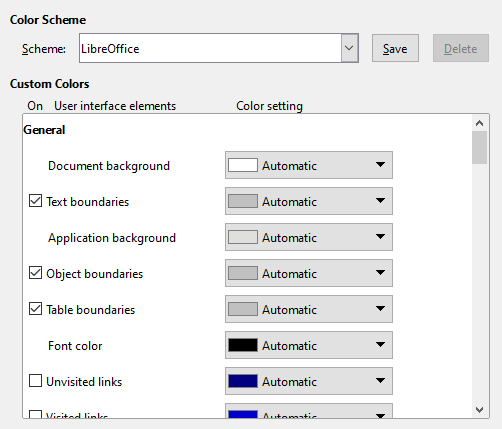
On the LibreOffice – Application colors page (Figure 2), you can specify which user interface elements are visible and the colors used to display them.
To show or hide items such as text boundaries, select or deselect the boxes in the On column next to the names of the elements.
To change the default colors for a specific element, click the down-arrow in the Color setting column by the name of the element and select a color from the drop-down list.
To save your color changes as a color scheme, click Save, type a name in the Scheme box, and then click OK.
Note
To change the color settings used in Track Changes mode, go to Tools > Options > LibreOffice Writer > Changes.
Figure 2: Showing or hiding text, object, and table boundaries
You can set the options for loading and saving documents to suit the way you work.
If the Options dialog is not already open, click Tools > Options. Click the expansion symbol (+ or triangle) to the left of Load/Save.
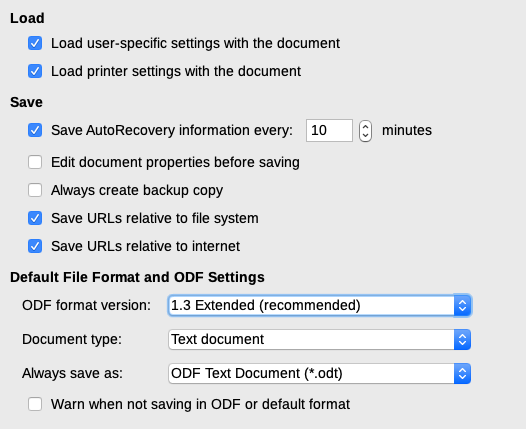
Most of the choices on the Load/Save – General page (Figure 3) are familiar to users of other office suites. Some items of interest are described below.
Load user-specific settings with the document
Settings available in File > Print > Options.
Spacing options for paragraphs before text tables.
Information about automatic updating for links, field functions, and charts.
Information about working with Asian character formats.
Figure 3: Choosing Load and Save options
Note
The settings for any data sources linked to a document are always loaded with the document, whether or not Load user-specific settings with the document is selected.
Load printer settings with the document
Save AutoRecovery information every __ minutes
Edit document properties before saving
Always create backup copy
Tip
Authors whose work may be very lengthy should always consider enabling LibreOffice to create an automatic backup copy.
Save URLs relative to file system / to internet
Default File Format and ODF Settings
On the VBA Properties page, you can choose whether to keep any macros in Microsoft Office documents that are opened in LibreOffice. For details, see Chapter 2, Setting up LibreOffice, in the Getting Started Guide.
On the Load/Save – Microsoft Office page, you can choose what to do when importing and exporting Microsoft Office OLE objects (linked or embedded objects or documents such as equations or spreadsheets): convert them into or from the corresponding LibreOffice OLE object or load and save them in their original format. For details, see Chapter 2, Setting up LibreOffice, in the Getting Started Guide.
Choices made on the Load/Save – HTML Compatibility page affect HTML pages imported into LibreOffice and those exported from LibreOffice. See HTML import and export in the Help, and Chapter 2, Setting up LibreOffice, in the Getting Started Guide, for more information.
Settings chosen in the LibreOffice Writer section of the Options dialog determine how Writer documents look and behave while you are working on them.
If the Options dialog is not already open, choose Tools > Options. Click the marker (+ or triangle) by LibreOffice Writer on the left side of the dialog.
The choices on the LibreOffice Writer – General page affect the updating of links and fields, the units used for rulers and other measurements, and the default tab stop positions.
Automatically Update [Fields and Charts]
Update Links when Loading
Figure 4: Choosing general options for Writer
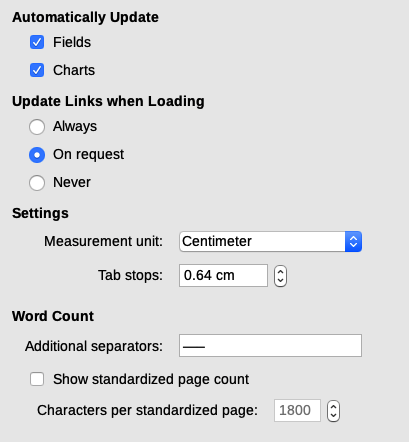
Settings – Measurement unit
Settings – Tab stops
Tip
To avoid unwanted changes, do not rely on default tab settings. Rather, define your own tabs in paragraph styles or individual paragraphs (see “Setting tab stops and indents” in Chapter 4, Formatting Text).
Word Count – Additional separators
Word Count – Show standardized page count
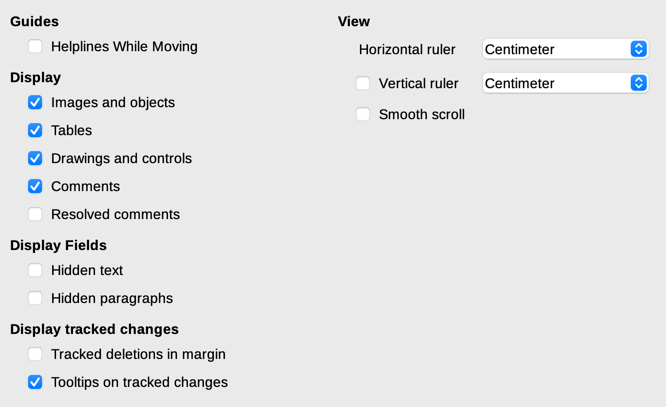
Two pages of options set the defaults for viewing Writer documents: View (described here) and Formatting Aids (described below). View is a good page to check if, for example, you cannot see graphics on the screen.
Guides – Helplines While Moving
Display Fields – Hidden text
Display Fields – Hidden paragraphs
Display tracked changes
If you have activated experimental features, another option (Outline Folding) is shown under View. See “Using experimental features” on page 1.
The other options should be self-explanatory. If not, please refer to the Help.
Figure 5: Choosing default View options for Writer
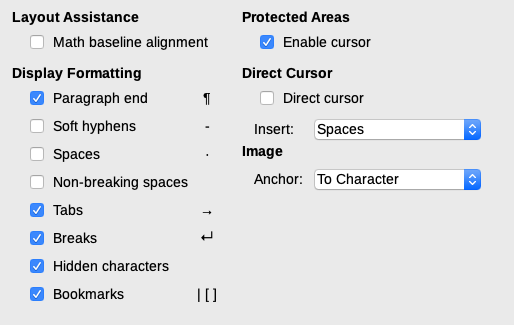
On the LibreOffice Writer – Formatting Aids page (Figure 6), select the desired options.
Layout Assistance – Math baseline alignment
Display Formatting
Direct Cursor
Note
The direct cursor feature can lead to many formatting oddities and is incompatible with rigorous use of styles.
Image – Anchor
Figure 6: Choosing default Formatting Aids options
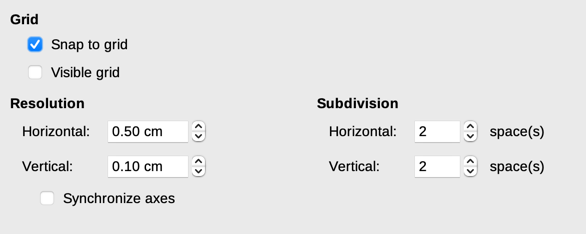
Snap to grid automatically moves an object to the nearest gridlines. This can be very helpful when you are trying to align several objects such as graphics or tables.
On the LibreOffice Writer – Grid page (Figure 7), you can choose whether to enable this feature and what grid intervals to use. If the grid intervals (subdivisions) are too large, you may find that you do not have enough control in placing the objects.
Figure 7: Choosing Grid options for Writer
On the LibreOffice Writer – Basic Fonts (Western) page (Figure 8), you can choose the fonts and font sizes for the Default Paragraph Style, headings, lists, captions, and indexes. These values are applied to new documents unless different settings are selected in the document itself or defined in the document’s template.
To reset the values to the defaults when LibreOffice was installed, click the Default button.
If Asian and/or CTL have been activated in Languages, extra pages are provided for their font options.
Figure 8: Choosing basic (default) fonts

On the LibreOffice Writer – Print page, you can choose which items are printed with a Writer document by default. These options are in addition to the general options for all LibreOffice components on the LibreOffice – Print page (see page 1).
Figure 9: Choosing default Print options for Writer
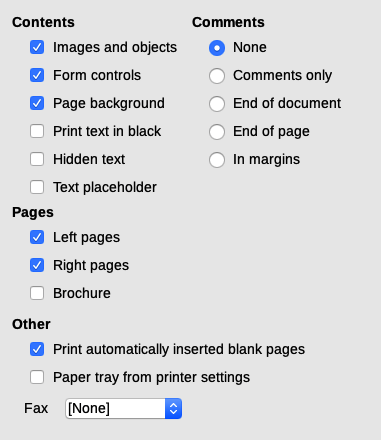
Some considerations:
When you are working on drafts and you want to save printer ink or toner, you might want to deselect some of the items in the Contents section.
The Print text in black option causes color text (but not graphics) to print as black on a color printer; on a black-and-white printer, this option causes color text to print as solid black instead of shades of gray (dithered).
By comparison, the Convert colors to grayscale option on the Options – LibreOffice – Print page (Figure 1), prints all text and graphics as grayscale on color printers. (On black-and-white printers, color in graphics normally prints as grayscale.)
If you are printing double-sided on a non-duplexing printer, you might choose to print only left or right pages, then turn the stack over and print the other pages.
Tip
You can override any of these defaults when printing a specific document. Click File > Print, then use the options on the various pages of the Print dialog.
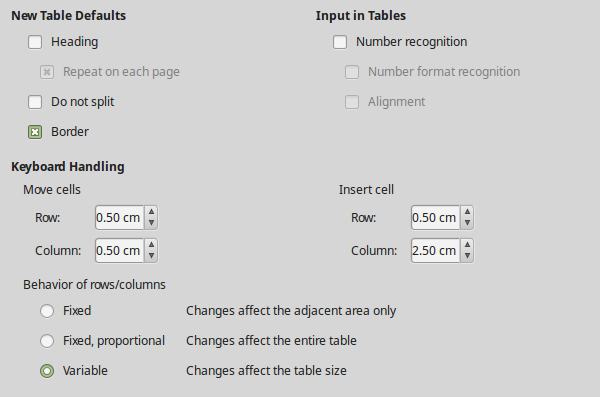
On the LibreOffice Writer – Table page (Figure 10), you can specify the default behavior of tables. See the Help or Chapter 13, Tables of Data, for more information.
Figure 10: Choosing default Table options
Some considerations:
If most of your tables will require borders or headings, you may wish to select those options. If most of your tables are used for page layout, deselect Border and Heading.
Select Do not split to prevent tables from being split across pages. Number recognition can be very useful if most of your tables contain numerical data. Writer will recognize dates or currency, for example, and format the numbers appropriately. However, if you want the numbers to remain as ordinary text, this feature can be quite irritating, so you may want to deselect it.
The Keyboard Handling section specifies the distances that cells move when you use keyboard shortcuts to move them and the size of rows and columns inserted using keyboard shortcuts. If you don’t use keyboard shortcuts for this purpose, you can ignore these settings. See the Help for more information.
The Behavior of rows/columns section specifies the effects that changes to rows or columns have on adjacent rows or columns and the entire table. You might need to test these selections to fully understand the effects.
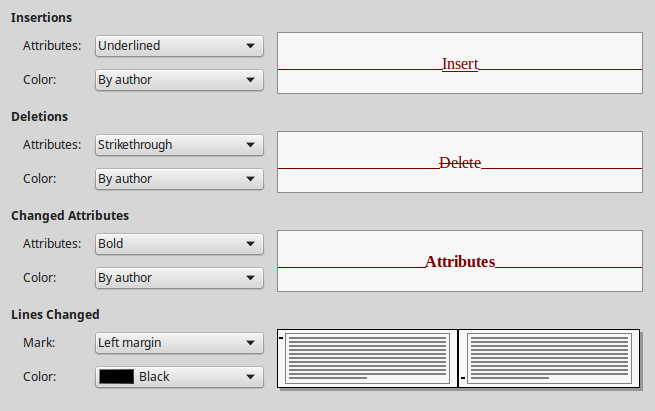
If you plan to use the change-tracking feature of Writer (described in Chapter 3, Working with Text: Advanced), use the LibreOffice Writer – Changes page (Figure 11) to choose the way changes to text and formatting are marked. Change bars can show wherever a change has been made to a line of text and are formatted under Lines Changed.
Figure 11: Choosing options for tracking changes
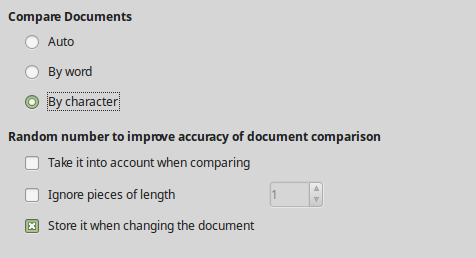
The options on the LibreOffice Writer – Comparison page determine the level of detail used by the Compare Document feature (Edit > Track Changes > Compare Document), described in Chapter 3, Working with Text: Advanced.
Figure 12: Choosing options for comparing documents
The settings on the LibreOffice Writer – Compatibility page (Figure 13) are used mainly when importing documents from Microsoft Word. If you are not sure about the effects of these settings, leave them as the defaults provided by LibreOffice. For information about settings that are not described below, see the Help. All settings selected will apply only to the current document, unless you select the Use as Default button at the bottom.
Figure 13: Choosing compatibility options
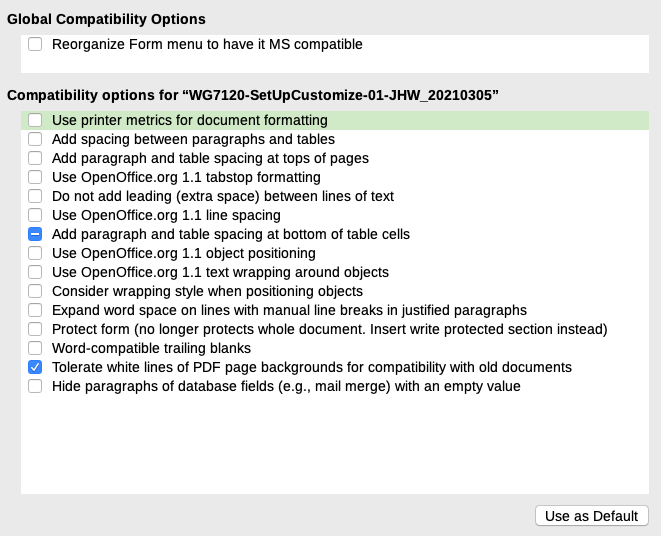
Use printer metrics for document formatting
Add spacing between paragraphs and tables
Add paragraph and table spacing at tops of pages
Add paragraph and table spacing at bottom of table cells
Use as Default
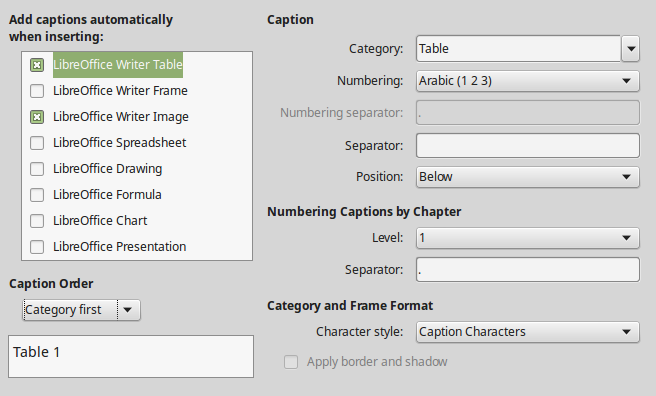
LibreOffice can automatically insert captions for tables, pictures, frames, and OLE objects in a Writer document. To set this up, use the options on the LibreOffice Writer > AutoCaption page. Select the object you want to be automatically captioned (LibreOffice Writer Image in Figure 14). With the item highlighted, specify the characteristics of the caption.
The categories supplied for captions are Drawing, Illustration, Table, and Text. To use another name (for example, Figure) for the caption label, type the required term in the Category box.
Note
You may not want captions for every table, for example if you use tables for layout as well as for tables of data. You can always add captions to individual tables, graphics, or other objects (right-click > Insert Caption).
Information about numbering captions by chapter, character styles, frame styles, and other items on the AutoCaption page is given in other chapters in this book.
Figure 14: Setting up automatic captions
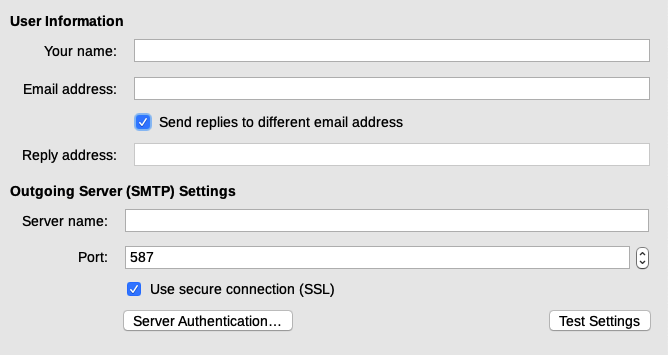
Using a data source such as an address book, Writer can insert personal, address, and other information into form letters. These documents can be printed for mailing or they can be emailed through Writer. (See Chapter 14, Mail Merge, for details.)
Use the LibreOffice Writer – Mail Merge Email page to set up the user and server information for sending form letters by email. If you are not sure what information to put in any of the fields, consult your email program or your internet service provider.
Figure 15: Specifying settings for use when emailing mail-merged form letters
You may need to do several things to get the language settings you want:
Install the required dictionaries.
Change some locale and language settings.
Choose spelling and grammar options.
LibreOffice automatically installs many language modules with the program. A language module can contain up to three submodules: spelling dictionary, hyphenation dictionary, and thesaurus. These are usually referred to as “dictionaries” in Writer.
To add other dictionaries, be sure you are connected to the Internet, and then choose Tools > Language > More Dictionaries Online on the Menu bar. LibreOffice will open your default web browser to a page containing links to additional dictionaries that you can install. Follow the prompts to select and install the ones you want.
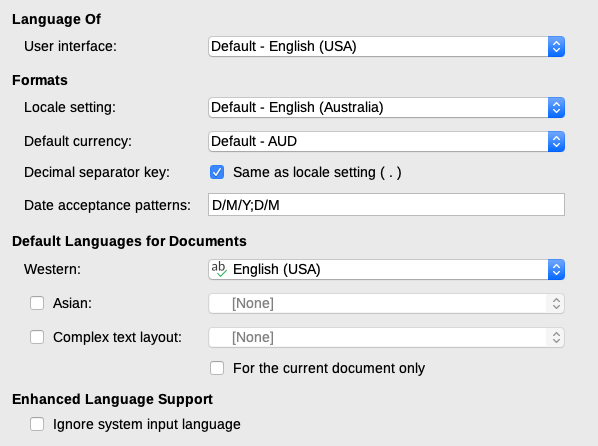
You can change some details of the locale and language settings that LibreOffice uses for all documents or for specific documents. See the Help for details on all these options.
In the Options dialog, click the expansion symbol (+ sign or triangle) by Language Settings and choose Languages.
On the right-hand side of the Language Settings – Languages page (Figure 16), change the settings as required. In the example, English (USA) has been chosen for all the appropriate settings, but you could choose a mixture of languages. For example, if you were working in Germany, you might prefer the user interface to be in English (USA), but German (Germany) for the Locale setting, which influences settings for numbering, currency, and units of measure.
If you want the language setting to apply to the current document only, instead of being the default for all new documents, select For the current document only.
Figure 16: Choosing language options
Changes to the system input language normally affect text typed into a document after the change. If you do not want this to happen, select Ignore system input language; new text will then continue to follow the language of the document or the paragraph, not the system language.
If necessary, select the options to enable support for Asian languages (Chinese, Japanese, Korean) and support for CTL (complex text layout) languages such as Hindi, Thai, Hebrew, and Arabic. If you choose either of these options, the next time you open the Options dialog, you will see some extra pages under Language Settings. These pages are not discussed here.
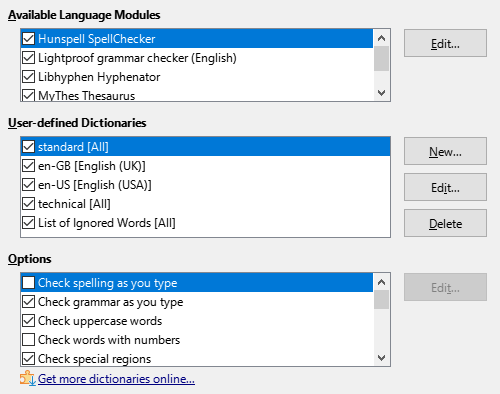
To change the options for checking spelling and grammar, use the Language Settings > Writing Aids page (Figure 17).
Some considerations:
If you do not want spelling checked while you type, deselect Check spelling as you type. (You can over-ride this setting in a document using Tools > Automatic Spell Checking on the Menu bar or the Toggle Automatic Spell Checking icon on the Standard toolbar.)
If you want grammar to be checked as you type, you must have Check spelling as you type enabled too.
Check special regions means that text in headers, footers, frames, and tables are also checked when checking spelling.
Here you can also select which of the user-defined (custom) dictionaries are active, add a new custom dictionary, edit dictionaries, and delete custom dictionaries. Dictionaries installed by the system cannot be deleted. For details on using the Available Language Modules and User-defined Dictionaries sections, please see the Help.
Tip
When checking spelling, words marked “Add to Dictionary” are added by default to the standard dictionary. Words marked “Ignore All” are added to the List of Ignored Words dictionary. See Chapter 2, Working with Text: Basics.
Figure 17: Choosing languages, dictionaries, and options for checking spelling
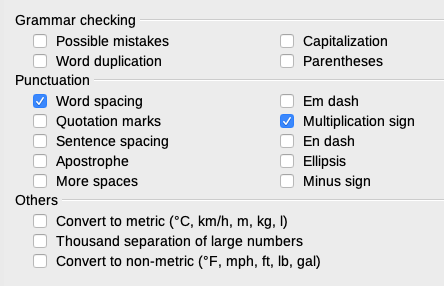
LibreOffice can check sentences in many languages. These checkers are enabled by default if the language is the computer’s default language, and others can be added using the Extension Manager (see page 1). The set of rules available for the sentence checkers depends on the language.
On the Language Settings > English Sentence Checking page (Figure 18), you can choose which items are checked for, reported to you, or converted automatically. This menu is also found in the English dictionaries extension installed by default by LibreOffice (select Tools > Extension Manager, select English spelling dictionaries and click the Options button to reveal the menu). Select which of the optional features you wish to check. These are described in Chapter 2, Working with Text: Basics.
After selecting the additional grammar checks, you must restart LibreOffice, or reload the document, for them to take effect.
Figure 18: Choosing options for checking sentences in English
You can add a variety of custom (user-defined) dictionaries, including a dictionary of exceptions (words to be avoided, which will be marked as incorrect) or dictionaries of project-specific terms (words that will not be marked as incorrect). You can then select which, if any, of these custom dictionaries to use (in addition to a standard dictionary) when setting up a document.
For more information, see “Writing Aids” in the Help.
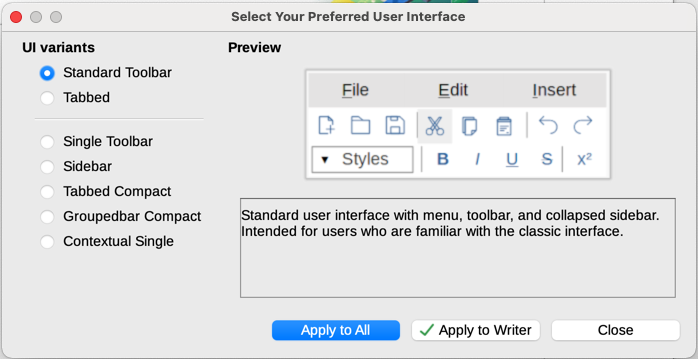
By default, LibreOffice Writer’s commands are grouped in cascading menus and in toolbars filled with icons—the standard user interface described in Chapter 1. In addition, Writer provides other user interface variations, displaying contextual groups of commands and contents. These are described in Chapter 21, User Interface Variants.
When you set up Writer, you can choose one of these user interfaces, and you can switch between them and the standard interface at any time.
1) Choose View > User Interface on the Menu bar.
2) On the Select Your Preferred User Interface dialog (Figure 19), choose one of the variants on the left. An example of the variant is shown in the Preview box on the right, along with a short description.
3) Choose the relevant button to apply your selection to all components of LibreOffice, or only to Writer.
4) Click Close to close the dialog and apply your selection. The Writer window changes to match your selection.
Tips
Several of the UI variants are collectively known as the Notebook bar. You can find more information about these variants in the Help system, by searching for “notebook bar” in the index, or see Chapter 21, User Interface Variants.
If you have activated experimental features (see page 1), several more choices appear on the left-hand side.
Figure 19: Selecting a user interface
You can add to and rearrange menus on the Menu bar, add commands to menus, and make other changes. You can also modify context (right-click) menus in a similar way.
To customize a menu, choose Tools > Customize. On the Customize dialog, go to the Menus tab (Figure 20) or the Context Menus tab.
Figure 20: The Menus tab of the Customize dialog
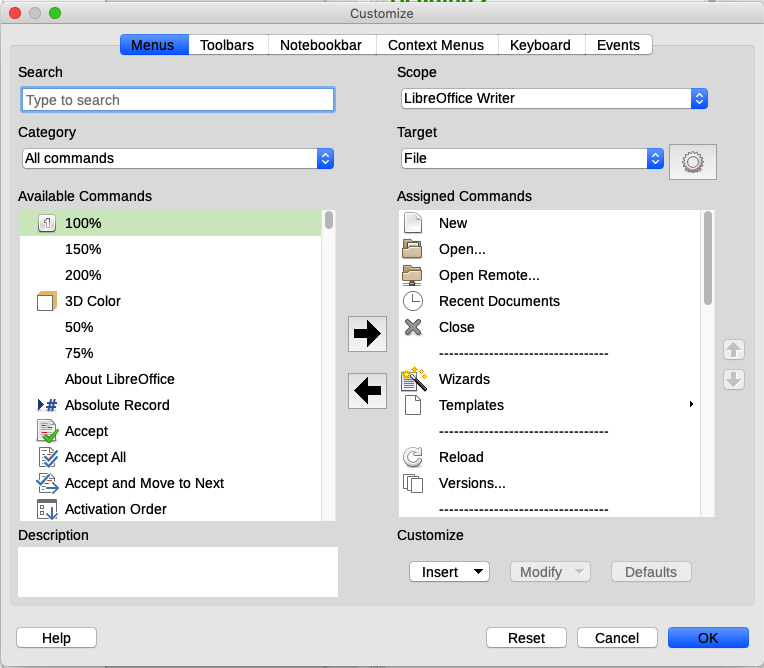
1) In the Scope drop-down list in the upper right of the Customize dialog, choose whether to apply the customized menu to all of LibreOffice Writer or only to a specific document.
2) In the Target drop-down list, select the menu that you want to customize. The list includes the main menus and submenus. The commands on the selected menu are shown in the Assigned Commands list.
3) To add a command to the selected menu, click on a command in the Available Commands list and then click the large right arrow. You can narrow the search by using the Search box on the top left or selecting the Category in the drop-down list. Use the up and down arrows on the right-hand side to move the command into the position where you want it in the list.
4) To remove a command from the selected menu, click on it in the Assigned Commands list and then click the large left arrow.
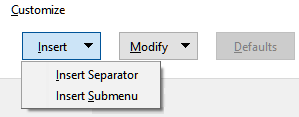
5) To insert a separator or submenu, select the item directly before where you want the inserted item to appear, and use the commands in the Insert drop-down.
Figure 21: Insert drop-down
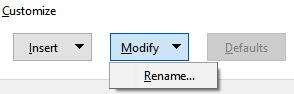
6) To rename a menu item, select it in the Assigned Commands list and choose Rename in the Modify drop-down.
Figure 22: Modify drop-down
7) When you have finished making all your changes, click OK to save them.
You might find a “Favorites” menu useful, or a menu collecting tools for a specific project. To create a new menu:
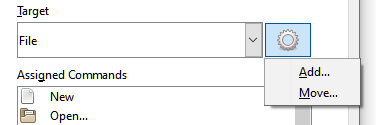
1) On the Menus tab of the Customize dialog, click the symbol next to Target and select Add in the drop-down list (Figure 23) to display the New Menu dialog (Figure 24).
Figure 23: Location of command to add a new menu
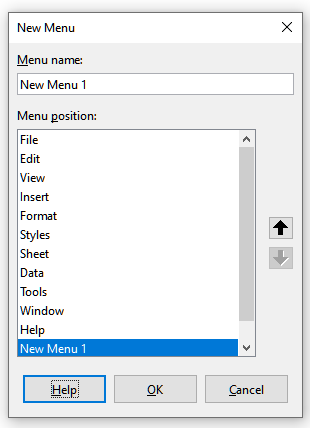
2) Type a name for the new menu in the Menu name box.
3) Use the up and down arrow buttons to move the new menu into the required position on the Menu bar.
4) Click OK to save and return to the Customize dialog.
The new menu now appears on the list of menus in the Customize dialog. It will appear on the Menu bar itself after you save your customizations.
After creating a new menu, you need to add some commands to it, as described above for modifying a menu.
Figure 24: Adding a new menu
You can customize toolbars in several ways, including choosing which icons are visible and locking the position of a docked toolbar (as described in Chapter 1, Introducing Writer), and adding or deleting icons (commands) in the list of those available on a toolbar. You can also create new toolbars.
The procedures for creating and modifying a toolbar are similar to those for menus.
1) Choose Tools > Customize on the Menu bar.
2) On the Toolbars tab of the Customize dialog (Figure 25), in the Scope drop-down list on the upper right, choose whether to save this changed toolbar for Writer or for a selected document.
3) In the Target drop-down list, select the toolbar that you want to customize. The current toolbar content is displayed in the Assigned Commands list.
Figure 25: The Toolbars tab of the Customize dialog
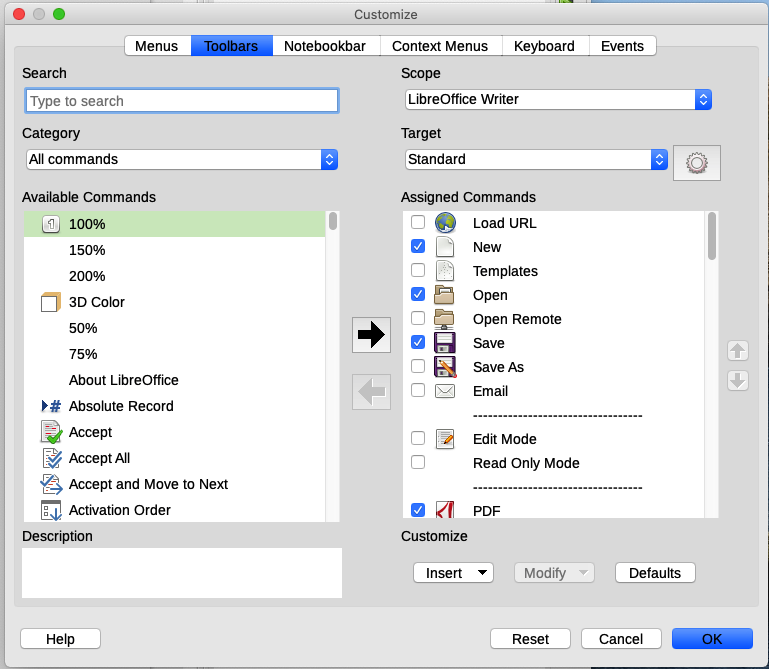
4) Select a command in the Available Commands list on the left. You can narrow your search by using the Search box on the top left or choosing a category in the drop-down list just below.
5) Click on the large right arrow to add the selected command to the Assigned Commands list for the toolbar (on the right). Use the up and down arrows in the far right to position the command in the toolbar.
6) To remove a command from a toolbar, select it in the Assigned Commands list on the right and click the large left arrow.
7) To show or hide a command assigned to a toolbar, select or clear the checkbox by its icon in the Assigned Commands list on the right.
8) To insert a separator, select the item directly before where you want the separator to appear, and use the command in the Insert drop-down.
9) To rename a toolbar item, select it in the Assigned Commands list and choose Rename in the Modify drop-down.
When you have finished making all your changes, click OK to save them.
To create a new toolbar:
1) Choose Tools > Customize on the Menu bar.
2) On the Toolbars tab of the Customize dialog, click the symbol next to Target and select Add in the list, to display the Name dialog.
3) On the Name dialog, type the new toolbar's name and choose in the Save In drop-down list where to save this new toolbar: for Writer or for a selected document.
The new toolbar now appears on the list of toolbars in the Customize dialog. After creating a new toolbar, you need to add some commands to it, as described above.
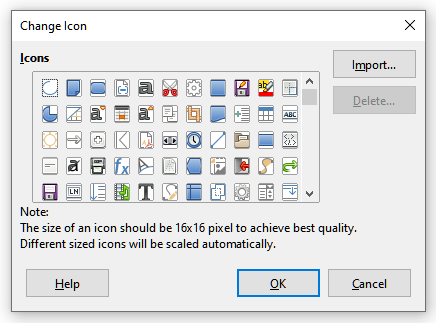
Toolbar buttons usually have icons, not words, on them, but not all of the commands have associated icons. If the command does not have an icon, you can choose an icon for it. To choose an icon, select the command in the list on the right, and click Modify > Change Icon. On the Change Icon dialog (Figure 26), scroll through the available icons, select one, and click OK to assign it to the command.
To use a custom icon, create it in a graphics program and import it into LibreOffice by clicking the Import button on the Change Icon dialog. Custom icons should be 16×16 pixels in size to achieve the best quality and should not contain more than 256 colors.
Figure 26: Change Icon dialog
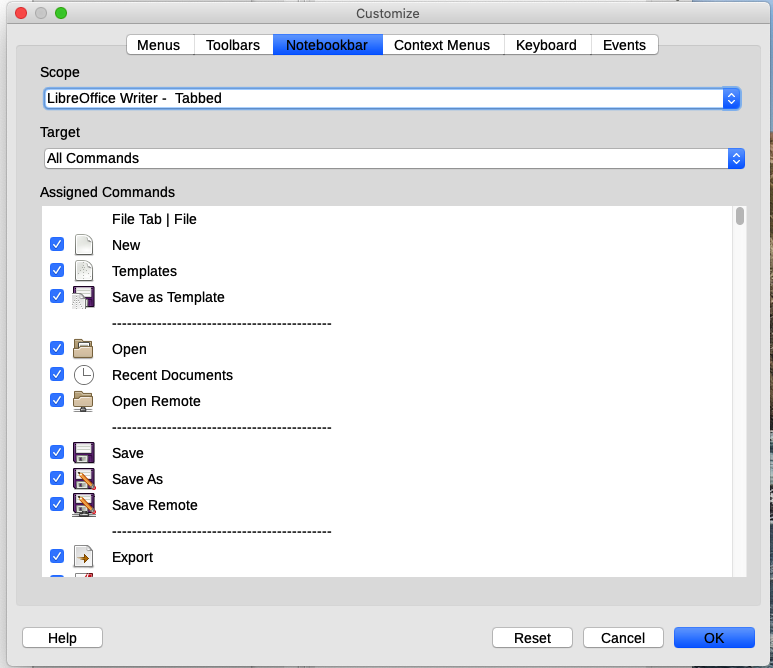
As mentioned in “Selecting the user interface” on page 1, one of the choices is Tabbed. In this mode, the area at the top of the workspace is divided into tabs, where each tab displays a set of icons grouped by context. The context can change depending on the object selected in the document, for example a table or an image.
Use the checkboxes on the Notebookbar tab of the Customize dialog (Figure 27) to show and hide the individual options on the various tabs that are provided in the Tabbed mode user interface.
Use the Reset button to reset the Tabbed mode of the notebook bar configuration to the default settings.
Note
LibreOffice has three notebook bar modes that can be selected through the View > User Interface dialog – Tabbed, Tabbed Compact, and Groupedbar Compact. However, only the Tabbed mode can be modified.
Figure 27: The Notebookbar tab of the Customize dialog
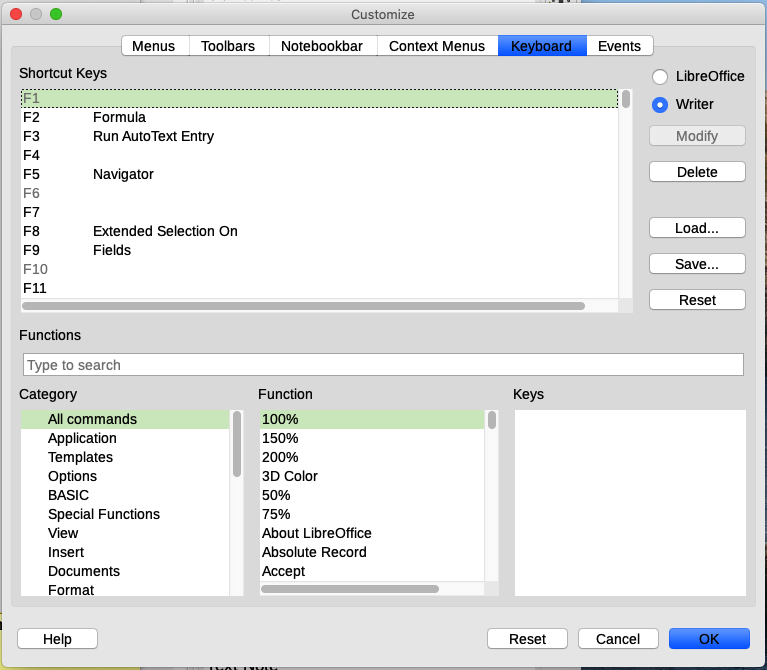
In addition to using the built-in keyboard shortcuts, you can define others. You can assign shortcuts to standard LibreOffice functions or your own macros and save them for use with Writer or with the entire LibreOffice suite.
To adapt shortcut keys to your needs, use the Keyboard tab of the Customize dialog (Figure 28).
1) Choose whether to have the shortcut key assignment available in all components of LibreOffice or only in Writer.
2) Select the desired shortcut key in the Shortcut Keys list at the top of the page.
3) Select the required function in the Category and Function lists.
4) Click the Modify button. The selection now appears in the Keys list on the lower right.
5) Click OK to accept the change.
Repeat as required.
Caution
Avoid reassigning your operating system’s predefined shortcut keys.
Figure 28: Defining keyboard shortcuts for applying styles
Note
Shortcut keys that are grayed-out in the listing on the Customize dialog, such as F1 and F10, are not available for reassignment.
Changes to the shortcut key assignments can be saved in a keyboard configuration file for use at a later time, so you can create and apply different configurations as needed. To save keyboard shortcuts to a file:
1) After making keyboard shortcut assignments, click the Save button at the right of the Customize dialog (Figure 28).
2) On the Save Keyboard Configuration dialog, type a name for the keyboard configuration file in the File name box, or select an existing file from the list. Browse to the location where you want to save the file. (The file extension is .cfg for Configuration.)
3) Click Save. A confirmation dialog appears if you are about to overwrite an existing file, otherwise there will be no feedback and the file will be saved.
To load a saved keyboard configuration file and replace your existing configuration, click the Load button on the Customize dialog, and then select the configuration file on the Load Keyboard Configuration dialog.
To reset all of the keyboard shortcuts to their default values, click the Reset button on the Customize dialog. Use this feature with care; no confirmation dialog will be displayed.
In LibreOffice, when something happens, we say that an event occurred. For example, a document is opened, a key is pressed, or the mouse moved. You can associate a macro with an event, so the macro is run when the event occurs. For example, a common use is to assign the “open document” event to run a macro that performs certain setup tasks for the document.
To associate a macro with an event, use the Events tab of the Customize dialog. For more information, see Chapter 13, Getting Started with Macros, in the Getting Started Guide.
An extension is a package that can be installed into LibreOffice to add new functionality. Template sets, spelling dictionaries, clipart galleries, macros, and dialog libraries can be packaged as LibreOffice extensions. They can add new top-level menus, submenus or toolbar icons. Extensions may also have their own settings, available from the extension manager.
Several extensions are shipped bundled with LibreOffice and are installed with the program. These can only be removed by changing the installation options. Others can be downloaded from various websites. The official extension repository is located at https://extensions.libreoffice.org/. These extensions are free of charge.
Some extensions from other sources are free of charge; others are available for a fee. Check the descriptions to see what licenses and fees apply to the ones that interest you.
Download the extension to your computer in any folder that you want (usually folder Download).
To install an extension that is listed in the repository, follow these steps:
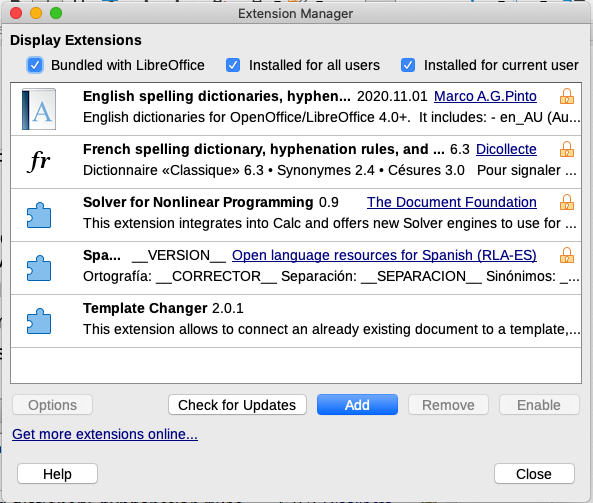
1) In LibreOffice, select Tools > Extension Manager on the Menu bar.
2) In the Extension Manager dialog (Figure 29), click Get more extensions online.
3) A browser window opens. Find and select the extension you want to install and download it to your computer.
4) After the extension is downloaded and saved, return to the Extension Manager dialog and click Add. Find and select the extension you want to install and click Open. The extension begins installing. You may be asked to accept a license agreement.
5) When the installation is complete, the extension is listed in the Extension Manager dialog.
To install an extension that is not listed in the repository, download the extension, then continue with step 3 above.
Click the Check for Updates button on the Extension Manager dialog to check for updates to installed extensions.
Figure 29: Using the Extension Manager
To remove (uninstall) an extension that you installed, select the extension in the main window of the Extension Manager dialog and click the Remove button.
To disable an extension without removing (uninstalling) it, select the extension in the main window of the Extension Manager dialog and click the Disable button, which then changes to Enable.
LibreOffice supports PostScript (.pfb), TrueType (.ttf), and OpenType (.otf) font file formats. Other font formats exist, and may be supported by your operating system, but these formats may be limited in selection and quality.
If you have administration privileges, you can install additional fonts through your operating system; they will then be available for use by LibreOffice and will appear in Writer’s font lists.
In addition to proprietary fonts from sources like Adobe, hundreds of free-licensed fonts are available. You can use, share, and edit free-licensed fonts as you please. Most are available at no cost. Many are clones or near-variations of classic fonts, but some are original fonts.
Many Linux distributions include a few free-licensed fonts in their package repositories. Other places where you can find free-licensed fonts include The League of Moveable Type (https://www.theleagueofmoveabletype.com/) and the Font Library (https://fontlibrary.org/).
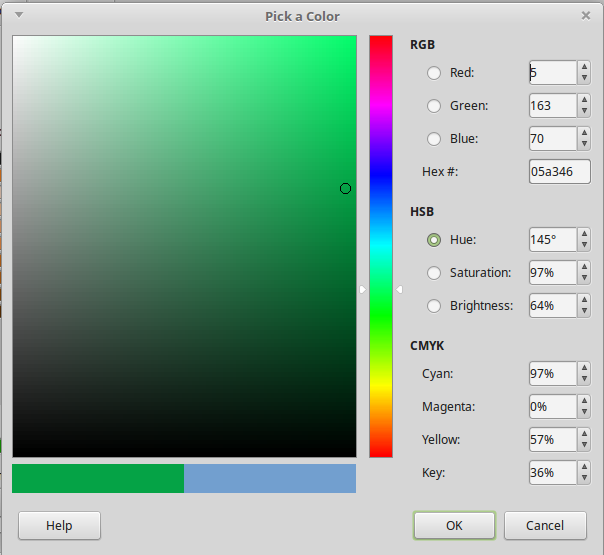
To add custom colors to a color palette, for example to exactly match a corporate color scheme, follow this procedure:
1) Insert any drawing object, such as a square, into any document.
2) Right-click on the object and choose Area in the context menu.
3) Go to the Color tab (Figure 30). Under Colors > Palette, choose which palette you wish to add the new color to. Under New, define the new color using RGB or Hex notation, or click the Pick button to select the color on the Pick a Color dialog (Figure 31).
Figure 30: Defining a new color
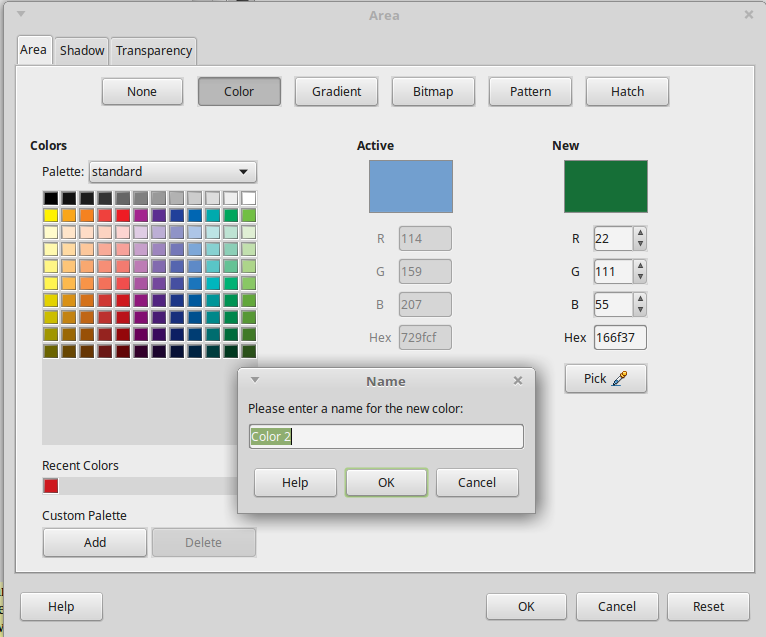
4) Click Add in the lower left corner, enter a name for the new color in the pop-up dialog, and click OK to save.
5) Delete the drawing object from the document, if it is not needed.
Figure 31: Defining a color by picking it from a color chart
On the Tools > Options > LibreOffice > Advanced dialog, in the Optional Features section near the bottom, is Enable experimental features (may be unstable). Experimental features may not yet be complete or may contain known bugs. These features may be different in each version of LibreOffice.
Figure 32: Bottom section of Tools > Options > LibreOffice > Advanced dialog

Some experimental features that may be of interest to users of Writer are:
On the Sidebar, two additional decks are available: Manage Changes and Design. These decks are not covered in this book.
Outline Folding: An extra option (Show outline-folding buttons) is available in Tools > Options > LibreOffice Writer > View (Figure 5). When this option is selected, a button with an arrow is visible near any selected heading in your document. Click on it to fold all text from the current heading to the next heading. If Include sub levels is also selected, clicking on a heading folds all text from that heading to the next same-level heading with all its subheadings.