
Writer Guide 7.3
Chapter 11,
Images and Graphics
Images, Drawing Tools, Gallery, Fontwork
This document is Copyright © 2022 by the LibreOffice Documentation Team. Contributors are listed below. You may distribute it and/or modify it under the terms of either the GNU General Public License (https://www.gnu.org/licenses/gpl.html), version 3 or later, or the Creative Commons Attribution License (https://creativecommons.org/licenses/by/4.0/), version 4.0 or later.
All trademarks within this guide belong to their legitimate owners.
|
Jean Hollis Weber |
|
|
|
Jean Hollis Weber |
Kees Kriek |
Bruce Byfield |
|
Gillian Polack |
Jamie Eby |
Ron Faile Jr. |
|
Barbara Duprey |
Colleen Hayes |
John A Smith |
Please direct any comments or suggestions about this document to the Documentation Team’s mailing list: documentation@global.libreoffice.org
Note
Everything you send to a mailing list, including your email address and any other personal information that is written in the message, is publicly archived and cannot be deleted.
Published March 2022. Based on LibreOffice 7.3.
Some keystrokes and menu items are different on macOS from those used in Windows and Linux. The table below gives some common substitutions for the instructions in this document. For a detailed list, see the application Help.
|
Windows or Linux |
macOS equivalent |
Effect |
|
Tools > Options |
LibreOffice > Preferences |
Access setup options |
|
Right-click |
Control+click or right-click depending on computer setup |
Open a context menu |
|
Ctrl (Control) |
⌘ (Command) |
Used with other keys |
|
Alt |
⌥ (Option) or Alt, depending on keyboard |
Used with other keys |
|
F11 |
⌘+T |
Open Styles deck in Sidebar |
You can add graphic and image files, including photos, drawings, and scanned images, to Writer documents. Writer can import various vector (line drawing) and raster (bitmap) file formats.
Images in Writer are of these basic types:
Image files, such as photos, drawings, and scanned images
Diagrams created using LibreOffice’s drawing tools
Artwork created using clip art or Fontwork
Charts created using LibreOffice’s Calc component
This chapter covers images, diagrams, and artwork. Instructions on how to create charts are given in Chapter 19, Spreadsheets, Charts, other Objects. For more detailed descriptions on working with drawing tools, see the Draw Guide. For more about charts, see the Calc Guide.
You might create images using a graphics program, scan them, or download them from the Internet (make sure you have permission to use them), or use photos taken with a digital camera. Writer can import various vector (line drawing) images, and can rotate and flip such images. Writer also supports raster (bitmap) file formats, the most common of which are GIF, JPG, PNG, and BMP. See the Help for a full list.
Writer can also import SmartArt images from Microsoft Office files. For example, Writer can open a Microsoft Word file that contains SmartArt, and you can use Writer to edit the images.
To edit photos and other bitmap images, use a bitmap editor. To edit line drawings, use a vector drawing program. You do not need to buy expensive programs. For many graphics, LibreOffice Draw is sufficient. Open-source (and usually no‑cost) tools such as GIMP (bitmap editor) and Inkscape (vector drawing program) are excellent. These and many other programs work on Windows, macOS, and Linux.
Some things to consider when choosing or creating images include image quality and whether the image will be printed in color or black-and-white (grayscale).
For best results:
Create images that have the exact dimensions required for the document, or use an appropriate graphics package to scale photographs and large drawings to the required dimensions. Do not scale images with Writer, even though Writer has tools for doing this, because the results might not be as clear as you would like.
Do any other required image manipulation (brightness and contrast, color balance, cropping, conversion to grayscale, and so on) in a graphics package, not in Writer, even though Writer has the tools to do a lot of these things, too.
If the document is meant for screen use only, there is no need to use high resolution images of 300 or more dpi (dots per inch). Most computer monitors work at between 72 and 96 dpi; reducing the resolution (and the file size) has no negative impact on what is displayed.
If color images are to be printed in grayscale, check that any adjacent colors have good contrast and print dark enough. Test by printing on a black-and-white printer using a grayscale setting. Better still: change the “mode” of the image to grayscale, either in a photo editor or in Writer itself (see “Image mode” below).
For example, the following diagram looks good in color. The circle is dark red and the square is dark blue. In grayscale, the difference between the two is not so clear. A third element in the diagram is a yellow arrow, which is almost invisible in grayscale.
|
Original drawing in color
|
Drawing printed in grayscale
|
Changing the colors of the circle and the arrow improves the contrast and visibility of the resulting grayscale image.
|
Original drawing in color
|
Drawing printed in grayscale
|
If the document will be available in black-and-white print only, a better result can often be obtained by choosing grayscale fills, not color fills.
Images can be added to a document in several ways: by inserting an image file stored on your computer, directly from a graphics program or a scanner, by dragging them from the clip art internal gallery, or by copying and pasting from a source being viewed on your computer.
When the image is in a file stored on the computer, you can insert it into a LibreOffice document using any of the following methods.
This method embeds (saves a copy of) the image file in the Writer document. To link the file instead of embedding it, hold down the Ctrl+Shift keys while dragging the image.
1) Open a file browser window and locate the image you want to insert.
2) Drag the image into the Writer document and drop it where you want it to appear. A faint vertical line marks where the image will be dropped.
1) Click in the Writer document where you want the image to appear.
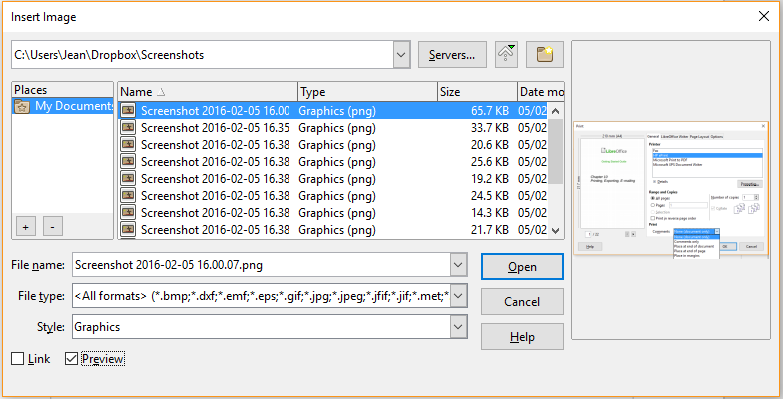
2) Choose Insert > Image on the Menu bar or click the Insert Image icon on the Standard toolbar.
3) On the Insert Image dialog, navigate to the file to be inserted, and select it.
4) At the bottom of the dialog (Figure 1) is a Link option; see “Linking an image file” below. Select Preview to show a thumbnail of the selected image on the right, as in the example. Click Open.
Figure 1: Insert Image dialog
Note
If you choose the Link option, a message box appears when you click Open. It asks if you want to embed the image instead. Choose Keep Link if you want the link, or Embed Graphic if you do not. To prevent this message from appearing again, deselect the option Ask when linking a graphic at the bottom of the message.
Using the clipboard, you can copy images into a LibreOffice document from another LibreOffice document and from other programs. To do this:
1) Open both the source document or program and the target Writer document.
2) In the source document, select the image to be copied.
3) Copy the image to the clipboard.
4) Switch to the target document.
5) Click to place the cursor where the image is to be inserted.
6) Press Ctrl+V (or right-click and select Paste in the context menu, or click the Paste icon on the Standard toolbar) to insert the image.
Caution
If the application from which the image was copied is closed before the image is pasted into the target, the image stored on the clipboard could be lost.
If the Link option in the Insert Image dialog is selected, Writer creates a link to the file containing the image instead of saving a copy of the image in the document. The result is that the image is displayed in the document, but when the document is saved, it contains only a reference to the image file, not the image itself. The document and the image remain as two separate files, and they are merged together only when you open the document again.
Linking an image has two advantages and one disadvantage:
Advantage – You can modify the image file separately, and the modified image will appear when you next open the document. This can be a big advantage if you (or someone else, perhaps a graphic artist) are updating images.
Advantage – Linking can reduce the size of the document when it is saved, because the image file itself is not included. However, file size is usually not a problem on a modern computer, and LibreOffice can handle quite large files.
Disadvantage – If you send the document to someone else, or move it to a different computer, you must also include the image files, or the recipient will not be able to see the linked images. You need to keep track of the location of the images and make sure the recipient knows where to put them, so the document can find them. For example, you might keep images in a subfolder named Images (under the folder containing the document); the recipient of the file needs to put the images in a subfolder with the same name and in the same place relative to the document.
Note
When inserting the same image several times in a document, LibreOffice embeds only one copy of the image file.
If you originally linked the images, you can easily embed one or more of them later if you wish.
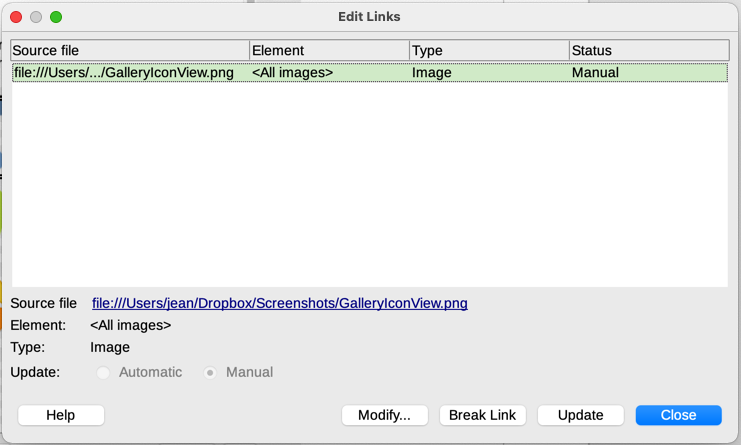
1) Open the document in Writer and choose Edit > Links to External Files on the Menu bar.
2) The Edit Links dialog (Figure 2) shows all the linked files. In the Source file list, select the files you want to change from linked to embedded.
3) Click the Break Link button and then click Yes to confirm embedding the image.
Figure 2: The Edit Links dialog
To change an image from embedded to linked, follow this procedure:
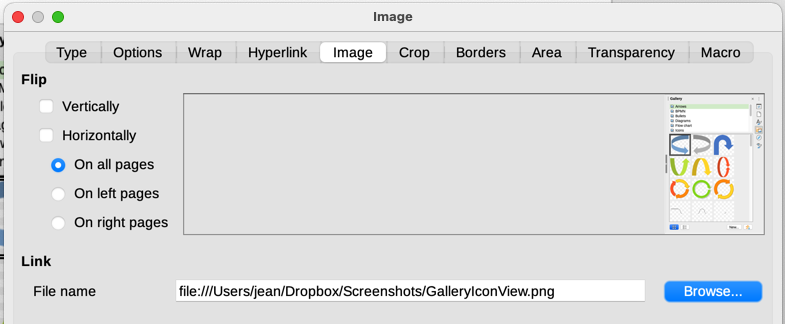
1) In the Writer document, select the image. Right-click and choose Properties in the content menu.
2) In the Image dialog, go to the Image tab (Figure 3). This field is empty for an embedded image.
3) Click the Browse button to the right of the Link File name field. A file browser opens. Find and select the file to be linked, and then click Open. The path to the selected file now appears in the File name field.
4) Click OK in the Image dialog. The embedded file is now linked.
Figure 3: Image tab of Image dialog, showing Link file name
If a scanner is connected to your computer, Writer can call the scanning application and insert the scanned item into your document as an image. To start this procedure, choose Insert > Media > Scan > Select Source on the Menu bar. Select the scan source from the list of available devices, then click in the document where you want the image to be inserted and choose Insert > Media > Scan > Request to open the imaging software where you can adjust settings for image quality, size, and other attributes.
Although this practice is quick and easy, it is unlikely to result in a high-quality image of the correct size. You may get better results by scanning material into a graphics program and cleaning it up there before inserting the resulting image into Writer.
The Gallery (Figure 4) provides a convenient way to group reusable objects such as graphics and sounds that you can insert into your documents. The Gallery is available in LibreOffice Writer, Calc, Impress, and Draw. You can copy or link an object from the Gallery into a document.
For more about the Gallery, see Chapter 11, Images and Graphics, in the Getting Started Guide.
Figure 4: The Gallery in the Sidebar
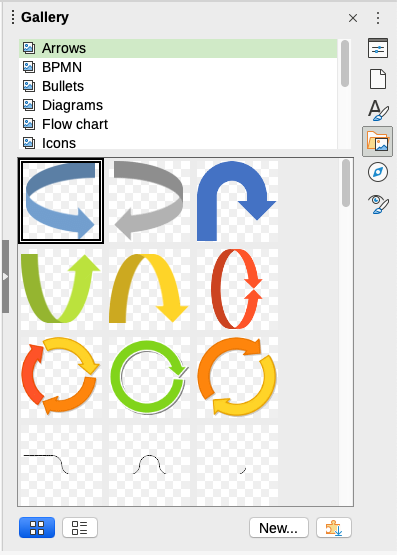
To insert an object from the Gallery into a document:
1) Click the Gallery icon on the Sidebar.
2) Select a theme in the list provided.
3) Select an object with a single click.
4) Drag and drop the image into the document, or right-click the object and choose Insert in the context menu.
5) Adjust the size of the image and position and anchor it as needed; see page below.
When you add an image to a text document, you need to choose how to position it with respect to the text and other images. Positioning is controlled by four settings:
Arrangement refers to the placement of an image on an imaginary vertical axis. Arrangement controls how images are stacked upon each other or relative to the text.
Alignment refers to the vertical or horizontal placement of an image in relation to the chosen anchor point.
Anchoring refers to the reference point for the images. This point could be the page or frame where the object is, a paragraph, or even a character. An image always has an anchor point.
Text wrapping refers to the relation of images to the surrounding text, which may wrap around the image on one or both sides, be overprinted behind or in front of the image, or treat the image as a separate paragraph or character.
The settings can be accessed in several ways, depending on the nature of the graphic:
In the Format menu: Anchor, Wrap, and Arrange (for images and drawing objects).
In the context menu displayed when you right-click the image; this menu also includes an Align submenu.
For images, on the Type and Wrap tabs of the Image dialog. You cannot control the arrangement or alignment using the dialog.
For drawing objects, on the Position and Size tab of the Position and Size dialog. To open the dialog, right-click the drawing object and choose Position and Size in the context menu.
For an embedded object (such as a Calc spreadsheet or Draw document), on the OLE-Object toolbar.
Note
While all the positioning techniques discussed in this section apply equally to frames, contour wrapping is not possible for frames.
Arranging an image means to determine its position relative to other images or text. Arranging is only relevant when objects are overlapping. You can choose between four common settings, plus a fifth special setting for drawing objects:
Bring to Front
Forward One
Back One
Send to Back
To Background / To Foreground
Tip
To select an object that is covered by other objects, press the Tab key to move through the objects until you reach the object you want.
You can anchor images as a character or to a page, paragraph, or character. You can also place images in a frame and anchor the frame to a page, paragraph, or character. Which method you choose depends on what you are trying to achieve.
To Page (available only on Image dialog, not the toolbar or context menu)
To Paragraph
To Character
As Character
To Frame
Tip
You can set a default anchor for images in Tools > Options > LibreOffice Writer > Formatting Aids (Figure 5).
Figure 5: Choices for setting a default image anchor
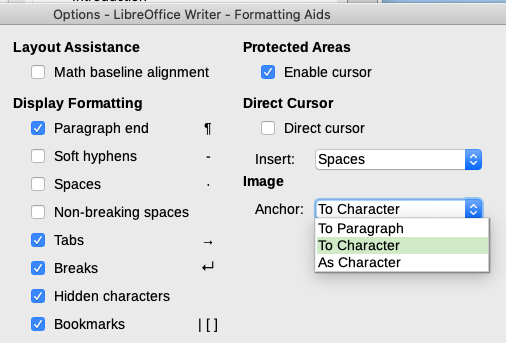
After you have established the anchor point of an image, you can decide the position of the image relative to its anchor: this is called aligning the image. Choose from six options: three for aligning the image horizontally (left, center, right) and three for aligning the image vertically (top, middle, bottom). Horizontal alignment is not available for images anchored As Character.
For finer control of the alignment, use the Position options on the Type page of the Image dialog, shown in Figure 6.
For both the horizontal and vertical position, start by picking the reference point in the right hand side drop-down menu, then select in the first drop-down menu among Left, Right, or Center for Horizontal or Top, Bottom, Center for vertical. If you select From left or From top, you can specify the distance. In the example in Figure 6, the image was anchored To Page; the upper-left corner of the image will be placed at 5 cm from the left edge of the page text area and 10 cm from the top edge of the entire page.
Figure 6: Fine tuning the alignment

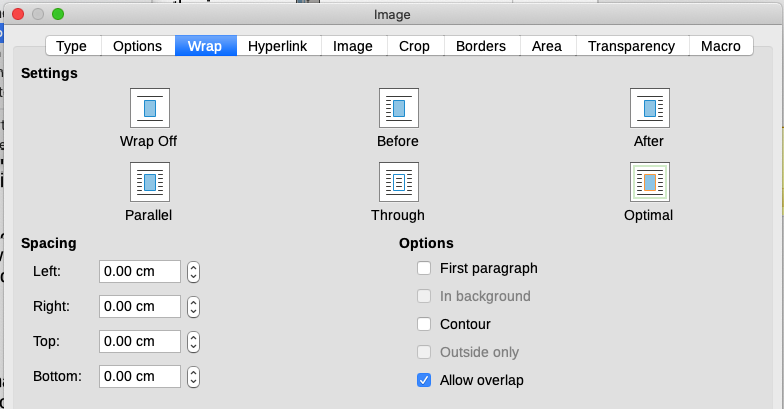
The Wrap setting determines the relation between the text and the image. It is normally selected after anchoring and alignment of the image. Several choices are available in the context menu, depending on the anchoring selection, and additional choices (including spacing from text on one or more sides of the image) are on the Wrap tab of the Image dialog (Figure 7).
None
Parallel
Optimal
Before
After
Through
In Background
Contour
Edit Contour
First paragraph
Note
When anchoring an image as character, you can adjust the distance between the image and the text, but no wrapping option is available.
On the Wrap tab of the Image dialog (Figure 7), you can use the Spacing section to adjust the spacing between the image and the text.
Figure 7: Options on the Wrap tab of the Image dialog
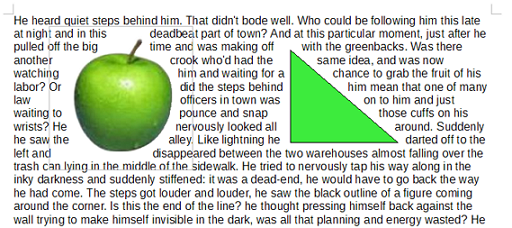
If you select Contour on the Wrap tab for an image (not available when Through or Wrap Off is selected), or if you right-click on the image and select Wrap > Contour from the context menu, LibreOffice automatically creates a contour. To edit the contour, right-click the image and select Wrap > Edit Contour in the context menu, or select the image and choose Format > Wrap > Edit Contour on the Menu bar.
The Contour Editor (Figure 8) opens. Use the tools provided to draw the region of the image you do not want to be covered by the text; this area will be shaded.
Figure 8: The Contour Editor
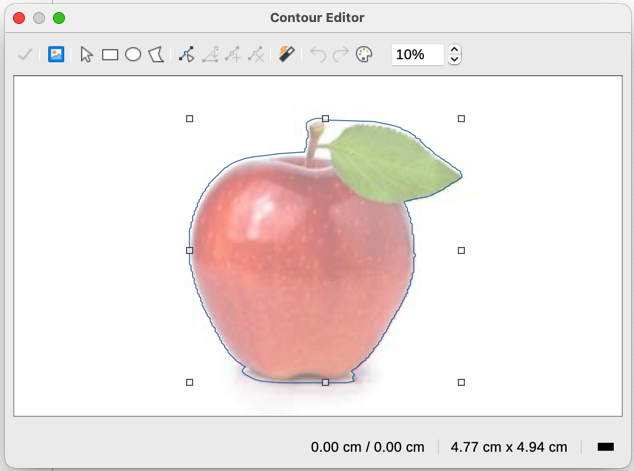
The tools available in the Contour Editor include Rectangle, Ellipse, Polygon, and AutoContour. Some familiarity with drawing tools is required to create complex contours; however, in most circumstances there is no need for high accuracy. You can also select the Edit Points button and adjust the contour shape point by point. See the Draw Guide for details.
When you are done, click the Apply button to save the contour.
Figure 9 shows the result of contour wrapping and spacing around an image and a drawing object.
Figure 9: Image and drawing objects with contour wrapping
You can add captions to images in three ways: automatically, by using the Caption dialog, or manually.
You can set up LibreOffice to add captions automatically whenever you insert an image, a table, or other objects into a document. You can choose which objects are captioned automatically, what the sequence name is for each caption (for example, Table or Figure), and the position of the caption.
To set up automatic captions, choose Tools > Options > LibreOffice Writer > AutoCaption. At the right of the dialog, choose which objects you want to be automatically captioned and specify the characteristics of the captions.
When you insert an image, if automatic captioning is enabled, the image is placed in a frame along with a caption containing the default sequence name for images. Position the cursor in the caption area and type the text for the caption. You can change the sequence name by selecting one in the drop-down Category list or typing in your own.
If you need a sequence name that is not one of the names provided, you can add any custom name you wish:
1) Open the AutoCaption dialog, as described above.
2) In the Add captions automatically when inserting section, select LibreOffice Writer Image. This activates the Caption area in the dialog for images.
3) Under the Category drop-down list, enter the name that you want added (say, Photo), by typing it in the box. (Overwriting a term in the box does not delete it from the list.) You can also set some options for the number style and for a separator between the name and the number, if desired. Click OK to save the changes.
To add captions using the Caption dialog:
1) Insert the image, then either right-click it and select Insert Caption in the context menu, or select it and choose Insert > Caption on the Menu bar.
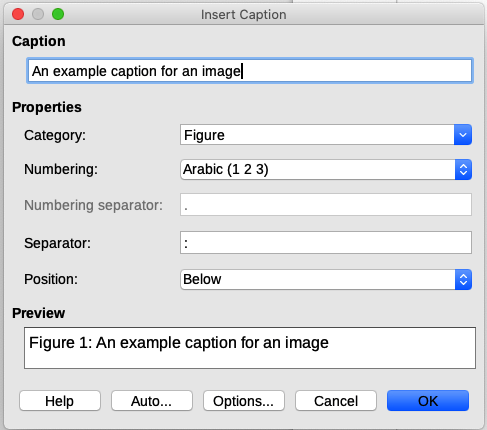
2) Under Properties on the Caption dialog (Figure 10), make your selections for the Category, Numbering, and Separator fields [Illustration, Arabic (1 2 3), and a colon (:), respectively, for the example in Figure 10] and type your caption text in the Caption box at the top. The text you enter for the caption appears in the box at the bottom, after the sequence name, number, and separator.
3) Click OK. The image and its caption are placed in a frame.
Tip
In the Category box, you can type any name you want (for example, Photo) if the drop-down list does not include it. Writer will create a numbering sequence using that name, as it does when using the AutoCaption feature.
Figure 10: Defining the caption for an illustration
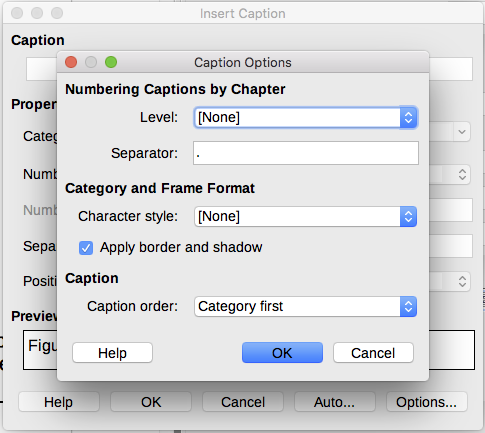
Additional options for numbering captions are available under the Options button in the Captions dialog (Figure 11). Some of these settings, which refer to the outline level, will have an effect only if you are using outline level paragraph styles on the chapter headings within your document.
When chapter numbering is set up, Writer will restart the caption numbering for each chapter it encounters. For example, if the last figure caption you create in chapter 1 is Figure 1.15, and the next figure caption you create is in chapter 2, the numbering will start over at Figure 2.1.
Options for chapter numbering of captions are:
Use Level to specify the outline level that triggers a restart of the numbering as well as how many levels of outline numbering are shown before the table number. For example, if the document uses Heading 1 style for chapters and Heading 2 style for sub-headings, if you want all the tables in a chapter (that is, between two Heading 1 paragraphs) to be numbered sequentially independently of the sub-heading they are under, select 1 as Level. If instead you want to restart the numbering at each sub-heading, select level 2.
Use the Separator field to establish the separator between the chapter number and figure number.
Use Character style to set a character style for the caption. This is useful if the separator of your choice is not a symbol included in the default font type of your document or if you want the caption to have a special color, size and so on.
The Apply border and shadow option does not apply to table captions. LibreOffice normally wraps the objects you can add a caption to in a frame, but not for tables.
Use Caption order to specify whether you want the category or numbering to appear first in the caption.
Figure 11: Options for numbering figures
If you save as or export to other formats, you may find that captions applied as described above (either automatically or using the Caption dialog) are lost during the export.
To avoid export problems, or as another way to put captions above images or below them (the usual case), you can add a caption manually, in either of two ways:
Place the image and its caption in separate paragraphs.
Use a table.
Insert the image and anchor it to its paragraph as a character. Press Enter to create a new paragraph for the caption.
1) In the caption paragraph, type, for example, Figure and add a space.
2) To insert the figure number automatically, click Insert > Field > More Fields (Ctrl+F2) and select the Variables tab.
3) Select Number range in the Type list. Select Figure in the Select list and choose (for example) Arabic (1 2 3) in the Format drop-down list. Click the Insert button.
4) A number will appear after the word “Figure” in the caption. Now, type the text of the caption.
Tip
If you are manually adding captions to a lot of figures using this method, you might want to make an AutoText entry containing, for example, Figure and a space, the figure-number field, and an optional separator and a space after it.
To ensure the image and its caption stay together on the page, create a new paragraph style, for example Figure. If the image is going above the caption, define the text flow of the Figure paragraph style as Keep with next paragraph and the next style as Caption. Conversely, if the caption is going above, define the Caption paragraph style as Keep with next paragraph and the next style as Figure.
Create a one-column, two-row table. Place the image in one row and type the caption in the other row—or use two or more rows for the caption and other text. This method can be especially useful for images with numbered legends, such as Figure 20 below.
When you insert a new image, you may need to modify it to suit the document. The placement of the image relative to the text is discussed in “Positioning images within the text” above. This section describes the use of the Image toolbar, resizing, cropping, and rotating an image.
Writer provides many tools for working with images. These tools are sufficient for most people’s everyday requirements. However, for professional results it is generally better to use an image manipulation program such as GIMP to modify images (for example, to crop, resize, rotate, and change color values) and then insert the result into Writer.
|
1 |
Filter |
10 |
Color |
19 |
Charcoal Sketch |
|
2 |
Image Mode |
11 |
Invert |
20 |
Relief |
|
3 |
Crop Image |
12 |
Smooth |
21 |
Mosaic |
|
4 |
Flip Vertically |
13 |
Sharpen |
22 |
Color |
|
5 |
Flip Horizontally |
14 |
Remove Noise |
23 |
Green |
|
6 |
Rotate 90° Left |
15 |
Solarization |
24 |
Blue |
|
7 |
Rotate 90° Right |
16 |
Aging |
25 |
Brightness |
|
8 |
Rotate |
17 |
Posterize |
26 |
Contrast |
|
9 |
Transparency |
18 |
Pop Art |
27 |
Gamma |
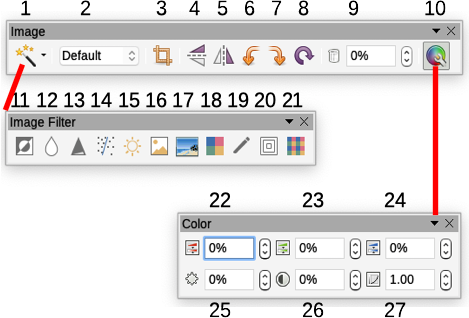
Figure 12: Image toolbar plus Color toolbar and Image Filter toolbar
When you insert an image or select one already present in the document, the Image toolbar (Figure 12) appears. You can set it to always be present (View > Toolbars > Image) and choose whether to float or dock it. Two other toolbars can be opened from this one: the Image Filter toolbar, which can be torn off and placed elsewhere on the window, and the Color toolbar, which opens as a separate floating toolbar.
From these three toolbars, you can apply small corrections to the image or obtain special effects: transparency, color adjustment, flipping and rotating, and applying special-effects filters.
Table 1 provides a short description of the available filters. The best way to understand them is to see them in action. Experiment with the different filters and filter settings, remembering that you can undo all the changes by pressing Ctrl+Z or Alt+Backspace or by selecting Edit > Undo. See the Draw Guide for more about image filters.
Table 1: Image filters and their effects
|
Name |
Effect |
|
Invert |
Inverts the color values of a color image or the brightness values of a grayscale image. |
|
Smooth |
Softens the contrast of an image. |
|
Sharpen |
Increases the contrast of an image. |
|
Remove noise |
Removes single pixels from an image. |
|
Solarization |
Mimics the effects of too much light in an image. A further dialog opens to adjust the parameters. |
|
Aging |
Simulates the effects of time on an image. Can be applied several times. A further dialog opens to adjust the aging level. |
|
Posterize |
Makes an image appear like a painting by reducing the number of colors used. |
|
Pop Art |
Modifies the image dramatically. |
|
Charcoal Sketch |
Displays the image as a charcoal sketch. |
|
Relief |
A dialog is displayed to adjust the light source that will create the shadow and, hence, the relief effect. |
|
Mosaic |
Joins groups of pixels into a single area of one color. |
You can change color images to grayscale, to black-and-white, or to a watermark by selecting the image and then selecting the relevant item from the Image Mode list.
To flip an image vertically, horizontally, or rotate it by ninety degrees, select the image, and then click the relevant button on the image toolbar.
Increase the percentage value in the Transparency box on the image toolbar to make the image more transparent. This is particularly useful when creating a watermark or when placing the image in the background.
Use this toolbar to modify the individual RGB color components of the image (red, green, blue) as well as the brightness, contrast, and gamma of the image. If the result is not satisfactory, you can press Ctrl+Z to restore the default values.
When an image is selected, you can customize some aspects of its appearance using the tools available on the Formatting toolbar and in the dialog opened by right-clicking on the image and selecting Properties. You can, for example, create a border around the image, selecting style and color; or you can (on the Borders tab of the Image dialog) add a shadow to the image.
When you are only interested in a section of the image for the purpose of your document, you may wish to crop (cut off) parts of it. Writer provides two ways to crop an image: the Crop tool and the Crop tab of the Image dialog. The Crop tool provides a quick and easy way to crop an image; but for more control, use the Image dialog.
Note
If you crop an image in Writer, the image itself is not changed. Writer hides, not cuts off, part of the image. If you export the document to HTML, the original image is exported, not the cropped image. For exporting individual cropped images, see “Exporting (saving) images” below.
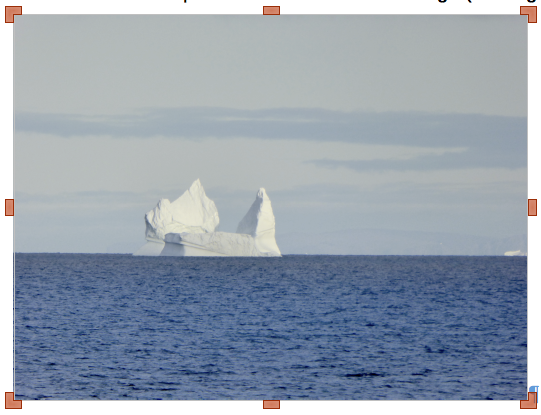
To use the Crop tool, right-click the image and select Crop in the context menu. Cropping handles appear at the corners and mid-points of the sides of the image (Figure 13). Drag a handle to cut off part of the image. Click outside the image to turn off cropping mode.
Figure 13: Cropping handles on an image
To use the Image dialog, right-click the image and select Properties in the context menu, then select the Crop tab of the Image dialog (Figure 14).
Figure 14: Result on image size of cropping using Keep scale option
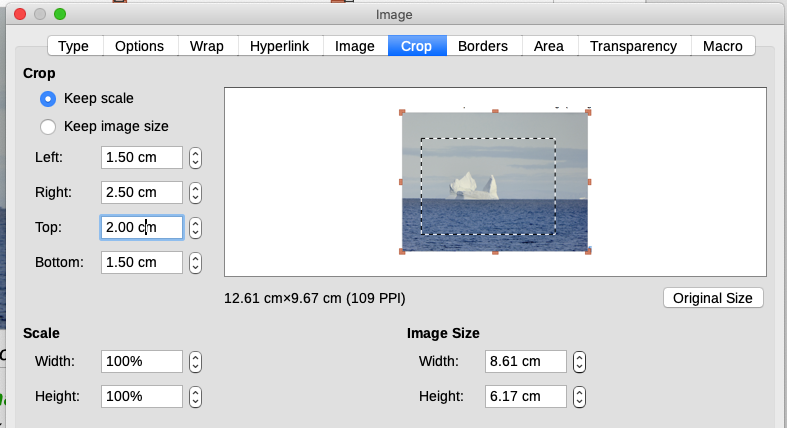
The units of measurement shown on the Crop tab are those set in Tools > Options > LibreOffice Writer > General.
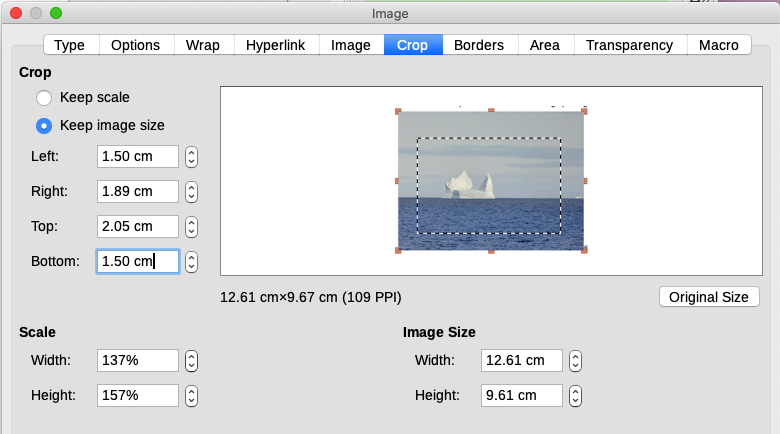
Two options are available in the Crop section: Keep scale and Keep image size. Keep scale maintains the proportions of the image; Keep image size may result in distortion of the image.
As the values for Left, Right, Top, and Bottom are altered, the boundaries of the image in the preview box change to show the crop area on the image, and the Width and Height fields under either Scale or Image size. This results in either an image size change (Figure 14), or a scale change for a fixed image size (Figure 15).
The original image size is indicated to the left of the Original Size button.
Figure 15: Result using Keep image size option
To fit the image into the document, you may have to resize it.
A quick and easy way to resize is by dragging the image’s sizing handles:
1) Click the image, if necessary, to show the sizing handles.
2) Position the cursor over one of the sizing handles. The pointer changes shape, giving a graphical representation of the direction of the resizing.
3) Click and drag to resize the image.
4) Release the mouse button when satisfied with the new size.
Tip
The corner handles resize both the width and the height of the image simultaneously, while the other four handles resize only one dimension at a time. To retain the original proportions of the image, hold down the Shift key while dragging one of these handles.
For more accurate resizing of images, use either the Crop tab (Figure 14) or the Type tab of the Image dialog.
On the Crop tab you can adjust the following settings:
Scale Width and Height: specify in percentages the scaling of the image. The size of the image changes accordingly. For a symmetrical resizing, both values need to be identical.
Image size: specify the size of the image in your preferred unit of measurement. The image enlarges or shrinks accordingly.
Original size button: when clicked, restores the image to its original size. This will be the size resulting after any cropping was carried out.
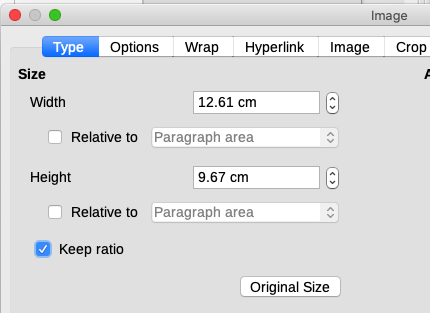
On the Type tab of the Image dialog (Figure 16), in the Size section, toggle the Relative to option to switch between percentage and actual dimension. For a symmetrical resizing, select the Keep ratio option. Clicking on the Original Size button restores the original image size, but the scale dimensions are altered if the image has been cropped.
Figure 16: Resizing by specifying a size on the Type tab
To quickly rotate an image 90 or 180 degrees, or flip it vertically or horizontally, right-click the image and select Rotate or Flip in the context menu, then choose the desired result. You can also use the settings on the Image tab of the Image dialog (Figure 18).
Figure 17: Quickly rotating or flipping an image
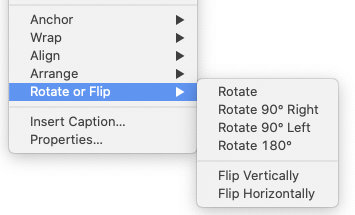
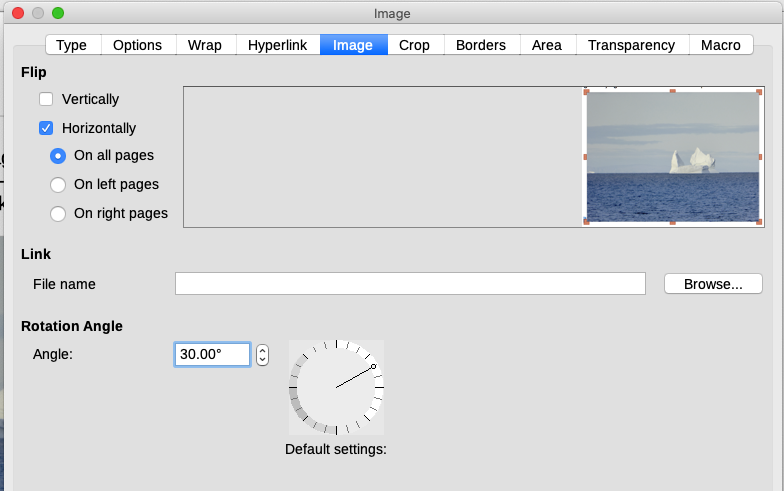
Figure 18: Use the Image tab of Image dialog, to flip, link, or rotate an image
You can rotate images at any required angle, using either of these methods:
Interactively. Select the image and click the Rotate icon on the Image toolbar or right-click and select Rotate or Flip > Rotate. Rotation handles appear around the object. Hover the cursor over a handle; when the cursor changes shape, click and drag it to the required angle. This method is quick and easy, but not precise.
Using the Image dialog. For precise rotation angles, right-click the image and select Properties. On the Image dialog (Figure 18), select the Image tab. In the Rotation Angle section, specify the rotation required in the Angle field.
The Image dialog (Figure 18) has ten tabs. The Crop page was described above; the Type and Wrap pages are explained in “Positioning images within the text” above. The other pages serve the following purposes:
Options: give the image a descriptive name (as you want it to appear in the Navigator), display alternative text when the cursor hovers over the image in a web browser, protect some of the image settings from accidental changes, and prevent the image from being printed.
Borders: create borders around the image. The Borders dialog is the same as the one used for defining table or paragraph borders. You can also add a shadow to the image.
Area: change the background color of the image. This setting produces the desired results only for images with a transparent color.
Hyperlink: associate a hyperlink to the image, or create an image map (see page below).
Image: flip or rotate the image, and display the original location of the file in case the image is linked rather than embedded.
Transparency: set the transparency options for the image.
Macro: associate a macro to the image. You can choose among the predefined macros or write your own.
To delete an image, click it to show the resizing handles, then press the Delete key.
To make complex adjustments to the image in another program, or to save an image for use in another document, you can export it directly from the document. Right-click the image and choose Save in the context menu to open the Image Export dialog. Writer will let you save the image in several formats. Name the image, select the desired image format in the File type list, and click Save.
Before the image is saved another dialog opens, where you can choose various image size and format options. The content of this dialog depends on the output file type selected. If the image has been modified within Writer, you will see a confirmation dialog where you can choose to save the original version or the modified version of the image.
If you insert a large image in a document and resize it to fit into the layout of the page, the complete original image is stored in the document file to preserve its content, possibly resulting in a large document file to store or send by email.
If you can accept some loss of quality of the image rendering, you can compress or resize the image object to reduce its data volume while preserving its display in the page layout. You probably do not want to compress something that will be professionally printed.
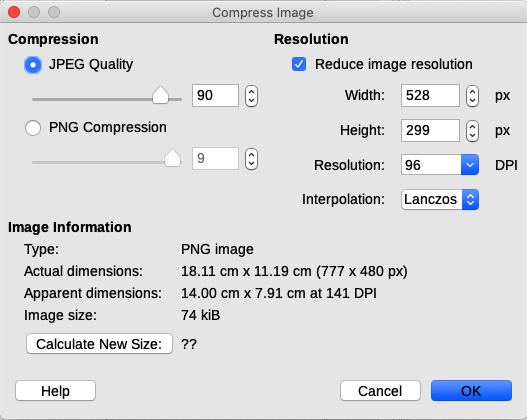
Right-click to select the image and open the context menu. Then choose Compress to open the Compress Image dialog (Figure 19). Use the Calculate New Size button to update the image information on the dialog on each parameter set you change.
Click OK to apply the compression settings. If the resulting image is not acceptable, press Ctrl+Z to undo and choose another compression setting. For more information, see the Help.
Figure 19: Compressing an image
You can use Writer’s drawing tools to create graphics such as simple diagrams using rectangles, circles, lines, text, and other predefined shapes. You can also group several drawing objects to make sure they maintain their relative position and proportion.
You can place the drawing objects directly on a page in the document or insert them into a frame.
You can also use the drawing tools to annotate photographs, screen captures, or other illustrations produced by other programs, but this is not recommended because:
You cannot include images in a group with drawing objects, so they may get out of alignment in your document.
If you convert a Writer document to another format, such as HTML, the drawing objects and the images will not remain associated; they are saved separately.
In general, if you need to create complex drawings, it is recommended you use LibreOffice Draw, which includes many more features such as layers and styles.
To begin using the drawing tools, display the Drawing toolbar (Figure 20) by clicking View > Toolbars > Drawing or by clicking on the Show Draw Functions icon on the standard toolbar.
|
|
|||||||
|
1 |
Select |
7 |
Rectangle |
13 |
Right Triangle |
19 |
Flowchart |
|
2 |
Insert Line |
8 |
Rectangle, Rounded |
14 |
Basic Shapes |
20 |
Callouts |
|
3 |
Lines and Arrows |
9 |
Square |
15 |
Symbol Shapes |
21 |
Insert Text Box |
|
4 |
Curves & Polygons |
10 |
Ellipse |
16 |
Block Arrows |
22 |
Fontwork |
|
5 |
Curve |
11 |
Circle |
17 |
Stars & Banners |
23 |
Points |
|
6 |
Polygon |
12 |
Isosceles Triangle |
18 |
Callouts |
24 |
Toggle Extrusion |
|
Figure 20: The Drawing toolbar |
|||||||
The Drawing toolbar may appear at the bottom or left side of the workspace. You can move it to another location and dock it, or float it and move it to a convenient place on the screen.
To use a drawing tool:
1) Click in the document where you want the drawing to be anchored. You can change the anchor later, if necessary.
2) Select the tool on the Drawing toolbar (Figure 20). The cursor changes to a drawing-functions pointer and the normal Formatting toolbar changes to the Drawing Object Properties toolbar (Figure 21).
3) Move the cross-hair pointer to the place in the document where you want the image to appear and then click-and-drag to create the drawing object. Release the mouse button. The selected drawing function remains active, so that you can draw another object of the same type.
4) To cancel the selected drawing function, press the Esc key or click the Select icon (the arrow) on the Drawing toolbar.
5) You can now change the properties (fill color, line type and weight, anchoring, and others) of the drawing object using either the Drawing Object Properties toolbar (Figure 21) or the choices and dialogs reached by right-clicking on the drawing object.
|
|
|||||||
|
1 |
Anchor |
8 |
Align Objects |
15 |
Arrow Style |
22 |
Points |
|
2 |
[Wrap] None |
9 |
Bring to Front |
16 |
Line Style |
23 |
Group |
|
3 |
[Wrap] Parallel |
10 |
Forward One |
17 |
Line Width |
24 |
Enter Group |
|
4 |
[Wrap] Optimal |
11 |
Back One |
18 |
Line Color |
25 |
Exit Group |
|
5 |
[Wrap] Before |
12 |
Send to Back |
19 |
Area Style / Filling |
26 |
Ungroup |
|
6 |
[Wrap] After |
13 |
To Foreground |
20 |
Fill Color |
27 |
Insert Caption |
|
7 |
[Wrap] Through |
14 |
To Background |
21 |
Rotate |
|
|
|
Figure 21: Drawing Object Properties toolbar |
|||||||
To set the properties for a drawing object before you draw it:
1) On the Drawing toolbar (Figure 20), click the Select tool.
2) On the Drawing Object Properties toolbar (Figure 21), click the icon for each property and select the value you want for that property.
3) For more control, or to define new attributes, you can click the Area or Line icons on the toolbar to display detailed dialogs.
The default you set applies to the current document and session. It is not retained when you close the document or close Writer, and it does not apply to any other document you open. The defaults apply to all the drawing objects except text objects.
To change the properties for an existing drawing object, select the object, then continue as described above.
You can also specify the position and size, rotation, and slant and corner radius properties of the drawing object: right-click the drawing object and select Position and Size in the context menu. Choose any properties, as required.
To resize a drawing object, select the object, click one of the eight handles around it and drag it to its new size. The object will be scaled up or down.
When you grab an edge or corner handle of an object and drag it, LibreOffice will not keep the object’s proportions. If you also press the Shift key, the resizing will keep object proportions.
For more accurate control of the size of the object, right-click on the object and choose Position and Size in the context menu, or choose Format > Text Box and Shape > Position and Size on the Menu bar. Use the Position and Size tab to set the dimensions independently. If the Keep ratio option is selected, then the two dimensions change so that the proportion is maintained, resulting in a scaled resizing.
Grouping drawing objects makes it easier to handle several objects as a single entity, while preserving their relative sizes and positions. When objects are grouped, any editing operations carried out on that group are applied to all members of the group. If you click on one member of the group, the whole group is selected.
To group drawing objects:
1) Select one object, then hold down the Shift key and select the others you want to include in the group. The bounding box expands to include all the selected objects.
2) With the objects selected, hover the cursor over one of the objects and choose Format > Group > Group on the Menu bar, or click the Group icon on the Drawing Object Properties toolbar, or right-click and choose Group in the context menu.
Note
You cannot include an embedded or linked image in a group with drawing objects.
You can edit an individual member of a group without ungrouping or breaking the group. Select the group and go to Format > Group > Enter Group on the Menu bar, or right-click and select Enter Group in the context menu, or click the Enter Group icon on the Drawing Object Properties toolbar.
When you have finished editing an individual member of a group, go to Format > Group > Exit Group on the Menu bar, or right-click and select Exit Group in the context menu, or click the Exit Group icon on the Drawing Object Properties toolbar.
To ungroup or break apart a group of objects, select the group then go to Format > Group > Ungroup on the Menu bar, or right-click and select Ungroup in the context menu, or click the Ungroup icon on the Drawing Object Properties toolbar.
You can rotate a drawing object in a similar way to rotating images (page above). To rotate a drawing object to any required angle, use either of these methods:
Interactively. Select the drawing object and click the Rotate icon on the Drawing Object Properties toolbar. Rotation handles appear around the object. Hover the cursor over a handle; when the cursor changes shape, click and drag it to the required angle.
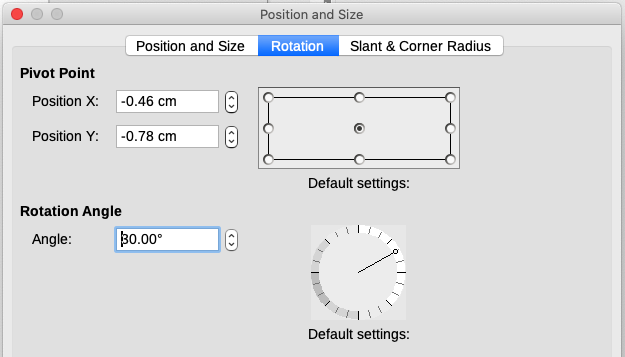
Position and Size dialog. Right-click the object and select Position and Size. On the dialog (Figure 22), select the Rotation tab. In the Rotation Angle field, specify the rotation required. By default, rotation is around the center of the object, but you can choose a different pivot point.
Figure 22: Position and Size dialog, Rotation tab
Tip
Of particular interest to Writer is the Text Box drawing object. Ordinary text can only be rotated to 90, 180, or 270 degrees, as described in Chapter 9, but a Text Box object can be rotated to any desired angle.
An image map defines areas of an image (called hotspots) with hyperlinks to web addresses, other files on the computer, or parts of the same document. Hotspots are the graphic equivalent of text hyperlinks. Clicking on a hotspot causes LibreOffice to open the linked page in the appropriate program (for example, the default browser for an HTML page; LibreOffice Calc for a ODS file; a PDF viewer for a PDF). You can create hotspots of various shapes and include several hotspots in the same image.
To use the image map editor (Figure 23):
1) In the Writer document, select the image in which you want to define the hotspots.
2) Choose Tools > ImageMap on the Menu bar. The ImageMap Editor (Figure 23) opens.
3) Use the tools and fields in the dialog (described below) to define the hotspots and links.
4) Click the Apply icon to apply the settings.
5) When done, click the Save icon to save the image map to a file, then close the dialog.
Figure 23: The dialog to create or edit an image map
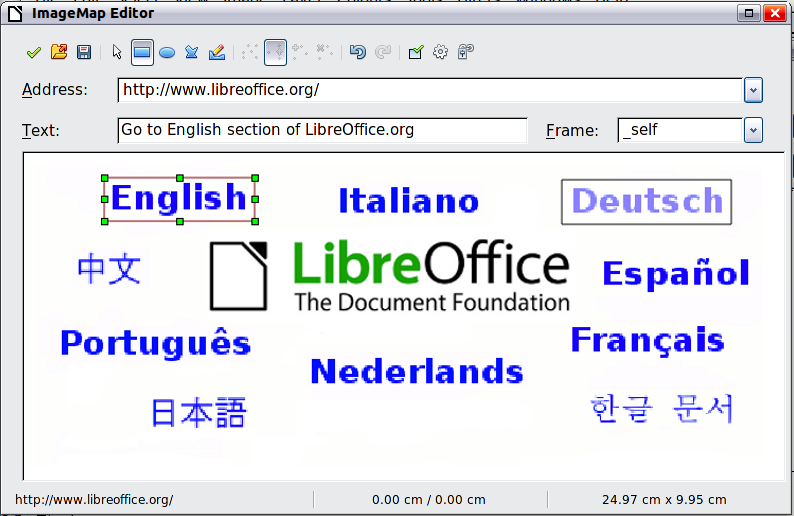
The main part of the dialog shows the image on which the hotspots are defined. A hotspot is identified by a line indicating its shape.
The toolbar at the top of the dialog contains the following tools:
Apply: applies the changes.
Open, Save, Close, and Select.
Rectangle, Ellipse, Polygon, and Freeform Polygon: tools for drawing a hotspot shape. These tools work in the same way as the tools in the Drawing toolbar.
Edit, Move, Insert, Delete Points: advanced editing tools to manipulate the shape of a polygon hotspot. Select the Edit Points tool to activate the other tools.
Undo and Redo: cancels the previous action or reapplies the previous canceled action.
Active: toggles the status of a selected hotspot between active and inactive.
Macro: associates a macro with the hotspot instead of just associating a hyperlink.
Properties: sets the hyperlink properties and adds the Name attribute to the hyperlink.
Below the toolbar, specify for the selected hotspot:
Address: the address pointed to by the hyperlink. You can also point to an anchor in a document; to do this, write the address in this format: file:///<path>/document_name#anchor_name
Text: type the text that you want to be displayed when the cursor is moved over the hotspot.
Frame: where the target of the hyperlink will open: pick among _blank (opens in a new browser window), _self (opens in the active browser window), _top or _parent.
Tip
The value _self for the target frame will work in the vast majority of occasions. It is therefore not recommended to use the other choices unless absolutely necessary.
By default, the Gallery is opened in the Sidebar. You can let the Gallery float as you can other Sidebar decks. You can display the Gallery in Icon View (Figure 2) or Detailed View (Figure 24), and you can hide or show the Gallery by clicking on the Sidebar’s Hide button.
Figure 24: Gallery in Detailed View
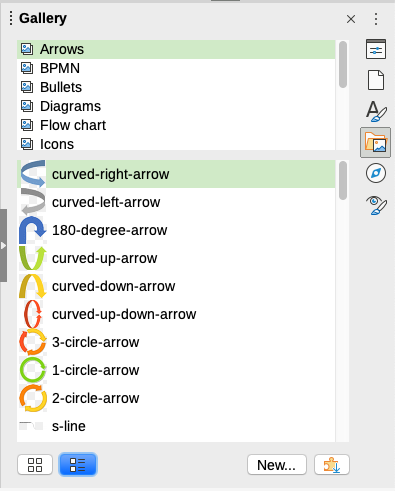
Graphics in the Gallery are grouped by themes, such as Arrows, Diagrams, and People. You can create other groups or themes and add your own images or find extensions containing more graphics. Click a theme to see its contents displayed in the Gallery window.
Note
The default themes supplied with LibreOffice can not be customized, although new themes can be added; see “Adding a new theme to the Gallery” below. The locked themes are easily recognizable by right-clicking on them; the only option in the context menu is Properties.
You may wish to add your own theme to the Gallery to hold any images or other objects that you use frequently, for example, a company logo. Or you may wish to add several themes, each holding images for a specific project.
To add a new theme to the Gallery:
1) Click the New button below the list of themes (Figure 24).
2) In the Properties of New Theme dialog, click the General tab and type a name for the new theme.
3) Click the Files tab and add images to the theme, as described below.
Tip
You can also get more gallery themes from the LibreOffice extensions website at https://extensions.libreoffice.org/, including themes from previous versions of LibreOffice that are no longer installed with the program. Themes in extensions install automatically.
To add objects to a theme that you have created:
1) Right-click the name of the theme and select Properties in the context menu.
2) In the theme’s Properties dialog, click the Files tab (Figure 25).
Figure 25: Gallery Properties dialog
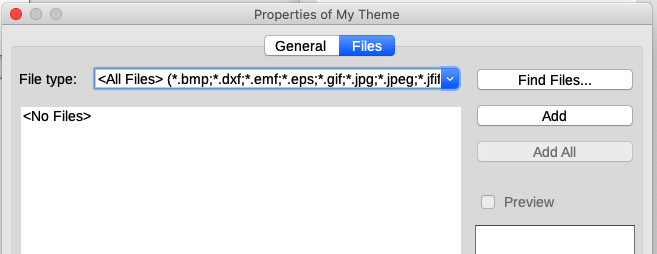
To add several files at once:
1) In the Properties dialog, click the Find Files button.
2) The Select Path dialog (not shown) opens. You can enter the path for the file’s directory in the Path text box, or you can navigate to locate the file’s directory.
3) Click the Select button to start the search. A list of files is then displayed in the Properties dialog. You can use the file type drop-down list to limit the files displayed.
4) To add all of the files shown in the list, click Add All. Otherwise, select the files to add and then click Add (hold down either the Shift key or the Ctrl key while clicking on the files).
To add a single file:
1) In the Properties dialog, click Add to open the Gallery dialog (a file browser).
2) Use the navigation controls to locate the image to add to the theme. Select it and then click Open to add it to the theme.
3) Click OK on the Properties dialog to close it.
To delete an image from a theme, right-click on the name of the image file or its thumbnail in the Gallery, then click Delete in the context menu. A message appears, asking if you want to delete this object. Click Yes.
Note
Deleting the name of a file from the list in the Gallery does not delete the file from the hard disk or other location.
To delete a theme from the Gallery, select it from the list of themes, right-click, then click Delete in the context menu. You cannot delete a theme supplied with LibreOffice.
Graphics and other objects shown in the Gallery can be located anywhere on your computer’s hard disk, on a network drive, or other removable media. When you add graphics to the Gallery, the files are not moved or copied; the location of each new object is simply added as a reference.
In a workgroup, you may have access to a shared Gallery (where you cannot change the contents unless authorized to do so) and a user Gallery, where you can add, change, or delete objects.
The location of the user Gallery is specified in Tools > Options > LibreOffice > Paths. You can change this location, and you can copy your gallery files (SDV) to other computers.
Gallery contents provided with LibreOffice are stored in a different location. You cannot change this location.
Note
The locations of Gallery themes distributed through LibreOffice extensions are determined by the extensions’ settings.
With Fontwork you can create graphical text art objects to make your work more attractive. There are many different settings for text art objects (line, area, position, size, and more), so you have a large choice.
1) On the Fontwork toolbar (View > Toolbars > Fontwork) or the Drawing toolbar (View > Toolbars > Drawing), click the Insert Fontwork Text icon, or choose Insert > Fontwork on the Menu bar.
Figure 26: The Fontwork Gallery
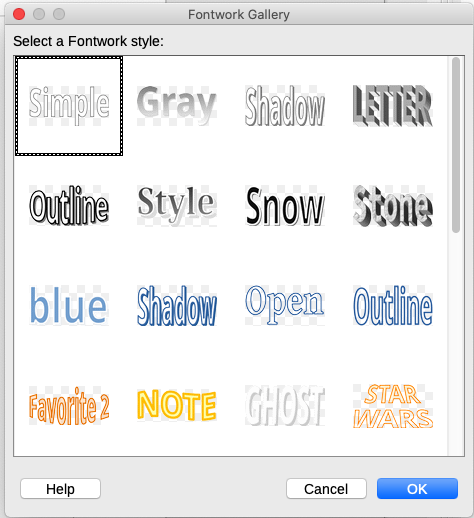
2) In the Fontwork Gallery dialog (Figure 26), select a Fontwork style (scroll down to see more choices), then click OK.
3) The Fontwork object will appear in your document. Notice the squares around the edge (indicating that the object is selected) and the differently colored dot; these are discussed in “Moving and resizing Fontwork objects” below.
4) Resize the object using one of the corner handles (hold down the Shift key to keep the sides proportional), or right-click and choose Position and Size in the context menu for more precise sizing.
5) Double-click the object to edit the Fontwork text (Figure 27). Type your own text in place of the black text that appears over the object.
Figure 27: Editing Fontwork text
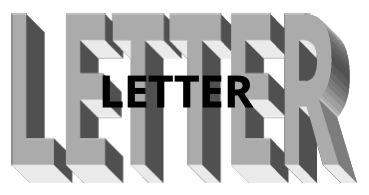
6) Click anywhere in a free space or press Esc to apply your changes.
Now that the Fontwork object is created, you can edit some of its attributes. To do this, you can use the Fontwork toolbar, the Fontwork panel on the Properties deck in the Sidebar, the Formatting toolbar, or menu options as described in this section. If the selected Fontwork object is a 3D object, you can also use the 3D-Settings toolbar.
Make sure that the Fontwork toolbar (Figure 28) is visible. If you do not see it, go to View > Toolbars > Fontwork. Click the icons to edit Fontwork objects. Icons 2–6 also appear in the Fontwork panel on the Properties deck in the Sidebar.
Figure 28: The floating Fontwork toolbar
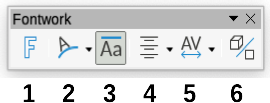
1) Fontwork Gallery: Opens the Fontwork Gallery (Figure 26).
2) Fontwork Shape: Edits the shape of the selected object. You can choose from a palette of shapes.
3) Fontwork Same Letter Heights: Changes the height of characters in the object. Toggles between normal height (some characters taller than others, for example capital letters, d, h, l and others) and all letters the same height.
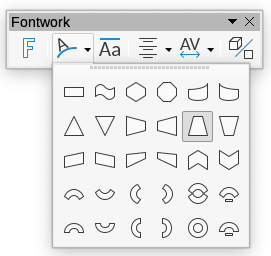
Figure 29: Left: normal letters; right: same letter heights

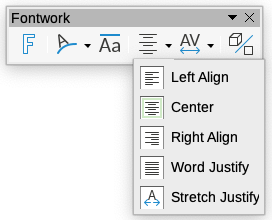
4) Fontwork Alignment: Changes the alignment of characters. Choices are Left Align, Center, Right Align, Word Justify, and Stretch Justify. The effects of the text alignment can only be seen if the text spans over two or more lines. Stretch Justify fills all the lines completely.
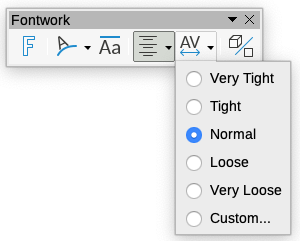
5) Fontwork Character Spacing: Changes the character spacing and kerning in the object. Choices are Very Tight, Tight, Normal, Loose, Very Loose, and Custom..., which opens a small dialog where you can specify a percentage.
6) Toggle Extrusion: changes a 2D Fontwork object into a 3D object or a 3D object into a 2D object.
You can customize the Fontwork object with several more attributes. Click on the object; the Formatting toolbar changes to show the options for customizing the object. These choices are the same as the ones for other drawing objects, described earlier in this chapter. See also the Draw Guide for details.
You can use some the choices in the Format menu to anchor, align, arrange, and group selected Fontwork objects, wrap text around them, and flip them horizontally and vertically.
You can also right-click a Fontwork object and choose many of the same options in the context menu. The context menu also provides quick access to the Line, Area, and Position and Size dialogs. On the Position and Size dialog, you can enter precise values for size and position. For more information on all of these menu options, see the Draw Guide.
If the selected Fontwork object is a 3D object, you can also use the options on the 3D-Settings toolbar. You can also change a 2D Fontwork object into a 3D object (or change a 3D object into a 2D object) by clicking the Toggle Extrusion icon on the Fontwork toolbar. For more information, see the Draw Guide.
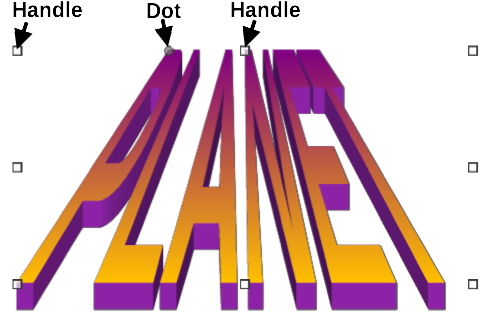
When you select a Fontwork object, eight squares (known as handles) appear around the edge of the object, as shown below. You can drag these handles to resize the object.
A dark or colored dot also appears on the object. This dot may be in the same place as a handle, or it may be somewhere else. If you hover the cursor over this dot, the cursor changes shape. You can drag the dot in different directions to distort the object.
Figure 30: Handles and distortion dot on Fontwork object
Hovering the cursor over other parts of the object turns the cursor into the usual symbol for dragging the object to another part of the page.
For precise control of the location and size of the object, and to rotate the object, use the Position and Size dialog (Figure 22 above).
Writer, Calc, Impress, and Draw can generate barcodes and QR codes. Barcodes are used for many purposes. A QR code (short for Quick Response code) is a type of barcode. QR codes often contain data that points to a website or application.
1) Choose Insert > Object > QR and Barcode on the Menu bar to open the QR and Barcode Code dialog (Figure 31).
2) Fill in the URL/Text field, select an error correction factor (the complexity of the graphic generated), the width of the margin around it, and the type of code, then click OK.
Figure 32 shows the code generated by the input in Figure 31. Figure 34 shows an ISBN barcode generated by the input in Figure 33.
After the barcode or QR code has been generated, you can edit it by right-clicking in the code and selecting Edit Barcode.
Figure 31: Generating a QR code
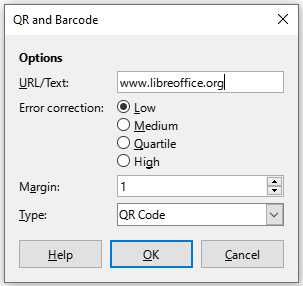
Figure 32: QR code example

Figure 33: Generating a barcode
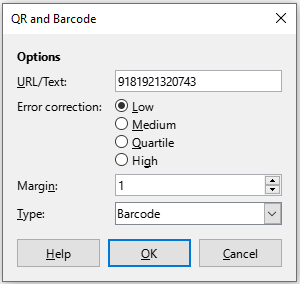
Figure 34: Barcode example (ISBN)
