
Writer Guide 7.5
Chapter 8,
Introduction to Styles
This document is Copyright © 2023 by the LibreOffice Documentation Team. Contributors are listed below. You may distribute it and/or modify it under the terms of either the GNU General Public License (https://www.gnu.org/licenses/gpl.html), version 3 or later, or the Creative Commons Attribution License (https://creativecommons.org/licenses/by/4.0/), version 4.0 or later.
All trademarks within this guide belong to their legitimate owners.
|
Jean Hollis Weber |
Antonio Fernández |
Kees Kriek |
|
Tsvetelina Georgieva |
|
|
|
Jean Hollis Weber |
Kees Kriek |
Gillian Polack |
|
Bruce Byfield |
John A Smith |
Ron Faile Jr. |
Please direct any comments or suggestions about this document to the Documentation Team’s forum at https://community.documentfoundation.org/c/documentation/loguides/ (registration is required) or send an email to: loguides@community.documentfoundation.org. Emails sent to the forum are moderated.
Note
Everything you send to a forum, including your email address and any other personal information that is written in the message, is publicly archived and cannot be deleted.
Published February 2023. Based on LibreOffice 7.5.
Some keystrokes and menu items are different on macOS from those used in Windows and Linux. The table below gives some common substitutions for the instructions in this document. For a detailed list, see the application Help.
|
Windows or Linux |
macOS equivalent |
Effect |
|
Tools > Options |
LibreOffice > Preferences |
Access setup options |
|
Right-click |
Control+click or right-click depending on computer setup |
Open a context menu |
|
Ctrl (Control) |
⌘ (Command) |
Used with other keys |
|
Alt |
⌥ (Option) or Alt, depending on keyboard |
Used with other keys |
|
F11 |
⌘+T |
Open Styles deck in Sidebar |
Most people are used to writing documents according to physical attributes. For example, you might specify the font family, font size, and weight (for example: Helvetica 12pt, bold). In contrast, styles are logical attributes. For example, you can define a set of font characteristics and call it Title or Heading 1. In other words, styles mean that you shift the emphasis from what the text looks like to what the text is.
Styles help improve consistency in a document. They also make major formatting changes easy. For example, you might decide to change the indentation of all paragraphs or change the font of all titles. For a long document, this simple task could be prohibitive. Styles make the task easy. In addition, Writer uses styles for other purposes, such as compiling a table of contents; see “Using paragraph styles to define a hierarchy of headings” below.
LibreOffice Writer has six style categories:
Paragraph styles affect entire paragraphs and are also used for purposes such as compiling a table of contents.
Character styles affect a block of text inside a paragraph; they provide exceptions to paragraph styles.
Page styles affect page formatting (page size, margin, and the like).
Frame styles affect frames and images.
List styles affect outlines, ordered (numbered) lists, and unordered (bulleted) lists.
Table styles affect the appearance of tables of data.
Paragraphs are the building blocks of every document: headings are paragraphs; headers, footers, and items in numbered lists are also paragraphs. Paragraph styles are, therefore, the most frequently used styles and are the ones treated in most detail in this chapter.
Note
Manual formatting (also called direct formatting) overrides styles. You cannot get rid of manual formatting by applying a style to it.
To remove manual formatting, select the text and choose Format > Clear Direct Formatting on the Menu bar, or right-click and choose Clear Direct Formatting in the context menu, or press Ctrl+M.
Styles management is primarily available through the Styles deck in the Sidebar (Figure 1). Here you can apply styles, modify styles, and create new styles.
To begin, do any of the following:
Click the Styles icon on the Sidebar.
Choose Styles > Manage Styles on the Menu bar.
Press F11 (⌘+T on macOS).
The first six icons at the top of the Styles deck select the category of styles. Click one of these icons to display a list of styles in that category, such as paragraph or character styles.
Select the Show previews option at the bottom of the deck to display the style names as examples of their formatting.
Figure 1: The Styles deck, showing paragraph styles and filter
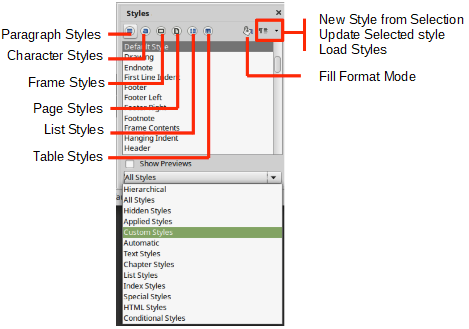
At the bottom of the Styles deck, use the drop-down menu to select a filter for the list of styles. Normally, you will need only a few styles in any document, so it’s useful to have only these styles shown.
At the beginning of the writing process, you may want to have access to all the available styles (by selecting All Styles), and then hide some of them (Ctrl+click to select each style to be excluded and finally right-click one of these styles and select Hide in the context menu). As the document develops, it is quicker to reduce the list displayed to only the styles already in use (by selecting Applied Styles). If you work on a document where you want to apply custom styles only, select instead Custom Styles. The Hierarchical view is most useful when modifying styles as it reveals which styles are linked together. This topic is discussed in Chapter 9, Working with Styles.
In the Paragraph Styles view, the drop-down menu contains several more filtering options so you can view, for example, only Text Styles, Special Styles, and so on.
Styles can be applied easily using the Styles deck on the Sidebar. In addition, you can apply certain styles using other methods, as explained in this section.
Paragraph styles can be applied in several ways:
Paragraph Styles tab of the Styles deck on the Sidebar
Styles menu on the Menu Bar (limited to common styles)
Context menu (limited)
Set Paragraph Style drop-down list at the left end of the Formatting toolbar and the Formatting (Styles) toolbar
Set Paragraph Style drop-down list at the top of the Properties deck of the Sidebar
Formatting (Styles) toolbar (Figure 5); limited to common styles
Fill Format Mode icon on the Styles deck on the Sidebar
Keyboard shortcuts Ctrl+1 to Ctrl+5 (Heading 1 to Heading 5)
Put the cursor in the paragraph and double-click the name of the style in the Paragraph Styles tab of the Styles deck on the Sidebar. You can select more than one paragraph and apply the same style to all of them at the same time.
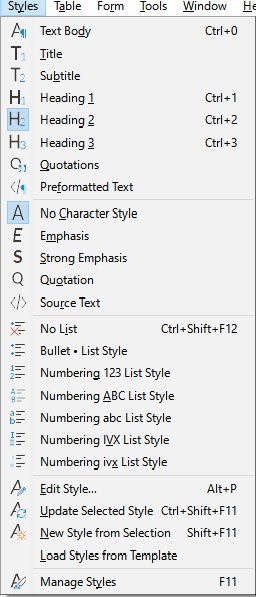
The Styles menu on the Menu bar (Figure 2) provides the most commonly used paragraph, character, and list styles, plus quick links to create, edit, and manage styles. You can add styles to the Styles menu; see Chapter 20, Customizing Writer. To apply a paragraph style, put the cursor in the paragraph and click Styles > [name of paragraph style] on the Menu bar. The other choices on this menu are described later in this chapter.
Figure 2: The Styles menu
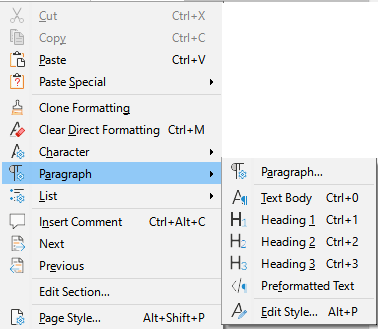
Right-click anywhere in a paragraph to open the context menu. Choose Paragraph. The submenu (Figure 3) includes some commonly used paragraph styles. You can add paragraph styles to this submenu; see Chapter 20, Customizing Writer.
Figure 3: Context menu, Paragraph submenu
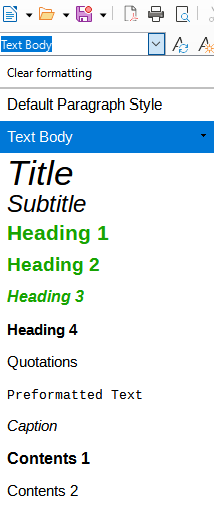
When a paragraph style is in use in a document, the style name appears on the Set Paragraph Style list near the left end of the Formatting toolbar (see Figure 4), the Formatting (Styles) toolbar, and the top of the Properties deck on the Sidebar.
Figure 4: The Set Paragraph Style list on the Formatting bar
To apply a style from this list, put the cursor in the paragraph to change, and then click the arrow to drop down the list of styles and click the desired style; or drop down the list and use the up or down arrow keys to move through the list, then press Enter to apply the highlighted style.
Tip
If the Sidebar Styles deck is not open, you can select Manage Styles at the bottom of the list to open it.
The Formatting (Styles) toolbar (Figure 5) includes common paragraph, character, and list styles. Use View > Toolbars > Formatting (Styles) on the Menu bar to display it.
To apply a paragraph style, put the cursor in the paragraph and click the relevant button on the toolbar. You can add styles to the this toolbar; see Chapter 20, Customizing Writer.
Figure 5: Formatting (Styles) toolbar

You can use Fill Format Mode to apply a style to many areas quickly without having to go back to the Styles deck and double-click each time. This method is useful for formatting scattered paragraphs, words, or other items with the same style, and it may be easier to use than making multiple selections first and then applying a style to all of them.
1) Open the Styles deck on the Sidebar (Figure 1).
2) Select a style to copy, and then click the Fill Format Mode icon at the top right.
3) To apply a paragraph, page, or frame style, hover the mouse over the paragraph, page, or frame and click. To apply a character style, hold down the mouse button while selecting the characters. Clicking on a word applies the character style to that word.
4) Repeat step 3 until you have made all the changes for that style.
5) To quit Fill Format mode, click the icon again or press the Esc key.
Some keyboard shortcuts for applying styles are predefined. For example, Ctrl+0 applies the Text body style, Ctrl+1 applies the Heading 1 style, and Ctrl+2 applies the Heading 2 style. You can modify these shortcuts and create your own; see Chapter 20, Customizing Writer, for instructions.
To apply a character style, select the characters or words and apply the character style from any of the following:
Styles menu on the Menu bar (limited)
Character Styles tab of the Styles deck on the Sidebar
Right-click context menu (limited)
Formatting (Styles) toolbar (Figure 5)
Tip
You may need to remove direct formatting before applying character styles. Select the text, then choose Format > Clear Direct Formatting on the Menu bar, or right-click and choose Clear Direct Formatting from the context menu, or press Ctrl+M.
The Styles menu on the Menu bar (Figure 2) provides the most commonly used paragraph, character, and list styles, plus quick links to create and edit styles. To apply a character style, select the characters and click Styles > [name of character style]. You can add styles to the Styles menu; see Chapter 20, Customizing Writer.
Open the Styles deck and click the Character Styles icon at the top. The list of available character styles is displayed. To apply a character style:
1) Select the text, or put the cursor into a single word, where you wish to apply the style.
2) Double-click the appropriate character style on the Styles deck.
Note
To apply a character style to more than a single word, you need to select all of the text to be changed. To apply the style to a single word, you only have to place the cursor in the word. In contrast, paragraph styles are applied to the whole of the paragraph in which the cursor is placed.
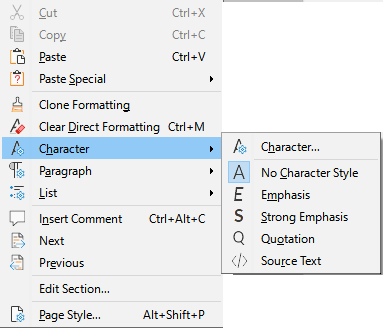
Select the block of text, or put the cursor into the single word, then right-click to open the context menu. Choose Character. The submenu (Figure 6) includes some commonly used character styles. You can add character styles to this submenu; see Chapter 20, Customizing Writer.
Figure 6: Context menu, Character submenu
The Formatting (Styles) toolbar (Figure 5) includes common paragraph, character, and list styles. If it not visible, use View > Toolbars > Formatting (Styles) on the Menu bar to display it.
To apply a character style, select the text or put the cursor in a word and click the relevant icon on the toolbar. You can add styles to the this toolbar; see Chapter 20, Customizing Writer.
To remove the character style formatting from some text, or change the character style to a different style, do this:
1) Select the text.
2) In the Styles deck on the Sidebar, click the Character Styles icon in the top bar.
3) Double-click the required character style, or double-click No Character Style to remove the character style.
When you insert an object (such as a graphic) into a document, it will automatically have an invisible frame around it. Some designers like to add frame styles to introduce variety. For example, you could have one frame style for photographs and a different frame style for other graphics such as line drawings. The one for photographs might have a border with a drop shadow, while the one for drawings might have only a border.
To apply a style to a frame:
1) Select the frame.
2) In the Styles deck on the Sidebar, click the Frame Styles icon in the top bar.
3) Double-click the required frame style.
Having applied a style to a frame, you can now modify the frame to be just how you want it. Most of a frame’s design can be set in a style, but the following options must be set manually:
Anchoring: how the frame is positioned in relation to the rest of the page’s contents (Format > Anchor). See Chapter 11, Images and Graphics, for details on anchoring images, frames, and other objects.
Arrangement: the frame’s position in a stack of objects (Format > Arrange). See Chapter 11, Images and Graphics, for details on arranging images, frames, and other objects.
Adding a hyperlink: so that a click on the frame opens a web page or another document (Insert > Hyperlink).
When a frame is selected, the Frame toolbar replaces the Formatting toolbar, and the context menu has items for anchoring, arrangement, wrap, and alignment.
Put the cursor anywhere on the page. The applied page style is shown on the Status bar.
Figure 7: The current page style is displayed on the status bar

To apply a different page style:
Right-click on the style on the status bar and select a style from the context menu, or
Open the Styles deck on the Sidebar, select the Page Styles icon at the top (fourth icon), and then double-click the desired page style.
Caution
Changing a page style may also cause the style of subsequent pages to change. The results may not be what you want. To change the style of only one page, you may need to insert a manual page break, as described below.
As discussed in Chapter 9, Working with Styles, a correctly set up page style will, in most cases, contain information on what the page style of the next page should be. For example, when you apply a Left Page style to a page, you can indicate in the page style settings that the next page must have a Right Page style; a First Page style could be followed by either a Left Page style or a Default Page Style; or any sequence you prefer.
Another way to change the page style is to insert a manual page break and specify the style of the subsequent page. The idea is simple: you break a sequence of page styles and start a new sequence. To insert a page break, choose Insert > More Breaks > Manual Break. This section illustrates two common scenarios where page breaks are useful.
A possible scenario: You are writing a book that is divided into chapters. Each chapter starts with a page style called First Page. The following pages use the Default Page Style. At the end of each (except the last) chapter, we return to the First Page style for the next chapter.
Figure 8 illustrates the flow of page styles when using page breaks.
Figure 8: Dividing a document into chapters using page styles

At some point, you will want to start a new chapter. Follow these steps:
1) Put the cursor at the end of the chapter, on a blank line (empty paragraph) of its own.
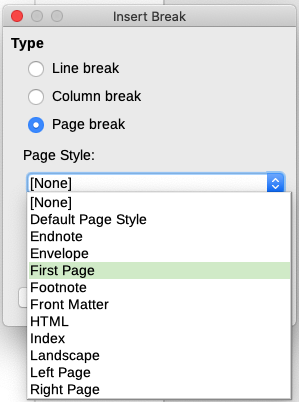
2) Choose Insert > More Breaks > Manual Break. The Insert Break dialog (Figure 9) opens.
3) Under Type, choose Page break and under Style, select First Page.
Figure 9: Choose Page break and select the First Page style
Tip
You can automate these breaks by defining the paragraph style of the chapter’s title (usually Heading 1) to include a page break.
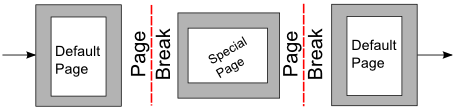
Sometimes you may need to insert a page with special formatting, for example a landscape page or a page with more columns. This can also be done with page breaks. Suppose that the current page has the Default Page Style.
1) Choose Insert > More Breaks > Manual Break.
2) Select the desired page style (say, Special Page) in the Insert Break dialog.
3) Type something on this page. Then insert another page break, selecting Default Page Style again.
This concept is illustrated in Figure 10.
Figure 10: Inserting a page with special formatting
Book chapters typically start on a right-hand page, with the first page of the chapter having a different layout from the rest of the pages. The other pages in the chapter are “mirrored” for double-sided printing. For example, page numbers in the header or footer may be positioned on the outside edge of pages and a wider margin (allowing for binding) provided on the inside edge.
Table 1 shows the properties of two page styles (First Page and Default Page Style) set up for a typical book chapter’s sequence of pages.
Table 1: Properties of customized page styles for a book chapter
|
Page Style |
Desired effect |
Property: setting |
|
First Page |
First page always on the right (an odd-numbered page) |
Page > Page layout > Only right |
|
No header or footer |
Header > Header on: Not selected |
|
|
Top margin of page larger than on other pages |
Page > Margins > Top: 6.00cm |
|
|
Default Page Style |
Mirrored margins |
Page > Page layout: Mirrored |
|
Header with page number on the top outside edge of each page |
Header > Header on: Selected |
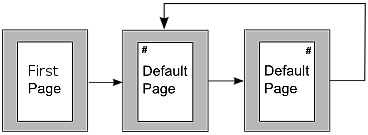
Figure 11 illustrates the transitions from the First Page to Default Page Style, with the change of header between left and right pages shown by the # symbol.
Figure 11: First Page and then the Default Page Style with different headers for alternate pages
Step 1. Set up the First Page style.
1) On the Styles deck, click the Page Styles icon to display a list of page styles.
2) Right-click First Page and select Modify in the context menu.
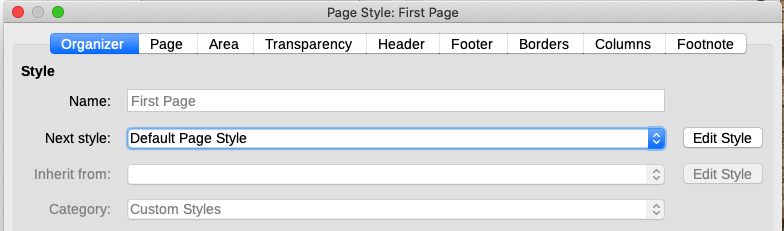
3) On the Organizer tab of the Page Style: First Page dialog, change Next Style to Default Page Style.
Figure 12: Specifying the next style after the first page of a chapter
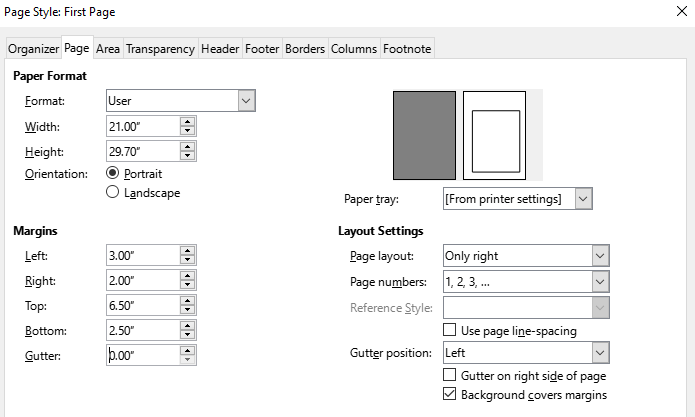
4) On the Page tab, specify either a gutter margin or a larger left margin for binding, and a larger top margin to move the chapter title down the page. See Chapter 9, Working with Styles, for more information about using gutter margins. This example does not use one.
Figure 13: Setting page margins and layout for the First Page style
5) On the Header and Footer tabs, be sure the Header on and Footer on options are not selected. Click OK to save your changes.
Step 2. Set up the Default Page Style.
1) On the Styles deck, in the list of page styles, right-click Default Page Style and select Modify in the context menu.
2) On the Organizer tab of the Page Style: Default Page Style dialog, be sure Next Style is set to Default Page Style.
3) On the Page tab of the Page Style: Default Page Style dialog, select Mirrored for Page layout and set the Inner and Outer margins to the same width as the Left and Right margins, respectively, on the First Page style. If a gutter margin has been set for the First Page style, use the same width for the gutter margin on the Default Page Style.
Figure 14: Setting page margins and layout for the Default Page Style

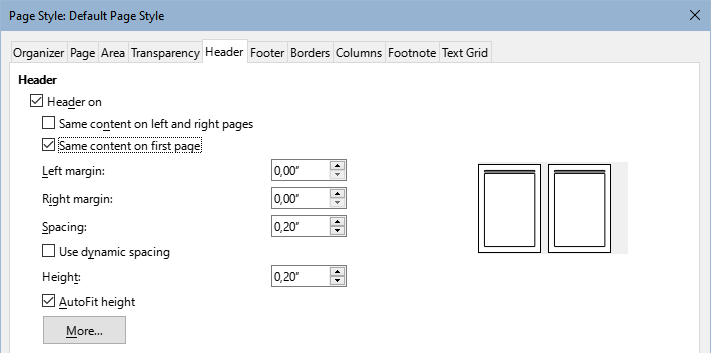
4) On the Header tab of the Page Style: Default Page Style dialog (Figure 15), select Header on and Same content on first page. Deselect Same content on left and right pages. Click OK to save your changes.
Figure 15: Setting up the header properties for the Default Page Style
Step 5. Set up the page numbers in the page headers.
1) Insert two page breaks in the document. You should now have one page with the First Page style, followed by two page of Default Page Style.
2) On the first (left hand) page with Default Page Style, place the cursor in the header and insert a page number field (Insert > Page Number). Keep the paragraph alignment set to left aligned.
3) On the next (right hand) page with Default Page Style, place the cursor in the header and insert a page number field. Change the paragraph alignment to right aligned.
You can delete these blank pages that have been used to configure the headers. The settings will remain in the file.
Step 4. Set up the Heading 1 paragraph style to begin chapters with the First Page style.
1) On the Styles deck, on the Paragraph Styles tab, right-click Heading 1 and select Modify.
2) On the Text Flow tab of the Paragraph Style dialog, in the Breaks section, select Insert, With Page Style, and First Page. Click OK to save your changes.
Figure 16: Setting a paragraph style to start on a page of a selected style
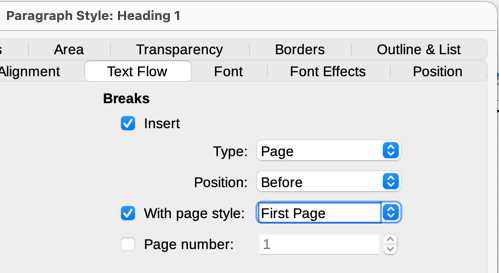
Now when you apply the Heading 1 paragraph style to the paragraph that will be the title of the chapter, it will automatically start on a new page with the First Page style.
Note
By default, the Heading 1 paragraph style is assigned to Outline Level 1. The assignment of paragraph styles to outline levels is done through Tools > Chapter Numbering.
List styles define properties such as indentation, numbering style (for example, 1,2,3; a,b,c; or bullets), and punctuation after the number, but they do not by themselves define properties such as font, borders, text flow, and so on. The latter are properties of paragraph styles.
Although you can apply list styles using the Styles menu or the Styles deck in the Sidebar, those methods are not recommended.
Whenever possible, use paragraph styles for creating bulleted and numbered lists. Writer comes with two sets of paragraph styles for this purpose. It is recommended to use list styles and paragraph styles together in these ways:
Use paragraph styles List 1, List 2, List 3, and so on for creating unordered (bulleted) lists. These styles use Bullet list styles.
Use paragraph styles Numbering 1, Numbering 2, Numbering 3, etc, for creating ordered (numbered) lists. These styles use the list styles called Numbering 1, Numbering 2, etc.
Writer has several predefined list styles, which use different bullet symbols or number sequences (123, abc, ABC, and so on). As with any style, you can redefine the properties of these styles, for example the numbering or bullet symbol and the indentation. You can also define other list styles in these series or create your own series. For more information, see Chapter 9, Working with Styles. Much more information about list styles is in Chapter 12, Lists.
Table styles define properties such as the font, paragraph spacing, number of columns, borders, and background color.
To apply a table style, position the cursor anywhere in the table, go to the Styles deck on the Sidebar, choose Table Styles, then double-click the name of a style on the list.
See Chapter 13, Tables, for information on creating a table style.
Writer provides many predefined styles, which are useful when sharing a document to another machine, especially one with a different language version of LibreOffice, but you may find that they do not fit your preferences. You can modify the predefined styles or build your own library of custom styles to use in addition to or in place of the predefined ones.
Note
New styles you create or changes you make to an existing style are available only within the document they belong to. Styles always stay with a document.
If you want to reuse modified or new styles in other documents, either save the styles in a template (see Chapter 10, Working with Templates) or copy the styles into the other documents, as described in “Load Styles (from a template or document)” below.
Writer provides these methods to modify both predefined and custom (user-created) styles:
Create or update a style from a selection
Load or copy styles from another document or template
Change a style using the Style dialog
Use AutoUpdate (paragraph and frame styles only)
Use AutoFormat (table styles only); see Chapter 13, Tables
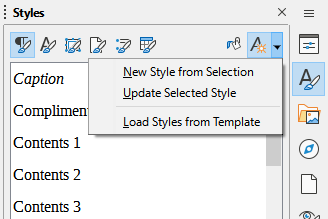
The last icon at the top of the Styles deck, Styles actions, provides three functions: New Style from Selection, Update Selected Style, and Load Styles from Template. These functions are also available from the Styles menu on the Menu bar.
Use New Style from Selection to create a new style from the formatting of an item in the current document. For example, you can change the formatting of a paragraph until it appears as you like, and then you can turn that formatting into a new style. This procedure can save time because you do not have to remember all the formatting settings you want, as is necessary when creating a new style with the Style dialog. In addition, you can immediately see how the item will look when formatted with the style you are creating.
Follow these steps to create a new style from a selection:
1) In the document, change the formatting of the object (paragraph, frame, and so on) to your liking. Select the item you want to save as a style.
2) Open the Styles deck in the Sidebar and choose the category of style to create (paragraph, character, and so on) from the tabs at the top.
3) Click the Styles actions icon, then select New Style from Selection (Figure 17).
Figure 17: Styles Actions menu in Sidebar
4) The New Style from Selection dialog shows the names of any existing custom styles of the selected type. Type a name for the new style and click OK to save it.
Follow these steps to update a paragraph style from a selection:
1) Create a new paragraph (or select an existing paragraph) and edit all the properties you want to alter in the style, such as indentation, font properties, alignment, and others.
Note
Make sure that the properties in this paragraph are uniform. For example, if there are two different font sizes in the paragraph, that property will not be updated.
2) Click anywhere in the paragraph.
3) On the Styles deck of the Sidebar, select the style you want to update (single-click, not double-click) and then click the Styles actions icon and select Update Selected Style.
The procedure to update another category of style (character, page, or frame styles) is the same: select the item in question, modify it, select the style you want to update, and choose Update Selected Style from the Styles actions icon.
The last option under the Styles actions icon is Load Styles from Template, which is used to copy styles into the current document by loading them from a template or another document. Using this method, you can copy all styles, or groups of styles, at one time.
1) Open the document to copy styles into.
2) On the Styles deck, click the Styles actions icon and then Load Styles from Template (Figure 17).
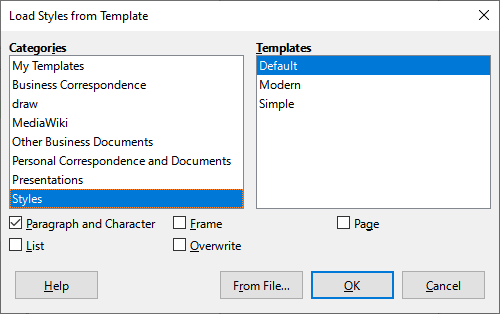
3) On the Load Styles from Template dialog (Figure 18), find and select the template to copy styles from.
4) Select the options for the types of styles to be copied: Paragraph and Character, Frame, Page, or List. If you select Overwrite, the styles being copied will replace any styles of the same names in the target document.
5) Click OK to copy the styles.
Figure 18: Loading styles from a template
If the styles you want are contained in a text document rather than a template:
1) Select the type of styles you want to copy.
2) Click the From File button to open a file browser, where you can select the required document.
3) Click Open to copy the styles to the open document.
Another way to create a new style is to drag-and-drop a text selection into the Styles deck.
1) Open the Styles deck on the Sidebar.
2) Select the style category you are going to create (for example a character style) using one of the icons near the top of the deck.
3) Select the object on which you want to base the style and drag it to the Styles deck. The cursor changes to indicate whether the operation is possible.
4) In the Create Style dialog, type a name for the new style and click OK to save the style.
Note
You cannot use the drag-and-drop method to create a new page style or table style.
To change a style (but not a table style) using the Style dialog, right-click the style in the Styles deck and select Modify in the context menu.
The dialog displayed depends on the type of style selected. Each style’s dialog has several tabs. The properties on these dialogs are described in Chapter 9, Working with Styles.
See Chapter 13, Tables, for information on changing a table style.
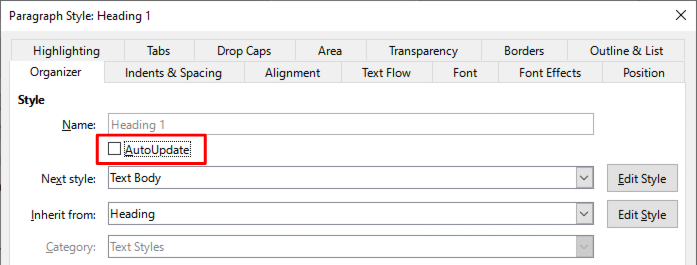
On the Organizer tab of the Paragraph Style and Frame Style dialogs is an AutoUpdate option (marked in Figure 19). If this option is selected, then LibreOffice will apply to the style any modification made manually to a paragraph formatted with that style.
Caution
If you are in the habit of manually overriding styles in your document, be sure that AutoUpdate is not enabled, or you may suddenly find whole sections of your document reformatting unexpectedly.
Figure 19: The Organizer page of the Paragraph Style dialog
It is not possible to delete LibreOffice’s predefined styles from a document or template, even if they are not in use. However, custom styles can be deleted.
To delete any unwanted styles using the Styles deck of the Sidebar, select each one to be deleted (hold Ctrl while selecting multiple styles), and then right-click and select Delete in the context menu. If the style is in use, a message appears warning you that the style is in use and asking you to verify that you really want to delete the style.
If the style is not in use, it is deleted immediately without confirmation.
Note
If you delete a style that is in use, all objects with that style will return to the style it was based on (inherited from) but may retain some of the deleted style’s formatting as manual formatting.
Tip
If an unwanted paragraph style is in use, you can use Find and Replace to replace it with a substitute style before deleting it. See Chapter 3, Working with Text: Advanced, for more information.
This section provides an example of a typical use of custom paragraph styles. We will create a Poem paragraph style and a Poem Header paragraph style, with the following properties:
Poem: Centered, with a font size of 10pt.
Poem Heading: Centered, bold, with a 12pt font size.
In addition, a Poem Heading style is to be followed by a Poem style. In other words, when you press Enter at the end of a paragraph in the Poem Heading paragraph style, the paragraph style for the next paragraph in the document changes to Poem.
Note
You may have noticed this behavior already. After you enter a heading using a Heading paragraph style and press Enter, the next style switches to Text body.
We will use the Default Paragraph Style as a starting point.
1) On the Styles deck, click the Paragraph Styles icon.
2) Right-click Default Paragraph Style and choose New.
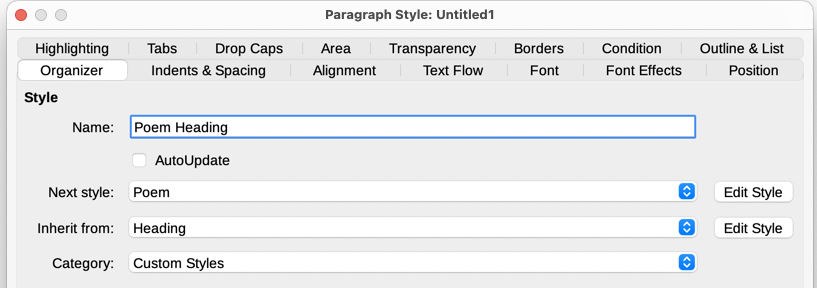
On the Paragraph Style dialog, select the Organizer tab. To create a custom style, you need to configure the top three entries.
|
Style fields |
Description |
|
Name |
The name of the style itself, like Heading 1 or Text body. Type the name Poem. |
|
The style of the paragraph that follows the paragraph that is in the Poem style. When you press Enter while typing text in the Poem style, this style is automatically applied to the new paragraph. Set this value to Poem. |
|
|
Inherit from |
If the properties of the Poem style are inherited from another style, say Default Paragraph Style, then any change in Default will affect Poem. For our example, this is not the behavior we want. Set this entry to – None –. This means that Poem is not inherited from any other style. |
Do not select AutoUpdate. After making these changes, the dialog should look like Figure 20.
Figure 20: Initial configuration for the Poem style. Set the first three entries as shown.

The next step is to configure the alignment and font properties of this style.
On the Alignment page, select the Center option.
On the Font page, select the 12pt font size.
Click OK to save the new Poem style.
To create a new Poem Heading style, use the same procedure as above, with these changes:
Next Style: Select Poem, not Poem Heading. When you press Enter while typing text in the Poem Heading style, the Poem style is automatically applied to the new paragraph.
Inherit from: Heading.
The dialog should look like Figure 21.
Figure 21: Settings for the Poem Heading style
Now choose the settings of the new style:
1) On the Alignment page, select Center.
2) On the Font page, choose a font and select typeface Bold and size 14pt.
3) Click OK to save the new Poem Heading style.
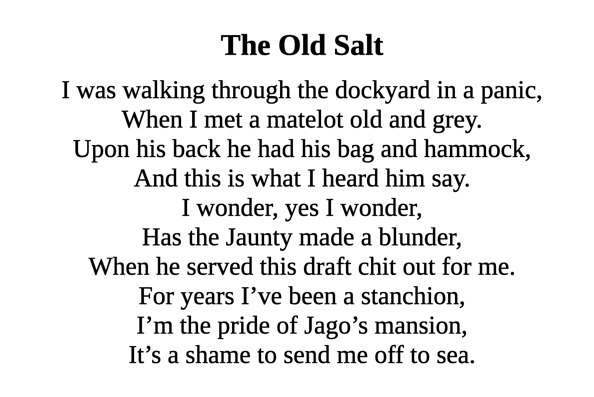
It is a good idea to test out your new styles and see if you are happy with them. Typing a poem using the styles we have just defined should produce the results in Figure 22.
Figure 22: Sample poem
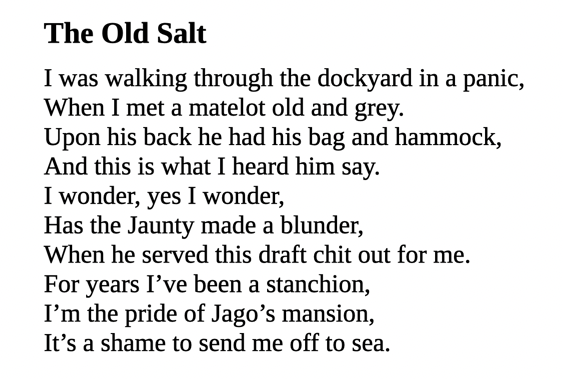
One of the main advantages of styles is that they allow the document formatting to be changed after the content has been written. For example, suppose you have written a 100-page book of poetry and used the style settings described above. Then you (or your publisher) decide you do not like the way the poems look; you prefer them to be left-aligned, not centered.
To change the alignment of the Poem and Poem Heading styles:
1) In the Styles deck, right-click Poem and select Modify.
2) On the Alignment page of the Paragraph Style dialog, select Left.
3) Click OK, and you should see the text change.
4) Repeat these changes for the Poem Heading style.
The poem should now look similar to Figure 23.
Figure 23: Result after changes to the styles
Paragraph styles are the key to Writer’s table of contents feature. Tools > Chapter Numbering defines the hierarchy of headings in a document. The default paragraph styles assigned to heading levels are the heading styles supplied with Writer: Heading 1, Heading 2, and so on. However, you can substitute any styles you wish, including custom (user-defined) styles.
The headings defined using the chapter numbering feature can be used for more than the table of contents (described in Chapter 15, Tables of Contents, Indexes, Bibliographies). For example, fields are commonly used to display section headings in headers and footers of pages (see Chapter 17, Fields).
If you are using the default heading styles for the headings in your outline, and you do not want to use heading numbering, you do not need to do anything on the Chapter Numbering dialog. The default outline numbering scheme uses the default heading styles.
To use custom styles in place of one or more of the default heading styles:
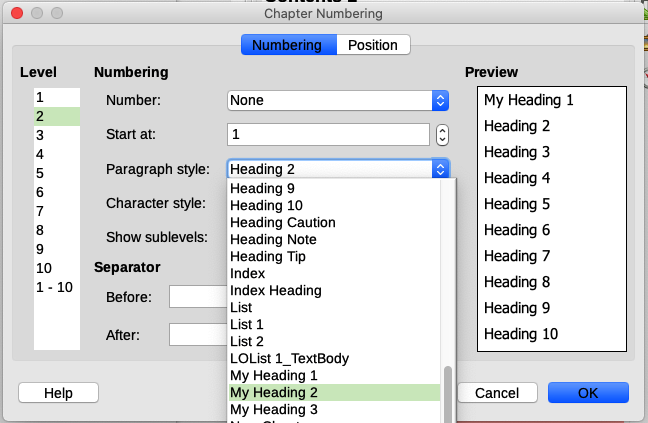
1) Choose Tools > Chapter Numbering to open the Chapter Numbering dialog (Figure 24).
2) On the Numbering tab, click the number in the Level box corresponding to the heading for which you want to change the paragraph style.
3) In the Numbering: Paragraph Style section, choose in the drop-down list the paragraph style you want to assign to that heading level. In this example, you might choose My Heading 1 to replace Heading 1 and for Level 2, My Heading 2 to replace Heading 2.
4) Repeat for each numbering level that you want to change. Click OK when done.
Figure 24: Choosing paragraph styles for numbering levels
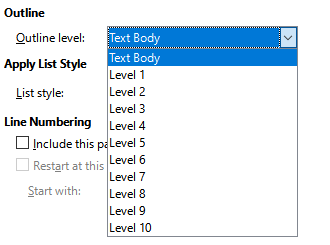
In Writer, you can assign an outline level to any paragraph style. This feature enables you to create a table of contents that includes those headings along with the headings using styles listed in the Chapter Numbering dialog. For example, you might use a different sequence of styles for appendixes, but you want the appendix headings and subheadings to appear in the table of contents at the same levels as the chapter headings and subheadings.
To assign an outline level to a paragraph style, go to the Outline & List tab for the style, and select the required outline level from the drop-down list. Click OK to save this change.
Figure 25: Specifying an outline level for a paragraph style
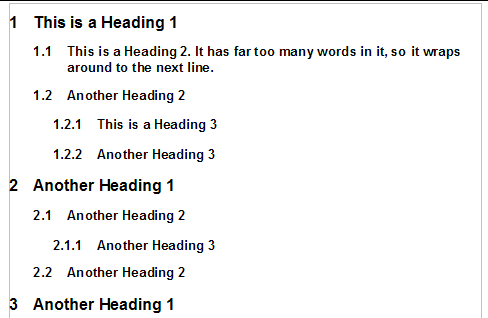
If you want one or more heading levels to be numbered, many choices are available; this example defines a scheme to create headings that look like those in the illustration below.
Figure 26: The numbering scheme to be set up
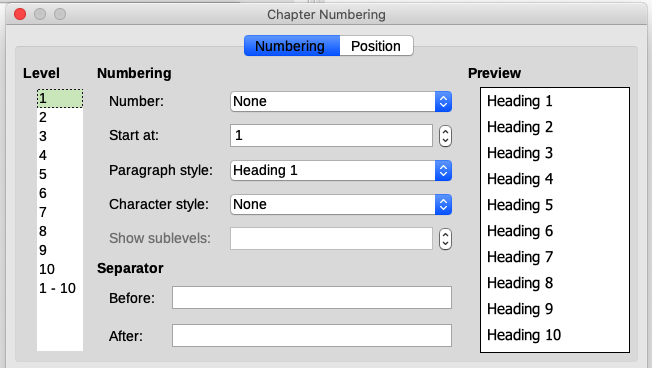
Use the Numbering tab of the Chapter Numbering dialog to define the numbering scheme and its appearance. Figure 27 shows the default settings.
Figure 27: Default settings on the Chapter Numbering dialog
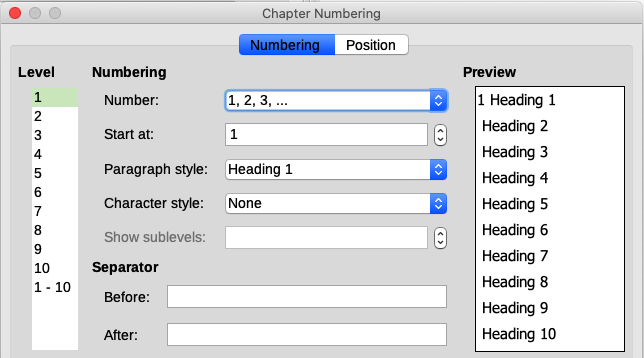
1) In the Level list, choose 1. In the Number list, choose 1, 2, 3, …. The result is shown in the preview box on the right in Figure 28.
Figure 28: Specifying numbering of Level 1 headings
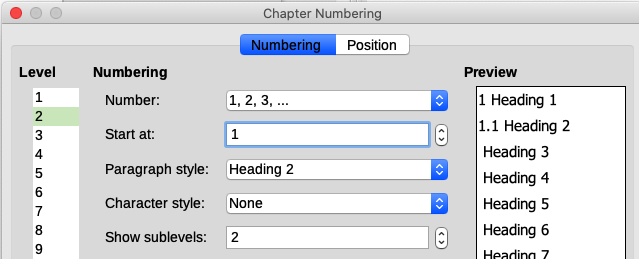
2) In the Level list, choose 2. In the Number list, choose 1, 2, 3, …. The Show sublevels field is now active; it should show 2 (if not, choose 2). The result is shown in Figure 29.
Figure 29: Specifying numbering of Level 2 headings
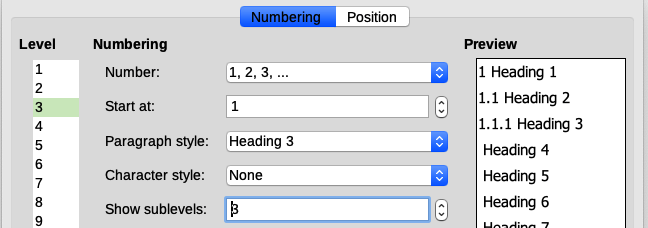
3) In the Level list, choose 3. In the Number list, choose 1, 2, 3, …. The Show sublevels field should show 3 (if not, choose 3). The result is shown in Figure 30.
Figure 30: Specifying numbering of Level 3 headings
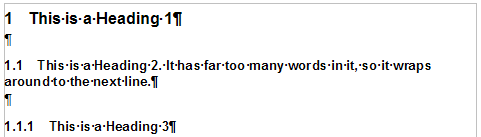
These choices produce the layout shown in Figure 31.
Figure 31: Results of numbering choices for headings
Whether or not the headings are numbered, you may want to change some of their formatting. For example, you may want the second-level and third-level headings to be indented from the margin. For numbered headings, you may also want the second line of long headings to line up with the first word of the heading, not the number. For these changes, use the Position tab of the Chapter Numbering dialog.
As an example, we will change the position and wrapping of a Heading 2:
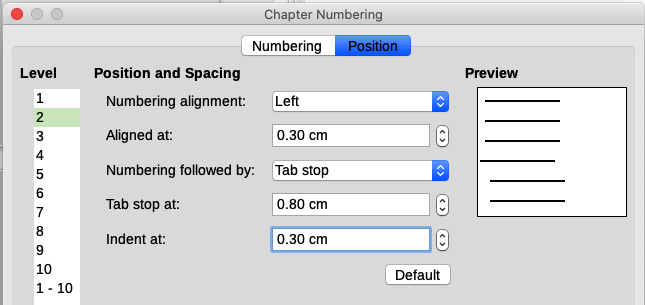
1) In the Level list on the left, choose 2. Change the values for Numbering followed by, Tab stop at and Aligned at, as shown in Figure 32. You may want to use a different value.
Figure 32: Indenting Level 2 headings
This indents the entire heading but does not affect the way long headings wrap around (Figure 33).
Figure 33: Result of changes to indentation of Level 2 headings

2) To change the wrapping behavior of long headings, change Indent at to a larger value, as shown in Figure 34. The result is shown in Figure 35.
Figure 34: Wrapping long headings
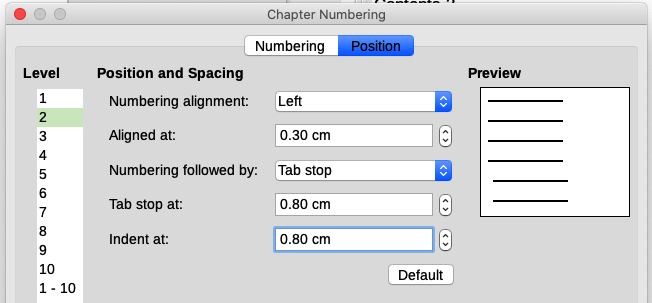
Figure 35: Result of changing Indent at value
