Writer Guide 7.5
Chapter 9,
Working with Styles
This document is Copyright © 2023 by the LibreOffice Documentation Team. Contributors are listed below. You may distribute it and/or modify it under the terms of either the GNU General Public License (https://www.gnu.org/licenses/gpl.html), version 3 or later, or the Creative Commons Attribution License (https://creativecommons.org/licenses/by/4.0/), version 4.0 or later.
All trademarks within this guide belong to their legitimate owners.
|
Jean Hollis Weber |
Antonio Fernández |
Kees Kriek |
|
John A Smith |
Jean Hollis Weber |
Leo Moons |
|
Ron Faile Jr. |
Bruce Byfield |
Gillian Polack |
|
Kees Kriek |
|
|
Please direct any comments or suggestions about this document to the Documentation Team’s forum at https://community.documentfoundation.org/c/documentation/loguides/ (registration is required) or send an email to: loguides@community.documentfoundation.org. Emails sent to the forum are moderated.
Note
Everything you send to a forum, including your email address and any other personal information that is written in the message, is publicly archived and cannot be deleted.
Published February 2023. Based on LibreOffice 7.5.
Some keystrokes and menu items are different on macOS from those used in Windows and Linux. The table below gives some common substitutions for the instructions in this document. For a detailed list, see the application Help.
|
Windows or Linux |
macOS equivalent |
Effect |
|
Tools > Options |
LibreOffice > Preferences |
Access setup options |
|
Right-click |
Control+click or right-click depending on computer setup |
Open a context menu |
|
Ctrl (Control) |
⌘ (Command) |
Used with other keys |
|
Alt |
⌥ (Option) or Alt, depending on keyboard |
Used with other keys |
|
F11 |
⌘+T |
Open Styles deck in Sidebar |
Chapter 8, Introduction to Styles, describes the basics of how to use, apply, and manage styles. This chapter gives a more detailed description of how to create or modify some styles, using the many options available on the various tabs of the Style dialog. It explains how these options affect the appearance of the style and how to use them efficiently.
The Style dialogs share many of the same tabs as the manual formatting dialogs, so this chapter can also help you apply manual formatting (though you do not need that if you use styles).
In addition to using the predefined styles provided by LibreOffice, you can add new custom (user-defined) styles. In Chapter 8, three methods are given for creating a new style: drag-and-drop, the New Style from Selection icon on the Styles deck, and the Style dialog.
The first two of these methods are convenient because you can check the visual effects that the style produces before creating it. However, for full control over the style (and its relationship to other styles), you need to use the Style dialog, as described in this chapter.
Note
Table styles are created in a different way; see Chapter 13, Tables.
Open the Styles deck on the Sidebar. Select the category of style you want to create by clicking on the appropriate icon on the top part of the Styles deck.
Right-click in the window and select New in the context menu. The dialog that is displayed depends on the type of style you selected.
Tip
The dialogs used to create a new style and to modify an existing style are mostly the same, but with one exception: conditional styles have a different dialog. See “Using conditional paragraph styles” below.
The Organizer tab, shown in Figure 1, is common to all style categories (except Table styles), with only small differences between them. Therefore, it is described only once.
Depending on the style you are creating, you will find the following fields on this tab:
Name: present on all the categories. Use this field to name the style you are creating.
AutoUpdate: only present for paragraph and frame styles. If this option is selected, then Writer will apply any manual modification to a paragraph or frame formatted with that style to the style itself.
Caution
If you are in the habit of manually overriding styles in your document, be sure that AutoUpdate is not enabled, or you may suddenly find whole sections of your document reformatted unexpectedly.
Figure 1: The Organizer tab displayed when a new Paragraph style is created
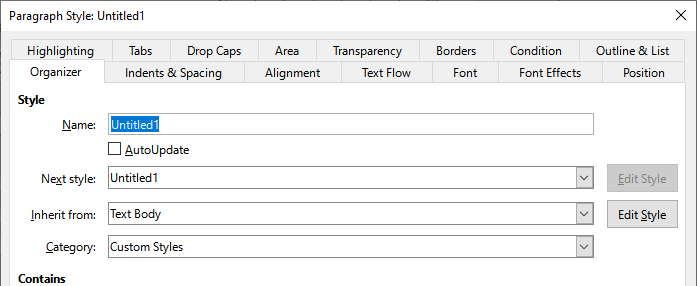
Next Style: only available for paragraph and page styles. Use it to specify which style will be applied to the next element of the same type. For example, a left page style is usually followed by a right page style, a first page style followed by a left page style, a heading followed by a text body, and so on.
Inherit from: available for paragraph, character, and frame styles; it determines the position of the style in the hierarchy. All the starting properties of the new style are inherited (copied) from the style specified here; see below for more information.
Category: available for all styles; use it to associate the new style with one of the categories. You cannot change the category of the predefined styles. Setting this field is useful when filtering the contents of the Styles deck.
Contains: shows a summary of the properties of the style.
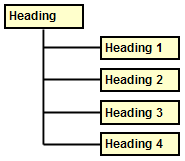
Style inheritanceWhen creating a new paragraph style or a new character style, you can use an existing style as a starting point for its settings. In this sense, LibreOffice links the styles together. When style settings are inherited, a change in the parent style affects every style inherited from it. To see the connections between styles, switch to the Hierarchical view on the Styles deck filter. For example, every Heading style (such as Heading 1, Heading 2) is inherited from a style called Heading. This relationship is illustrated in Figure 2. |
Figure 2: Hierarchical view of inheritance in styles
|
Inheritance is a method to create “families” of styles in which you can change their properties simultaneously. For example, if you decide that all the headings should be green (such as in this guide), you only need to change the font color of the parent style to achieve the desired result. However, changes made to a parameter of the parent style do not override changes previously made to the same parameter in the child styles. For example, if you change the Heading 2 font color to green, a change of the font color of the Heading style (the parent style) to red will not affect the Heading 2 font color.
You can easily check which properties are specific to a style by looking at the Contains section of the Organizer tab. If you want to reset the properties of a child style to that of the parent style, click the Reset to Parent button located at the bottom of each Paragraph and Character style dialog.
Suppose that you want to change the font of not only Heading 1 or Heading 2, but all headings.
1) Open the Styles deck, select the Paragraph Styles category, right-click Heading, then select Modify to open the Paragraph Style dialog for the Heading style.
2) Select the Font tab, then select a font and click OK. Now the fonts of all the heading styles (Heading 1 through Heading 10) are changed in a single operation.
Figure 3: Select the Heading font
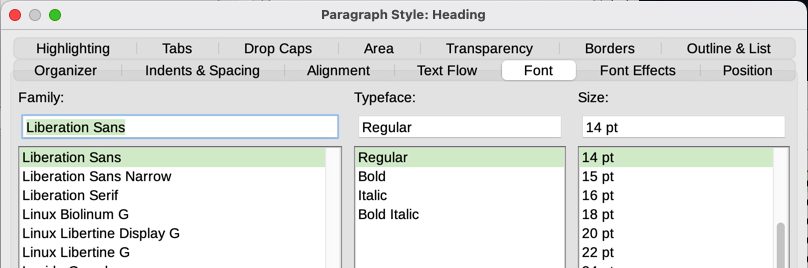
Although this section describes most of the parameters scattered over the tabbed pages shown in Figure 3, you do not need to configure them all. In most cases, you need to modify only a few attributes, particularly if you link styles or base the new style on a similar one.
On the Indents & Spacing tab (Figure 4), you can set up the indentation of the paragraph and the spacing between lines and between one paragraph and the paragraphs above and below.
Figure 4: Settings on the Indents and Spacing tab of a paragraph style dialog
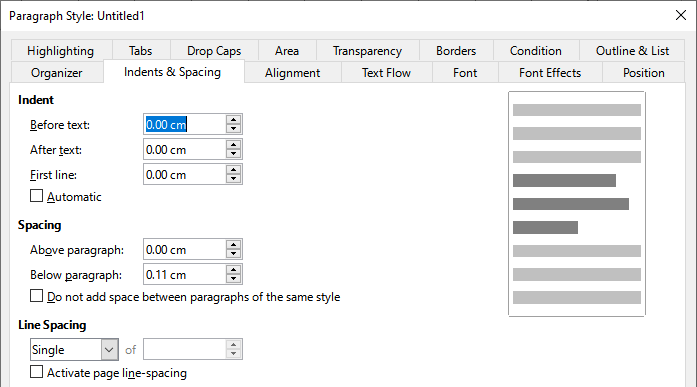
Use the Indent section of the tab to set up the indentation, using these parameters:
Before text: controls the space in the selected unit of measurement between the left margin of the page and the leftmost part of the paragraph area. Entering a negative value results in the text starting on the left of the margin. This may be useful in situations where your left margin is quite wide, but you want the headings to be centered in the page.
After text: controls the space in the selected unit of measurement between the right margin of the page and the rightmost part of the paragraph area. Entering a negative value results in the text extending into the right margin of the page.
First line: enter the offset in this box (either positive or negative) of the first line of the paragraph relative to the paragraph area. A positive value increases the indentation of the first line, while a negative value makes the first line start to the left of the paragraph area.
Automatic: select this box to allow Writer to automatically control the indentation of the first line. The value is calculated by Writer on the basis of the font size and other parameters.
Use the Spacing section of the tab to determine the amount of vertical space above and below the paragraph. It is customary to include some “space above” in heading styles so that they are separated from the text body of the previous section without the need to insert empty paragraphs. Spacing between paragraphs is also normal in certain types of documents. The body text style of this guide is configured to leave some space between consecutive paragraphs. You can select the option to remove space between paragraphs of the same style.
Note
An option in Tools > Options > LibreOffice Writer > Compatibility controls whether space above and space below are added together (the default) or if the larger space is the only one that applies. See Chapter 20, Customizing Writer, for more information.
The spacing between paragraphs does not affect the spacing between lines within a paragraph, which is controlled in the Line spacing section. You can select one of the following values:
Single: the default setting—applies a single line spacing to the paragraph. This is calculated automatically based on the font size.
1.15 lines: sets the line spacing to 1.15 lines. This small increase often improves the appearance of text without using a lot of vertical space.
1.5 lines: sets the line spacing to 1.5 lines.
Double: sets the line spacing to 2 lines.
Proportional: activates the edit box next to the drop-down list where you can enter a percentage value. 100% means a single line spacing, 200% double line spacing, and so on.
At least: this choice activates the edit box next to the drop-down list, where you can enter the minimum value (in your selected unit of measurement) to be used for the line spacing.
Leading: if this is selected, you can control the height of the vertical space between the base lines of two successive lines of text, by entering a value, which is summed with the value of single line spacing, into the edit box.
Fixed: this choice activates the edit box next to the drop-down list, where you can enter the exact value of the line spacing.
Tip
When using different font sizes in the same paragraph, the line spacing may be uneven. To obtain evenly spaced lines, select Fixed or At least in the drop-down list and a value that is large enough to create a spacing between the lines sufficient to account for the largest font size used.
The last option on this tab is Activate page line-spacing. It works with the Use page line-spacing option for a page style (see page below). See the Help and Chapter 6, Formatting Pages: Advanced, for more information on the use of these options.
Use the Alignment tab to modify the horizontal alignment of the text, choosing between Left, Right, Center, and Justified. The results of the selection are shown in a preview window on the right-hand side of the tab.
When selecting Justified alignment, you can also decide how Writer should treat the last line of the paragraph. By default, Writer aligns the last line to the left (Start), but you can choose to align it to the center or to justify it (meaning that the words on the last line will be spaced in order to occupy it fully). If you have selected to justify the last line and select the Expand single word option, then when the last line of a justified paragraph consists of a single word, this word is stretched by inserting spaces between characters so that it occupies the full length of the line.
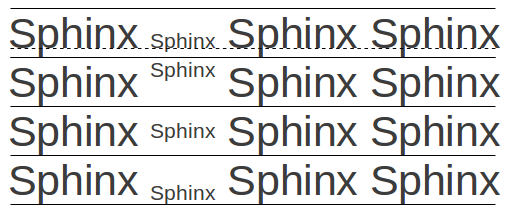
The Alignment tab is also used to control the Text to Text vertical alignment, useful when you have mixed font sizes on the same row. Choose the element of the fonts on the line that will be aligned between Automatic, Base line, Top, Middle, Bottom. Refer to Figure 5 for a visual representation of these reference points.
Figure 5: Text to text vertical alignment: Base line, Top, Middle, Bottom
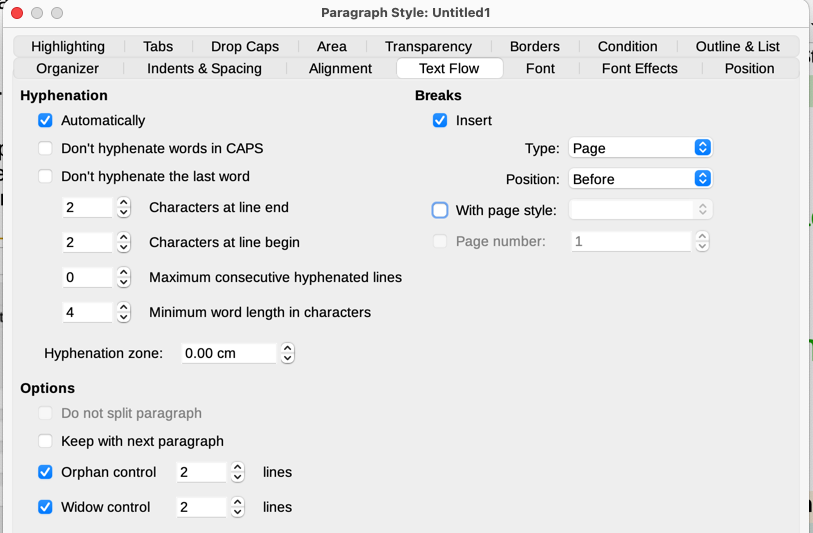
The Text Flow tab (Figure 6) has three parts: Hyphenation, Breaks, and Options.
When Automatically is selected under Hyphenation, these options are available:
Don't hyphenate words in CAPS
Don't hyphenate the last word
Characters at line end
Characters at line begin
Maximum consecutive hyphenated lines
Minimum word length in characters
Hyphenation zone
Figure 6: The Text Flow tab of the Paragraph Style dialog
In the Breaks section, you can require a paragraph to start on a new page or column and specify the position of the break, the style of the new page, and the page number. A typical use for this option is to start the first page of a new chapter on a new (usually right-hand) page.
To always start a new page with a particular style, choose the following settings:
In the Breaks section, select Insert. Make sure that Type is set to Page and Position is set to Before.
Select With Page Style and choose the page style from the list.
To continue page numbering from the previous chapter, do not select the Page number option. To restart each chapter’s page numbering at 1 (a style used in some technical documents), select Page number and set it to 1.
Note
If you want the first page of a new chapter to always start on a right-hand page, make sure that the page style for the first chapter page is set for the right page only by making this selection in the Layout settings field on the Page tab of the Page Style dialog (see Figure 17 below).
The Options section of the Text Flow tab provides settings to control what happens when a paragraph does not fit on the bottom of a page:
Do not split paragraph: If a paragraph does not fit on the bottom of one page, the entire paragraph moves to the top of the next page. This could cause a large blank space at the bottom on the page.
Keep with next paragraph: Use for headings or the lead-in sentence to a list, to ensure that it is not the last paragraph on a page.
Orphan control and Widow control: Widows and orphans are typographic terms. An orphan is the first line of a paragraph alone at the bottom of a page or column. A widow is the last line of a paragraph that appears alone at the top of the next page or column. Use these options to allow paragraphs to split across pages or columns but require at least two or more lines to remain together at the bottom or top of a page or column. You can specify how many lines must remain together.
Three tabs of the Paragraph Style dialog are dedicated to settings controlling the appearance of the typeface: the Font, Font Effects, and Position tabs. The first two tabs are straightforward. Many of the options are the same as those used when creating a character style, as discussed below. Options that can be used when creating a paragraph style are described here.
Tip
On the Font tab, in the lower right, is a Features button. The configurable features available in the dialog that opens depend on the selected font and are not described here. They may include, for example, discretionary ligatures and horizontal kerning.
You can specify a fixed font size (in points or other measurement units). In addition, if you are creating a style based on another style (linked style), you can specify a font size relative to that other style either as a percentage or as a plus or minus point value (–2pt or +5pt). Relative font sizes are commonly used for Web pages.
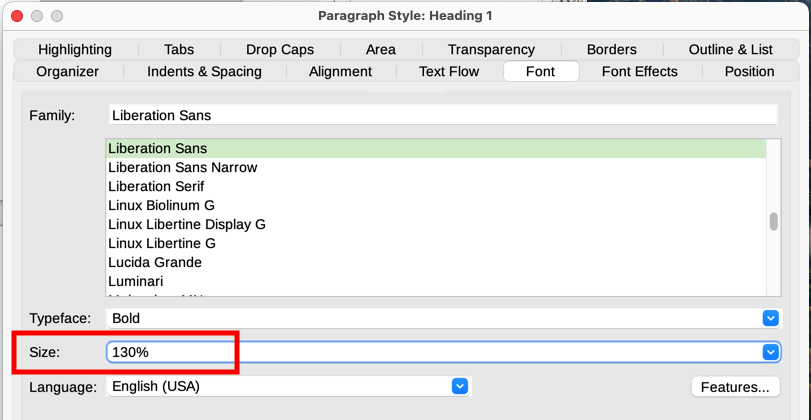
For example, the Heading 1 paragraph style is based on the Heading style. If the font size of the Heading style is 14pt, and the font size of the Heading 1 style is specified as 130%, the resultant font size of text in a paragraph formatted with the Heading 1 style is 14pt times 130% = 18.2pt.
To specify a percentage font size: in the Paragraph Style dialog, select the Font tab. In the Size box, enter the percentage amount followed by the symbol % (Figure 7). Similarly, you can enter a plus or minus sign followed by the number of points to be added to or subtracted from the base font size.
To change from a relative font size back to an absolute font size, enter the desired font size in a specific measurement, such as points (pt).
Figure 7: Selecting a type size based on a percentage
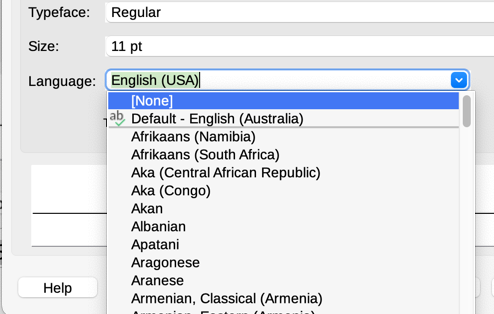
The language selected for a document (on Tools > Options > Language Settings > Languages) determines the dictionary used for spelling, thesaurus, hyphenation, the decimal and thousands delimiter used, and the default currency format. You can only use a language whose dictionary is installed.
Within the document, you can apply a separate language to any paragraph style. This setting has priority over the language of the whole document.
On the Font tab of the Paragraph Style dialog, languages with installed dictionaries are marked in the Language list by a small icon (Figure 8). When checking spelling, Writer will use the correct dictionary for paragraphs with this style.
If you write documents in multiple languages, you can use the linked styles to create two paragraph styles that differ only in the language option. If you then want to change some of the other properties of the paragraph style, all you need do is to change the parent style.
To insert occasional words in a different language and avoid their being picked by mistake with the spelling checker, it is more convenient to use a character style, as discussed in “Creating a new character style” below.
Figure 8: Selecting a language for a paragraph style
Tip
The selection [None] for Language is useful when a paragraph includes text you don’t want checked, like URLs and programming code.
The Position tab of the Paragraph Style dialog collects all the options that affect the position of the text on the screen or printed page.
Figure 9: The Position tab of the Paragraph Style dialog
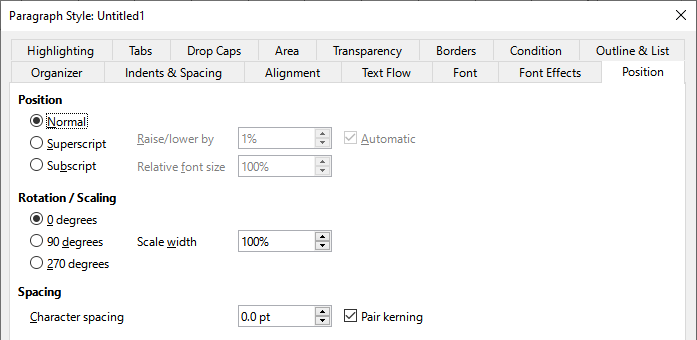
Use the Position section to control the appearance of superscripts and subscripts (characters above or below the normal line of type, as in H2O or M2). However, you will normally apply superscript and subscripts to groups of characters rather than to entire paragraphs. Therefore, it is strongly recommended to change these parameters only when defining a character style and, instead, leave the default settings for the paragraph styles.
The second section of the Position tab controls the rotation of the paragraph area. One common use for rotated paragraphs is to fit headings above narrow table columns (Figure 10). Another use is to create portrait headers and footers on landscape pages; see Chapter 6, Formatting Pages: Advanced, for details.
Figure 10: A table with rotated headings

The Scale width box controls the percentage of the font width by which to compress or stretch the rotated text horizontally; that is, from the first character to the last.
Tip
Rotated table headings are usually more readable if they are angled, not vertical. To produce angled text, you need to create a text object from the Drawing toolbar and rotate it to any angle you wish. See Chapter 11, Images and Graphics.
As an example, we will apply rotated table headings to a pre-existing table.
1) Create a new paragraph style. Name it Table Heading Rotated.
2) On the Position tab of the Paragraph Style dialog, in the Rotation / scaling section, select 90 degrees. Click OK to save the new style.
3) Select the heading row of the table and apply the new style. Any text in the cells of the heading row is now rotated.
4) If the headings are aligned to the top of the cells, you may want to change the alignment to the bottom of the cells, as shown in Figure 10. To do this, click the Bottom icon on the Table toolbar or select Format > Alignment > Bottom on the Menu bar.
Use the Spacing section of the Position tab to control the spacing between individual characters in the paragraph. When selecting an option other than default in the drop-down menu, use the edit box to enter the value in points by which you want to expand or condense the text.
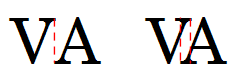
The Pair kerning option (selected by default) increases or decreases the amount of space between certain pairs of letters to improve the overall appearance of the text (Figure 11). Kerning automatically adjusts the character spacing for specific letter combinations. Kerning is only available for certain font types and, for printed documents, only works if your printer supports it.
Figure 11: Kerning disabled (left) and enabled (right)
Although borderless tables are generally considered a much better solution to space out material across a page, in some situations tabs are sufficient to do what you need, with the added advantages of being simpler to manage and quicker to apply.
Caution
If you need to use tabs, and you will be sending a document to other people, do not use the default tab stops. If the recipients of the document have defined default tab stops that are not the same as the ones you are using, the paragraph may look very different on their machines. Instead, define the tab stops explicitly in the paragraph or the paragraph style; then you can be sure that everyone will see the same layout.
To define tab stops in your paragraph style, use the Tabs page, shown in Figure 12. Here you can choose the type of tab: Left, Right, Centered, or Decimal; the character to be used as a decimal point; and the Fill Character—the characters that appear between the end of the text before the tab and the beginning of the text after the tab.
You can also create a custom fill character by entering it in the corresponding box. A common use of a fill character is adding dots between a heading and a page number in a table of contents or an underscore character when creating a form to fill in.
Figure 12: Specifying tab stops for a paragraph style
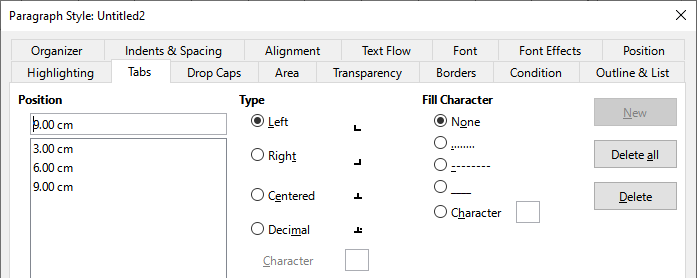
To create a new tab stop, specify its position relative to the left margin, the type of tab, and the fill character and click the New button. The new tab stop is then listed in the Position box on the left. To modify the position of a tab stop, create a new one in the desired position and delete the old one using the buttons on the right-hand side of the page.
It is not possible to define tabs that exceed the page margin. In the rare cases where that may be needed, use a borderless table instead.
Use the Outline & List tab to assign an outline level to any paragraph style, as described in Chapter 8, Introduction to Styles. This feature enables you to create a table of contents that includes those paragraphs along with the headings using styles listed in Tools > Chapter Numbering.
You can also use this tab to associate a paragraph style with a list style. Refer to Chapter 12, Lists, for additional information and an example.
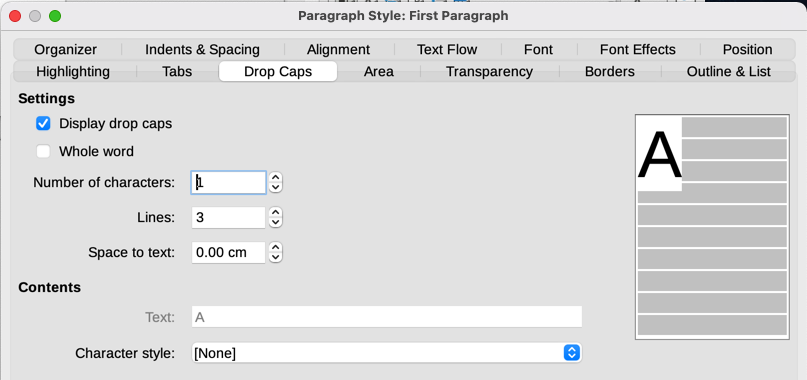
Drop caps (one or more characters in a larger font at the beginning of a paragraph) are generally suitable only for a first paragraph style. You can predefine the properties in the Drop Caps tab of the Paragraph Style dialog. Select the Display drop caps option to enable the other choices: the number of lines occupied, the number of characters to enlarge (if you want the whole first word, check the corresponding box), and the space between the drop caps and the text.
Drop caps use the same font and have the same properties as the rest of the paragraph; however, you can easily modify their appearance by creating a specific character style and using it. For example, you may want the drop caps to be of a different color or apply an outline effect. Select the character style you want to use in the corresponding drop-down menu.
Figure 13: Options for adding a drop cap to the paragraph style
Adding a background color, gradient, pattern, hatching, or image to a paragraph is an alternative to using a frame. You can customize the background using the Area tab of the Paragraph Style dialog. The choices are described in Chapter 6, Formatting Pages: Advanced.
Figure 14: Types of fill for paragraph backgrounds

You may want to consider the following points when working with the Area tab:
If you do not find the desired color in the list of predefined ones, you can define your own as described in Chapter 20, Customizing Writer.
You can select different backgrounds for the paragraph area and for the text in the paragraph. Use the Highlighting tab for the text. Figure 15 shows the difference.
The area treatment is applied only to the paragraph area. If you have defined an indented paragraph, the space between the paragraph and the margin does not have the paragraph’s background color.
Figure 15: Different Area and Highlighting colors

On the Transparency tab, you can choose the transparency options for the selected background. Values range from 0% (fully opaque) to +100% (fully transparent).
Borders are often used to set off paragraphs from the text without using a frame, or to separate header and footer areas from the main text area (such as in this guide), and to provide decorative elements in some heading styles. Consider the following points:
Watch out for the effects that the spacing between borders and paragraph area produces on indentations and tabulations.
If you want the border to be drawn around multiple paragraphs, leave the Merge with next paragraph option at the bottom of the page selected.
Often, white space can have the same effect.
See Chapter 4, Formatting Text, for more about the Borders tab.
Making a paragraph style conditional means it changes its formatting depending on where it is used. For example, you may want the style MyTextBody to be black by default but turn white when inside a frame with a blue background.
Probably the most common use for conditional formatting is with single-style outlining. Single-style outlining is a type of outline numbering designed with a Numbering List Style. Instead of using different styles for the various outline levels, it changes the number formatting when you press the Tab key to create a subordinate heading.
The only trouble with single-style outlining is that all levels look the same. This is where a conditional paragraph style comes in handy. Assign the paragraph style to an outline style in the Outline & List tab and then open the Condition tab. There, you can assign the levels of the outline style to other paragraph styles. Then, when you press the Tab key while using the paragraph style, each level of the outline takes on different formatting, making single-style outlining even more convenient than it is on its own.
When you create a conditional style, you are saying “in this condition make this style look like that other style”. For example, “When typing into a footer, make this style look like the my_footer paragraph style; when typing into a table, make this style look like the table_text paragraph style”.
In addition to setting the normal (unconditional) properties of the style, you need to define which other style it will look like in different situations. To do this, use the Condition tab.
Note
Predefined styles (other than Text body) such as Default, Heading 1, and Heading 2 cannot be set to be conditional.
Caution
If you want to create a new style and make it conditional, you have to do it while the Paragraph Style dialog is still open for the first time. After the dialog closes, the Condition tab no longer appears in the dialog when it is reopened.
Figure 16: Condition tab for paragraph styles

To set up a conditional paragraph style:
1) Define a new paragraph style.
2) Select all the paragraph properties for the style. Do not click OK!
3) Click the Condition tab.
4) Select the first condition in the Context list (left side of the dialog) and select the style you want for this condition in the Paragraph Styles list on the right-hand side.
5) Click Apply. The name of the paragraph style appears in the middle list.
6) Repeat steps and for each condition you want to have linked to a different style.
7) Click OK.
When the style is selected, you will see that the formatting of your text depends on the context.
Character styles over-ride the formatting in a paragraph style. They are applied to groups of characters, such as words or phrases, rather than whole paragraphs. They are mainly used when you want to change the appearance or attributes of parts of a paragraph without affecting other parts. Examples of effects that can be obtained by means of character styles are bold or italic typeface or colored words.
Other ways of using character styles are described elsewhere in this book. These uses include making chapter numbers, page numbers, or list numbers larger than the surrounding text and formatting hyperlinks. When you do not want some words (for example, names, or words in a different language) to be detected as spelling mistakes, you can define the language (if any) to be applied in the character style’s properties.
The tabs of the Character Styles dialog are similar to those for paragraph styles:
Use the Organizer tab to name the new character style and set up its hierarchical level (if needed).
Use the Font tab to choose the font, style, and size for the new character style. You can specify the font size as a percentage or a point increase or decease in the size of the font in the paragraph where the character style is applied. You can also specify the language of the text to which the character style is applied, so you can insert words in a different language and have their spelling checked using the correct dictionary.
Use the Font Effects tab to set up attributes such as font color, underlining, relief, or other effects. If you frequently use hidden text, for example, it may be convenient to define a character style where the Hidden option is marked. Relief effects may be appropriate for a drop cap or to give more emphasis to the chapter number or other parts of the title.
Use the Highlighting tab to apply a colored background to the text. This yields the same effect as using the Highlight Color tool on the Standard toolbar.
Use the Borders tab to apply a border and a shadow to the text, if so desired.
Use the Position tab to create a subscript or superscript in case you are not satisfied with the default ones or even a sub-subscript which may be useful for certain scientific publications. In the same tab, you can create rotated, condensed, or expanded text.
Note
When rotating a group of characters, you also need to specify whether the rotated text should fit in the line or if, instead, it is allowed to expand above and below the line. This property is active only for character styles.
Frames are often used as containers for text or graphics. To provide consistency in the appearance of frames used for similar purposes, it is a good idea to define styles for frames. For example, you might want photographs to be enclosed in a frame with a drop-shadowed border, line drawings in a frame with a plain border, marginal notes in a frame without a border but with a shaded background, and so on.
Writer provides several predefined frame styles (see Table 1), which you can modify as needed, and you can define new frame styles. The technique for defining and applying frame styles is similar to that for other styles.
Tip
There is considerable overlap between the uses of frames and sections for some page layout purposes. You may find Chapter 6, Formatting Pages: Advanced, useful for information about the use of frames and sections.
Table 1: Predefined frame styles and their uses
|
Style |
Comments and Use |
|
Formula |
The frame style used for formulas. The default includes AutoSize, which adjusts the size of the frame to the formula. |
|
Frame |
The default frame style. |
|
Graphics |
The default frame style for graphics. The defaults include AutoSize to fit the graphic, no text wrap, and a thin border around the frame. |
|
Labels |
The default frame style for use with File > New > Labels. It seems to be used by LibreOffice automatically and is not intended for users. |
|
Marginalia |
A frame style for placing a frame beside the left margin. This style is intended for comments added in the margin of text. The style also is useful for creating sideheads—headings against the left margin, which often are used in technical documentation. An example is given in Chapter 8, Introduction to Styles. |
|
OLE |
The default frame style for OLE objects and floating frames. The default places the frame at the top and center of a body of text. |
|
Watermark |
The default frame style for a watermark, a graphic placed as the background to a body of text. The default is a Through wrap, with text passing over the frame and anything in it. The graphic should be faint enough that text still is readable over top of it. |
When an object is added to Writer, it is automatically enclosed in a frame of a predetermined type. The frame sets how the object is placed on the page, as well as how it interacts with other elements in the document. You can edit the frame by modifying the frame style it uses or by using a manual override when a frame is added to the document.
Because frames and objects are used together, it is sometimes easy to forget they are separate elements. In some cases, such as charts, you can edit the frame and object separately.
Unlike other elements that use styles, frames can be defined only partly by their style because their use can vary so much. Several elements of frames, such as the anchor and protected elements, need to be defined manually for individual frames.
To format a frame manually, select Insert > Frame on the Menu bar. The dialog that opens contains all the settings available when frame styles are set up, as well as some that are only available when the frame is inserted.
If you are using a mix of graphics, you may want to define two related styles, one with a border for graphics with white backgrounds and one without a border for all other backgrounds. You also may want to design one or more frames for text only.
Otherwise, the default frame styles (listed in Table 1) cover most users’ needs. The only significant addition that you might need is one or more styles for text frames.
You can access frame settings by selecting New or Modify in the Styles deck for a frame style.
Type tab: sets the size and position of the frame. One of the most useful options here is AutoSize, which automatically adjusts the frame to the object it contains. If the frame style is used automatically, then this option should be selected.
Options tab: sets whether the contents of the frame are printed and able to be edited in a read-only document. This tab also sets the text direction, which is useful if you are using the frame for contents in a language that uses right-to-left text direction.
Wrap tab: sets how text is positioned in relation to the frame and how close text comes to a frame. If you want the frame contents to stand out from the paragraphs around it, set the wrap to Wrap Off. This probably is the single most important tab for frames.
Area tab: sets the background color, bitmap, hatching, gradient, or pattern. This tab is useful mostly for text frames in complex page layouts, in which a text frame has an appearance different from the general background of the page.
Transparency tab: sets the transparency options for the selected background. Values can range from 0% (fully opaque) to +100% (fully transparent).
Borders tab: sets the attribute for a line around the frame, if any.
Columns tab: this tab can be ignored unless the frame is being used for text. The options are the same as those used to set up a page style, as described in Chapter 6, Formatting Pages: Advanced.
Macro tab: sets a macro to use with the frame in order to trigger an action when the user interacts with the frame. These options are useful for on-line Writer or HTML documents.
Page styles control page properties (margins, page size, header and footer, among others). However, unlike paragraphs, characters, and frames, pages can not have directly applied properties. If you change the properties of a page, you are actually changing the underlying page style, so those changes are applied to all pages that use that page style. To change the properties of individual pages, you need to create a new page style.
To create a new page style, open the Styles deck and click the Page Styles icon. Right-click anywhere in the window and select New. The Page Style dialog contains nine tabs.
The Organizer tab is described above.
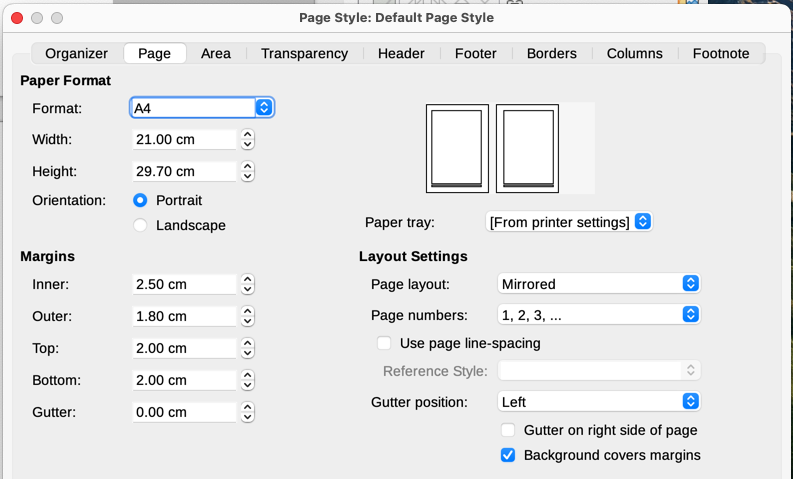
The Page tab of the Page Style dialog is where you can control the general settings of the page. The tab consists of three sections, plus a preview area in the top right.
In the Paper Format section, you can specify the size of the paper, choosing from one of the many predefined formats, or select User to define your own paper size using the Width and Height fields. Select the orientation of the paper: Portrait or Landscape. If your printer has more than one tray, you can specify the tray from which to print pages in the new page style.
In the Margins section, specify the size of the margins in your preferred unit of measurement. If you select Mirrored for Page layout in the Layout settings section, then the names of the margins change from Left and Right to Inner and Outer.
The Gutter margin is the extra space to leave between the left (or inner) edge of the page and the left (or inner) margin, to allow for binding of a book. (Alternatively, you can leave the Gutter set to zero and add the gutter margin amount to the left or inner margin value.) See also the Gutter position setting, which can be Left (the default) or Top.
Figure 17: Page tab of Page Style dialog
In the Layout Settings section, choose the desired Page layout in the drop-down list. Decide whether the page style being defined applies to both left and right pages (default), mirrored pages, or right or left pages only. Some considerations:
If you plan to bind the printed pages using this style like a book, select a mirrored layout.
A common practice in page layouts is to have asymmetrical page margins—both for left and right margins and for top and bottom margins. The most common scheme follows these two general rules for printed page layouts: (a) The outer margin (right margin on a right-hand page) would be wider than the inner margin (left margin on a right-hand page); (b) The bottom margin would be larger than the top margin.
If you want the first page of a new chapter to always start on a right page, make sure that the page style for the first chapter page is set for the right page only in the Layout settings field. The typical procedure for the rest of a chapter is to define a single “mirrored” page style (perhaps, Default Page Style) for both left and right pages. A mirrored page can have different headers and footers. If done this way, every chapter will use two page styles.
You can choose to define separate page styles for left and right pages, if you want the pages to be very different in appearance (for example, different margins or columns; imagine a book with a full-page photograph on the left pages and two columns of text on the right pages). In that case, make sure that the Next Style field for the first page style is set for a left-only page, which, in turn, is set to be followed by a right-only page style. If done this way, every chapter will use three page styles. A hypothetical case might have these page style names: First Page, Left Page, and Right Page.
Use the Page numbers drop-down list to specify the page numbering style to apply to this page style.
The Use page line-spacing option works with the Activate page line-spacing option for paragraphs and paragraph styles (see page above). See the Help and Chapter 6, Formatting Pages: Advanced, for more information on the use of these options.
By default, page backgrounds (colors, images, and so on) fill the entire page, including the area in the margins. If you want the background to fill only the text area, but not the margin area, then deselect the Background covers margins option in the lower right of the dialog.
The Area and Border tabs are described in detail in Chapter 6, Formatting Pages: Advanced. Use the Area tab to apply a background (covers the entire page, including the margins) or the Border tab to draw a border around the text area of the page (inside the margins). You can also add a shadow to the text area.
You can associate a different header or footer with each page style. This property makes it easy to have different headers on left and right pages, to avoid headers on pages at the start of a new chapter, and so on. You can also have a different header or footer on the same page style where it is used for the first page of a document.
If you choose a Mirrored or Right and Left page layout on the Page tab, you can specify a different header for left or right pages even if you use a single style for both. This option is not available on the predefined Left Page and Right Page page styles or on any other page style defined to be a left or right page only.
The Header and Footer tabs are described in detail in Chapter 5, Formatting Pages: Basics.
Figure 18: Different content on left and right pages

Use the Columns tab to create the column layout for the page style. It has three sections: Settings, Width and Spacing, and Separator Line. Choose the desired number of columns. If you select more than one column, the Width and Spacing section and the Separator LIne section become active. You can use the predefined settings (equally spaced columns) or deselect the AutoWidth option and enter the parameters manually. When you work with multiple columns per page, you can also fine tune the position and size of a separator line between the columns.
Use the Footnote tab to adjust the appearance of the footnotes. See Chapter 5, Formatting Pages: Basics, for details.
List styles work together with paragraph styles. They define indentation, alignment, and the numbering or bullet characters used for list items. You can define many list styles, from simple bulleted lists to complex multi-level (nested) lists.
As with other styles, the main reasons for using list styles are consistency and speeding up your work. Although you can create simple lists quickly by clicking the Toggle Ordered List or Toggle Unordered List icons on the Formatting toolbar, and create quite complex nested lists using the icons on the Bullets and Numbering toolbar, the appearance of the resulting lists may not be what you want, and you might want to have more than one style of list.
You can use the Bullets and Numbering choice on the Format menu to manually format the appearance of some or all of the lists, but if you later need to change their appearance, you will have a lot of manual work to do.
See Chapter 12, Lists, for details on how list styles and paragraph styles work together.
The dialog to create a new list style includes six tabs in addition to the usual Organizer tab discussed above.
The Unordered, Ordered, and Image tabs contain predefined formatting for list item symbols (bullets or numbers). To use one of them for your style, click the image. A thick border indicates the selection. The bullets on the Bullets tab are font characters; those on the Image tab are graphics.
Use the Outline tab to select from eight predefined nested lists. You can also select one and use it as a starting point for your own style, customizing the list using the Position tab and the Customize tab, as described below.
Use the Position tab (Figure 19) to fine tune the indentation and spacing of the list item symbol and the text of the list item. This tab is particularly effective when used in combination with the Customize tab.
Figure 19: Position settings for a List style
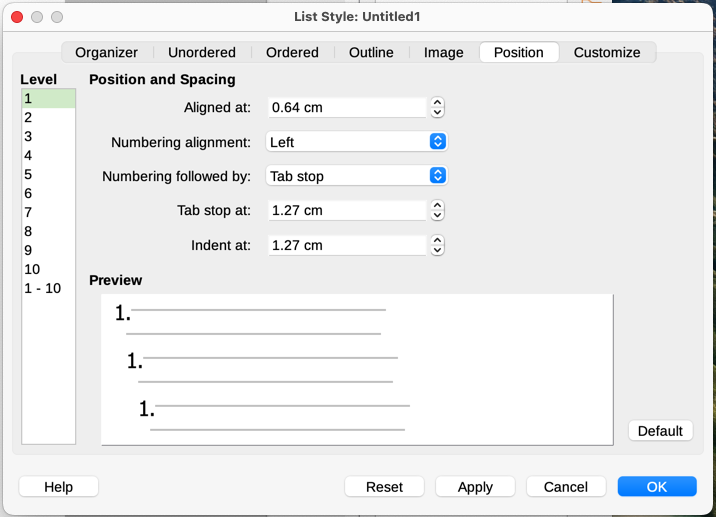
You can adjust the following settings for each individual level or all levels at once (to make them all the same).
Aligned at: the position of the numbering symbol, measured from the left margin of the page.
Numbering alignment: Select Left to align the numbering symbol to start directly at the Aligned at position. Select Right to align the symbol to end directly before the Aligned at position. Select Centered to center the symbol around the Aligned at position. This option does not set the alignment of the paragraph, only the numbering symbol.
Numbering followed by: the character to follow the numbering symbol (plus any characters—for example a punctuation mark—chosen on the Customize tab to appear after the number). Choose between a tab stop, a space, or nothing.
Tab stop at: If you selected the tab stop above, you can specify the position of the tab.
Indent at: Specify the distance from the left page margin to the start of all lines in the numbered or bullet paragraph that follow the first line.
Tip
To fully appreciate how the Numbering alignment and other parameters work, try to create a numbered list with more than ten elements and make sure that enough room has been made for numbers with two or more digits. You may also wish to right-align numbers 10 or greater.
Use the Customize tab (Figure 20) to define the style of the outline levels. The options available on this tab depend on the type of marker selected for the list. First, on the left side, select the level you want to modify. To modify all ten levels at once, select 1 – 10 as the level. If you started from a predefined outline, some of the levels will already have settings.
Figure 20: The Customize tab for a list style
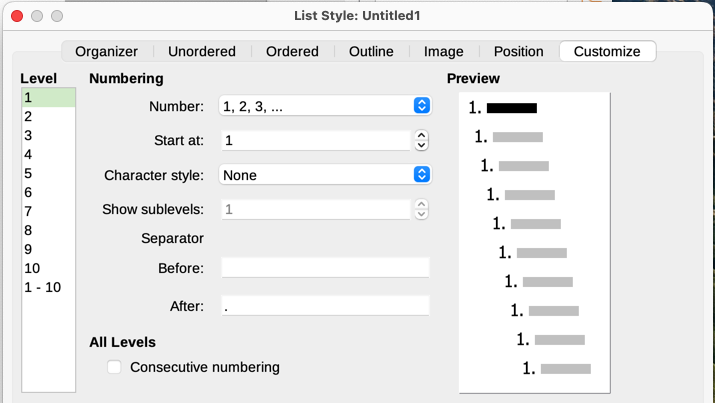
Depending on the numbering style selected in the Number box (bullet, graphic, numbering), some of the following options become available on the tab (not all are shown in the illustration):
Start at: the first value of the list (for example, to start the list at 4 instead of 1).
Character Style: the style to be used for the number or bullet.
Show sublevels: The number of previous levels to include in the numbering style. For example, if you enter "2" and the previous level uses the "A, B, C..." numbering style, the numbering scheme for the current level becomes: "A.1".
Separator – Before: any text to appear before the number (for example, Step).
Separator – After: any text to appear after the number (for example, a punctuation mark).
Character Select button: click to select the character for the bullet.
Graphics Select button: opens a list of available graphics (Gallery) or allows the selection of a file to be used as the list marker.
Width and Height: the dimensions of the graphic marker.
Keep ratio option: fixes the ratio between the width and the height of the graphic marker.
Alignment: the alignment of the graphic object.
The right-hand side of the dialog shows a preview of the modifications made.
If you choose the Linked graphics option in the Number list, the graphic object is linked rather than embedded in the document. The bullet will not be displayed when the document is opened on a different computer (unless the same graphic file is located in the same location on both computers) or if the graphic file used is moved to a different location on the computer.
To revert to the default values, click the Reset button in the bottom right corner. Finally, if you wish to use consecutive numbers regardless of the outline level, select the Consecutive numbering box at the bottom of the tab.
The Style Inspector (Figure 21) is located on the Sidebar. It displays all the attributes of the styles (paragraph and character) and any direct formatting present in the paragraph or word where the cursor is located. These details can be useful when you are trying to figure out why some formatting in a document appears to be incorrect or inconsistent.
Figure 21: Style Inspector example
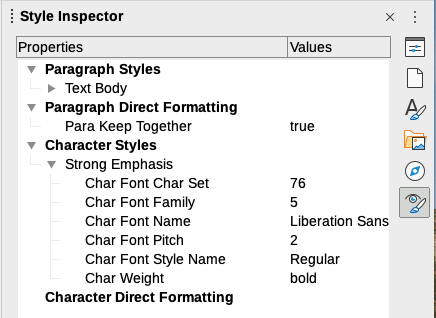
Use the Style Inspector to uncover formatting issues in a text document.
Style properties overwritten by direct formatting are grayed out in the Paragraph and Character style tree, indicating that the style property is not effective any more.
Paragraph style properties that are re-defined by a child paragraph style are grayed out.
Character style properties that are re-defined by a child character style are grayed out.
Paragraph style and direct properties that are re-defined by character styles or character direct properties are grayed.
For example, if the margins of the paragraph are changed by direct formatting using the rulers, the margins property of the paragraph style are grayed out and the margins properties are displayed in the Paragraph Direct Formatting entry of the Style Inspector.
Another example: if the Emphasis character style highlights a word with a yellow background, and the user mistakenly overwrote it by using a white background, the yellow attribute is grayed out and white is listed under Direct Formatting in the Style Inspector. The Style Inspector shows only those attributes that diverge from the parent style.
Some features of the Style Inspector are of interest mainly to advanced users:
The Style Inspector can show any hidden RDF (Resource Description Framework, a W3C standard) metatdata at the cursor position associated with text spans, paragraphs, and bookmarks. For annotated text spans, “Nested Text Content” item can show the boundary of the nested annotated text ranges and metadata fields.
Custom color metadata field shadings can be set for an annotated text range or a metadata field, for visualization of metadata categories in the document editor. Use View > Field Shadings or Ctrl+F8 to disable or enable these field shadings.
For more information, see the Release Notes for LibreOffice 7.1 and 7.2 Community:
https://wiki.documentfoundation.org/ReleaseNotes/7.1#Style_inspector
https://wiki.documentfoundation.org/ReleaseNotes/7.2#RDF_metadata_in_Style_Inspector
https://wiki.documentfoundation.org/ReleaseNotes/7.2#Custom_color_metadata_field_shadings