Writer Guide 7.5
Chapter 16,
Master Documents
This document is Copyright © 2023 by the LibreOffice Documentation Team. Contributors are listed below. You may distribute it and/or modify it under the terms of either the GNU General Public License (https://www.gnu.org/licenses/gpl.html), version 3 or later, or the Creative Commons Attribution License (https://creativecommons.org/licenses/by/4.0/), version 4.0 or later.
All trademarks within this guide belong to their legitimate owners.
|
Jean Hollis Weber |
Olivier Hallot |
|
|
Jean Hollis Weber |
Kees Kriek |
Felipe Viggiano |
|
Bruce Byfield |
Gillian Polack |
John A Smith |
|
Klaus-Jürgen Weghorn |
Barbara Duprey |
Ron Faile Jr. |
|
David Blymire |
|
|
Please direct any comments or suggestions about this document to the Documentation Team’s forum at https://community.documentfoundation.org/c/documentation/loguides/ (registration is required) or send an email to: loguides@community.documentfoundation.org. Emails sent to the forum are moderated.
Note
Everything you send to a forum, including your email address and any other personal information that is written in the message, is publicly archived and cannot be deleted.
Published February 2023. Based on LibreOffice 7.5.
Some keystrokes and menu items are different on macOS from those used in Windows and Linux. The table below gives some common substitutions for the instructions in this document. For a detailed list, see the application Help.
|
Windows or Linux |
macOS equivalent |
Effect |
|
Tools > Options |
LibreOffice > Preferences |
Access setup options |
|
Right-click |
Control+click or right-click depending on computer setup |
Open a context menu |
|
Ctrl (Control) |
⌘ (Command) |
Used with other keys |
|
Alt |
⌥ (Option) or Alt, depending on keyboard |
Used with other keys |
|
F11 |
⌘+T |
Open Styles deck in Sidebar |
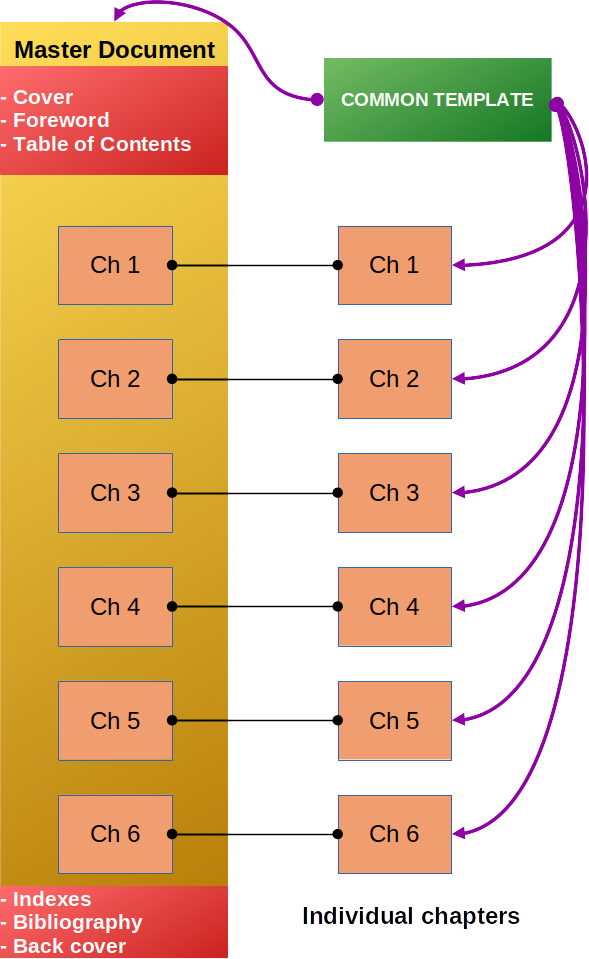
A master document (.odm) is a container that joins separate text documents (.odt) into one larger document and unifies the formatting, table of contents (TOC), bibliography, index, and other material. Master documents are typically used for producing long documents such as a book, a thesis, or a long report. Figure 1 shows a typical scheme for master documents.
Figure 1: Structure of a master document
Note
A master document is actually a Writer document with some extra features for handling linked subdocuments. All features of a text document are available to a master document including printing, export to PDF, and export to a conventional Writer text document.
A master document is especially useful in these situations:
When the file size or number of pages is quite large; writing, reviewing, and editing may be easier when done on subsets of the full document.
When for security and reliability reasons you choose to store chapters in different places to minimize risks of losing the complete document (single point of failure).
When a long report needs periodic updates of a single set of subdocuments, not affecting the structure of the report.
When different people are writing different chapters or other parts of the full document.
When files will be published as stand-alone documents as well as becoming part of a larger document. The chapters of this Writer Guide are an example of this usage.
When subdocuments are used in more than one final document.
You can use several methods to create master documents. Each method has its advantages and disadvantages. Which method you choose depends on what you are trying to accomplish. The different methods are described in this chapter, along with suggestions on when to use each one.
In Writer, the Navigator has two forms: one is used in ordinary text documents and the other in master documents.
In an ordinary text document, the Navigator displays lists of the graphics, tables, index entries, hyperlinks, references, and other items in the document, as shown on the left in Figure 2. The master document Navigator on the right displays the document structure shown in Figure 1.
Figure 2: The Navigator for a text document (left) and for a master document (right)

In a master document, you can toggle between the regular and master views by clicking on the Toggle Master View icon at the upper left. In the master view, the Navigator lists the subdocuments and text sections, as shown on the right in Figure 2. The use of the Navigator in a master document is covered in more detail later in this chapter (see “Step 6. Insert the subdocuments into the master document” below and “Combining several documents into a master document” below).
Note
You cannot edit the contents of a subdocument shown in a master document. The subdocuments are linked in read-only mode. You will be warned if you try.
However, a double-click on a subdocument entry in the master document Navigator opens the subdocument for editing. This can be a convenient way to quickly open a subdocument file when doing the finishing touches of the master document.
A stand-alone document becomes a subdocument when it is linked into a master document.
A document can be used as a subdocument in several master documents. Each master document may have different style definitions (font, type size, color, page size, margins, and so on), which affect the appearance of the final document, but the individual documents retain their original characteristics.
The relationships between styles in a master document and its subdocuments are as follows:
Custom styles used in subdocuments, such as paragraph styles, are automatically available to the master document. This preserves the custom formatting of subdocuments in the master document final result.
The styles in the subdocuments are only changed in the master document, so when a subdocument is opened for editing the original subdocument styles are not affected. This preserves subdocuments’ style specifics.
If a style with the same name exists in the master document and in the subdocuments (for example, Default Paragraph Style), then the master document style overrides the style of the subdocument. This provides formatting consistency for all subdocuments contents in the master document final result.
If more than one subdocument uses a custom style with the same name (for example, myBodyText), then only the one in the first subdocument to be linked is imported into the master document. The custom style of the first subdocument over-rides the custom style of the same name used in the other subdocuments.
Direct formatting used in subdocuments is preserved in the master document.
Tip
Master document best practices recommend to use the same document template for the master document and its subdocuments. Then the subdocuments will look the same when they are loaded into the master document as they do when viewed as individual files.
When you modify or create a style, be sure to make the change in the template. Then when you reopen a subdocument or a master document, the styles can be updated from the template.
If the master document and the subdocuments do not share the same original template, it may be necessary to update the set of styles available to all subdocuments and master document.
Since master documents are containers for linking individual subdocuments, it is important to update the master periodically to refresh indexes, table of contents, page numbering, references, and more, especially after editing subdocuments.
Note
When opening a master document, Writer prompts to update the links to the subdocuments. Click Yes to refresh the master document immediately.
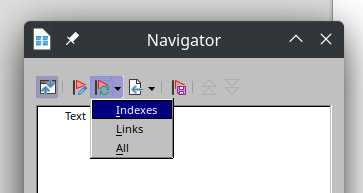
To update the master document, choose Tools > Update > Update all (or any of the specific elements listed in the submenu). You can also use the icons in the master document Navigator as shown in Figure 3.
Figure 3: Update icon in the navigator
Depending on the document complexity, this operation may take some time, as Writer will go through all the linked files to rebuild the master document with all the references adjusted.
Note
When saving a master document, all the subdocuments are embedded in the master. This allows the master document to be opened in full when the linked subdocuments are not available. In this case, when you are asked if you want to update all links, choose No.
Which method you choose from the three most common methods for creating a master document depends on the current state of your document:
You already have a master document template available. See “Creating a master document template” below,
You have no existing documents but intend to write a long book containing several chapters, possibly by multiple authors.
You have several existing documents (chapters) by one or more authors that you want to combine into one book, controlled by the master document.
You have one existing document (a book) that you want to split into several subdocuments (chapters) that will be controlled by the master document.
We will look at each of these scenarios in turn.
As described in Chapter 10, Working with Templates, you can start a blank master document using a master document template created previously. Ideally, the template should contain the formatting styles, the document’s front and back covers, the table of contents, and other parts of the final document.
1) If any text or page breaks came into this document from the template, delete the text. (The TOC, index, and any fields in headers and footers can stay.)
2) Add the subdocuments as explained in “Step 6. Insert the subdocuments into the master document” below.
3) Update the master document so the references, table of contents, page numbering, and other automatic operations are refreshed.
When you start with no existing documents, you can set up everything the way you want from the beginning. Follow these steps, in the order given. Each step is explained in detail in the following topics.
Although you can make changes at most steps in this process, the more you can plan before you start, the less work you will have to correct any problems later. Here are some things you need to plan. Figure 1 shows the structure to plan for the task.
Parts of book or report required. What pages will be in the master document and what will be in the subdocuments? Consider as an example a book with the parts given in the table below.
|
Part |
Location |
|
Title (cover) page |
In master document |
|
Copyright page |
In master document |
|
Table of contents (TOC) |
In master document |
|
Preface (Foreword) |
Subdocument |
|
Chapters 1 to 7 |
Subdocuments |
|
Bibliography |
In master document |
|
Index |
In master document |
Page, paragraph, character, frame, and numbering styles. Determine the styles you wish to use. See Chapter 8, Introduction to Styles, and Chapter 9, Working with Styles, for instructions on how to create or modify styles and examples of the use of styles in book design. Pay particular attention to setting up headings using styles, as described in Chapter 8.
Fields and AutoText entries, as required. See Chapter 2, Working with Text: Basics, and Chapter 17, Fields, for ideas.
One or more templates for master and subdocuments. If you are starting a new project, create the master document and all the subdocuments from the same template. Not using the same template can create style inconsistencies that could cause your document not to look as you expect. For example, if two subdocuments have a style with the same name that is formatted differently in each document, the master document will use the formatting from the first subdocument that was added.
Page numbering. In our example, the pages are numbered sequentially from the title page. (The title page style can be defined not to show the page number, but it will still count as page 1.) Therefore the first chapter begins on a higher number page, for example page 5. To create a book in which the page numbering restarts at 1 for the first chapter, you need to do some additional work. See “Restarting page numbering” below.
You can create a template from an existing document or template that contains some or all of the page, paragraph, character, and other styles you want for this document, or you can create the template from a blank document. For more about templates, see Chapter 10, Working with Templates. Be sure to use File > Save As Template when creating the template.
Tip
You can also create master document templates; see page below.
It does not matter in what order you create the master and subdocuments, and you do not have to create all the subdocuments at the same time, when you are starting the project. You can add new subdocuments at any time, as you need them.
Follow this process to create the master document:
1) Open a new document from the template you created in Step 2. Create a template, by choosing File > New > Templates, then selecting the template you created. Be sure the first page of this new document is set to the page style you want for the first page of the final document. In our example, the style for the first page is Title page.
2) If any text or page breaks came into this document from the template, delete the text. (The TOC, index, and any fields in headers and footers can stay.)
3) Click File > Send > Create Master Document. Save the master document in the folder for this project. We will return to this master document later. For now, you can either leave it open or close it.
Note
Using File > New > Master Document will create a master document file (.odm) associated with the default template. If your document is, or will be, based on a custom template, use the method described above.
A subdocument is no different from any other text document. It becomes a subdocument only when it is linked into a master document and opened from within the master document. It can still be used as a stand-alone document. Some settings in the master document will override the settings in a subdocument, but only when the document is being viewed, manipulated, or printed through the master document.
Create a subdocument in the same way as you create any ordinary document:
1) Open a blank document based on the project template (very important) by choosing File > New > Templates, then selecting the required template.
2) Delete any unwanted text or other material that was brought in from the template, and set the first page to the page style you specified for the first page of a chapter.
3) Click File > Save As. Give the document a suitable name and save it in the folder for this project.
If you already have some of the chapters written, the files may not be based on the template you just created for this project. Although you can use the existing files as subdocuments as they are, you may want to change the template attached to those files; if so, use the technique described in Chapter 10, Working with Templates.
To assist you, do the following:
Make sure paragraph marks are showing. You can set them in Tools > Options > LibreOffice Writer > Formatting Aids, or click the Toggle Formatting Marks icon on the Standard toolbar, or press Ctrl+F10.
Show text boundaries, table boundaries, and section boundaries (Tools > Options > LibreOffice > Application Colors).
If your master document does not contain any required “front matter” such as a title page, copyright page, or TOC page, add them now. The example in this section uses the sequence of page styles given in “Step 1. Plan the project” above.
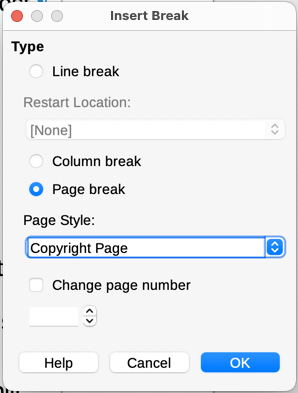
1) Open the master document (.odm file) you created and type the contents of the title page (or leave placeholders and fill in later). With the insertion point in the last blank paragraph on the page, click Insert > More Breaks > Manual Break. On the Insert Break dialog, select Page break and the page style for the second page (Copyright Page in our example), and leave the Change page number option deselected. Click OK.
Figure 4: Inserting a page break between the title page and the copyright page
2) Type the contents of the copyright page (or leave placeholders). With the insertion point in the last blank paragraph on the page, use the same method to insert another manual page break, this time setting the page style to Table of Contents page.
3) On the Table of Contents page, leave a blank paragraph or two or insert a TOC (Insert > Table of Contents and Index > Table of Contents, Index or Bibliography). The TOC will not have any contents until you add the subdocuments, but a gray mark or box indicates its location. For more about inserting and formatting TOCs, see Chapter 15, Tables of Contents, Indexes, Bibliographies.
Note
Depending on the style definitions for the first paragraph (usually a heading) on the Copyright and TOC pages, you may not need to insert manual page breaks.
Now we are ready to add the subdocuments.
Tip
Subdocuments are inserted into a master document before the item highlighted in the Navigator. If you insert the last subdocument first, and then insert the other subdocuments before the last one, they will end up in the correct sequence without the necessity of moving them up or down in the list.
1) Display the Navigator (click the Navigator icon on the Sidebar).
2) Be sure the Navigator is showing the Master View (see “Error: Reference source not found” Error: Reference source not found). If necessary, click the Toggle Master View icon at the upper left to switch between regular and master views.
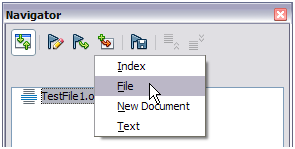
3) On the Navigator, select Text, then click Insert > File on the Navigator toolbar, or right-click on Text and select Insert > File in the context menu.
Figure 5: Inserting a subdocument into a master document using the Navigator
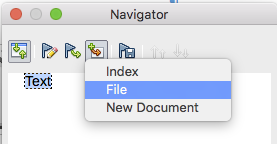
Figure 6: Navigator after inserting one subdocument
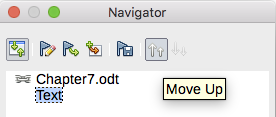
4) Because the Text section contains the title page and other material, highlight it and click the Move Up icon to move it to the top of the list. (Or, highlight the subdocument you just inserted (Chapter 7) and click the Move Down icon to move it below the Text section.)
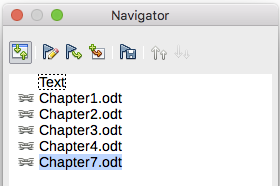
5) Highlight the subdocument you just inserted (Chapter 7), then click Insert > File to insert the first subdocument; in this example, Chapter 1. Chapter 7 remains highlighted. Repeat with Chapter 2, Chapter 3, and so on until all the subdocuments have been added to the list. You can insert several several files at the same time. The Navigator will now look something like Figure 7.
6) Save the master document again.
Tip
You can reorder the subdocuments in the master document by dragging and dropping the subdocument entry in the Navigator.
Figure 7: The Navigator showing a series of files in a master document
You can generate a table of contents, bibliography, or index for the book, using the master document. You must insert these items into a text section in the master document. For more about these document elements, see Chapter 15, Tables of Contents, Indexes, Bibliographies.
In case you did not insert a table of contents in step 5, position the cursor on the page in the first text section where the table of contents is to go and choose Insert > Table of Contents and Index > Table of Contents, Index or Bibliography to create it.
If you do not have a Text section at the end of the master document, insert one before the last subdocument, then move it down so it is after the last subdocument. Now, if you have included bibliographic entries in your subdocuments, you can put the insertion point on the page in this last text section where the bibliography is to go and create the bibliography.
If you have included index entries in your subdocuments, put the insertion point on the page in the last text section where the index is to go and create the index.
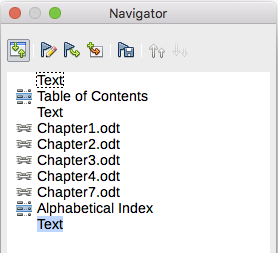
Figure 8 shows the Navigator after addition of a TOC and index.
Figure 8: Navigator showing subdocuments, table of contents, and index in a master document
When you have several existing documents, you can combine them into one document controlled by a master document.
This method works best when all of the documents were created from the same template, but you can also use it when the documents have been created from different templates. This method is especially useful when the subdocuments are created or maintained by multiple writers. For example, you might be creating an anthology of short stories, a book of symposium papers, or a set of engineering test results with a standard company title page.
We will use a book of engineering test results as an example.
Tip
You could create a master document template (see page below) and use it as the starting point for this method. In that case, skip steps 1 and 2 and start with step 3.
1) Open the title page document that you plan to use as the master document. To avoid creating too many subdocuments when this document is converted to a master document, have only one level 1 heading present. If there are more, temporarily change them to lower level headings and note which they are (add, for example, an asterisk at the end of each heading to remind you which have to revert to level 1 headings later).
2) Select File > Send > Create Master Document, name and save this master document (see “How to do it” on page 1).
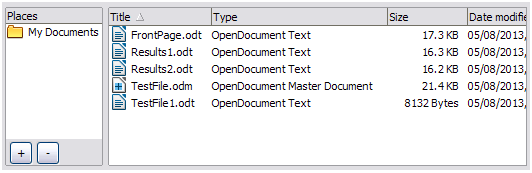
Figure 9: TestFile documents created from FrontPage
3) Open the master document and click Yes to update links. The master document opens with the Navigator showing by default (see “Master document Navigator“ above and “Step 6. Insert the subdocuments into the master document“ above for more detailed information).
4) Click Insert > File.
Figure 10: Adding files to the master document
5) Navigate to the location of the test results files (Results1.odt, Results2.odt, and so on). Select the first file to insert, Results1.odt for example, and click Insert. The file is inserted above the existing entry.
6) Click the Move Up icon to have the TestFile1 text above the Results1 text (file contents are inserted above the selected file in the master document).
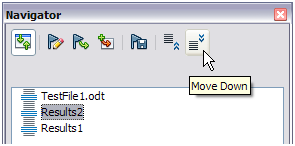
7) Repeat from step 4 as often as required. It does not matter which file is highlighted in the master document when you insert the next one, just select the inserted file and use the Move Up or Move Down icons to position it as required.
Figure 11: Moving subdocuments
8) To edit the master document, to perhaps add a serial number and a client's name, in the master document right-click TestFile1.odt and select Edit in the context menu. Add the required content to the file that opens, save and close the file (see “Editing a master document” below for more detailed information).
9) Select Tools > Update > Links on the Menu bar, or click Update > Links in the Navigator and click Yes to confirm. All the edits in the master document will now show.
When you have one existing document that you want to split into a master document and several subdocuments, you can have Writer split the document automatically at headings with an outline level of your choice.
Although this method is quick and easy, some cleanup work may be necessary.
The automatically generated file names for the subdocuments are maindocnameX.odt, where X is 1, 2, 3, and so on. If you have a Preface or other “chapter” starting with a Heading 1 before Chapter 1, the file names will not directly correspond to the chapter numbers. You may wish to rename the subdocuments; see “Adding, deleting, or renaming subdocuments” below.
1) Open the document and choose File > Send > Create Master Document.
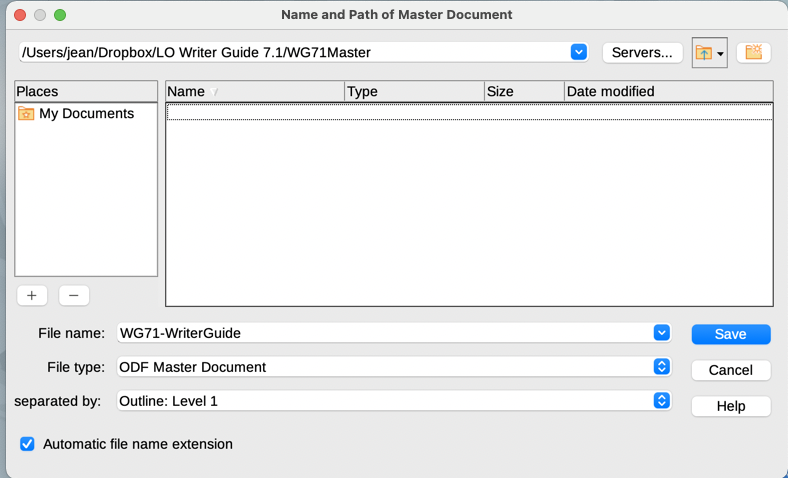
2) On the Name and Path of Master Document dialog (Figure 12):
a) Navigate to the folder where you want to save the master document and its subdocuments (or create a new folder).
b) Type a name for the master document in the File name box.
c) In the separated by: list, choose the outline level where the file should be split into subdocuments. Usually this is Outline: Level 1 for a chapter heading, but your document may be structured differently. For more information about outline levels, see Chapter 8, Introduction to Styles.
d) Leave the Automatic file name extension option selected, and click Save to split the document into subdocuments and create the master document.
Figure 12: Splitting a document into master and subdocuments
If you selected Outline: Level 1 and the paragraph style at that level is Heading 1, each of the subdocuments begins with a Heading 1 paragraph.
The examples in the previous sections showed a very basic collection of files with sequential page numbering. This is useful for many documents, including e-books, but a typical printed book has the following sequence of page numbers:
No page numbers on cover page or copyright page.
Lower-case roman numerals in the front matter, starting with i.
Arabic numerals in the body of the document, starting with 1.
Page numbering sequential through the rest of the book.
To set up a master document to produce such a book, you need to define a different paragraph style for the heading of the first chapter and assign two special characteristics to it.
Example
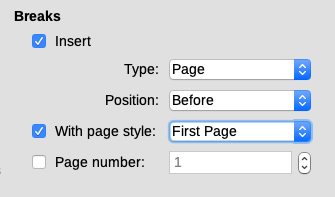
Each chapter may start with a Heading 1 paragraph, set up in the Breaks section of the Text Flow tab of the Paragraph Style dialog to start on a new page (Figure 13). The Page number checkbox is not selected, so numbering continues from the number of the previous page.
Figure 13: Breaks section of Text Flow tab of Paragraph Style dialog for Heading 1
Look on the Outline & List tab (Figure 14) of this dialog to see what outline level Heading 1 is assigned to. Usually this will be Outline level: Level 1. The level cannot be changed here because it has been set in Tools > Chapter Numbering.
Figure 14: Outline & List tab of Paragraph Style dialog for Heading 1

Only one paragraph style can be assigned to Outline Level 1 through Tools > Chapter Numbering. However, you can assign additional paragraph styles to any outline level by using the Outline & List tab on the Paragraph Style dialog.
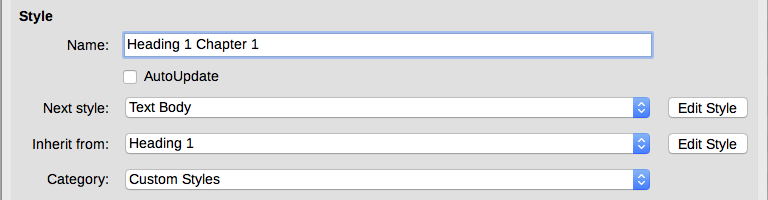
Therefore, you want to define a style called Heading 1 Chapter 1 that is identical in appearance to Heading 1 but has one essential difference:
1) Right-click Heading 1 in the Paragraph Styles section of the Styles tab in the Sidebar, and select New. On the Organizer tab of the Paragraph Style dialog, name the new style, select the next style, and be sure Inherit from shows Heading 1.
Figure 15: Organizer tab for the new style
2) On the Text Flow tab, in the Breaks section (Figure 13), select Insert, Type: Page, Position: Before, With Page Style: First Page, and Page number: 1.
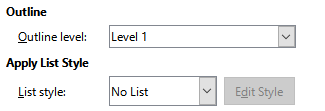
3) On the Outline & List tab, set the Outline level to Level 1 (Figure 16). This ensures that the heading will appear in the Table of Contents along with the other chapter headings. The List Style for this heading is No List, as it was not assigned an outline level through the Outline Numbering dialog.
Figure 16: Assign the style to Outline level 1
4) Now, assign the new style to the first paragraph of Chapter 1, and you’re done.
After creating a master document, you may want to change its appearance or contents.
You can change the styles in the template as your project develops. Do not make changes to styles in the master document or in any of the subdocuments; make those changes in the template.
To update the master document (and all of the subdocuments) with changes to the template, open the master document. You will get two messages: first, to ask if you want to update all links; and second, if you want to apply the changed styles. Answer Yes to both of these messages.
You cannot edit a subdocument from within the master document. Instead, you must open the subdocument, either by double-clicking on it in the master document’s Navigator, or by opening it from outside the master document. Then you can edit it just as you would edit any other document.
If, while editing a subdocument, you want to make changes to the styles that apply to the master document, see “Changing the appearance of the master document” above.
If you change the contents of any subdocument, you need to manually update the table of contents, bibliography, and index from within the master document.
To add a subdocument, follow the method described in “Step 6. Insert the subdocuments into the master document“ above.
To delete a subdocument, right-click its file name in the Navigator and choose Delete.
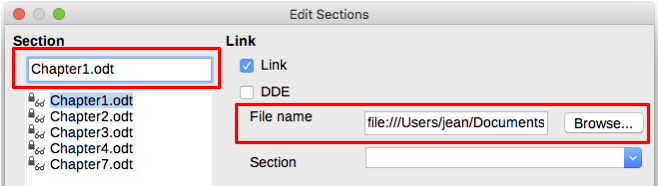
If you rename a subdocument by changing its file name, the next time you update links in the master document, that subdocument will show up in the Navigator as a broken link (shown in red). To fix this, you can either change back the name of the file (the link will be restored in the next update) or follow these steps:
1) Right-click the broken link in the Navigator and choose Edit link.
2) In the Edit Sections dialog (Figure 17), select the renamed file, and edit the name of the section (which is the name shown in the Navigator).
3) Click OK to save the changes.
Figure 17: Editing a link in a master document
A master document template is created in much the same way as any other template, described in Chapter 10, Working with Templates:
1) First, create the master document using File > Send > Create Master Document, as described in earlier sections of this chapter.
2) Then, use File > Templates > Save as Template to create the template (.otm), which will then be listed in the Templates dialog along with other templates.
Tip
Include in the name you give a master document template some indication that it is not an ordinary template.
Master documents are .odm files containing linked subdocuments, which are in .odt format. Although linked files are very useful when writing and editing a large document such as a book, sometimes you might need to have a copy of the entire book in one file, for example when sending it to a publisher.
To export a master document to a .odt file (without affecting the original .odm file):
1) Open the master document and update all links. Choose File > Export on the Menu bar.
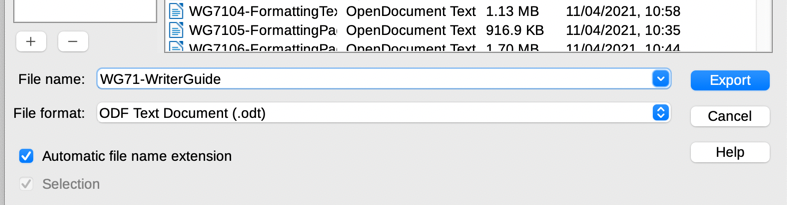
2) On the Export dialog (Figure 18), type a name for the exported .odt file and choose ODF Text Document (.odt) in the File format list (it should be the default choice). Click Export. This step creates an .odt file, with each subdocument in a separate write-protected section.
3) Close the master document and open the new .odt file, updating all links.
4) To break the links and remove the write protection, go to Format > Sections, select the first item in the Section list, then Shift+click on the last item in the list in order to select all the items. Deselect both Link in the Link section and Protect in the Write Protection section.
5) Click OK.
If you wish to eliminate some or all of the sections to have a plain text document, select the sections you wish to remove, and click Remove. The contents of those sections remain in the document; only the section markers are removed. Click OK.
Figure 18: Exporting a master document to an Open Document Text (.odt) file
An image (graphic) anchored To page in a subdocument is not displayed in a master document. Because the master document reorganizes the page flow, page numbers, and cross-references when it collates the subdocuments, the image loses its anchor reference and disappears.
In contrast, an image anchored To page in a text section of a master document stays with that page and does not move if the length of subdocuments changes. The image may end up on a page somewhere in the middle of a subdocument, not where you want it to be.
Note
The anchor “to page” is deprecated. Avoid using it.
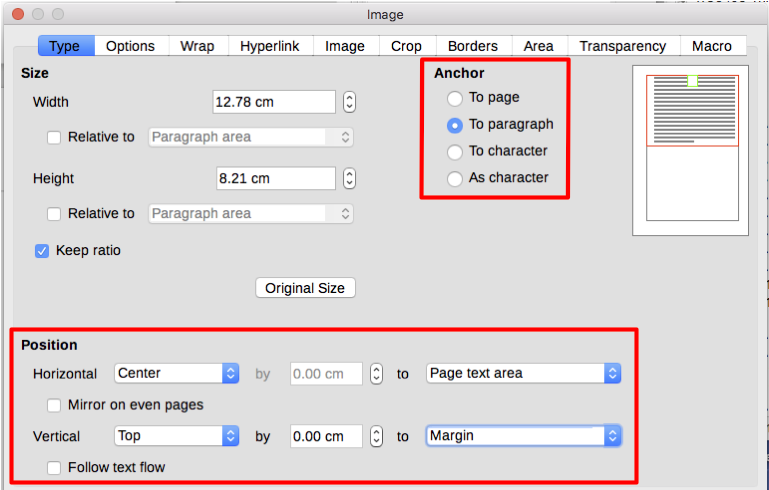
To keep an image positioned precisely on a particular page, anchor the image as follows:
1) Right-click the image and choose Properties in the context menu.
2) On the Type tab of the Image dialog (Figure 19), set the anchor to To character, As character, or To paragraph.
3) Under Position, choose suitable horizontal and vertical references to the page. Click OK to save the changes.
Figure 19: Anchoring an image and setting its position on a page